
Crevasse rescue: simplified drop loop 2:1

Here's a simple method to create a progress capture on 2:1 hauling system that uses minimal gear, is fast to set up, and puts minimal force on the anchor.
Advantages to this system:
Uses basic gear you’ll always have: one friction hitch and one carabiner.
Doesn’t require a specialized and expensive progress capture pulley (but works even better if you have one.)
About the simplest and least complicated rigging possible.
Because there's no redirect, you eliminate this friction in your haul system, AND put the smallest possible load onto the anchor. A redirect puts 2X your pulling force onto the anchor. No redirect means a reduced load on the anchor. That's a good thing.
Modern equipment, such as the Petzl Traxion progress capture pulley, are superb tools for self rescue. They are small, lightweight, cool (because they‘re French!), and they work great.
However, they are expensive, you may not have one when you need it.
Especially with skills like crevasse rescue, a good approach is to learn it first with the bare minimum of gear, and then add fancier tools after you have the basic mechanics dialed.
As climbers, we’re often locked into the idea when we build an anchor, all the important things must happen actually ON that anchor. For example belaying up your partner, and having the progress capture in a hauling system.
However, it doesn't have to be that way. Often, we can use a fixed strand of rope, instead of the anchor itself.
Doing this can create many interesting options, which may make your rigging more efficient, comfortable, or ergonomic.
Let's have a look at the basic mechanics of the 2:1 drop loop.
When one strand of the rope is fixed to the anchor, and a loop is on the load, and you pull on the other side of the rope, you create a 2:1 mechanical advantage.
If you pull 2 meters of rope, the load moves 1 meter.
In a theoretical frictionless world, you can move a 100 kg load by applying about 50 kg of “pull. ”
In the real world with the friction of a carabiner on the load, your actual mechanical advantage around 1.5:1.
When you're pulling, you’re lifting about half the weight of the load, and the remaining half of the load is on the anchor.
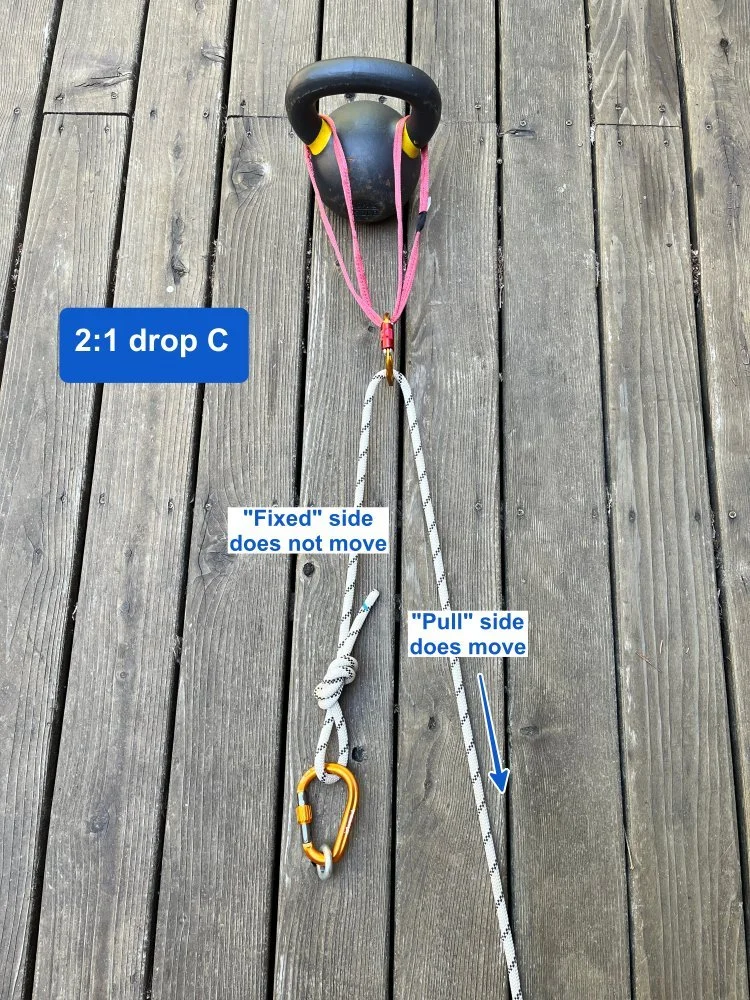
Check out the photo. Note that one side of the “C “ is fixed to the anchor, the other side you can pull.
The “pull” side moves, and the “fixed” side doesn't.
This means that you can use the fixed side to attach your progress capture. This is the key to the simplified method.
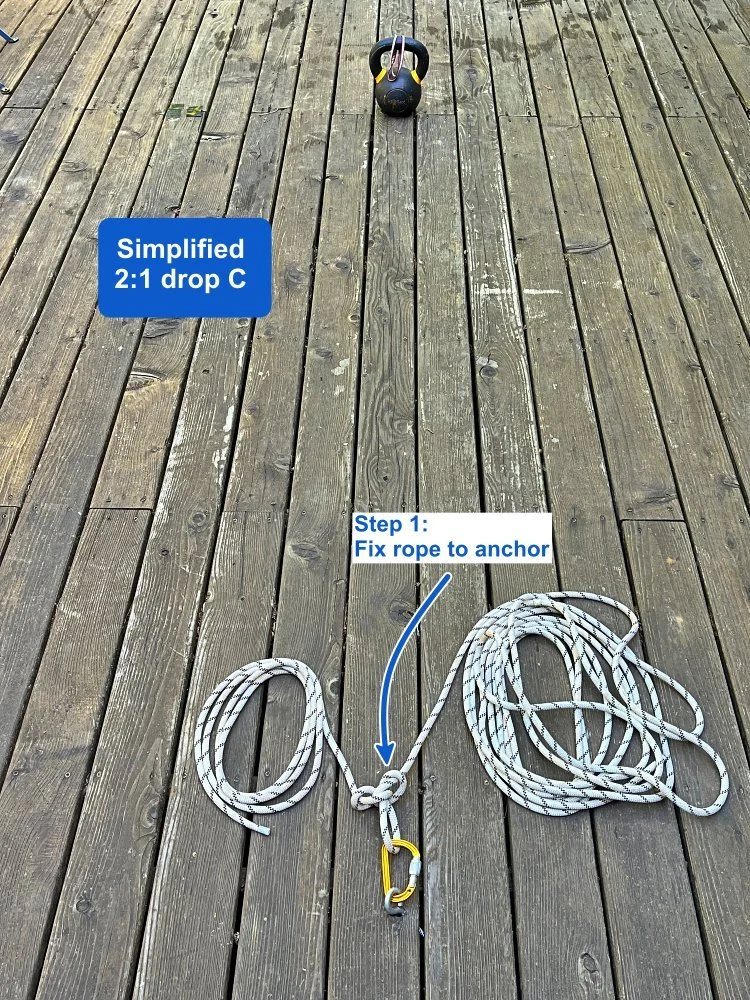
Here's a step-by-step of how to set up a simplified 2:1 drop loop.
Step 1: Tie the rope to the anchor.
This could be the end of the rope, or any point along the middle of the rope (as shown here) and would be typical in a crevasse rescue. Be sure you have at least twice as much rope between you and the load.
Step 2: Clip a loop of rope to the load.
In a crevasse rescue, this would typically be lowered down to the victim. If you have a pulley to minimize friction, this is a great place to use it. If you don't, it still works, but you need to pull a little harder.

Step 3: Tie a bight knot to the “fixed” strand of rope.
This is the side of the “C” that’s tied to the anchor, and it doesn’t move when you pull. Here I tied a butterfly because it's easy to untie after it's been loaded. A figure 8 or overhand works fine as well.
Tie this knot at any convenient spot along the fixed rope. Make the loop small, like fist sized.

Step 4: Tie a prusik (or attach a Traxion) to the “pull” strand of rope.
This is the side of the “C” that’s returning to you from the load, and moves when you pull. Use a prusik rather than an autoblock or klemheist, because it usually grabs the best and you don’t want this knot to slide/creep when weighted.
Here I'm using a Sterling Hollowblock which is quite short. Short is good.
If you have a progress capture pulley like a Traxion, put it on the “pull” strand and clip it to the bight knot with a locker. (This actually works better than the friction hitch, but for this example I’m showing simple gear.)

Step 5: Attach the prusik to the bight knot with a locking carabiner.
Give yourself a high five, now you’re ready to haul. At least one “puller” needs to stand by the friction hitch. Make a hauling stroke with your body, moving the load up. As you reset your hands for another stroke, slide the friction hitch down toward the load to capture the progress.
If you have a second person hauling, have them stand just behind the anchor so they can keep an eye on it and be sure it's happy. This can be especially important in crevasse rescue because the anchor is in the unpredictable medium of snow.
After every few strokes, tie a backup bight knot in the accumulating slack rope, and clip it to the anchor so the entire load is not hanging off just the friction hitch. (Not shown in photo.)
Repeat until your load is where you need it to be.

Here’s a nice video from the American Mountain Guide Association (AMGA) showing this technique, more or less.