
Rappel pull cords 101
Note - This post discusses techniques and methods used in vertical rope work. If you do them wrong, you could die. Always practice vertical rope techniques under the supervision of a qualified instructor, and ideally in a progression: from flat ground, to staircase, to vertical close to the ground before you ever try them in a real climbing situation.
This article was written with collaboration from expert alpine climbers Priti and Jeff Wright. Connect with them on Instagram (Priti / Jeff) and their website, alpinevagabonds.com
This article focuses on the how to use a rappel pull cord. It's closely related to:
(If you’re completely new to this descending method, I suggest starting with this rope block article and then coming back here.)
Using a small diameter pull cord (which some folks call a tagline) can allow you to do a full length single strand rappel, and (typically) use that smaller diameter rope to pull down your primary climbing rope. This can allow full length rappels with less rope, weight and bulk.
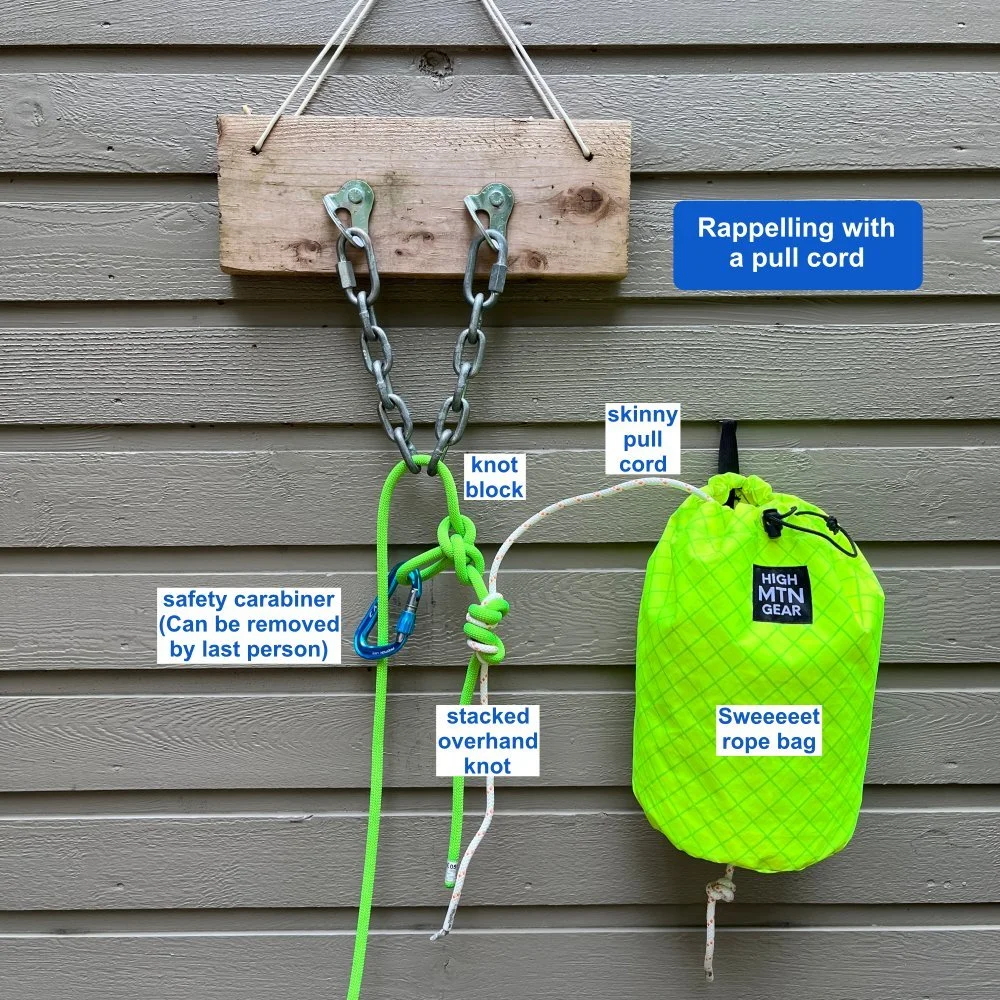
The key to making this work is what's called a rope block. This can be done with a knot or a carabiner. A rope block allows the rope to move through the anchor in one direction but not the other. You rappel on the full strength climbing rope, which is fixed to the anchor by the block. When it's time to pull the rope you use the pull cord on the side that’s not fixed to the anchor.
But, like everything in climbing, there are pros and cons, so let's have a closer look.
Conceptually, pull cords are pretty simple. In practice:
There are some subtleties to doing it correctly.
There are some downsides to it even when you do it correctly.
If you screw it up, you could die or get your rope hopelessly stuck.
For these reasons, I consider it an advanced technique that you absolutely should practice with a qualified instructor. And, even when you’re confident with it, I feel it should generally not be part of your regular practice. It can definitely get you out of a jam in certain situations, but there are enough moving parts that I feel it's not a routine technique for most recreational climbing situations.
Here are articles on two closely related techniques that use pull cords:
Before we dive into pull cords, let's look at some other options
Bring a second properly rated double rope that you can actually use for real climbing if necessary. This is a popular option for many people. If you're gonna bring a 6 mm pull cord, why not just bring a slightly larger 7.5 or 8ish mm half rope, which can cost about the same anyway, and offer a few more benefits? Or climb on twin/double ropes to begin with?
A more specialized option for a full length rappels, that does not require a tag line (but does require a bit of courage to use for the first few times) is the Beal Escaper; a very clever bit of gear that you definitely want to practice with first. I'll have an article on that coming up soon.
First off, let's be clear on the Golden Rule of a rope block: it absolutely, positively cannot pull through the rappel hardware.
If you haven’t closed the system by attaching the pull side of the rope to the rappel side of the rope and the block pulls through the hardware, you will probably die.
If you have closed the system and the rope pulls through, your rope will probably be hopelessly stuck.
If you had the slightest suspicion that the knot might be able to pull through the anchor hardware, it's probably a better choice to use a carabiner block instead.
Potential downsides to using a pull cord / rope block
The big one was already mentioned, but it's worth mentioning again: if the knot pulls through the hardware, the entire system fails and you die, or your rope gets stuck.
You’re adding an extra knot and carabiner to your system, which are two more things that can potentially get snagged when you're pulling your rope. Note that the last person can choose to remove the safety carabiner.
There are increased steps and complexity, which can increase the chances of making a mistake. This is especially true because for most people, this is a non-standard system that does not get used regularly. See accident reports at the top of the page.
If you're using a lighter weight pull cord, if you start pulling your rope and it gets snagged after the end of the climbing rope is out of reach, you only have a 6 mm rope in your hands to deal with the problem. Not good.
It can be difficult to toss the pull cord in the normal manner, because it's so light it doesn't want to spool out nicely down the cliff.
If you're doing multiple rappels, and want to always pull the same strand of rope, it takes additional time to do the standard trick of threading the pull cord through the lower anchor. Why? Because you’re usually pulling the skinny cord, but the fat rope needs to be the one through the anchor. This means you have to do some shenanigans like untying your joining knot, putting the proper strand of rope through the anchor, and then re-tying the joining knot at each rappel station, which takes additional time.
Yarding on a 6 mm rope can be rough on your hands. Consider adding a Tibloc or Micro Traxion on the pull cord to make the pulling easier. Gloves are recommended.
Pulling the rope can be significantly harder, because you do not have a counterbalanced weight on the pulling strand to assist your pull.
The safety carabiner that's clipping the block onto the rappel strand can add a significant amount of extra friction, making your rope pull more difficult.
You’re rapping on a single strand of rope, which might be uncomfortably fast. Be sure you know some ways to add friction to your rappel. LINK
When you “close the system” by clipping the blocking knot to the rappel line, you've essentially created a closed loop that you then need to pull down. If the two sides of the rope making this loop happen to go on either side of some rock protrusion, boulder, shrub, etc, the loop is going to get caught when you pull down your rope, causing your rope to get stuck. Check my article on rope blocks to see a photo example of this.
Skinny rope pull down trick
This can really save your hands! #CraftyRopeTrick!

When to use a pull cord?
A pull cord usually makes the most sense when you have one or maybe two full length rappels and want to go light, or maybe as a sort of emergency back up if you need to retreat unexpectedly. If it’s long or remote route, with many rappels needed, using a proper second rope may be a better choice for most folks.
A pull cord generally works best on relatively smooth, clean, steep ice or rock. The more low angle, cracks, shrubs, boulders, and rope-grabby bits, the higher the chance your block might get caught on the way down (A good general rule on terrain like this: it can be better to make more rappels that are shorter, than fewer rappels that are longer.)
Tangle-free pull cords - in praise of rope bags
Ahh, the dirty little secret about pull cords - those skinny rascals need constant attention to keep them from turning into a hopeless spaghetti pile. This is even more true in high wind, low angle blocky terrain, etc.
There are several options to try to deal with this. Some people opt for the “saddlebag” technique, others butterfly coil the rope over the rappel extension. I’ve tried both. For me they didn’t work very well, and I still got some maddening tangles.
Fortunately there's a simple system to tame your pull cord that works just about perfectly every time: the rope bag.
Rope bags are magical! The first time you use them, it looks like there is no possible way you can just flake the rope into a bag and have a feed out perfectly from the top every time, but that's pretty much what always happens. Rope bags are common in industrial rigging, SAR / rope rescue, canyoneering and whitewater, but rarely used by recreational climbers. I hope that changes, because they can be extremely helpful.
To deploy, you simply clip the rope bag with a sling onto your harness so it hangs below you, and the rope should feed out perfectly as you rappel.
When it's time to pull on the skinny cord to retrieve your rope, good practice is one person pulls and the other one stacks the rope into the bag. If the rope is already down, it's convenient to redirect the rope through some high point on the anchor, and then pull the rope down into the bag, hand over hand.
Once you have a fairly direct line to the bottom of your rappel, you can toss the bag and hopefully the rope will come out of it cleanly. (Yes you DID remember to tie the end of your tagline onto the bag, right?)
The rope bag doesn’t have to be fancy. I’m a fan of the humble reusable plastic shopping bag; large, sturdy, cheap, lightweight, convenient handles for clipping onto an anchor, and the top is stiff enough to stay open so you can easily stuff in the rope.

If you find yourself using pull cords a lot, you're probably gonna want to upgrade your rope bag. A great option is this sweet version made by High Mountain Gear. It's super sturdy, easily holds a 60 meter 6 mm cord like the Petzl PURline, has a grommet in the bottom so you can tie a stopper knot so you don't lose the bag, and has a tab so you can clip the bag to your harness.

Keep control of the cord
Be sure and keep the pull cord attached to you. If you lose control of it and it blows or swings out of reach, you could have a serious problem! Some people like to have the pull cord going through their ATC / rappel device, even though you're not putting any weight on it. This can help take any twists or kinks out of the cord as you descend. Others prefer simply clipping it to a spare carabiner on the gear loop. That's my preference, because if you're using a rope bag, you pretty much don't have any twisting in the cord.
An Instagram reader noted that if you clip the cord to your harness like this, it works fine for a normal rappel when you’re in contact with the rock. But if there's any sort of overhang or free hanging part, and you start to spin, the ropes can easily twist around each other. (This may be also an issue rapping double strand in a normal tube style device.) If you anticipate this happening, it may be better to tie the end of the cord to you rather than clipping it to your harness like this.
Here’s a great diagram from the always awesome Petzl website showing how to do it.
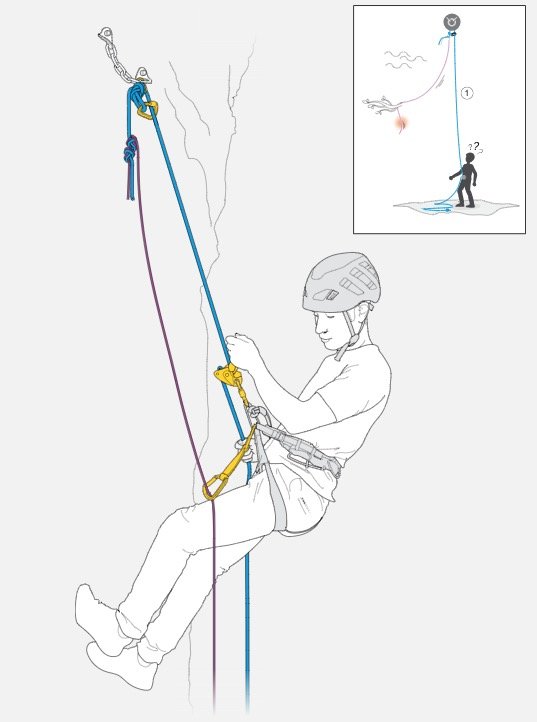
image: https://www.petzl.com/US/en/Sport/Multi-pitch-rappelling-with-a-single-rope?ProductName=PUR-LINE-6-mm
Don’t load both strands when rappelling
If you rappel with both strands through your ATC, it's important to remember it's a single strand rappel, and keep your brake hand and third hand/autoblock on the real climbing rope. If you put your weight on both strands, the difference in friction going through your device can make the knot start to do some weird things at the anchor.
Also, if you're using something other than a stout rated (15 kN!) rope like a Petzl PURline, it's probably better practice to clip the pull cord through a carabiner on your harness gear loop rather than have it go through your ATC.
How to connect to the pull cord to the main climbing rope?
Petzl recommends a “stacked overhand”; basically two flat overhands right next to each other, to connect their slippery PURline pull cord and the larger diameter rope. Some people might consider this a bit overcautious and be fine with a single flat overhand bend, and that's probably gonna be fine as well.

IMAGE CREDIT: HTTPS://WWW.PETZL.COM/INT/EN/SPORT/ROPES/PUR-LINE-6-MM
What cord to use?
Over the years, climbers have used everything from parachute cord, to 5-ish mm accessory cord, to highly specialized expensive cord/rope made specifically for this purpose.
Today, lots of manufacturers offer various flavors of pull cords: The Beal Backup Line, the Black Diamond 6.0 static rope, the Bluewater 8 mm Pull Down cord, and the Imlay Pull Cord 6.0, to name a few.
However, the generally accepted gold standard for pull cords is the Petzl PURline. It's static, it's slippery, it's super strong, lightweight, compact, and works great as a pull cord (or for hauling moderate loads). Unfortunately it’s expensive. Here's a detailed article on the Petzl PURline.
The PURline comes in a rather odd length of 65 meters. Why is that, you wonder? When you rap on your 60 meter dynamic rope on the other side of the block, your rap rope will stretch about 5 meters, which takes you conveniently to the end of the 65 meter static PURline. Yes, those Petzl product designers are quite clever!
How should I rig a pull cord?
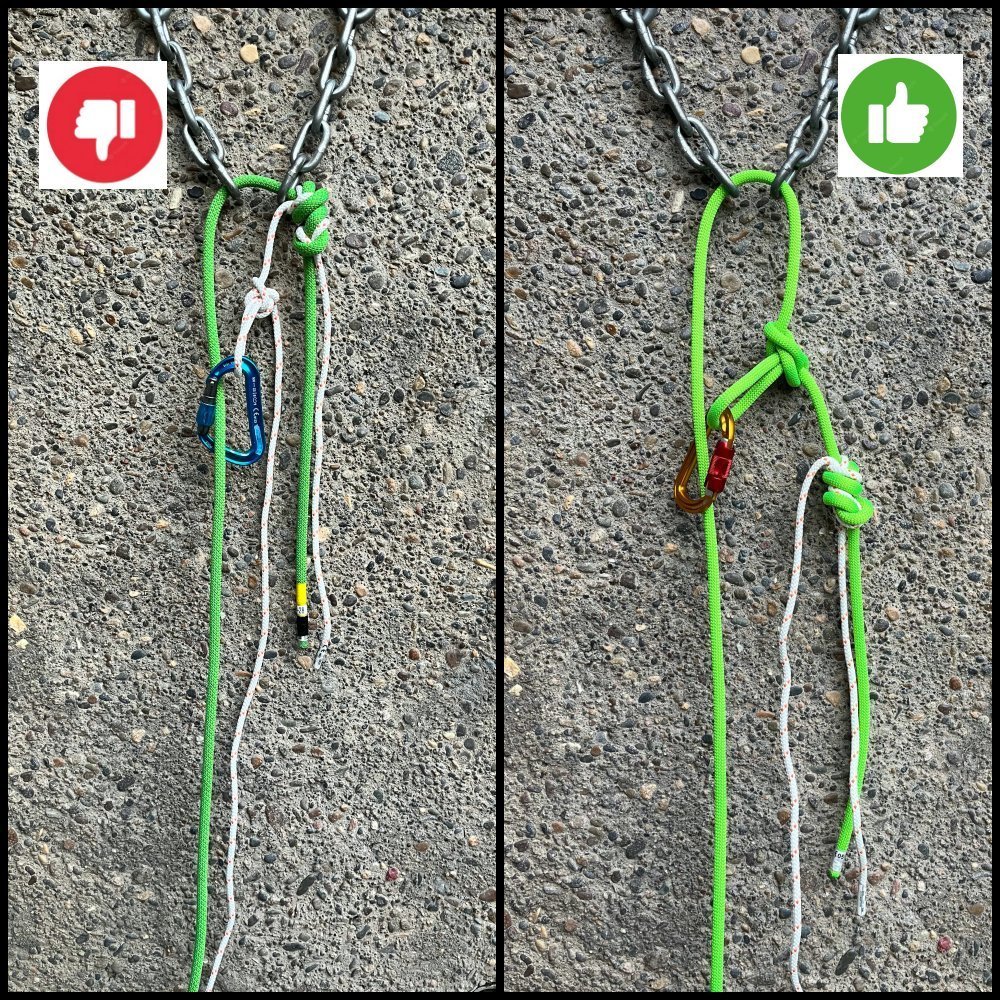
It's best practice to have the pull cord set up to pull the rope, and should not be part of the blocking knot. Tie the blocking knot in the full strength rope. Why? If the blocking knot were to pull through the anchor, your entire weight is now resting on a 5 or 6 mm pull cord, instead of the full strength of the “real” rope. (If you're using a Petzl PURline rated to 15 kN this should not be a problem, but if you're using 5 mm accessory cord then it very well could be.)
Pro tip for multi pitch rappels: as the butterfly knot and carabiner arrive at the lower station, take a moment and clip the carabiner into some point on the anchor. Doing this instantly secures your rope at the middle point.
Here’s another variation on how to rig the pull cord, from the always awesome Petzl website.
The slight advantage to the bottom system, with the pul cord attached to the carabiner, is that you can start threading the rope at the lower station and setting up the rappel before you pull down the entire rope.
The potential disadvantage to this bottom system is that if you have any twisting in either rope, they are much more likely to twist together, which could be a substantial problem. The solution is to keep the safety carabiner in place for everyone except the last person. If the last person is carefully inspecting the knot and is absolutely sure it cannot pull through the anchor, they can unclip the safety locker from the blue rope, which greatly reduces the chance of rope twist induced problems.
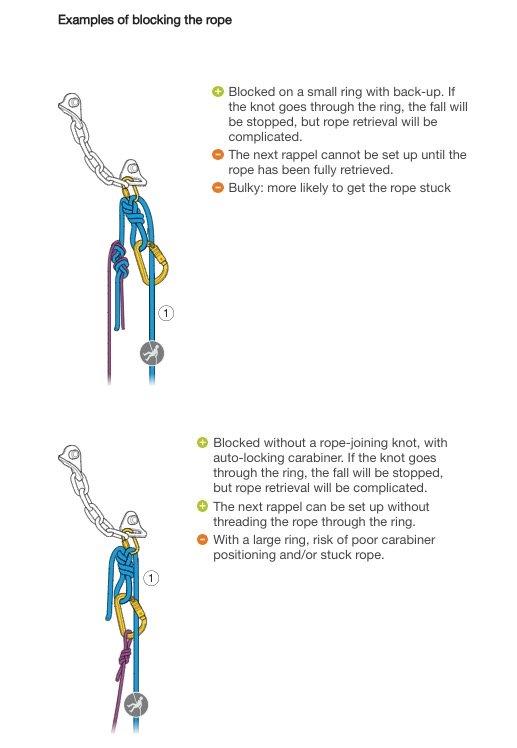
image: https://www.petzl.com/US/en/Sport/Multi-pitch-rappelling-with-a-single-rope?ProductName=PUR-LINE-6-mm
Advanced topic: What about using the fat rope as the pull cord?
Traditionally, the pull cord is the skinny rope, and the fat rope is always the one through the anchor. In the days before modern full strength pull cords, this was probably a fine idea, as pull cords were generally some flavor of 5-ish mm cord, not something that you’d trust for full bodyweight.
However, the typical set up of “pull skinny” comes with a couple of inherent problems.
If you start pulling your rope and it gets snagged after the end of the fat rope is out of reach, you only have a skinny cord to deal with the problem.
Pulling the skinny rope down is hard on your hands, and usually has greatly increased friction.
So, let's look at rigging with the fat rope as the pull strand, with the skinny rope going through the anchor. Doing this neatly address both of the above problems: if something gets stuck you have a real rope in your hand, and it's easy to retrieve the very lightweight pull cord.
Andy Kirkpatrick has a some nice diagrams and discussion of this in his outstanding book on descending mountains called “Down”, (pg 329) highly recommended reading for all climbers.
Andy K. suggests, and I agree with him, that this is an experts-only technique that you absolutely need to practice before ever doing it in the wild and be fully aware of the pros and cons.
Diagram from Andy: the two basic ways to set it up: (top) with the fat rope through the anchors, and “pulling skinny”, versus (bottom) skinny cord through the anchors, and “pulling fat”.
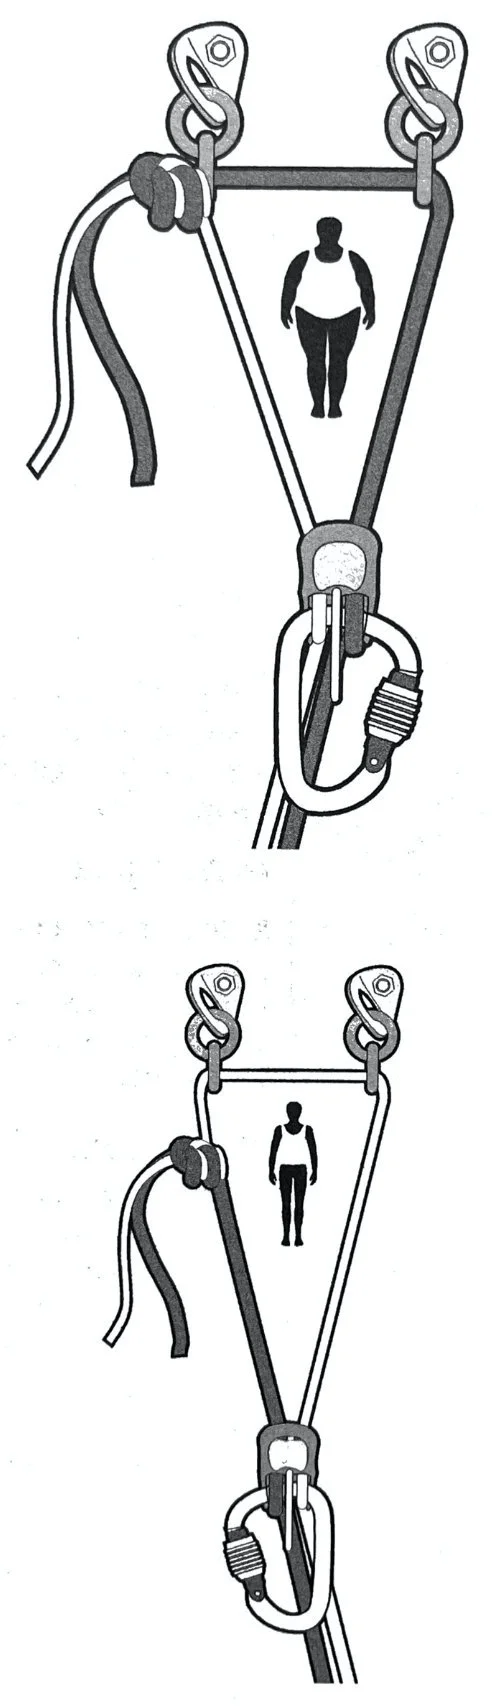
Image: Andy KIRKPATRICK, from “Down” SHARED with PERMISSION
However, like everything in climbing, this technique comes with some cautions and downsides.
You might need to rappel on the skinny strand. Obviously this is an advanced technique and might requires a specialized rappel device such as the Grivel Scream or Edelrid Mago 8, that are designed for very skinny ropes.
If you put both ropes through a standard tube style device, the extra friction from the thick rope can cause the joining knot to start “migrating down”. This can cause the thick rope to move down, the skinny route to move up, and this results in ends of your rope being uneven. Using a figure 8 style device like Mago 8 can help with this.
This migrating rope also cause the skinny rope to move under load through the rappel anchor. Probably not an issue if it's metal, but definitely a concern if it's cord or webbing, which can be common on alpine routes and a V thread made from cord when ice climbing.
Good news: these problems can be easily mitigated.
You can fix the fat rope at the top which prevents the knot from migrating (photo below).
The first person down can tie off the skinny rope at the bottom (assuming the anchor can take an upward pull) and then the top person can remove the fixed fat rope, which also prevents the knot from migrating.
Expert American alpine climbing team Priti and Jeff Wright shared this story with me, about their first ascent of K6 in Pakistan. This shows the effectiveness of pull cords in extreme alpine terrain, when performed by experts with full understanding of the system. (And yes, “pulling fat” is not a problem.)
“We had 19 V-thread rappels to descend the mountain and we would alternate Pull-Fat/Pull-Skinny (Half Rope+Pur Line) as the fastest method of descent where we were not concerned with stuck ropes. We made the 19 rappels in very quick time (half a day), rappelling on both strands for every rappel, never retying the joining knot, and the leader pre-threading the next V-thread while the follower rappels.”
See these solutions in action in the diagram below, especially the one on the right. The diagram on the right shows a great application of the Stone hitch. This cleve knot effectively fixes both strands of rope. Another solution is to tie the end of the skinny rope to the lower anchor, as we see below on the right.

Image: Andy KIRKPATRICK, from “Down” SHARED with PERMISSION
I’m not giving any advice or recommendation on this. I’m providing information to hopefully allow you to make an informed choice, and to be aware that using the fat rope as a pull cord is an option for VERY experienced climbers, who fully understand the risks and benefits.
I’ll close with this wise observation from American alpine climber Colin Haley:
“It can be quite tricky to rappel with ropes of very different diameters, and these are expert techniques. I could write a lot on this subject alone, but it isn’t the scope of this article. If you’ve never rappelled before with ropes of very different diameters, do some research beforehand and practice the techniques in a low-stress setting before trying it on top of a mountain!”