Anchor your haul bag with a docking cord
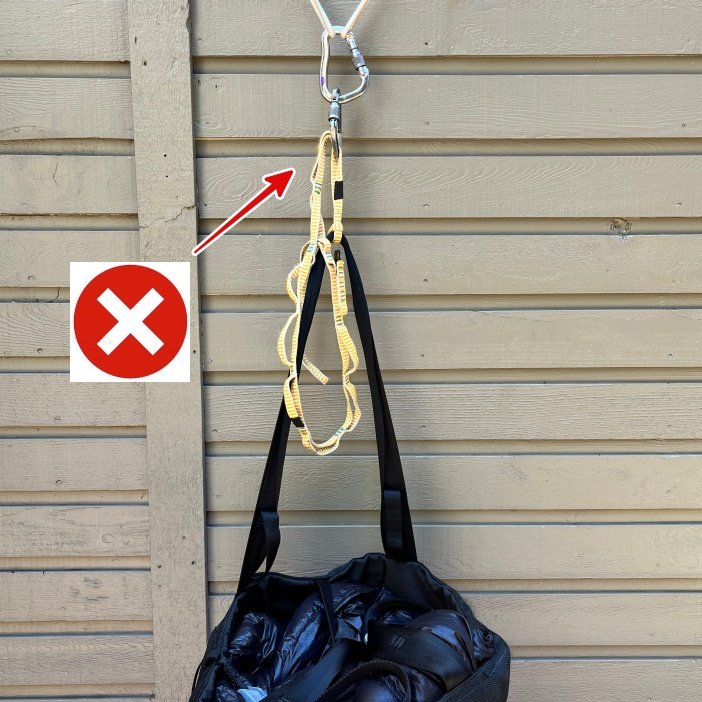
Standard big wall practice for many decades was to girth hitch a sewn loop daisy chain to your haul bag, and then clip the daisy to the anchor with a locking carabiner. Seems like a decent idea on the surface, doesn’t it?
But just try to unclip that monster bag from an awkward stance, if the bag is being pulled sideways, and any number of other scenarios, and the shortcomings quickly become obvious - you have to lift the entire weight of the bag with one hand/arm, and use your other hand to unclip the carabiner on the daisy. Yes, it sucks!
You don’t EVER want to be doing this if you can possibly avoid it!
Here’s the modern way: always attach your haul bag to the anchor with a system that is releasable under load - the docking cord. This is simply a 15 (or so) foot doubled length of 8 mm (or 7 mm) cord that’s used to tie a munter hitch plus a “barber pole” wrap to the anchor that can be easily released, even under full tension.
A Munter Mule overhand, aka MMO, on a single or double strand, work as well.
The lineage of the docking cord method is a little hard to trace, but it's generally attributed to Chongo, a legendary Yosemite aid climber, and then further popularized by Yosemite veterans Pete Zabrok and Mark Hudon. (Let's give credit where credit is due, eh?)
Nice diagram from vdiffclimbing.com. (Note that the docking cord is clipped to the master haul bag carabiner. I prefer tying it to the long strap on the haul bag, more on that below.)
image: vdiffclimbing.com/bigwall-hauling/
Where do you attach the docking cord?
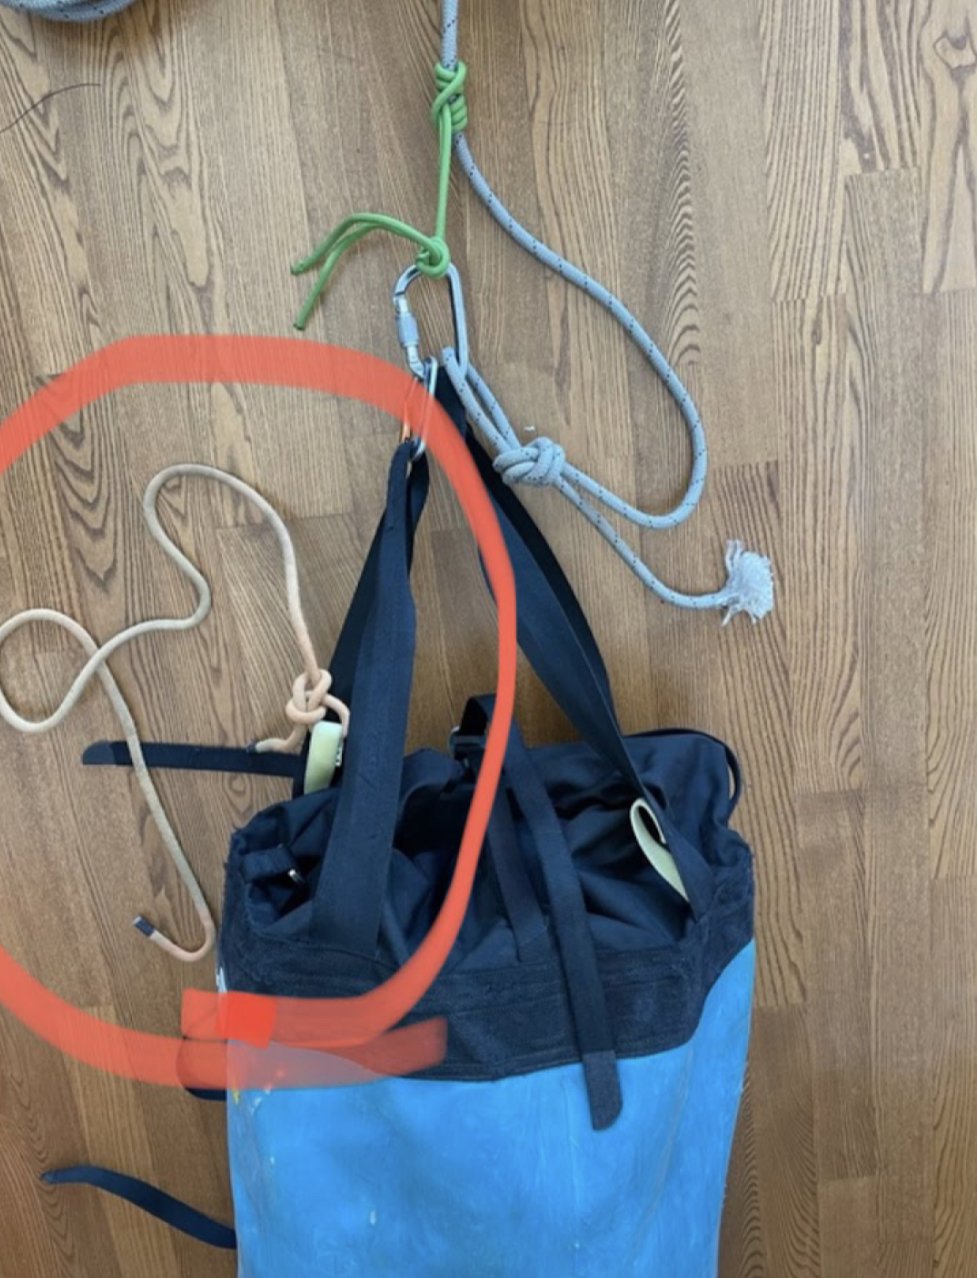
Many people clip it directly to the master carabiner, as shown below on the right. However, if you do this, when the bag is docked, you have the weight of the bag also loading the master carabiner, which can make opening at the bag bit more difficult.
I think a better option is shown in the left photo below: tie the docking cord with a retraced overhand knot directly to the long strap. If you do this, after the bag is docked and you release tension on the haul rope, you have slack on the master carabiner, which makes getting in and out of your bag much easier.
Here's one more tip on where to tie your docking cord (which I unfortunately learned after I shot all these photos). Most haul bags have some sturdy sewn tabs around the opening. If your tie your docking cord to one of these tabs, you can dock the bag higher up on the anchor, which often makes accessing the bag more convenient. Plus, there is no tension on either of the black straps, which makes getting in and out of your bag easy, One potential downside of this is that your bag may not hang level which is usually okay.
The photo below is not mine, I borrowed it off of Instagram and no longer know the source. If it's yours, please let me know and I will give you proper credit.
Consider where the bag should go on the anchor. Something to keep in mind: does the next pitch traverse? If it does, you want the bag on that side. For example, if the next pitch traverses to the right, you want the bag docked on the right. If it’s docked on the left, when it's released, it's going to do it's best to treat you as a bowling pin as it’s lowered out. You will probably make this mistake only once. =^)
If the next pitch goes pretty much straight up, it doesn't really matter where the bag is docked. Generally, you want it away from where your partner is coming up, so if the last piece of gear is on the right, you generally want the bag docked on the left.
If it's the last pitch of the day and you're spending the night in a portaledge, you need to give some thought to where are you going to hang the ledge and hopefully dock the bags somewhat close by. If you're going to put on the ledge fly, you need to know where the opening is, and hang the bags next to the opening.
And one more thing: some people will tell you to always pull the bag up tight to the anchor. But, unless this is your bivy spot, that's really not so important. The bag can hang down quite a ways below the belay after docking. You shouldn't need to get into it during the day, because you were smart enough to bring a wall bucket, or day bag, right?
Here's a tip: After you have your pigs docked, you need transfer the load onto your docking cord. To do this, you need to release the cam on your hauling pulley. Here's one way way to do that. Put a Grigri onto the “pull” end of the haul line, close to the pulley. Sit down hard, push off the wall with your feet, whatever you need to do to lift the bag just a centimeter or so. Once you lift it, release the cam on your pulley. Now, use your Grigri to slowly lower the load onto the docking cord. Clever, no? (This crafty rope trick comes from the excellent big wall instructional book “Hooking Up”, by Pete Zabrok and Fábio Elli.)
While you're at the gear shop buying the cord, you might as well get another 30 feet of 8mm cord, of a few different colors, so you can make gear tethers, something we cover at this Tip.
Note: it’s a Good Idea to make your docking cord a bright obvious color that’s different than your gear tethers, so you can see at a glance which is which.
You probably wouldn’t be too excited about having your only connection to the anchor be a bit of 8 mm cord, and your haul bags probably feel the same way. After you make the primary connection with the docking cord, consider backing it up to something solid. If you have one bag, this could be clipping the haul rope to some other point on the anchor.
If you have two bags side-by-side, each bag is clipped to a different master point in the bags are clipped to each other, so one essentially backs up the other.
(Think through what would happen if that docking cord were to fail - your haul bag could potentially free fall 60 meters the length of the haul rope, which would then put that force onto your anchor. Bad news!)
Here’s what big wall expert Mark Hudon has to say about this system, from his website Hudonpanos.com:
“I use 15 feet of 8 mil cord, doubled. Tie an 8 knot loop in the middle and clip it to the main haul bag carabiner. When you reach an anchor, reach down and grab both strands of one docking cord. Run them up through a carabiner on the anchor (I hang a carabiner down from one of the large lockers of my “Anchor Kit”) and tie a Munter hitch using both cords. Once the Munter is tied, separate the cords and wrap them in opposite directions (aka “barber pole”) around and down the docking cord coming up from the haul bag. After five or six wraps, secure the ends with a simple square knot. Each haul bag has its own docking cord going to different master point carabiner (and each haul bag is clipped to the other) so my feeling is that one is backing up the other.
Releasing this knot and the bags is one of the great features of this system. Untie the square knot and unweave the 8 millimeter cord.
Only when you get to the Munter will you feel any pull on the cords from the bags. It’s casual to let the cords slip from you hand and set the bags free. If I’m with a partner, I can hold both bags with one hand and only one Munter, while waiting for the haul line to come tight and the bags to start moving.”
Here’s a nice video by Mark that shows a very clever way to transfer the haul bag from one part of the anchor system to another, using “far end hauler”, a Micro traxion pulley attached to the haul bag.
Here’s a video that covers it well.
Finally, here's a great diagram from the always amazing artist Mike Clelland, showing how the docking cord works with the other components of a tidy big wall anchor. Note that the diagram shows a single strand of rope tied with a Munter Mule; a bit different than the double strand method shown above, but accomplishes the same thing.
image credit: Mike Clelland


