
Pros and cons of the Garda Hitch
Do you need to haul a small load? Did you forget your Petzl Traxion or Tibloc? Might be time to break out the old-school Garda hitch, aka “alpine clutch”.
The Garda hitch is a one-directional, self-locking hitch that lets you haul, but lets you relax your grip when you need a break, capturing your hauling progress.
To haul, simultaneously pull UP on the load side of the haul rope and DOWN on the brake side of the rope. Don’t just pull down on the brake side, because the garda hitch adds a LOT of friction. An informal test I did with a spring scale and a 10 pound barbell weight showed it took about 60 pounds of pulling force to lift a 10 pound weight through a Garda hitch; just 17% efficient. That is terrible!
The Garda hitch can work (reasonably) well when you create slack from doing something else, and then pull the slack rope through the hitch. If the rope has any kind of load on it, it's going to be very difficult to pull through. So, be sure you lift UP on the load side, and not just pull DOWN on the brake side.
Locking the knot is simple: just let go.
A few notes:
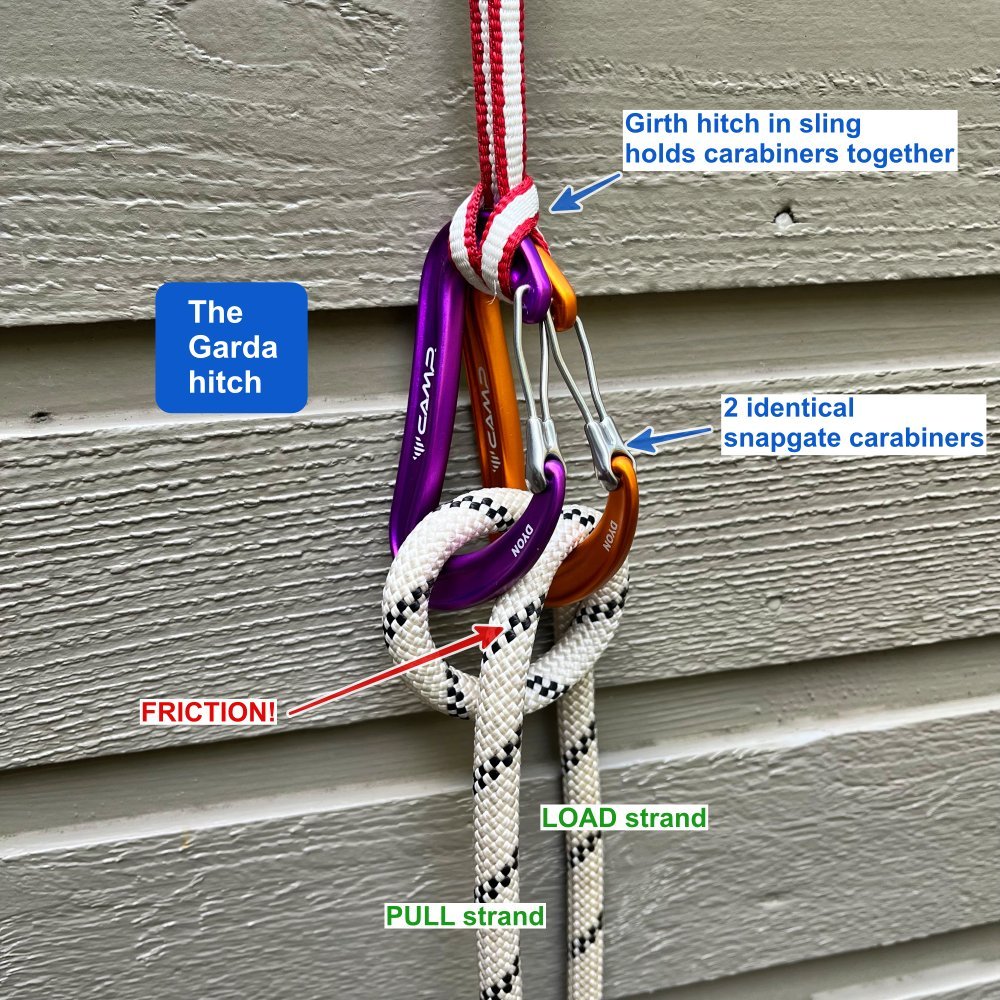
Ideally, use identical snapgate carabiners. Some people think it works better with oval carabiners, but personally I don't think they make much of a difference. Some people say only use D shaped carabiners.
Avoid locking carabiners with a sleeve, as the sleeves can prevent the rope from locking down properly.
Adding the girth hitch from the anchor sling is optional. In my experience, having the top of the carabiners held together makes the hitch better behaved. Try it with and without and go with what works for you.
While some sources suggest this can be used in a crevasse rescue operation as the progress capture, many folks think this is not such a great idea because the hitch can be a little squirrely if the carabiners are not properly oriented, it's very hard to release under load, and depending on how it's configured, it can add a LOT of friction to your hauling system. The few times I've used it, it's been for non-critical situations such as hauling up a backpack. (Having said that, I recently went to a crevasse rescue clinic taught by a pro guide, and he used a Garda as a progress capture in a 6:1, creating slack and then capturing it with the Garda.)
It's important to monitor the Garda hitch carefully. If you get a loop of slack rope above the carabiners, weirdiosities can happen and the entire thing can unclip itself! Yikes! (Another reason why I am not a fan of this for rescue purposes. )
Downsides to the Garda hitch:
Lots of friction. Yes I mentioned that, but it's worth mentioning again.
Very difficult to release under load.
A bit tricky to remember which is the load strand and which is the haul strand.
Depending on the carabiners used, it can be a little wonky and unreliable. Adding a girth hitch to squeeze the tops of the carabiners together, as shown in the previous photo, can help with this.
This hitch works best if the carabiners are hanging free instead of lying against the rock. When you start hauling, the rope will run along the spine of the carabiner, see photo below. If the carabiners are resting against the rock, it could have the rope rubbing against the rock, creating extra friction, or even do something weird to the carabiners or so they don't “lock” together as you expect them to.
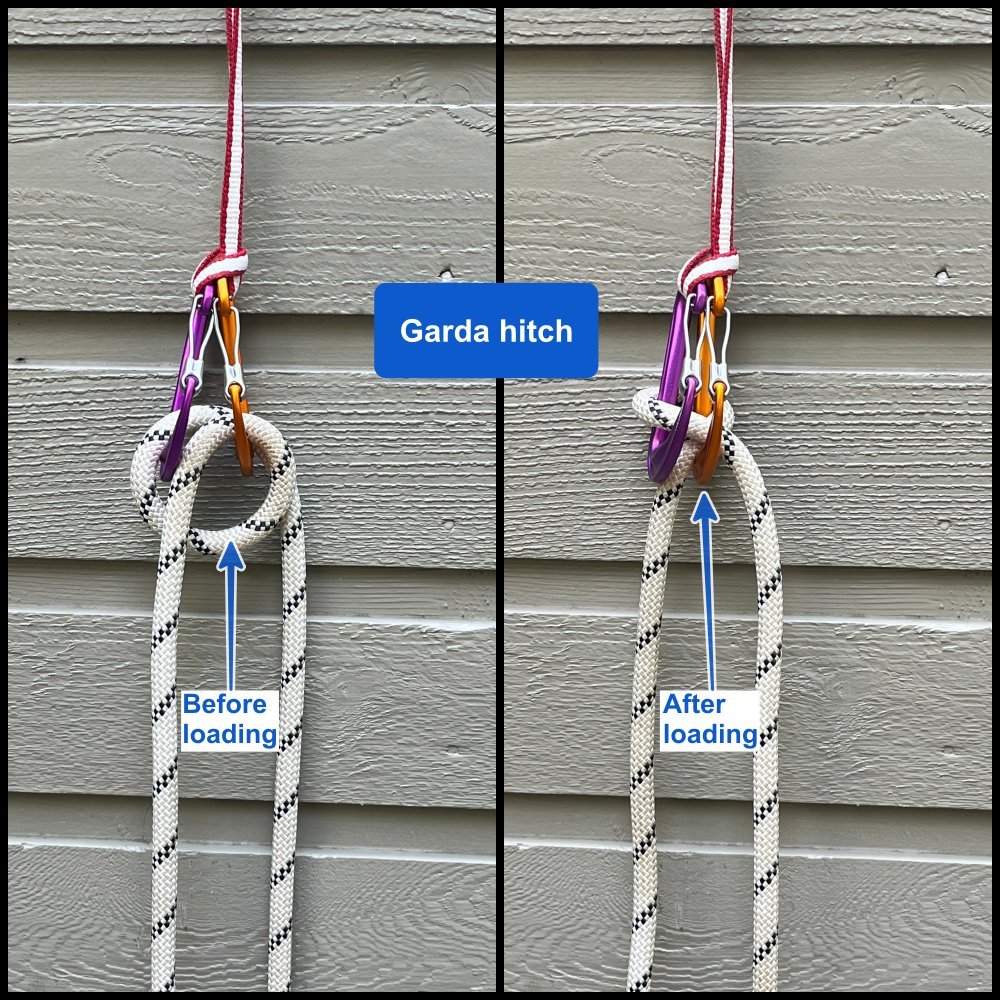
It usually flips after it’s loaded and looks completely different than how you originally tied it, which is a little unnerving! There is no other climbing knot that does this. See photo below.
Having said that, it can be used for crevasse rescue; in this case, to ascend a rope. Here's a great video on crevasse rescue techniques from some top German guides. Watch the video below, starting at around 3:15, to see the demonstration..
Here's how to tie it.
Start with two identical carabiners (non-lockers preferred) clipped to the anchor, gates facing down and out. Clip the rope through both carabiners.
In the photo below, the hauling rope is on the left (purple carabiner) and the loaded rope is on the right (blue carabiner).

in the haul strand of the rope on the left, make a loop as shown.

Clip this loop into the right side carabiner.

Done. If you've tried it correctly, the haul strand should be coming down between the two carabiners. Pull on this, and the load will come up. If you stop pulling, the load tensions the carabiners together, pinching the rope.
