
Reverse your crampon straps
Credit for this tip goes from British Guide Sam Leary, who made the video at the bottom of the page where I first saw this clever trick.
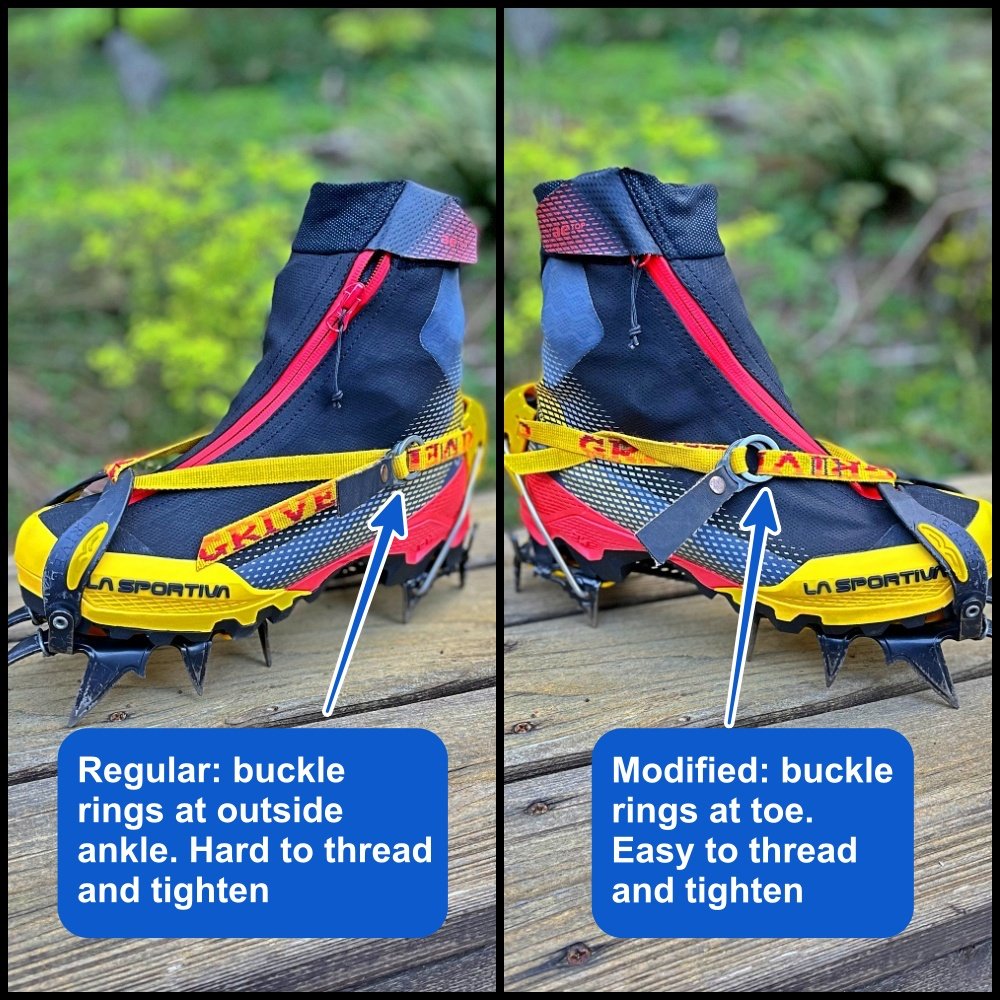
Short version: remove the straps from your crampon heel levers, and reverse the straps. This lets you move the buckle rings to your toe, rather than your outside ankle, which makes threading the strap through the rings and cranking it tight MUCH easier.
It’s time to put on crampons on the side of a dark, steep icy mountain. It’s cold, you have gloves on and lots of puffy layers. You plunk the crampon into the snow, carefully insert your foot, clip down the heel lever, . . . and then attempt the spine torquing, black belt yoga position of twisting to the outside of your boot, trying to thread the strap through the double rings that you can’t really even see . . .
At this moment, you may think, “why the HELL are crampons designed to be put on in this incredibly awkward way?!”
Good news: there’s an easy modification (for most crampons) that makes this process a LOT easier.
Disclaimer #1: The industrial designers at crampon companies (who are of course far smarter than I am) may not approve of this.
Disclaimer #2: This does not work with all styles of crampons. A quick look at yours should tell you whether it works, or not.
Disclaimer #3: If you try this modification and screw it up, your crampon straps might become unusable. Do not try this on the mountain, and you probably shouldn’t try the night before a climb either. You’ll need a few simple tools like scissors (and probably) needle nose pliers. Read this article, watch the video at the end, and be fully aware of how this works before you ever try it for yourself.
Crampons with a heel lever are typically set up with the strap threaded counterclockwise on your left crampon, and clockwise on your right crampon. With this set up, the buckle is on your outside ankle, and you pull the strap forward, or toward your toe, to tighten.
We’re going to reverse this. Instead:
Thread the strap CLOCKWISE on your left crampon, and
COUNTERCLOCKWISE on your right crampon.
This lets you put the buckle up near your toe, where you can see what you’re doing with no contortions and double back the strap with ease. You also tighten the strap by pulling toward your body, which is more ergonomic.
Doing this also puts the buckle on the outside of your foot, which is where it should be, so you don’t accidentally loosen it by clipping the inside of your ankles together.
You could move the buckle to the front without removing it from the heel lever. But if you do this, the buckle will be tensioned on the inside of your foot. This is no bueno, because you’re much more likely to kick it unintentionally with your other foot and release the tension on your strap.
I’m showing it here with my Grivel G12 crampons, so I can’t speak to other brands. According to the video below, it works the same with Petzl and some models of Black Diamond. (It does not work with my Black Diamond Contact universal crampons, because the strap is sewn in to one of the holes on the rear cup and can’t be unthreaded to do this.)
Notes:
For my Grivel G12s, I found that cutting the crampon strap with scissors to make sort of a “V” point, rather than a 45° angle, made it quite a bit easier to thread through the heel lever.
After you make this cut, melt the ends of a strap in a flame and when melted, give it a quick squeeze with pliers to make sort of a hard tip.

When you’re completely done with this project and the straps look good, you MIGHT, repeat might, want to cut off some of the excess extra strap, assuming you’re not going to use these crampons with any larger boots (like ski boots) or loan them to anyone with size 15 feet.
You will probably need needle nose pliers to pull the crampon strap through the heel lever. Take it slow, be patient. A small flat blade screwdriver can help push the strap through too.
Before you thread the strap through the heel lever, lay it all out and figure how the strap is going to lay on your boot, ideally with no twists. With the Grivel‘s, the black leather tab needs to end up lying flat against your boot, on top of the other ring. The way it ended up working for me, the strap is not showing the Grivel logo on the inside of the boot, and it is showing the logo on the outside of the boot. This way means no twists when you’re done. If you do and up with a half twist, it’s certainly still going to work fine, it’s just not as aesthetic as it could be. So, take some time before you thread that heel lever and see that everything is lined up correctly with no twists. “Measure twice, cut once”, as they say.
Do one boot at a time. If you mess it up on the first one, you have your original strap on the other crampon as a reference.
Here's what mine looked like when I was done. The buckle is threaded through the toe piece, and is easily tightened to the outside of the boot by pulling back toward you.

The video below shows this process in detail. Watch it before you try it! Thanks to AMI (Association of Mountaineering Instructors) Guide Sam Leary and LeadingEdge Mountain to show you how it works. She has lots of other solid Youtube instructional videos, give her a subscribe.