
Start your anchor with a quickdraw

Premium Members can read the entire article here:
This post discusses techniques and methods used in vertical rope work. If you do them wrong, you could die. Always practice vertical rope techniques under the supervision of an experienced climber, and ideally in a progression: from flat ground, to staircase, to vertical close to the ground before you ever try them in a real climbing situation.
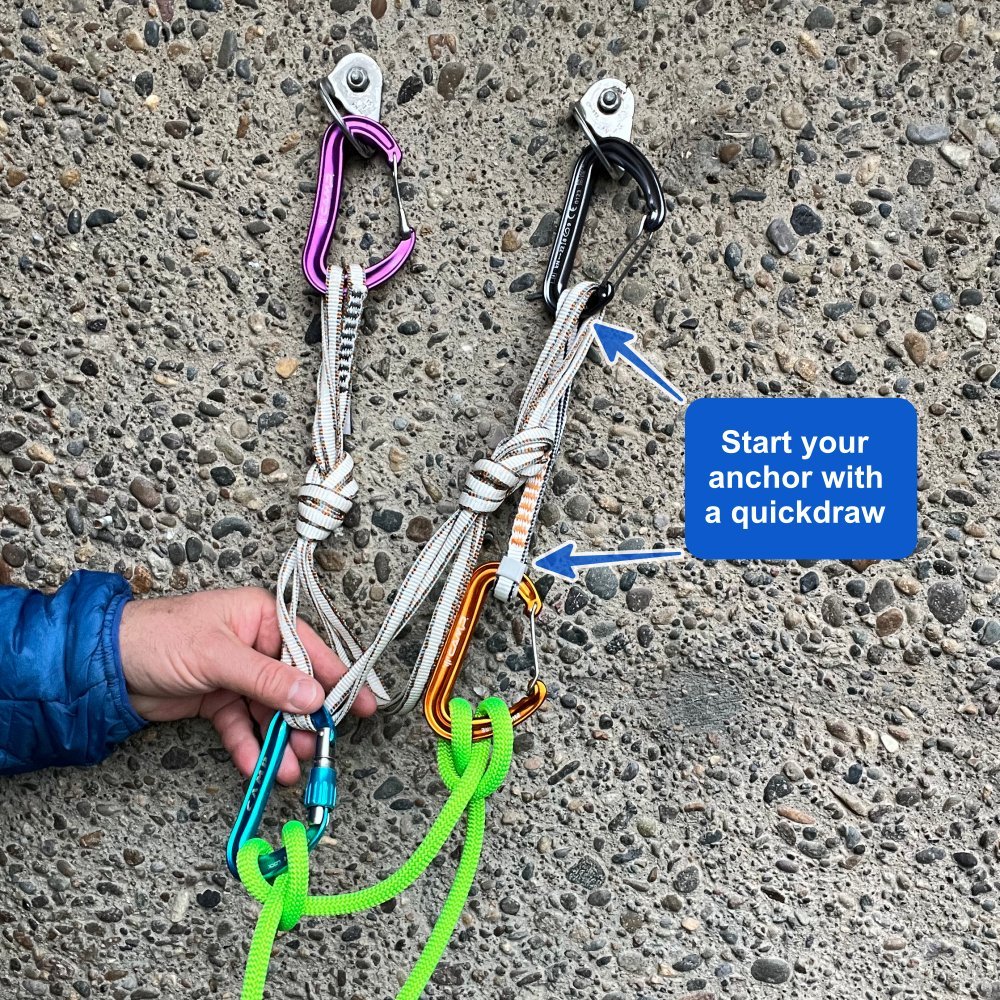
When you arrive at a bolted anchor, and the stance is small, a good first step is often to clip a quickdraw.
Using a quickdraw in your anchor has a few benefits:
Give you immediate security when you arrive at the anchor. If you have a decent stance, you can simply clip to the anchor. If you want more security, you can tie a one handed clove hitch to attach yourself directly to one bolt.
When it's time to pull up the rope, going to your partner, clip it to the draw and then pull down. This is usually more ergonomic and faster than pulling the rope up hand over hand.
If you want, the leader for the next pitch can clip the quickdraw as the first piece. This practice has some pros and cons, see below.
Here are two examples of starting your anchor with a quickdraw:
Multi pitch climb
Single pitch top rope
For both examples, let's assume there's not much place to stand, so you secure yourself initially with a clove.
I'm using a pre-tied quad made from a 180 cm Dyneema sling, but the anchor could be pretty much anything you like.
For a multi pitch, after you build a proper anchor, you can use the bottom carabiner on the quickdraw as a place to hold your backpack, or maybe a sling with extra gear.
It may NOT a good idea to use this as the first clip for the next pitch. That is a rather involved topic, and it's discussed a bit at the bottom of the article.
Method 1: Sequence for multi pitch anchor
What you need:
One quickdraw
Pre-tied quad, racked on one snapgate carabiner
One locking carabiner
Procedure:
Arrive at two bolt anchor.
Clip quickdraw to one bolt (for this example, the right bolt.)
Clove hitch your lead rope into the bottom of the quickdraw. You’re secure at the anchor, but you remain on belay, as you’re only clipped to one bolt. (You’re protected by your belayer and all of the gear/bolts below you.)
Clip the snapgate carabiner and the left arm of the quad to the left bolt.
Clip the right arm of the quad to the top carabiner on the quickdraw.
Clip the locking carabiner into two strands of the quad.
On the back side of the clove hitch connecting you to the quickdraw, tie another clove hitch and clip it to the locking carabiner.
Take a breath, whew!
Check everything: the locking carabiner is clipped to two strands of the quad, carabiner is locked, and the clove hitch connecting you to the locker looks good.
Remove the first clove hitch you tied on the bottom of the quickdraw, and feed the resulting slack through the second clove hitch to adjust your position.
Schweeeet! Now you’re secure. Call off belay.
Add your belay device to the other two strands.
Quickdraw benefit #2: Clip the rope going to your partner to the quickdraw, and now you can pull ergonomically down to stack your rope.
Put your partner on belay, and bring ‘em up.
Quickdraw benefit #3: If you want, the leader for the next pitch can clip the quick draw as the first piece.
Extra security step:
As you're learning and practicing this, you can clip a personal tether / PAS to some component of the anchor and use this to back up the system as you’re building and testing it. Keep the tether attached to the anchor until you’re fully on belay from your partner below, and ready to be lowered. Like I said, practice this in a controlled environment with a qualified instructor!
Here's a photo sequence, step by step.
Step 1: Clip a quickdraw to the bolt, and tie a one handed clove hitch to secure yourself temporarily. Stay on belay.

Step 2: Clip the quad to the left bolt with the snap gate carabiner it's racked on (purple), and to the top carabiner of the quickdraw (black).

Step 3: Clip a spare locker (blue) to the quad. Tie a second clove hitch to this locker.

Step 4: Systems check - locking carabiner is clipped to 2 strands of the quad, it’s locked, and the clove hitch looks good. Now you can remove the first clove hitch from the bottom of the quickdraw and feed a bit of slack through the clove to adjust your position.
Schweeeeet! You’re secured to the master point on the anchor. Give yourself a high five. =^)
Call “Off belay!”
Clip your belay device to the other two strands of the quad, pull up rope, and bring up your partner.

Want to see a step-by-step and photo sequence of how to do this for a multi pitch anchor?
Why is it maybe NOT a good idea to use the bottom of the quickdraw as your first clip on the next pitch?
