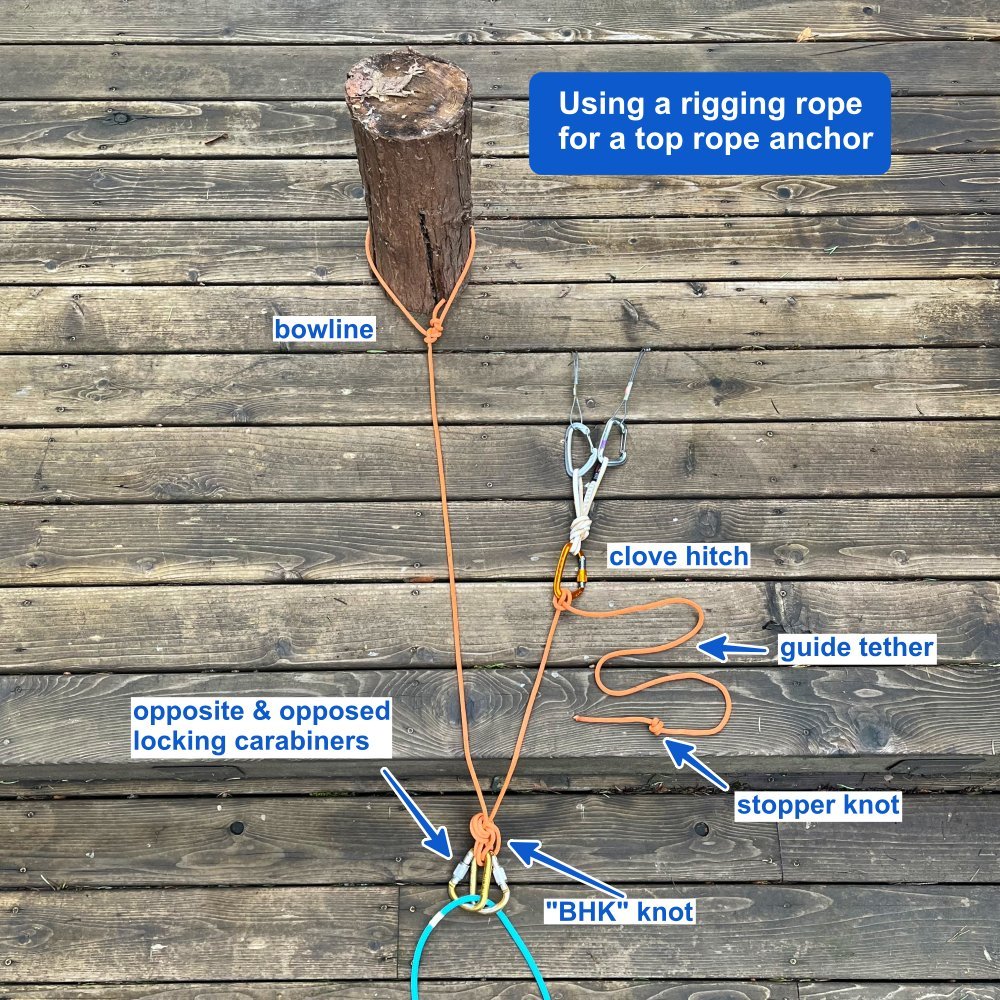
Use a rigging rope for top rope anchors
You’re setting up a top rope at a single pitch climbing area, where you have easy access to the top of the cliff. The anchor points (a solid tree and a boulder with some good cracks for gear) are about 5-10 meters back from the edge of the cliff.
How can you quickly rig a simple, strong and speedy top rope anchor with a master point that extends over the edge?
The old-school way method for many folks was to use webbing; usually a big length of 1 inch tubular, or maybe even start girth hitching or connecting every sling you and your partner have, to extend the master point over the edge.
This is also known in some circles as the “Joshua Tree System”. Joshua Tree is a wonderful climbing area where this rigging is especially handy, because good anchor points are often far back away from the actual edge of the cliff.
A better solution: have a second rope with you that you only use for anchor rigging and safety near the cliff top, aka a “rigging rope”.
A typical rigging rope is static (minimal stretch), 9 or 10 mm, between 20 and 30 meters in length. Even so-called “static” ropes have a little bit of stretch; they are actually about 25 percent dynamic. So it’s not like you’re climbing on a steel cable, a common misconception.
You‘re not likely to find static rope sold by-the-foot at your local climb shop, so ask ‘em if they can special order it for you. (Support your local climb shop before you buy online.) Consider buying a 60 meter static rope, cutting it in half and sharing the other half with a climbing pal.
Another option is to get two different lengths of maybe 12 or 15 meters each. If you only need a shorter length, you can bring one. If the anchors are farther apart, you can tie the ropes together to extend them. That way, you don't need to bring an extra 30 m of rope in your pack for every rigging project.
Consider a canyoneering rope. They are static, and come in various shorter useful lengths, like 30 meters.
Cost is approximately $3 per meter, so you’re looking at $70- $100. Yes, it's expensive, but as they say, buy once, cry once. Every time you set up a top rope like this, it’ll be well worth it.
Why use a static rigging rope instead of 1” webbing?
Overall, using a rigging rope is faster to set up, easier to inspect and adjust, and has fewer individual components.
Static materials are good to use here. With a standard dynamic climbing rope, as the rope is weighted and unweighted. it stretches and unstretches under load over the cliff edge, which could potentially damage it.
Static ropes usually have a very durable sheath. Webbing has no sheath.
Kernmantle (German: “kern”= core, “mantel” = sheath) rope is generally quite abrasion resistant, while tubular webbing is definitely not. When loaded over an edge with a sideways sort of pull, rope will tend to roll, whereas webbing tends to slide. Sliding is going to lead to more potential abrasion.
Static rope works with a Grigri, which is a great tool to reduce your risk when you're working around a cliff edge. Can't use a Grigri with webbing. With a Grigri, always have a stopper knot or hard backup bight knot below the device, as a Grigri can creep downward under a light load.
You can tie many more knots (and use friction hitches) in rope than you can in webbing. With webbing, you're pretty much restricted to a water knot or an overhand on a bight.
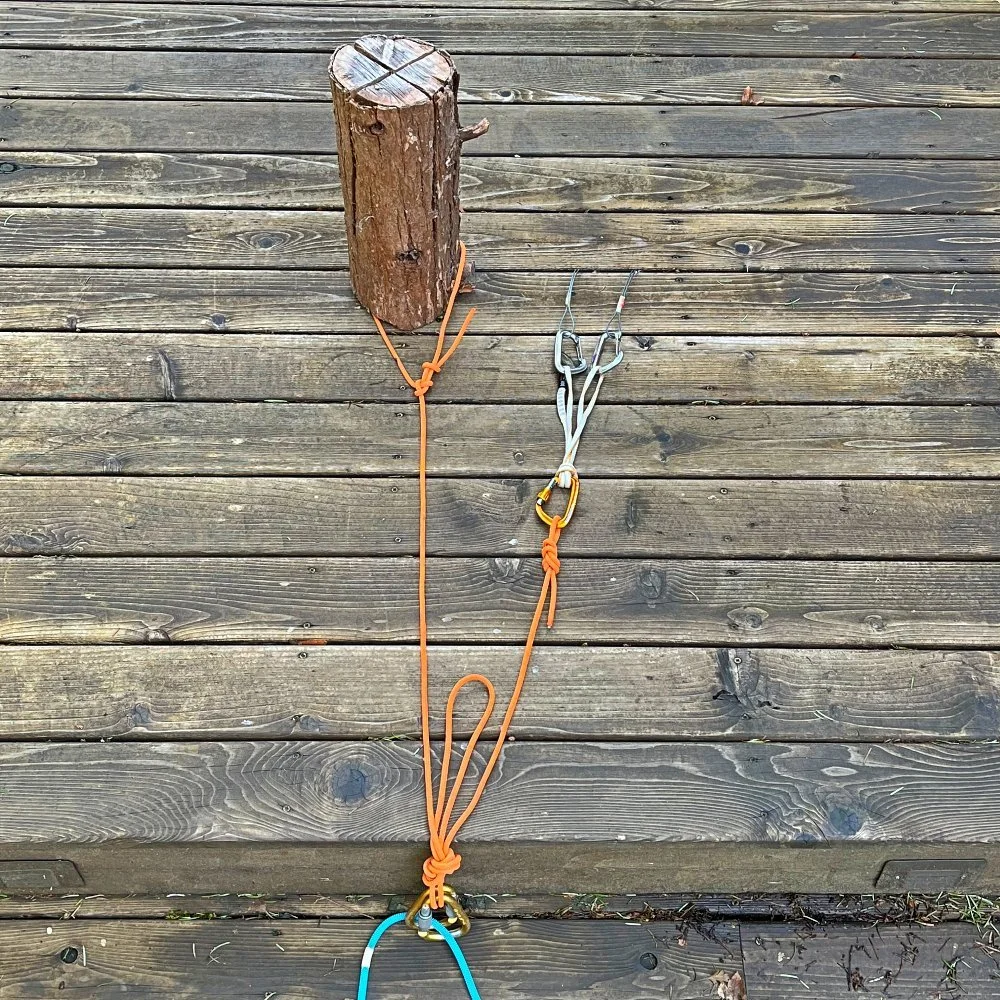
Here's another slightly different way to set up a rigging rope. Here, each END of the rope is tied to a solid anchor. You walk to the edge, tie a BHK in two strands, and use that for your top rope master point. You will have an extra loop of rope. Just set this on the ground or coil out of the way and don't use it.
Notes . . .
Don’t stress out about getting perfect equalization between the two arms. Most of the time, you’ll have a stout rope with each strand attached to an unquestionably strong anchor. Try to get each arm of the anchor as close to equal load sharing as you can, but there's rarely a need to make them an exact match.
It's good practice to always secure yourself if you are within 2 meters of the edge of a cliff. After you set up one leg of the anchor, you can put on a Grigri or friction hitch to approach the edge and tie the BHK.
It's good practice to tie a hard backup bight knot below your Grigri or fiction hitch, and clip this backup knot to your belay loop with a locking carabiner.
Be nice to trees. Try to avoid damaging the bark, especially if the tree is regularly used as an anchor. Consider padding the tree with an empty backpack, or maybe an old piece of carpet. If you have an option to use a rock, you might want to do that instead.
If the rope is being loaded over a rough or sharp edge and you’re concerned about it getting damaged, you have a few options. Quick and dirty, put a backpack under it. If you plan ahead a bit, you can take a section of cut up garden hose sliced lengthwise, and put that around the rope as a protector. What works best, and are still fairly inexpensive, are commercial rope protectors. If you find yourself setting up top ropes a lot, these can be a good investment.
If you still don't like the rope being loaded over a sharp edge, then maybe you should go climb somewhere else. =^)
Here's an example of a specially made rope protective sleeve. If you top rope a lot on rough rock, this can be a good investment. Under $20.
image: https://www.amazon.com/MONSTER-Rope-Protector-Armor-1-6/dp/B08NPNYN82
Finally, here's a great video from our friends at Smile Mountain Guides with a more detailed tutorial of how to set it up.


