What’s a “series” anchor?
Premium Members can read the entire article here:
Peer review on this article comes from Sean Isaac. Sean is an ACMG (Association of Canadian Mountain Guides) Certified Guide, a former professional climber, and author of the “Ice Leader Field Handbook” and “How to Ice Climb” (2nd ed.) Follow @seanisaacguiding for tech tips. Thanks, Sean!
Series anchor onto vertical bolts. Edelrid Aramid sling on left, rope on the right. (Belay connection to second omitted for clarity.)
On your first day of Climbing 101 class, you probably got the concept of equalization drilled into your head - always try to distribute the load (more or less equally) among all components of the anchor. This is still about the only technique taught in most every how-to book I’ve ever seen. Overall, this is still a valid approach, especially with trad anchors, made with stoppers, cams and maybe pitons.
However, it’s not an absolute rule when it comes to using two reliably solid pieces, such as bolts or ice screws.
There’s a whole other genre of anchors, known as a “series” anchor, where all of the primary load goes to ONE anchor component. The second component of the anchor is used only for redundancy, as a backup in the extremely unlikely event that the first bolt were to fail. There’s no attempt at equalization/load distribution. Redundancy, yes. Equalization, no.
So, how can we get away with ignoring equalization, one of the cardinal rules of anchor building? Because modern bolts and hardware are so ridiculously strong (well over 20 kN for each one when properly placed in good rock) that there’s no requirement to try to equalize forces. In many cases with good bolts, it can be faster and more convenient to build a series anchor.
Series anchor overview
As a general guideline: if you have two unquestionably strong bolts, consider a series anchor. Anything other than that, consider a distributed anchor.
Series anchors are best made with two components; three or more is tricky.
Series anchors work on horizontal, vertical or diagonal bolts or ice screws. The vertical or diagonal are preferred. These can be hard to find in North America.
Series anchors are more common in Europe. They are endorsed by the German Mountain and Ski Guides Association (“Verband Deutscher Berg und Skiführer” or “VDBS”). Here's a detailed article covering series, and other interesting anchor flavors.
If you have vertical bolts, make the master point on the bottom bolt. If the bolts are horizontal, make the master point on the bolt where your second will approach the anchor.
A series anchor does not provide a shelf, so all of your clip in points get kind of scrunched together.
You can make a series anchor with a sling tied with a double loop bowline on a bight, a double loop figure eight, or with the rope.
An advantage to using a sling is that you can easily transition to a fixed point lead belay on the next pitch. (That is a whole other topic, which I cover extensively in this article.)
How strong a ring loaded bowline in Dyneema?
Double loop bowline in Dyneema sling being ring loaded, breaks around 20 kN. From HowNot2 (about 6:30 in the video). A belay loop usually breaks around 15 kN, so think about that for a moment . . .
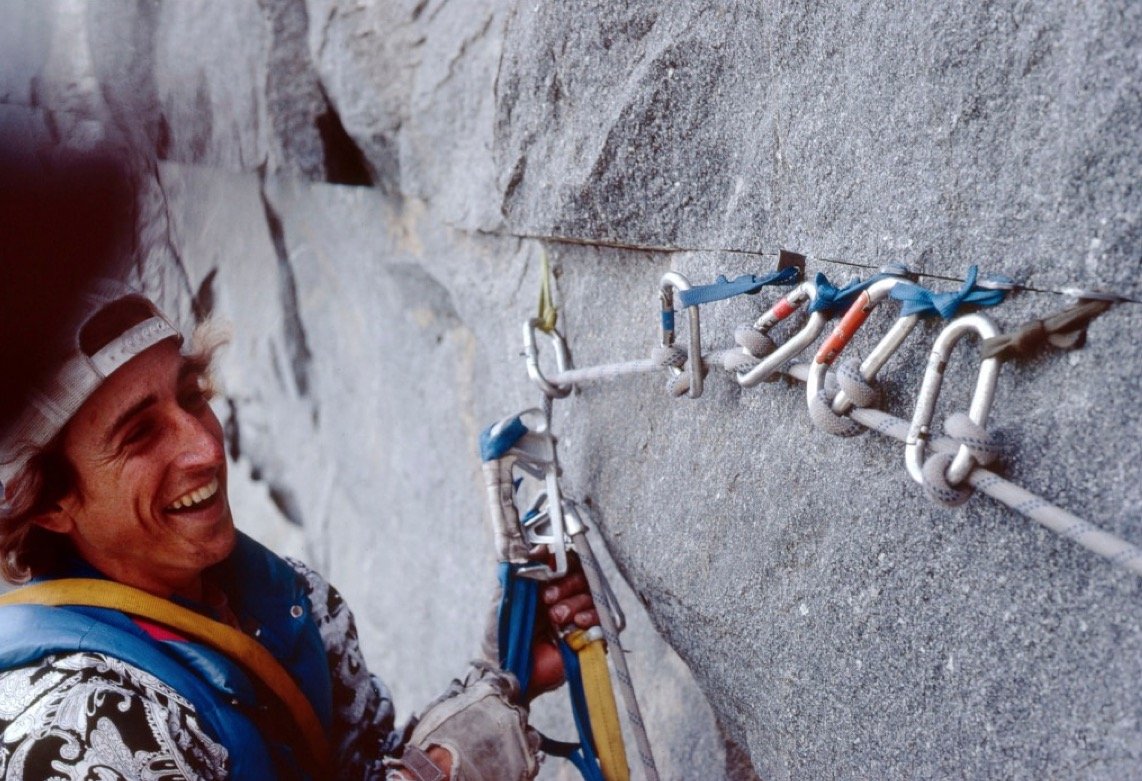
The series anchor is definitely not a new concept! Check out this classic photo from the early days of Yosemite climbing, which I caption as” “I’m so happy to still be alive after jugging this rope connected to a few RURPs strung together by clove hitches . . . (Photo by Dave Diegelman, climber, Dale Bard, Sea of Dreams, El Capitan, 1978)
Photo credit: Dave Diegelman
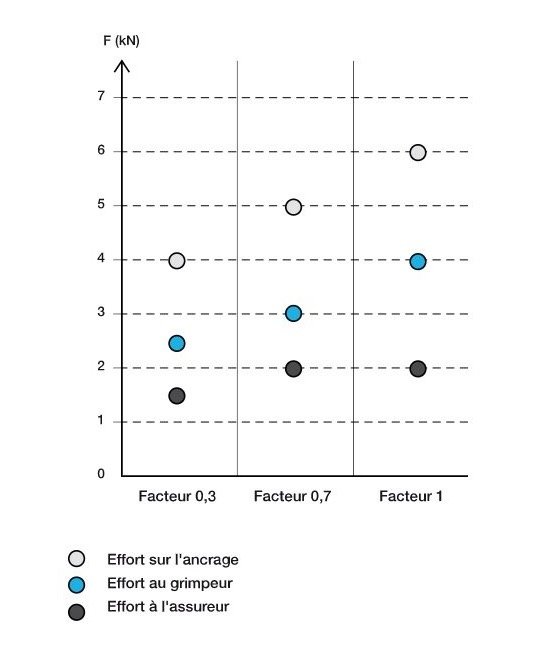
When considering how strong an anchor needs to be, it’s good to keep in mind the realistic forces it might be required to hold. Petzl did some very nice studies on this, showing what real world realistic forces are when you measure actual climbers instead of static weights in a drop tower. I have a whole article in that that, read it here.
Below is a great diagram from Petzl. If your French is a little rusty:
gray dot = force on the top piece of gear
blue dot = force on the climber
black dot = force on the belayer
The three different columns indicate different fall factors: 0.3, 0.7, and 1.0.
Even when catching a significant fall factor 1, the force on the bottom anchor is only about 2 kN, quite low! That’s good!
If you are belaying up your second and keeping the rope reasonably tight, the force should never get above 1 or 2 kN. Given this, trying to equalize that load between two bolts that can hold 40 kN combined may seem unnecessary.
FALL FORCES IN CLIMBING. IMAGE: HTTPS://WWW.PETZL.COM/US/EN/SPORT/FORCES-AT-WORK-IN-A-REAL-FALL
Let’s look at a few ways to make a series anchor.
Method 1: Series anchor with sling and double loop bight knot.
Typically made with a a 120 cm sling, with a double strand bowline on a bight, shown here. (A double loop bunny ears figure 8 works too.) Don’t worry about ring loading the bowline, it’s fine and it’s been tested. See the video below to learn how to tie the bowline on a bight. It’s a new knot for most folks. Can be on horizontal (photo 1) or vertical (photo 2). Vertical is better, but you gotta use what you have.
Using a sling:
makes block leading easier
simplifies self rescue
allows you to do a fixed point lead belay
Method 2: Series anchor with the climbing rope
You get some minimalist style points. You already have a nice strong dynamic rope, so use it if you like.
Downsides are the opposite of the 120 cm sling:
block leading is harder
self-rescue is more difficult
fixed point lead belay is trickier
Can be on horizontal (photo 1) or vertical (photo 2) bolts.
Here's a another version of the example just above. This one might work well for the very top of a route where there is a walk off, or a large secure ledge, because there's not much place for the second to easily attach when they arrive.
The set up as shown in the photo is not very ergonomic because the masterpoint is low. But you could extend the clove hitch from the harness, and the butterfly knot, if you want to conveniently stand at most any distance from the bolts that you want.
(Inspiration credit, IFMGA Guide Dale Remsberg, from his Instagram post.)


