

Alpine Tips

Friction can lower forces on an anchor
When rappelling, often the rope is going over a ledge. This added friction can make your rope pull more difficult, but it also reduces the force on the anchor, which can be a good thing. The greater the angle, up to about 90°, the less force is put on the anchor.
This tip comes from my pal and canyoning expert Kevin Clark and his book, “Canyoning in the Pacific Northwest: A Technical Resource.”
I did a live body test of this at the rock climbing wall in Marymoor park in the Seattle area. My friend Ryan from @hownottohighline shot the video. See the short Instagram reel and the results here.
Results:
me hanging fully on rope: 190 lbs on anchor
Rope angle from edge to anchor about 50°: 135 lbs on anchor, or about 30% less load
Rope angle from edge to anchor about 10°: 80 lbs on anchor, or about 58% less load
When rappelling, the maximum force on the anchor usually occurs just as the rappeller is passing over the edge on top of the pitch. Once below the edge, the load on the anchor is reduced by the friction from the rope passing over the edge. The more contact with rock the rope has, and the larger the angle, the lower the force on the anchor.
There are lots of factors involved, such as how slippery the sheath of your rope is, if the rock edge is rounded or sharp, whether the rock is wet or dry, the type of rock, etc.
With a rope that runs over the edge at a 45° angle, the load on the anchor can be reduced by as much as 50%.
If the rope passes over the edge at a 90° angle, the load reduction can be as high as 66%.
If your anchor is questionable, that's probably a good thing. The trade-off is your rope is going to be harder to pull.
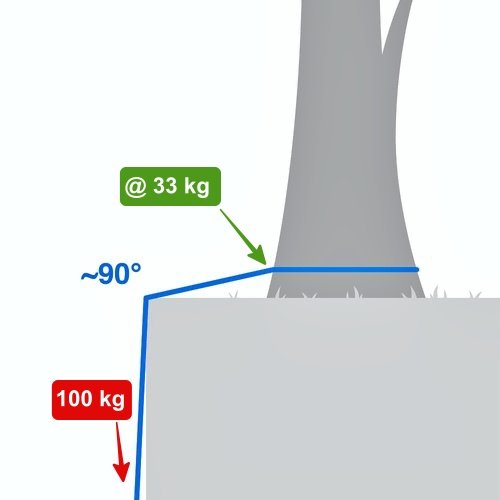
Let's look at some examples. Let's assume our rappeler weighs about 100 kg.
Example 1: The rope is anchored to bolts hanging over the edge of the cliff top. There is zero friction from the cliff edge. Our 100 kg rappeler puts a 100 kg load on the anchor. Hopefully that should be pretty obvious. (And yes, starting your rappel from a position like this might be a bit difficult.)

Example 2: Instead of using the bolts, the climber is now rappelling from a sling they put around the tree about, say, head height. Yes, this can increase leverage on the tree, but if the tree is stout, it doesn't really matter. A higher anchor point is more convenient to get rigged and start your rappel.
(Sidenote, it's best practice to avoid rapping with your rope around the tree. Doing this can damage the tree, get tree sap on your rub, and make for a very difficult pull. Add a sling instead.)
This makes an angle of about 45° over the edge of the cliff. Once the climber is over the edge, how much force do we now have on the anchor?
Using that best case scenario of 50% force reduction, the load on the anchor is now about 50 kg.

Example 3: Instead of anchoring higher up in the tree, our climber decides to use the base of the tree. (This decreases the leverage on the tree, but might make it harder to rig your rappel.)
This makes an angle over the cliff edge of around 90°. Once the climber is over the edge, what kind of load do we now have on the anchor?
Assuming a best case reduction of about 66%, the tree only sees a load of 33 kg. Good trick if your tree (or other any other sort of anchor) is marginal!
Here are some other techniques to minimize the load on the anchor:
Interestingly enough, you can significantly increase the forces on the anchor in that brief second or two when your feet are on the edge of the rock and you are leaning backwards. This has an interesting force multiplier, even if it's just for a moment. If your anchor is marginal, you probably want to avoid doing that.
To counter this, you can get as low as you can when starting the rappel, perhaps even sliding over the edge. Canyoneers call this a "soft start.”
Pushing the rope down into the rock surface as you go over the edge to help maximize friction.
Keep a consistent load on the anchor, good rappel technique, etc. Don’t jump down the rock like a special forces cowboy.
Use footholds if possible to keep load off the anchor.

A closer look at the “American Death Triangle”
The so-called “American Death Triangle” admittedly is a catchy name, is not best practice for anchor rigging . . . and is not as bad as it’s reputation. Learn about why it's stronger than you might think, and the pros and cons of related rigging methods.
This article has contributions from Over the Edge Rescue, IFMGA Certified Guide Karsten Delap, and HowNot2.com
Short version: the American Death Triangle (ADT) is not a preferred method for rigging anchors, but it's not as bad as you might think. With anchor angles typical in climbing (under 90 degrees), the ADT puts about 100% of the load onto each anchor point; the exact amount depends on the angle. The main problem with it is zero redundancy; if the sling fails, so do you. If you have to use one in the wild, provided the sling is in good shape, you're probably going to be fine.
American Death Triangle: top rope setup

American Death Triangle: rappel setup

The so-called “American Death Triangle” (“ADT”) in the early days of climbing, was a fairly common way to build anchors. It uses a minimum amount of webbing, and offers good equalization. At first glance it appears to be serviceable, even if it ignored a few basic rules of physics. Plus, you have to admit it's a catchy name!
However, for a long time it’s been roundly slammed in just about every climbing book ever written. “Don’t use it! Load multiplication! It creates dangerous forces on the anchors!” is usually about the extent of it.
Overall, that’s good advice. There are almost always better options for rigging that are redundant and put lower force on the anchor points.
But, you might wonder, how bad is it, really?
Before word got out that they weren't so great, ADTs were used for probably tens of thousands of anchors over decades. Did you ever hear of one failing? Are “catastrophic” forces really being created? If someday you have to use one in the wild, is it a YGD (Yer Gonna Die) scenario? What about other related configurations, like rappelling off of side-by-side rings, or lowering off of an adjacent route, or slinging a big boulder, that are sort of the same thing?
While the ADT may not be as bad as you might think, there are some reasonable concerns (listed in rough order of importance)
It’s not redundant. In the photos above, any failure of the sling/cord means the whole anchor fails. That's the primary problem!
It can put a inward / sideways pull on your gear, which could be an issue. For example, a piton in a horizontal crack could be plenty strong enough for a downward pull, but maybe not for an inward pull. More on that below.
It can increase the load onto the anchor points. The amount of this increase is related to the angle at the bottom of the triangle. It's rarely more than 1X the actual load onto each anchor point. More on that below. If the anchors are reasonably solid, this is probably not a concern.
You're only using the strength of a single strand of the material, instead of doubling it up, which increases the strength.
If one anchor point failed, it's likely you’re going to have some extension onto the the remaining piece, no bueno.
Since load multiplication is the main concern most people have, let's look at that first. (We’ll keep the physics and math as simple as possible, I promise!)
Pretty much every “Climbing Anchors 101” class has a diagram something like the one below. The smaller the angle between the two legs, the better the load sharing on the anchor points. As you get close to 180°, like on a slackline or Tyrolean traverse, the load multiplication gets ridiculous. This is for sure a good principle to keep in mind for standard anchor building.
Do you remember a vector force diagram like this from your anchor class? I suspect that this is at the root of the idea that the ADT causes high forces: “Horizontal rope in anchor ALWAYS equals super duper load multiplication.”
However, this does NOT apply to the ADT, where are the load direction is completely different from the diagram below.

image: https://www.ropebook.com/information/vector-forces/
Let's check the numbers
Here’s a nice chart from “Rock Climbing: The AMGA Single Pitch Manual” by Bob Gaines and Jason Martin. This is the only book I’ve seen with actual data on the ADT.
The second column, “V rigging”, refers to a standard way of clipping a sling to each anchor, making two arms, and then tying it off with a bight knot.

source: “Rock Climbing: The AMGA Single Pitch Manual” by Bob Gaines and Jason Martin
Turns out, with a 100 lb load and a small bottom angle of approximately 30°, there’s only 82 pounds of force being put on each leg of an ADT anchor. That’s a bit more than the 52 pounds or so on each leg with standard “V rigging”, but nothing close to catastrophic.
Even at a 90° angle, about as large as you would normally want to go, the ADT only puts 130 pounds on each anchor. Again, not close to catastrophic. (If your anchor placements can't hold 130 pounds, you've got some much bigger problems!)
So check that out, load multiplication is not really a problem!
For you engineers and more visual folks who want to see the math behind this and some nice diagrams, check out this webpage from our New Zealand friends at Over the Edge Rescue.
Rappelling on adjacent rings?
I've heard this question a few times: What about rappelling on adjacent rings? Does that create any sort of a dangerous death triangle? Short answer is no. The angle created by your rappel device in the photo is quite small, 30° or less. This creates a load on each anchor point that's just a bit more than your body weight. The bolts can easily handle that, plus they can take a load in any direction, so no worries. (Check out the HowNot2com video link at the bottom, at around 12 minutes, to see some testing on this.)

Stone hitch?
Here’s a similar situation. There’s a Stone hitch tied below the anchor, which isolates each strand of rope, typically so you can rappel on a single strand.
Does this create a dangerous ADT on the anchors? Yes it's an ADT, but with those bolts it’s certainly not dangerous. For rappelling, where the load is never going to be more than 1-2 kN, load multiplication is of no concern.

Lowering from an adjacent route?
Scenario: Say you have two different bolt anchors that are the same height at the top of the climb. If you climb the left route, clip 1 anchor, traverse to the right, clip the other anchor, and then lower off without pulling your rope through the first anchor, are you making any sort of dangerous ADT?
Answer: no. A clever engineer friend of mine calculated that the force on each anchor is just a little over the climber’s body weight. (To be more specific, the right anchor takes about 1.25x the climber’s weight, and the left anchor takes about 0.9x the climber’s weight.) So the takeaway: no problem!
If you do this, be aware that you’ll need more rope to safely lower your partner to the ground, so be SURE your rope is long enough!

What are the real world forces?
In the “rappel setup” photo near the top of the page, the joining knot is on the legs of the triangle between the load and the anchor. What if we put the knot on the base of the triangle instead, horizontally between the anchor points? Would the knot see increased forces, or decreased forces?
In the photo below, we have an approximate equilateral triangle, with 60° in each leg, and the joining knot, a Flemish bend, between the two anchor points. Say we have a load of 100 kg hanging off of the rappel ring. Will the knot see less than, equal to, or greater than 100 kg? Take a guess!
Answer: quite a bit less. That's because the friction on each of the anchor points absorb some of the load. The actual amount depends on the slickeriness of the material you're using, and what it's actually running through at the anchor, but the takeaway is that the base of a triangle sees the lowest amount of force. Is that surprising? It was to me!
(Note on the photo below: yes I know you could put your rope directly through the rappel rings and ignore the entire ADT rigging, but I needed to set up like this to get a equilateral triangle with the length of cord I had . . . =^)

The theoretical force on each bolt would be the same as the load, or 100 pounds. But because the cord is running through the rappel rings, this friction actually reduces the force going to the hangers, which is a good thing. With a 60° equilateral triangle, about 80% of the load goes to the bolt, and about 36% is seen by the knot (a Flemish bend, in case you’re wondering).

Below is a screen grab from our friends at HowNot2.com who tested pretty much the same set up.
With a load of 2.4 kN at the master point:
the base of the triangle between the anchor points saw a load of 0.9 kN, about 36% of the load.
each bolt saw a load of 1.96 kN, about 80% of the load.
(There's a link to the whole video at the bottom of the page.)

image: HowNot2.com, screeng rab from: https://www.youtube.com/watch?v=7sQNpjnJe40
Changing the direction of force
Here's a diagram that shows a bit how that works. (Original diagram credit: Over the Edge Rescue).
In the diagram, we have an ADT with angles of 60° on each side, an equilateral triangle. “A” are the two anchor points, and “L is the load.
Check out the blue arrows pointing inward from the anchors. This is known as the “resultant”, and it's the change in direction of force caused by the ADT. This means that instead of having the force going down the legs of the anchor directly to the load, it's instead directed inward, halfway between the base of the triangle and the two legs.
In this example, if we have a load of 100 kg at the bottom, 0.6 of that load (red circles, 60 kg) goes to each leg of the anchor. This results in a theoretical force of 100 kg on each of the two anchor points, pulling in the direction of the blue arrows. (As we saw above, in the real world because of friction, this force on the two anchor points would be reduced, but for here let's use the theoretical model.)

Here's an example of how this “resultant” force might cause a problem: two pitons in a horizontal crack. Either of these would probably be good for a more downward pull, which we would have with a “V rigged” anchor.
However, the ADT puts a larger INWARD force on the pitons, which could cause them to fail. This is another problem with the ADT, loading gear in a direction you may not have anticipated.
(image credit: Karsten Delap

image credit: karsten delap, from: https://www.youtube.com/watch?v=bW15yKu1ATM
More resources . . .
Sheesh, the ADT even has its own Wikipedia page!
Our New Zealand friends at Over The Edge Rescue have an article that will appeal to the engineers.
IFMGA Certified Guide Karsten Delap has a nice article on his website, along with the video below.
HowNot2.com has a detailed video on the ADT.

Retreat anchors - sport climbing
If your ambition sometimes exceeds your ability, a sudden storm is rolling in, or you discover your rope is too short to reach the anchor, it's probably time to think about bailing off of that sport route. There are a few considerations for gear, and one crafty rope trick you can use to reduce your risk.
Note - This post discusses techniques and methods used in vertical rope work. If you do them wrong, you could die. Practice vertical rope techniques with a qualified instructor, and ideally in a progression: from flat ground, to staircase, to vertical close to the ground before you ever try them in a real climbing situation.
Takeaway:
Dos: Lowering off of a single snapgate carabiner is probably gonna be fine. If you're not comfortable with that, use a locker or put some tape on a snapgate.
Don’ts: Avoid using quicklinks, because they can be hard for the next person to open and complicate others using the route. Don’t lower off the hanger, nad for sure don’t lower off a sling!
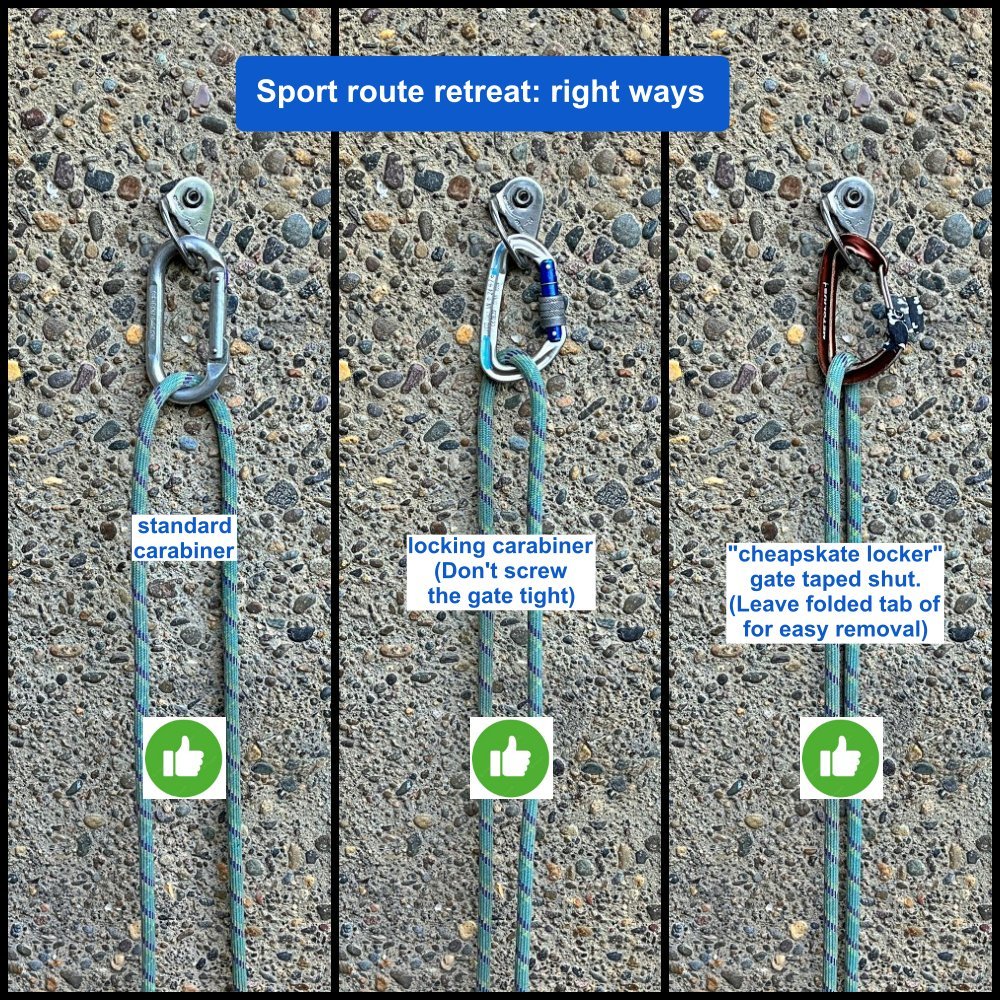

Not comfortable lowering off of a single snap gate carabiner? Make a “cheapskate locker” with a few wraps of tape securing the gate. Stick the tape end to itself to make a tab for the next person to clean more easily.
Is this a little harder for the next person at the route to clean? Yes.
Is making it convenient for the next person more important than your comfort and level of acceptable risk when lowering off one bolt? No.
Ever bailed from a sport route? If not, it's probably going to happen someday, and when it does, you’ll need to have a retreat strategy.
When you bail from a route, be at a one pitch sport climb or an alpine multipitch, the objectives are similar: Get to the ground in one piece, with each anchor point strong enough but not overbuilt, and leave a minimum of gear behind.
Reasons to bail on a sport climb include:
“Ambition exceeding ability” - the climbing is too hard for you to complete
It’s getting dark, rainy, lightning, etc.
The route is longer than the rope you’re using, meaning for a one pitch sport route, the middle mark of the rope goes through your belayer’s device before you make it to the anchor. Hopefully you have both an attentive belayer who notices this, and a good middle mark on your rope. (Next time, bring a longer rope and read the damn guidebook!)
Hopefully, you’re on a modern sport route that has properly stout bolts and hangers. If you trust a bolt to take a lead fall on, you should certainly trust it to be gently lowered from, right? One encouraging thought: the maximum force possible on an anchor when lowering is not much more than double your body weight, 2 kN (about 450 lbs), which should be well within the strength rating of even a poorly placed bolt.
If you happen to be on a bolt that looks sketchy, you can reduce the force on the bolt by rappelling instead of being lowered. This puts only your bodyweight on the bolt. Because of the pulley effect, lowering puts approximately two times your bodyweight onto the anchor. Hopefully the next bolt lower down inspires a little more confidence.
What if you’re bailing from one pitch sport route, and more than half of the rope has already been used? Well, that means you can’t lower off from that point and make it to the ground or the previous anchor.
First, make SURE your belayer is tied into the rope end or at the very least has a knot in the very end (aka a “closed rope” system) so they can't drop you. There are a few different ways to handle this, but this is probably the easiest one: Lower to one bolt fairly close to the ground, tether yourself to that bolt, pull your rope, and then lower off again from that lower bolt. Yes, this requires you donate one more carabiner.
Are you bummed you're leaving gear behind? Of course you are. Think of it as the price of a lesson in humility and judgment, and try to do better next time.
Safety note: Do not thread the rope directly through a bolt hanger for either lowering or rappelling! The sharp edge might damage your rope, and if you rappel, the extra friction might make it impossible to pull your rope down. Please, never consider doing this and always leave behind a $5 carabiner instead. (Scroll to the bottom to see one possible solution if you come across anchor bolts with no hardware.)
You can lower from basically four gear options:
regular carabiner
locking carabiner
quicklink / maillon
taped gate carabiner
1) Regular carabiner. Most of the time you can pilfer a carabiner from one of your quickdraws, leave it on a bolt, and lower off that.
This is probably going to be fine most of the time, because if you have a smooth lower under a constant load, it would be quite difficult for the rope to do anything weird in the carabiner. But the load may not be constant: you may have to start/stop, bypass ledges or vegetation, stop and clean gear, etc. All of these could cause some strange carabiner jiggling, cross loading, or some other unwanted some rope/carabiner weirdiosity. So because of this, many people are more comfortable with something that can be locked.
If the bolt you’re lowering from doesn’t give you a warm fuzzy feeling, then leave another carabiner on the next bolt down. In the highly unlikely event of the top bolt failing, you should be caught by the next one. Yes, this does involve leaving behind a second carabiner. (That's never happened in the entire history of climbing as far as I know, but hey, it's cheap insurance.)
2) Locking carabiner. Not only is this a secure option, it makes it easy for the next person up to clean and remove it. That's a big bonus, so this is a fine choice. (Don't crank the gate down too hard.)
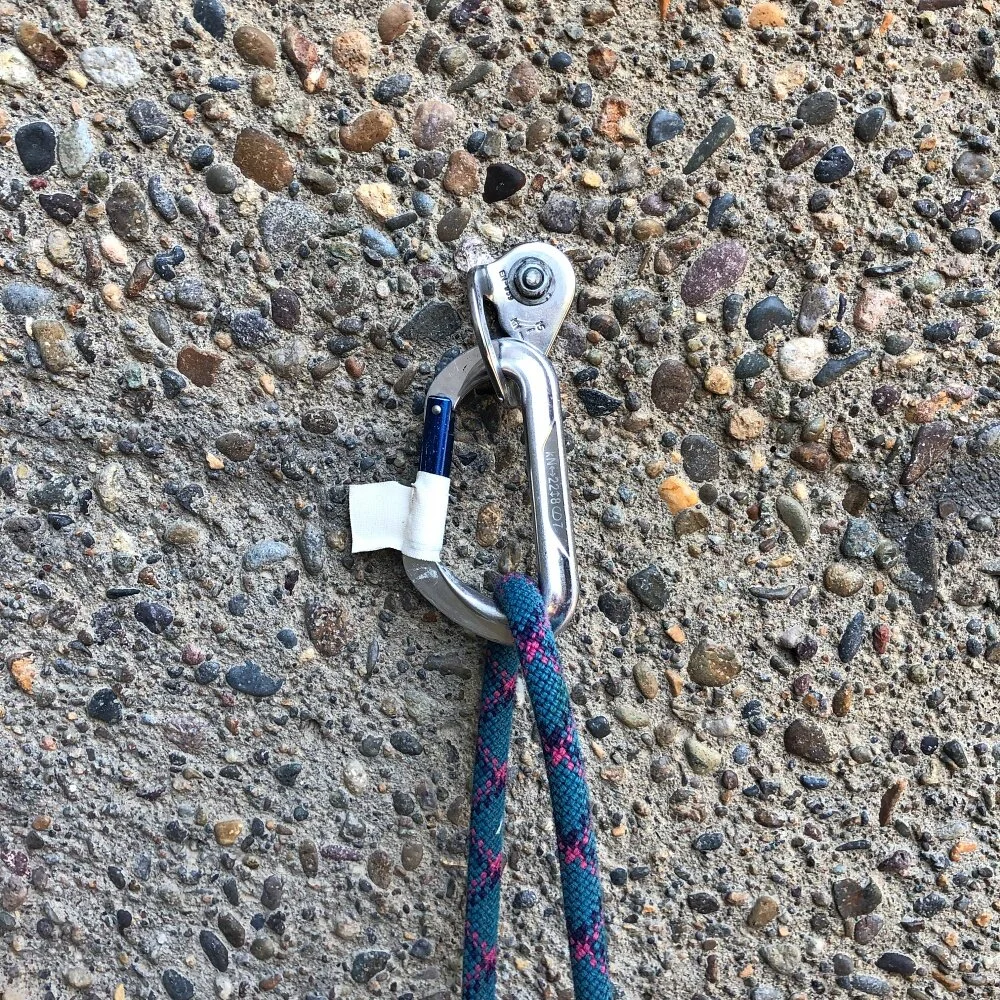
3) Quicklink / maillon. These offer an inexpensive locking lowering point, but they have a couple of downsides. The locking sleeve on the quicklink is probably going to cinch down, maybe get rusty, and be hard to open without pliers, which makes cleaning it problematic. It's more courteous to leave the route in better shape for the next person by lowering from an easy-to-clean carabiner instead.
Plus, depending on the size of the hanger, the next person on the route may have a hard time clipping their quickdraw past the quicklink. If you come across a quicklink (or something similar) on a hanger and you can't remove it, it's best practice to clip your quickdraw directly to it or under the link, as shown below.
Plus, quicklinks are a bit heavy and a single use piece of gear, and for that reason alone many people choose not to carry them.
If you clip a quickdraw on TOP of a quicklink in the same hanger, it can lever the carabiner and actually break it yikes! See this Instagram video of it actually happening in real time.

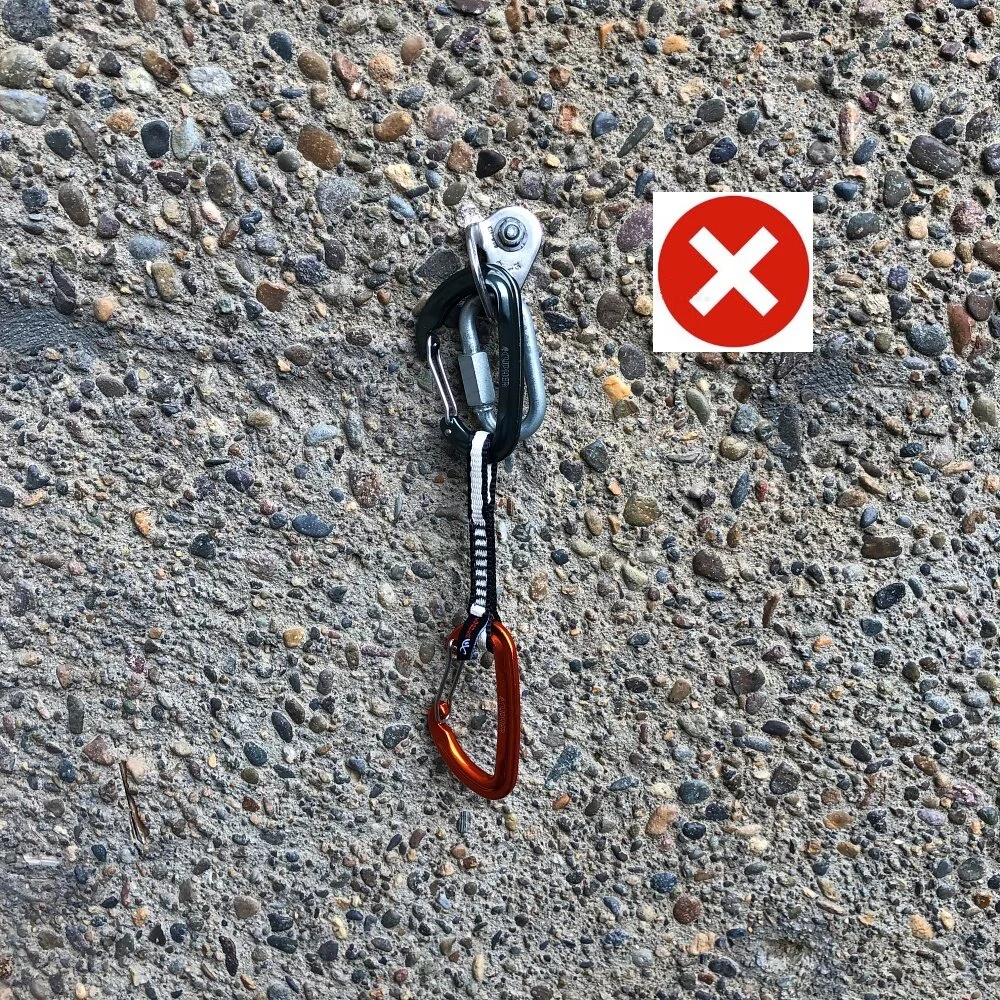
Photo from instagram.com/zacwronski/ showing a carabiner that broke after being clipped on top of a quicklink, yikes!.

image: instagram.com/zacwronski/
4) Taped gate carabiner (aka cheapskate locker). Here's a simple and inexpensive option that only requires a bit of forethought. If you have a tiny roll of tape on your harness, a strip or two stuck inside your helmet, or a premade “bail carabiner” with some tape already wrapped around the spine, you can tape the gate of the carabiner closed. This is known in some circles as a “cheapskate locker.” (Thanks to IFMGA Guide Jeff Ward for the “pre-made bail carabiner” idea, wish I thought of that one!)
Although you might think this looks a little sketchy, the cheapskate locker has been used by big wall climbers for decades, and is “super-good-enough” as an improvised lowering point. Provided you have the tape, this is a low cost, secure, and easy-for-the-next-person-to-clean method.
Please be courteous for the next person up the route who is going to clean this: fold over the end of the tape on itself to make a little tab, so it’s easy to unwrap.
When I posted this on Instagram, I had a fair number of comments criticizing it for being “hard to clean”. To those people I say:
Someone’s right to choose the method and level of risk tolerance when lowering off a single bolt is more important than slightly inconveniencing the next person up the route, IMHO.
If you seriously think this would be hard to clean, perhaps you need to work on your clipping skills.
Dealing with this carabiner should not be a surprise in most cases, because you hopefully spotted this from the ground before you started.
I’ve come across a taped gate, quicklink, etc. on hangers many times. I’ve never had an issue. Simply clip a quickdraw under the quicklink / carabiner (most all modern bolt hangers have room for two carabiners.) Keep on climbing, and clean it when you lower off and have two hands free.
If you want to clean it on the way up, clip the rope to your draw, and call for a take. Remove the tape or locking carabiner. Again, hopefully the previous person was courteous and left you a little tab of tape to easily unwrap it.
Did your redpoint get ruined? Boo-hoo. (Look on on the bright side, you bootied a carabiner. =^)
Pre-made bail carabiner: Wrap a few inches of athletic tape around the spine. Use it as a regular carabiner for any purpose; the tape is always there when you need it for a cheapskate locker.
Make it easy for the next person to remove it by folding the tape onto itself to make a little tab.


A suggestion from Petzl:
While a bolt failing during a body weight lower is very, very, unlikely, here's one way to reduce your risk if you're concerned about it.
If you add a friction hitch to the rope going down to your belayer, and slide this along as you’re lowered, it might prevent you from taking a ground fall if the top piece fails (extremely unlikely) in some way. If you're doing this, you should only take a fall down to the next piece/bolt below you, because it isolates the increasingly larger loop of rope that’s being created as you descend. One more reason to carry a prusik when you lead.
Would a fall on this be terrifying? Yes!
Might the prusik melt and damage your rope? Possibly yes!
Are both of these better than the alternative? Yes!
This may be little hard to visualize, so have a look at the nice illustration below from Petzl and hopefully it’ll make sense. According to the diagram, Petzl has tested this, and it works. (Note the diagram shows a quick link on the top bolt, but as mentioned above, a carabiner is recommended.)

image: petzl.com
Finally, a tip on not exactly bailing from a sport route, more about what to do if you come across a pair of bolt hangers that don't have any rings / chains / rappel hardware.
This happened to me at Smith Rock. My partner and I climbed a route that was brand new; so new that the route developer had not yet put chains at the top. We finished the route, and found just a pair of bolt hangers. After some head scratching, we decided to clip one carabiner to each hanger and lower off. This got us to the ground, but the rope was very difficult to pull, and we had some nasty rope twisting, because the carabiners were lying flat against the rock instead of perpendicular. Lesson learned! (Here's a longer article that explains this phenomenon.)
Here's one of many ways to deal with this, assuming you have a cordelette.
Pass a bight of your cordelette through each of the bolt hangers, making a big letter “M”.
Bring the loops together, tie them off in an overhand knot, and add a cheapskate locker. The cord is doubled up going through the hangers, which should give a little more peace of mind. While certainly not ideal for a long-term anchor, it’s definitely strong enough, and fully redundant, to rappel on. The cost is about $10 for the cord and $5ish for the carabiner; less than leaving behind two quickdraws.

Here’s a close up of the cheapskate locker.


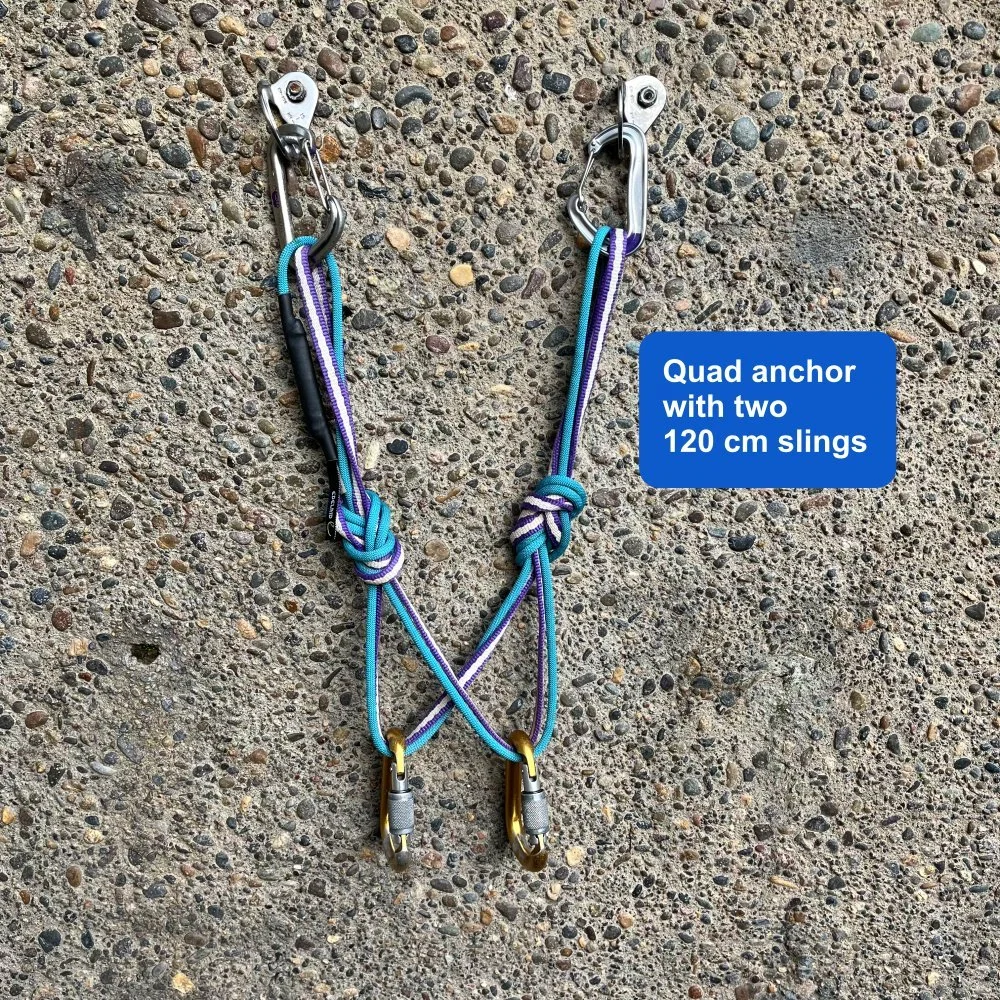
Quad anchor with two 120 cm slings
The quad anchor is a popular choice, but usually requires a 180 cm doubled sling or bulky cordelette. What if you don't have that gear with you? Here's an alternative: Simply use a pair of 120 cm slings.
The quad anchor is an increasingly popular choice for many climbers. (See a detailed article about the quad here.)
The standard way of tying it, with a doubled 180 cm or 240 cm sling, works great, provided you have that gear with you. However, those slings are unusual sizes, and can be hard to find.
What if you want to make a quad anchor and all you have is a pair of 120 cm slings? No problem. Put them together, tie two bight knots, and you’re good to go. Tip: Try to tie the bar tack sewing in one of the two loops (above, it's in the left.)
In the photo, notice we have a figure 8 on a bight rather than an overhand knot. This has a couple of benefits:
It uses up a bit more cord, which makes your master point higher, which is usually more ergonomic
The extra bend in the figure 8 makes it easier to untie after its been loaded
The photo shows a newer Metolius 11 mm Dyneema sling, paired with an Edelrid Aramid cord sling (one of my favorites for anchor building.) Strong anchor, simple (easy to inspect) completely redundant, fast to tie, zero extension if a sling were to fail, and a pair of (pretty darn well) equalized connection points. Bonus: using the blue Aramid cord it makes it much easier to untie as well.
If the bolts are very close together, you might be able to tie a quad anchor with a one 120 cm sling. However, doing this takes a fair bit of fiddling to get the knot and bar tack in exactly the right place, so I much prefer to use a 180 cm sling, or this method.

A quick rope anchor for rock horns or trees
Alpine terrain can offer single point anchors like a rock horn or tree. Provided it’s unquestionably strong, here’s an elegant way to use these single point anchors. Pass the rope around the tree or rock horn, and tie an overhand knot (BHK) in both rope strands. This secures you, and gives a convenient double loop to belay your partner.
Note - This post discusses techniques and methods used in vertical rope work. If you do them wrong, you could die. Always practice vertical rope techniques under the supervision of a qualified instructor, and ideally in a progression: from flat ground, to staircase, to vertical close to the ground before you ever try them in a real climbing situation.
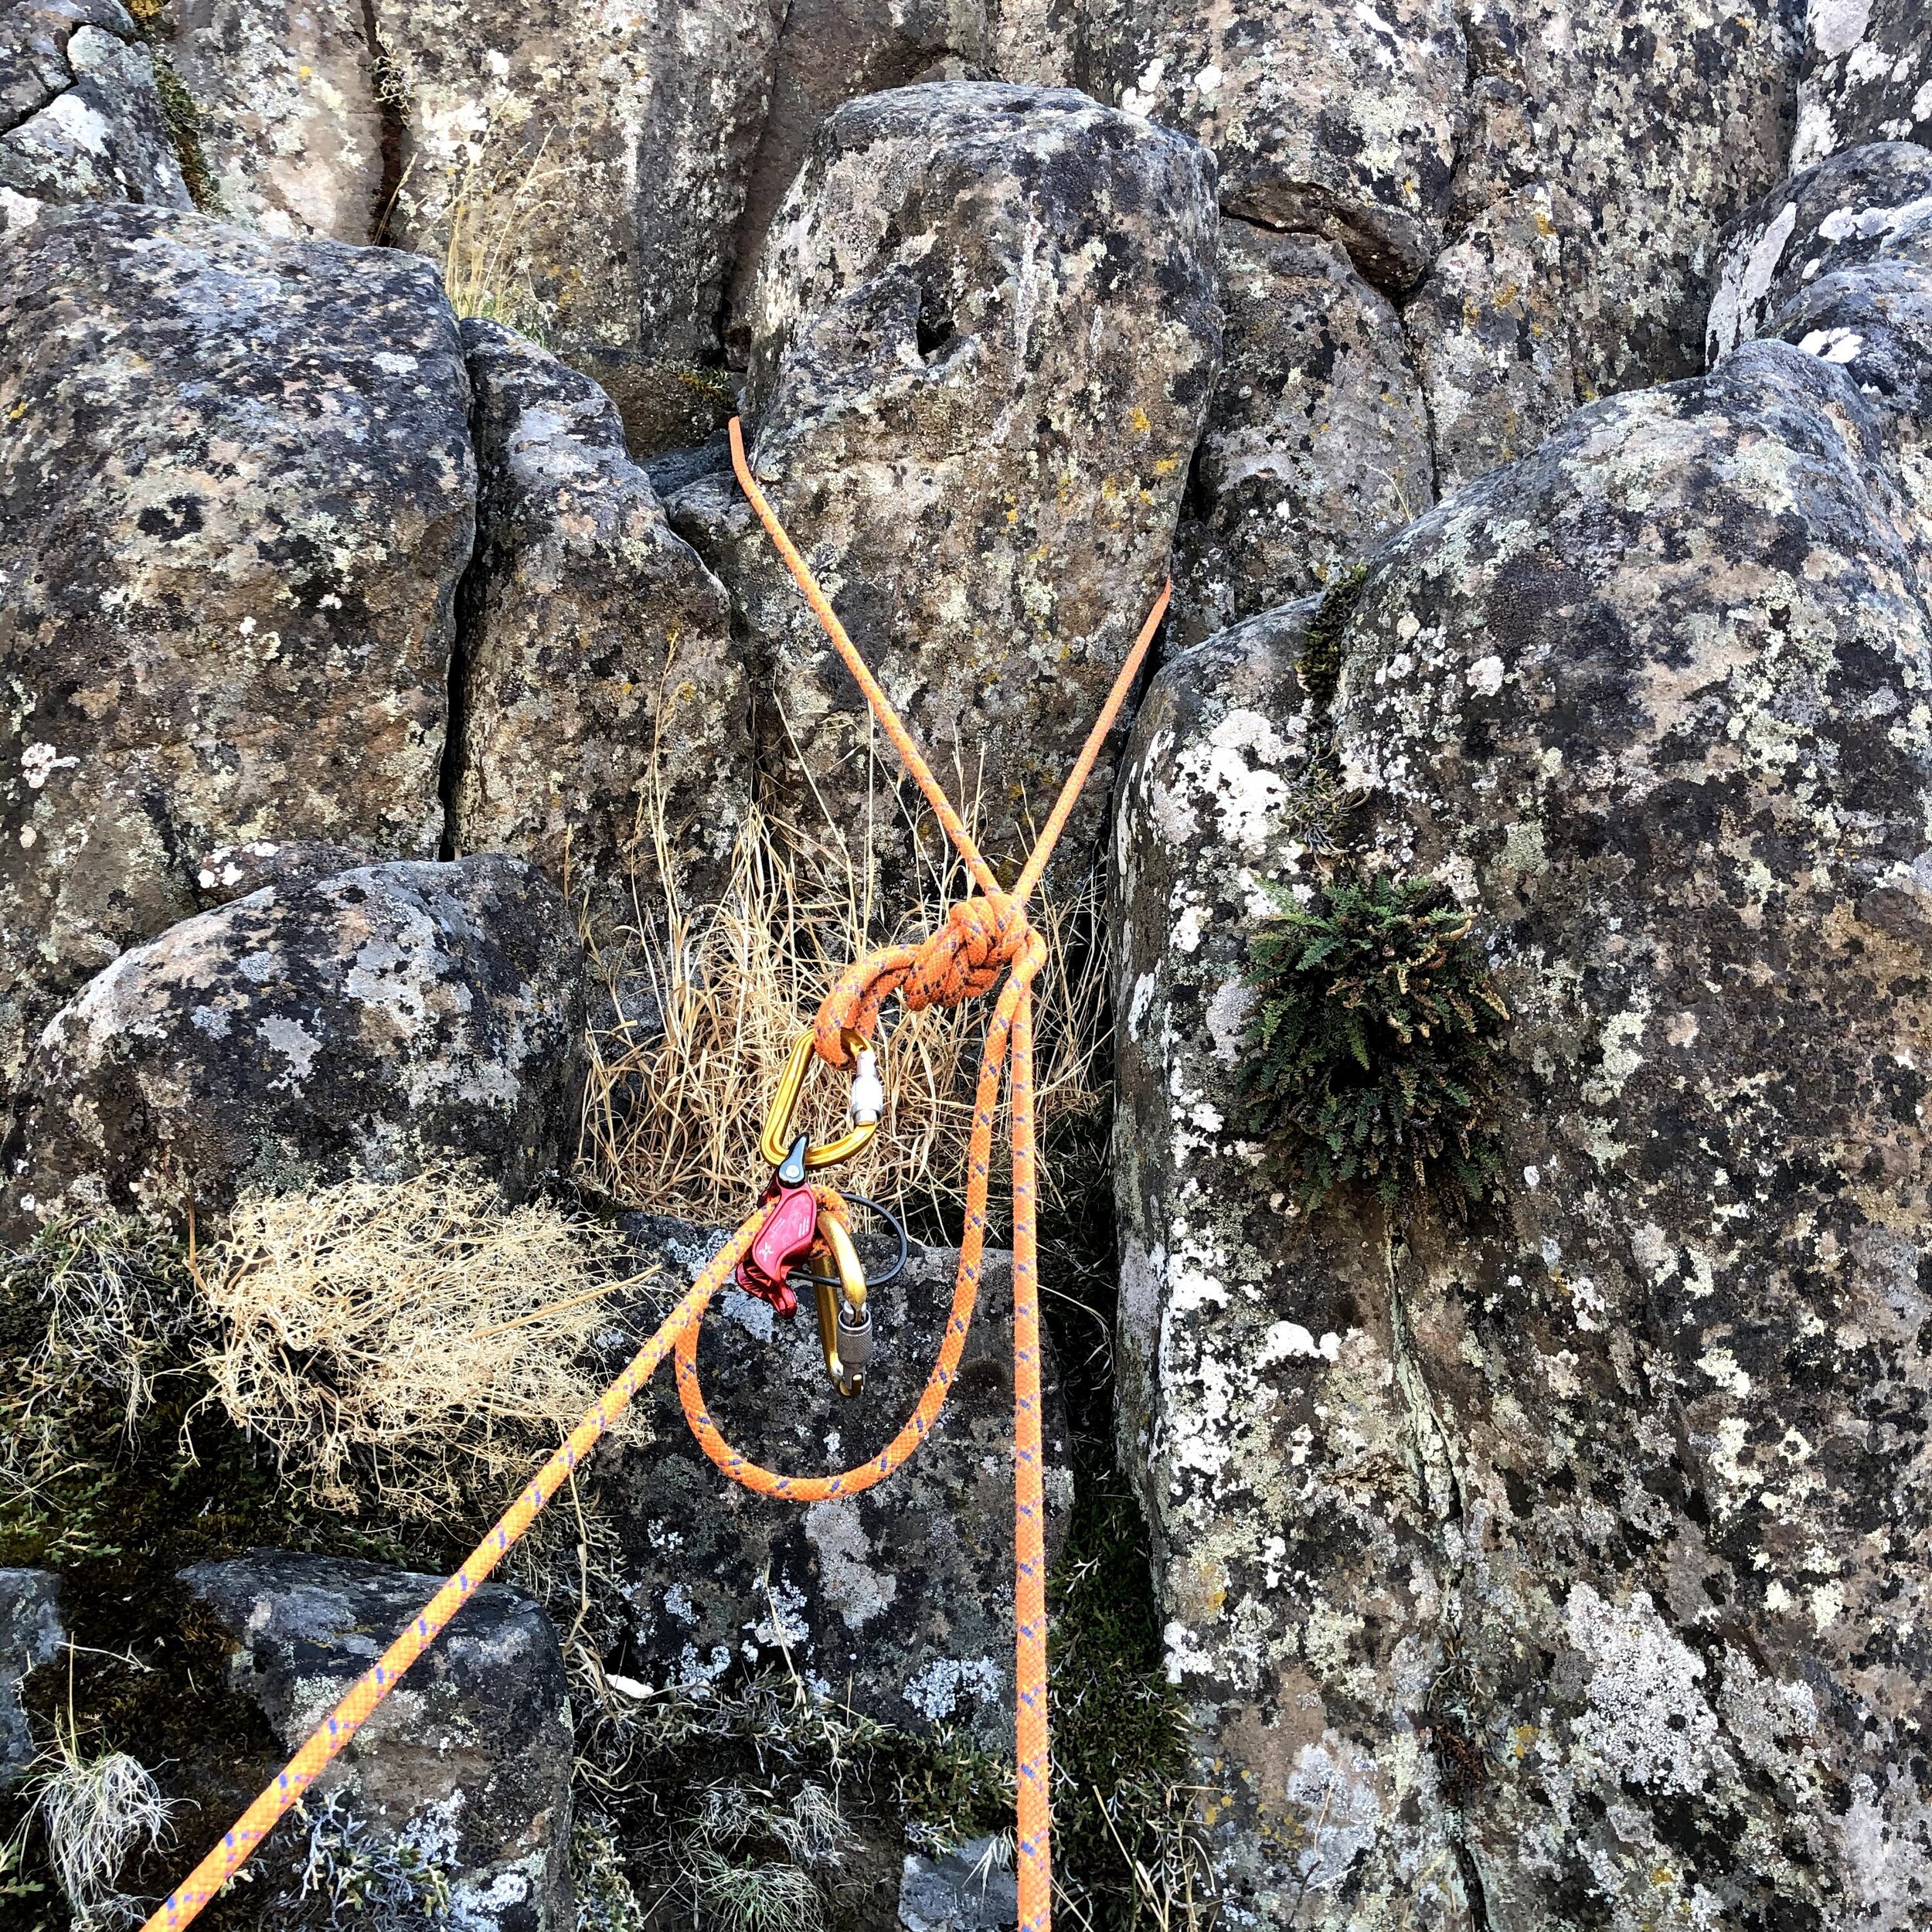
Here’s a quick and effective way to make an anchor with your rope around an extremely sturdy single point anchor. This is typically a substantial tree or unquestionably strong rock horn.
In this case we’re using a rock horn. If you have a tree, you can walk around it, or if that's not possible, put a long sling / cordelette around it and clip the rope to the sling with a locking carabiner.
If you're using a rock horn, it's probably not good for much of an upward pull. So, if that's the case, and this is your only anchor point, it's best used at the top of a climb when the next step is to walk off or rappel.
Note, in the photo above, there is a very short bit of rope between the knot and the belay device. This was done to keep the photo uncluttered; in real life, you’d have some coils of extra rope here.
Here's how to do it.
Find a rock horn that is unquestionably strong and doesn't have any sharp edges around the back. (If using a tree, it's good if it’s not a conifer with sap on it; getting sap on your rope is not fun.)
Pull up a couple of meters of slack, and toss a loop of rope over the top of the rock horn.
Step down below the rock horn a bit, so there's no chance that the rope can lift over the top. Tie an overhand on a bight knot using both strands of rope. In some circles this is known as a “BHK”, or “Big Honkin’ Knot”.
The BHK now secures you (in the photo, that's the strand on the right). It also creates a convenient double loop where you can clip your plaquette belay device, insert the rope, and bring up your second. If you need to shorten up the distance between you and the BHK, tie a bight knot to take up some slack.
Done!
Now, in fairness, let's look at some downsides of using your rope to make an anchor like this.
It could get damaged from being loaded around a sharp edge of the boulder / rock horn.
If you put it around a conifer tree, you could get tree sap on your rope, no fun.
It makes escaping the belay if you need to do some kind of self rescue a bit more of a problem.
On a multi pitch route, if you’re seconding, when you break down your rope anchor it introduces more slack that your partner above you now needs to take up.

Multi directional placement with two opposing stoppers
Rigging two opposed stoppers is a good trick to make a single multi directional placement. This is typically rigged with a clove hitch, which to be honest usually doesn't work too well. Here's an improvement: wrap the sling TWICE around the top carabiner, and then tension it. The double wrap holds the tension, letting you more easily tie it off.

Rigging two opposed stoppers/nuts in a vertical crack it's kind of an old-school trick, which dates back to the Paleolithic era before cams were invented. But even today, it can be a good tool for those times when you need a multi directional placement and are low on cams, or want to preserve them for further up the pitch.
Basically, it can make one good placement out of two lousy ones!
When might rigging opposed stoppers be helpful?
The first piece when leading a trad pitch, to prevent an upward pull from zippering out your gear.
Setting up a belay anchor that needs to take a potential upward pull, such as a fixed point lead belay
Top rope soloing, where you need to set an anchor to take an upward pull
Clipping a Micro Traxion or Tibloc for simulclimbing
You are starting out in trad climbing, have a small rack of expensive cams, and prefer to use them for lead climbing and not anchor building
This “opposing two stoppers” trick is typically done with a clove hitch. However, many people find the clove to be tricky to tie and snug down, and that the clove doesn’t maintain tension very well between the placements.
Here's an alternative that I prefer. The #CraftyRopeTrick here is to pass the sling TWICE around the top carabiner, with the second pass going BETWEEN the strands of the first pass. Then pull down to tension the sling. This double wrap maintains sling tension, making it much easier to tie a final half hitch to secure the whole thing.
Caveats . . .
You need a good stance and probably both hands to do this.
Although you’re using two pieces, because there's only one downward piece, this essentially counts as one placement. (In other words, this is NOT a two piece anchor.)
As shown here, this technique uses two stoppers, three carabiners, and a sling. (You can save one carabiner by girth hitching the bottom stopper, yes it's strong enough.) Often simple placing a solid cam can serve as a multi directional placement, plus it's faster and uses less gear. This is simply one more trick in the toolbox for more advanced climbers.
Questions, concerns, grumbles . . .
“Does this create a 2:1 ‘pulley affect’, doubling the load on the top piece of gear?” No. Because of the half hitch at the end, it doesn't. It’s a bit hard to describe, but give it a try and see for yourself.
“Does this create a vector/outward load on the gear which greatly increases the force on the placements?” It doesn't. The only force on the gear is going upwards or downwards.
“What if you did this in a horizontal crack?” Then you would have some odd vector angles on this anchor and it would probably not be so strong. But, if that's your only placement option, then you might have to do it.
“Good luck doing this on lead.” Yes, this does take a good stance and probably two hands to rig, so you're probably not gonna do it in the middle of some hard pitch. But as part of the anchor when you're hopefully on a ledge, usually not a problem.
Like most climbing techniques, it’s a better show than a tell. Check the video below to see how it works.

The offset quad anchor
The quad anchor, typically tied with a 180 cm Dyneema sling, is an increasingly popular choice for bolted anchors or ice climbing. Here's a variation, the offset quad. This gives you two clipping points at two different levels, which can be helpful in certain situations.

The standard quad anchor works great for many anchor setups where you have two reliable bolts or ice screws. (While you can use a longer cordelette, many people find that a 180 cm or maybe 240 cm Dyneema sling, that’s 10 or 11 mm and fairly new, to be a more compact and lightweight option.)
Here's a simple variation: the “offset quad”. Rather than the standard method of tying it with four loops of the same length, you tie it with a long lower loop and a shorter upper loop. This can be helpful in certain climbing situations, such as:
Climbing with more than two people
Low anchors, where you may want to connect to the lower loop and belay your partner off the higher loop, because it's more ergonomic
Big wall climbing, where multiple staggered clip in points can be helpful
Rigging a redirected lower, where you are lowering on a tube belay device and you need to redirect the brake strand through a higher point. Learn more about a redirected lower at this article.
Rigging a belayed rappel, where you want to redirect the belay through a higher anchor point. (Thanks to a clever Instagram reader for pointing this one out to me, I didn’t think of it.)
Small cautionary note: Check that the angle on the top two loops is ideally less than 90°, otherwise you can start multiplying the load on your anchor points. If the anchors are far apart and/or your sling is a bit short, perhaps you should consider another rigging method, like a standard quad.
Give the offset quad a try and see if it works for you!
Here’s a video from IFMGA certified Rock and Alpine Guide Karsten Delap showing how it's done:

Top rope directional for ice and rock
For top rope climbing on rock and especially ice, having a directional placement off to one side of the anchor has many benefits. Learn them here from guest author, ACMG Guide Sean Isaac.
Photos and article (used with permission) are from Sean Isaac. Sean is an ACMG (Association of Canadian Mountain Guides) certified Alpine guide, a former professional climber, and author of the “Ice Leader Field Handbook” and “How to Ice Climb” (2nd ed.) Follow @seanisaacguiding for more great tech tips.
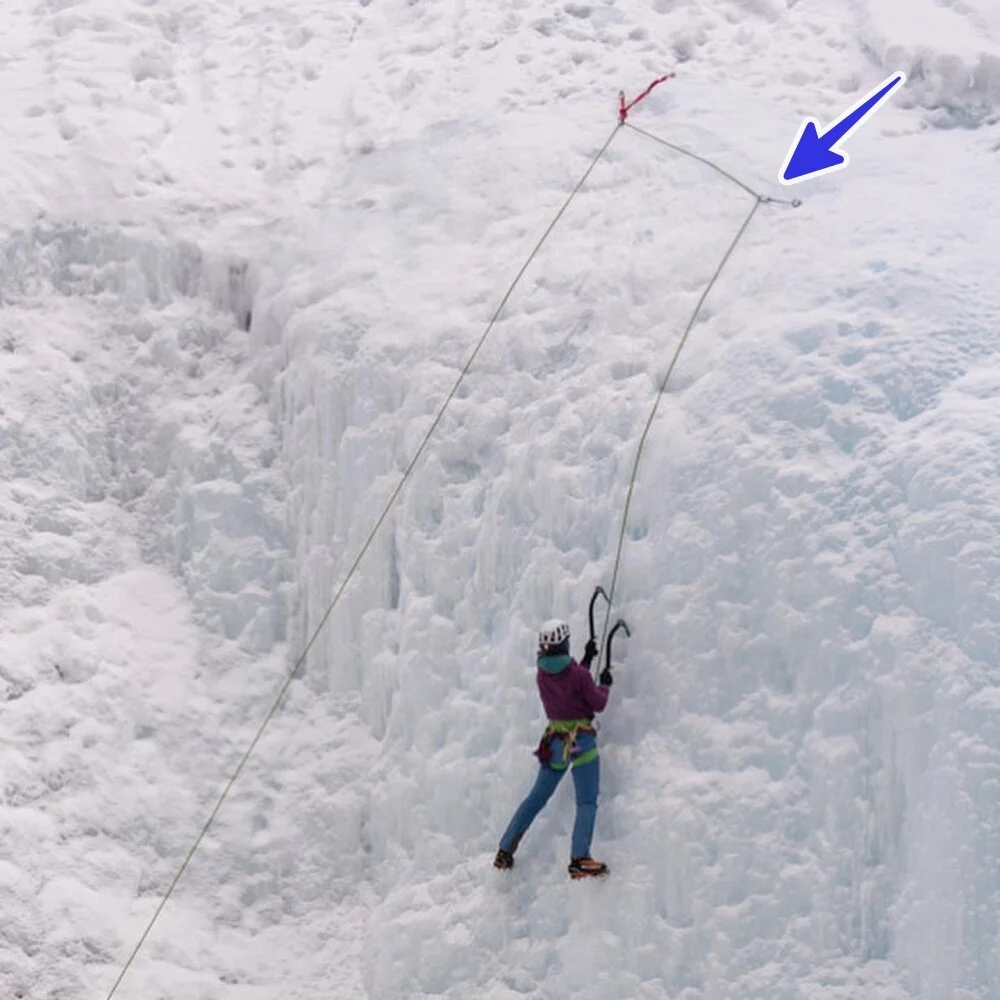
Using a directional protection point in top-rope ice climbing can significantly reduce risk and increase climber enjoyment. A top-rope directional should be used more often than not for many reasons.
One of the main ones: keep the belayer’s side of the rope away from the swinging ice tools of the climber. When rock climbing, it’s annoying when the belay rope slaps the climber in the back of the helmet, but in ice climbing this can be a major hazard. The climber can catch the belay rope behind them as they swing, which can result in either dropping the tool or putting a pick in the rope (I’ve seen both examples happen).
In addition, a top-rope directional helps to:
Keep the rope in line with the route and between ice tool placements (less chance of hitting the rope)
Keep the rope out of wet ice
Prevent a pendulum swing into hazards: ice pillars, hanging icicles, rock corners/dihedrals
Create two separate climbing lines from a single top-rope anchor
Keep the rope away from loose rock or sharp edges
Prevent swinging out away from the rock on steep mixed routes
Prevent climbers from going higher than you want them to (i.e. over a bulge, too close to an ice anchor, out of sight, etc)
Prevent the two strands of rope from crossing and twisting around each other
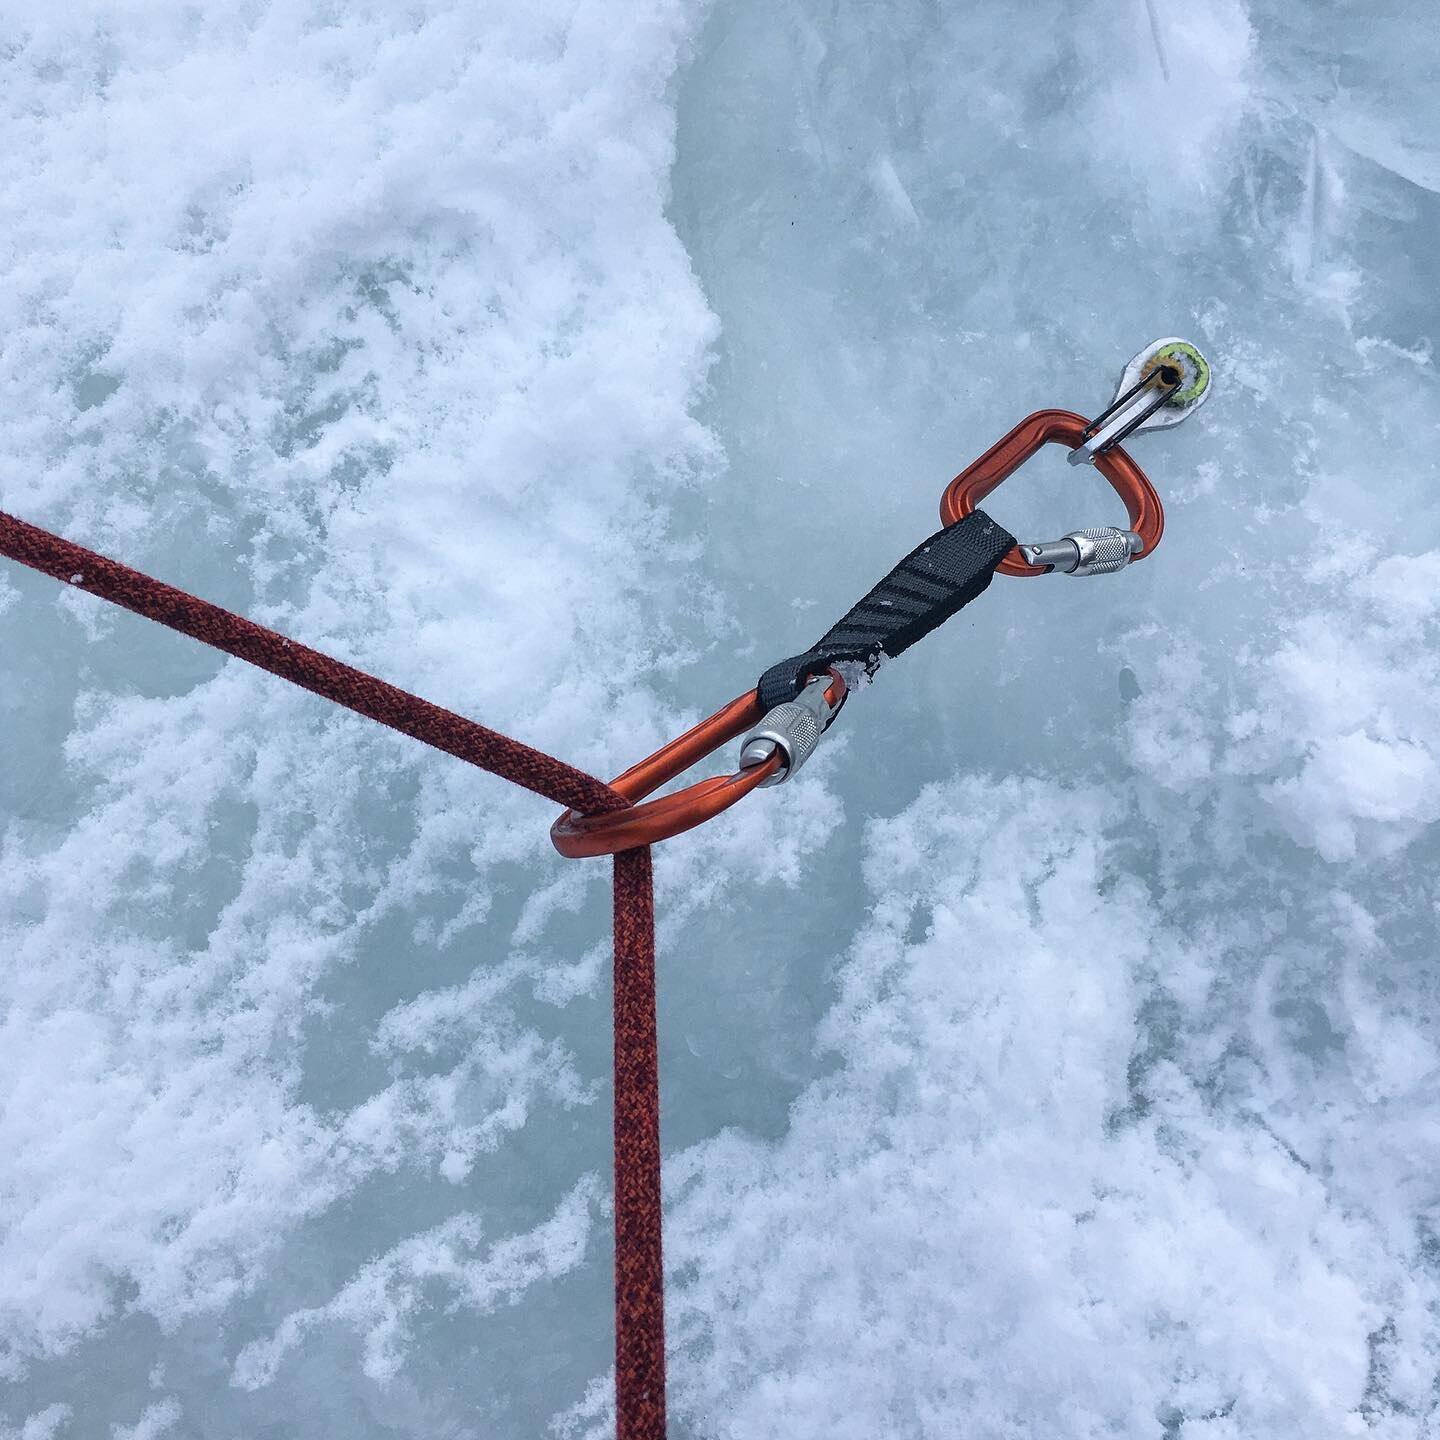
Almost any type of protection can be used as a top-rope directional including: ice screw, V-thread, tree, bolt or rock gear.
Some common concerns . . .
“Isn’t that some sort of American Death Triangle (ADT) vector, which increases forces on the main anchor and the directional?” It's not an ADT because the force doesn’t come to one point. Actually, having the directional decreases force on the main anchor, because the directional takes some of the force. For a good ice screw that can hold at least 10 kN, it’s not a concern.
“If the directional fails, doesn't it shock load the main anchor?” The directional should never fail. (If it's a warm day or the anchor is in direct sun and you're worried about the screw melting out, then making a V thread might be a better choice.) In the highly unlikely event that it fails, you're going to take a swinging lateral fall onto a very stretchy dynamic rope. Which could certainly be exciting, but not an issue for the main anchor.
Does it twist the rope? As long as the directional is below the elevation of the main anchor, the rope doesn’t get twisted. (In the small chance it does, try this simple trick to remove the twists.)
A caution: Be sure your rope is long enough. If you add a directional, this increases the length of rope required to lower to the ground. For an ice anchor directional of just a few meters as shown above, that shouldn’t be a problem. However, if it's a rock route with bolted anchors that are exactly placed, for say, a 30 meter climb, you might need more than a 60 meter rope if you add a directional. One more reason to always close your rope systems with a stopper knot.
If the directional is critical to avoiding a specific hazard, then a locker draw (below) can be a fine idea. (There are lots of other uses for a locker draw, learn them at this article.)

Anchor overview - a German perspective
The German Mountain and Ski Guides Association (VDBS) published a short PDF file of recommended anchor building practices. Many of them are strikingly different than those used in many parts of the world. Let’s learn some new anchor setups!
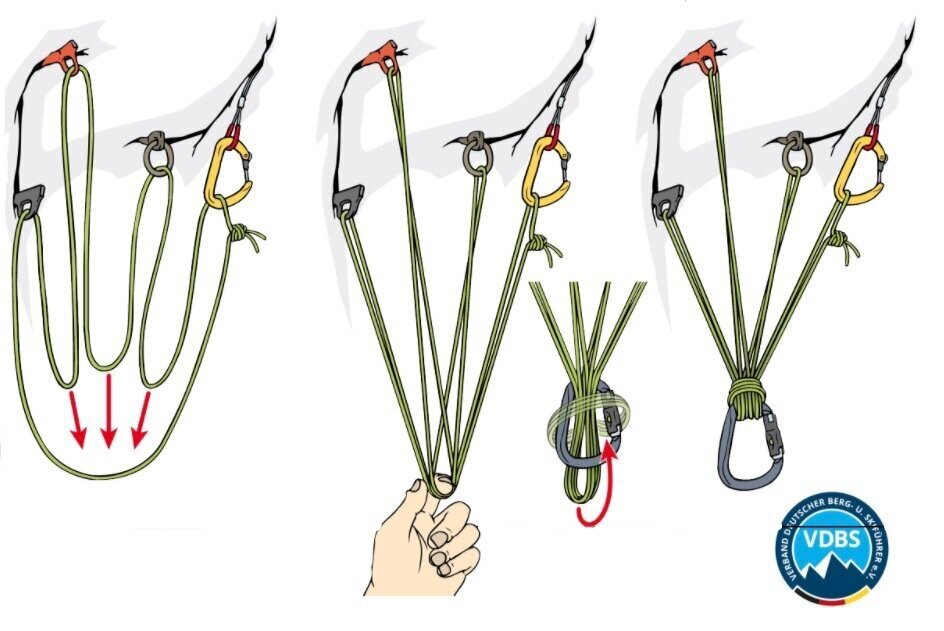
image credit: Georg Sojer / Chris Semmel / VDBS
The German Mountain and Ski Guides Association (“Verband Deutscher Berg und Skiführer” or “VDBS”) has a well deserved reputation for professionalism and technical expertise.
German Mountain Guide / Bergfuhrer Chris Semmel published an interesting PDF file that summarizes some modern, “VSBS approved” approaches to anchor building.
Many of them are quite different than what's used in the United States, so let's have a look!
Suggestion: When we encounter a technique that’s different from the one we currently use, it’s good to keep an open mind. There are few absolutes in climbing, “gotta do it this way or else”. Most everything else is somewhat subjective. Always practice new methods on the ground first, ideally with a qualified instructor.
A few notes . . .
All images on this page are credited to Georg Sojer, Chris Semmel and the VDBS.
Side note: Georg is a superb and funny cartoonist! Follow him on on the Insta: @sojercartoon
Many of these anchors originated in the “South Tirol”, (Dolomites) which is in northern Italy and not Germany, but credit still goes to Chris and the VDBS. Let's not get hung up on country of origin here, okay?
Graphics with the “VDBS “ logo are the recommended practice. Graphics without the logo are “alternative” methods.
The images are screen grabs from a zoomed in PDF file, so sorry if the quality is not so great.
I'm sure there are some native German speakers reading this who might take issue with some of my translation. I had help from a friend who is self-professed 90% fluent, so any mistakes I blame on him. =^) Let's stay focused on the image content and not get bogged down in tiny translation errors, okay?
Alpinesavvy tries not to offer advice, only ideas and information. I’m absolutely not saying that you should go out and start using these techniques tomorrow, especially without knowing the context and having appropriate instruction. I say again, having appropriate instruction. (Doing this may require a trip to Europe, lucky you.)
I'm not posting every graphic in the entire document, rather the ones I found personally interesting. I encourage you to check out the whole PDF file yourself; click the button below.
The title of the PDF: ”Standplatzlogik VDBS 2019 - Ausbildungsstandard VDBS & Alternativen”
This translates as “Belay stance logic - VDBS training standards and alternatives.” This title alone caught my attention. It's “Professional German Guide Training Standards”, not, “random stuff I saw on the Internet that might work for anchor building.” =^)
Let’s get to it!
Anchor 1 - Let's start off with something not familiar to Americans, a single bolt.
Yes, that's right, one bolt, no redundancy, that's all you got, better get comfortable with it. It's probably a glue in, it's probably about 20+ cm long, and you can probably hang a bulldozer off of it, but it's still one bolt.
It appears that the leader is cloved hitched directly to the yellow carabiner, and brings up the second with a Munter hitch on the black carabiner.

image credit: Georg Sojer / Chris Semmel / VDBS

image credit: Georg Sojer / Chris Semmel / VDBS
Anchor 2 - Here's an anchor set up more familiar to the rest of the world, “two solid fixed points”
Do you see a sling, a quad, a cordelette, or any attempt at equalization? Nope! If you want to build an anchor using the rope, this is about as simple as it gets. All the load is obviously on the left bolt, with the right bolt only serving as a backup in the (1 in 100,000?) chance that the left bolt fails.
This reflects a different approach to anchor building in areas that have top-quality twin bolted anchors - there's really no need to try to equalize.
(Note, the rope is tied to the belay loop and not the harness tie in points. Not a standard practice in the US and not recommended by most harness manufacturers, but apparently acceptable to the VDBS, so in this case I'm gonna call it good.)

image credit: Georg Sojer / Chris Semmel / VDBS
Here's another approach, in the diagram on the right. Instead of clove hitch, you can make a bight knot and belay from that.

image credit: Georg Sojer / Chris Semmel / VDBS - https://drive.google.com/file/d/1rpPxbNOHjCQNFZmnI-qB9iEXun7Q4Qyf/view
Side note: Check out how the rope is tied to the harness in the diagram above: to the belay loop! This is definitely not standard practice in North America, but maybe in Germany?
Have a look at the screen grab below from the Edelrid website. It clearly shows that tying to the belay loop is acceptable.

image: https://media.edelrid.de/images/attribut/54507_GAL_Gurte_Sport_ANSICHT.pdf
Anchor 3 - The fixed point belay
Again, used with two solid bolts, and again, this puts all of the load on the left bolt with the right serving as backup. This time, instead of using the rope and two clove hitches to connect the bolts, you use a double length (120 cm) sling instead. The sling is tied with a double loop bowline on the left, and either a clove hitch with the end clipped, as shown on the left, or a simple overhand knot, as shown on the right.
This technique can be used here as shown, to bring up your partner(s), and it can also be used to belay the leader directly from the anchor. AlpineSavvy has a detailed article on the fixed point belay technique, read it here.
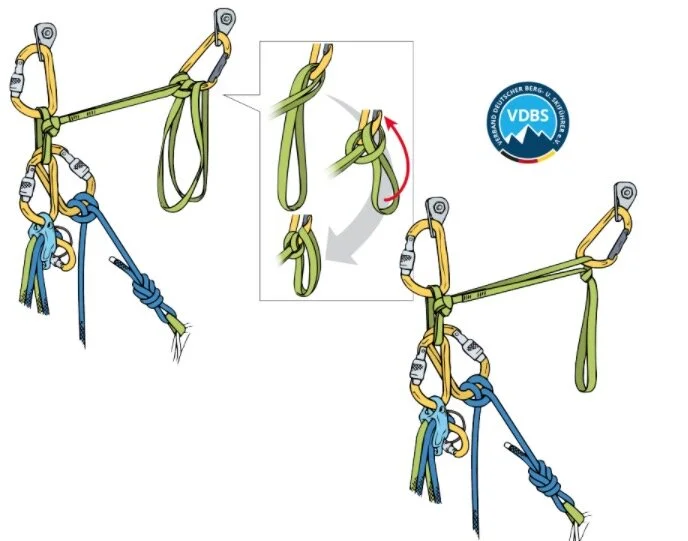
image credit: Georg Sojer / Chris Semmel / VDBS
In the right side margin is this text. It's highlighted, I'm guessing it's pretty important. =^)
Yellow: “Dyneema at the belay as linear connection sling with double bowline: width starting at 10 mm recommended (careful with older 6 or 8 mm slings) In red: “NO old dyneema slings with knots at the belay”

image credit: Chris Semmel / VDBS
Takeaway: (I would guess that the applies to using Dyneema slings for any kind of anchor, not just a fixed point as shown.)
Dyneema slings are fine to use when building an anchor.
It's best practice to use slings that are 10+ mm.
It's okay to put knots in them, provided the slings are relatively new.
Anchor 4 - Swinging leads with a rope anchor
Now, this is interesting. Lots of people think that if you build an anchor with the rope, you can’t block lead. You have to swap leads, because there's nowhere for the second to easily secure themselves.
Well, the set up below lets you swap leads!
It took me a minute or two to digest what was going on, look at the photo below and think it through. Using the quick draw on the top bolt is the key move.
This one is fairly complicated and definitely one to practice on the ground first!
Left: The second is belayed up on the light green rope with a munter hitch.
Center: The second clove hitches into the upper carabiner on the bottom bolt, removes the bottom carabiner, passes the rope behind the connection to the leader, and then clove hitches to the top carabiner of the quick draw.
Right: The leader is put on belay with a munter hitch from the bottom bolt, and clips the quick draw as the first piece for the next pitch.

image credit: Georg Sojer / Chris Semmel / VDBS
Anchor 5 -Now we're getting into alpine anchors, with “2 fragile fixed points”.
(See, your German is getting better already!) “Standard for load distribution.”
Notice, static equalization only. No sliding X, so no chance of suddenly loading the remaining anchor. An overhand knot on the left, and a girth hitch on the right. Yes, a girth hitch, it's fine to use that at the master point. Get used to it, you're about to see a few more. Learn more about the girth hitch master point here.
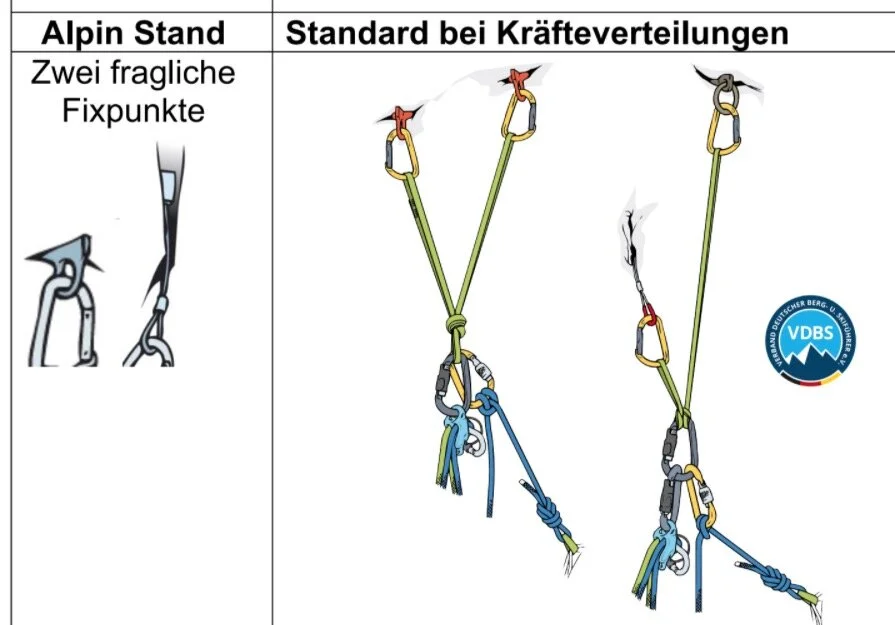
image credit: Georg Sojer / Chris Semmel / VDBS
Anchor 6 - Girth hitch on the ring at the top, pass a bight through the piton at the bottom, and then girth hitch the master point carabiner.
Many people would assume this anchor would require three carabiners, but in fact you only need one. You can rig this same anchor if you find yourself at a chain anchor and are low on carabiners; learn how from this article.

image credit: Georg Sojer / Chris Semmel / VDBS
Anchor 7 - Look, another girth hitch at the master point!
Also note, this is tied with an open, or untied cordelette. This lets you thread one end through the two pitons and the ring, and then re-tie the cord.
This can be a good method on rock that has a lot of fractures, pockets, or protrusions, because there are fewer carabiners that might be loaded sideways at strange angles.
Historical and geographical note, this style of anchor originated in the Dolomites in northern Italy, where there are lots of fixed pieces of gear in often marginal rock with lots of strange bumps and protrusions. This area is called the “Sud Tirol”, or South Tirol.
Can you see how the cord is tied into a loop? Looks like that's called in German a “paketknoten”, or “parcel knot” which is kind of a 1.5 overhand bend. (Personally I'm fine with a standard flat overhand bend here, although probably with slightly longer tails than what’s shown.)

image credit: Georg Sojer / Chris Semmel / VDBS
Here's a similar version, this time with a caption in English. (For any of you still wondering whether a girth hitch at the master point is a valid technique, hopefully you're convinced by now.) This is from a PDF file called: “Standplatzübersicht VDBS DAV 2020”
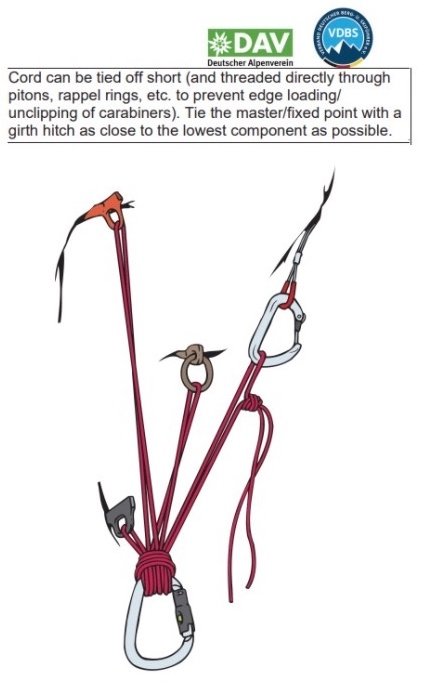
image credit: Georg Sojer / Chris Semmel / VDBS
Here’s how to tie the Paketknoten / parcel knot.
Anchor 8 - Hopefully you never have to make a five piece anchor, but if you do, you might want to remember this technique.
The clove hitches require a lot less cord compared to the traditional cordelette, where you’d have to pull down loops between each piece of gear.
(There’s a three-piece variation of this, called the “V clove” anchor, here's an article about it.)
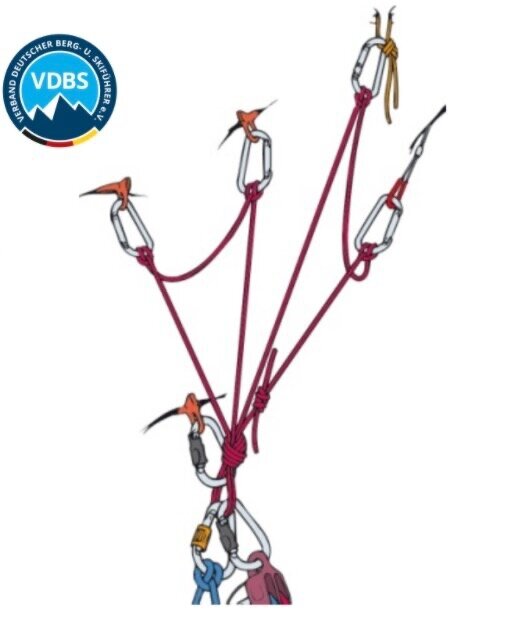
image credit: Georg Sojer / Chris Semmel / VDBS
That's about all. Hopefully this may have broadened your perspective a bit on acceptable anchor building practices.
Again, anchors are often dependent on context and intended use, so it can be a bit tricky to extrapolate from a single diagram what are appropriate real world uses.
Please seek qualified instruction for learning critical skills like this.
And finally, if you've read this far, everyone has at one point wished for an octopus anchor =^)

image credit: Georg Sojer / Chris Semmel / VDBS - https://drive.google.com/file/d/1rpPxbNOHjCQNFZmnI-qB9iEXun7Q4Qyf/view

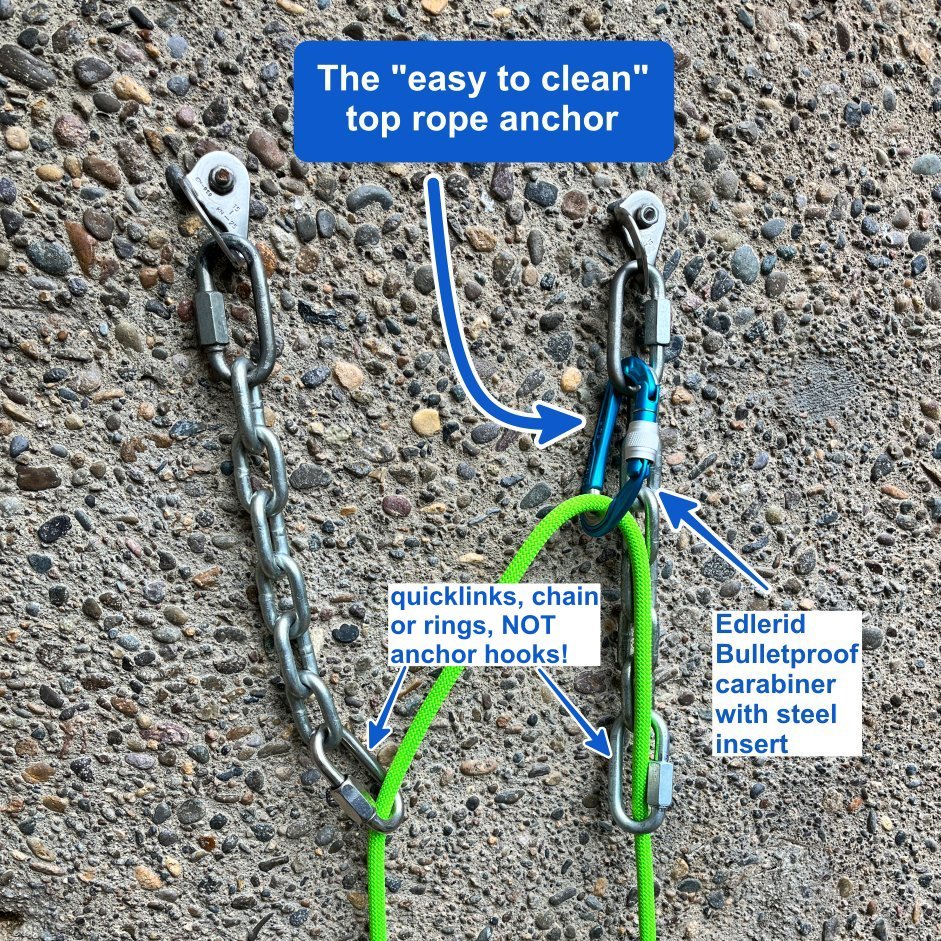
The "easy-to-clean" toprope anchor
Are you top rope climbing with someone who doesn't know how to clean and lower from an anchor? Here's a simple way to rig a top rope to make cleaning and lowering safe and simple for the last person.
Modern “clip & lower” anchor hardware like fixed steel carabiners and Mussy hooks allow faster and simpler transitions from climbing to lowering, and are a great development at many popular climbing areas. However, they are still catching on, and many routes will have a chain anchor without clip & lower hardware. That usually means you need to build your own anchor of some sort, because it’s generally bad practice top rope directly through the anchor hardware. (Hopefully you know that already . . .)
Typically, the most experienced person will lead the route, which means the beginner climbs second and cleans the anchor. Of course, learning to safely clean and lower is an important skill to learn eventually. But if you're climbing with someone who does not have it down, here’s a way to rig your anchor to keep it simple and low risk for the last person up.
Important cautionary note at the bottom of this article, please read all of it!
The first person leading the route, usually the most experienced, can rig the anchor is shown. You can now top rope off this anchor all day, and all the wear-and-tear from the rope goes your bottom carabiner, not on the fixed hardware.
If you’re toproping a lot, you might want to use steel carabiner or maybe the cool Edelrid “Bulletproof” carabiners. These are aluminum and have a steel insert at the bottom where the rope goes, meaning they will last much longer.
Notice how the carabiner is clipped through the quick link which means it's facing out, perpendicular to the rock. This can help minimize rope twists.
For the last person up (typically less experienced) to clean the anchor, it couldn’t be much easier. They simply clean the carabiner and call for a take and lower.
To clarify, lowering directly from the anchor chains is only for the LAST person, not everyone who’s top roping the route. Avoid top roping through fixed gear.
Concerns, grumbles, FAQ . . .
“You should never top rope through fixed gear.” That's generally true. It might seem like that's what's happening here, but it's not. As soon as the rope is weighted, all the force goes onto the carabiner and there's no significant wear on the rings.
“It’s not equalized.” That’s correct, because it doesn’t need to be. You're climbing on two modern bolts, each of which is rated to at least 25 kN. In the extremely unlikely (1 in 100,000?) event that the left bolt were to fail, the rope will be caught on the right bolt. (If equalization is important to you, simply clip a second carabiner into the quick link on the right side hanger.)
“If the bolt fails, it’ll shock load the other one. ” Not a concern. This is a top rope anchor with your stretchy dynamic rope absorbing almost all the force of the very modest fall, if a very unlikely bolt failure ever were to happen. (Again, if this concerns you, just clip a second carabiner to the right bolt.)
“Do I need a locker?” Not really. A standard snap gate carabiner is fine here. If the rope were to detach from the carabiner, it’s still going through the rings. But if it makes you happy to use a locker, go for it.
“Lowering through chains is bad, rappelling is better.” With modern anchor hardware that's inexpensive and easily replaceable, it’s now preferred practice (in most areas) for the last climber to lower, not rappel, from the anchor. This anchor is set up perfectly for that: large long-lasting 50 kN stainless steel rings at the bottom, connected to a quick link for easy replacement. This is per the recommendation of the American Alpine Club.
Caution: Don't do this on “open” anchor hardware (like anchor hooks)
This technique should only be used on “closed” anchor hardware, such as a ring, quick link, or chain, where there is no possibility of the rope coming unclipped. Do NOT use this technique on “open” anchor hardware, such as anchor (aka Mussy) hooks, carabiners, or a ram’s horn / pigtail.
In autumn 2023, there was a fatal accident in Alabama. It involved a beginning climber who was cleaning an anchor hook anchor, that had a locking carabiner added to minimize wear on the hooks. The carabiner was removed, somehow the rope unclipped from the hooks, and she fell.
Short version: for anchor hooks, do NOT add a carabiner on the anchor for the rope. If you do toprope through your own equipment, extend quick draws or slings BELOW the level of the hooks, and put the rope through your own gear that way. This reduces, but does not eliminate, the risk of the above accident happening again.
Also, NEVER have someone clean an anchor who is not 110% solid on the correct procedure. The proper learning sequence should be: 1) instruction on the ground, until the person can demonstrate several times in a row the correct sequence. Then, 2) doing it with an instructor off the ground, hanging at the actual anchor, where they can be directly supervised. (This means NOT yelling instructions from the base of the cliff!)

Here’s an analysis of the accident from IFMGA Certified Guide Karsten Delap.
Here's another video from Karsten showing some ways to build your own anchor with your own gear, and then transfer to the anchor hooks when it's time to lower off for the last person.

Anchor-induced rope twisting
Certain configurations of anchor hardware can put a mean twist in your rope. Learn how to spot these culprits, how to re-rig an anchor with additional hardware to minimize the problem, and a way to quickly remove twists from your rope.

Some configurations of anchor hardware can give you a smooth easy rope pull with no twists. Others can add some snarls to your rope. Here are a few examples of each.
Side note: if the rock below the anchor is slab / lower angle, that often leads to more twists. If it’s hanging pretty much freely or vertical, it’s usually less twisting.
Do you need to rappel, lower off, or redirect a lower from an anchor rigged like the top photo? Be prepared for some possible rope twisting.
When you run a weighted rope through anchor point(s) with the bottom link(s( lying flat against the rock like this, the rope drags at these two spots and starts spiraling, which can put some serious pigtails in your rope.
The general concept: the more friction and direction changes, the more twisting will happen.
(It's unlikely you will ever see this, because any halfway competent route setter will add another link so it looks like the second photo below, but it's possible; I've seen it a few times.)
If you have two extra quick links with you, or maybe want to donate a couple of carabiners, you can add those to the anchor to improve it as shown below. You might want to tape the gates of the carabiner closed, to discourage people from stealing them.
If you don't have any hardware to enhance the anchor, there's probably not much you can do about it. If rappelling, try to separate the rope strands when you pull them, so one doesn’t twist around the other which might make pulling your rope difficult to impossible. If it's your local crag, be a good citizen, climb up there another day with some hardware and re-rig it as shown below.
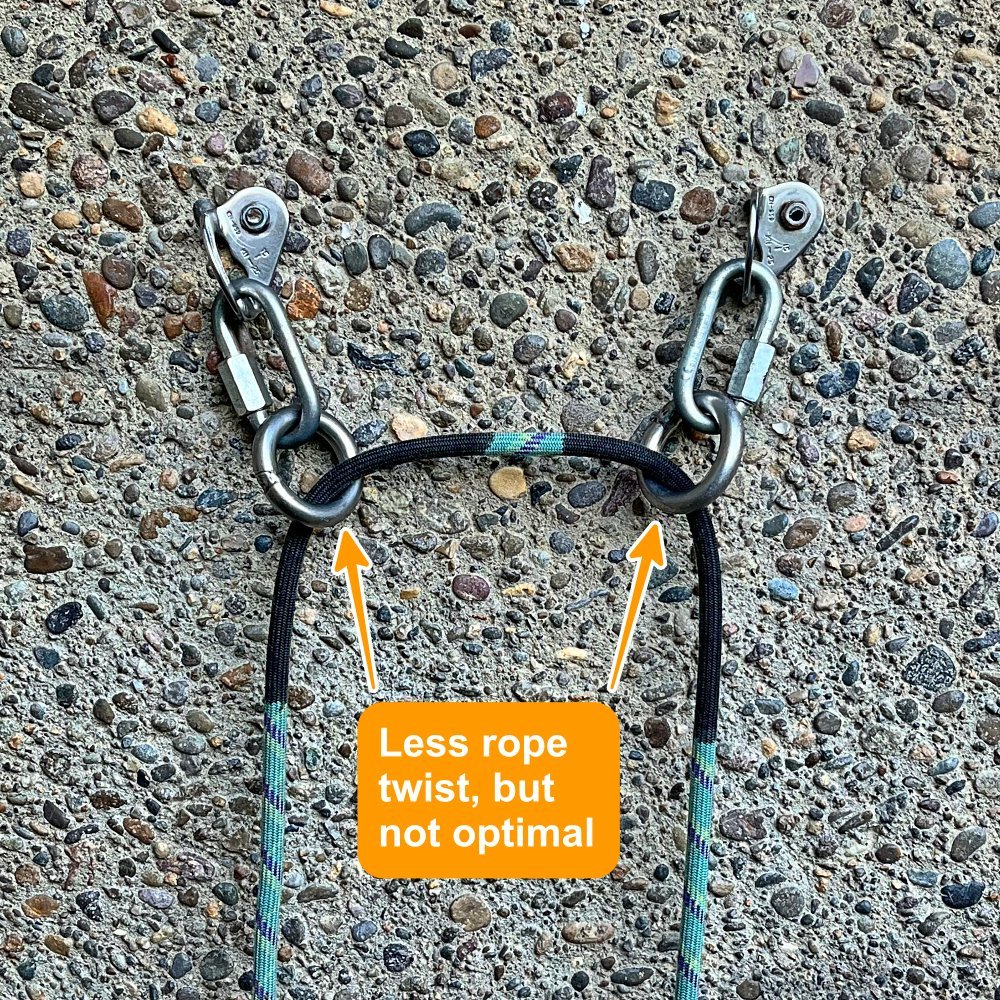
One improvement: add a second set of either welded steel rings (preferred, as they rotate and last longer) or good quality quick links. Note that these are now perpendicular to the rock. This results in an easier rope pull with less twisting. But, depending on a few other variables, your rope might still get a bit pigtailed.
Of course, if adding rings you’ll need to open the sleeve of the existing quick link, so be sure and bring some pliers.
It helps if the bolts are aligned horizontally. If one bolt is a bit higher than the other in this setup, you still might get a little rope twist, but not nearly as badly as you might without the second link/ring.
The closer together the rings are, generally the less rope twist you will have.
Lowering someone tends to create more twists, because the rope has a higher load. If come across anchors like the image below, you might be better off rappelling rather than lowering.
Anytime you're putting a quick link on an anchor, especially at a popular climbing area, it's best practice to use at least 8 mm (and perhaps even 10 mm) and ideally proper CE climbing rated quick links rather than random ones from the hardware store. CAMP is one of several manufacturers to offer strong, inexpensive, CE rated quick links, read an article about that here.
One more quick link note: it's best practice to place quicklinks so the threaded sleeve closes in a downward direction. That way, if the sleeve ever loosens, gravity helps hold it closed. As the saying goes, ”Screw down so you don't screw up.”
If you’re setting quick links in a more permanent position, give them a good crank with some pliers or a wrench and maybe some Loctite on the threads. If you do that, it doesn't matter which way the threaded sleeve is facing.
A great way to rig a rappel anchor for minimal rope twisting is to have two points that come together at the same level.

Even better, a single point of connection. Like this welded ring rated for something ridiculous like more than 80 kN. Yes, it’s not redundant, but you can trust this absolutely.

Tip: If your rope does get twisted, when you get to the bottom or maybe the next lower anchor, try pulling the entire rope through a tube style belay device clipped above you. This can be a fast way to remove the pigtails. Read how to do that at this article.


Use a quicklink as a wrench
Need to tighten or maybe loosen a quick link you find at an anchor? If you have another quick link with you, you might be able to use it as an improvised “wrench”. Not as good as pliers, but probably better than just your fingers.
Quick links are commonly used as rappel hardware, but they can loosen over time and of course work better when the sleeve is locked down tight. If you find a loose quick link on a route, here's how you might be able to tighten it, provided you have another link with you. This lets you apply a lot more torque then you can with just your fingers.
Notes:
This method is meant for field improv. Obviously, the best tool for this job is a crescent wrench or pliers.
It's best practice to install quick links so the sleeve threads down to close, not upwards. That way it's more likely to stay closed.
Quick links are a rather heavy, single use piece of gear, and many people will choose not to carry them. For some routes it makes make sense to have them, for others perhaps not.
It's best practice to use proper CE rated quick links for climbing rather than random ones from the hardware store. CAMP makes inexpensive, super-strong quick CE rated links in three different sizes, read more about those here.
Like many things in climbing, it's a better show than a tell. Here's a quick video I made to show how it works.