


What’s a “series” anchor?
Traditional anchor building teaches always try to “equalize” the load. However, with solid bolts or ice screws, it may be faster and more convenient to build what’s called a series anchor, where all the load goes to one component and the other is a backup.

Peer review on this article comes from Sean Isaac. Sean is an ACMG (Association of Canadian Mountain Guides) Certified Guide, a former professional climber, and author of the “Ice Leader Field Handbook” and “How to Ice Climb” (2nd ed.) Follow @seanisaacguiding for tech tips. Thanks, Sean!
Series anchor onto vertical bolts. Edelrid Aramid sling on left, rope on the right. (Belay connection to second omitted for clarity.)

On your first day of Climbing 101 class, you probably got the concept of equalization drilled into your head - always try to distribute the load (more or less equally) among all components of the anchor. This is still about the only technique taught in most every how-to book I’ve ever seen. Overall, this is still a valid approach, especially with trad anchors, made with stoppers, cams and maybe pitons.
However, it’s not an absolute rule when it comes to using two reliably solid pieces, such as bolts or ice screws.
There’s a whole other genre of anchors, known as a “series” anchor, where all of the primary load goes to ONE anchor component. The second component of the anchor is used only for redundancy, as a backup in the extremely unlikely event that the first bolt were to fail. There’s no attempt at equalization/load distribution. Redundancy, yes. Equalization, no.
So, how can we get away with ignoring equalization, one of the cardinal rules of anchor building? Because modern bolts and hardware are so ridiculously strong (well over 20 kN for each one when properly placed in good rock) that there’s no requirement to try to equalize forces. In many cases with good bolts, it can be faster and more convenient to build a series anchor.
Series anchor overview
As a general guideline: if you have two unquestionably strong bolts, consider a series anchor. Anything other than that, consider a distributed anchor.
Series anchors are best made with two components; three or more is tricky.
Series anchors work on horizontal, vertical or diagonal bolts or ice screws. The vertical or diagonal are preferred. These can be hard to find in North America.
Series anchors are more common in Europe. They are endorsed by the German Mountain and Ski Guides Association (“Verband Deutscher Berg und Skiführer” or “VDBS”). Here's a detailed article covering series, and other interesting anchor flavors.
If you have vertical bolts, make the master point on the bottom bolt. If the bolts are horizontal, make the master point on the bolt where your second will approach the anchor.
A series anchor does not provide a shelf, so all of your clip in points get kind of scrunched together.
You can make a series anchor with a sling tied with a double loop bowline on a bight, a double loop figure eight, or with the rope.
An advantage to using a sling is that you can easily transition to a fixed point lead belay on the next pitch. (That is a whole other topic, which I cover extensively in this article.)
How strong a ring loaded bowline in Dyneema?
Double loop bowline in Dyneema sling being ring loaded, breaks around 20 kN. From HowNot2 (about 6:30 in the video). A belay loop usually breaks around 15 kN, so think about that for a moment . . .

The series anchor is definitely not a new concept! Check out this classic photo from the early days of Yosemite climbing, which I caption as” “I’m so happy to still be alive after jugging this rope connected to a few RURPs strung together by clove hitches . . . (Photo by Dave Diegelman, climber, Dale Bard, Sea of Dreams, El Capitan, 1978)
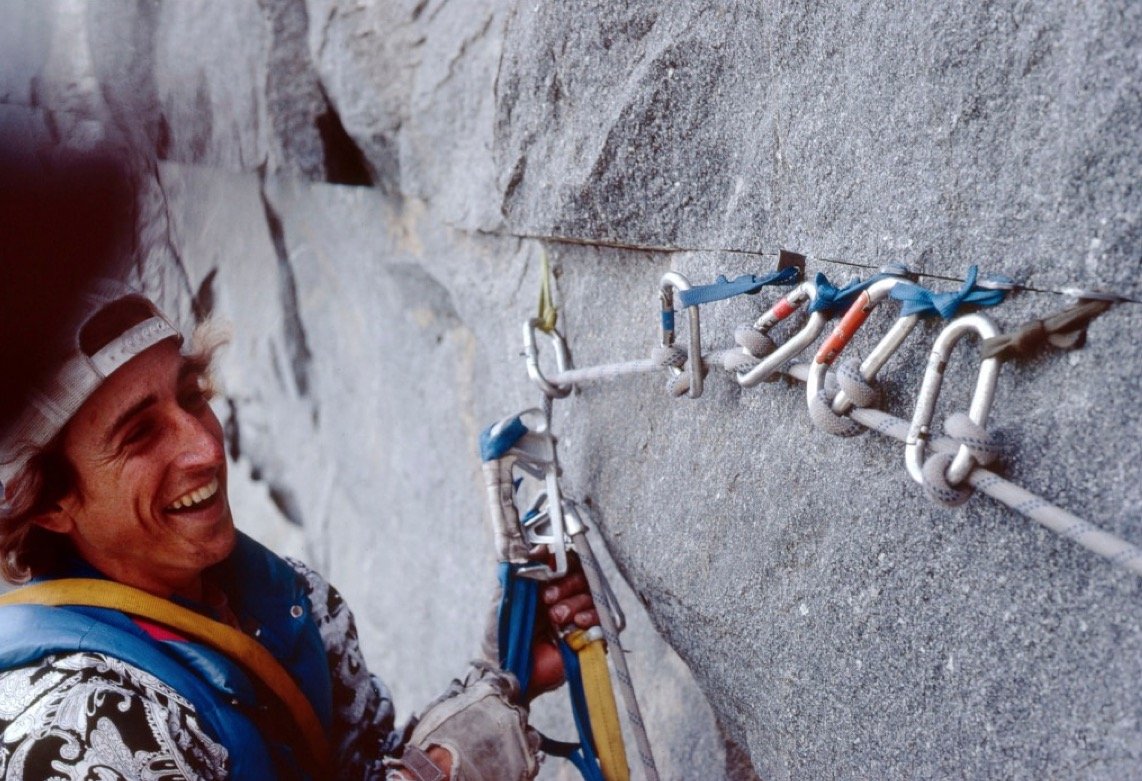
Photo credit: Dave Diegelman
When considering how strong an anchor needs to be, it’s good to keep in mind the realistic forces it might be required to hold. Petzl did some very nice studies on this, showing what real world realistic forces are when you measure actual climbers instead of static weights in a drop tower. I have a whole article in that that, read it here.
Below is a great diagram from Petzl. If your French is a little rusty:
gray dot = force on the top piece of gear
blue dot = force on the climber
black dot = force on the belayer
The three different columns indicate different fall factors: 0.3, 0.7, and 1.0.
Even when catching a significant fall factor 1, the force on the bottom anchor is only about 2 kN, quite low! That’s good!
If you are belaying up your second and keeping the rope reasonably tight, the force should never get above 1 or 2 kN. Given this, trying to equalize that load between two bolts that can hold 40 kN combined may seem unnecessary.
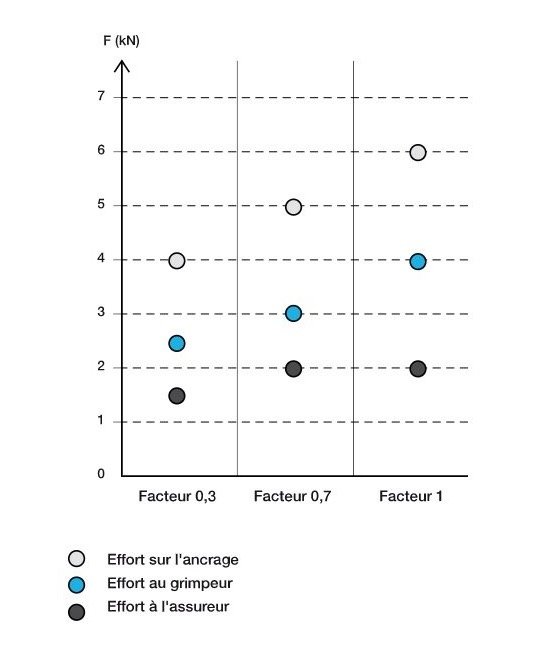
FALL FORCES IN CLIMBING. IMAGE: HTTPS://WWW.PETZL.COM/US/EN/SPORT/FORCES-AT-WORK-IN-A-REAL-FALL
Let’s look at a few ways to make a series anchor.
Method 1: Series anchor with sling and double loop bight knot.
Typically made with a a 120 cm sling, with a double strand bowline on a bight, shown here. (A double loop bunny ears figure 8 works too.) Don’t worry about ring loading the bowline, it’s fine and it’s been tested. See the video below to learn how to tie the bowline on a bight. It’s a new knot for most folks. Can be on horizontal (photo 1) or vertical (photo 2). Vertical is better, but you gotta use what you have.
Using a sling:
makes block leading easier
simplifies self rescue
allows you to do a fixed point lead belay


Method 2: Series anchor with the climbing rope
You get some minimalist style points. You already have a nice strong dynamic rope, so use it if you like.
Downsides are the opposite of the 120 cm sling:
block leading is harder
self-rescue is more difficult
fixed point lead belay is trickier
Can be on horizontal (photo 1) or vertical (photo 2) bolts.


Here's a another version of the example just above. This one might work well for the very top of a route where there is a walk off, or a large secure ledge, because there's not much place for the second to easily attach when they arrive.
The set up as shown in the photo is not very ergonomic because the masterpoint is low. But you could extend the clove hitch from the harness, and the butterfly knot, if you want to conveniently stand at most any distance from the bolts that you want.
Credit: Dale Remsberg, from his Instagram post.)

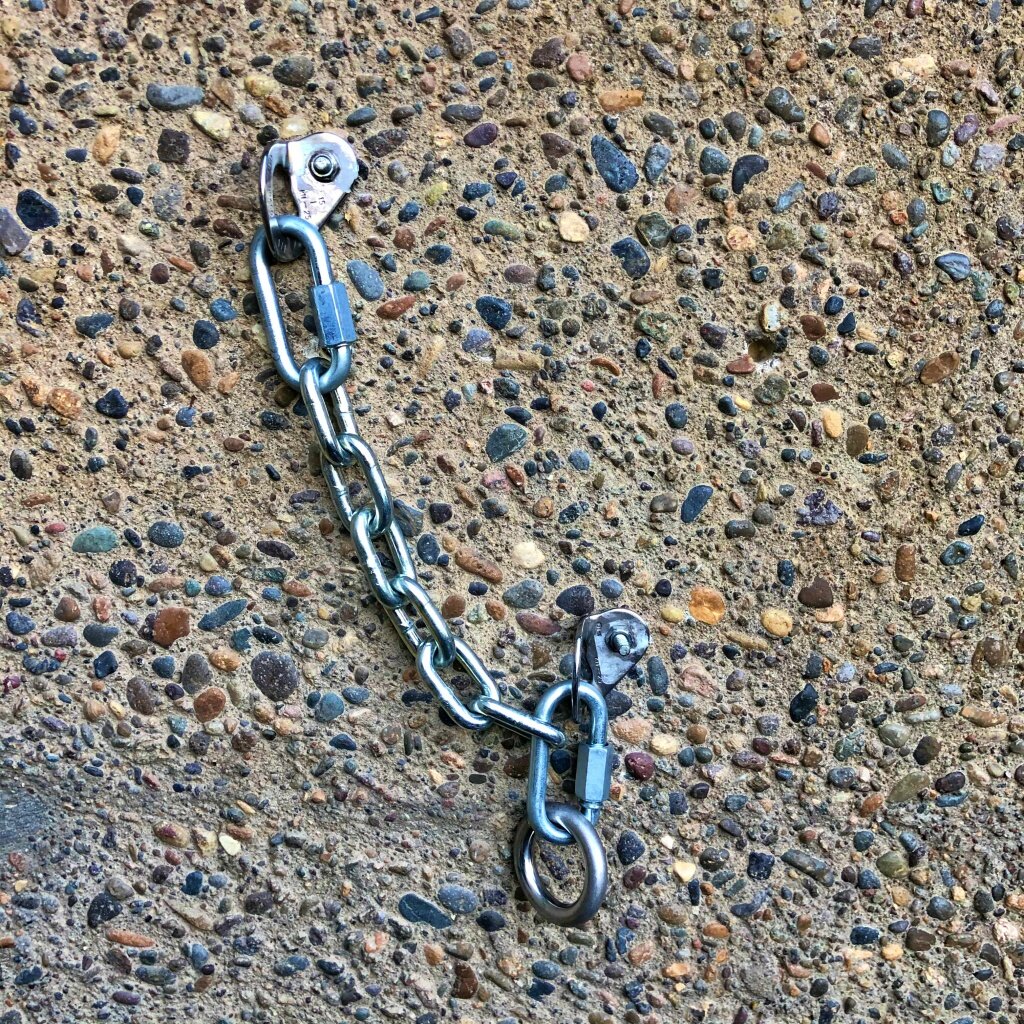
Method 3: Fixe vertical chain anchor
These anchors are ideal for multi pitch climbs, not so great for single pitch sport climbs. Feel free to use that huge ring at the bottom as your master point, it’s rated somewhere north of 30 kN. Learn more on this style of anchor at this article.
And yes, it's fine to clip the top bolt hanger like this over the top of the chain. It's just your bodyweight of less than 1 kN.

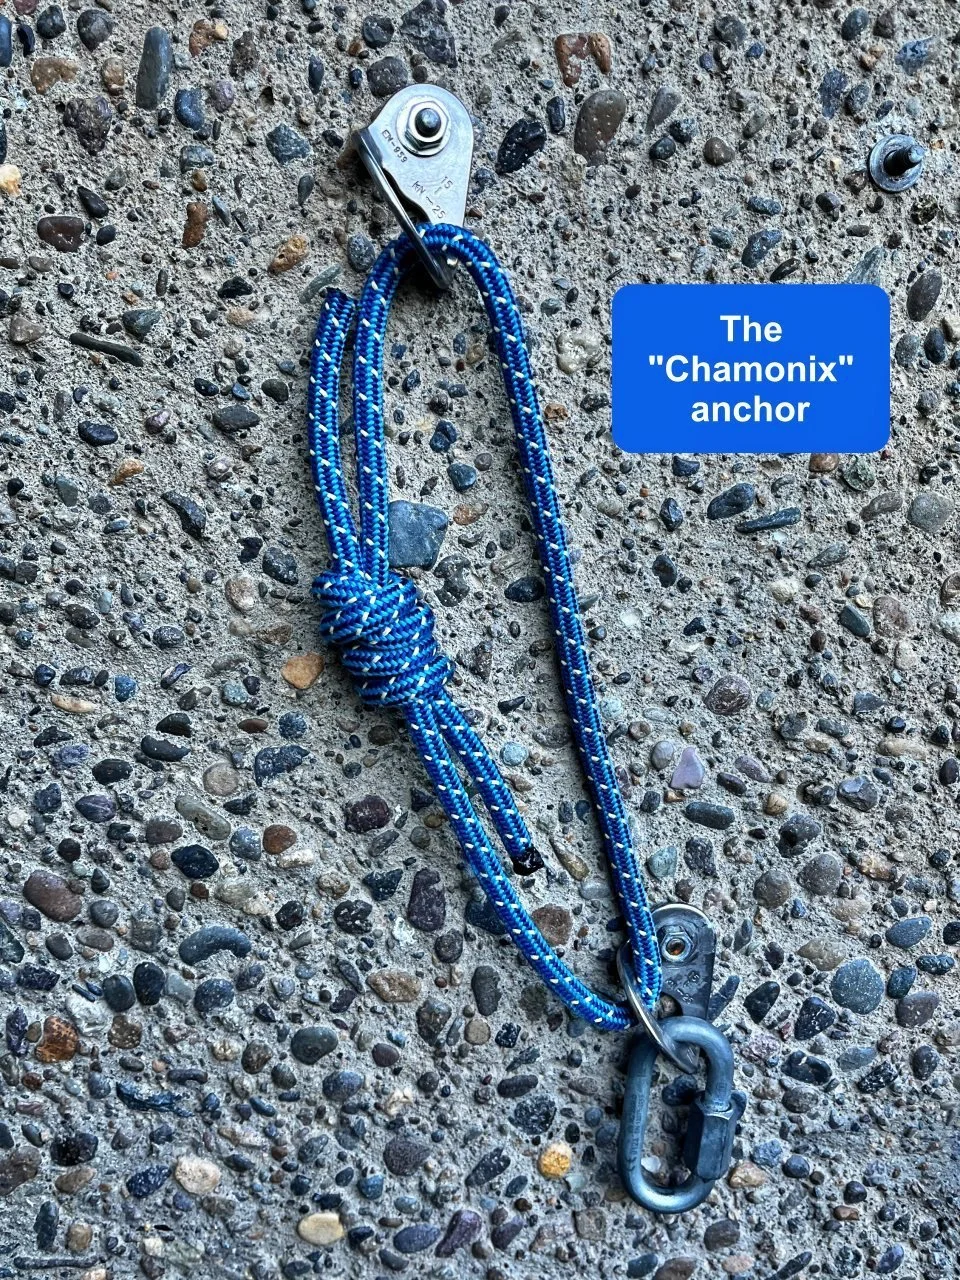
The “Chamonix” alpine anchor
Here’s a flavor of vertical series alpine anchor that apparently is quite popular around Chamonix. This was brought to my attention by IFMGA Chamonix based Guide Dave Searle.
Two vertical bolts, connected by a loop of cord. Bottom bolt has a quicklink for rappelling. It's basically the same design as Fixe vertical chain anchor, but with cord connecting the bolts instead of chain.
What do you think?
Sketchy as Donald Trump's tax returns?
Lovely example of elegant anchor minimalism?
Here we’re using 7 mm cord, which is rated about 13 kN tied like this. The hardware is inexpensive and light, and means you don't need to carry chains up an alpine route to establish the anchors. That 8 mm quicklink on the bottom is rated about 40 kN. Each bolt is good for at least 20 kN. If everybody carries a couple of meters of extra 7mm cord, you can easily replace the cord as needed. (Yes, if you add another quicklink that would hang perpendicular to the rock you might have a slightly easier pull of the rappel rope, but that’s a minor quibble.)
What do you want to have this in a high use sport climbing area? Probably not. Use chains that will last longer. But, in more remote alpine setting? Sure thing! I say, #SuperGoodEnough!
Rappelling a multi-pitch, quick series anchor on 2 bolts
Simply clip a quickdraw to connect the bolts, and have each climber clip to one bolt. Again the quick draw is there for redundancy in the wildly unlikely event that one bolt fails under body weight.

Here's a short video showing how to tie the bowline on a bight.
Here's a video showing this technique from the excellent (if awkwardly named) series, “Safety Academy Lab Rock”, produced by Petzl and Ortovox, featuring some top German guides.

Vertical anchors 101
While vertically oriented chain anchors are still uncommon in many areas, they offer a few advantages over side-by-side matched horizontal anchors. Learn some of the benefits of vertical anchors, and check out several possible ways to rig them for top rope, multi pitch, and rappel.
This article was written with editing assistance from Silas Rossi, IFMGA Certified Guide. Connect with Silas at Alpine Logic.

Vertically oriented chain anchors tend to be more common in Europe and Canada than in many parts of the United States, but they are catching on. While they can be rigged for one pitch top rope climbs, they really shine on multi pitch routes, where the rappel (descent) is the same as the ascent.
The photo above shows a “all in one” vertical chain anchor made by the Spanish company Fixe. Note that the hangers, chain and ring are all welded together. While these are popular, they have the small drawbacks of a fixed length of chain, and no way to replace individual components.
An alternative is to build your own vertical chain anchor, using quick links to connect components. Doing this allows adjustment of the chain length to better fit any rock bulges or pockets, and allows easy replacement of individual parts as needed. If you do this, try to use CE climbing rated quick links, that test to about 40 kN, not hardware store links with a questionable lineage and no CE rating. Secure the links with Loctite and pliers. Here's an example of a vertical chain anchor made from separate components.
Fixe recently updated this anchor. There’s now a ring at the top bolt hanger, instead of the welded chain link. See photo below. The example shown in the rest of the photos on this page is the older model.
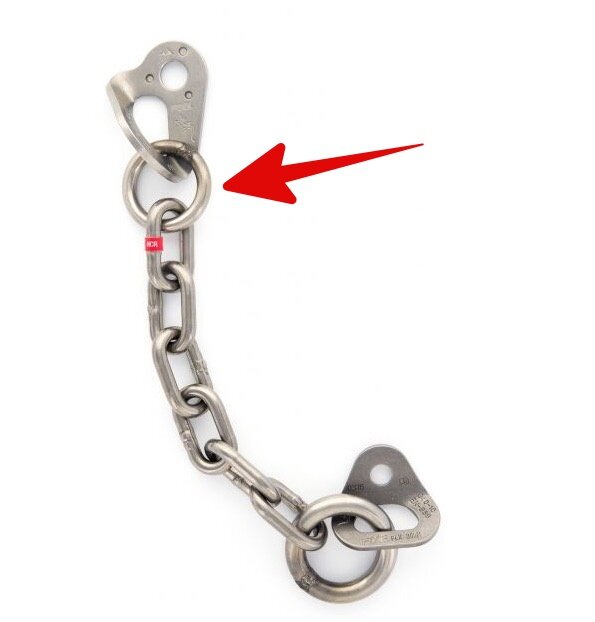
image: fixehardware.com/index.php/fixe-plx-duplex-ss-1-2-traditional-anchor.html
Where to clip?
It's best practice to avoid clipping the horizontal hanger on the bottom. Most of the time this will be OK. But in some cases with certain styles of carabiner, they can get twisted and torqued in some strange ways. I've never heard of one breaking, but it's usually better to clip the ring or the top vertical hanger.
(There is a long-standing climbing myth that Fi\xe actually recommends doing this. However I’ve looked through their technical documentation and can't find any recommendation, so I think this is not true.)

What are the advantages of a vertical chain anchor?
Simplifies clipping to an anchor that’s redundant and very strong. This is especially helpful when rappelling; clip your tether to any component of the anchor and you’re attached to two bolts instead of one.
Efficient use of materials. It can be less expensive (compared to two hangers, four quicklinks and two chains) and the route setter does not have to deal with cutting chain links or carrying unneeded heavy hardware to the crag and up the route.
Gives the route setter more flexibility in where the anchor goes, especially important in rock with pockets, protrusions, erosion, etc. Choosing to use a vertical anchor can depend on the rock structure and geology.
Zero twisting of the rope when lowering or rappelling, because it’s only going through one bit of anchor hardware. Plus, because the ring always hangs perpendicular to the rock, you're probably going to have an easier rope pull with less friction.
Lower visual impact. This is a concern in some areas.
However, using these anchors can be a bit of a head-scratcher for climbers who are used to a pair of horizontal matched bolts and chains. What should I use as a master point? Can I REALLY trust that ring? The doozy for many people, is it really redundant and/or equalized?! And sheesh, can I ignore all of this confusing hardware and just clip a quad or cordelette to the bolts?
Let's address some common concerns about vertical chain anchors.
“It's not redundant.”
Yes, you’re fully relying on the single ring at the bottom. But it's made of 10 mm welded stainless steel rod. Hownot2.com tested two of these rings. One broke at 90 kN and the other broke at 47 kN. You can see the ring results here in their YouTube video. (Steel ring testing starts at 6:00.)
You can hang (4? 5?) Toyotas from it, and it’s WAY stronger than all of the things you normally rely on that are single point and not redundant, such as your belay loop, your rope, your harness, all of your carabiners, probably the bolt that you just took several huge falls on . . .
Plus, both the ring is right there in the open and easy to inspect, as opposed to a bolt in the rock.
“The load isn’t equalized.”
Correct, it's not. When using the ring, all the load is pretty much on the bottom bolt, with the top bolt backing it up. A modern, properly placed ⅜” (10mm) bolt, or better yet ½” (12mm) bolts should hold more than 25 kN. There's really no need to try to equalize the load between bolts this strong.
“Clipping to the ring clogs it up, so another team can't use it to rappel.”
This often can be true in a more traditional anchor that might have a small chain link or quick link at the bottom. However, with this anchor, and the giant ring, it's not a concern. Even if you're clipped to the ring, there's plenty of room to thread the rappel over the top of your carabiner. Plus, there's a simple technique for a “down” team to pass an “up” team - the up team adds their locking carabiner to their anchor, and the down team clips their rope to it for a rappel. See a full article on that here.
“You’re clipping metal to metal. Clipping a carabiner to a rappel ring can damage it.”
Clipping a couple of locking carabiners to each other and an anchor when you're standing right there to monitor them is totally fine. Plus, your soft aluminum carabiner is never going to put any nicks or scratches on the much harder steel ring. (It's like using a plastic ice scraper on a car windshield; the soft plastic is never going to hurt the much harder glass.)
“What's up with that funky horizontal hanger on the bottom?”
The horizontal hanger allows the welded steel ring to sit perpendicular to the rock, which usually gives an easier rope pull after you rappel. If you had a normal vertical hanger at the bottom, the ring would lie flat against the rock which increases friction, not good.
“This causes tri-axial (3 direction) loading on the carabiner, that’s bad.”
Yes, technically the master point carabiner (see below) is being potentially loaded in three different directions. But, under realistic recreational climbing scenarios, any potential load is going to be very small, like 2-3 kN, and well within the capabilities of the carabiner.
I have a whole article on the issue of tri-axial loading, and Black Diamond did some testing on it. You can learn more here.
There are three basic uses for a vertical chain anchor: 1) rappel, 2) top rope, and 3) multi pitch. Let's look at a few possible rigging examples for each of these.
1 - Rappel
There are several ways to rig this. A convenient one is to clip a master point carabiner into the ring, and then have you and your partner clip to the master carabiner. This moves both tethers below the ring, which can make threading the rope through a bit easier.
That's a big benefit to vertical chain anchors. You don't have to build your own anchor with slings or a quad, or have any concern with clipping two tethers to two different non-redundant bolts.
Because of the single ring, you get zero twisting when you pull your rope. =^)
2 - Toprope
While vertical anchors are perhaps better suited for multi pitch and rappelling, you can of course use them for toproping. (While it's usually fine to lower the last person through the ring, typical climbing etiquette is that you don’t set up a top rope that directly weights the ring. Hopefully you know this already.)
Is someone rappelling the route while you're toproping? Consider this solution: be polite, take a break, and let them rappel on your rope. Generally, it's good practice to yield to the team that is coming down.
Top rope method #1: Clip two opposite and opposed carabiners onto the ring, clip the rope to the carabiners, and lower off. (If you're concerned about the whole load on the single ring, you could leave a quick draw on the next lower bolt, and run the rope through that as a backup.) But remember, that ring is rated at 50 kN.

Top rope method #2 (easy-to-clean): Clip the carabiner on the chain above the ring. Rig the rope through the ring and through the carabiner, and lower off. Here's a link to the procedure and videos on how to do this correctly.

All of the load goes to your carabiner, not the fixed hardware. The last person climbing the route cleans the carabiner and lowers off through the ring. This can be a good approach if the last person climbing doesn’t have the required experience to safely re-thread the rope through the ring and lower off. If you're doing this a lot, a steel carabiner can minimize the wear on your gear. Because the rope is already through the ring, the carabiner does not have to be locking.
Yes, the last person is being lowered through the fixed ring. This is generally considered the best practice, at least in most climbing areas in North America. But hey, if you prefer to rappel, you're welcome to do that instead.
Depending on anchor configuration, this could potentially twist your rope when you lower your partner. In the photo below, notice the carabiner is clipped to a chain link that lies flat against the rock. Doing this orients the carabiner 90°, so it's facing out, same as the ring. This minimizes twists when lowering.
With the whole anchor pretty much in a straight vertical line, you're unlikely to get much twisting no matter how you rig this. If the bolts were more offset, like around 45° angle, then twisting may be more likely to happen.
If you do have twists in your rope, here’s a great way to get them out.
3 - Multipitch
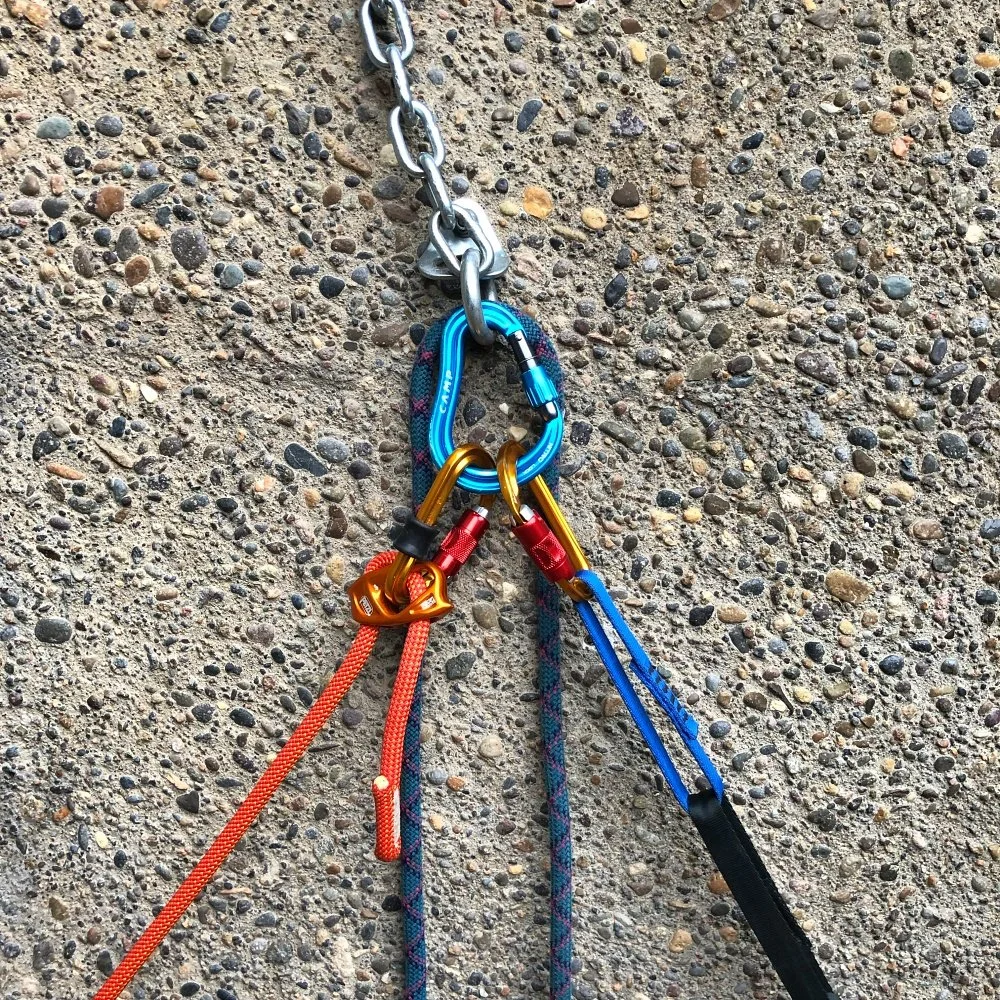
Note: In the next three photos, the extra rope between the leader tie in and the belay device is omitted for clarity.
One approach, maybe the simplest: clove hitch the leader to the ring and belay the second off the ring. No slings, no cordelette, no quad required.
“But wait”, I can hear some of you saying, “doesn't this obstruct the ring for anyone else who wants to rappel past you?” Not really. There's still room to thread the rope, and besides, the rappelling team doesn’t have to actually thread the ring. Learn more at this article.
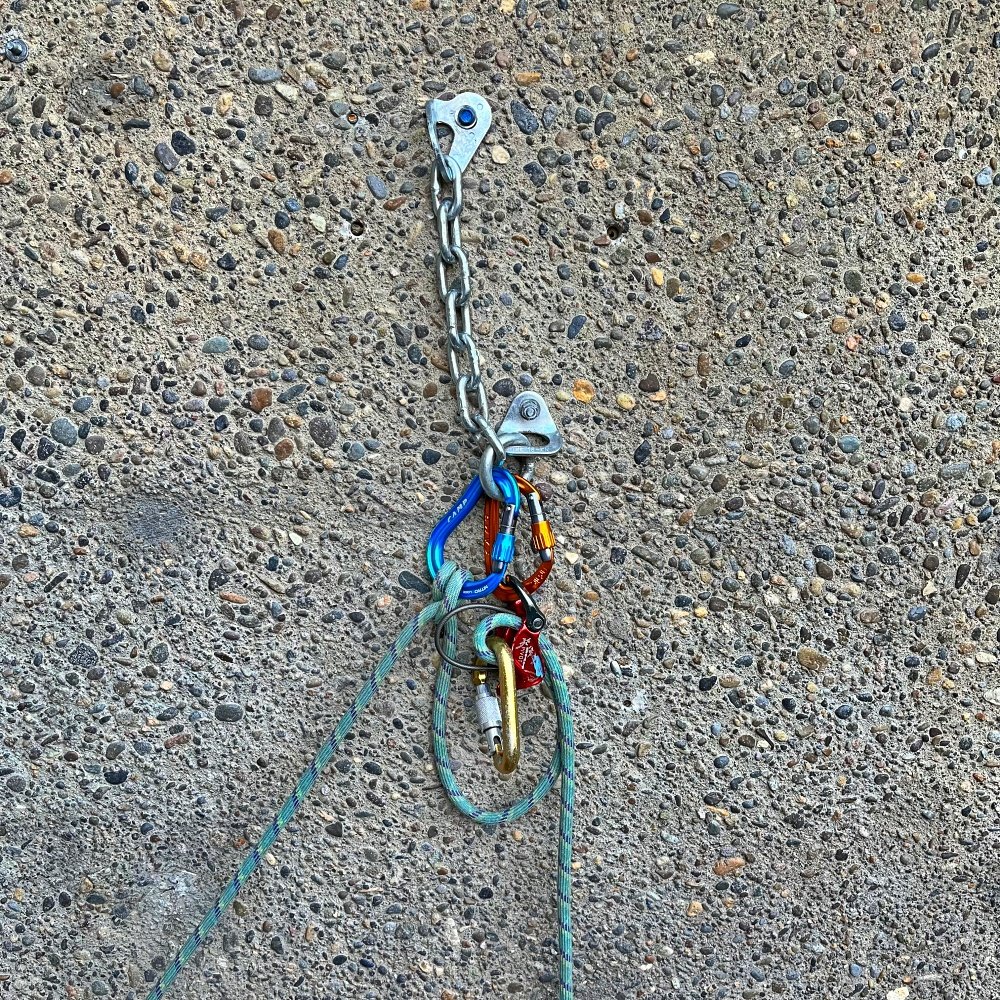
The leader can also connect to one of the chain links.

Another option: clip a master point carabiner into the ring, and then add two additional locking carabiners to that for the leader’s connection and the belay.
If you have a spare HMS carabiner, this is a good way to go. It has a couple of benefits: 1) slightly less cluster and a bit more room to move around at the anchor; and 2) the ring is a bit more accessible for any other parties rappelling who may need to access it.

Finally, if you want to use the fixed point lead belay, this anchor is perfect for that. Here's one way to rig it.

And, after all that, if you’re happier with a quad . . . you can do that too!

Here's an alternative set up for a vertical anchor setup for a single pitch climb. There is a captive eye stainless steel carabiner on the bottom, and an anchor hook above that off to one side. This gives a very easy option for clip and lower. (Don't use galvanized “gym” carabiners outside, they rust way too quickly.)
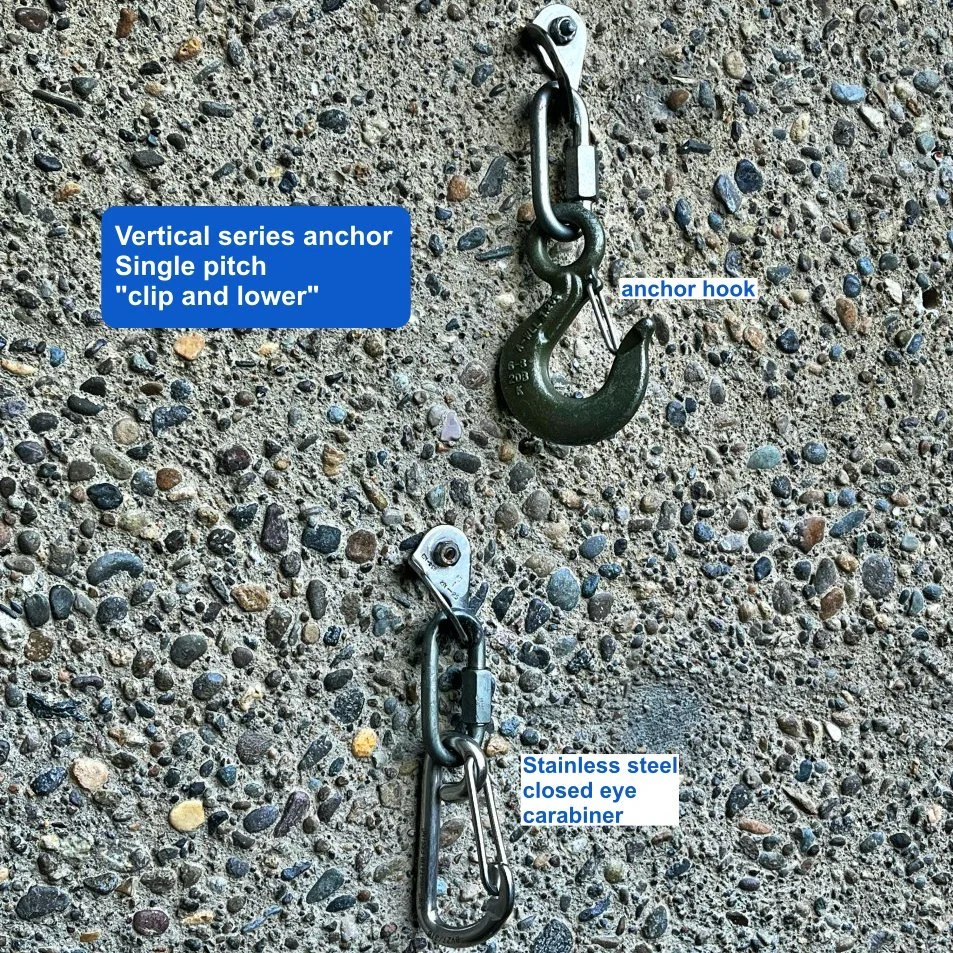
For top roping, simply add your own locking carabiner to the top quick link. Everyone top ropes through that with zero wear on the fixed gear. When it's time to lower, the last person clips the rope cleans the carabiner, and lowers off.
Extra points for using the cool Edelrid Bulletproof locking carabiners, shown here. They have a steel insert that makes ‘em last much longer, perfect for top roping.


Here’s Bobby Hutton from his video showing a similar configuration only with a ram’s horn on the top rather than a Mussy.
image: screen grab from https://www.youtube.com/watch?v=CNiyQyGYDE0