
Big wall anchors: a middle ground
A few words on hauling, from the excellent big wall climbing book, “Higher Education”, by Andy Kirkpatrick (Buy it here):
“Hauling is potentially one of the most dangerous aspects of big wall climbing. This translates to ultra-caution in all parts of your hauling system and interaction with bags, haul lines, docking cords, and pulleys. If you rush and make a mistake, drop a load or have it shift where it's not wanted, you could easily kill someone or yourself. I try and teach climbers to view their bags as dangerous creatures, like a great white shark, rhino, or raptor that is in their charge. The ability to keep them calm and under your control comes down to paranoia, foresight, and heavy respect for the damage they can do.”
Big wall anchors can take many different forms. Let’s see some examples.
Old school hardman sketchy
A caption here could be: “I’m so happy to still be alive after jugging this rope connected to a few RURPs strung together by clove hitches . . . (Photo by Dave Diegelman, climber, Dale Bard, Sea of Dreams, El Capitan, 1978)
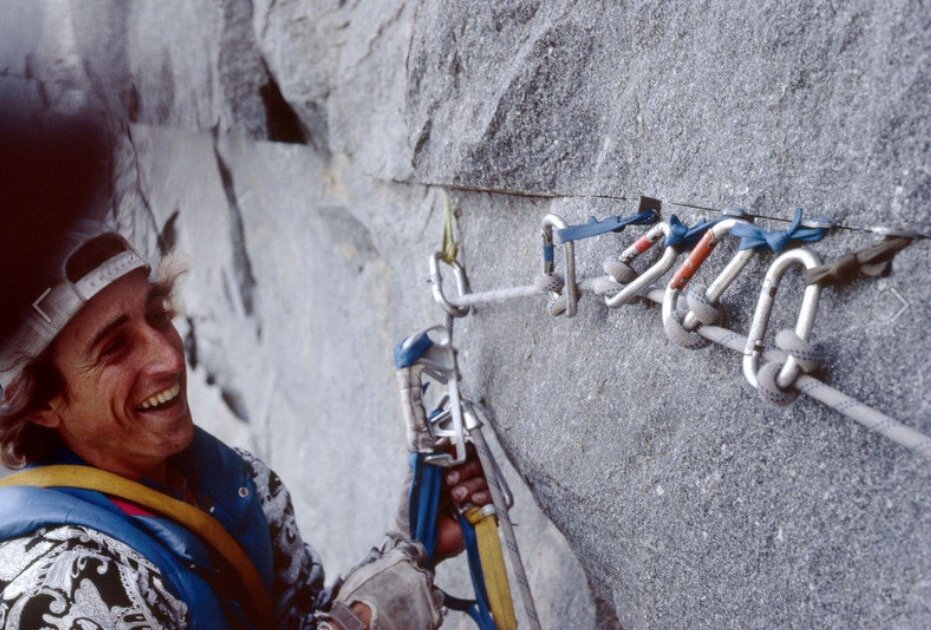
Photo by Dave Diegelman, climber, Dale Bard, Sea of Dreams, El Capitan, 1978
Modern minimalist
“Build your anchor with the rope, and haul from one bolt” anchor. (Purple and red cords are docking tethers for the haul bag.) Photo: Mark Hudon
Some big wall experts will tell you that it's fine to haul off of one bolt. Well, it probably is fine in bulletproof Yosemite granite, on a well-travelled route with newish 3/8” inch bolts on every anchor. But not everybody climbs with such sweet anchors, do they? How about a sandstone wall in Utah, where are the anchors are often older and in much softer rock? Maybe not!
Do you want your pet velociraptor tied to just one bolt, when including another one takes just a few seconds and a couple of extra pieces of gear? (Remember, never let anyone else dictate your level of comfort or safety, no matter what their credentials might be.)
The photo below shows making the with anchor with the lead rope. This can work if you are thoughtful and organized with your belay set up (aka experienced), but it can be a frustrating time suck if you start making rookie mistakes like clipping a heavy load over the top of the lead rope (ask me how I know this . . .) If this works for you, great, but if you're getting started in big wall climbing, having some sort of equalized masterpoint(s) and not using the lead rope to make the anchor, might be a better approach.
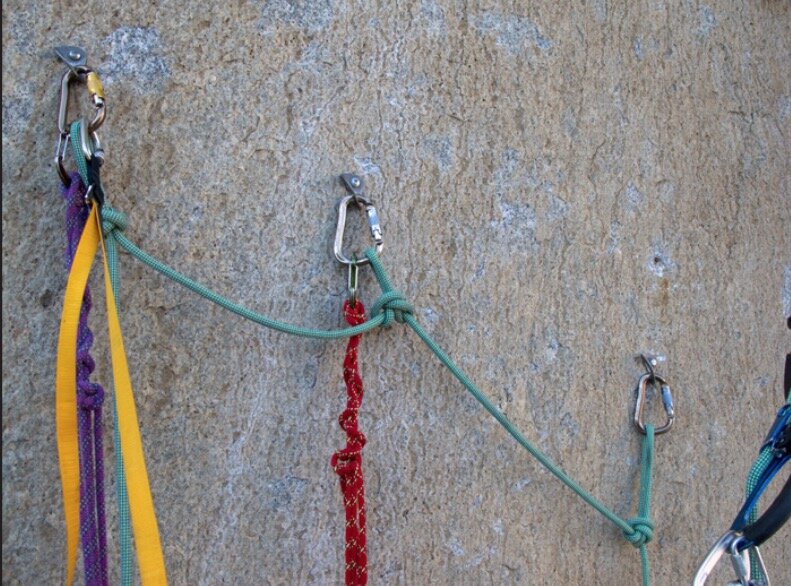
photo: mark Hudon, hudonpanos,com
Classic overbuilt
Quite possibly one of the best climbing illustrations ever, by the always amazing Mike Clelland, from (I think) Climbing magazine. Redundancy, definitely. 24+ carabiners and an engineering project, also definitely. Probably overbuilt for most people, but still a great drawing.

image credit: Mike Clelland
Ideally, big wall anchors have the following qualities:
Adequate strength - Adequate strength means strong enough for the intended loads, and not overbuilt. It also means adequate enough not to give you the slightest hesitation or stress about whether the anchor is going to hold.
Simplicity - A tangled rat’s nest of slings and rope is confusing and potentially unsafe, because it’s not easy to see what can safely be unclipped and what cannot.
Consistency - Ideally, you and your partner have the same system that you agree on and that you’re able to use at pretty much every anchor. The gear to do this is already packaged up in two identical “anchor kits”. One of these is in use at the current anchor, and the other is either on the leader’s harness or on the zip line ready to send up to them when they finish the pitch. A classic beginner mistake is to build a random anchor with whatever gear can be scavenged from your depleted rack after you’ve led your pitch. Please don't do this.
Zero to minimal knots - Tying knots, as in a cordelette style anchor, takes more time, energy, cursing and hassle to untie when you’re breaking down the anchor. Try to avoid knots in your anchor whenever possible.
Sketchy old school, modern minimalist, and classic overbuilt are not your only options. There’s a large middle ground, where your anchor can be strong enough, with a fast set up and easy break down, yet still have redundancy for your hauling point to keep your rhino under control.
For this example, let's assume:
Tina the Tiger led the last pitch and built the anchor.
A typical big wall trade route anchor of three horizontal bolts.
A hanging belay with no friction-inducing ledge. (If you do have the haul rope running over a ledge, then having your haul point as high as possible will help minimize evil friction.)
The hauling load is shared between two points; no hauling from a single bolt without a backup. (Of course you CAN choose to haul from one bolt; we’re not in this example.)
Tina fixed the lead rope (green) for her second to the right bolt with a butterfly knot, and backed it up with a clove to the middle bolt. You probably don't need an equalized master point to fix the rope for your second, because it’s holding pretty much just their body weight. Back up the rope, yes. Equalize it to a master point, probably not.
Tina’s partner is coming up on the right, so she set up the hauling point on the opposite side, in this case the left. Don't make your partner climb over the haul bags if you don't have to. (Note: if the next pitch traverses to say the right, you usually want to set up the haul on the right, so you can lower out the bags without them smacking into you.)
Certain parts of a real life anchor are omitted for clarity, such as rope bags, the leader’s daisies, etc.
Generally speaking, having the haul point higher is better, because it can give you a more efficient pulling stroke and can minimize friction from any ledges that the rope might be rubbing on. The longer the runners you’re using, the lower the hauling point will be. Keep this in mind when setting up your anchor.
Method 1 - Haul from one bolt, and back it up with a sling to an adjacent bolt
Let's start with the one bolt method, but give it a little more security with a back up sling. Most of the time, try to make this your go-to. Reason: it keeps your hauling point high, which is often better ergonomically, and can minimize evil friction if the haul rope is running over any rock edges.
You have one bolt that looks totally bomber, and it's nice and high. Schweeet! Simply back this up with a sling to a neighbor bolt. In the highly unlikely event the left bolt fails, you're backed up by the middle bolt. (This tip is from the outstanding big wall instruction book “Hooking Up” by Pete Zabrok and Fabio Elli, highly recommended.)

Method 2 - Two single runners
This is a simple yet often overlooked technique that can work great if the bolts are more or less level. Strong, redundant, distributed load, fast set up, and zero knots to untie when you're done. If you need to shorten a runner a little bit to better distribute the load, you can add some twists or make a few wraps around a carabiner, as we cover in this tip here.

Method 3 - Metolius PAS (or similar sewn loop tether, NOT a daisy chain with bar tacked pockets)
This also offers bomber strength, a quick set up, decent load distribution, and with the extra bonus of lots of places to clip things to full strength loops when you need to. It’s extremely handy to have multiple clipping points like this.

Metolius makes a longer version of the PAS called an “Anchor Chain”, which could be a good option if the bolts are a bit farther apart, or if you need a few more places to clip things. (Each sewn loop is rated 22 kN.)

Metolius Anchor Chain, image: Metolius.com
Method 4 - Quad anchor from 180 cm sling
You can make a quad anchor out of a 180 cm sling and keep the knots in it permanently tied. (Yes, a 180 cm sling is a little hard to find. Try a Google search for “Mammut Contact” or “Petzl Pur’Anneau”. ) Again, this gives a fast set up and good equalization, and offers several different places to clip in stuff.

Method 5 - Girth (or clove) hitch at the master point
This might look like a cordelette that would be a hassle to untie, but check out the master point: it's tied with a girth hitch. This makes it easy to untie even after it's been severely loaded. Yes, a girth hitch is fine to use at the master point, we cover it in depth here. You could use a clove hitch also, which we cover in this Tip.

Each of these systems offers quick set up, zero knots to struggle with, just a few extra pieces of gear, and redundancy and load distribution at the hauling point. For those not ready to embrace anchor minimalism, these methods offer a good compromise.