How to pack a cooler - pro tips
Okay, let me say this up front: this is not a tip for alpine climbing, more for car camping and river trips. But everyone uses a cooler, and when you do, these tips may help a bunch!
If you're out for a night or two, then cooler packing is not a very big deal. However, on a longer, more remote road trip when you can't restock ice, or especially on multi-day whitewater river trips (a passion of mine) it's a lot more important. Rafters can be FANATIC about cooler packing and ice preservation - on a three week Grand Canyon trip, having ice left on the last day is the sign of a true pro. (I won't cover those very advanced tips here, because they don't apply to many folks.)
The following tips I’ve learned from a few expert river rats over the years, as well as some of my own trial and error. (And no, you don't need a $400 high end cooler!)
Give some or all of these tips a try on your next multi-day outing.
Freeze your own ice in plastic bottles
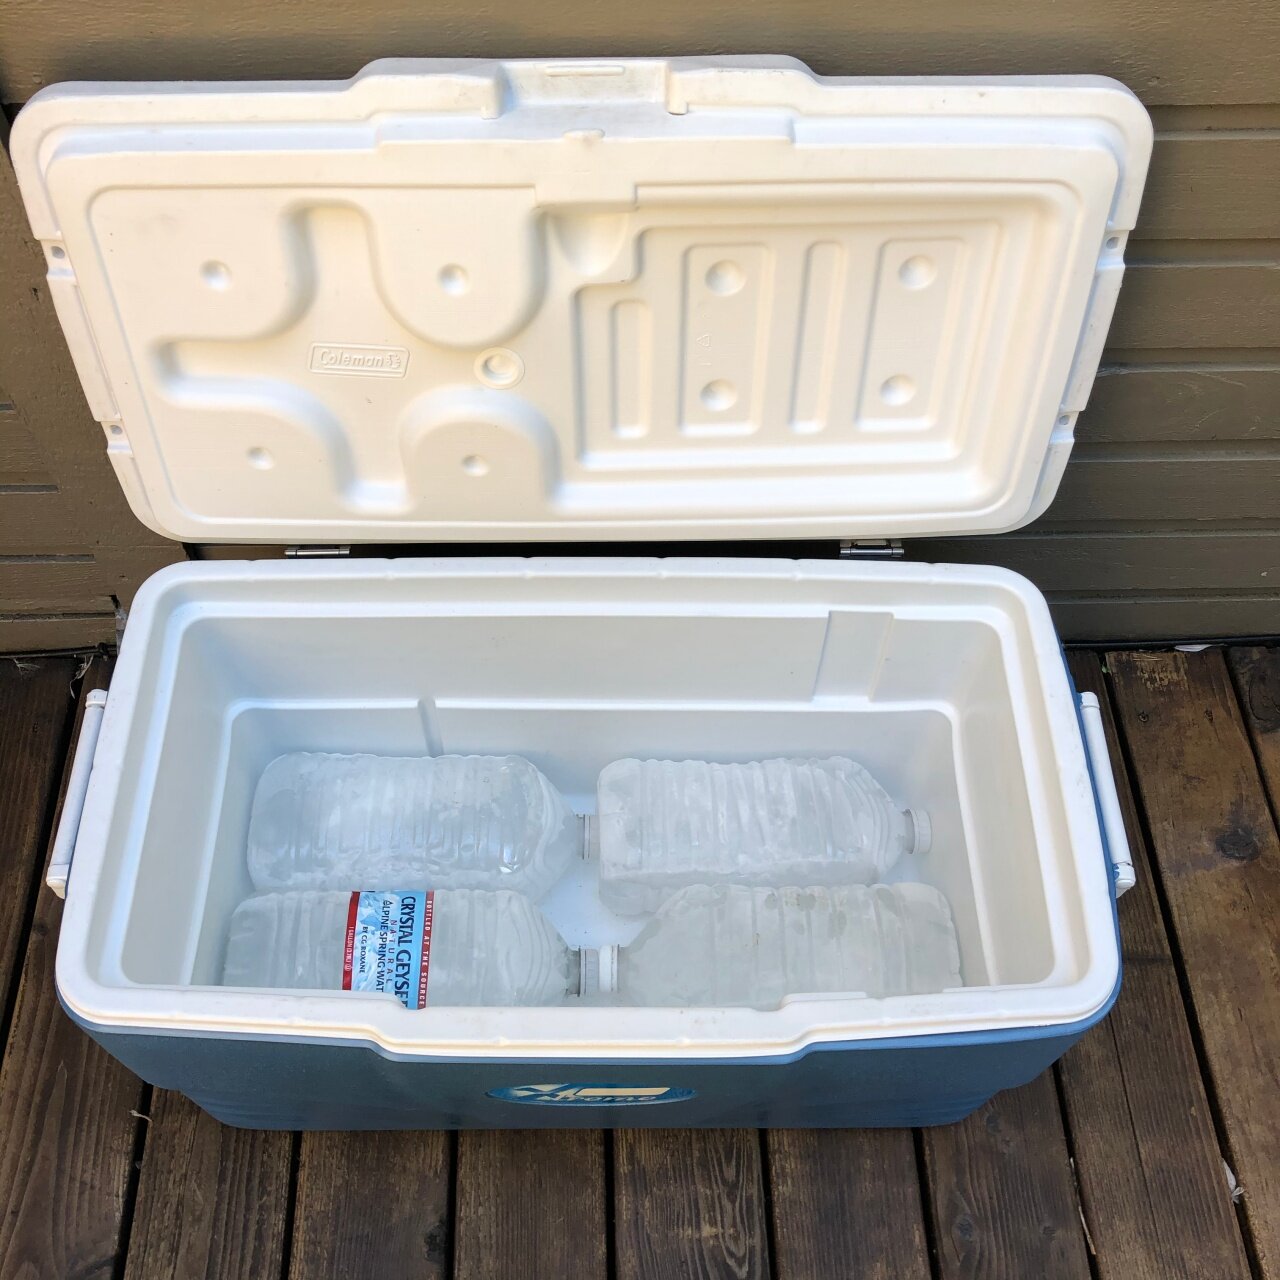
Freeze some plastic bottles for your ice supply, so you never have nasty melt water sloshing around the bottom of your cooler. One gallon Crystal Geyser bottles can be bought almost anywhere, are reasonably sturdy, and best of all are square-ish to fit nicely in a larger cooler. Mix and match water bottle sizes to fit the cooler you have. Empty two liter pop bottles are another good choice, and a bit more sturdy because they're built to handle carbonation.
Plus, when the ice melts, you have a big jug of cold water for drinking or cooking.
If you're don't have access to a freezer, block ice always lasts longer than ice cubes. However, most commercially available block ice you buy at stores is actually made from squished together ice cubes, and so it melts much faster than ice you freeze yourself.
Get resourceful on refreezing your bottles. If you're camping somewhere that's near a freezer, ask nicely, and you very well might be able to pop a few bottles in a restaurant freezer overnight to give you ice for the next few days.
(Side note on cooler sizes: bigger is always better for ice preservation. It's physics: the more mass of cold you have, the longer it's going to last.)
Use heavy duty shopping bags (or plastic containers) to keep food away from the ice
The last thing you want is your precious food taking a bath in yucky melted ice water, having delicate items getting crushed, or burrowing around to pull out the one thing you need that's worked its way to the bottom. Put all food into large container(s) or plastic reusable shopping bags.
Keeps food totally separate from any ice melt in your cooler.
Lets you quickly grab what you need minimizing the time the cooler lid is open, which helps a lot with ice preservation.
The downside is you lose a tiny bit of storage, but to me the trade-off is worth it.
Start with a couple of good quality reusable plastic shopping bags, like from Trader Joe's or Whole Foods. Note, these may not be completely waterproof, so you might want to test them first. If you follow the previous suggestion of keeping your ice in plastic bottles, the shopping bag(s) will pretty much keep your food perfectly dry. Try to be gentle with delicate produce in these bags; easier said than done.
For plastic tubs, go to a restaurant supply or “Cash and Carry” type store. Google “restaurant supply”. The containers are typically round or square, and come in lots of different sizes. The square shaped ones obviously fit better in a rectangular cooler. Bring your cooler with you to be sure the containers fit.
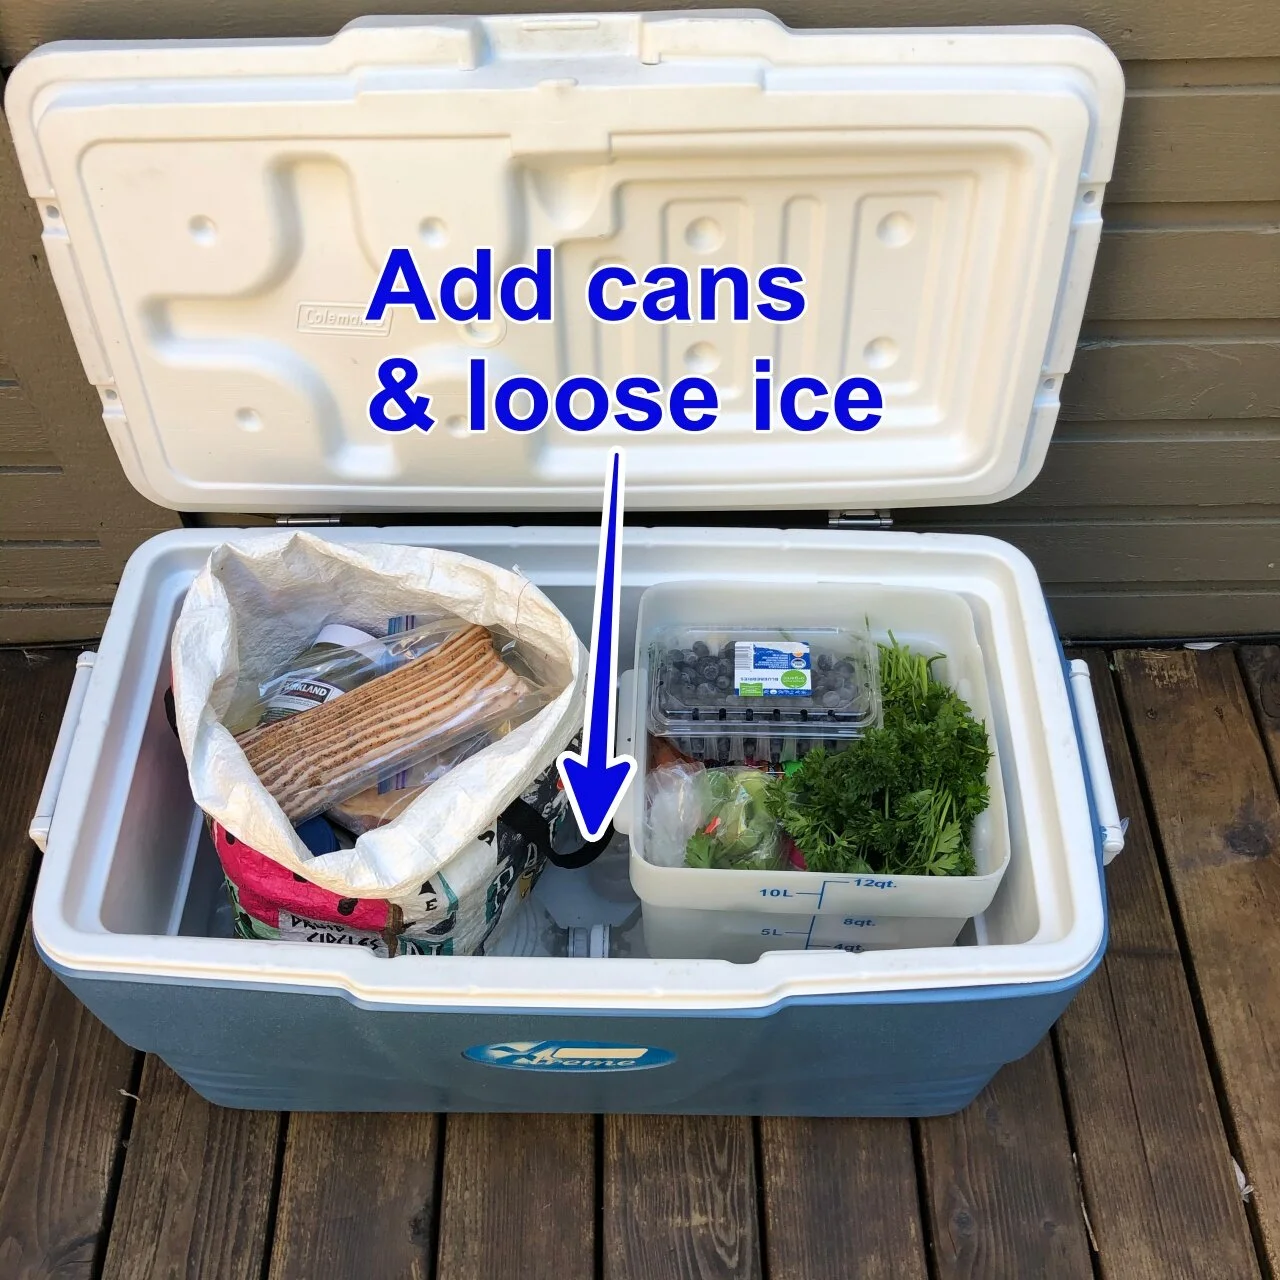
For my cooler, a 12 quart container fits nicely. Cost, about $12. My main cooler can fit two 12 quart containers side-by-side, with loose ice in the bottom and narrow frozen water bottles in between. If you’re taking a large amount of food, use two containers side-by-side. Try dinner stuff in one and lunch stuff in another, so you can just reach in and grab it and pull out the container you need. Doing this minimizes the time the cooler is open on a hot day, which helps a lot with ice preservation. Put fragile food, like fruit, inside the plastic tub, it can protect it a bit.
If the container stands just a little bit tall for your cooler, don't be shy about cutting off the top to make it fit. A power jigsaw is perfect for this.
Getting ready to pack: Put the bottles in flat on the bottom and the food on top, fill the space between with loose ice cubes and cold cans. Fruit and veggies in the plastic bin (so they don't get squished), everything else in the shopping bag.
Transfer anything liquid from a “snaptop” into sturdy “screw top” containers
Salsa? Hummus? Forget those plastic tubs that they come in. When (not if!) the top comes off inside the cooler you’re going to have a TOTAL mess! (This is also known as ”cooler soup” =^) And yes, I've made that mistake; definitely not recommended.
Repackage into repurposed sturdy plastic screw top containers. Save the empty ones throughout the year, and by summertime you'll have a nice collection. Smaller rectangular containers stack really well and are space efficient. Sauerkraut containers (see the salsa photo below) are especially stout. Talenti ice cream comes in nice reusable screw top jars. Costco has a lot of items in large squarer screw top containers, such as mixed nuts.
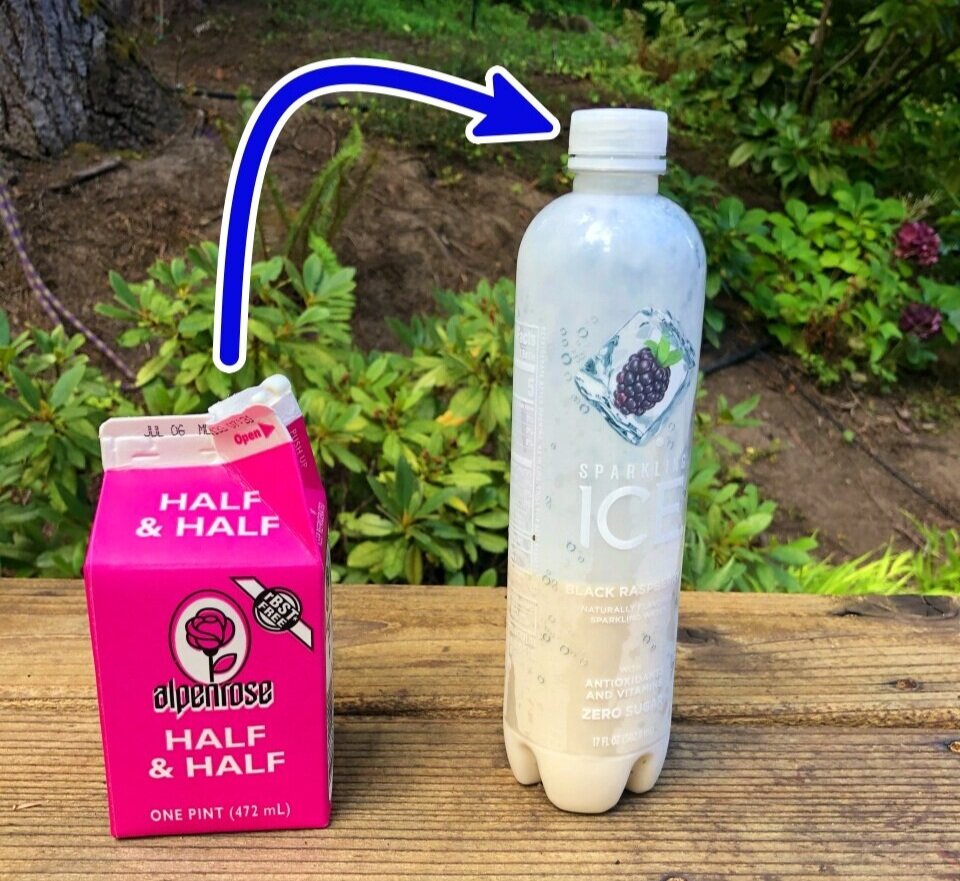
Putting a paper container (milk, creamer, orange juice, etc.) straight into your cooler is also asking for trouble. It gets wet, the paper gets weak, and a puncture is highly likely. Instead, transfer liquids into sturdy empty plastic bottles. Tall skinny ones like this are good; they save on space and are easy to grab from above. (And yes, you can freeze milk and half-and-half.)
Eggs? I crack them into a sturdy plastic bottle, pour some half-and-half and give them a shake. They can be frozen, and give perfect scrambled eggs with zero mess once they are thawed.
Cover your cooler with wet fabric, and/or try to keep it in the shade
Take an old, light colored towel, get it wet, and drape over your cooler if it's in the sun, like on a raft or the bed of truck. This gives some evaporative cooling and helps with ice preservation.
If you want to really get fancy you can make a “cozy” for your entire cooler out of mylar coated bubble wrap, called Reflectix. This also keeps direct sun off of your cooler and on a multi day trip can really help with preserving ice.
The main concept is to try to avoid opening your cooler in the heat of the day. When it's cool in the morning, pull out everything you need for lunch from the main cooler and maybe transfer it to something smaller.
Pre-chill or freeze as much food as you can
Coolers are good at keeping food cold, but not so good at making food cold. Avoid putting any warm or room temperature food, especially drinks, into your cooler. Buy your canned beverages already cold, or pre-chill them the night before in another smaller cooler or main fridge and then add to your main cooler the day of your trip. Try to freeze all meat before you put it in the cooler. (If you can prep slice the meat and even put a marinade on it before you put it in the cooler, bonus points for you. The vacuum sealer can be your friend here.) What else can be frozen, like pasta sauce, milk or scrambled eggs? Freeze everything you can.
On a related note, you can pre-chill your entire cooler. Take a few sacrificial bags of ice, put them in the cooler the night before your trip, and then load your pre-chilled food in the day you leave. (If you have access to a walk-in freezer or refrigerator, that makes it a lot easier.) This also works with a smaller flexible fabric type cooler, simply put the whole thing in your fridge or freezer the night before.
Bring an extra cooler just for ice
If you're on a long trip and you have the extra space, consider bringing an additional large cooler just for ice. As the ice melts off in the main food cooler, you can replace it, plus always have clean ice available for beverages.
For the “ice-only” cooler, duct tape the top closed to help eliminate any air drafts, and also reduce any temptation to open it before you really need to.
Bring an extra cooler just for drinks
If you’re planning a trip with lots of, ahem, beverage consumption, a good approach is to have one cooler for food that gets opened only at mealtimes, and an entire separate cooler for beverages, that has mostly loose ice. This keeps thirsty people from constantly opening and closing the main food cooler.
Empty space means warm air, which means your ice is going to melt faster. Ice is cheap. Buy an extra bag or two and fill up the whole cooler completely. If possible, pre-chill all beverages before you put them in the cooler
Add a cover inside your cooler
Cut a piece of closed cell foam pad to fit snugly inside of your cooler, to add a extra insulation. A folded wet towel put inside the lid does much the same thing, preventing your ice from getting blasted by hot air. This can also keep your food away from condensation or any meltwater.
Go a creek nearby? Put your cooler in it!
If you have a cold stream / lake nearby, keep your cooler in it. Of course be sure it doesn’t float away or tip over, that would be a problem. 😉
Did someone give you block ice? Put it in a dry bag
If you're on a river trip and someone donates a block of ice to you, you can put it inside a dry bag, and then put the dry bag in the cooler. This keeps all the meltwater contained.
Try dry ice
Consider using dry ice underneath your frozen water jugs. That can get you an extra day or two of cold. Note that some food does not do well stored with lots of dry ice, like many vegetables. This is more of an issue if you use all dry ice in your cooler. If you have mostly frozen water jugs and a little dry ice, it's gonna be fine.
Divide your food for sections of a longer trip
You're lucky enough to be on a LONG river trip, an extended desert adventure, or anywhere where are you can’t restock ice. Here's one approach:
You need two coolers. Ideally, one is large and well insulated.
Separate your food carefully (I mean carefully!) into the first half of your trip and the latter half of your trip. (Let's say we have a 10 day trip, so call days 1-5 “cooler 1” and days 5-10 “cooler 2”.)
Pack your food (using the tips mentioned above) in each cooler. Make cooler 2 the larger and more insulated one, so you can hopefully pack in a bit more ice.
On cooler 2, duct tape the top closed and write on the tape: “DO NOT OPEN until day 5!” Maybe even make a reflectix cover for it as mentioned above, keep it in the shade as much as possible, and whatever you do, don’t open it until all the food in the first cooler is used up. Simply not ever opening cooler #2 until day 5 is the biggest thing you can do to preserve the ice. The duct tape reminds people not to even think about opening it, as well as sealing up any micro air leaks.


