How to tie the perfect retraced figure 8
The retraced figure 8 tie in knot is probably the most important knot you’ll ever tie, so it's well worth it to pay attention to the small details so it's perfect every time. No twists, crosses, or other weirdness! (A figure 8 doesn’t need to be tied absolutely perfectly to function. If you have a twist or cross in the strands, it's still going to be fine. However, it is the fundamental knot in climbing, so let's take the time to do it right!)
Lots of instruction on the retraced figure 8 (be at books, video, or in person) fall short in explaining it properly. Simply saying, “Tie an 8 about a meter from the end of the rope, pass the free and through your harness, and then retrace the 8” doesn't tell the whole story. There are quite a few different ways you can do this, and many of them lead to an end product that’s Less Than Ideal.
I’m going to show you the way that works best for me, that I teach, and that people seem to find the easiest to learn. If you have a different way that works for you, and the result is a perfect knot, then keep doing what you're doing!
Let's learn some of the nuances of a perfect retraced figure 8 knot.
First off, avoid talking when you or your partner are tying into the rope. Like packing a parachute, your tie-in knot is worthy of your complete attention, so stop the chitchat for a few seconds when tying in.
It may be tempting to begin the knot like the left photo below, because that's where the large obvious “hole” is. However, this often leads to crossed strands in the final knot. (Yes, there is a way to tie a retraced figure 8 correctly by doing this, but for most people that leads to twists and confusion.)
Instead, begin your knot as shown on the right.
Some instructors call this “start hard, finish easy.” This advice is a little cryptic, but it means start the knot through the hard-to-see, non-obvious “hole”, and finish the knot, with the remaining two passes, through the the easy-to-see, obvious “holes”.
(I put blue tape on the end of the rope to more easily see it.)
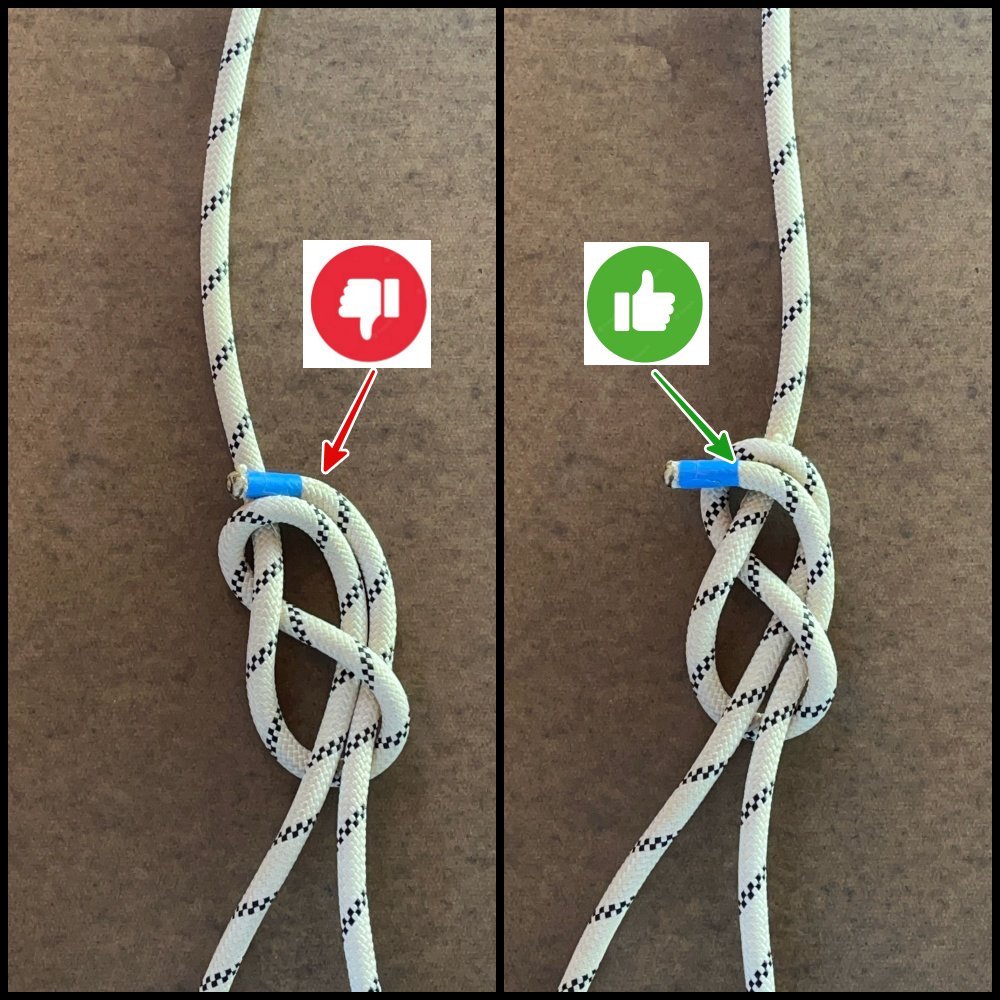
This next photo shows a problem that trips up many experienced climbers. (And yes, I’ll admit that I did this step wrong for quite a long time . . . )
In the left photo, if you pass the end OVER the top of the knot, you end up with the strands crossed when you're done. (At least, I always did!) While you can correct it later, why not do it right the first time?
Pass the end of the rope BELOW the top of the knot, as shown in the photo on the right. This gives you a perfect symmetrical knot when you're done, no twists or crosses.
If you make either of the two goofs above, your completed knot will probably look something like the one on the left below. See how the strands are crossed? That's not a catastrophic mistake, but it's not 100% correct either.
Below on the right is a proper retraced figure 8. All strands are nice and tidy, parallel, with no crossing or twisting.
There’s also a proper length tail on both knots, not too long not too short. Ideally the tail is about 6 inches / 15 cm. If your tail is shorter than this, start over. If your tail is longer than this, you can tie an overhand knot to take up the extra. But it’s unnecessary and doesn’t add any extra security to the knot, in spite of what the rules might be at your local rock gym.
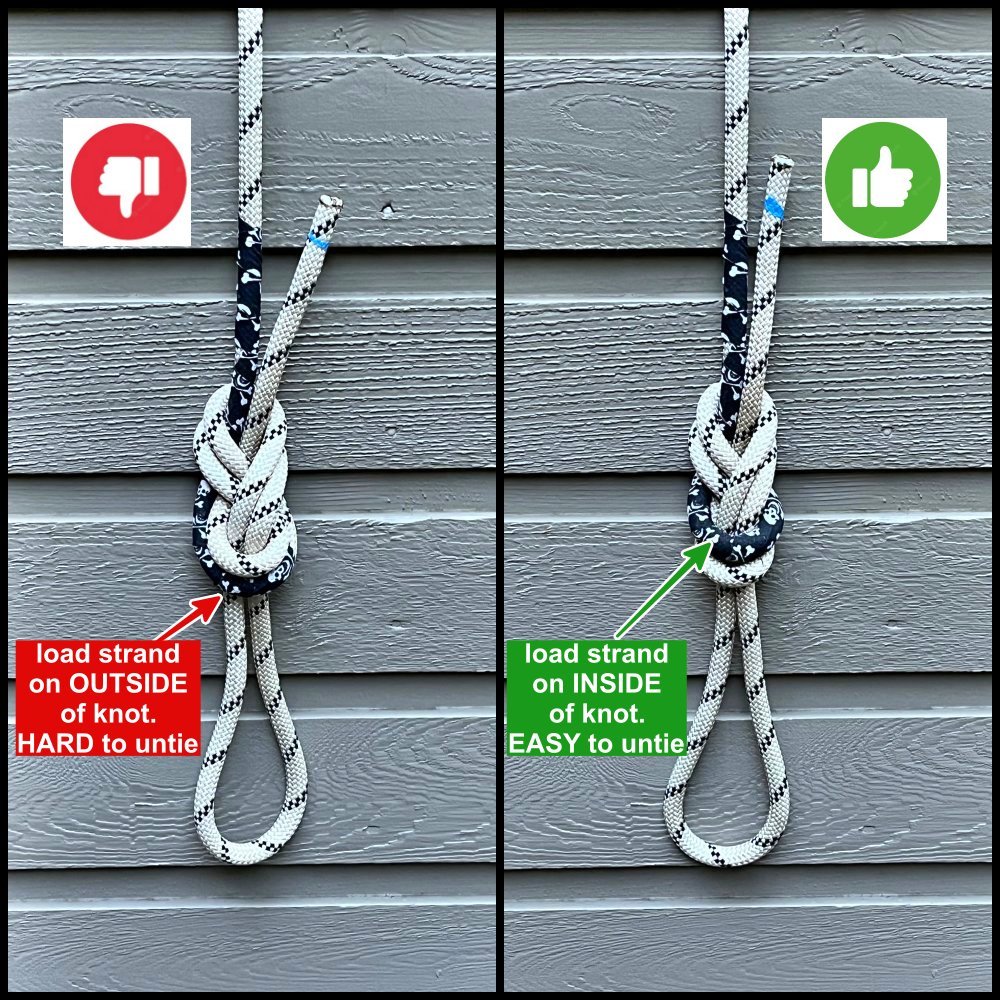
There's another subtlety for tying a correct figure 8, and that is keeping an eye on where the load strand goes. (If you tie it like I showed above, the load strand will always be in the correct place.)
Let’s add some tape so we can more easily see what's going on. (Note the skull and crossbones hockey tape, my favorite for marking soft goods like slings! =^)
The load strand on the left comes out on the OUTSIDE of the knot.
The load strand on the right goes through the MIDDLE of the knot.
Most people find the knot on the left to be significantly harder to untie. It can depend a bit on how much load you're putting on it, the type / diameter of rope you are using, etc.
Why?
Load strand on the outside of the knot: When loaded, this cinches down on the entire knot, even to the point of partially deforming it. No loose strands, welded, hard to untie.
Load strand on the inside of the knot: the very top strand goes to the rope tail, and takes minimal load. This gives you a slightly looser strand to start with when you need to untie it.
Both versions are equally strong and secure, the difference is only in the ease of untying.
When I posted this on Instagram, a substantial number of people commented that I was completely wrong, and having the load strand on the outside of the knot makes it easier to untie. Well, maybe that works for you, but it's not my experience, nor what various other rope experts have to say on it. The relative ease or difficulty of untying a knot is a fairly subjective judgment. Try both ways yourself and see what you think.
Check out the nice video below from “Hard is Easy”for a very thorough discussion of every step tying a retraced figure 8. If you’re a new climber you may benefit from watching the whole thing. If you're more experienced, start at 7:08 to see some of the methods discussed above.


