

Alpine Tips

All about friction hitches - Part 2
Let's take a deep dive into the hitch cord, something that deserves to be on your harness. If DIY, how long a cord and what diameter? If factory made, what are the options? What about spliced instead of sewn? Are eye to eye hitch cords helpful for climbers? Answers are all here.

Premium Members can read the entire article here:
I'll start with a story that a student shared with me awhile back in a self rescue class.
This person, climbing second, was traversing on a multi pitch route. They took a fall, swung into overhanging terrain, and found themselves hanging in space about 5 meters below the last bolt. All they needed to do was ascend the rope and keep on climbing. They had a cordelette and various slings, but didn’t know how to rig them as friction hitches to climb the rope. (There was too much friction in the rope for the leader to haul them up; plus the leader didn’t know how.)
This turned into a call to the local search and rescue team, and this unfortunate person had to wait almost 4 hours to get rescued, hanging there in their harness! Ouch!
A little knowledge of improvised friction hitches, and how to use them to ascend a fixed rope, would've solved the issue.
The humble friction hitch cord. Inexpensive, lightweight, and pretty much infinitely useful when it comes to #CraftyRopeTricks and self-rescue stuff.
Let's have a closer look at the hitch cord, the Swiss Army knife problem-solver of climbing gear.
Is a “hitch cord” the same as a “prusik loop”?
Terminology: I'm using the more general and accurate term of hitch cord. Why?
You can tie several different knots with a hitch cord, like an autoblock and Klemheist, not only a prusik.
It doesn't have to be a loop, it can be “eye to eye", with a small loop on each end. (More on that below.)
How do you make your own friction hitch loop?
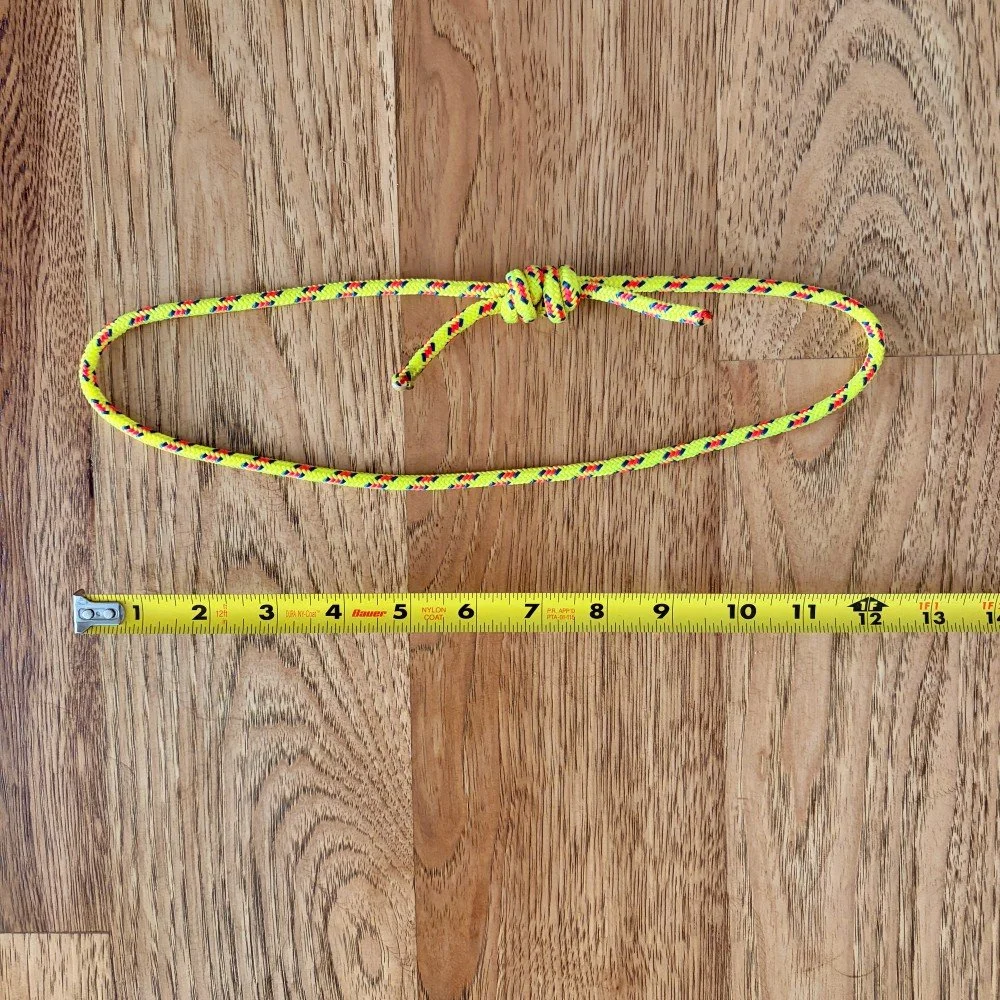
To tie your own, a good starting point is 120 centimeters / 48 inches of 6 mm cord.
I’ve experimented a lot with the length. 106 cm / 42 inches (when tied) gives about the smallest usable loop. 120 cm gives you more wiggle room. Having a little extra length in your hitch cord is usually fine, but having one that's too short can be a problem. I suggest starting with 120 cm, tie different hitches on different diameter ropes (single and double strand) and then trim it down a bit if you want.
A common mistake is making a hitch cord that's too long. You only need it long enough to tie an effective hitch onto whatever diameter rope(s) you're using, and enough space to clip a carabiner. When you first cut the cord, it's probably gonna look too long. That double fisherman's knot, with nice long tails, takes up a lot more cord than you might think.
6 mm is a good diameter. It's small enough to be grabby on small diameter ropes, but big enough to inspire confidence when you're hanging from it way off the ground.
When you're done tying it, you want a loop that measures about 30-38 cm / 12-15 inches when you stretch it out. (The photo below shows a slightly smaller loop.)
Have the climb shop use their hot knife to seal the ends. If that's not an option, tape the cord where you want to cut it, slice it carefully with a sharp knife, and then put a few dabs of superglue on the end to seal it up. Here's my longer article on how to neatly cut a rope.
Different manufacturers make cord of various softness / stiffness. Cord that’s softer tends to work better for friction hitches, so if you have a choice, go for that.
Tie into a loop with a double fisherman's knot that's properly dressed, and really snug down the knot with tails of at least 5 cm / 2”. After you get the length dialed, you can get this knot wet and crank it tight by bouncing on it, because you're never going to untie it.
Test your rigging systems
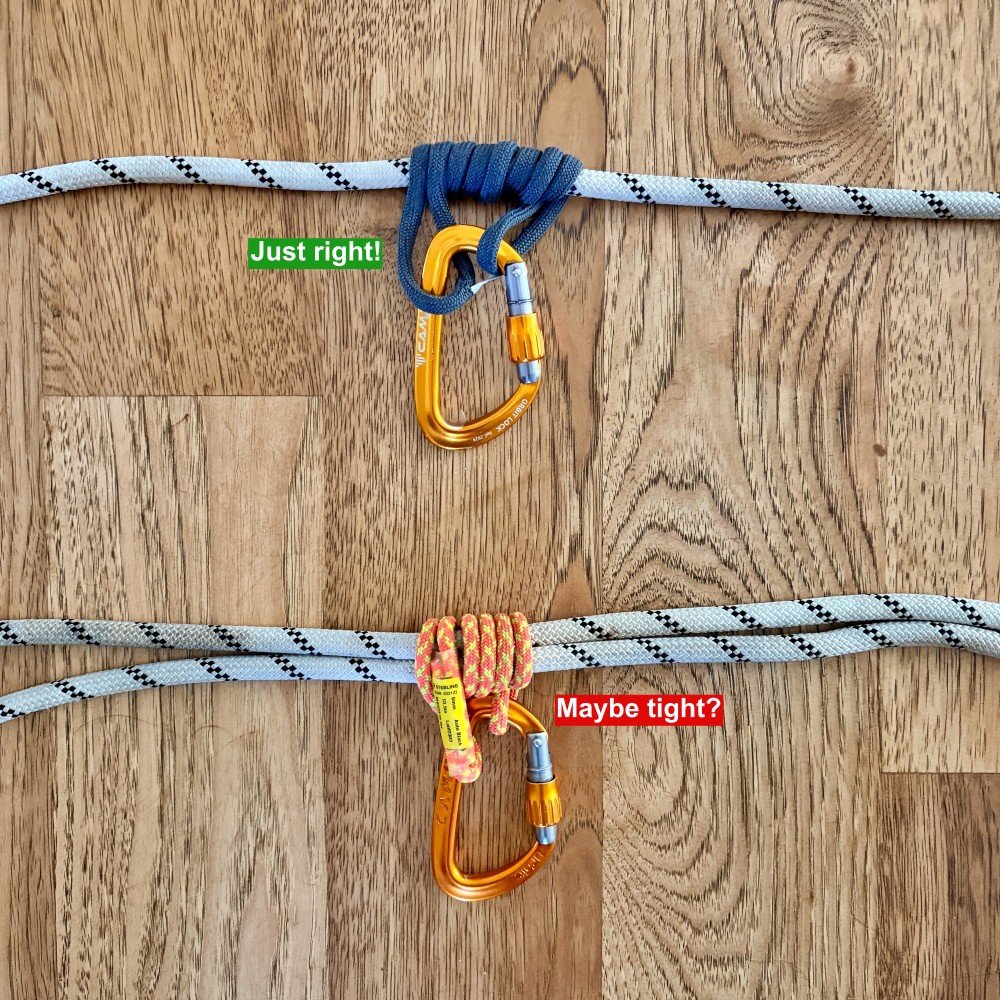
It's good to have a go-to setup, especially for a rappel autoblock, that you use all the time. Test different flavors of hitch loops with the rope that you use most often, both double strand and single strand, to see, which works the best. This could be especially important with smaller diameter rope.
You don't want to find out in the middle of a rappel that your hitch cord has too much or not enough friction. Figure this out ahead of time in a controlled environment. Maybe start on a staircase, and then move to something vertical close to the ground.
For example, in the photo below, the auto block hitch on the single strand of 10 mm rope looks great. However, the hitch cord on the double strand is just barely big enough.
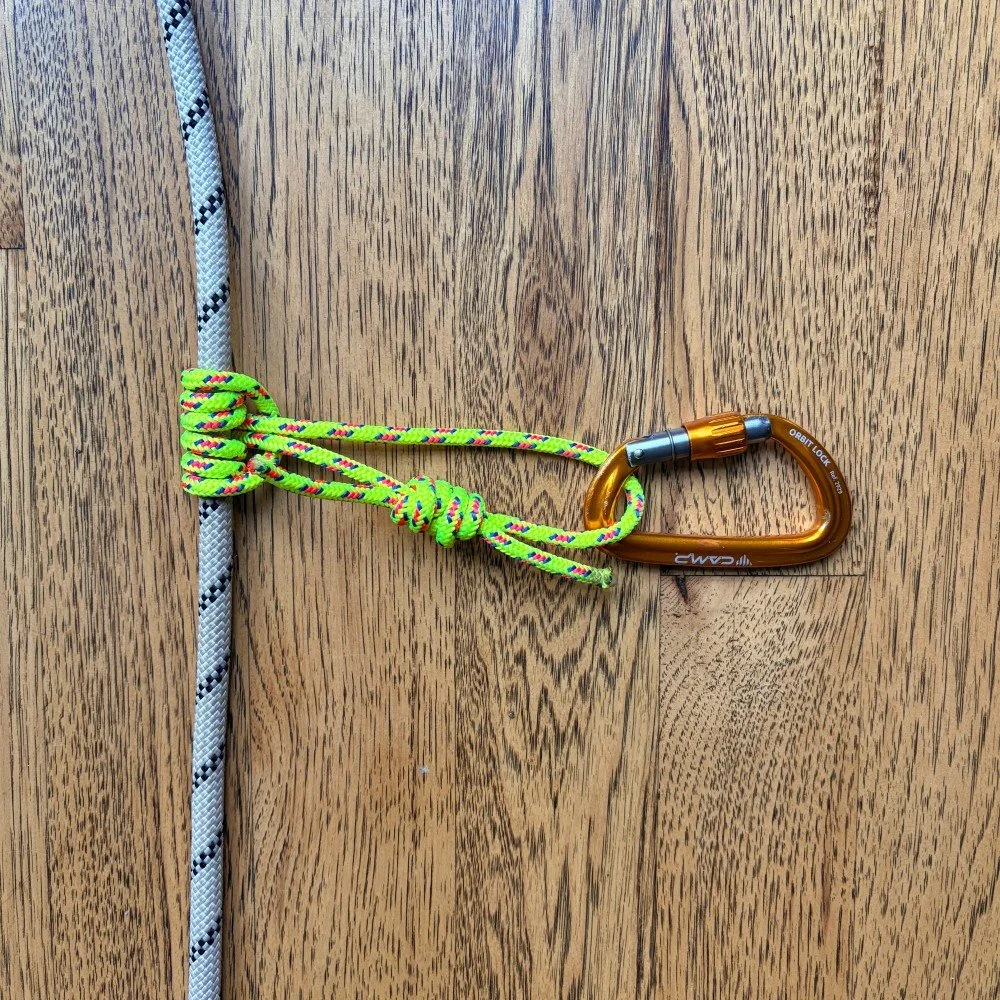
How do you rack it? Do the twist
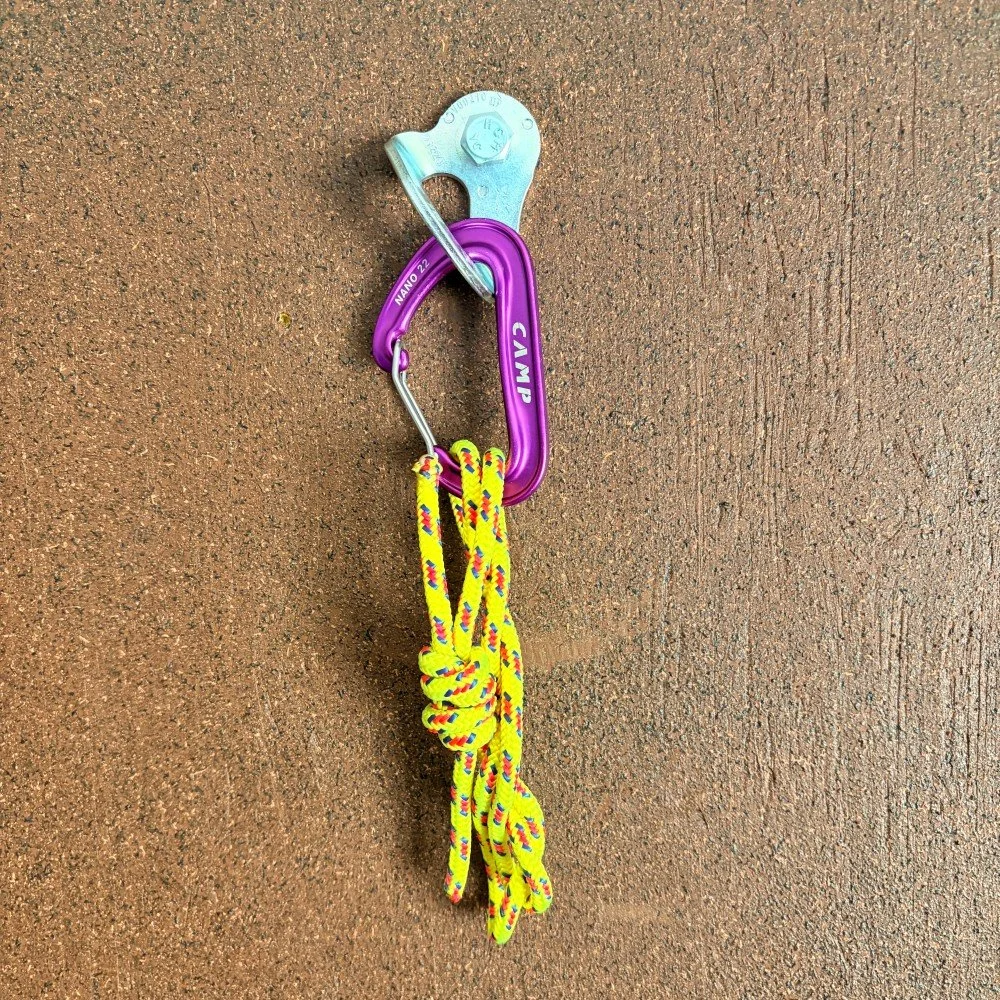
My favorite way: “do the twist”. Hold the loop by both hands, put a few twists in it, then clip it with a carabiner. The cord sort of does a little double helix thing, gives itself a hug, and makes a neat bundle for your harness. No need for fancy macramé projects. The twist is fast, simple, and works with cordage of any length.
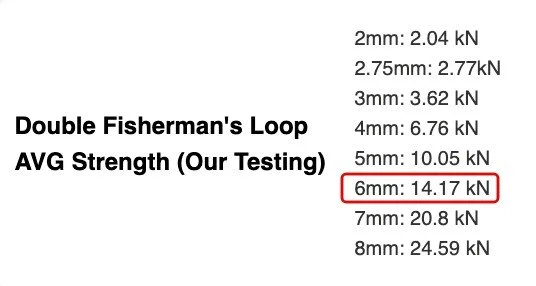
How strong is that DIY hitch loop?
Great question. Our friends at HowNOT2 have these specs on their website. Sterling 6 mm accessory cord, tied into a loop with a double fisherman's knot, is around 14 kN.
Can I use a Dyneema sling to tie a friction hitch?
Yes, you can, but cord is usually better. Cord is typically more “grabby”, so you might have to make a few more wraps if you use Dyneema. But hey, if you're in some unexpected situation and you need a friction hitch, like the one described at the top of this article, then go for it.
It's best practice to NOT use a Dyneema sling as a third hand / rappel backup. Because Dyneema has a relatively low melting point, the heat generated from a fast rappel could potentially damage the sling.

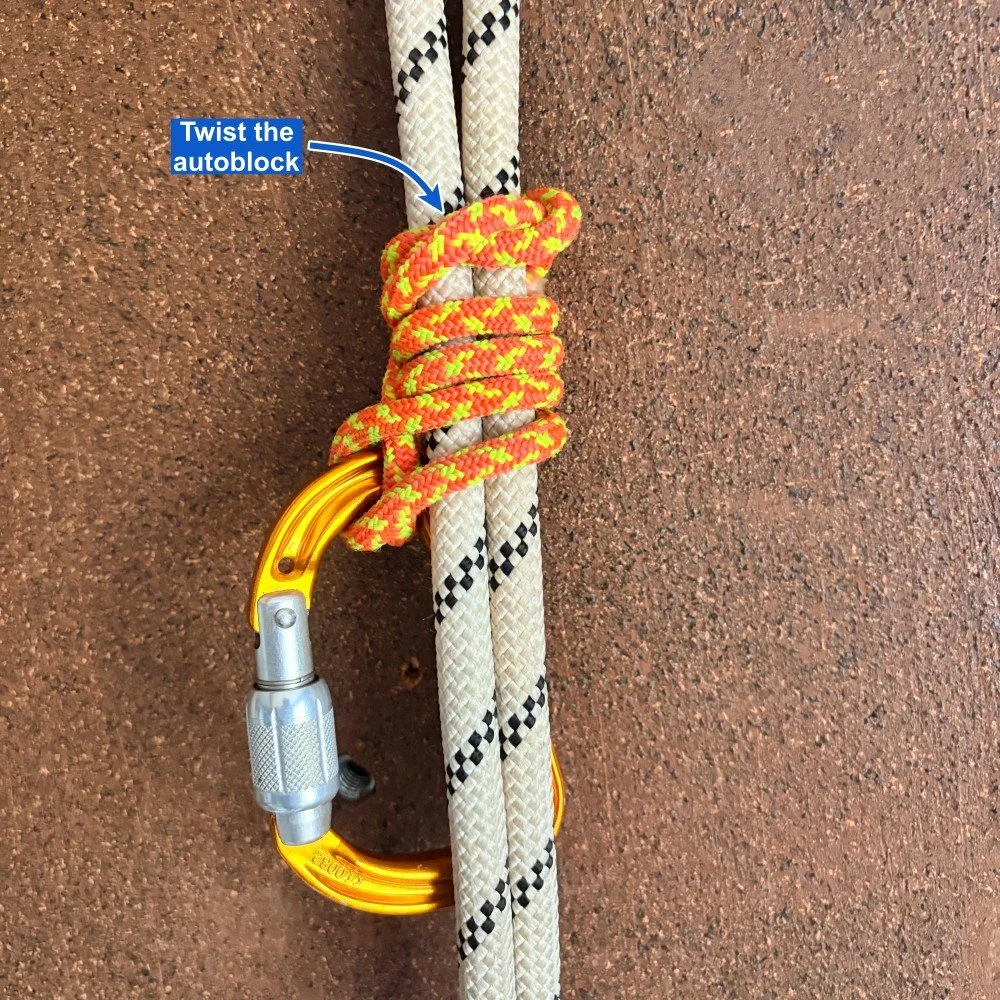
Autoblock tip: add a twist
Sometimes, your autoblock rappel backup might be too “grabby” with three wraps, or not grabby enough if you only use two wraps. Here's a trick that can help.
Instead of making the third wrap, instead twist the auto block sling a couple of times before you clip it to the carabiner. This effectively constricts the hitch onto the rope, which can often give you just the right amount of friction for a smooth rappel.
Here’s a bonus article on this topic (usually only available for my premium members) with a video from an IFMGA guide showing how it's done.
What about factory made hitch loops?
Most rope manufacturers offer some version of a sewn hitch loop. These are usually sewn, so they're a little less bulky and slightly easier to tie friction hitches. They're also more expensive than the DIY version.
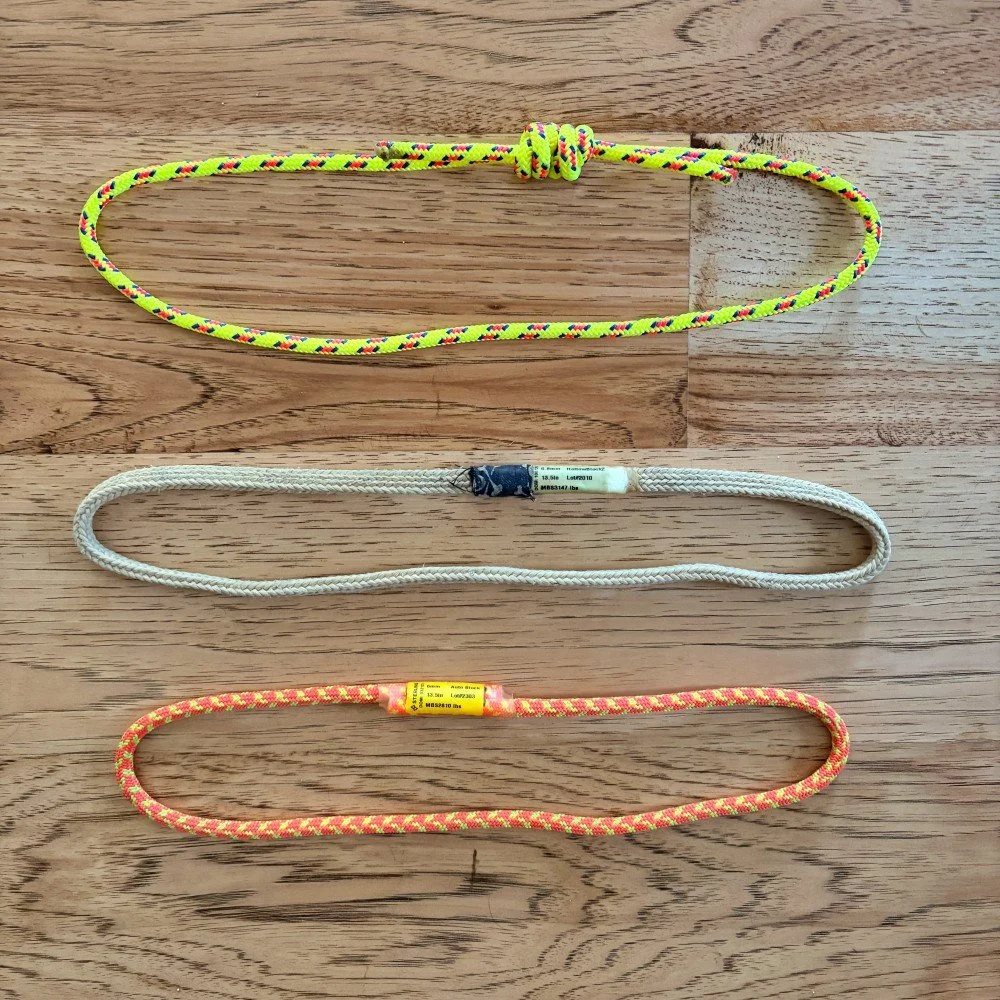
When you're out with friends who have different flavors of these, give them a try and see what you think. Below are some that I have.

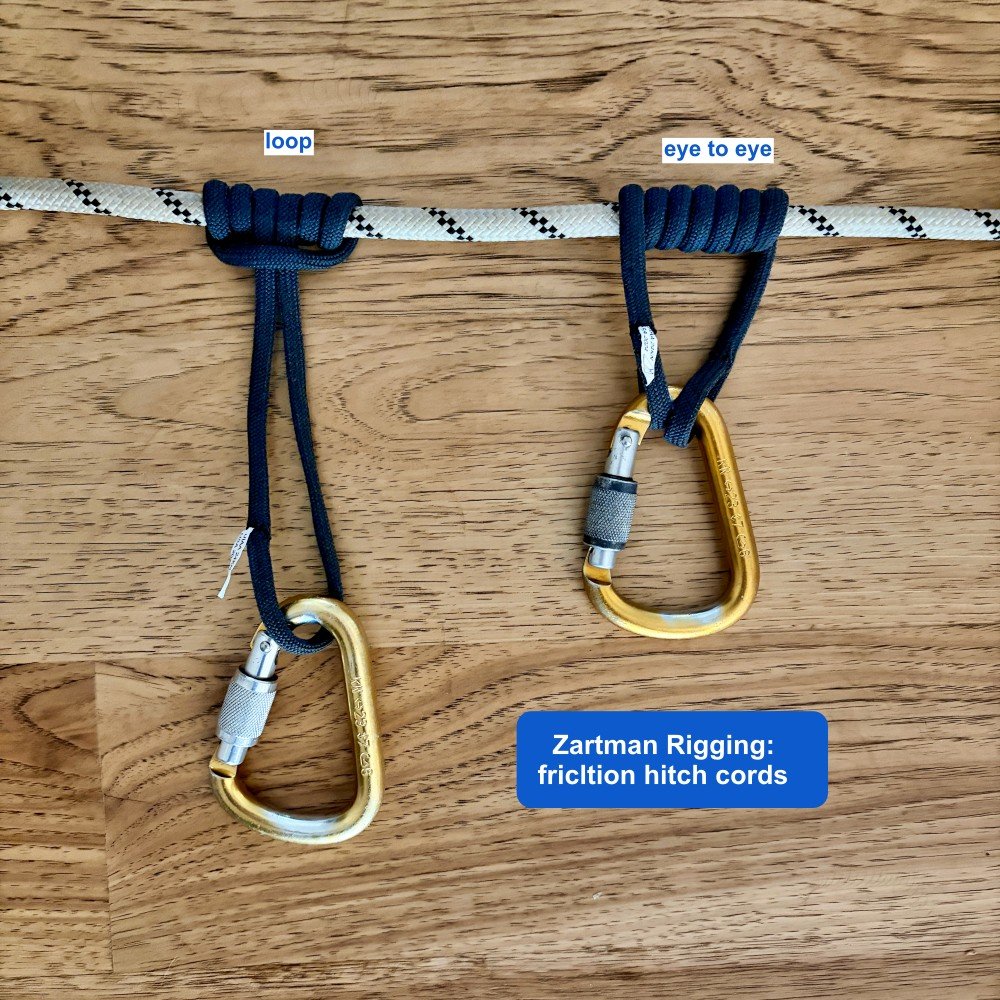
What about spliced hitch cords?
Zartman Rigging make some very interesting spliced soft goods for climbing, among them two flavors of hitch cord. One is a loop, the other is eye to eye.
Because of the splicing, there's no stitching. That makes it easier to tie a friction hitch.
Dyneema core with a Technora / Aramid sheath
UIAA rated to 24 kN
Very interesting products! Check out the Zartman Rigging catalog here.
Here's a link to my more detailed article about Zartman products.
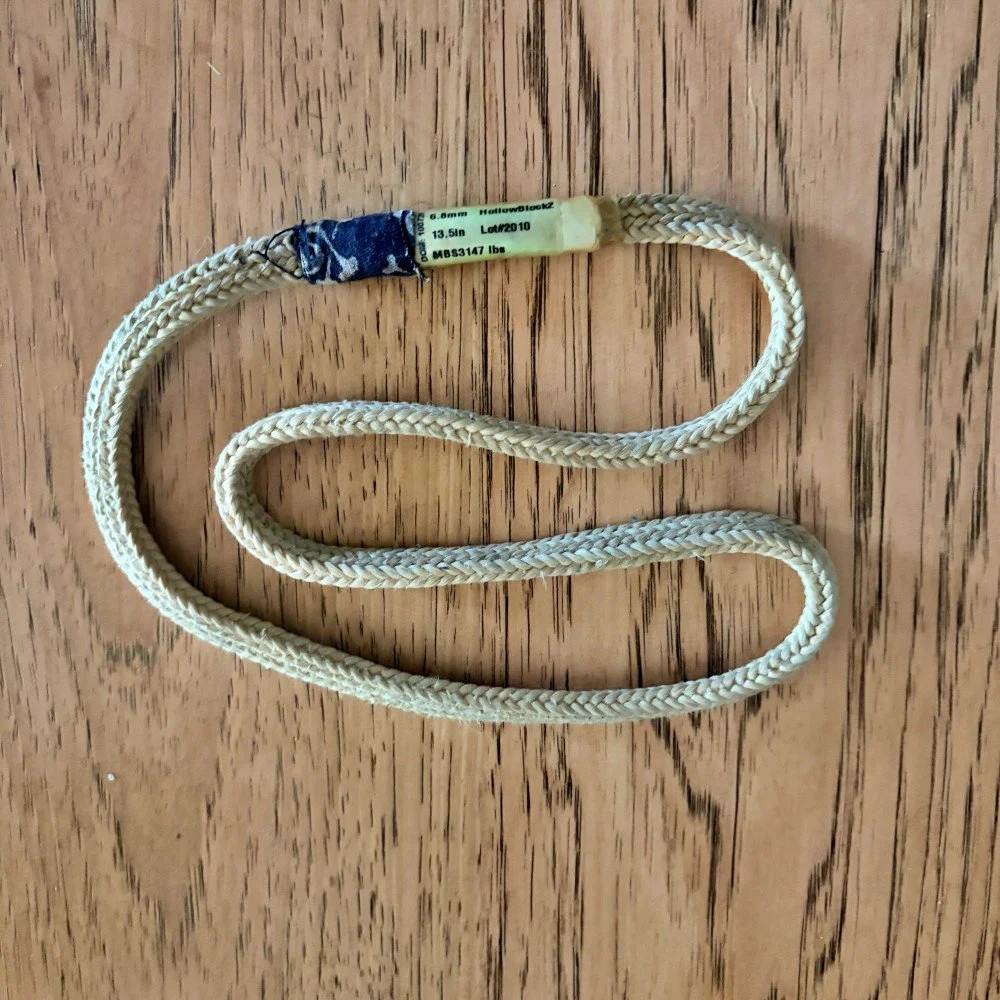
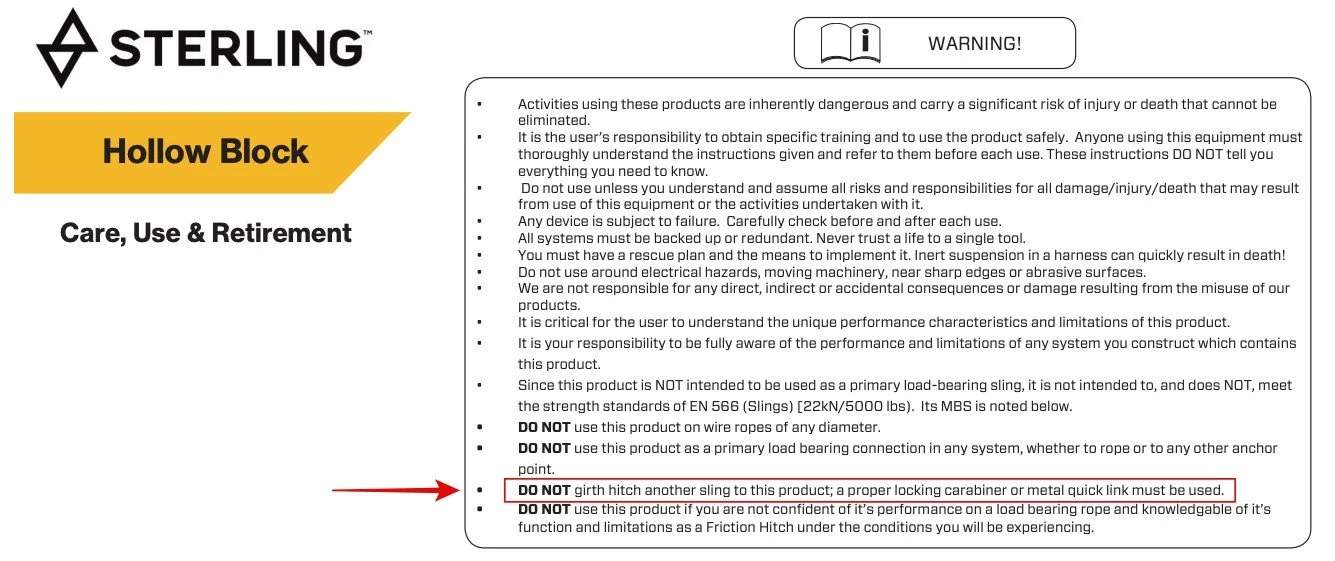
More on the Sterling HollowBlock . . .
A common factory sewn hitch loop is the Sterling HollowBlock. This is made of Aramid/Kevlar, grabs quite predictably on ropes of various sizes, and is a popular choice as third hand back up for rappelling.
Because it doesn’t have a sheath, dirt/sand/gunk can get inside the cord and compromise its strength. As with all small diameter cord, replace if it starts looking the slightest bit worn out.
Here's a nice article from Sterling about when to retire a HollowBlock.
The current iteration of the HollowBlock is version 2, which Sterling says is made out of a stronger material. Get version 2.
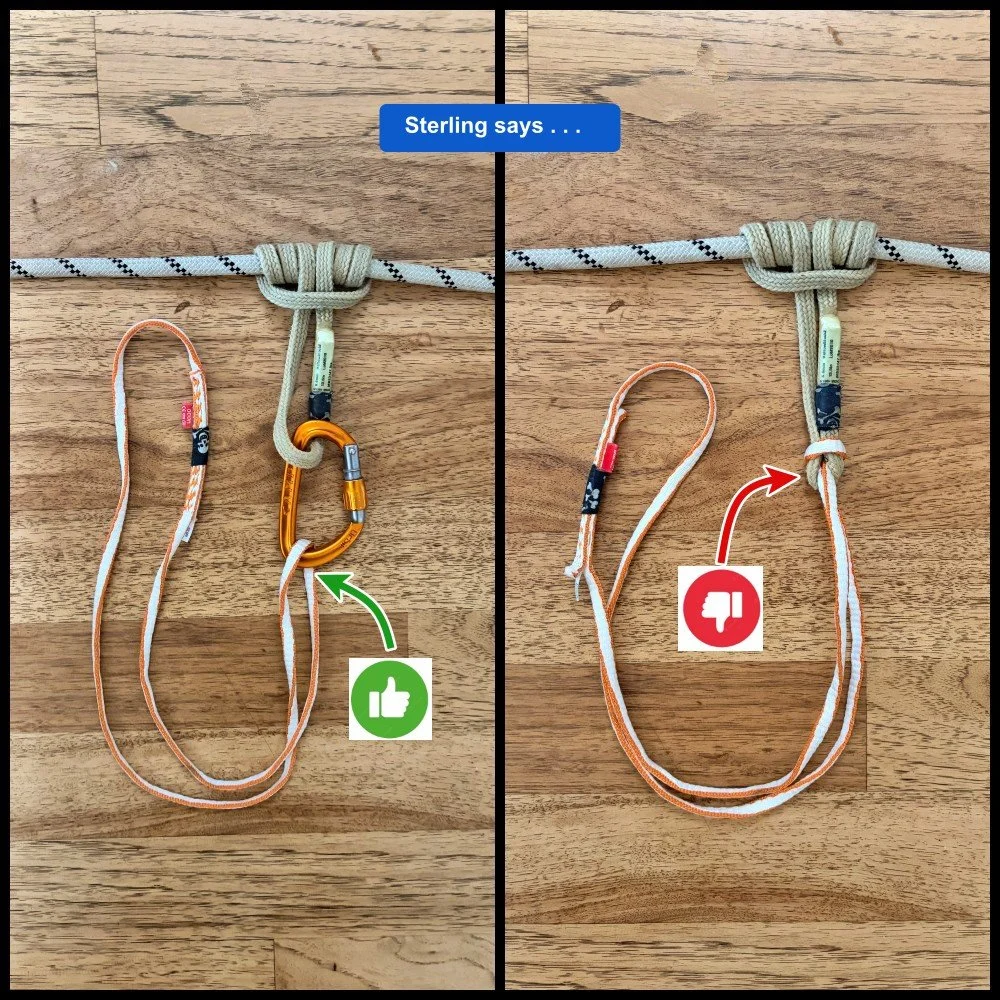
HollowBlock caution: no girth hitching
Sterling says on their website to avoid girth hitching another sling directly onto the HollowBlock. Instead, they recommend a carabiner to connect the slings.
I don't know if this notice is from the legal department or from the engineering department, but I wanted to pass it along.
(Personally, I've girth hitched slings directly on a HollowBlock for rope ascending practice quite a bit and haven't seen any damage; your mileage may vary.)
What about wet or icy ropes?
Friction hitches are usually less grabby if your rope is wet or iced up. Take additional wraps with the hitch around the rope to increase friction. This is a case when having a slightly longer friction hitch to make that extra wrap can be helpful. Test before use!
What about carrying a “waist” prusik and a “foot” prusik in case I need to ascend a rope?
Don't bother. Those are pretty much single use pieces of gear, and it's very old school to carry those. Instead, improvise with the gear you have.
With a short hitch loop attached to longer slings or cord, you can make just about any rope ascending system you need. Here's a link to my article on this.
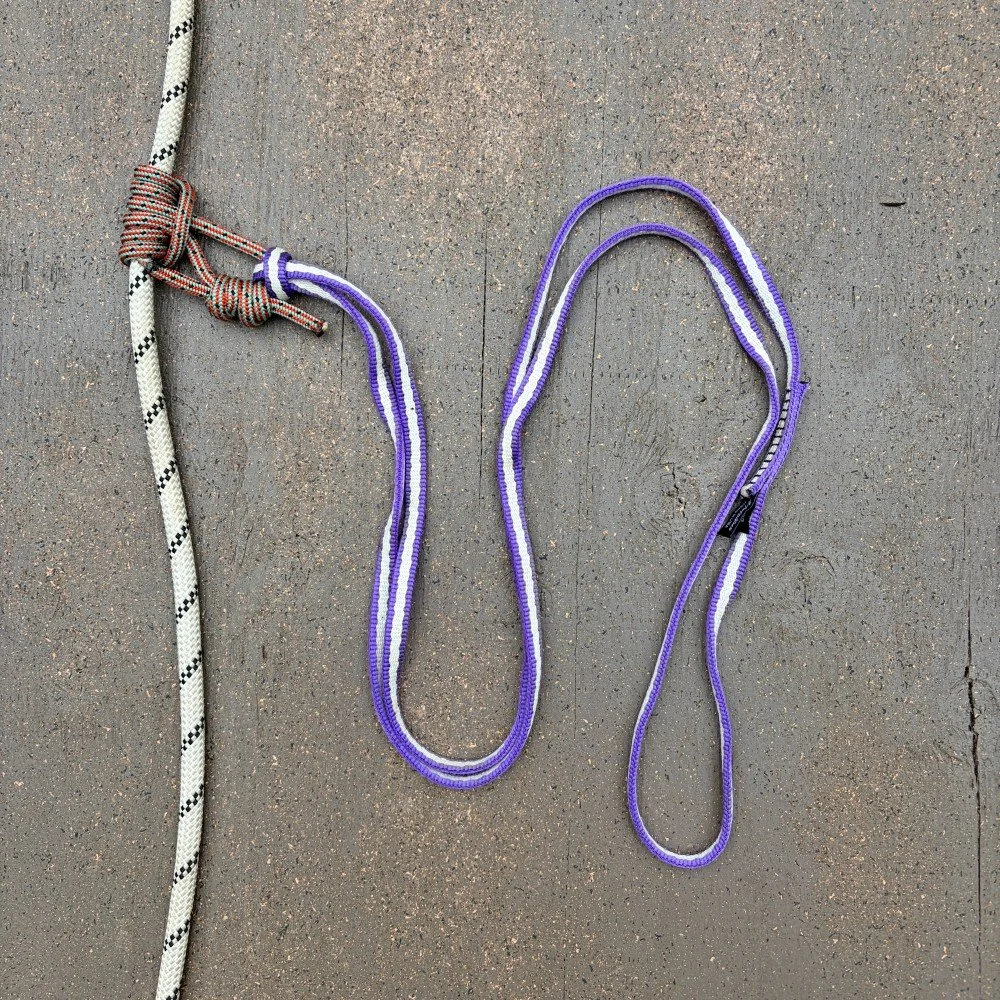
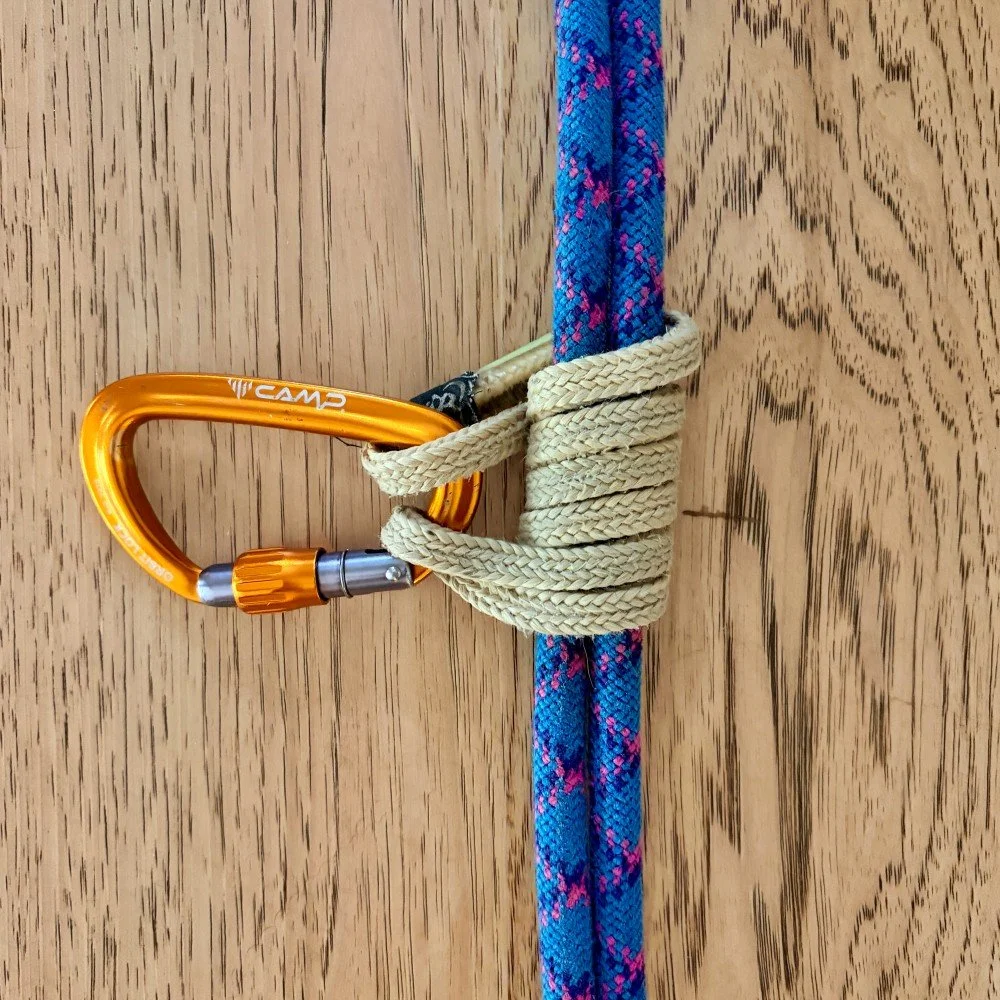
Here’s a short hitch loop, with a 120 cm sling girth hitched to it. This becomes the “foot prusik” for ascending a rope.
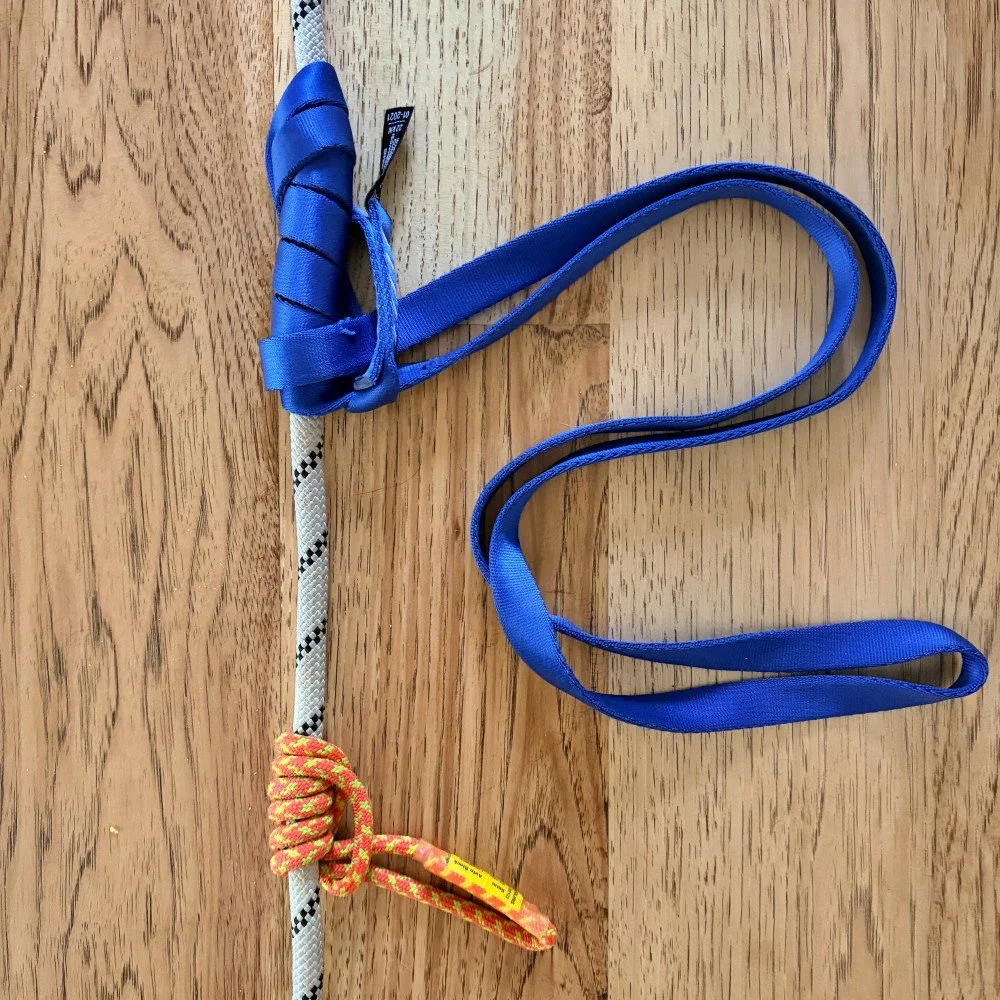
What about an attachment for your waist? Attach a 60 cm sling to another short friction hitch loop.
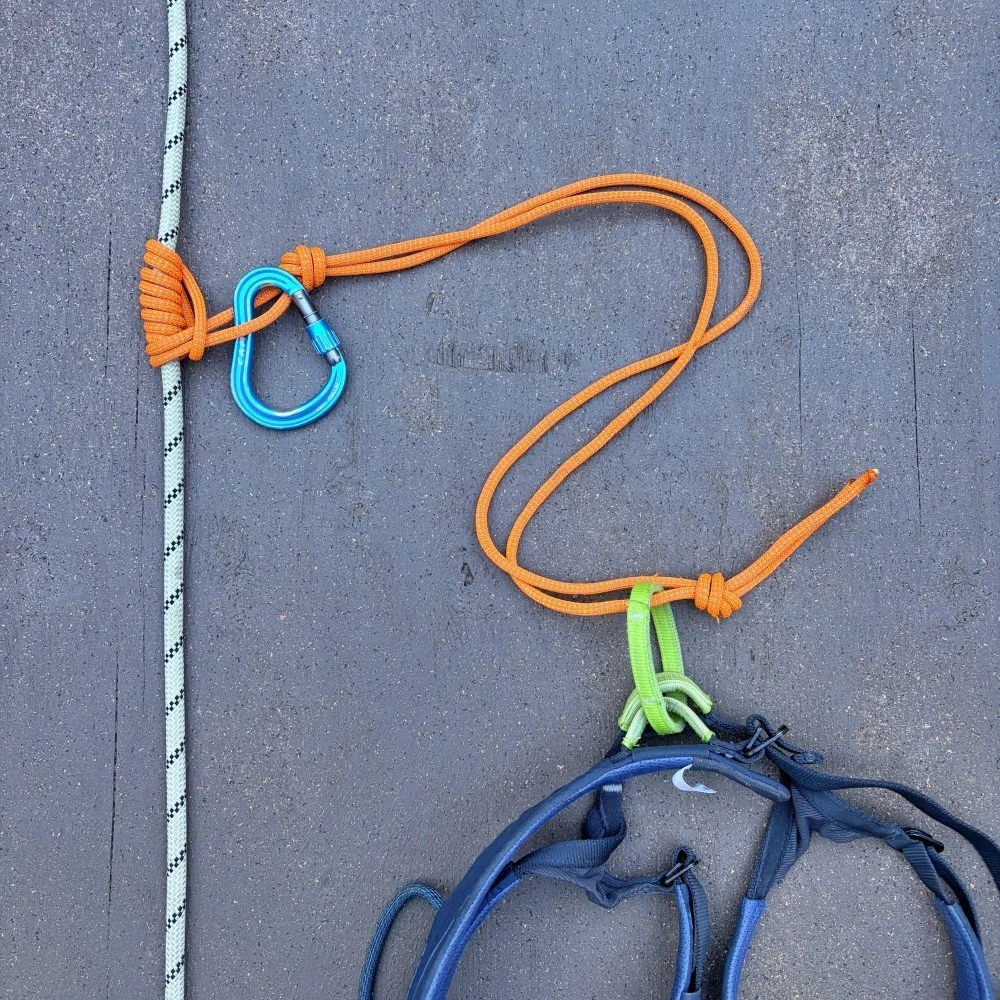
Here‘s a long 6 mm cordelette, tied with a Klemheist hitch to the rope. An overhand knot is tied close to the hitch, giving a convenient clipping point. A long cord can make a hitch loop of any length you need, nice!
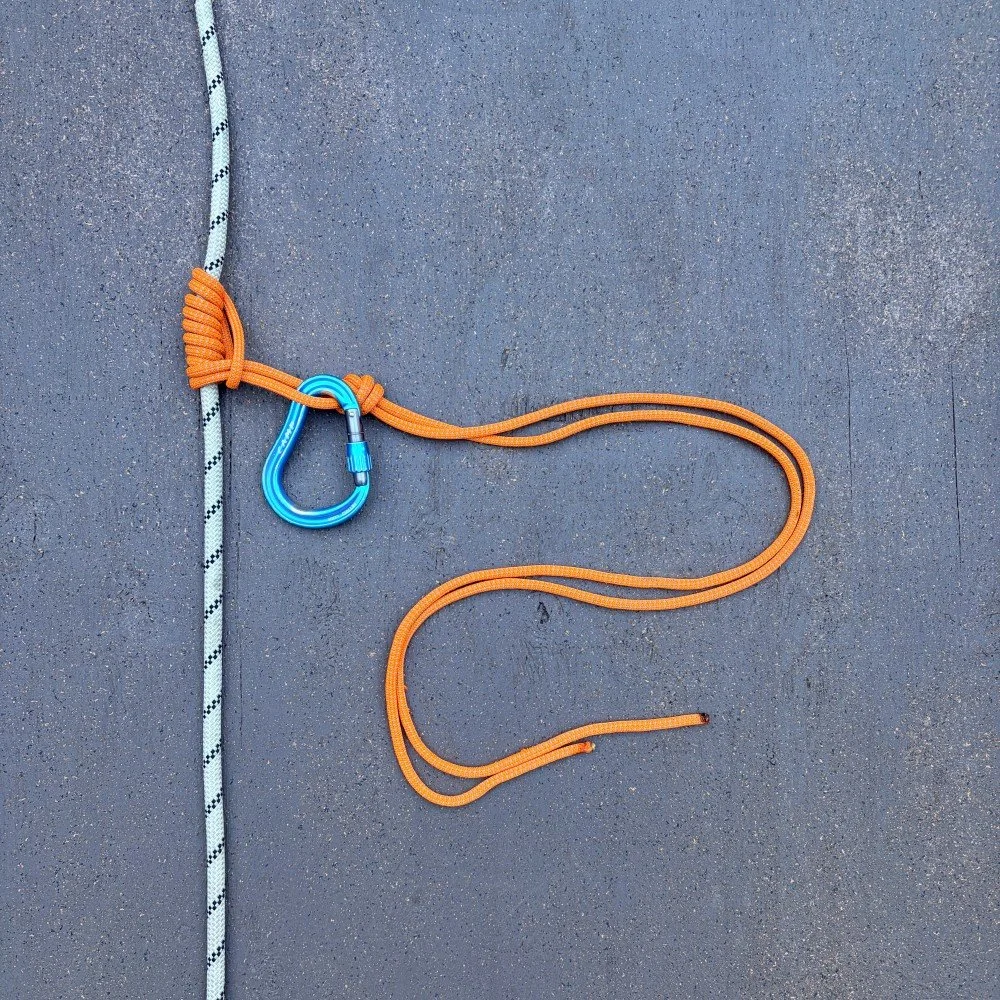
Taking the above example a step further, you can pass the cord through your harness, tie an overhand knot to connect yourself, and then clip the carabiner for hauling or other rescue operations to the short loop close to the friction hitch. This can be helpful for crevasse rescue; I cover more about this technique in this article.
(Related tip: when you're on a glacier, you generally don't need to have your friction hitch(s) already on the rope. Keep them at the ready on your harness, and add them to the rope if you need to.)
Here’s a nice diagram from Ortovox showing this method.
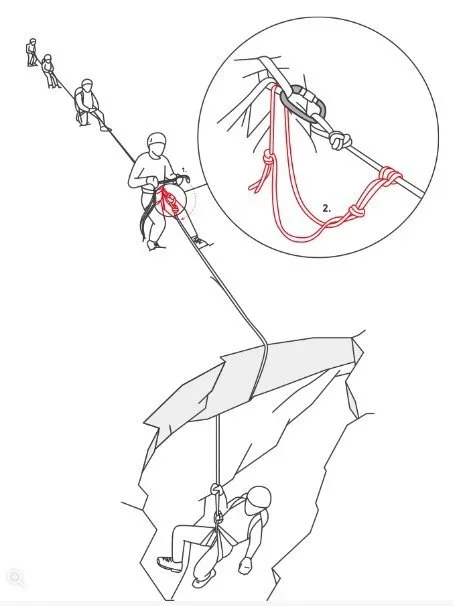
image: https://www.ortovox.com/uk/safety-academy-lab-ice/chapter-3/rescuing-a-companion
What type of hitch cord works on skinny 6 mm rope?
Usually, the diameter of the hitch cord needs to be at least a couple of millimeters smaller than the diameter of the rope it's going on. This makes it challenging to use hitch cords on 6 mm ropes like the Petzl RADline.
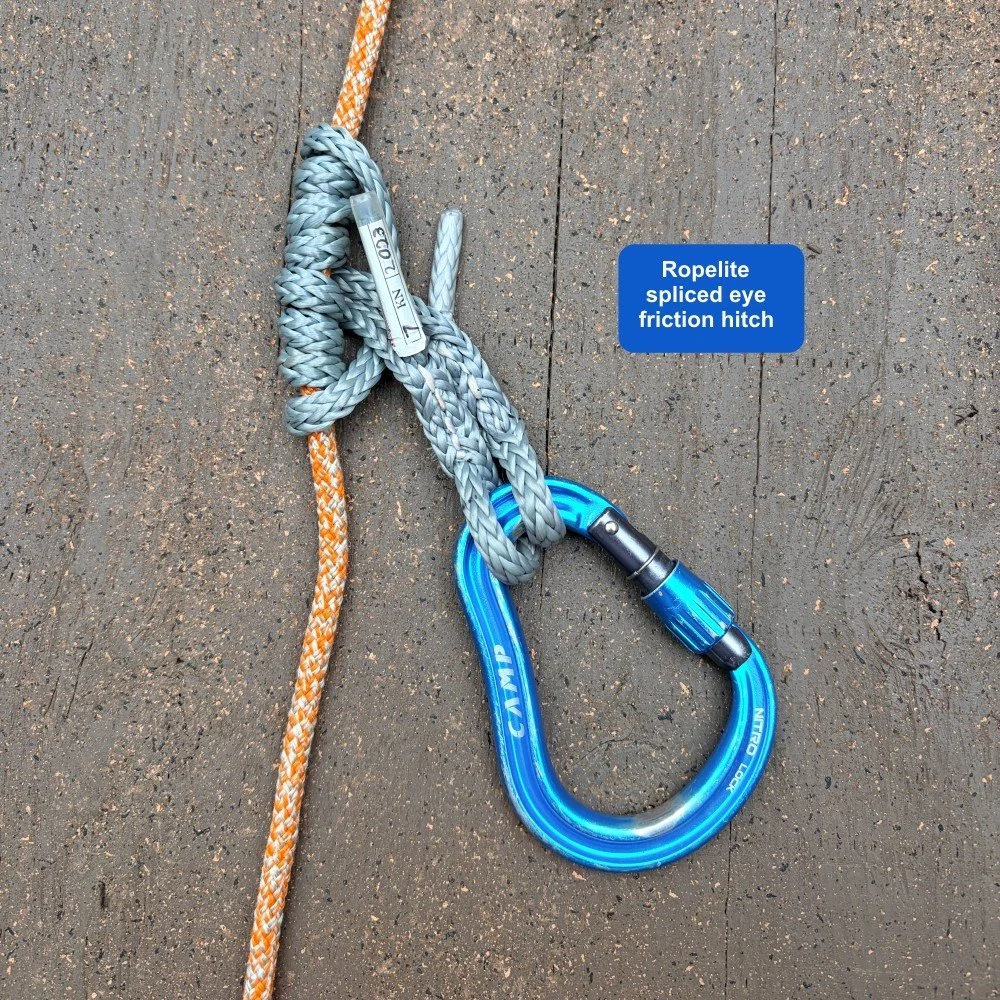
Here's what I have that works well; a spliced polyester 5 mm cord from Ropelite. Even though it's just 1 mm smaller than RADline, a four wrap prusik holds my bodyweight on a single strand.
Ropelite makes some other similar products from Vectran and Technora, as well as other creative, lightweight cordage. Check them out on my “Innovative Gear” page.
Does it matter where the bartack / stitching goes?
What about “eye to eye” hitch cords?
What’s a (small) caution on the Beal Jammy?
Join my Premium Membership to read the rest of the article.
Thanks for your support!


All about friction hitches - Part 1
The humble friction hitch: probably the lowest cost, lightest weight, and most useful thing you could have on your harness for creative rigging and self rescue. Learn about 'em here.
Premium Members can read the entire article here:
The humble friction hitch loop. Inexpensive, lightweight, and pretty much infinitely useful when it comes to #CraftyRopeTricks and self-rescue stuff.
(Something I've noticed over the years: the more experienced the climber, the more likely they're gonna have a hitch loop or two on their harness. Unless you're in the gym; then you look like a dork.)
Let's have a closer look at friction hitches (Part 1) and hitch loops (Part 2, coming soon), the Swiss Army knife problem-solver of climbing gear.
What is a friction hitch, and how is it used?
A friction hitch is a type of knot that is usually tied with a short loop of cord, which from now on I’ll call a “hitch cord”.
When a friction hitch is tied onto a larger diameter rope, the hitch grabs the rope when it's weighted, and can slide when unweighted. You can tie a friction hitch on a single strand of rope, or on two strands.
This makes it helpful for many common climbing techniques, such as:
Ascending a fixed rope
Backing up a lower
Backing up a rappel
Rope grab (and progress capture) in mechanical advantage hauling systems
Safety on a fixed line when you're near a cliff top or crevasse edge
Can I clip my grandma to one friction hitch?
Short answer, no. A single loop of skinny cord should not be your only safety connection in any part of your climbing system, and that includes a friction hitch.
A hitch cord holding a human sized load should always be backed up in some way.
Typically, this backup is:
An additional rope grab or friction hitch
A backup knot
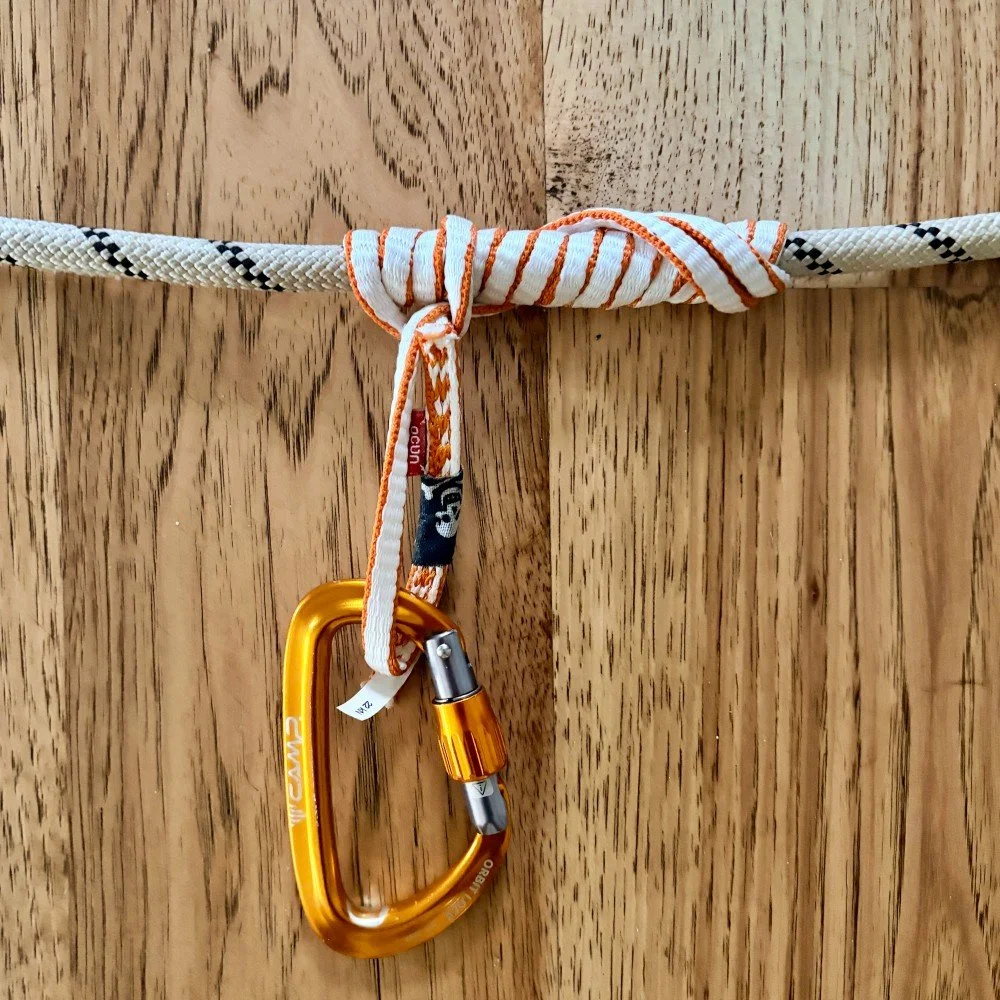
Below left: the load is held only by the friction hitch, and there's no backup. Not good.
Below right: if the friction hitch slips or fails, the load is caught by the backup knot clipped to the blue carabiner. Much better. As you pull more rope through your haul system, you can add additional backup knot(s).

Is a friction hitch the same as a prusik?
“Prusik” is one of the more confusing terms in climbing, because it's a verb, an adjective, a noun, and even a proper noun! It’s named after Karl Prusik, the Austrian mountaineer (and yes, Nazi) credited with its invention. (For this article, I'm using the more precise terms “friction hitch” and “hitch loop”.)
Short version: a prusik is a type of friction hitch, but not all friction hitches are prusiks. Without being too fussy about definitions, be aware that “prusik” is used casually by climbers to mean lots of different things:
“I'm going to prusik up that rope.” (verb)
“Did you bring your prusik loop?” (adjective)
“Good thing I brought my prusik” (noun)
How “grabby” does it need to be?
Sometimes grabby is good, other times not so good. This is why it's good to have a few different friction hitches in your toolbox, so you can use the right one for the task.
Sometimes you want a friction hitch that grabs tight and is hard to loosen up, like for a tractor on a mechanical advantage hauling system. For that application, a three wrap prusik or a klemheist with a lot of wraps might work best.
Other times you want to hitch that slides easily, like when you want to ascend a rope, or as a rappel backup. In that situation, an autoblock or a klemheist with less wraps could be a good choice.
A caution on the autoblock . . .
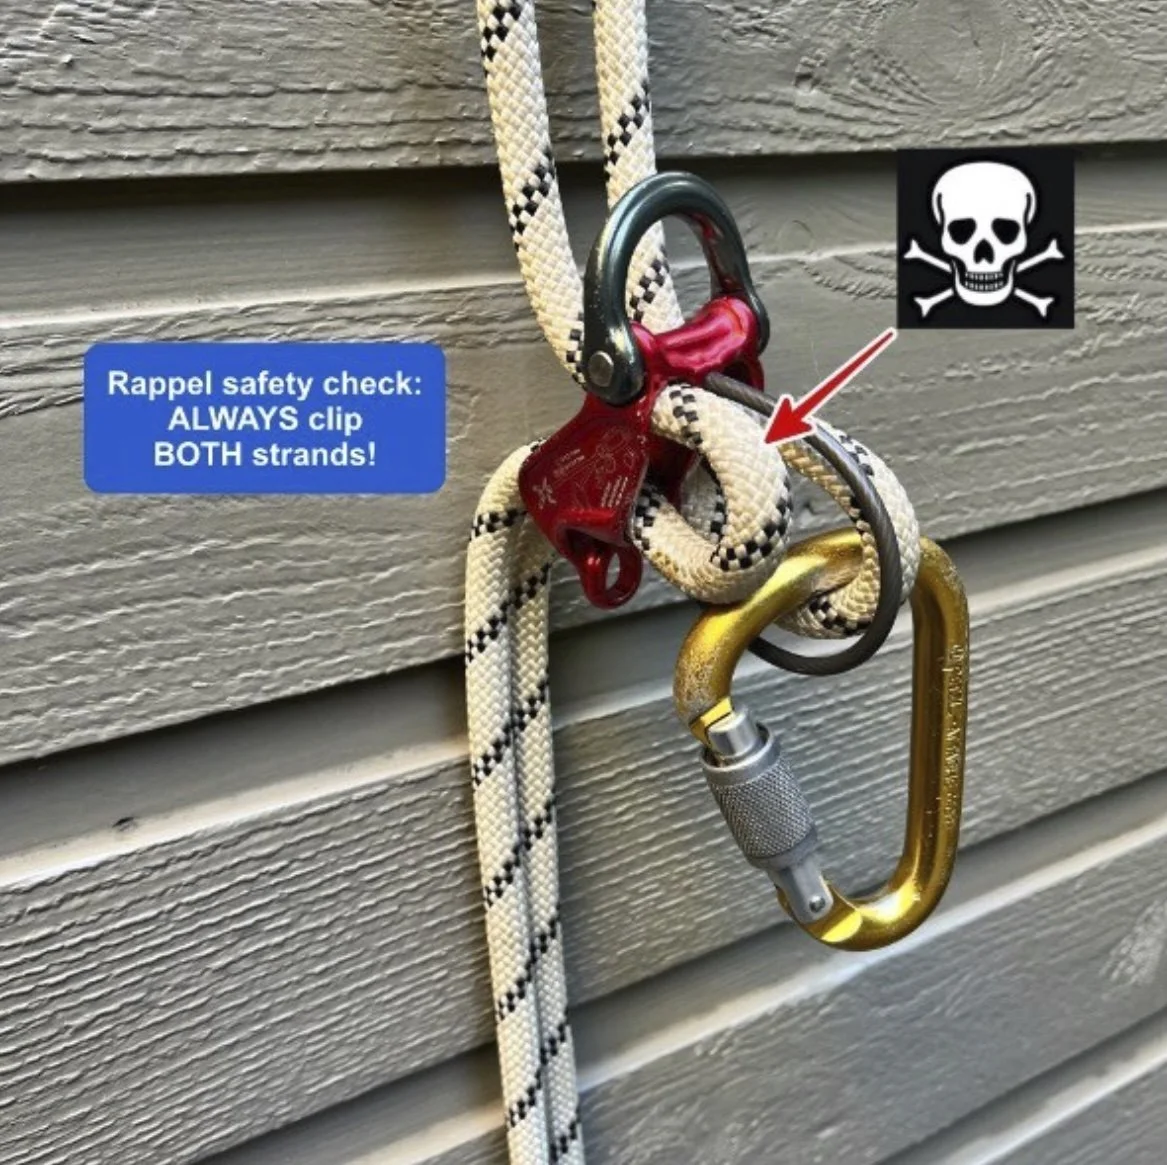
This is a quite common and potentially lethal mistake: clipping one, but not both, rope strands into your rappel carabiner.
Lots of people, myself included for a long time, thought that if you have an autoblock properly tied below your device, the autoblock would grab both rope strands (and keep you from dying) if you made this mistake.
Well, guess what, I was wrong!
If you tie your autoblock, but then clip only ONE strand as shown above, and then load the rope, the autoblock does NOT grab the rope as you might expect.
Instead, you start sliding down like the autoblock is almost not there! I tested this on fat ropes and skinny ropes, and with several different varieties of hitch cords. Pretty much the same outcome every time. It’s easy to test. Give it a try yourself.
(If you were to use the old school method of putting your friction hitch ABOVE your device, then it DOES catch you if you make this mistake. However, that comes with its own host of problems, it's an outdated technique in most situations, and I don't recommend it.)
The best way to reduce rigging errors like this: weight the rope with your tether still attached to the anchor before you commit to it.
Autoblocks are good practice for many reasons, but they don’t solve the problem of only clipping one strand. Do your partner safety checks as standard procedure. Don't be complacent, no matter how many rappels you've done in your life.
What are the main types of friction hitches?
There are MANY different friction hitches! Riggers, arborists and other rope pros have a quiver of exotically named and specialized hitches, often made with an eye to eye hitch cord (more on that below).
Climbers, on the other hand, usually don't carry this type of gear, and need to rely on a bit of improv with slings and cordage they are hopefully already carrying.
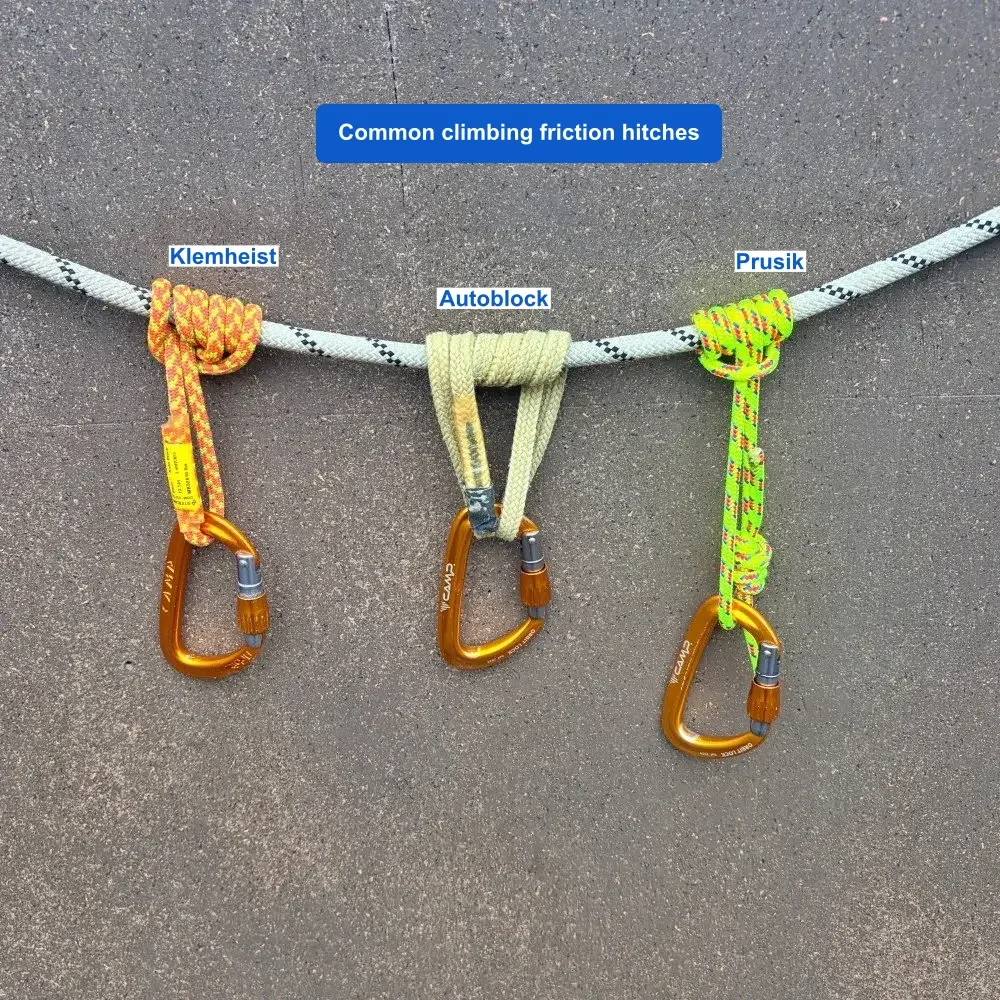
There are three common friction hitches in climbing:
autoblock
prusik
Klemheist
Autoblock
Has a few names: aka “French prusik” and “third hand”.
Has a fairly low level of grabbiness.
Most common use: rappel or lowering backup, hence the name “third hand.”
Can usually be released when it’s loaded.
Can be loaded in either direction.
Typically tied with cord (or a HollowBlock), not webbing.
You can use as many wraps around the rope as needed until the autoblock properly grabs. (As a rappel back up, three wraps are commonly used.)
Tip on using the autoblock as a rappel backup: Best practice is to have your hand on the rope just above the autoblock when rappelling, not putting your entire hand / fist around the auto block.
One more autoblock tip: sometimes two wraps is too loose, and three wraps is too grabby. Start with two wraps, and then twist the hitch cord a few times before you clip it to your carabiner. This can add some extra tension to the knot, which might be the fine-tuning that you need. (Here's an Instagram video from IFMGA Guide Ian Nicholson that shows how to do it.)
Prusik
The “grabbiest” of the three common hitches.
Typical use: “tractor” or progress capture in a mechanical advantage hauling system and ascending a fixed rope.
Needs to be dressed perfectly to work correctly, so it's a little finicky.
Usually takes longer to tie, and is harder to tie with gloves or cold hands.
Typically tied with three wraps around the rope, but can use two or four wraps.
Can be loaded in either direction.
Needs to be tied with cord, not webbing.
Klemheist
Has a medium level of grabbiness.
Can be tied with either cord or webbing.
Can add or removes wraps adjust the grabbiness.
Generally works best when loaded in one direction.
Works without being perfectly tidy / dressed, which is nice when you need to do it fast and maybe have gloves on.
The Klemheist is a good choice when you’re tying it with something very long, like a cordelette. It's faster to tie because you don't need to pass the ends through the knot with every wrap, only once at the end.
You can tie a Klemheist hitch with a sling/webbing or cord.
Here’s a Klemheist hitch tied with a 60 cm Dyneema sling. Lots of wraps, very grabby!
Note: because Dyneema has a relatively low melting point, it's not a good idea to use a Dyneema sling for any sort of a rappel backup. A fast rappel could potentially damage the sling.
How do you tie a “cowboy” Klemheist (with a video demo)?
Does it matter where the bartack / stitching goes on a friction hitch?
What's the real world force where these hitches start to slip or break (with video of the testing?
Join my Premium Membership to read the rest of the article.
Thanks for your support!

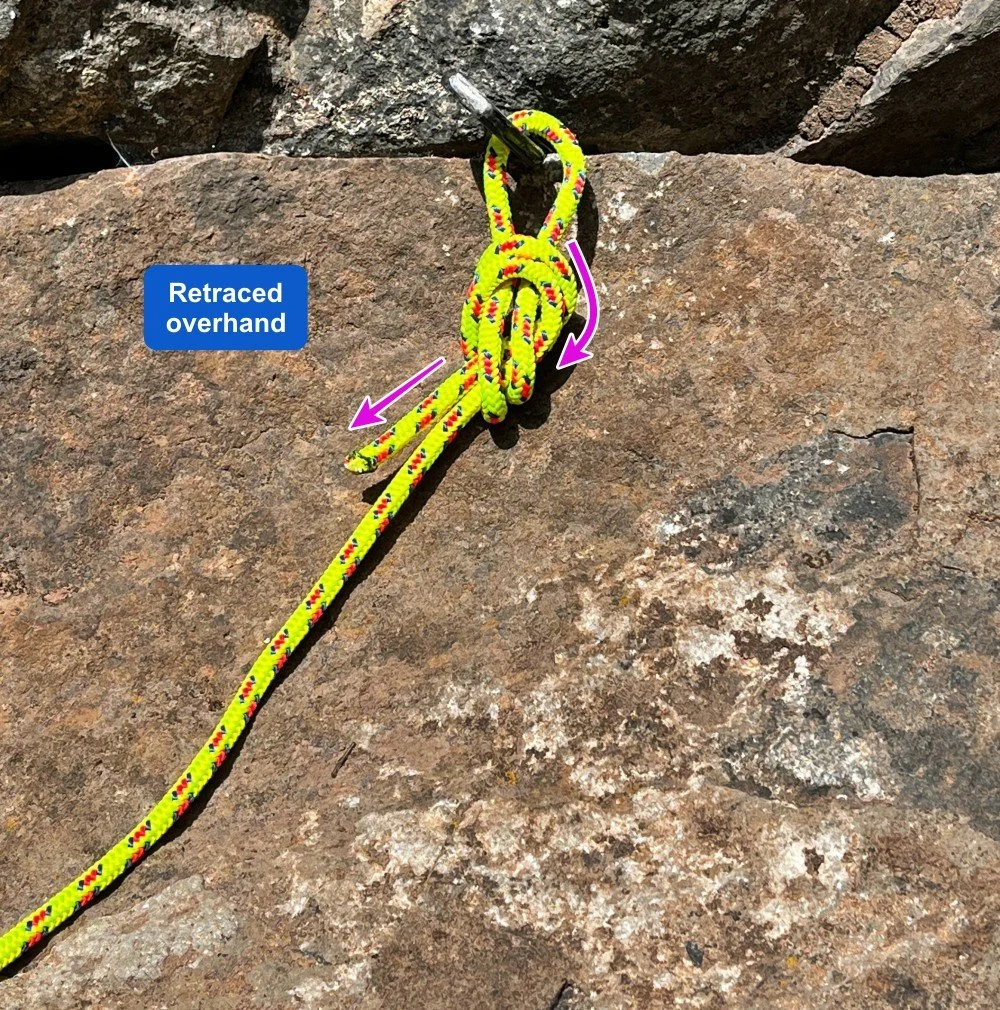
The retraced overhand knot
A close cousin of the retraced figure 8, the retraced overhand knot has a few niche applications, like making retreat anchors. Learn about it here.

Premium Members can read the entire article here:

All climbers know the retraced figure 8. Meet the cousin: the retraced overhand.
Here I’m using it to tie a 6mm anchor cord through a fixed piton. You could tie a retraced figure 8 here as well and it would be fine.
However, the retraced overhand is a little simpler to tie, and it uses less material. So in this particular application, it may be a better choice.
It’s also is gonna be a little harder to untie after loading, so that's the trade off. In this case, you're leaving it behind for a rap anchor, so untying it is not an issue.
Being able to directly tie to fixed gear like this is one more benefit of carrying an open cordelette, as I detail in this article.
This knot is closely related, but a bit different from the “brotherhood” or “competition” knot. See the photo at the bottom of the page.
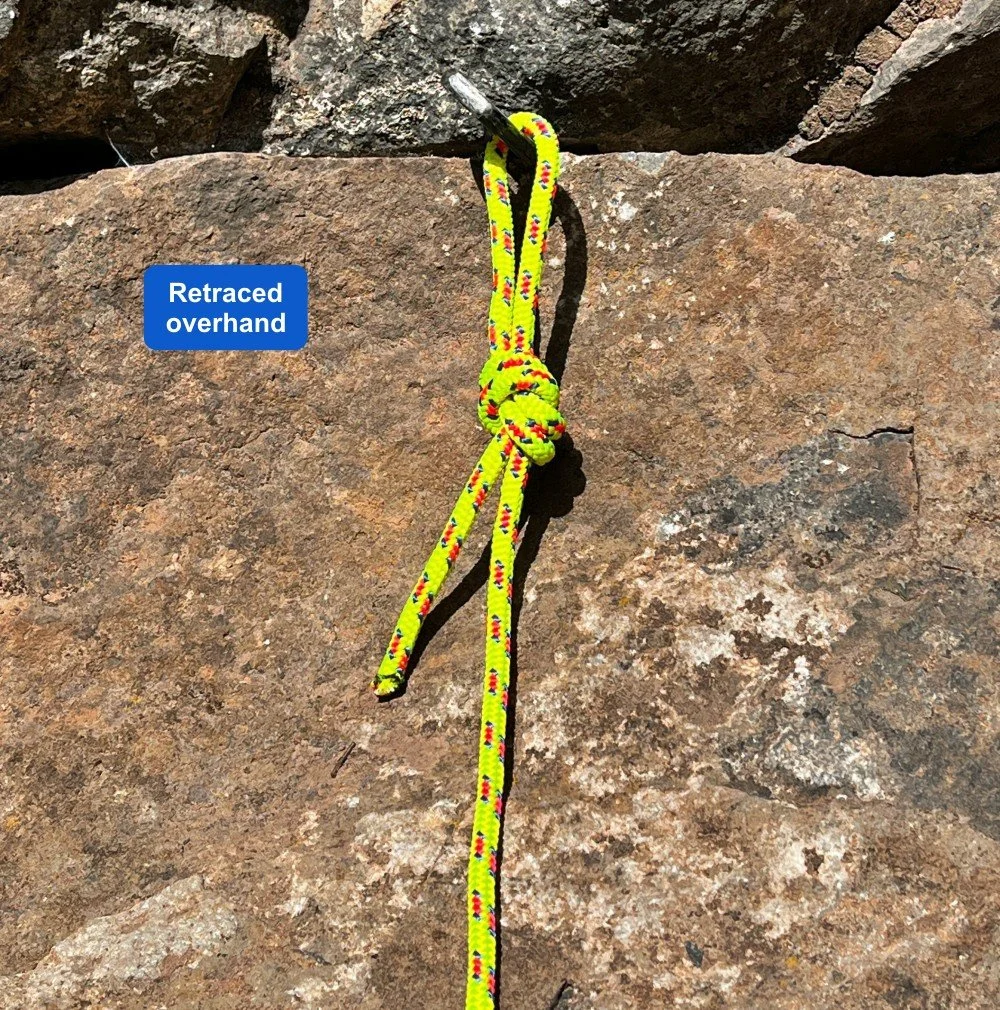
How to tie the retraced overhand knot
Start by tying a loose overhand knot about 1 foot / 30 cm away from the end of your cord.
Pass the end of the cord through the gear, here a fixed piton. (Check the piton to be sure it doesn't have any sharp edges.)
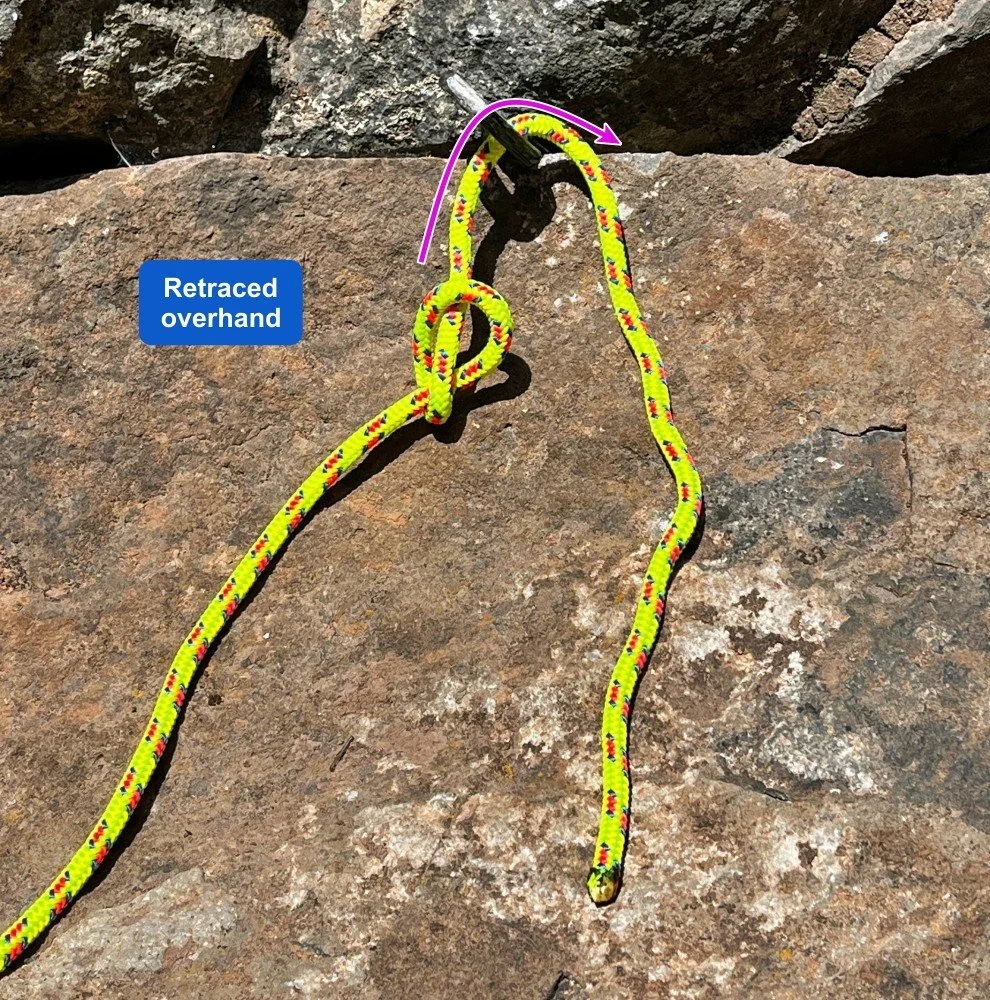
Start retracing the knot, very similar to how you tie a retraced figure 8.
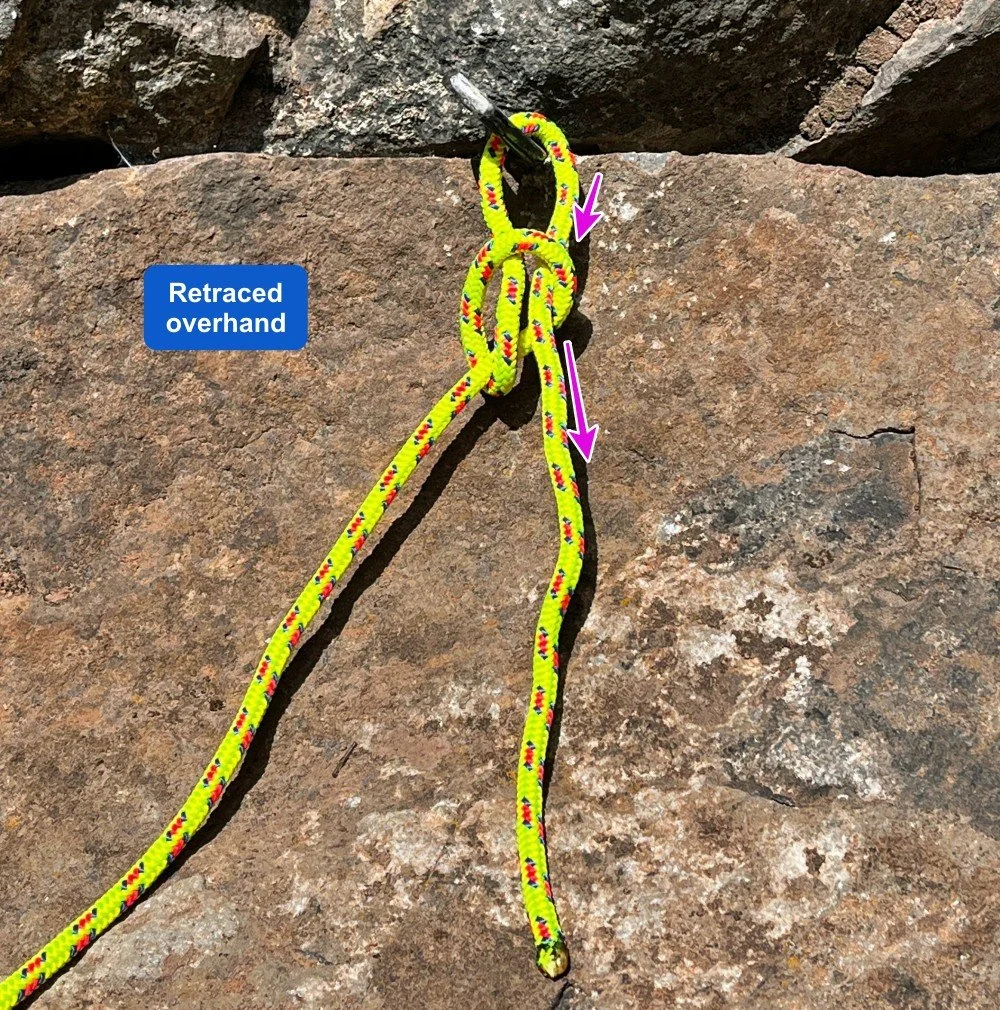
Continue tracing the overhand knot with the end of the cord.
This is the shape of the knot before it gets “dressed and stressed”.
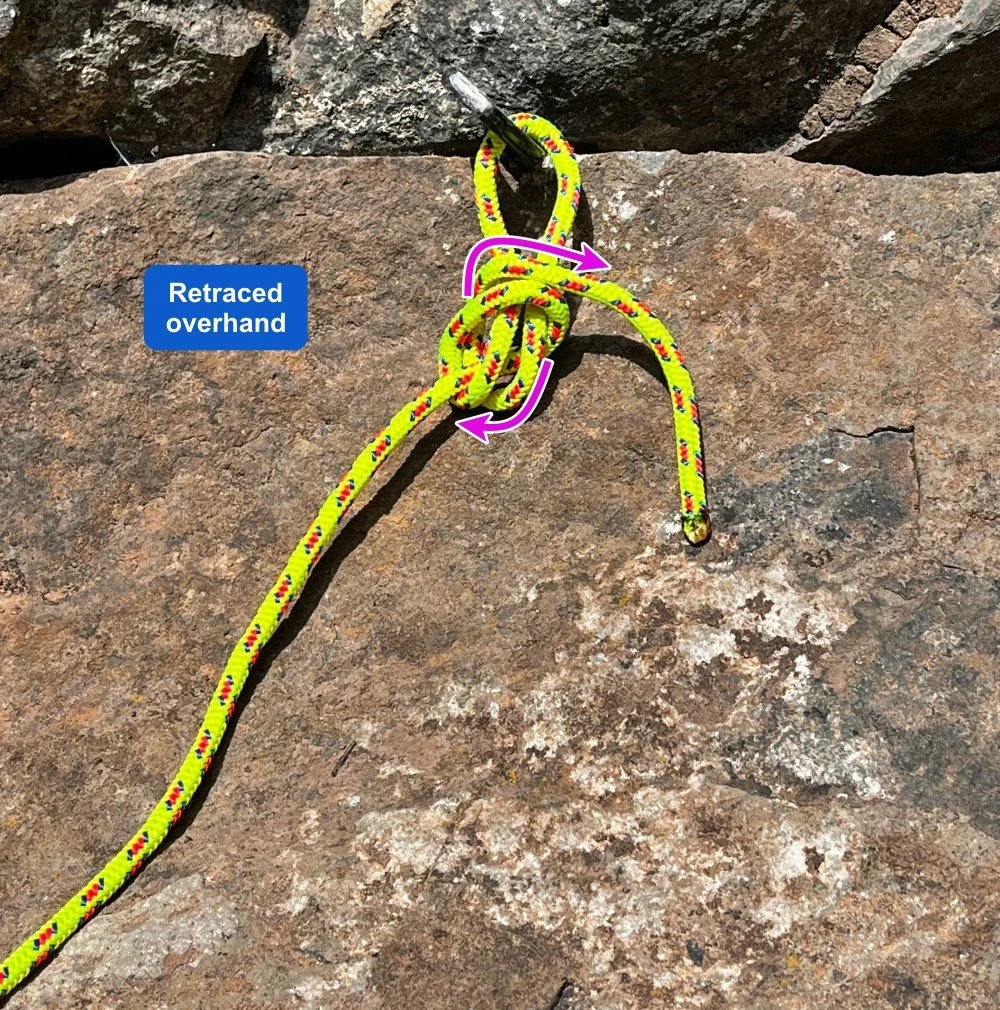
Dress the knot well - snug down all four strands, and be sure you have a tail of at least 3 inches / 8 cm or so.
(And yes, the loop in the knot could be even smaller if you wanted to use even less cord.)
Done!
What's a practical application for this, and how would you rig it?
What's the difference between this and the so-called “competition” or “brotherhood” knot, another flavor of the retraced overhand?
Join my Premium Membership to read the rest of the article.
Thanks for your support!

Need a stronger anchor? Try a basket hitch
Want to boost the strength of your rigging? Simply doubling the strands into a basket hitch can dramatically increase the strength, which could be helpful in some situations. See the test results here.
Premium Members can read the entire article here:

A basket hitch (and no, I don't know why it's called that) is pretty simple. It’s a loop of loop of webbing, cord, or rope, doubled into a “U” shape.
Takeaway: a basket hitch more or less doubles the breaking strength of whatever material you’re using, because the load is shared over four strands instead of two.
For most climbing situations, this doesn't really apply much, because the maximum possible forces in any recreational climbing situation are never going to be more than about 9 kN. If you're using a sewn sling that has a Minimum Breaking Strength (MBS) of 22 kN, no worries.
And, even clipped in the regular end to end method shown below, the 28 kN where it broke is probably stronger than your carabiner!
But in a few cases that I can think of, knowing a trick to increase the strength of your rigging might be helpful:
You need to use some skinny 5 mm cord for some kind of anchor building or application that it's not really designed for, and you want to squeeze some extra strength from your material.
If you want to do something involving possible LARGE forces, such as pulling your car out of the ditch, dropping a big tree limb, or detaching a wrapped whitewater raft off a rock.
My friend Ryan Jenks, the mad scientist gear-breaking genius behind the great YouTube channel HowNOT2, did some break testing on this.
Here are Youtube screenshots of the results of three different break tests. He’s using a standard sewn 8 mm Dyneema sling, rated with an MBS of 22 kN.
Photo 1: The sling gets a “normal” end-to-end pull. It broke well above the 22kN MBS, which is a good thing.

Photo 2: The same 22 kN sling, this time doubled with a basket hitch. With this rigging, it more than doubled the MBS.
Want to see the ACTUAL break test results for the basket hitch?
Join my Premium Membership to read the whole article.
Thanks for your support!


Klemheist ver 2.0: stitching IN the knot
A Klemheist is a useful friction hitch / rope grabber, but DANG, have you ever tried to use it to actually go up to fixed rope? Tied in the normal way, that sucker bites down hard and is really difficult to slide! Here’s a clever variation that gives adequate grab on the rope, and is much easier to slide when you need to move up.

Premium Members can read the entire article here:
Credit for this method goes to Silvan Metz, @silvanmetzfotografie

Left photo, normal way to tie a Klemheist. Right photo, the modified method which is much easier to slide.
The Klemheist is one of three friction hitches every climber ought to know. (The other two are the prusik and the autoblock, aka French prusik, or Machard.)
Friction hitches are used typically used as a rope grab in a mechanical advantage haul system, and as a tool for emergency rope ascending.
The Klemheist is handy because you can tie it with either cord or a sewn sling, and you can easily adjust the amount of friction by increasing or decreasing the wraps around the rope.
But DANG, have you ever actually tried to climb a rope with a Klemheist, especially one tied with a skinny Dyneema sling? You probably discovered that it bites down very hard on the rope, and is very difficult to slide up after you've loaded it with your body weight.
Here's a clever variation on the Klemheist hitch, where the stitching on a sewn sling is intentionally tied INTO the hitch, as in the photo above on the right.
WTF?! I learned in Knots 101 you should never do this, why would you?
Answer: for ascending a rope.
By including the stitching in the hitch, it allows enough friction for good grabbing on the rope, but also allows the knot to MUCH more easily slide on the rope when you need to move it.
Notes . . .
Works great with a sewn sling, even Dyneema (Don’t use Dyneema for a rappel backup.)
Grabs pretty well in both directions, but still holds best in one.
Easily adjustable with the number of wraps; more wraps for a skinny rope, fewer for thicker ropes or twin strands.
Some people think this is a Hedden hitch, or maybe an FB hitch. To be honest I don't really care about the name. It's more important to know how to tie it and the best applications, so let's not get distracted by lineage and whether I use the exact right term to describe it. Lots of “knot-knerds” like to argue about stuff like this. I’m not one of them.
Want to learn how to tie it, with a video from Silvan?
Join my Premium Membership to read the whole article.
Thanks for your support!


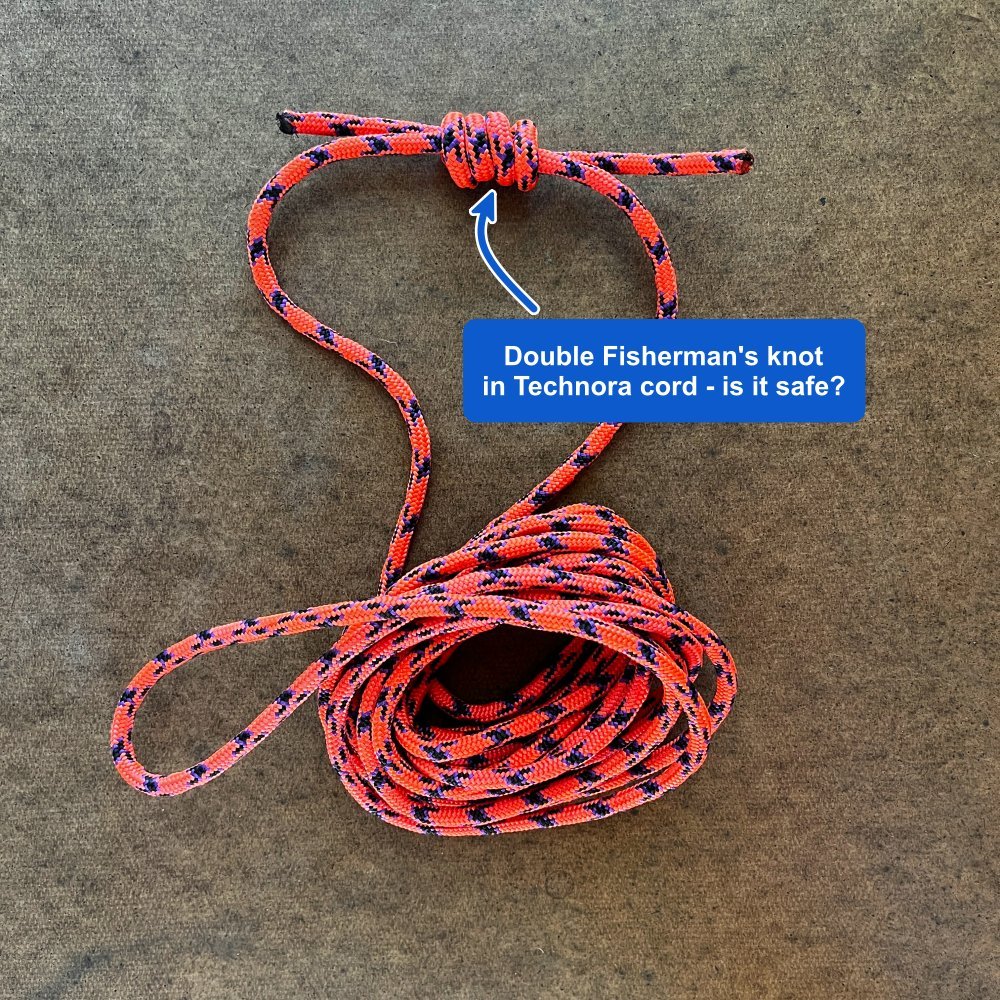
Do you need a triple fisherman's for tech cord?
A long-standing “rule”: always use a triple fisherman's knot to connect ends of “tech” cord, that has a Kevlar / Aramid core. Is this really true? What happens if you tie a double fisherman's instead? Here's the answer, courtesy of the gear breaking lab at HowNOT2.

Premium Members can read the entire article here:
General climbing wisdom:
Use a double fisherman's knot to securely connect cord ends to make a permanent loop (like for a cordelette) in standard cord.
Use a triple fisherman’s knot to securely do this in so-called “tech” cord, that might have a Dyneema or Technora/Aramid/Kevlar core.
(Sidenote: yes, this several-different-names-for-the-same-thing is confusing! “Technora” and “Kevlar” are trademarked names. “Aramid” is a more general name, sort of like “Kleenex” and “facial tissue”,
I sure remember learning this when I first started climbing. Way back then, about the only tech cord available was this extremely stiff Kevlar cord that we used for stringing hexes (remember those?) With that ancient cord, the triple was the way to go.
Turned out that that extra stiff material didn’t have very good fatigue resistance, so it fell out of favor. Modern Aramid cord like Technora is more supple, and is more resistant to fatigue, i.e. repeated bending in the same place, like what happens inside a permanent knot.
The classic triple fisherman's knot endures in the modern era. The question is, do you still need a triple fisherman’s, or will a double work?
Ryan Jenks, the gear breaking mad scientist genius behind HotNot2, did some testing on this, using Sterling Powercord. This is very nice cord: 6 mm, rated to 19.5 kN, nylon sheath with a Technora core.
Here are the break test results (yes, small sample size of 1)
Powercord double fisherman's: 18.7 kN.
Powercord triple fisherman’s: 21.9 kN
So . . . the triple was a bit stronger, but the double was quite close.
Given about the largest possible force in recreational climbing is around 8-ish kN, and your spine is going to start breaking around 12, the double fisherman’s appears to be just fine.
The main advantage to using the double? You use less cord to tie it, which is less expensive and a little bit lighter. Is there any downside to using a triple is it makes you feel warm and fuzzy? Not really.
Want to see the break test video and all the test results?
Join my Premium Membership to read the whole article.
Thanks for your support!


Big load on a bight knot? Try a butterfly
Is your bight knot going to take a BIG load? Consider using a butterfly instead of a figure 8 or an overhand. The butterfly is usually a lot easier to untie after it takes a heavy load.

There are three bight knots commonly used in climbing:
overhand
figure 8
butterfly
(Yep, I'm calling it a butterfly, and not an “alpine” butterfly. I don't see any need for the word “alpine”, and I like simplicity.)
If you're putting any significant load onto this knot, consider using the butterfly.
It's usually much easier to untie after being loaded than the other two, with the overhand usually being the most difficult. (Most big wall climbers, who regularly deal with heavily loaded knots, have known this trick for a long time.) In the photo below, we have a figure 8 on the pig, because that’s pretty much a permanent knot in your haul rope that stays there all the time.
Of course, “hard” or “easy” is subjective! Factors such as your finger strength, level of patience, whether your rope is old and crusty or new and slick, wet or dry, can all have an effect.
What about a bowline?
A bowline is also easy to untie after being loaded. However, it has a tendency to loosen if it's subject to repeated loading and unloading, and it also needs some sort of backup. Also, it's tricky to tie as a bight knot in the middle of the rope, as we're doing here.
So, in most recreational climbing applications, one of the three bight knots listed above is usually preferred.

Munter hitch to clove hitch conversion
Are you belaying your second up on a Munter hitch? (Yes, old school, I know). Here is a very #CraftyRopeTrick to convert that Munter into a secure clove hitch once they arrive at the anchor. Even if you think you would never use this, it's a fun little bit of rope wizardry to practice. Check out the short video to learn how.
Yes, belaying your second from a Munter hitch is a bit of an old-school technique, but it can be helpful in certain situations.
Once your second arrives at the anchor (and is at a reasonably secure stance) whip out this clever bit of rope sorcery to convert that Munter into a clove hitch.
Doing this immediately secures them to the anchor, without any additional knots, tethers, etc.
It looks like a rope magic trick. After you flip the first loop back through the carabiner, you seem to have made a total tangle. But then unclip the correct loop, and that ungodly mess magically transforms into a clove hitch. #CraftyRopeTrick, for sure!
Yes, this technique does involve unlocking the carabiner gate and flipping the rope through twice momentarily. Provided the second is reasonably balanced and secure, this should not be a problem. Or, maybe this technique is just not for you and you can skip it, that's cool too. =^)
Note: the last movement of doing this, when you unclip one strand, requires you to be 135% sure you’re doing this correctly; otherwise there's a risk of you completely unclipping your partner from the anchor. Practice this a bunch and be sure you have it down correctly before you ever do it in the real world! If you're not sure you're doing it right, then don't do it!
There are at least two different variations on how to do this, I’m showing one. Even if you think you might not use this, it’s worth practicing just for the magic trick / entertainment value. :-) Like most things related to knot tying, it’s just about impossible to explain in words, but very easy to learn from a video.
Check out this nice video from Petzl Germany on how it's done.

How to tie the perfect retraced figure 8
The retraced figure 8 is probably the most important knot you'll ever tie, so let’s learn the nuances of tying it correctly, every time. There's more to it than what’s usually taught in books and by many instructors. Learn the tricks to make a perfect figure 8, plus how to do it so it's much easier to untie.
The retraced figure 8 tie in knot is probably the most important knot you’ll ever tie, so it's well worth it to pay attention to the small details so it's perfect every time. No twists, crosses, or other weirdness! (A figure 8 doesn’t need to be tied absolutely perfectly to function. If you have a twist or cross in the strands, it's still going to be fine. However, it is the fundamental knot in climbing, so let's take the time to do it right!)
Lots of instruction on the retraced figure 8 (be at books, video, or in person) fall short in explaining it properly. Simply saying, “Tie an 8 about a meter from the end of the rope, pass the free and through your harness, and then retrace the 8” doesn't tell the whole story. There are quite a few different ways you can do this, and many of them lead to an end product that’s Less Than Ideal.
I’m going to show you the way that works best for me, that I teach, and that people seem to find the easiest to learn. If you have a different way that works for you, and the result is a perfect knot, then keep doing what you're doing!
Let's learn some of the nuances of a perfect retraced figure 8 knot.
First off, avoid talking when you or your partner are tying into the rope. Like packing a parachute, your tie-in knot is worthy of your complete attention, so stop the chitchat for a few seconds when tying in.
It may be tempting to begin the knot like the left photo below, because that's where the large obvious “hole” is. However, this often leads to crossed strands in the final knot. (Yes, there is a way to tie a retraced figure 8 correctly by doing this, but for most people that leads to twists and confusion.)
Instead, begin your knot as shown on the right.
Some instructors call this “start hard, finish easy.” This advice is a little cryptic, but it means start the knot through the hard-to-see, non-obvious “hole”, and finish the knot, with the remaining two passes, through the the easy-to-see, obvious “holes”.
(I put blue tape on the end of the rope to more easily see it.)

This next photo shows a problem that trips up many experienced climbers. (And yes, I’ll admit that I did this step wrong for quite a long time . . . )
In the left photo, if you pass the end OVER the top of the knot, you end up with the strands crossed when you're done. (At least, I always did!) While you can correct it later, why not do it right the first time?
Pass the end of the rope BELOW the top of the knot, as shown in the photo on the right. This gives you a perfect symmetrical knot when you're done, no twists or crosses.

If you make either of the two goofs above, your completed knot will probably look something like the one on the left below. See how the strands are crossed? That's not a catastrophic mistake, but it's not 100% correct either.
Below on the right is a proper retraced figure 8. All strands are nice and tidy, parallel, with no crossing or twisting.
There’s also a proper length tail on both knots, not too long not too short. Ideally the tail is about 6 inches / 15 cm. If your tail is shorter than this, start over. If your tail is longer than this, you can tie an overhand knot to take up the extra. But it’s unnecessary and doesn’t add any extra security to the knot, in spite of what the rules might be at your local rock gym.

There's another subtlety for tying a correct figure 8, and that is keeping an eye on where the load strand goes. (If you tie it like I showed above, the load strand will always be in the correct place.)
Let’s add some tape so we can more easily see what's going on. (Note the skull and crossbones hockey tape, my favorite for marking soft goods like slings! =^)
The load strand on the left comes out on the OUTSIDE of the knot.
The load strand on the right goes through the MIDDLE of the knot.
Most people find the knot on the left to be significantly harder to untie. It can depend a bit on how much load you're putting on it, the type / diameter of rope you are using, etc.
Why?
Load strand on the outside of the knot: When loaded, this cinches down on the entire knot, even to the point of partially deforming it. No loose strands, welded, hard to untie.
Load strand on the inside of the knot: the very top strand goes to the rope tail, and takes minimal load. This gives you a slightly looser strand to start with when you need to untie it.
Both versions are equally strong and secure, the difference is only in the ease of untying.
When I posted this on Instagram, a substantial number of people commented that I was completely wrong, and having the load strand on the outside of the knot makes it easier to untie. Well, maybe that works for you, but it's not my experience, nor what various other rope experts have to say on it. The relative ease or difficulty of untying a knot is a fairly subjective judgment. Try both ways yourself and see what you think.

Check out the nice video below from “Hard is Easy”for a very thorough discussion of every step tying a retraced figure 8. If you’re a new climber you may benefit from watching the whole thing. If you're more experienced, start at 7:08 to see some of the methods discussed above.

The Figure 9 knot
The “Figure 9” is a variation of the standard figure 8 on a bight. The figure 9 simply takes an extra wrap of cord. This can help raise the master point a bit higher. (Many people think that the figure 9 is easier than the figure 8 to untie after loading, but it turns out this isn’t always true.)

The figure 9 is pretty much the same as figure 8 on a bight. The one difference is you make an extra twist before you tie it.
Why might you want to use the figure 9?
Because the figure 9 uses extra cord, this raises your master point a bit higher, which may be more ergonomic. Check the photos below, you can see how the figure 9 gives the highest master point.
Admittedly this is fairly rare, so most of the time the figure 8 is going to be the better choice.
A possible downside: the figure 9 may not be as recognizable as the figure 8, so you might have to explain to your partner what the hell you're doing. =^)
The sling I'm using is the Edelrid Aramid cord, my favorite for anchor building. Strong, very durable sheath, and easy to untie after being loaded, no matter what knot you use. Here's a longer article about these slings.

Lots of people think that figure 9 is easier to untie then the figure 8, but depending on your loads and the rope/cord you're using, that may not be true. Check out this video below from The Rope Access Channel on YouTube. He puts about a 480 kg load on both knots and tests which is easier to untie. Hint, it's the eight.
In the video below, the test goes from about 2:45 to 6:00.
Tame skinny ropes with a daisy chain
Long lengths of skinny rope, such as a 6 mm rappel pull cord, can easily turn into a hopeless tangle if you're not careful. Solution: the daisy chain. This “crochets” a rope into a series of short chain links, reducing the length by about a factor of six. A daisy chained rope is pretty much impossible to tangle when stored, and easy to deploy when you need it.
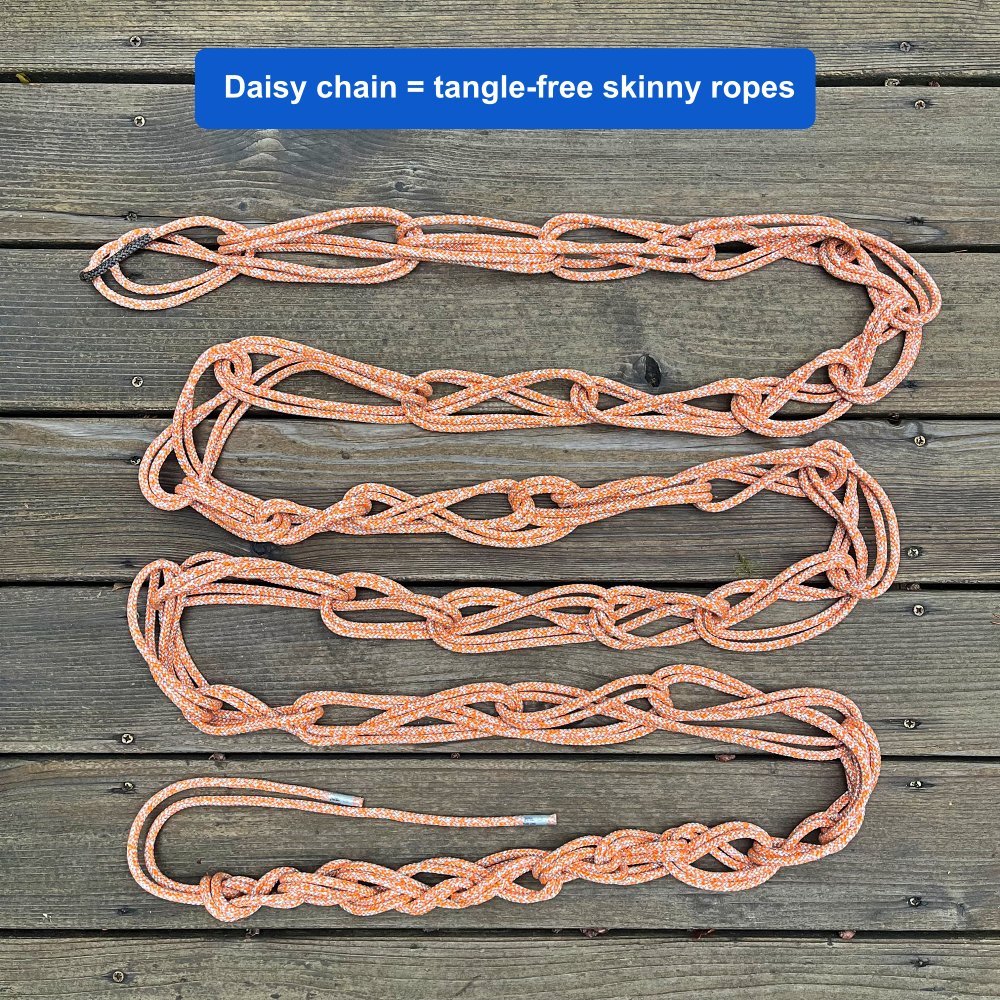
Daisy chain, lineman’s coil, chain sinnet. A few different terms that mean the same thing: to do a little crocheting on your climbing rope to help it stay tangle-free in your pack.
Daisy chaining your rope can be especially helpful when using a long length of tangle-prone skinny rope, such as like the Petzl PURline or RADline, or a rappel pull cord. The photo above shows a 30 meter RADline.
(It also works great to bundle up long electrical extension cords, which is where I first learned this trick doing construction way back when.)
If the rope is inside your pack, a daisy chain lets it smoosh it around and better fit the contours of your backpack and other gear, as opposed to a butterfly coil. If you’re carrying your rope draped over the top of the pack, then a butterfly coil is probably a better choice.
And, even if you don't have a skinny rope to deal with, it's still a fun rope trick to play around with and practice, so get out your cordelette and give it a try!
How to make a daisy chain
I like to start at the middle of the rope. (Your rope DOES have a middle mark, right?) Make a girth hitch, reach one hand through the loop you made, and grab two strands of the rope. Pull these two strands through the girth hitch loop, forming a second loop. Reach through that loop, grab two strands, and repeat. (Congrats, you just learned to crochet.)
When you’re done, the rope will be in a series of what looks like chain links. In link, you’ll see six strands of rope. So, the daisy chain effectively shortens your rope by a factor of six. That means your 60 meter climbing rope is now a much more manageable 10 meters long. You can take a daisy chained rope and stuff/smash/smoosh it around all you want, and it’s never going to get tangled up.
To deploy the rope, find the ends of the rope and pull on them. The entire daisy chain should magically unravel itself, and you should be left with a nicely flaked rope with both ends on top.
(Another good approach for managing a long length of skinny rope is a rope bag. It doesn’t need to be fancy, a reusable plastic grocery bag with sturdy handles works fine, packs down very small, and weighs just 2+ ounces / 60ish grams.)
Like most everything to do with knots, it’s a better show then a tell. Check out the video below to see how it’s done.

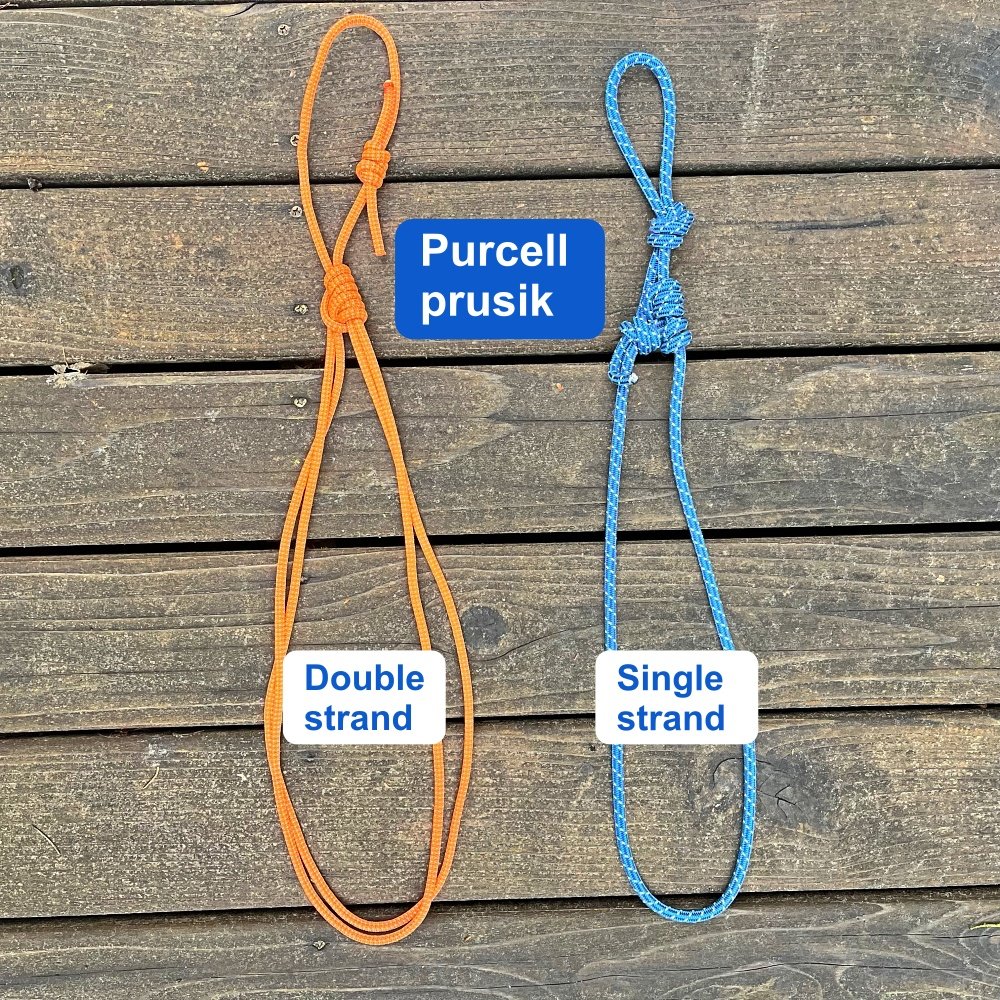
Single strand Purcell Prusik
The Purcell prusik is an interesting bit of ropecraft good for certain applications, but it's a bit clunky and tangle-prone. Here's a more streamlined variation: tying it with a single strand.
This Crafty Rope Trick comes from my canyoneering expert buddy Kevin Clark. Check out Kevin's book, “Canyoning in the Pacific Northwest”. Kevin learned it from Ben Lewis, a canyoning expert who made the video at the bottom. Thanks, Kevin and Ben!
The Purcell prusik is named after the Purcell Mountains of British Columbia Canada, and was invented in the 1990s by Canadian IFMGA Guide and rigging expert Kirk Mauthner.
The Purcell prusik is an interesting, sometimes useful, and sort of klunky bit of ropecraft.
Tied in the usual way, it consists of a prusik hitch sort of tied back onto itself to make an double strand adjustable loop. (The method shown here is a bit different than how it was first introduced.)
This has a few applications in self rescue, rope ascending, rigging mechanical advantage systems, adjusting rescue litters, and impressing your knot-nerd pals. One useful feature is that it can be extended under load, which makes it handy for knot passing and other rescue-type stuff. Plus, it’s inexpensive.
But it has a few downsides:
it’s bulky
the twin loops tangle easily
you need two hands to shorten it
it only adjusts from full length to half length (unless you know a certain #CraftyRopeTrick, see below)
Some climbers use the Purcell prusik as a personal tether or ice ax leash or something similar. But the hassles listed here mean it’s not part of everyday gear for most people. (If you want an adjustable tether, a more modern approach is something like the Petzl Connect Adjust, or a DIY version, the Kong Slyde.)
Here’s an interesting variation: the single strand Purcell prusik.
Because it’s tied on a single strand, it’s lighter, lower bulk and less tangle prone than the regular double strand version. (It still has the downsides of only adjusting from full length to half length, and needing two hands to shorten it,)
You could use a few different materials to tie it. 6 mm accessory cord works for things like an ice ax tether, or some connection that’s not going to be taking much force. Remember, 6 mm cord is rated to about 7.5 kN, and when knotted, it’s going to be about half that, more like 4 kN, so it’s probably not something you want as a load bearing anchor. (But 7 mm cord is rated to a stout 13 kN, that’s an option too.)
Here’s a single strand Purcell prusik made with about 8 feet of 7mm cord. Much more stout at 13 kN, fine for anchoring.

If you want light and strong, you can tie it with Sterling PowerCord, a svelte cord at just 5.9 mm with a Technora core that’s is rated to a burly 18 kN, plenty strong enough for a serious anchor even with a knot in one end.
Side note: PowerCord is a great choice for a cordelette.

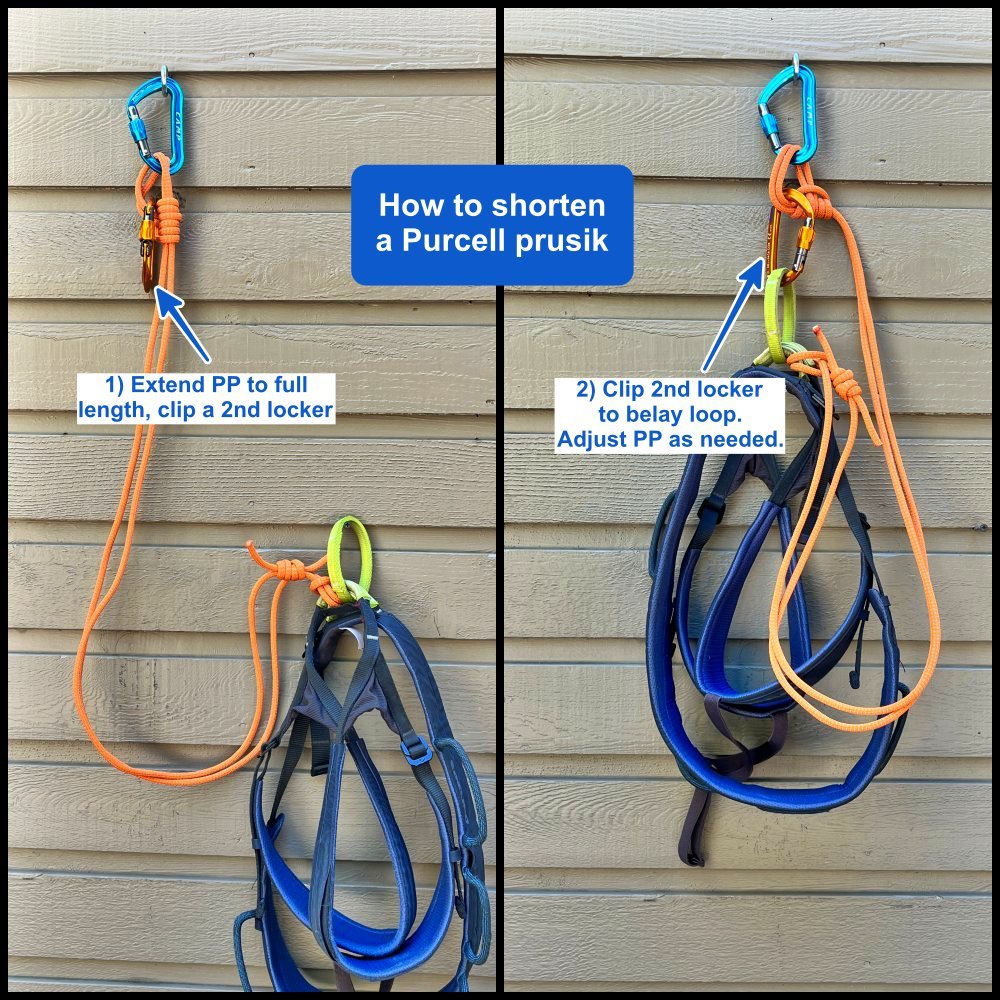
Lots of people think that one of the main problems with the Purcell prusik is that you can never get it any shorter than half the length. So, how do you stay clipped in very close to something?
I thought this too for a long time, until I learned this #CraftyRopeTrick from my pal Ryan at HowNot2. He shows it the video at the bottom of this page. (The photo below is with a standard double strand, but it works the same way with a single strand.)
Extend your PP all the way, until there's just a tiny loop of rope at the end. Into this loop, clip a second locking carabiner.
Now, clip this second locker to your belay loop. Now you can clip just two carabiner lengths to anything. Plus, you can increase the size of this loop by feeding cord through, to adjust your distance as needed.
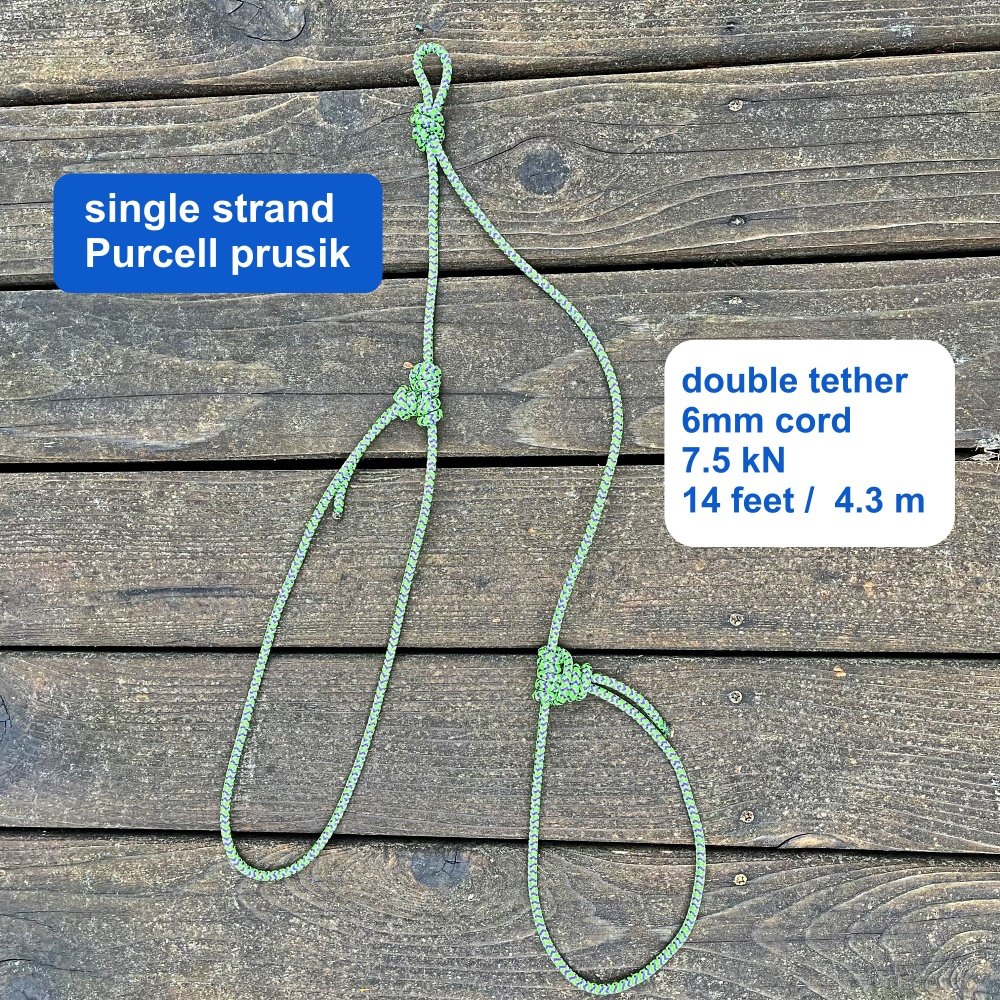
Kind of for fun, I also made a single strand Purcell prusik into a double tether, tied with about 14 feet of 6mm cord. Applications for this . . . ? Aid climbing tethers? Foot loops for ascending a rope? Maybe ice tool tethers? Doing rigging or rope work or routesetting and you have these attached to your tools, drill, bucket, whatever? I was experimenting and haven't used it in the real world, but give it a try and let me know how it works for you.
Now, I get it that lots of people don’t like to carry any kind of designated tether, and that’s fine. I’m putting this tip out there for people who might find it helpful. At the very least, it’s an interesting bit of knotcraft to play around with, so try it yourself and see how it works, even if you don’t think you’ll find a use for it.
Check out the video by Ben Lewis to learn how to tie it. (You’ll probably need to watch it a couple of times, hint hint.)
Finally, here's a nice video from our friends at HowNot2 that discuss how to tie the standard version, and some strength tests on it.