
Passing a knot when hauling
Credit for this tip goes to Andy Kirkpatrick. It’s from his outstanding book: ”Higher Education: A Big Wall Manual”.
Note - This post discusses techniques and methods used in vertical rope work. If you do them wrong, you could die. Always practice vertical rope techniques under the supervision of a qualified instructor, and ideally in a progression: from flat ground, to staircase, to vertical close to the ground before you ever try them in a real climbing situation.
This might be a seldom-used technique in your toolbox of big wall trickery, but it can sure come in handy for one main thing: it lets you do extremely long hauls, with two or more ropes tied together, allowing you to skip intermediate anchors. For example, you could lead several pitches and then do one L O N G haul.
What’s the problem you need to solve? You have two ropes tied together with a knot that can’t pass through your progress capture pulley / Traxion. This means the knot (which is under a lot of tension) needs to be untied somehow without losing your haul bags.
(Note, if you're hauling with a 2:1 “pig rig”, passing a knot is really easy, because you already have about half the system in place. For this example, we’ll assume a 1:1 haul.)
There are several ways to accomplish this. Here's one that's pretty straightforward. Credit for this technique goes to Andy Kirkpatrick and his excellent big wall book “Higher Education”, definitely recommended.
Before we get into the technique, here’s a favorite related quote from Andy K:
“Hauling is potentially one of the most dangerous aspects of big wall climbing. This translates to ultra-caution in all parts of your hauling system and interaction with bags, haul lines, docking cords, and pulleys. If you rush and make a mistake, drop a load or have it shift where it's not wanted, you could easily kill someone or yourself. I try and teach climbers to view their bags as dangerous creatures, like a great white shark, rhino, or raptor that is in their charge. The ability to keep them calm and under your control comes down to paranoia, foresight, and heavy respect for the damage they can do.”
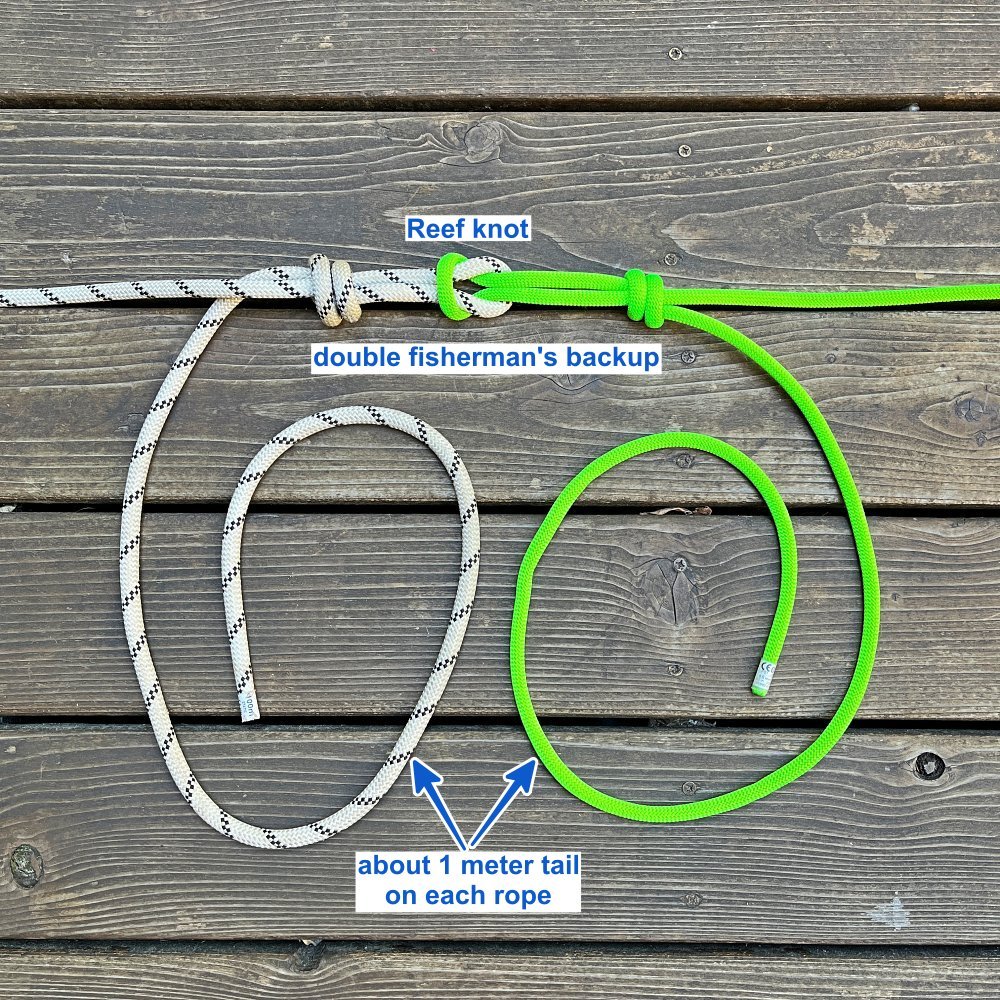
First, you need to join the ropes with a knot that won’t get welded under a heavy load, perhaps multiple haul bags. Try using the reef knot, backed up with a double fisherman’s, and a long tail of about 1 meter, as shown. There are certainly other options. This one is simple, easy to check, and works well.
It's critical here to leave a minimum of 1 meter tail on the ropes, as shown. (You actually only need it on one strand. But, so you don't screw it up, it’s simpler to make a long tail on both strands.) If you're not sure if you have enough tail, make it a bit longer.
We’re hauling on the white rope. Stop when the joining knot gets about 10 cm / 4 inches from your progress capture pulley. Don’t yank the knot into the pulley!

Get out some more gear: two lockers, a 30 cm (or so) sling, and an ascender. (Instead of the ascender, you could also use a friction hitch, but make it a good one.)

Clip the ascender upside down to the loaded rope. Clip the other end of the sling to the anchor. Here we’re using the Grivel Vlad on the master point, a combination locking carabiner and rigging plate, very helpful for this procedure. A quad, or other type of anchor rigging that gives you several different connection points, works too.
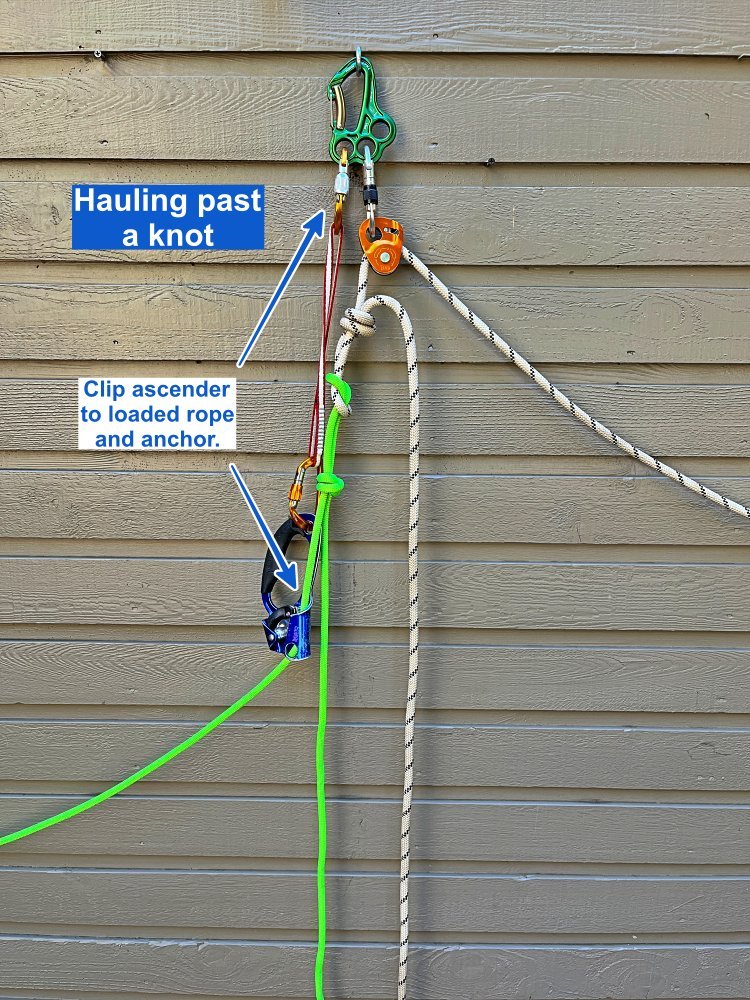
Next, pull up a bit on the white rope, release the cam on the Traxion, and slowly transfer the load onto the ascender. Once you do this, re-engage the cam on the Traxion to back up the ascender.
Notice how doing this creates slack on the knot, yay!

Safety step: tie a bight knot in the end of the green rope and clip it to the anchor with a locker. This ensures the ascender is backed up before you do the next step.

Sweet, you have slack on the knot, and the system is backed up. Now you can untie that reef knot that was joining the ropes. (Give yourself a high-five because you picked a knot that was so easy to untie. =^) Remove the white rope from the system; careful, don't drop it!
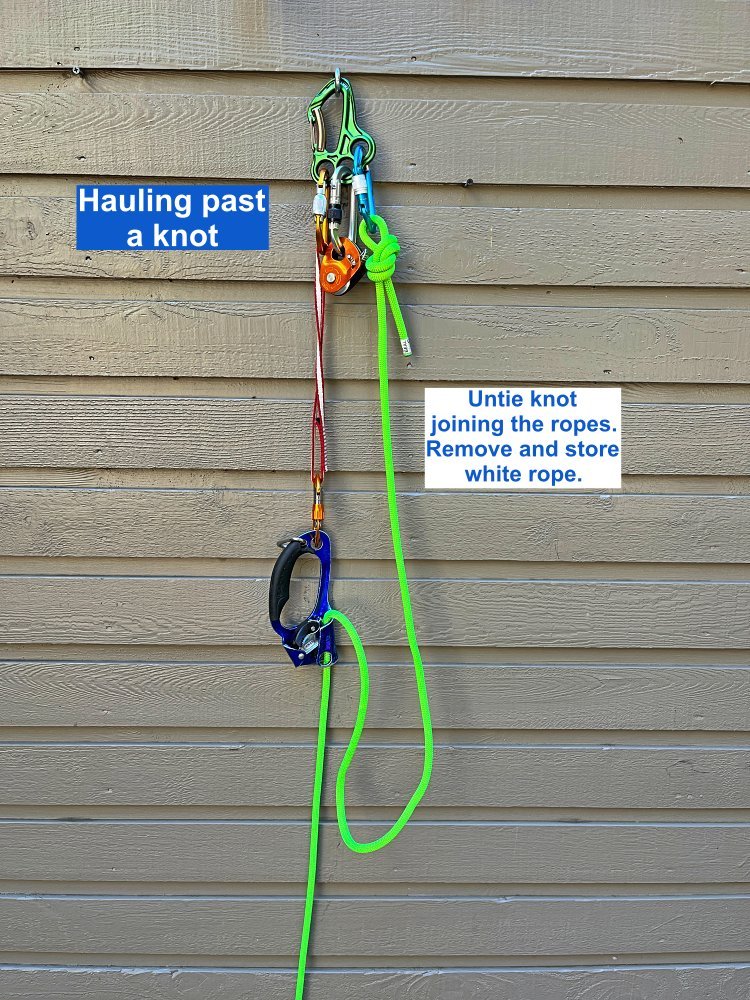
Carefully remove Traxion from the carabiner, load the green rope into the Traxion, and untie the backup bight knot. If you feel lucky and are comfortable with the ascender holding the entire load for about two seconds, you can keep the Traxion clipped onto the anchor and push the end of the green rope through the device. I'm showing a bit more conservative, less risky method.

Remove the ascender and sling from the system.

Schweeeeetness, Give yourself a high five, you're done!
All the load is now on the green rope with no knot. Now all you have is 60 more meters of hauling, lucky you!
