

Alpine Tips

Locking carabiners for sport anchor quickdraws
A majority of sport climbers are fine with using two standard quickdraws for their anchor. Most of the time, that's probably cool, but for instructional settings or your own peace of mind, you can go one step further and use lockers on everything.
A standard single pitch anchor is for the leader to simply clip two standard quick draws to the bolts (opposite and opposed at the master point) and lower off.
Gates on the quick draws are facing away from each other, or outward. This makes the bottom gates opposite and opposed and also mostly keeps the bottom gates from potentially messing with each other.
Nothing wrong with this setup. The fact that it is been done literally millions of times without incident should probably tell you that it's an acceptable practice.

Having said that, many people prefer at least one designated “locker draw” as part of the anchor.
If you’re in an instructional setting, with many people top roping off the same unattended anchor all day, without a more experienced person going up regularly to check things, locking carabiners can add great peace of mind.
Because it's a top rope, you’re not right there next to the anchor to see if any carabiners are getting cross loaded, gates getting unscrewed, or other strangeness that could lead to an anchor being compromised.
(Sidenote: there are lots of other handy uses for having a locker draw, you can learn them here.)
Personally, I pretty much always use one locker draw on top rope anchors.
This is an easy and inexpensive set up. You probably already have a few extra locking carabiners around, and spare “dogbone” draws are only $5-$6 apiece.
If you’re inclined to be a little more cautious, using lockers on your sport anchors can be a little extra insurance, with low cost and high confidence factor. Look at it this way: Other climbers might call you a little paranoid, but there's really not much downside to doing this.
“I don't want to climb with that guy, he's too safety conscious.” That's the kind of criticism many people don't mind hearing. =^)
As I like to say here at Alpinesavvy, it's YOU who’s accountable for your level of comfort and acceptable risk. It doesn't get to be dictated by anyone else, regardless of their experience or credentials.
Now, we have a locker draw in place of one of the regular quickdraws. Definitely a bit more security here. (The angle of the rope running through the carabiners will add a bit of friction, but it's still acceptable.)
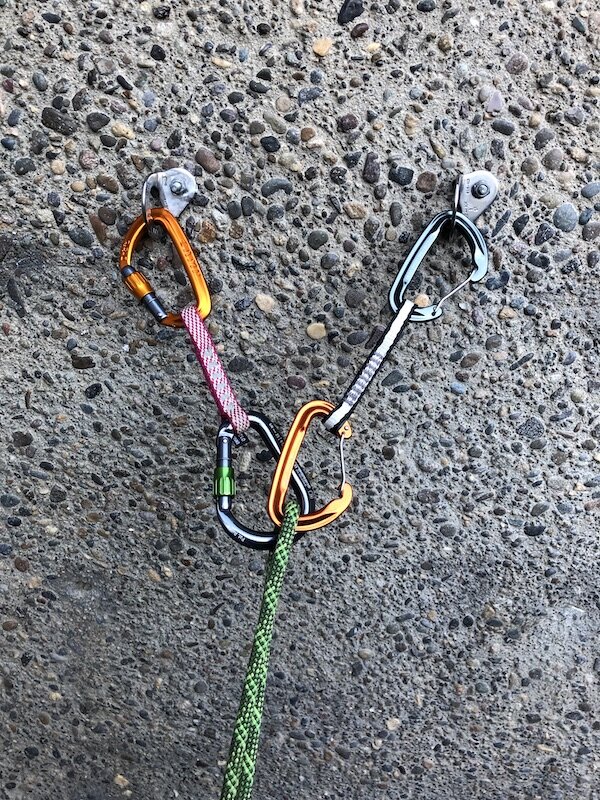
Here’s an (overly cautious?) alternative. Similar setup, this time with two locker draws. Long dogbones, round stock carabiners at the bottom for a smooth lower, and super secure.
There's no way to objectively prove this, but personally I don't think that extra locker draw offers much tangible improvement and safety. But hey if it gives you a warm fuzzy feeling and you want to do it, go right ahead.


“Wrap 3, Pull 2” - about the strongest anchor possible
Need to make an absolutely bombproof anchor around a tree, for a rappel or maybe to pull your car out of a ditch? Try this.
The "wrap 3, pull 2" has long a preferred anchor method with rescue teams for rigging on trees or similar round objects. What are some benefits to this anchor?
Super strong, because the load is distributed among many strands of webbing instead of one or two. (This anchor tests around 35-40 kN.)
Load distributing, to a certain extent
Pretty much zero force is applied to the knot, which otherwise would be the weak point of the system
But, it has a few downsides:
Require a LOT of 1 inch webbing
Can take a while to tie, if you don't practice it much
Is not redundant (when tied in the typical way)
Strengthwise, it’s overkill for most recreational climbing situations. (If your carabiner is rated around 20 kN, you shouldn't need an anchor that can hold 40.)
But, if you are a rescue person, or want to use it in a high load situation like river rescue or maybe pulling your car out of the ditch, it can be handy to learn.
You need is a long (10+ feet) length of 1 inch webbing.
Note that you can’t make this anchor with a sling that's sewn into a loop. You have to have a single long piece of webbing.
To make the “wrap 3 pull 2” anchor:
Make three wraps with the webbing around a large solid object. This is probably a tree.
Tie the free ends in an overhand knot (or water knot) with at least 3 inches of tail.
Now, pull / wiggle the two strands of the webbing that don’t have the knot in them, leaving the actual knot against the tree.
Clip your master point carabiner to these two strands extending away from the tree.
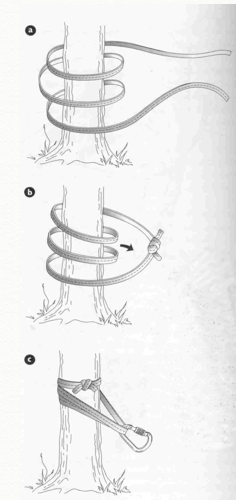
Diagram: Freedom of the Hills, 7th edition, The Mountaineers Press

Slinging a boulder for an anchor - two cautions
When you put a sling around a boulder for an anchor, the angles can get wide very easily, magnifying the load.
A common anchor on alpine routes is the simple sling around a boulder or rock spike. Even though the boulder itself may be super solid, there are some things to watch for when using this method.
1) Check the boulder carefully all the way around for any sharp edges. A new sling that can hold 20kN can cut very easily under tension combined with the sharp edge of rock or a crystal.
2) A short sling around a large boulder may make a wide angle in the sling that put a larger-than-ideal load on the sling material. (An angle of 90 degrees or less is the rule of thumb, and 60 degrees or less is ideal). Solution: Use a longer sling to make the anchor angle smaller. The diagram below shows how a small change in sling angle and greatly increase the forces on your anchor.

The diagram is from the excellent book "The Complete Guide to Climbing and Mountaineering" by Pete Hill.