Alpine Tips

The quad anchor
The quad anchor rig offers fast set up, great strength, good load distribution and complete redundancy, all in a light, compact package. Learn all about it here.

Premium Members can read the entire article here:
The quad anchor, first mentioned (I think) around 2006 by John Long in his book “Climbing Anchors”, was an attempt to have the Holy Grail in anchors. What’s cool about the quad?
Good load distribution
Minimal extension
Fully redundant
Quick to set up and break down, no knots to untie
Super strong (would you believe 40 kN?!)
Bonus, two independent and load distributed master points, which can be quite handy
Well, it didn’t catch on right away. One reason may have been that the original version suggested using a long and bulky cordelette to rig it.
Traditional quad anchor rigged with 7mm cordelette. Nothing really wrong with it, just big and bulky.
Well, here’s the modern iteration of that idea, in a much lighter and more compact package. Rather than using a huge honker cordelette, instead you use a Dyneema sling; I prefer 180 cm. Double it, tie two a figure 8 or overhand knots (with the stitching in one of the end loops), and then use two strands to make an anchor for both toproping and multipitch.
The knots stay in the sling for at least the entire day. It's good practice to untie the knots every few days or after a weekend of climbing to “rest” your sling.
This system works best with two solid pieces of gear that are fairly close together and ideally in a horizontal plane. Two bolts on a sport route are a perfect application. Two ice screws that are slightly offset would also work too. (If you’re building a 3 piece anchor from trad gear, it may be faster to use a more traditional cordelette.)
What's the best sling length?
For me, the 120 cm is a bit too short. It can work if the bolts are very close together and you use a small diameter sling, like 8 mm.
I think 180 cm is about the sweet spot. Not too short, not too long, works on horizontal bolts and with a little adjusting, vertically offset ice screws.
Some people think this is called the quad anchor because it uses a “quad” length sling, or 240 cm. A 240 cm sling can be handy for many kinds of anchor building, especially for equalizing three points of protection, orslinging around a tree. But for side by side bolts like this, many people find it’s too long, a bit bulky, and hard to rack.
But hey, as you can see below it's only a bit longer than the 180, so many people this is gonna work fine.
Notice the 180 and the 240 are tied with a figure 8 rather than overhands. This uses up a bit more material which raises the master point, and it also makes the knot quite a bit easier to untie after it's been loaded.

Here's another trick with the 240 cm sling quad to make it a little more manageable. Instead of doubling the cord, you can triple it. Then, when you tie your knots, it raises the master point and you clip to three strands rather than two. This makes it the effective same size as the 180 cm sling, nice!
If you look carefully at the photo below, you can see the yellow locking carabiner is clipped to three strands of cord, rather than two.
If you were climbing a route that maybe had a mix of gear anchors and bolt anchors, this might be a good trick to be able to use the 240 for both.

Quad toprope anchor
Lockers on each of the two bolts, opposite and opposed lockers for the rope, good to go.
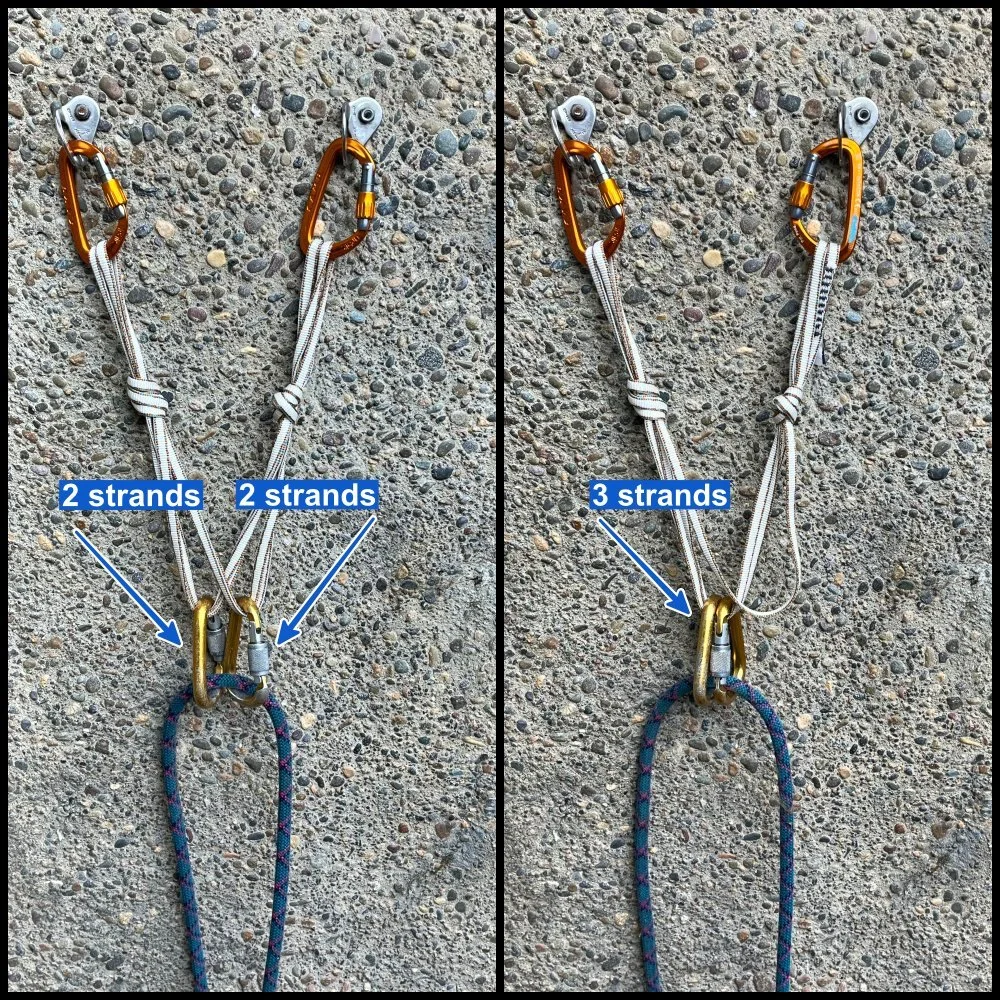
There's some difference of opinion about whether you should clip the master point lockers onto two separate strands (left), or put both of them onto three strands (right).
Argument against the set up on the left: the sling arms could rub against each other when loaded, and the carabiners might bind against each other a bit, giving you less than ideal equalization.
Argument against the set up on the right: if either bolt where to fail, you're only being held by one additional strand.
I think both of these issues are highly unlikely, and you're gonna be fine no matter how you rig it. Personally I prefer the one on the left.
(Hopefully this is glaringly obvious, but you absolutely should NOT clip all four strands. If you did this and any anchor point failed, the carabiners with slide off and you would die.)
Side note regarding lockers on the bolts . . . For a top rope anchor, when you're not right there next to it to keep an eye on it, and maybe multiple people will be using it over a long period of time, it's good practice to use locking carabiners on the bolts. In some circles this is known as an “unattended” anchor. However, if you’re multi pitch climbing, it's fine to use non-locking carabiners on the bolts. We can call this an “attended” anchor, because there's someone there the whole time watching it.
Notes . . .
For those of you who are extra concerned about tying a knot in Dyneema . . . A full strength Dyneema runner is about 22 kN. Here, we are doubling the sling, which in theory makes it about 44 kN, and then we're tying a knot, which reduces that in about half, which brings it back down to about 22 kN. In other words, it's absolutely not an issue. We cover the “tying a knot in Dyneema” issue more detail here.
A 180 cm sling can be a bit hard to find, But is this type of anchor becomes more popular, hopefully more manufacturers will offer them. (If the links below don't work, just Google around until you find them.)
A skinny Dyneema sling is best for this. (It won’t work nearly so well with a nylon runner because the knots are too big, plus finding a 180 cm nylon runner is difficult.)
A 10 mm or 11 mm Dyneema sling is recommended for anchor building. These are larger than the 8 mm used in many 60cm and 120cm slings. Most of the 180 cm slings I have seen are in this larger diameter, so that's good.
How strong is the quad?
Ridiculously strong. How about a 40kN break test? The great team at HowNot2 tested this several times, and the quad is WAY stronger than anything else you will probably have on your harness. See the video here.

image: screen grab from https://www.youtube.com/watch?v=she8vH1DCBU
Can I clip the shelf? Yes. HowNot2 did a pull test on the shelf, and the knot started sliding at around 13 kN. SuperGoodEnough! (Same video link, start at 7:00.)
Quad with a cordelette
While I'm generally not a fan of the 7 mm cordelette, you can certainly use one to make a quad anchor. In the photo below, the red cord is Sterling Powercord. While it’s a bit expensive, it's only 6 mm but is rated to 20 kN, almost 3 times stronger than normal 6 mm cord. If I am carrying a cordelette, this is what I grab first.
As the saying goes: “You can have it strong, light, and cheap. Pick two.”
In the photo, both left and right anchors are structurally strong. However, the right photo, showing the knots tied a bit lower, is slightly preferable. In the highly unlikely event of a bolt failing, the lower knots limit the extension of the anchor.

Here's another option: Tie a “figure 9” knot rather than an overhand knot to isolate the strands. This is simply a figure 8 knot with one more turn. This has a few advantages: it brings your master point up a bit higher, because the knot takes up more cord, and because of the extra turns, it's easier to untie at the end of the day.

Want to learn more tips about the quad anchor?
Join my Premium Membership to read the whole article.
Thanks for your support!


The “meat anchor”: what is it, how do you use it?
If you’re ever in the mildly desperate situation of having to rappel in moderate terrain that one person can hopefully downclimb, and there's no anchors on top, it might be time to pull the “meat anchor” out of your bag of #CraftyRopeTricks.
Photo credit: diagram by Andy Kirkpatrick, used with permission. From his excellent book “Down”, highly recommended!
This article was written with assistance from my expert canyoning friend Kevin Clark, author of “Canyoneering in the Pacific Northwest: A Technical Resource” Lots more on meat anchors in his book.

If you’re ever unfortunate enough to find yourself at the top of some terrain that needs to be rappelled, but has zero anchor building possibilities, you might want to pull the “meat anchor” out of your bag of tricks.
A meat anchor is where a person(s) is the actual anchor, so other people can rappel (or maybe be lowered) directly off of them.
The meat anchor is also known as a “human anchor”. It’s a variation of the classic sitting hip belay.
A meat anchor is often used in canyoning, where you often encounter a wide variety of terrain, with much of it possibly down-climbable and relatively short by alpine climbing standards.
The least skilled and/or heaviest person goes first. The most skilled climber (and hopefully the lightest climber) goes last. In a larger group, the anchor can be backed up by other team members when the first/heavier people are descending.
A meat anchor can also be used to belay someone who is downclimbing, or lowering, if necessary. (You’ll have a lower load on the anchor if they rappel.)
Of course, if you’re able to brace your feet on something, or sit your butt down in the snow, this can be remarkably strong and improves the security of your anchor.
Got more than two people? Share the load. Have them sit in a “train”, clipped to each other's harnesses, and have them back each other up. They can also sit side-by-side, and equalize the load off of each other's harness.
What else helps to decrease the load? Having the rope go over a ledge (which can decrease forces on the anchor up to 66%), having the rappeller go slowly with minimal bouncing, and have the rappeller begin as low to the rock as possible.
Here's a scenario that might be used with a larger group.
You come to a drop that you think is downclimbable, but aren't 100% certain. Set up a meat anchor (backed up), then an experienced party member downclimbs on belay. One of three outcomes:
They report back that it's an easy downclimb, so toss the rope down for them to coil, and everybody downclimbs.
They report that it can be downclimbed, but it's spicy - and might be better for the newbies to rappel. Newbies rappel off the human anchor and best climber goes last.
They have to be lowered, so it's a rappel for every one. Maybe the human anchor stays in position and have people start rappelling, while another person starts rigging an anchor nearby.
You're probably thinking, “What about the last person, what do THEY do? Of course, this doesn’t give many good options for the last person going down. Hopefully they’re able to downclimb. This often might be the case with a guide-client scenario, or a more experienced trip leader with beginners.
The first person down can place protection anywhere they can find it, and clip one rope strand to it. Then the last person can downclimb and clean the gear, while being belayed from below.
This technique is known in some circles as “downleading”, and it can be a good strategy whether or not you’re doing a meat anchor and want to safeguard the descent for the last person. Here’s an article on downleading.
So, this is a Crafty Rope Trick you’re hopefully not doing on a regular basis, but it might get you out of a sticky situation.
Photo: meat anchor with multiple “anchor points”

image: https://www.mountainproject.com/forum/topic/114012583/transition-to-canyoneering

Friction can lower forces on an anchor
When rappelling, often the rope is going over a ledge. This added friction can make your rope pull more difficult, but it also reduces the force on the anchor, which can be a good thing. The greater the angle, up to about 90°, the less force is put on the anchor.
This tip comes from my pal and canyoning expert Kevin Clark and his book, “Canyoning in the Pacific Northwest: A Technical Resource.”
I did a live body test of this at the rock climbing wall in Marymoor park in the Seattle area. My friend Ryan from @hownottohighline shot the video. See the short Instagram reel and the results here.
Results:
me hanging fully on rope: 190 lbs on anchor
Rope angle from edge to anchor about 50°: 135 lbs on anchor, or about 30% less load
Rope angle from edge to anchor about 10°: 80 lbs on anchor, or about 58% less load
When rappelling, the maximum force on the anchor usually occurs just as the rappeller is passing over the edge on top of the pitch. Once below the edge, the load on the anchor is reduced by the friction from the rope passing over the edge. The more contact with rock the rope has, and the larger the angle, the lower the force on the anchor.
There are lots of factors involved, such as how slippery the sheath of your rope is, if the rock edge is rounded or sharp, whether the rock is wet or dry, the type of rock, etc.
With a rope that runs over the edge at a 45° angle, the load on the anchor can be reduced by as much as 50%.
If the rope passes over the edge at a 90° angle, the load reduction can be as high as 66%.
If your anchor is questionable, that's probably a good thing. The trade-off is your rope is going to be harder to pull.
Let's look at some examples. Let's assume our rappeler weighs about 100 kg.
Example 1: The rope is anchored to bolts hanging over the edge of the cliff top. There is zero friction from the cliff edge. Our 100 kg rappeler puts a 100 kg load on the anchor. Hopefully that should be pretty obvious. (And yes, starting your rappel from a position like this might be a bit difficult.)

Example 2: Instead of using the bolts, the climber is now rappelling from a sling they put around the tree about, say, head height. Yes, this can increase leverage on the tree, but if the tree is stout, it doesn't really matter. A higher anchor point is more convenient to get rigged and start your rappel.
(Sidenote, it's best practice to avoid rapping with your rope around the tree. Doing this can damage the tree, get tree sap on your rub, and make for a very difficult pull. Add a sling instead.)
This makes an angle of about 45° over the edge of the cliff. Once the climber is over the edge, how much force do we now have on the anchor?
Using that best case scenario of 50% force reduction, the load on the anchor is now about 50 kg.

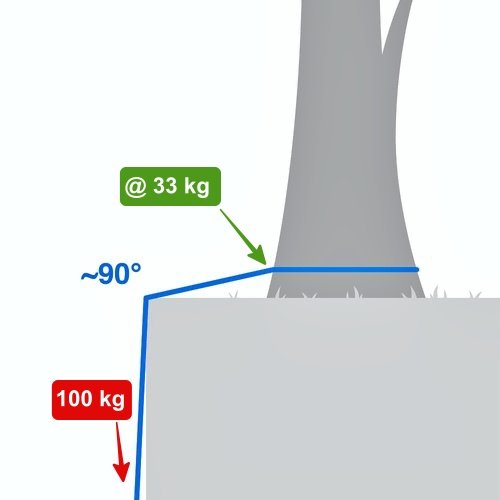
Example 3: Instead of anchoring higher up in the tree, our climber decides to use the base of the tree. (This decreases the leverage on the tree, but might make it harder to rig your rappel.)
This makes an angle over the cliff edge of around 90°. Once the climber is over the edge, what kind of load do we now have on the anchor?
Assuming a best case reduction of about 66%, the tree only sees a load of 33 kg. Good trick if your tree (or other any other sort of anchor) is marginal!
Here are some other techniques to minimize the load on the anchor:
Interestingly enough, you can significantly increase the forces on the anchor in that brief second or two when your feet are on the edge of the rock and you are leaning backwards. This has an interesting force multiplier, even if it's just for a moment. If your anchor is marginal, you probably want to avoid doing that.
To counter this, you can get as low as you can when starting the rappel, perhaps even sliding over the edge. Canyoneers call this a "soft start.”
Pushing the rope down into the rock surface as you go over the edge to help maximize friction.
Keep a consistent load on the anchor, good rappel technique, etc. Don’t jump down the rock like a special forces cowboy.
Use footholds if possible to keep load off the anchor.

A closer look at the “American Death Triangle”
The so-called “American Death Triangle” admittedly is a catchy name, is not best practice for anchor rigging . . . and is not as bad as it’s reputation. Learn about why it's stronger than you might think, and the pros and cons of related rigging methods.
This article has contributions from Over the Edge Rescue, IFMGA Certified Guide Karsten Delap, and HowNot2.com
Short version: the American Death Triangle (ADT) is not a preferred method for rigging anchors, but it's not as bad as you might think. With anchor angles typical in climbing (under 90 degrees), the ADT puts about 100% of the load onto each anchor point; the exact amount depends on the angle. The main problem with it is zero redundancy; if the sling fails, so do you. If you have to use one in the wild, provided the sling is in good shape, you're probably going to be fine.
American Death Triangle: top rope setup

American Death Triangle: rappel setup

The so-called “American Death Triangle” (“ADT”) in the early days of climbing, was a fairly common way to build anchors. It uses a minimum amount of webbing, and offers good equalization. At first glance it appears to be serviceable, even if it ignored a few basic rules of physics. Plus, you have to admit it's a catchy name!
However, for a long time it’s been roundly slammed in just about every climbing book ever written. “Don’t use it! Load multiplication! It creates dangerous forces on the anchors!” is usually about the extent of it.
Overall, that’s good advice. There are almost always better options for rigging that are redundant and put lower force on the anchor points.
But, you might wonder, how bad is it, really?
Before word got out that they weren't so great, ADTs were used for probably tens of thousands of anchors over decades. Did you ever hear of one failing? Are “catastrophic” forces really being created? If someday you have to use one in the wild, is it a YGD (Yer Gonna Die) scenario? What about other related configurations, like rappelling off of side-by-side rings, or lowering off of an adjacent route, or slinging a big boulder, that are sort of the same thing?
While the ADT may not be as bad as you might think, there are some reasonable concerns (listed in rough order of importance)
It’s not redundant. In the photos above, any failure of the sling/cord means the whole anchor fails. That's the primary problem!
It can put a inward / sideways pull on your gear, which could be an issue. For example, a piton in a horizontal crack could be plenty strong enough for a downward pull, but maybe not for an inward pull. More on that below.
It can increase the load onto the anchor points. The amount of this increase is related to the angle at the bottom of the triangle. It's rarely more than 1X the actual load onto each anchor point. More on that below. If the anchors are reasonably solid, this is probably not a concern.
You're only using the strength of a single strand of the material, instead of doubling it up, which increases the strength.
If one anchor point failed, it's likely you’re going to have some extension onto the the remaining piece, no bueno.
Since load multiplication is the main concern most people have, let's look at that first. (We’ll keep the physics and math as simple as possible, I promise!)
Pretty much every “Climbing Anchors 101” class has a diagram something like the one below. The smaller the angle between the two legs, the better the load sharing on the anchor points. As you get close to 180°, like on a slackline or Tyrolean traverse, the load multiplication gets ridiculous. This is for sure a good principle to keep in mind for standard anchor building.
Do you remember a vector force diagram like this from your anchor class? I suspect that this is at the root of the idea that the ADT causes high forces: “Horizontal rope in anchor ALWAYS equals super duper load multiplication.”
However, this does NOT apply to the ADT, where are the load direction is completely different from the diagram below.

image: https://www.ropebook.com/information/vector-forces/
Let's check the numbers
Here’s a nice chart from “Rock Climbing: The AMGA Single Pitch Manual” by Bob Gaines and Jason Martin. This is the only book I’ve seen with actual data on the ADT.
The second column, “V rigging”, refers to a standard way of clipping a sling to each anchor, making two arms, and then tying it off with a bight knot.

source: “Rock Climbing: The AMGA Single Pitch Manual” by Bob Gaines and Jason Martin
Turns out, with a 100 lb load and a small bottom angle of approximately 30°, there’s only 82 pounds of force being put on each leg of an ADT anchor. That’s a bit more than the 52 pounds or so on each leg with standard “V rigging”, but nothing close to catastrophic.
Even at a 90° angle, about as large as you would normally want to go, the ADT only puts 130 pounds on each anchor. Again, not close to catastrophic. (If your anchor placements can't hold 130 pounds, you've got some much bigger problems!)
So check that out, load multiplication is not really a problem!
For you engineers and more visual folks who want to see the math behind this and some nice diagrams, check out this webpage from our New Zealand friends at Over the Edge Rescue.
Rappelling on adjacent rings?
I've heard this question a few times: What about rappelling on adjacent rings? Does that create any sort of a dangerous death triangle? Short answer is no. The angle created by your rappel device in the photo is quite small, 30° or less. This creates a load on each anchor point that's just a bit more than your body weight. The bolts can easily handle that, plus they can take a load in any direction, so no worries. (Check out the HowNot2com video link at the bottom, at around 12 minutes, to see some testing on this.)

Stone hitch?
Here’s a similar situation. There’s a Stone hitch tied below the anchor, which isolates each strand of rope, typically so you can rappel on a single strand.
Does this create a dangerous ADT on the anchors? Yes it's an ADT, but with those bolts it’s certainly not dangerous. For rappelling, where the load is never going to be more than 1-2 kN, load multiplication is of no concern.

Lowering from an adjacent route?
Scenario: Say you have two different bolt anchors that are the same height at the top of the climb. If you climb the left route, clip 1 anchor, traverse to the right, clip the other anchor, and then lower off without pulling your rope through the first anchor, are you making any sort of dangerous ADT?
Answer: no. A clever engineer friend of mine calculated that the force on each anchor is just a little over the climber’s body weight. (To be more specific, the right anchor takes about 1.25x the climber’s weight, and the left anchor takes about 0.9x the climber’s weight.) So the takeaway: no problem!
If you do this, be aware that you’ll need more rope to safely lower your partner to the ground, so be SURE your rope is long enough!

What are the real world forces?
In the “rappel setup” photo near the top of the page, the joining knot is on the legs of the triangle between the load and the anchor. What if we put the knot on the base of the triangle instead, horizontally between the anchor points? Would the knot see increased forces, or decreased forces?
In the photo below, we have an approximate equilateral triangle, with 60° in each leg, and the joining knot, a Flemish bend, between the two anchor points. Say we have a load of 100 kg hanging off of the rappel ring. Will the knot see less than, equal to, or greater than 100 kg? Take a guess!
Answer: quite a bit less. That's because the friction on each of the anchor points absorb some of the load. The actual amount depends on the slickeriness of the material you're using, and what it's actually running through at the anchor, but the takeaway is that the base of a triangle sees the lowest amount of force. Is that surprising? It was to me!
(Note on the photo below: yes I know you could put your rope directly through the rappel rings and ignore the entire ADT rigging, but I needed to set up like this to get a equilateral triangle with the length of cord I had . . . =^)

The theoretical force on each bolt would be the same as the load, or 100 pounds. But because the cord is running through the rappel rings, this friction actually reduces the force going to the hangers, which is a good thing. With a 60° equilateral triangle, about 80% of the load goes to the bolt, and about 36% is seen by the knot (a Flemish bend, in case you’re wondering).

Below is a screen grab from our friends at HowNot2.com who tested pretty much the same set up.
With a load of 2.4 kN at the master point:
the base of the triangle between the anchor points saw a load of 0.9 kN, about 36% of the load.
each bolt saw a load of 1.96 kN, about 80% of the load.
(There's a link to the whole video at the bottom of the page.)

image: HowNot2.com, screeng rab from: https://www.youtube.com/watch?v=7sQNpjnJe40
Changing the direction of force
Here's a diagram that shows a bit how that works. (Original diagram credit: Over the Edge Rescue).
In the diagram, we have an ADT with angles of 60° on each side, an equilateral triangle. “A” are the two anchor points, and “L is the load.
Check out the blue arrows pointing inward from the anchors. This is known as the “resultant”, and it's the change in direction of force caused by the ADT. This means that instead of having the force going down the legs of the anchor directly to the load, it's instead directed inward, halfway between the base of the triangle and the two legs.
In this example, if we have a load of 100 kg at the bottom, 0.6 of that load (red circles, 60 kg) goes to each leg of the anchor. This results in a theoretical force of 100 kg on each of the two anchor points, pulling in the direction of the blue arrows. (As we saw above, in the real world because of friction, this force on the two anchor points would be reduced, but for here let's use the theoretical model.)

Here's an example of how this “resultant” force might cause a problem: two pitons in a horizontal crack. Either of these would probably be good for a more downward pull, which we would have with a “V rigged” anchor.
However, the ADT puts a larger INWARD force on the pitons, which could cause them to fail. This is another problem with the ADT, loading gear in a direction you may not have anticipated.
(image credit: Karsten Delap

image credit: karsten delap, from: https://www.youtube.com/watch?v=bW15yKu1ATM
More resources . . .
Sheesh, the ADT even has its own Wikipedia page!
Our New Zealand friends at Over The Edge Rescue have an article that will appeal to the engineers.
IFMGA Certified Guide Karsten Delap has a nice article on his website, along with the video below.
HowNot2.com has a detailed video on the ADT.

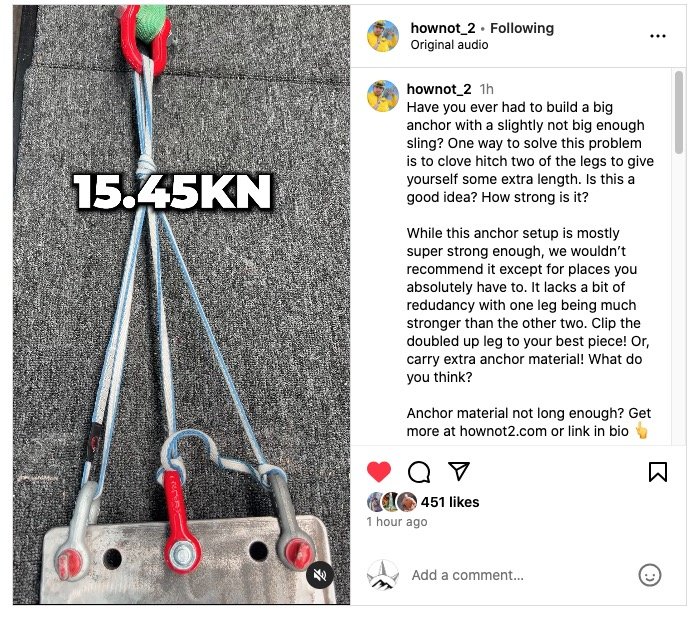
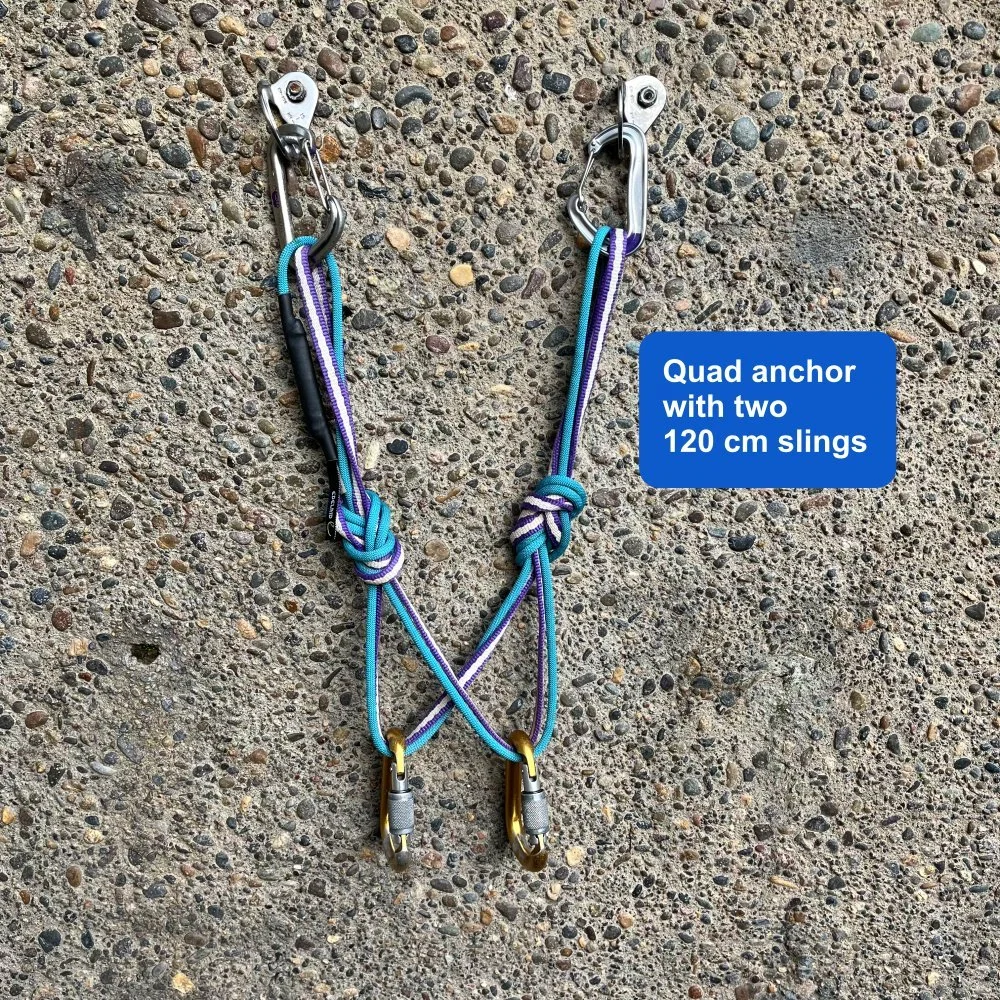
Quad anchor with two 120 cm slings
The quad anchor is a popular choice, but usually requires a 180 cm doubled sling or bulky cordelette. What if you don't have that gear with you? Here's an alternative: Simply use a pair of 120 cm slings.
The quad anchor is an increasingly popular choice for many climbers. (See a detailed article about the quad here.)
The standard way of tying it, with a doubled 180 cm or 240 cm sling, works great, provided you have that gear with you. However, those slings are unusual sizes, and can be hard to find.
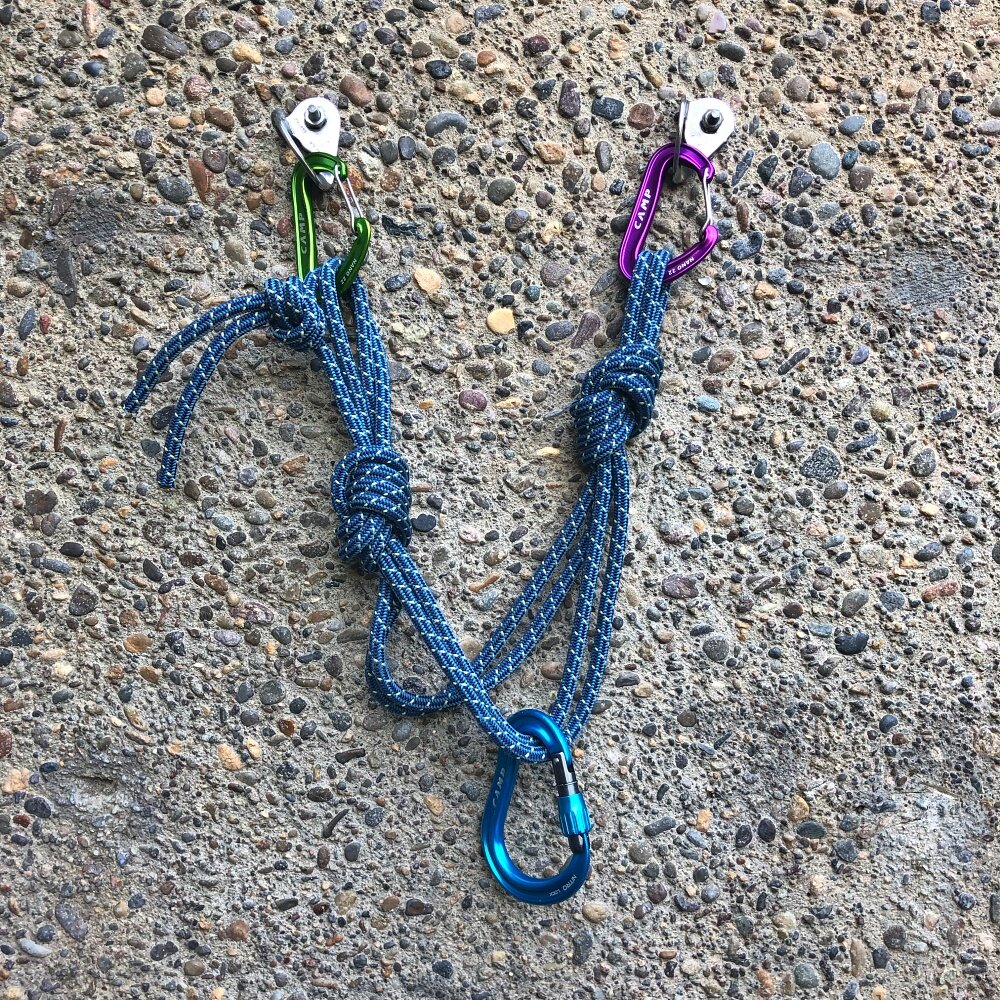
What if you want to make a quad anchor and all you have is a pair of 120 cm slings? No problem. Put them together, tie two bight knots, and you’re good to go. Tip: Try to tie the bar tack sewing in one of the two loops (above, it's in the left.)
In the photo, notice we have a figure 8 on a bight rather than an overhand knot. This has a couple of benefits:
It uses up a bit more cord, which makes your master point higher, which is usually more ergonomic
The extra bend in the figure 8 makes it easier to untie after its been loaded
The photo shows a newer Metolius 11 mm Dyneema sling, paired with an Edelrid Aramid cord sling (one of my favorites for anchor building.) Strong anchor, simple (easy to inspect) completely redundant, fast to tie, zero extension if a sling were to fail, and a pair of (pretty darn well) equalized connection points. Bonus: using the blue Aramid cord it makes it much easier to untie as well.
If the bolts are very close together, you might be able to tie a quad anchor with a one 120 cm sling. However, doing this takes a fair bit of fiddling to get the knot and bar tack in exactly the right place, so I much prefer to use a 180 cm sling, or this method.

A quick rope anchor for rock horns or trees
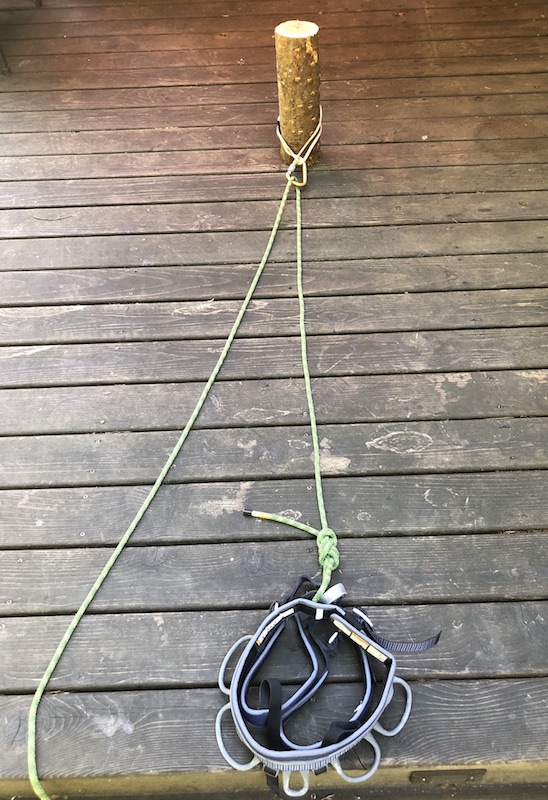
Alpine terrain can offer single point anchors like a rock horn or tree. Provided it’s unquestionably strong, here’s an elegant way to use these single point anchors. Pass the rope around the tree or rock horn, and tie an overhand knot (BHK) in both rope strands. This secures you, and gives a convenient double loop to belay your partner.
Note - This post discusses techniques and methods used in vertical rope work. If you do them wrong, you could die. Always practice vertical rope techniques under the supervision of a qualified instructor, and ideally in a progression: from flat ground, to staircase, to vertical close to the ground before you ever try them in a real climbing situation.
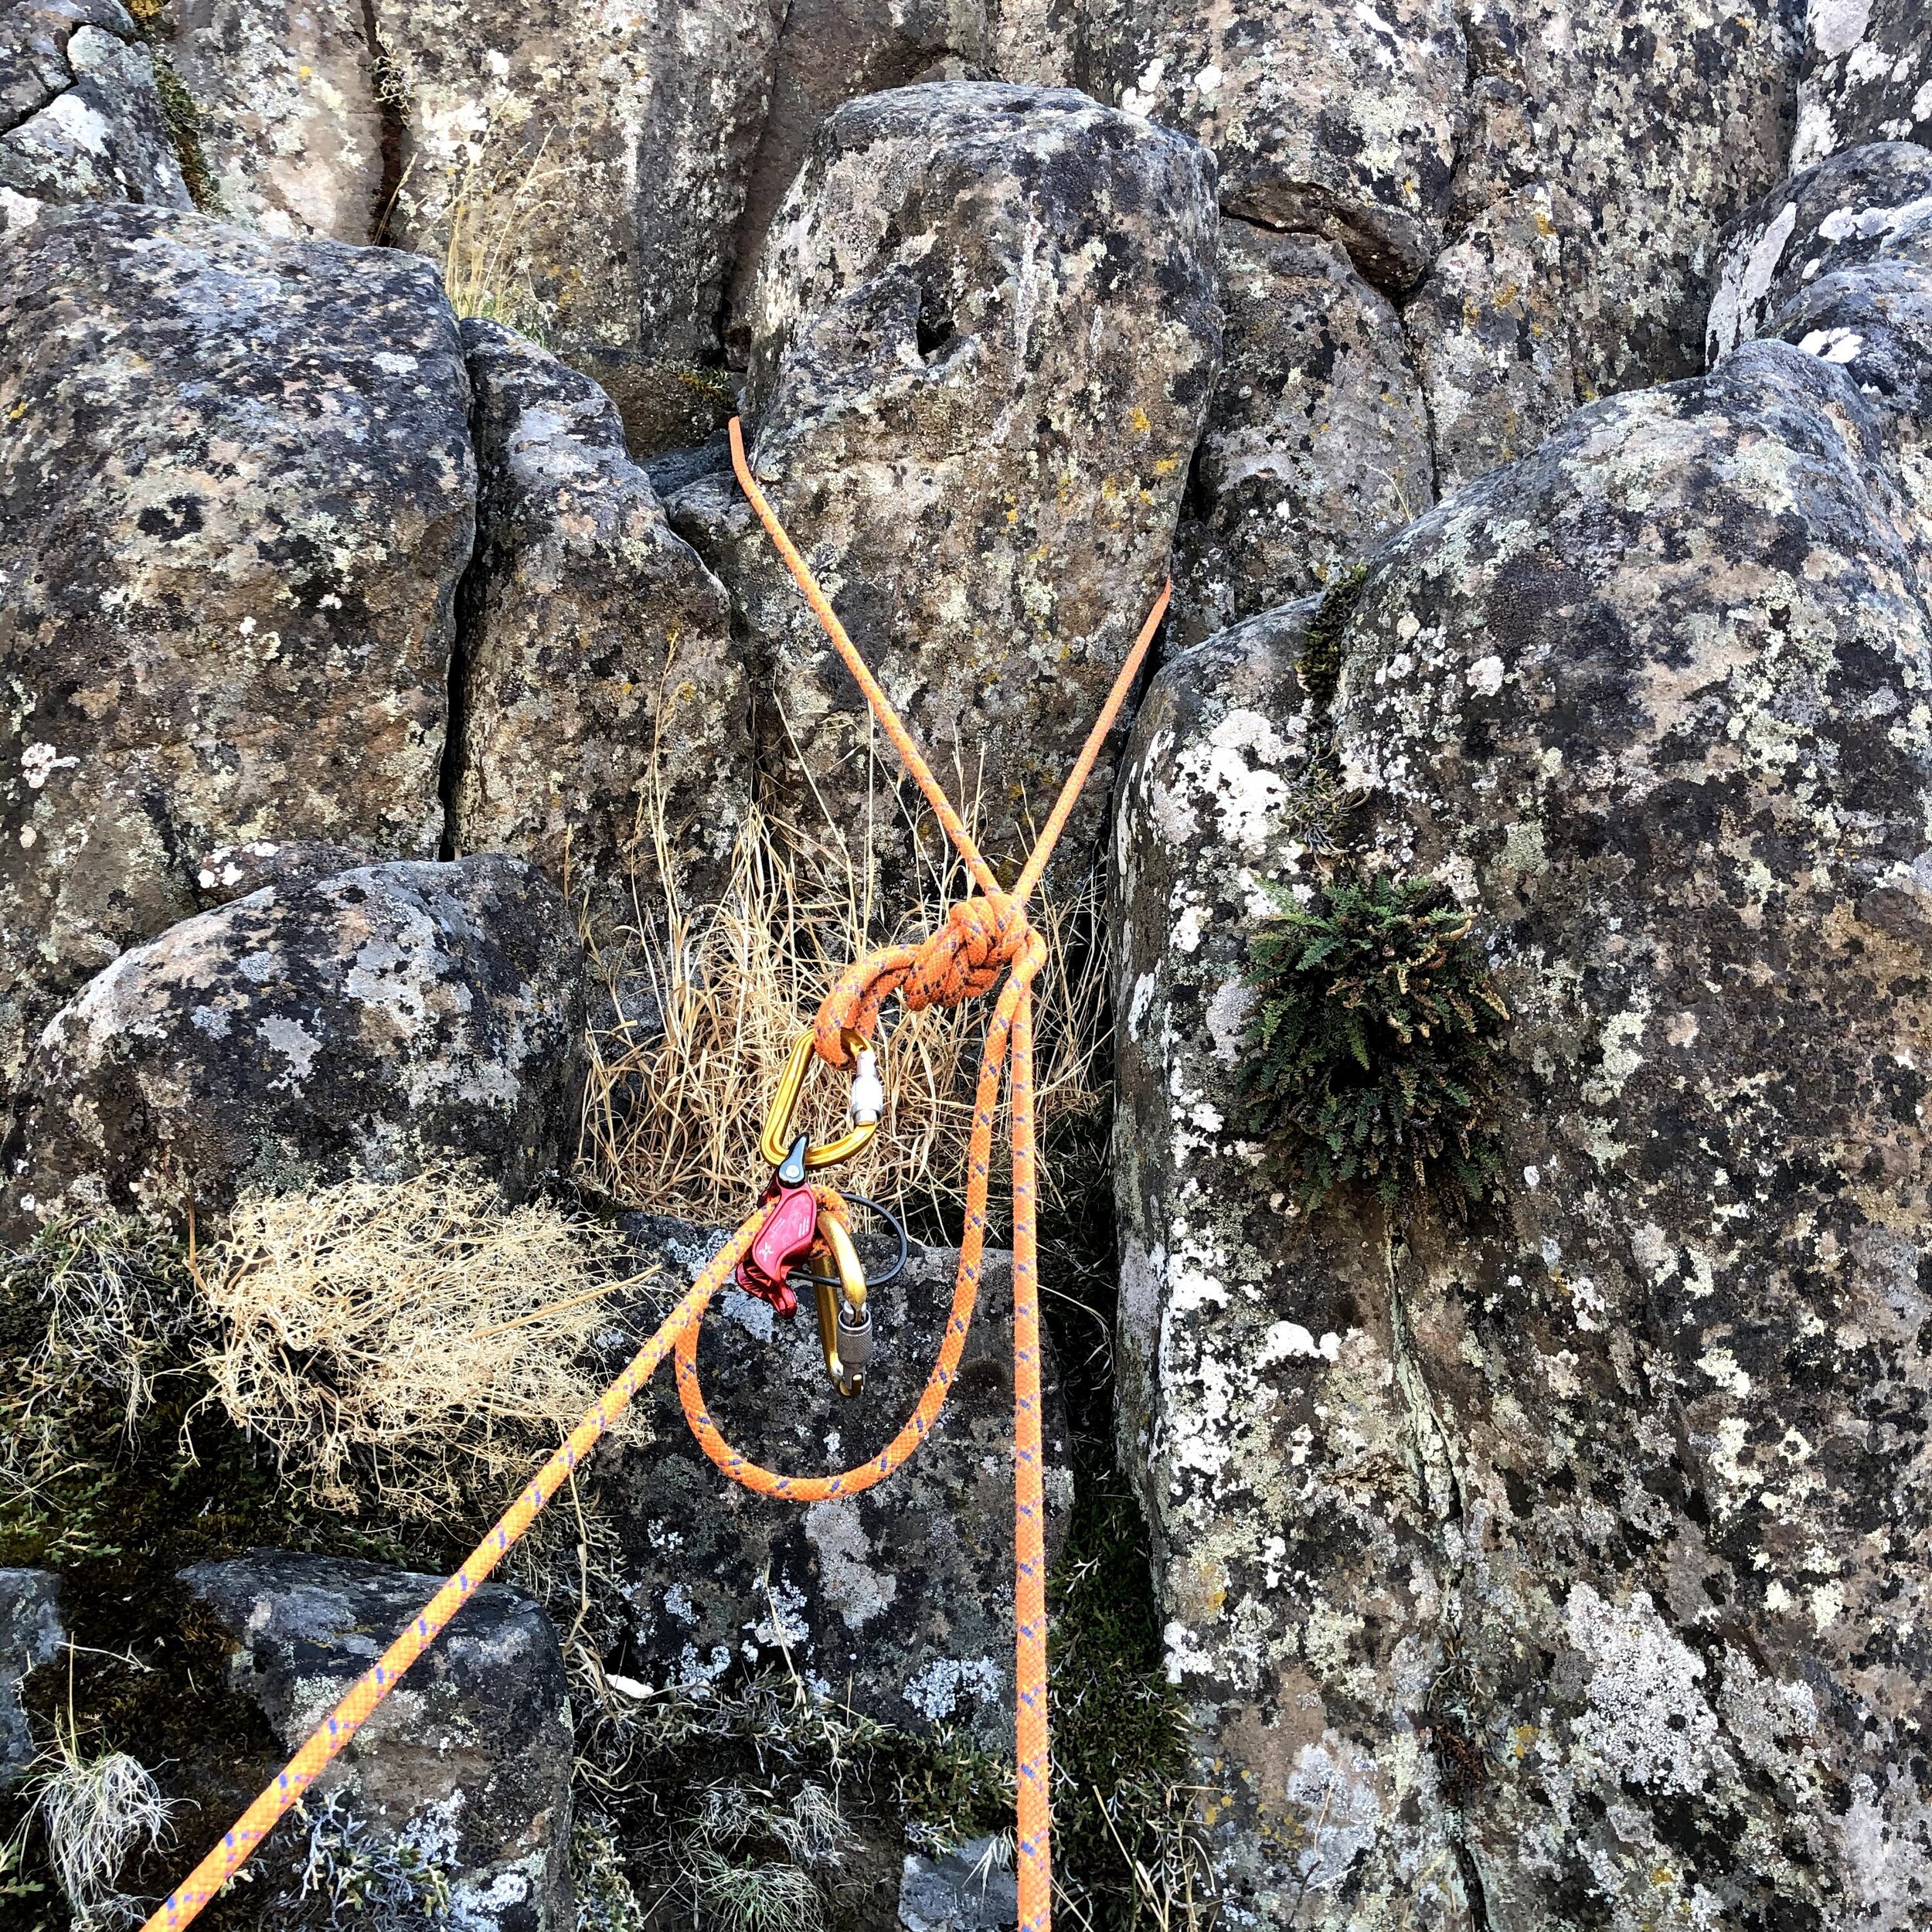
Here’s a quick and effective way to make an anchor with your rope around an extremely sturdy single point anchor. This is typically a substantial tree or unquestionably strong rock horn.
In this case we’re using a rock horn. If you have a tree, you can walk around it, or if that's not possible, put a long sling / cordelette around it and clip the rope to the sling with a locking carabiner.
If you're using a rock horn, it's probably not good for much of an upward pull. So, if that's the case, and this is your only anchor point, it's best used at the top of a climb when the next step is to walk off or rappel.
Note, in the photo above, there is a very short bit of rope between the knot and the belay device. This was done to keep the photo uncluttered; in real life, you’d have some coils of extra rope here.
Here's how to do it.
Find a rock horn that is unquestionably strong and doesn't have any sharp edges around the back. (If using a tree, it's good if it’s not a conifer with sap on it; getting sap on your rope is not fun.)
Pull up a couple of meters of slack, and toss a loop of rope over the top of the rock horn.
Step down below the rock horn a bit, so there's no chance that the rope can lift over the top. Tie an overhand on a bight knot using both strands of rope. In some circles this is known as a “BHK”, or “Big Honkin’ Knot”.
The BHK now secures you (in the photo, that's the strand on the right). It also creates a convenient double loop where you can clip your plaquette belay device, insert the rope, and bring up your second. If you need to shorten up the distance between you and the BHK, tie a bight knot to take up some slack.
Done!
Now, in fairness, let's look at some downsides of using your rope to make an anchor like this.
It could get damaged from being loaded around a sharp edge of the boulder / rock horn.
If you put it around a conifer tree, you could get tree sap on your rope, no fun.
It makes escaping the belay if you need to do some kind of self rescue a bit more of a problem.
On a multi pitch route, if you’re seconding, when you break down your rope anchor it introduces more slack that your partner above you now needs to take up.

Clip a chain anchor directly with a master carabiner
Find yourself at a chain anchor with a single huge ring or two equal lengths of chain? Lucky you, your anchor building may have gotten a lot easier. You can probably clip the bottom chain links with a large HMS carabiner and simply use that as your master point.
You're on a multi pitch route. If you come across a stout chain anchor, and if the bolts are close together and/or the chain is quite long, lucky you! You’ve got about the easiest and fastest anchor you could ever build. (Note, a vertically oriented chain anchor is also perfect for this, we're going to cover that in a new article soon.)
Why is this a sweet setup? Extremely fast to build, minimal extra gear, no slings, no knots, really easy to break down for your second.
Get the largest HMS “pearabiner” belay carabiner you have, clip the bottom two links, lock it, done. That becomes your “master carabiner”.

Note: Carabiners are strongest when loaded along the spine. When you bring up your second, that will be a larger load than just holding your body weight. So, take a moment before you clip that master point carabiner to have a look at where the rope is running down the pitch. In this example, let's say the rope is coming up from the left side of the anchor. Ideally, that means the spine of the carabiner would be on the left to take the potentially larger load, and the gate of the carabiner should face to the right.
Check out the nice diagram from Petzl to see how this works. In the diagram, the loaded rope is closest to the gate, the weakest configuration. In theory, It would be better if the load strand were on the left, closest to the spine.
(In my humble opinion, this is more of a potential issue with large loads. When bringing up your second, the load is never going to exceed 2-3 kN, so it's probably not critical if you forget to do this step. But it’s best practice, so it’s worth mentioning.)

image: Petzl.com
Add a smaller locking carabiner and clove hitch to the master point to secure yourself.

Clip your plaquette style belay device and blocking carabiner to the master carabiner. (As mentioned above, ideally clip this closest to the carabiner spine, because that's going to be taking a slightly higher load than just your bodyweight on the right.)

Finally, if you’re feeling courteous and have a spare locking carabiner, you can clip that to the master point on the far left to give your second a convenient place to clove hitch themselves when they arrive.

Possible concerns, addressed. (In some climbing situations these are valid concerns, but not necessarily here.)
Clipping multiple carabiners together!
Clipping directly into the rappel rings and possibly damaging them!
Loading the carabiner in multiple directions!
Clipping multiple non-locking carabiners together and having them flop around is a bad idea, because they can unclip themselves. However, at an anchor like this, when you use all lockers and there is no flopping movement of the carabiners, this is acceptable practice. We cover this more in this article.
Clipping into the rappel rings is totally fine with aluminum carabiners. Aluminum, being softer than the steel ring, is never going to damage the rappel hardware. (It's like using a plastic ice scraper on a car windshield; the soft plastic is never going to hurt the glass no matter how hard you scrape.) We cover this in detail here.
Loading a carabiner and three or four directions at once (known as tri-axial and quad-axial loading) can weaken a carabiner. But in this case it's not a worry, because the chains are quite long and the loads are not going to exceed 2 or 3 kN. If the loads were higher, and chains were shorter and/or the bolts farther apart, it might be a concern. Multi axis carabiner loading is an interesting and slightly complicated situation, and we cover it extensively in this article.
Detour to a toprope anchor: If you’re rigging a top rope on a chain anchor, and maybe you're short on quickdraws or other anchor material, you can clip two carabiners opposite and opposed to the bottom links. Ideally one of these is a locking carabiner.
This is generally not standard practice, it's usually a better option to use two quick draws or a mini quad, but if you're short on gear this is acceptable.
Note: if you do this on a link of the chain, you'll probably have enough room to pass the end of the rope through but probably not enough room for a bight of rope to lower from. In this case, there are large quick links at the bottom, so there's plenty of room to rig for lowering off, as shown in this article.
(I first saw this technique in a YouTube video (at 7:45) made by AGMA Rock Guide Cody Bradford.)

Here’s a nice video from Outdoor Research that shows many of these concepts in action. Important points mentioned in the video:
Avoid using smaller D shaped locking carabiners at the master point, because the carabiners become stacked on one another and the loading becomes less than ideal.
Of course, always avoid directly cross loading any carabiner gate; that’s a bad thing.
If the bolts are too far apart, and/or the chains too short, you might start to get some side loading on the top part of your carabiner. Be mindful of this, and re-rig with a sling if you don't like it. Here's an article on strength reduction from off-axis carabiner loading. (It's probably a lot stronger than you think; you'll be fine.)

Thoughts on redundancy in climbing anchors
Redundancy is one of the tenets of anchor building, for good reason. It's a great rule for most climbers in most situations. But, it’s actually more of a situational and subjective guideline than a black and white rule. Learn some of the factors that may influence this choice, and see some examples of non-redundant anchors in action.
This article was written with editorial assistance from Richard Goldstone, thanks Richard!
Redundancy in anchors, while a good maxim for most climbers in most cases, is a situational and not an absolute rule.
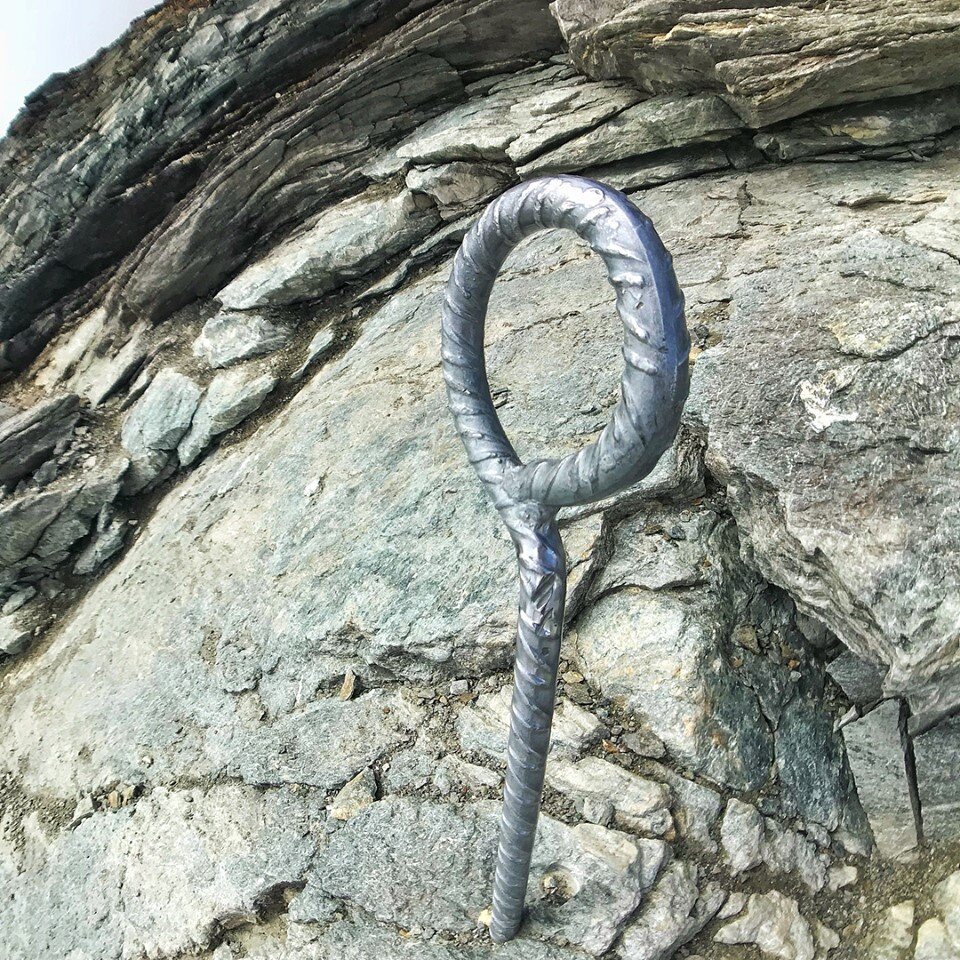
One of many single piece, non redundant anchors on the Matterhorn. Photo by Dale Remsberg.
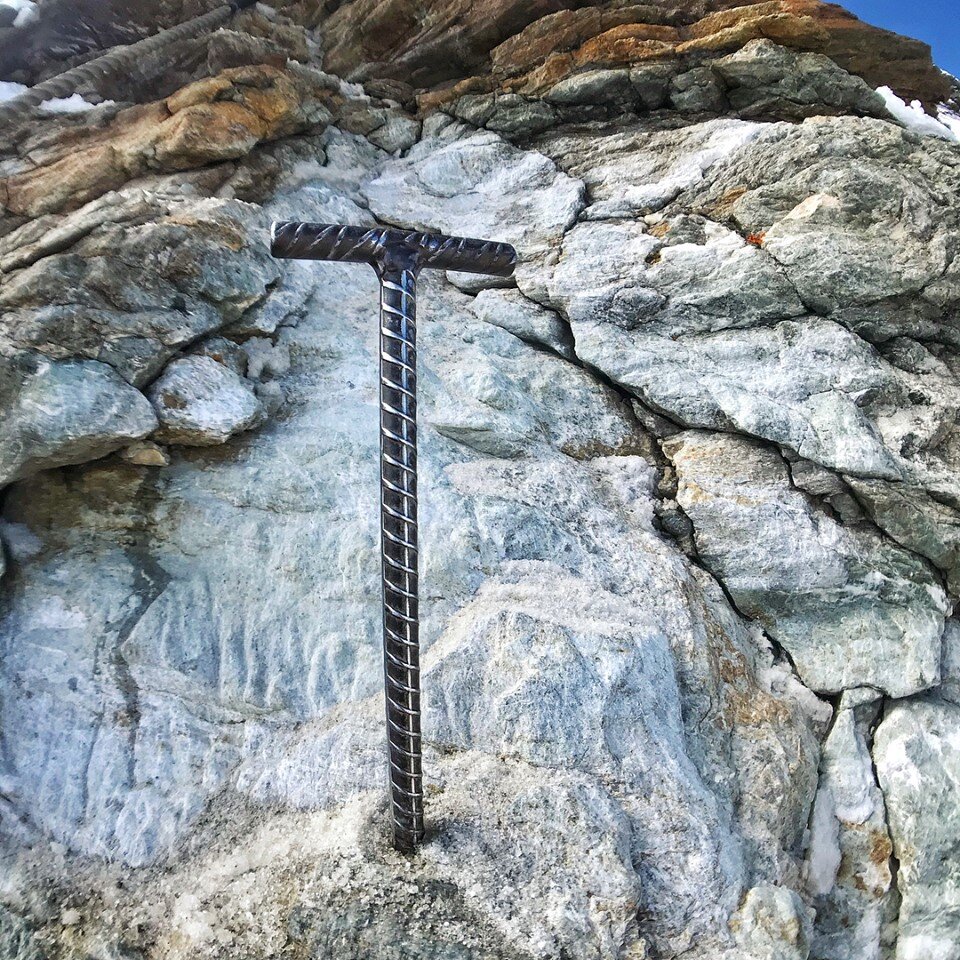
Single point, non redundant anchor on the matterhorn. photo: Dale Remsberg
“Good judgment comes from experience. Experience often comes from surviving bad judgment.”
Will Rogers
One of the core concepts of anchor building is redundancy - if any single component were to fail, the entire anchor wouldn’t fail. This mandate has been around for a long time for a good reason, because it's arguably the single best thing relatively newer climbers can do as a buffer against the mistakes of inexperience. The sketchier the situation, the more redundancy counts. When in doubt, double up isn’t a bad rule to live by. If you have the gear and the time, do it.
Sliding X anchor? Not redundant. If that sling gets cut, adios.
Statically equalized cordelette style anchor? Perfectly redundant, if any part of the sling fails, the rest of the anchor still works.
However, outside of anchor construction, climbing has many mission critical components that are not redundant.
Most of us climb on one rope
Pretty much every harness has one belay loop (Yes, it's doubled over and sewn, but it's still one piece of webbing)
We belay and rappel with one carabiner, with one belay device
We clip the one bolt/hanger with one carabiner/draw as the first clip on a sport route, and would deck if it fails
You get the idea. Why do we accept so many potential “single points of failure” in many parts of the system, yet demand it always be a component of our anchors?
The answer is, it doesn’t always have to be. Rather than being a mandate for every anchor, all the time, think of redundancy as a concept that applies in varying degrees to varying situations. It’s overall a good idea, and you should never be faulted for doing it, but it’s a situational, and not absolute, rule.
IFMGA Guide Dale Remsburg writes: “The idea of redundancy comes from pieces in the rock, not the links or tools we use to connect them.”
Keep in mind, creating redundancy comes at a cost of time, or gear, or both. Mostly, that’s a good tradeoff to make. Other times, perhaps not.
A fundamental principle of economics (and many other aspects of life, including anchors) is the law of diminishing returns, which, in econ-speak, means that adding additional factors of production eventually results in smaller increases in output. Say that it takes one builder one year to build a house. So, if you have 365 builders, can you build a house in one day? Of course not, because after a certain point, the extra production (builders) result in lower output (less work getting done because they are tripping over each other).
And yes, this can apply to building anchors. Continuing to add “production” (additional slings, backups, double locking carabiners, etc.) at some point do not significantly increase your “output” (safety margin), so it's probably not so smart to keep doing it. Of course, the question becomes, where do you cross that point? There's no firm answer, but here's one way to think about it mathematically.
Say that the odds of failure of an anchor sling are one in 1,000. If you backup that sling with another, the theoretical odds of anchor failure become 1,000 x 1,000, or one in 1 million. Add a third sling? The theoretical odds of failure are 1,000 x 1,000 x 1,000, or one in 1 billion.
What's your acceptable level of risk? If you're feeling good with one in 1,000, then going to one in 1 million (let alone 1 billion) is probably not worth doing.
Another broad component of anchors is having proper context in anchor photos/examples. This gets more into the situational judgment of when redundancy is more important. It's tricky to simply show a photo of an anchor and ask if it's acceptable or not. The slightly snarky yet truthful answer is, “It depends! Some broader context questions might be:
Is the anchor for a multi pitch lead belay, top rope anchor or a rappel anchor? Loads vary a LOT between these. Peak force on a rappel anchor, 2-3 kN; theoretical max force on a lead anchor, about 9kN. (Source)
How difficult is the pitch below or above, and what’s the skill level of the climbers?
Is it a part of multi pitch climb or the top of a climb?
Is there a chance of rock or ice fall that might hit the anchor?
Is it a casual day at your local crag, or are you trying to do a remote 15 pitch alpine route?
And so on.
Let’s examine that last point - that of speed/efficiency. When people cut corners on anchor building, the usual rationale is that it saves time and/or uses less equipment. Let's be honest though, the requirements for “speed” on a relaxed three pitch climb on a sunny day at your local crag (where time, weather, and daylight are not major issues) is minimal. On a casual route with no real need to hurry, eliminating redundancy from an anchor because it saves you a few minutes is not a very compelling argument.
How about a long, committing, 15 pitch alpine mountaineering route? There, shaving off a few seconds wherever you can might become more important, because the time savings multiply over the course of a big day.
Some people always seem to be in speed mode, striving to do everything the quickest way possible. If that works for you, great. But, for most of the rest of us, and especially for newer climbers, safety should always be a priority over speed.
Let's have a look at a few anchors that question the concept of redundancy. How do you feel about them? Consider the trade-offs in time, gear or both to make the anchor “textbook” redundant.
Rappel anchor
One tree, one sling, one carabiner. Every part of this anchor is non-redundant.

However, each of these three components is vastly stronger than any possible rappel load, which at most, even with terrible rappel technique, is never going to exceed 3 kN.
The tree is well rooted and stout enough. (Some folks use “5 & alive” for tree anchors - at least 5 inches in diameter, and alive.)
Some brand new 1 inch webbing (rated about 18 kN) tied in a well-dressed water knot with good long tails. The webbing is rubbing on tree bark, not the sharp edge of a rock.
Snapgate carabiner (rated 22 kN) left behind for the rope connection, gate taped shut for extra security (aka cheapskate locker). Extra points for using pirate hockey tape.
So, whaddya think? Would you rap on it? Why or why not? If not, what would you change / add so you’d feel comfortable?
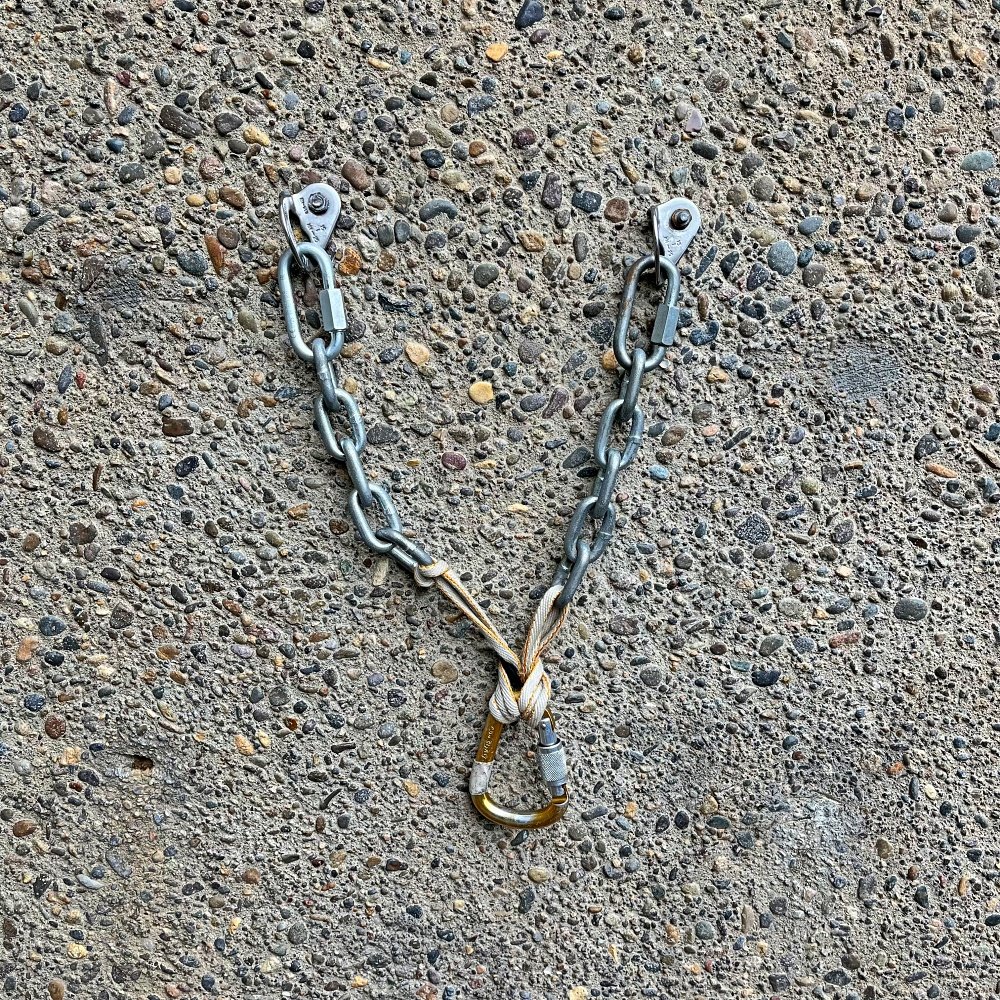
How about this anchor? It’s a Fixe PLX/Duplex anchor, standard in many parts of Europe and Canada, but not so common in many parts of the USA. Everything is stainless steel, the rings are 10 mm thick, and the whole thing is rated at 30 kN.

How about that bottom ring? The gear testing wizards at HowNot2.com tested a couple of these. One broke at around 90 kN, the other broke around 60 kN! That is miles stronger than your rope, your belay device, your belay carabiner, and all those other single points listed above. If you're happy with those single points, why not be happy with this?
This is an anchor that can leave redundancy advocates scratching their noggin. Hmm, what do I do with this mishmash of hardware? Am I supposed to clip just that ONE ring at the bottom?! That’s not redundant, if it fails, YGD! (You’re Gonna Die).
Redundancy advocates might just ignore the chains and ring, and rig this with a long runner clipped to the bolt hangers. Remember, it's probably totally fine if you choose to do this, but it’s not the intended nor most efficient way to use this style of anchor.
Here’s an Instagram video posted by AMGA Certified Rock Guide Cody Bradford using this exact style of anchor. Cody clips a single large locking carabiner to the ring making a master point, then clips two carabiners onto that, one for his clove hitch and one to belay his partner. Yep, everything off the one ring. (And then everything off of one yellow carabiner.)
Not textbook redundant, right? What do you think about this anchor set up? What would you do with anchor hardware like this if you had to belay up your partner?
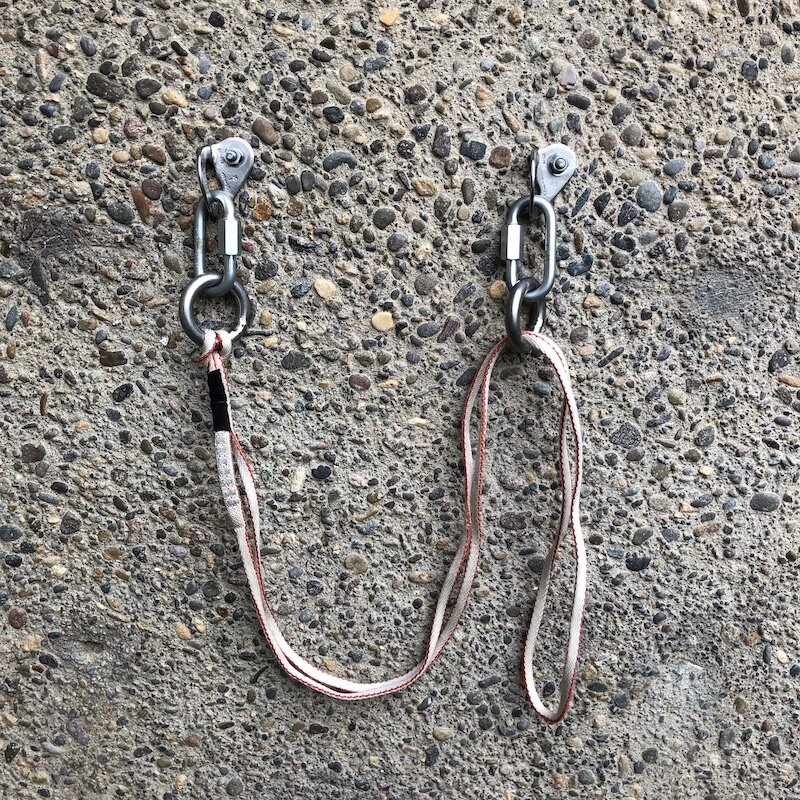
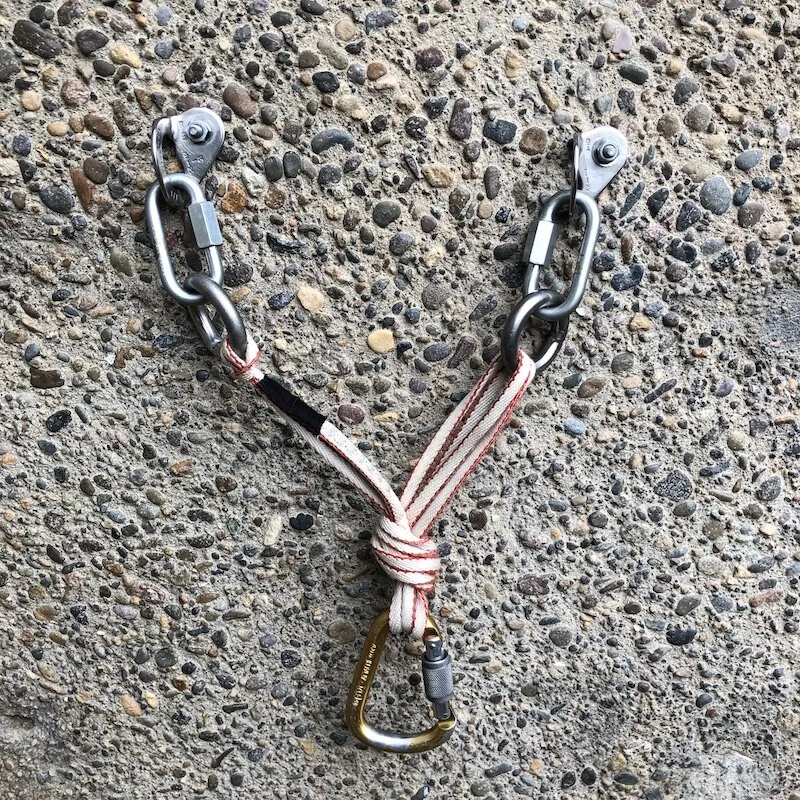
Here’s another example. I first saw this anchor on the Facebook feed of Dale Remsberg, an IFMGA Certified Guide and technical director of the American Mountain Guide Association. (So yeah, Dale knows his stuff.) It's a photo he took of an anchor he built while guiding a client, and put it on Facebook to start a discussion about, guess what, redundancy. (For context, it’s on a large ledge, the pitch below is an easy 5.7ish, and there is no risk of rock fall from above.)
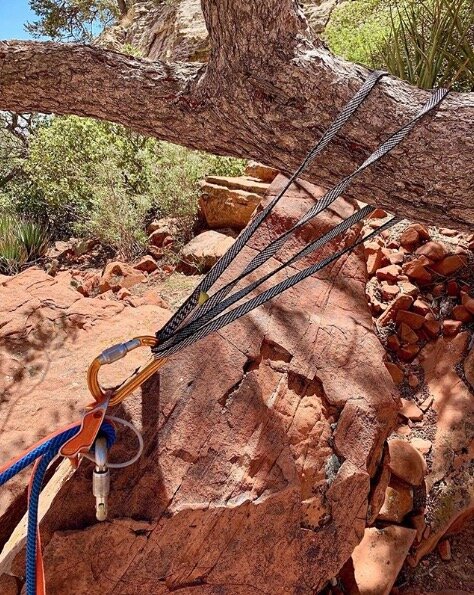
image: Dale Remsberg - https://www.instagram.com/p/BxH139Tj1M5/
What do you think of this?
At first glance, redundancy advocates would dismiss this immediately. A basket hitched sling has zero redundancy; if it gets cut or fails, immediate anchor failure and YGD!
Technically true, but how would this sling possibly fail? It's running around tree bark, not any sort of sharp rock. There is zero risk of rockfall from above impacting the sling. The only way it could fail for is for it to physically break, something that has pretty much never happened in the history of rock climbing outside of the ever awesome Sly Stallone movie, Cliffhanger. (Readers, please correct me on this last sentence if I’m mistaken.)
One approach to make this anchor redundant is to tie a knot in the sling. Maybe so, but what's the trade-off? You might barely have enough sling material to make the knot . . . or perhaps you wouldn't. You also weaken the sling by tying a knot. You also take the time to tie the knot, and probably a longer time to untie it, which if it gets weighted, could be a hassle. (Side note: could be a great place for a girth hitch at the master point.)
Which is more important, having the full strength of the runner, or weakening it by tying a knot which creates redundancy? Oh, and there’s just one tree branch there, that's certainly not redundant. What about that?
Now, I saved that's the best for last. Here's one that’ll give redundancy advocates nightmares. (And to be honest, I’ve never seen one of these in real life and I'm not super excited about it either . . . )
How about ONE SINGLE BOLT?!
Here’s a screen grab from a video, link below. From the video: “( . . the anchor can) . . . in some instances be a single large glue in bolt, which is the only anchor at the anchor point.”
How are you going to make this redundant? Answer is, you probably can't.

image : screen grab from: https://youtu.be/1r7hIZREJoQ?t=
Now, before you start thinking this is a 20 year old photo from East Boondockistan, this video comes courtesy of the excellent (if awkwardly titled) “Safety Academy Lab Rock” video tutorial series, produced by the well-regarded German company Ortovox, and backed by Petzl and the German Mountain and Ski Guides Association (in German, “VDBS”). So, while if Americanos like me may not have any personal experience with it, the fact that it’s featured in an instructional video made by VDBS I’d say give it a fair bit of cred.
And no, you don't truly know the quality of the steel, the length of the bolt, the type of adhesive used to glue it into the rock, etc. But, a properly placed long glue in bolt like this has a UIAA minimum standard downward pull of 25kN, and have actually tested up to 50(!) kN, which makes it about the strongest component you'll pretty much ever encounter in climbing (right up there with the huge master point ring in the Fixe anchor above.) So, the short answer is yes, you can probably rely on this single point of connection. (But, in all honesty, as an American climber raised with the mantra of redundancy, I would not be overjoyed to discover this as my only connection to the rock.)
But hey, if you find this at the top of the first pitch and you don't like it, you can always rappel off and go climb somewhere else, right? :-)
Below is the whole video; see the single point anchor part starting at 0:40.
(And the fixed point belay? We’ll cover that soon in another Alpinesavvy article.)
And, for a little historical perspective, here’s one of many single piece anchors on the iconic Matterhorn, photo by Dale Remsberg.
Stout? Looks like it.
Used by probably tens of thousands of climbers over decades, most of them professional guides? Yes.
Redundant? Nope.
anchor on the matterhorn. photo: Dale Remsberg

Make a sling anchor with just one carabiner
If you get to an anchor with chains and are low on carabiners, this crafty rope trick lets you build an anchor with just one runner and a single carabiner. (Note, this is not standard practice.)
This tip comes from AMGA Certified Rock Guide Cody Bradford.
While sadly Cody is no longer with us, his Instagram continues to stay up and is a great source of tips like this, check it out.
Note - The following tip is intended for more advanced climbers to add to the toolbox, and not meant as standard practice. Use carabiners when possible to attach a runner to bolts/chains/gear.
Someday in your climbing career, you’ll need to build an anchor after you’ve pretty much run out of carabiners.
If you have just one sling (either a double length/120 cm or a single length/60 cm) and one carabiner for the master point, you (might be) in business.
Note / disclaimer:
This example is on a bolted anchor with rap rings. The rings give a nice rounded metal edge and is bomber strong. While you could get away with it, it's not best practice to girth hitch a runner directly into a bolt hanger or to a stopper cable. If you do this and catch any sort of significant fall on the runner, inspect it carefully and possibly retire it. On the other hand, testing has shown that hitching a sling to a stopper cable can hold between about 8 kN and 12 kN, which is probably more than you think. Can a bolt hanger be much worse than that? So, like I said, something for the advanced climber’s toolbox, and not for standard practice. See the last photo at the bottom of the page for what you generally do NOT want to do.
Girth hitch a double length runner through one of the bottom rings, here the left. Try to get the runner’s stitching close to the girth hitch.
Pass the other end of the runner through the other ring, here the right.
Bring the loops together and clip your master point carabiner like so.

and tie it off with an overhand knot, done.
and here’s a video from AMGA Guide Cody Bradford showing how it’s done. (Note that Cody is using Metolius rappel hangers, which have a larger, rounded, sling/rope friendly edge than a regular bolt hanger.)
How strong is this?
I posted a similar set up to this on Instagram, and got a fair amount of disparaging comments about girth hitch weakening the sling, never put a knot in Dyneema, Yer Gonna Die (YGD), this is stupid, blah blah blah.
So, I visited my gear breaking buddy Ryan at How NOT2, and we tested it.
Well, it did break . . . the steel carabiner, at 31 kN!
That's pretty crazy so I'm gonna say it again. The steel carabiner broke before the sling! Case closed, #MoreThanSuperGoodEnough.
Here's the video from HowNOT2 to showing the testing.
This can also work if you have two pieces that are vertically offset, or if one is a piton. Note the girth hitch at the master point. This example comes from a nice PDF file showing some European style anchor techniques, made by the German Mountain and Ski Guides Association (“Verband Deutscher Berg und Skiführer” or “VDBS”).
Supposedly, this style of anchor is more common in the south Tirol / Dolomites. In this area, the rock is often fractured or heavily featured and there's often fixed fixed gear. Using slings like this to connect directly to pitons and rings means there’s less chance of a carabiner being loaded sideways over an edge.

image: Standplatzlogik VDBS 2019 - Ausbildungsstandard VDBS & Alternativen
Other rigging options - chains and a single length / 60 cm runner
You can also do this with a single length/60 cm runner. But you won’t be able to tie it off with an overhand knot as shown above, because it's too short.
One option is to make a girth hitch at the master point, which uses less sling material than an overhand knot. (Don't freak out about this, a girth hitch is fine to use at the master point. We cover it extensively at this tip.)
Or, even easier, if the chains are long enough, you might be able to clip both of them with the single big locker and have that be your Masterpoint. Yes, it's cool to do this and don't worry about three-way loading, we cover that in this article.

Oh, and on your next lead, bring a couple extra carabiners for the anchor, will you? When your partner arrives with some extra gear and freaks out about the anchor you built, feel free to add a some carabiners from their rack if it makes them happy. =^)
If you happen to face this situation with only hangers and no chains/rings, it's still doable, but WAY Less Than Ideal. Please don't rig an anchor like this unless you really have to. Going straight through the bolt hangers is not the greatest. You may want to: 1) Check the sling after you’re done and retire if needed; 2) Brace the belay if you can with your body and belay from your belay loop; 3) Rebuild this with proper carabiners once your partner gets to the belay.
and sheesh, bring more gear with you next time, will ’ya?!


The "double top rope quad" anchor
Here's a slick way to use a quad anchor to set up two adjacent top ropes on same set of bolts.
This tip and video come from AMGA Certified Rock Guide Cody Bradford.
While sadly Cody is no longer with us, his Instagram continues to stay up and is a great source of tips like this, check it out.

Say you’re toproping with a few friends on two adjacent routes that share one common anchor. It can be a challenge to set this up so you have two separate master points, while minimizing anchor cluster.
There are various ways to rig this, but here’s one that’s exceptionally simple and clean. Use a quad anchor, and put two opposite and opposed carabiners on each pair of the quad strands.
Your quad anchor could be a large length of cord (usually 7mm) tied in a big loop cordelette style, or the new school “mini quad” typically made with a 180 cm runner, as we cover in this tip here.
To make the master points, you can use two lockers, or one locker and one snapgate. Both are fine. The choice depends on the gear you have available and your general level of acceptable risk.
Is this example “overbuilt”? Maybe. Do you have to have locking carabiners all the way around. No. But hey, if you're out climbing with several people, I bet you can come up with six lockers! To me, it's sort of like looking both ways before you cross a one-way street. Technically you shouldn't have to do it, but in reality, there's no downside to doing it, and it may give you a warm fuzzy feeling. On this website and my Instagram, I am generally going to show the most conservative approach.
No one should “safety shame” you if you decide use all lockers. (Remember, YOU are responsible for your safety and level of acceptable risk; don't let other people's opinion or what you read on the inter-web dictate that for you.)
At a top rope anchor, the anchor is “unattended” - you’re not there to monitor the rigging maybe for hours at a time with perhaps many people using it. Given this, most folks use an anchor set up that is a little more secure (i.e., more lockers) than they might for a lead belay anchor, even though the potential forces involved in top roping are much less.
Safety note: It's best to use this set up on adjacent routes, and not to have two people climb the same route at the same time on different ropes. If you were to do this, you might have a situation where one loaded rope could be running over the other rope, not good. Clipping the rope through the top bolt or piece of gear on each route as a directional can help ensure the ropes stay away from each other.

Try a girth hitch at the master point
Here's an unconventional approach to anchor building - tie a girth hitch at the master point. This has a few advantages over the standard overhand knot.
I first heard of this technique from IFMGA guide and technical director of the American Mountain Guide Association (AMGA) Dale Remsberg, and a video (see it below) made by the German Mountain and Ski Guides Association (VDBS).
Researcher and AMGA Certified Rock Guide Derek DeBruin partnered with Petzl USA to perform a rigorous analysis of the girth hitch master point. Conclusion (published September 2021), it's solid.
Why might you want to use a girth hitch at the master point?
Keeps the master point carabiner properly oriented, it can never spin and become cross loaded
Easy to untie after it’s been loaded (no welded knot to deal with)
Easier to tie and untie if hands are sore and/or cold, or you’re wearing gloves
Adjustable - If the load direction changes after tying it, you can feed slack side to side to get better load distribution
You can equalize three placements with a 120 cm runner and two placements with a 60 cm runner, if the bolts/gear are close together. Great if you are short on long slings
Redundant (even though it may not appear so at first glance. Really it is; cut one strand and it still holds, see a video testing on this below
Plenty strong (yes, girth hitching “weakens” the sling, but this is a 20+ kN runner; are you really worried about it?)
Endorsed by Climbing magazine and backed by solid research

If you try to tie a cordelette style anchor with an overhand knot in a double length / 120 cm runner clipped to three pieces of gear, the knot (almost always) takes up so much material that it can’t be tied. Given this, for a three-piece anchor, most climbers would automatically reach for their cordelette.
But, there’s another option. Provided the gear is fairly close together, the 120 cm runner works great if you make a girth hitch at the master point rather than an overhand knot.
The same technique also works with a two piece anchor and a single length runner. If you get to a two piece anchor and find you only have a 60 cm runner left, or you don't want to deal with untying a welded knot, or if you think carrying a huge cordelette is kind of a PITA, this is an solid alternative.

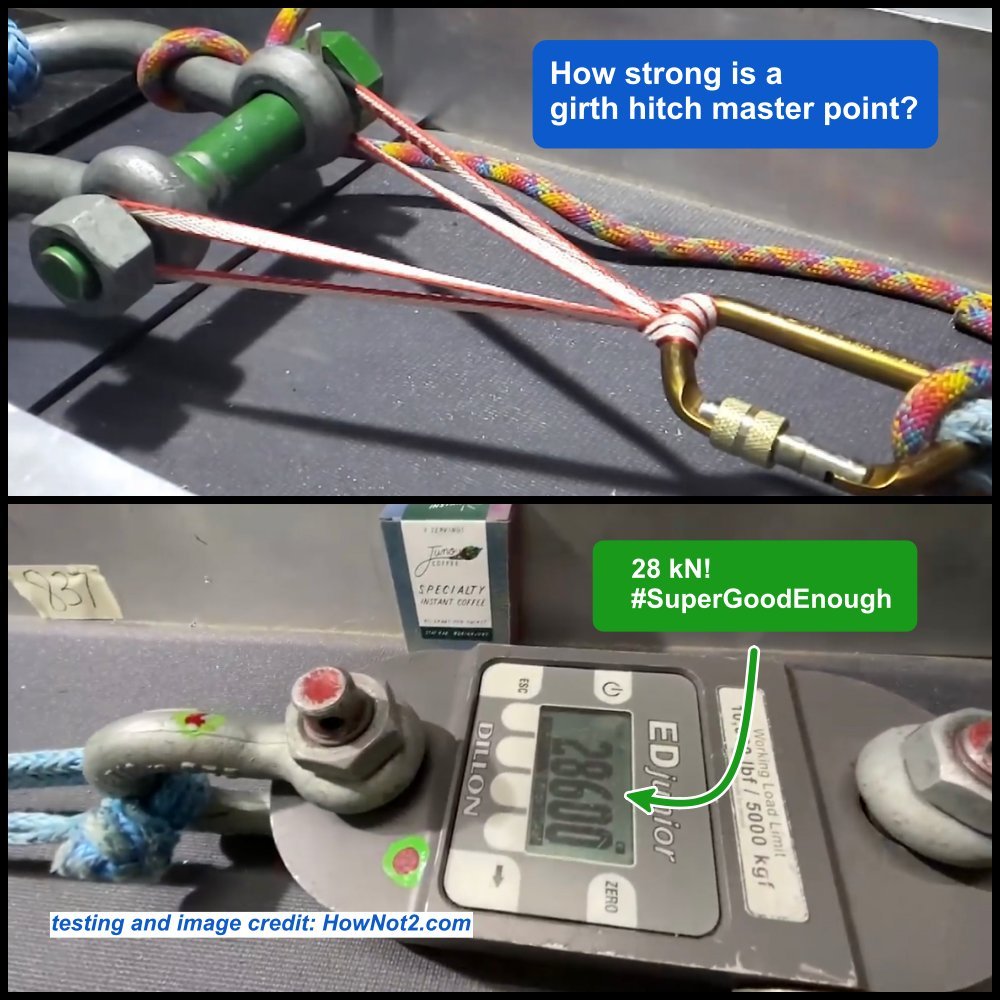
Let's address that “how strong is it / doesn't a girth hitch weaken the sling?” a question right off the bat. This was tested by our friends at HowNot2.com. It broke at around 28 kN.
Are you surprised by this? Think of it this way: the 22 kN sling is doubled, giving it a minimum strength of around 44 kN. Then you tie the knot which approximately by half. So, the resulting strength is somewhere in the neighborhood of the original untied sling. The takeaway: absolutely strong enough for any recreational climbing load.
Here's a break test of a girth hitch master point tied with Sterling Power Cord. This cord is great for cordelettes and anchor building. It's 5.9 mm and rated about 20 kN. Our friends at HowNOT2.com did a break test on this: 31 kN.

Common concerns and questions about the girth hitch master point . . .
- Is it okay to use a girth hitch? I thought it weakens the sling too much. The maximum load you could ever have in a recreational claiming scenario of crazy factor 2 fall onto the anchor in somewhere around 9 kN. As you can see in the image above, this anchor tests somewhere around 28, kN so no problem.
- Is it redundant? It might not appear so when you first look at it, but in fact it is. Watch the videos below. You can see one strand being cut under load and not pulling through. (Having a sling get cut like this in real life is maybe a 1 in 100,000 occurrence, but yes, it has happened.) Consider the much more likely scenario of a piece of gear pulling and then the master point being loaded. If the sling were to slip, the carabiner clipped to the gear would slowly slide and eventually be stopped by the girth hitch. Some of the videos below show the sling actually being cut. You can test this without cutting your gear, just put full weight on it after unclipping one of the pieces.
- What about the video from “How Not To Highline”, where it says the girth hitch master point is not redundant because it slips under load? Yep, I saw that video. (Ryan is a great guy and is doing some very interesting testing, I love his YouTube channel.) Yes, this method can “fail” if: 1) a sling gets cut, 2) is then subjected to a very large (6-7 kN) load, and 3) that load is continuously applied. This is applicable to a highline set up, which is why Ryan tested it, but a constant load on an anchor of 6+ kN is very hard to achieve in a normal climbing scenario. (Climb team of four NFL linemen at a hanging belay? Expedition big wall climbing with 600 kg / 1,300 pounds of haul bags, all hanging from the same anchor point? Not gonna happen.)
(Some testing where it gets impacted with a sudden dynamic load of 7+ kN would be interesting. If anyone knows of tests like that, please let me know, I think the Alpine Club of Italy has some results, I'm trying to track it down, stay tuned.)
- Did you make this up in your backyard? I've never heard of it before. It's not yet widely used in the United States, but gaining in popularity. It’s widely used in Europe. It’s advocated by lots of IFMGA Certified Guides, the German Alpine Club (DAV) and the German Mountain and Ski Guides Association (VDBS), demonstrated in the video at the bottom of the page. Do you think some of the most expert guides in the world would advocate a technique that’s unsafe?
- Can I tie it with a Dyneema sling? According to the video below made by the German Mountain and Ski Guides Association (VDBS), the answer is yes. (Some climbers suggest using a 11 or 12 mm Dyneema sling (such as the Petzl Pur’Anneau) rather than a skinny 8 mm sling, which might lessen any slippage, if that's something you're concerned about.)
- Is there a usable shelf? Hmm Sort of. Maybe. Apparently the German Alpine Club (DAV) thinks not; I’m looking for a technical recommendation on that, stay tuned. But, IFMGA Guide Dale Remsberg says yes; but to use the shelf, a load needs to be clipped into the master carabiner, so the shelf is best used to belay from. If the shelf is an anchor point for a climber, you also have to have a climber in the master carabiner. You may find if you load the shelf and the master carabiner at the same time, some wonky carabiner loading issues start to develop because they're pretty much right next to each other. A shelf is an optional feature in anchors, and very rarely a requirement. Experiment with this in a controlled environment and see what you think.
- What about adding a twist in one strand before you make the girth hitch? Does that mitigate slippage? Canadian rope solo expert Yann Camus did an interesting study that showed this in fact might help. However, a piece of protection failing and a slow steady pull causing anchor failure is not going to happen, because the carabiner attached to the protection would wedge against the hitch.
- Can I top rope on it? Yes, but it’s not so great. The main reason is that’s it's difficult to tie this around two carabiners, which is what most people like to have at the master point when top roping. The secondary reason, at least for me, is that the security of this anchor relies on the cord being firmly snugged down around the carabiner. Over the course of a long top rope session it's possible that the hitch could loosen up and start to do some strange things on the carabiner, especially if no one is there to monitor it. For a long top roping session, other options such as a quad may be preferable.
- What are the best uses for this anchor? This is best used on multi pitch climbing. It’s a good choice if you need to equalize three pieces of gear and have a 120 cm runner and not a cordelette, or if you’re climbing in cold weather and want to tie it quickly with gloves on, and avoid dealing with a welded knot.
Are you on a SAR / rope rescue team and need to maintain a 10:1 safety factor in everything you rig? Are you trying to pull your car out of a ditch? This may not be not the best anchor for you. It’s another tool in the toolbox for more advanced climbers, and not a perfect technique for every situation.
- “I dunno, it just looks sketchy.” That's fine, sometimes what we feel can be more important than what we think. Alpinesavvy offers information and ideas, not advice. If you don't like it, don't use it. =^)
Test 1: Here's an unscientific (but still quite fun) test I recently did. TWO pretty big guys, Dyneema sling, both of them loading a girth hitch master point. One strand, cut . . . no problem!
Test 2: Full weight of climber hanging from anchor, slippery Dyneema sling cut very close to the master point, no slippage. Also, no slippage when using cord. (This Instagram post has three sections, the video is in clip 2 and 3.)
Test 3: Slow pull break testing in Germany, no issues with the girth hitch slipping.
Nylon sling, 2 arm anchor, one arm clipped, failure at 15 kN.
Nylon sling, 3 arm anchor, two arms clipped, failure at 23 kN.
Dyneema sling, very short, one loop of two clipped, test stopped at 12 kN.
Hey, don’t listen just to me. How about these reputable endorsements for the girth hitch master point?
Ortovox (a German company best known for avalanche transceivers and related ski mountaineering gear) has an excellent Youtube tutorial video series on many aspects of mountaineering. The video series has the (somewhat awkward) title of “Safety Academy Lab Rock”. It's produced in partnership with Petzl and the German Mountain and Ski Guides Association (in German, “VDBS”). So, you can probably assume that the techniques shown have technical approval at the highest levels.
The video below shows various VDBS guides building multi piece anchors using an open (aka untied) cordelette.
In every case, they use a girth hitch to create the master point.
(The climber in the video is also using two techniques uncommon in the United States: 1) using an overhand knot to make a loop from his cordelette; and 2) threading the open/untied cordelette directly to the pitons / protection without using carabiners.)
Watch the video below. (The whole video is only 3:30, but if you have a short attention span, start at 1:00 and 2:00. )
Note the girth hitch at the master point in the thumbnail image below (and yes Eagle-Eye, this is for a four piece anchor.)
Dale Remsberg is an internationally licensed mountain guide (IFMGA) and technical director of the American Mountain Guides Association (AMGA). He has a great Facebook feed with regular tech tips. On it, he recently highlighted the girth hitch as a master point, calling it one of his “go to’” anchors.
Below is a screen grab of his post.
The photo and comments from Dale’s post:

image: Dale Remsberg Facebook - https://www.facebook.com/photo.php?fbid=10220309097824401&set=a.10204728922969767&type=1&theater
Below is a PDF article (LINK) from Erwin Steiner, a guide in the Dolomites. It's in German. A rough translation of the takeaways:
“Even when loading one arm of the anchor, it only slipped 1-3 cm”
“ . . . these tests gave us full confidence that the girth hitch can be used for anchor building. It has clear advantages in the guiding context when it comes to usability, use of material, security, speed, and comfort for the clients.”

This crafty anchor has a girth hitch on the top piton and at the master point. This image comes from a nice PDF file showing some European style anchor techniques, made by the German Mountain and Ski Guides Association (“Verband Deutscher Berg und Skiführer” or “VDBS”).

IMAGE: STANDPLATZLOGIK VDBS 2019 - AUSBILDUNGSSTANDARD VDBS & ALTERNATIVEN
Here's another image from the same PDF. Note the use of an “open” or untied cordelette, which can be threaded through fixed gear like pitons, and then tied in an overhand knot. Once again, girth hitch at the master point.
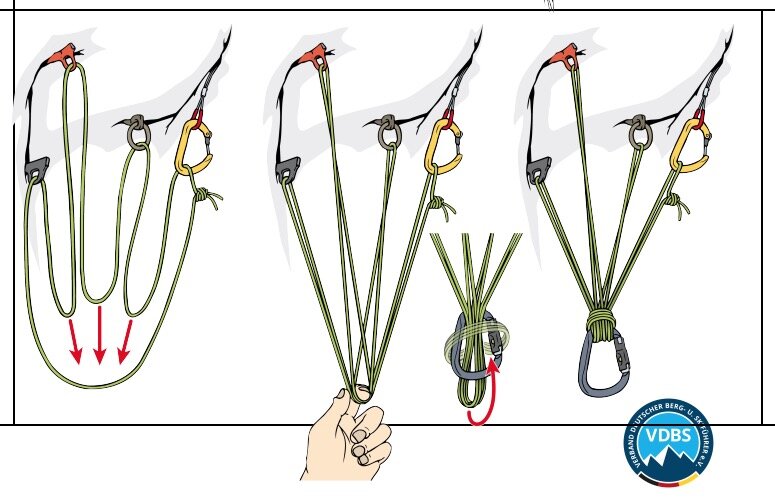
IMAGE: STANDPLATZLOGIK VDBS 2019 - AUSBILDUNGSSTANDARD VDBS & ALTERNATIVEN
Here's another nice feature of this technique. It's easy to adjust the angle of pull if it changes. Here's a nice Instagram video clip from @GoldenMountainGuides showing how that works.
I get it that everyone is not going to be thrilled with this as an anchor technique. And that's OK, you don't have to. Alpinesavvy is here to offer ideas and information, not advice.
In the end, everyone has personal accountability for their own choice of technique and level of acceptable risk. (That's why they call it the “Freedom of the Hills”, right?) But, at least be open to new ideas, especially if they come from reputable sources.

Use the rope to extend your anchor to a cliff edge
You top out on a pitch, and see a perfect tree anchor 10 feet back from the edge. Here's how to quickly rig a stout anchor that will position you in the perfect spot with a ready-made masterpoint to belay or haul.
Scenario: you’ve finished leading a pitch, and find yourself on a big ledge. You see nothing near the edge to use for an anchor, but about 15 feet / 5 meters back from the edge, there’s a nice big tree. You want to build an anchor on the tree, but then belay from the edge of the cliff. Being on the cliff edge lets you see your partner, minimize rope drag, have better belay communication, and who knows, maybe even toss the occasional pebble at them if they’re making it look too easy. =^)
Here’s one of several ways to rig this (and no, you thankfully don't need a heap of 1 inch webbing!) This assumes you have at least 30 feet . 10 meters of rope left after your lead.
Walk over to the tree, put a sling or cordelette around it, clip a locking carabiner or two to the sling, and clip the rope through the carabiner(s). Walk back toward the cliff edge. You’re still on belay the entire time.
(You could skip the sling and carabiner and just walk around the tree, assuming you can easily do this, and the tree is not going to get evil tree sap on your rope. If it’s a conifer tree, a sling might be a better choice.)
When you get close to the edge about where you want to belay, pull up a few feet of slack, and tie an overhand on a bight using BOTH strands of the rope. (This is known in some corners of the climbing world as a Big Honkin’ Knot, or “BHK”.)

Done! 1) You’re fixed to the anchor. 2) it positions you nicely on the edge so you can watch your partner, and 3) it gives you a nice master point from which you can belay your second or set up a hauling system on a big wall. (Note the ATC Guide clipped to the overhand loop, ready to belay up the second.)

What about a more exposed location?
The example above assumes a pretty large, flat ledge that you can't fall off of. If you need to approach something that is maybe downward sloping, loose rocks etc. with more chance of a potential fall, here are a couple of options.
Rigging option #1: Put a Munter hitch on the anchor, and sort of belay yourself as you walk to the edge (while remaining on belay from your partner the entire time.)
Rigging option #2: Back yourself up with a friction hitch on the backside of your clove hitch. (This might sound like a lot of fussy steps, but it's quite simple.)
Build your anchor on the tree.
Estimate how far you want to stand from the tree; in this case let's say it's 5 meters.
Pull up about 7 meters of rope.
Tie a clove hitch onto the anchor. You are now secure to the anchor, with 7 meters of rope between you and the tree.
Tie a friction hitch onto the backside of your clove hitch and clip the friction hitch to your belay loop with a locker.
Carefully walk to your chosen belay spot, sliding the friction hitch along the rope.
With the extra 2 meters of rope, tie a butterfly above you. Clip your belay device to this, pull up the slack rope, put your partner on belay.
If you need to fine-tune your position by shortening the rope a bit, you can tie an overhand on a bight to take up some of the extra rope, then remove the friction hitch.
One caution, because of the dynamic rope, keep in mind that if your second takes a big fall, the rope might stretch enough to potentially pull you over the edge. Try to keep a tight rope on your second when belaying, use an auto locking belay device such as a Black Diamond ATC guide, and try to brace your feet a bit on something if possible.
One other possible enhancement: If you have any concern about your ropes running over a sharp edge, or rockfall onto them, or if they might get damaged in anyway, or if redundancy simply gives you a warm fuzzy feeling, you could tie an overhand on a bight and clip it to the anchor point, giving you two redundant strands.
Here's a short Instagram video from Swedish guide Nikki Hammarstrom showing how it's done. (Note the pine tree - if there is any visible sap on it it's probably better to use a sling rather than your rope.)
Here’s a related technique that's more suitable when using double ropes. Put both strands of rope through the anchor, walk back to the edge, tie a double overhand loop for the belay, tie another a double overhand loop and clip it to your harness. See photo below, contributed by Alex Kostadinov; thanks Alex!

photo: Alex kostadinov
A reader mentioned to me that there is an excellent article about this at climbing.com, called “belay extensions.” Read it here.
This technique can also be used for big wall climbing, to rig a hauling a point to minimize friction.
True life story: my partner and I had topped out on The Prow, a classic big wall route in Yosemite. The last pitch concluded in a series of fourth class ledges. We set up our anchor on a tree above the ledges that made our hauling absolutely miserable from all the extra friction. Following us on the route were a team of two New Zealand mountain guides. Their leader finished, went to a nearby tree, rigged the anchor exactly as shown above, walked back down to a low-friction place to haul, and set up his hauling system directly on the overhand loop. He got his bag to the top with minimal cursing and MUCH faster than we did. Lesson learned!

Back up that single point rappel anchor
Especially on alpine routes, you can count on occasionally finding a rappel station with just a single marginal connection for the rope. There's a few ways to back it up. Here's one that doesn’t involve leaving a precious carabiner behind.
Every climber will someday find themselves at a rappel anchor that's set with a single Less Than Ideal rappel point. Maybe it's a skinny rap ring, or maybe it's a small diameter hardware store quick link, like this example.
(Note: You can buy quick links properly rated for climbing that are fine to rappel from, such as these from CAMP. These are just $3, CE rated, and around 40 kN - a much better choice than one from the hardware store.)
You have a choice: Rappel on that one point, or back it up somehow.

Now, lots of people are going to be just fine rappelling from a single quicklink. For canyoneers it’s common, and it's probably going to work great 99.9% of the time. But, if you're a more conservative climber, for whom redundancy in anchors gives you a warm fuzzy feeling, especially when you are completely reliant on them when rappelling, you have a few options.
Note: It's best practice to close the sleeve of the quick link by screwing it down toward the ground. This means that gravity is helping keep the sleeve closed. A little pneumonic to help remember this is: “Screw down so you don't screw up.” If you have a link that you want to fix it more permanently, give it an extra turn with a pair of pliers; a multi-tool is your friend.
If you want to back up that one point, the easiest thing to do is sacrifice a carabiner off your rack and just leave it. Unless you’re a serious cheapskate, this is typically the best option.
Or, you could back it up with a carabiner for everyone who is rapelling except the last person, and then that last person removes the carabiner and raps on the single quick link. (The traditional rule of thumb for this is that the lightest person goes last. I have a feeling this rule was made up by heavy people.)
But, for the frugal climbers out there who can't even stand to part with a $5 carabiner, here's another option.
Cut about a bit under 2 feet of cordelette, sling, or whatever reasonably strong cord you have with you. (Yes, that looks like it's going to be too much, and no it won't be, ‘cuz water knots always take up more webbing than you think they will.) A rule of thumb in the field: measure about three hand spans, my hand span is about 7 inches. And yes, you do need to have a knife for this.
This is yet another reason to bring along an '“alpine runner,” a 9 foot length of 9/16” tubular webbing, tied in a double runner length loop. It's very inexpensive and easy to cut up and leave behind for little projects like this.

Tie it in a loop (here with a water knot) through the anchor point, and make the loop a little bit longer than the metal connection.
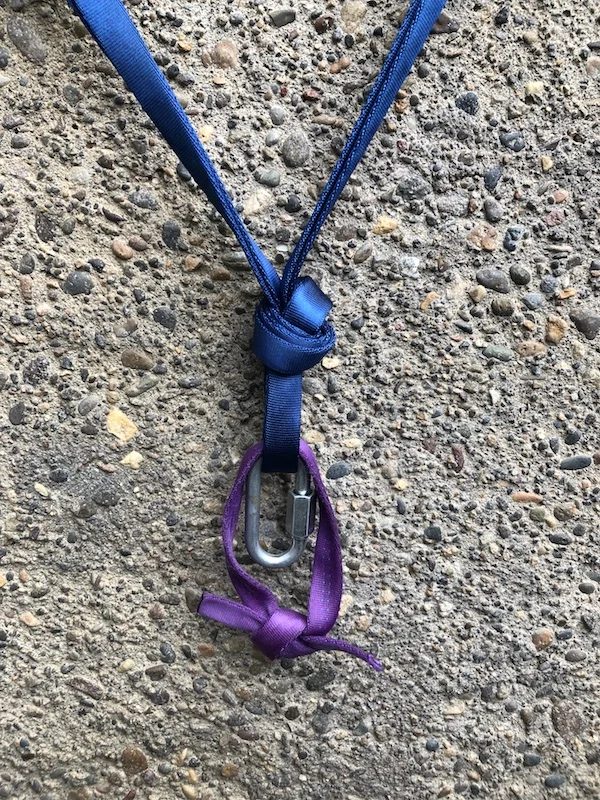
Now, thread your rappel rope. Because the backup webbing is slightly longer than the quicklink, when you weight the anchor and pull your rope, any friction is going to be on the quicklink, not the webbing backup. However, if the metal were to somehow fail, the webbing will catch the rope.
Doing this of course, takes a knife, and some sort of extra sling material, and the time to rig it. Like I said, faster and probably a bit safer is just to leave a carabiner. Don't be a cheapskate. :-) Or, if you want a little extra security even on top of that, put some tape on the carabiner gate to make a cheapskate locker.
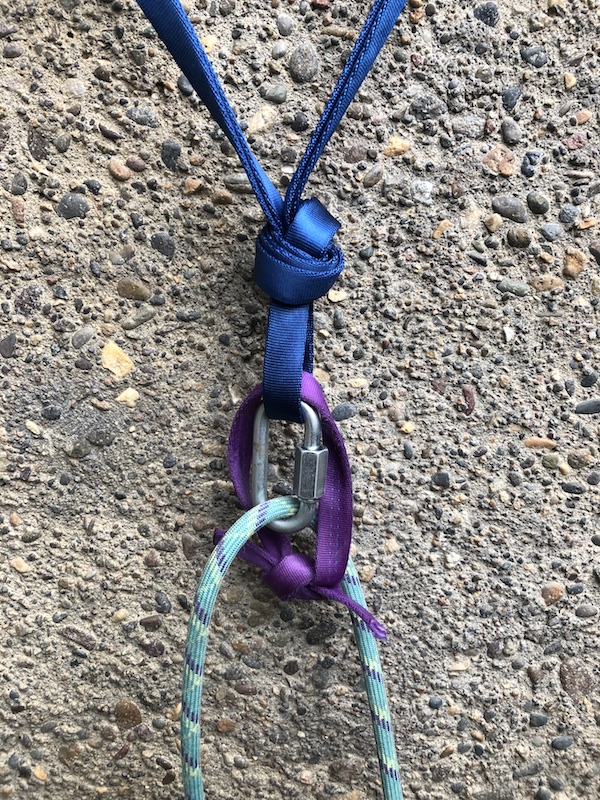

The "open" cordelette
There are many variations on anchor building with a cordelette. How about carrying it with no knots at all? Here's how to build a fast, secure anchor with an “open” cordelette.
While a traditional cordelette is about 16 feet of 7mm cord tied into one big loop, many climbers (if they carry one at all) prefer to leave it untied, known in some circles as an “open” cordelette.
Why use an open cordelette? It’s more versatile.
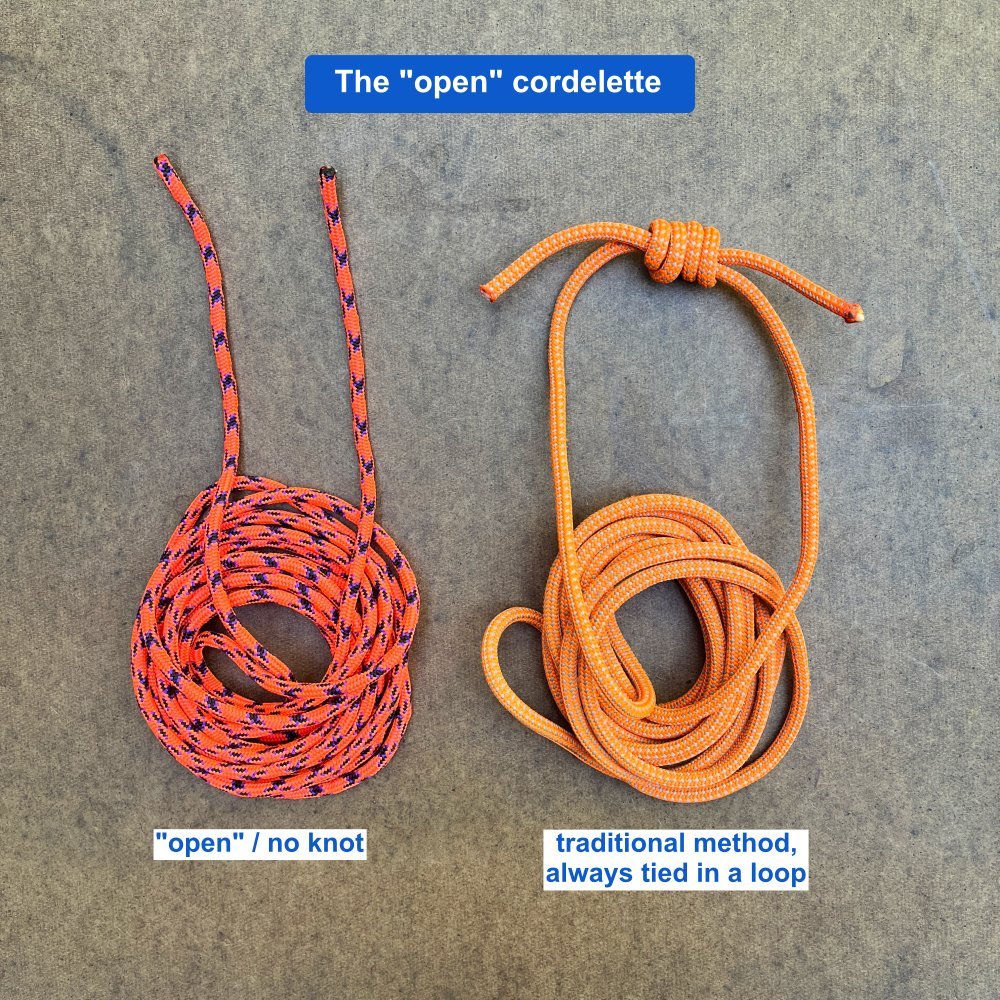
You can tie the ends together quickly in a big loop if you need it, with a simple flat overhand bend. (That’s right, no double fisherman’s knot required.) It’s fast to tie and easy to untie when you’re done compared to many other knots.

You can tie small loops in either end to make a ”bunny ears” cordelette. This can be handy when the gear is far apart, or you need to sling a big tree or boulder. Just tie a small overhand loop near the ends.

“Bunny ears” used to clip gear that’s far apart.
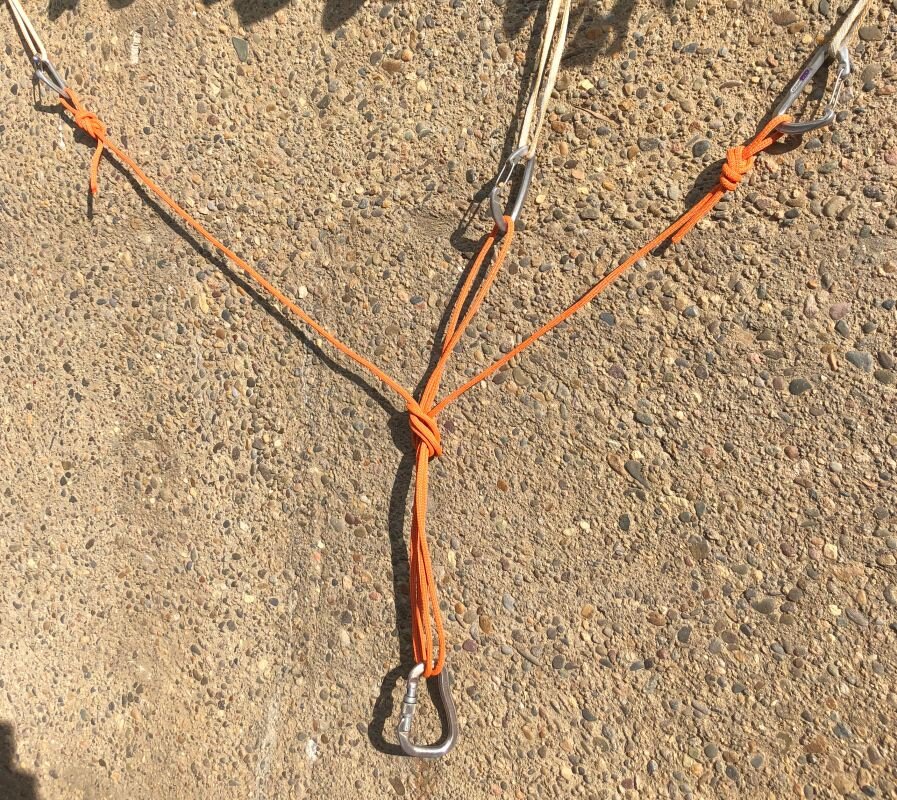
Ice climbing toprope
If you're setting up an ice climbing top rope anchor, you can make two V thread anchors and connect them both with a single cord, if you keep it untied.

Photo credit, Tim Banfield and Sean Isaac
Thread the open cord through fixed protection
This example comes from a nice PDF file showing some European style anchor techniques, made by the German Mountain and Ski Guides Association (“Verband Deutscher Berg und Skiführer” or “VDBS”). Here, using an open cordelette lets you thread one and through the fixed gear that can’t be clipped. Also, note the girth hitch at the master point.

image: Standplatzlogik VDBS 2019 - Ausbildungsstandard VDBS & Alternativen
Crevasse rescue
After a crevasse fall is held by the team on top, the person closest to the crevasse can tie a prusik hitch with an open cordelette (about 5 meters of 6 mm cord) on the rope, tie an overhand to make a clipping point, and tie the ends through their belay loop.
The key here is that the ends can be passed through the belay loop and tied if needed in a rescue; the rest of the time it stays out of the way on your harness.

Image: https://www.ortovox.com/uk/safety-academy-lab-ice/chapter-3/rescuing-a-companion
Alternative anchor rigging
You can make an multi point anchor by not really tying any knots at all at least until the master point. Here's one way to do it, shown by my pal Ryan Jenks at HowNot2.com. It's a little hard to explain in words, so check out the video below.
Spoiler alert: 28 kN strong anchor made with 6mm cord, impressive!
Start it at 7:00.
Here's another way.
Place three pieces of gear, or in this case, three bolts. At least 1 foot from one end of the cord, tie a clove hitch and clip it to the left bolt. At least 1 foot from the other end of the cord, tie another clove hitch, and clip it to the right bolt. Then, take the approximate middle of the cord and clip it to the middle bolt.

Clip a locking carabiner through the two “U” shaped strands in the middle.
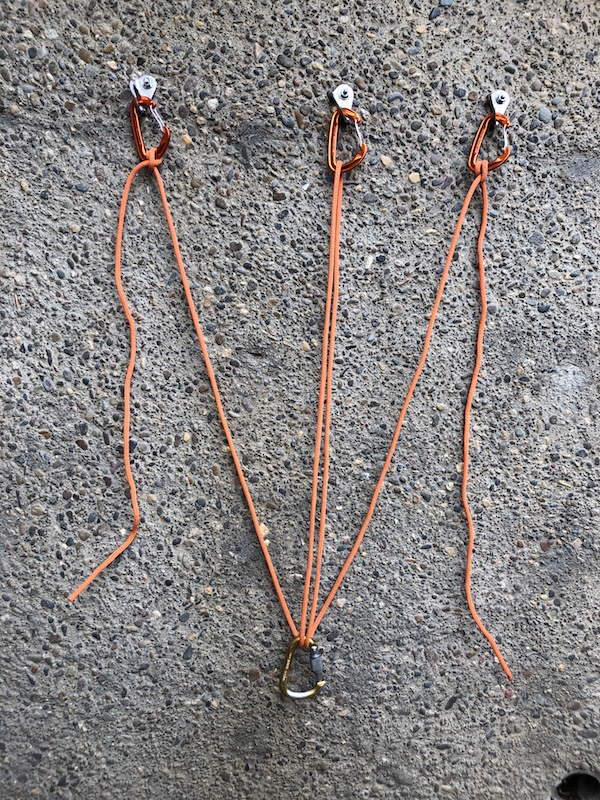
Tie an overhand knot (or figure 8) to make the master point. Done!

Note:
There is no redundant shelf on this anchor. The loop that goes from the masterpoint knot to the middle bolt is probably okay for clipping a backpack, but not for belaying.
This anchor is easily adjustable. If the pieces are far apart, or farther away from you, tie the clove hitch nearer to the end of the cord (while still leaving a foot or so of tail, and snugging down the knot.) If, like in this case, the pieces are very close together, you can tie a clove hitch with longer tails, making a more compact / higher master point.
This anchor can be easily adjusted if the direction of pull changes. If the direction of pull changes to one side, say the left, then the strand of cord going to the left anchor is going to go slack, which means it's not taking any of the load. You can easily adjust this by shortening the clove hitch going to the left bolt, which can regain a nice three point load distribution.
You only have about half rated strength of the cord going to the single arms. A 7 mm cord is rated about 13 kN, so half of that is around 6.5, which should be fine. However, a 6 mm cord is only rated 7.5 kN, so halving that brings it down to 4 kN, which is sort of in the danger range. So, if you're ever going to use this technique, please use a 7 mm cord.
Hey, don't take my word for it. Here's a short (31 seconds!) video by expert climber Hans Florine (multiple speed climb record holder on The Nose on El Capitan, among other things) showing this technique.

Using a rope to make a tensionless tree anchor
Do you need to fix a rope and have a stout tree available? Lucky you - this is probably the simplest and strongest anchor you could ever build. Just watch the sap on those pine trees . . .
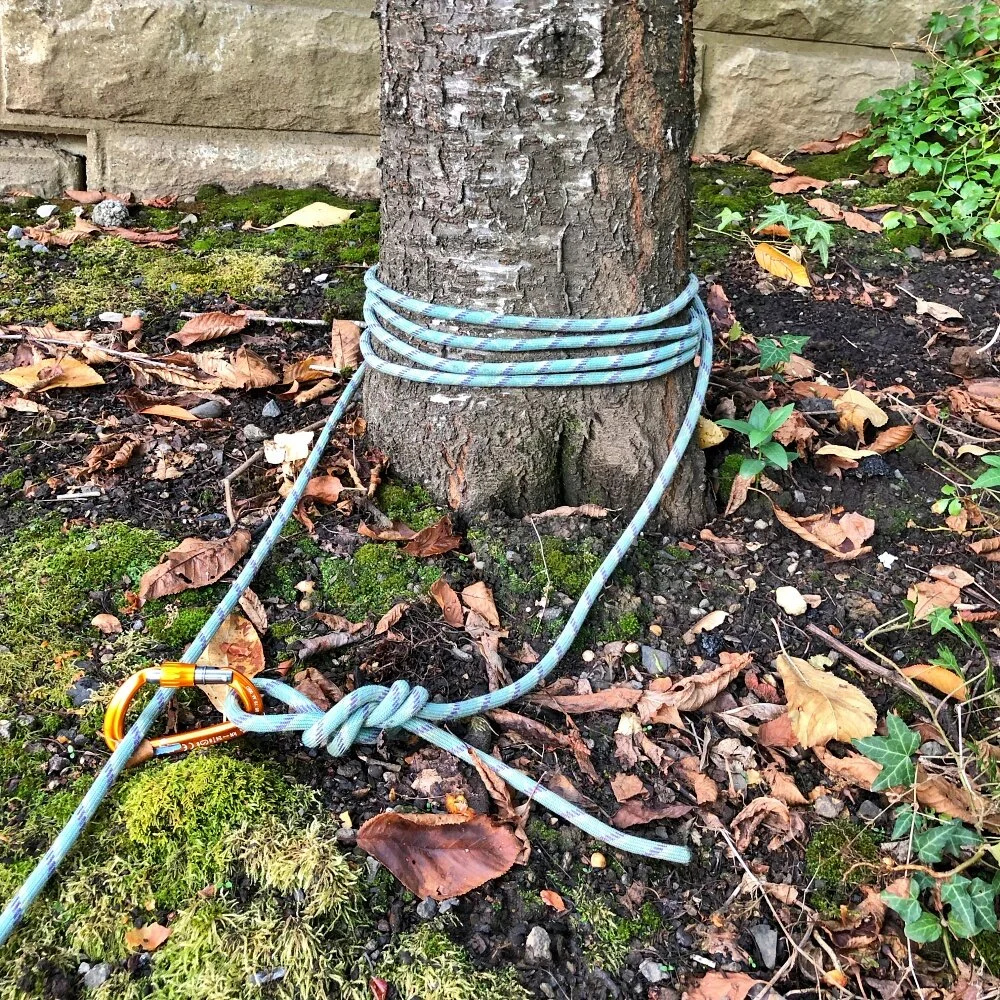
Need to secure the end of a rope around a stout tree? Provided the tree is not oozing with sap, and you have a bit of extra rope, here's a good way to do it.
This is known by some as a “tensionless” anchor, because there is no knot that's under load or tension. I prefer to call it the “tree wrap”, as it's more descriptive. This is one of the strongest anchors you can build, because you’re using the entire strength of your rope, with no loaded knots which weaken it. One main benefit, it's very easy to untie when you're done, even after a huge load.
First off, have a good look at the tree. The American Alpine Institute blog has a good memory jog for this, "Five-and-Alive." The tree should be at least 5 inches in diameter, 5 feet tall, and alive with a good root base. Be wary of trees that could have a shallow root-base, in dirt, sand and/or on top of a rock. Thanks AAI, good advice! (Personally, I’d consider a 5 inch diameter as the absolute minimum, larger is better!)
Starting with one end of the rope, take a few coils in your hand, and pass them around the tree trunk 4-5 times. This may well take more rope than you think, so start with a bit extra. Tie a figure 8 on a bight or overhand in the end of the rope, and clip this bight to the load strand with a carabiner to close the rope system.
If you tie this correctly, the friction alone from the rope on the tree bark will support the load, and the carabiner at the end should never see any force at all.
Rigging this close to the base of the tree reduces leverage and increases strength. This is more important if the tree is at all marginal. (If the tree is unquestionably strong, it doesn't really matter.)
Try four wraps as a minimum to start. Add more if needed.
Try to keep the loops reasonably tidy, but if they get a bit crossed up it's still going to be fine.
This should not damage the tree (especially if it's one part of a multi piece anchor) because the force is spread out over many rope strands, and not gouging into the bark. If you wanted to be extra nice to the tree, feel free to put in a backpack or something similar between your rope and the tree trunk.
If you're doing this on a conifer tree, there's a good chance you're going to get sap onto your rope. YUCK! This is something you want to avoid if at all possible, so try not to use conifer trees.
If you do get tree sap on your rope, hands or anywhere else, you can use mayonnaise, believe it or not, to clean it off quite effectively.
Another good option to secure the end of a rope around the tree is a bowline, either one strand or two.
If you REALLY want to go with elegant minimalism, you can skip the carabiner entirely, and tie a rewoven figure eight around the load strand. That's pretty cool, an anchor you can hang a truck from that doesn’t use a single piece of metal!
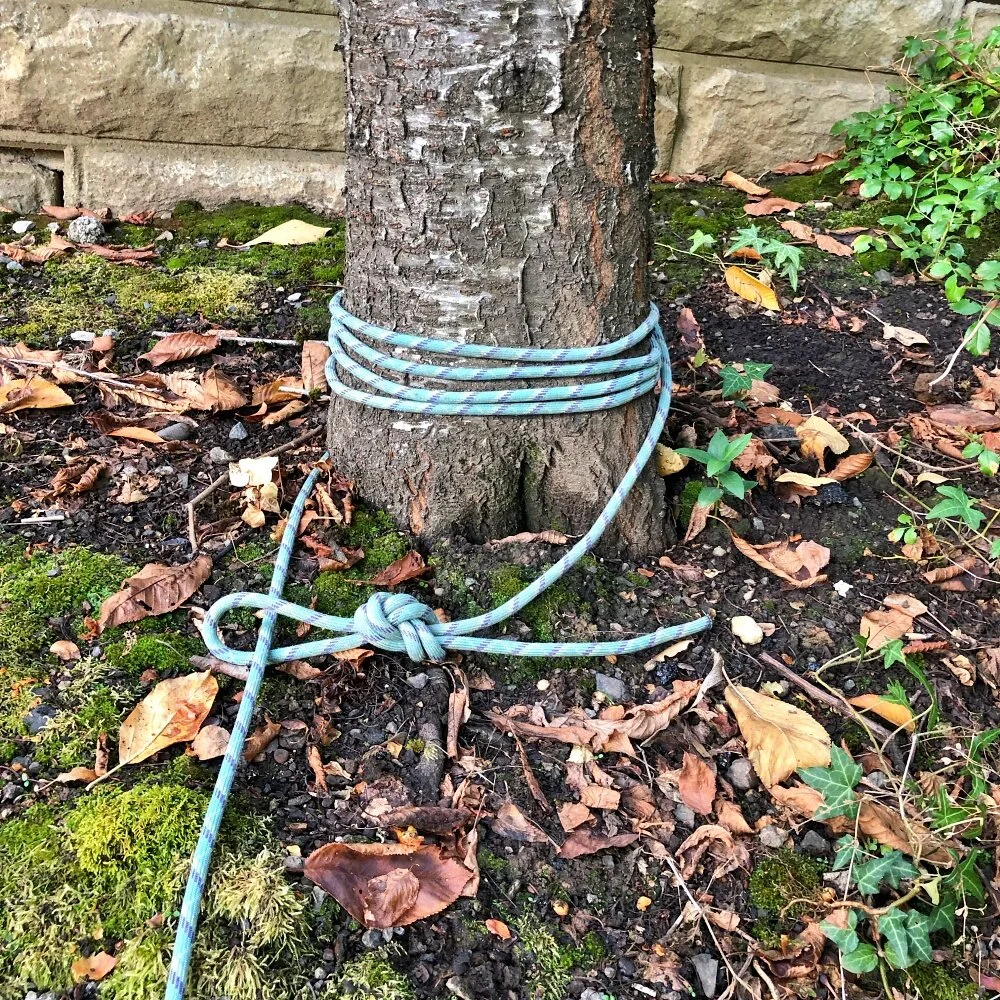
Cordelette on a tree: caution on the shelf
Passing a long cordelette loop around a stout tree and tying off with an overhand knot is an excellent way to make an anchor. However, if you want to use the shelf, you want to think carefully about where it actually is. It may not be where you think.

Say you have a standard cordelette tied in a big loop, and you want to use it to build an anchor on a stout tree or a rock pillar, aka a “monolith” (one piece) anchor. If you pass the cordelette around the tree and tie it off in an overhand knot, (or double it and loop it over the rock pillar) it might seem that you have a bomber shelf if you clip one strand on the left and one strand on the right, just like when you clip two separate pieces of gear.
But be careful, it’s not what it appears. If you clip the two strands like you would for a gear anchor, there is a 50% chance you're going to be on just ONE strand of the cord, and therefore not redundant.
See the photos below.
I have to say, I was scratching my head a bit when I first heard of this. I had to set it up on a tree in my yard to see for myself.
After you read this, you may think that any anchor failure like this in the real world is so extremely unlikely that you're not going to worry about it. Well, that may well be true. However, this is not a very intuitive thing to grasp for most people, and I want to illustrate best practice in all aspects of anchor building. So, absorb it if you want and toss it if you don't. :-)
Here's an Instagram video I made that shows it pretty well, with one strand of the cordelette wrapped in blue tape, to hopefully make it a bit more clear.
Long cordelette looped around a tree, tied off with an overhand knot and locking carabiner as the master point. Perfect.
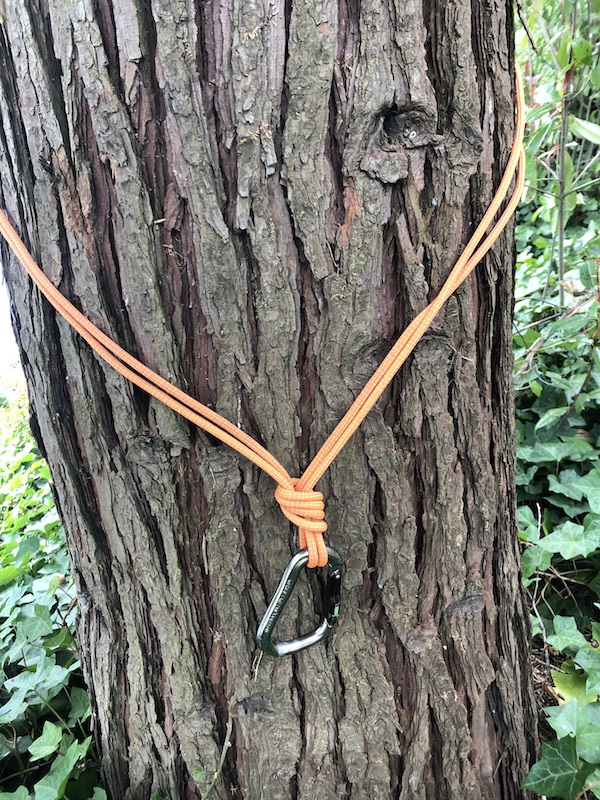
Hmm, thinks the climber, I think I want to add a shelf. How about I clip another locker to the two strands coming out of the top of the master point? Well, doing this is not a lethal mistake, but if you think you’re getting redundancy on two rope strands, you only have a 50% chance of doing so.
As it's shown here, the top carabiner appears to be clipping two different strands, but it's actually clipping the same strand twice - not redundant, whoops! You can't see it in the photo without a video walk-around the tree, but you can easily set it up yourself to see what I mean.

Here, the black carabiner is clipped correctly to both strands coming out of one side of the masterpoint knot. It's clipped to both strands, giving redundancy. Yes, if you're a long time cordelette user and have always used it to clip single pieces of gear, this photo below is probably giving you a minor freakout. Trust me, it's right, and set it up for yourself to see how it works. You can do it inside around a chair or pretty much anything.
(Of course, there's no reason to really use the shelf at all. In most cases, it's an optional nice thing to have but certainly not a mandatory part of the anchor. So, if this post is making your eyes cross, you could go back to the photo at the top, with no mention of the shelf at all, build an anchor like that and be just fine.)
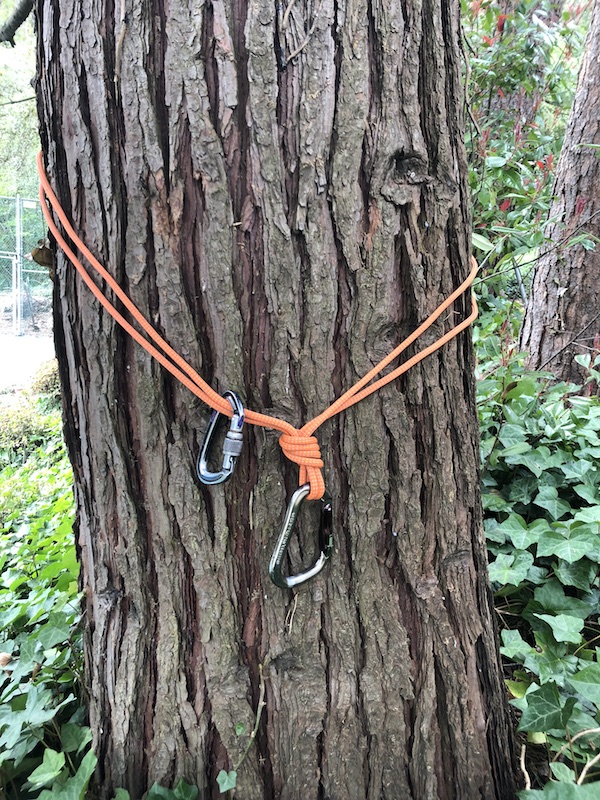

A slick way to build an anchor from the rope
Making an anchor with only the rope and a few carabiners can be a very useful skill. Here’s a Crafty Rope Trick (CRT) that does this with just a few carabiners and knots you already know.
There are lots of ways to build an anchor with just the climbing rope. You could use a bowline on a bight, or a “bunny ears” figure 8, as discussed in this post. Either of these gives decent load distribution, but they do require that you learn new knots that some people find a little tricky.
Here’s a slick method to make an anchor with the climbing rope that simply uses clove hitches and a butterfly or overhand knot, which you hopefully already know. (If not, check out the video section.)
One good reason for using the climbing rope as your anchor: if the climbing is tough and run out right off of the anchor, and thus a greater chance for a leader fall to put a large amount of force onto the anchor and belay. Having the entire anchor made out of dynamic rope gives more stretch to the system and will lower the force on all the other components.
There are a few downsides to rope anchors:
It works best if you’re swinging leads on a multipitch climb. If one person is doing all the leading, or if this is the last anchor at the top of a climb and you’re transitioning to rappel, it’s better to craft an anchor from a sling or cordelette so you have both ends of the rope to work with. (Even if you plan on swinging leads, your partner might decide they don't want to take their turn and you might have to go again, so keep that in mind.)
If the next pitch is a real rope stretcher and you might need every bit of it, this may not be the best choice.
When the leader pulls up the rope on the second, the rope pull come tight first onto the anchor and not directly onto the second climber. This can create a few meters of potentially unwanted slack when the second breaks down the anchor. The second can clip in to one bolt or piece of solid gear with a tether before they remove the anchor as a possible solution.
Rope anchors can make any sort of self rescue technique more challenging, because the end of the rope is a component of the anchor. Yes the belayer can can simply untie and they're out of the system, but then they’ll have a harder time using the rope for much of anything useful.
Say you’re leading, and arrive at a two bolt belay anchor. Here’s what you do.
Clove hitch the rope (that’s tied to your harness) to a bolt with a locker. Clip a second locker onto the second bolt.

Maybe 6-8 inches inches on the “backside” of this clove hitch, tie a bight knot. Here I tied a butterfly knot, but it could be an overhand or figure 8 on a bight.

Next, clove hitch the rope to the second bolt. Adjust the clove as needed to center the loop.

Clip a plaquette style belay device to the butterfly, and bring up your partner.
Done! You’re connected to both bolts, and you have an equalized master point. You hopefully set this up in under one minute, and used a minimum amount of gear.


How to rig a "courtesy" anchor
Extending a rappel anchor master point over a ledge can make for an easier rope pull, but a tougher start to the rappel. Rigging a “courtesy anchor” can make things easier and safer for just about everyone. (Sorry there, last person . . . )
This tip comes from my pal and canyoning expert Kevin Clark. Check out his excellent book, “Canyoning in the Pacific Northwest: A Technical Resource.”

A “courtesy anchor” is a concept from the canyoneering world, where generally a LOT more thought is given to rappel technique than is typical in rock climbing. It’s not something you’ll rig very often, but in certain situations it's a very #CraftyRopeTrick to have in the toolbox!
Imagine this scenario: -A rappel anchor has a long extension on it, maybe webbing or chain. The purpose of the extension is to hang the anchor master point out over the cliff edge, making it easier to pull the rope. The problem: this probably will make an awkward start to the rappel, because the master point is hanging out into space rather than being on on the actual anchor, which is set back on a nice flat ledge. (In the Portland Oregon area, the rappel off of Rooster Rock in the Columbia River gorge is a great place where you can use this technique.)
The “courtesy anchor” is a simple solution. The main benefit: only one person on the team (ideally the person with the most experience, who goes last) has to perform the awkward rappel start. Everyone else can begin their rappel at the actual anchor point, away from the edge of the cliff. There’s no need for everyone on the team perform an awkward / dangerous / difficult start to the rappel.
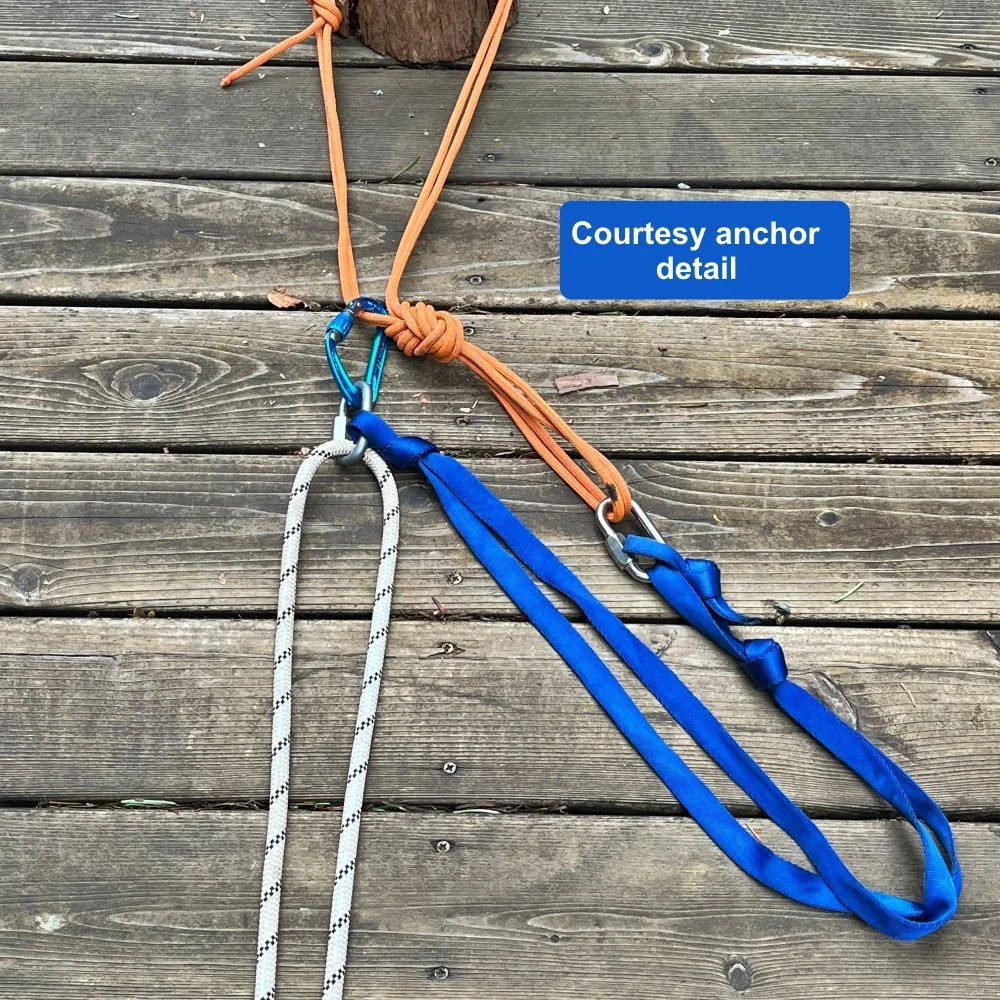
There are various ways to rig this. Here’s one of them.
Add a carabiner onto the upper anchor point, and then bring the rappel master point back and clip it to this added carabiner.
This allows every person but the last to start their rappel on a nice flat ledge rather than shimmying over the edge. The last person to go, hopefully a more experienced and skilled climber, removes the courtesy carabiner, extends the master point to its original position, and makes the awkward start to the rappel.
The last person has a few options to reduce their risk.
Get a firefighter’s belay from below
Lock off their rappel device with a mule knot (or similar)
Tie a hard backup (aka catastrophe knot) / overhand loop with both strands of the rope, about 10 feet below the edge, and clip that to their belay loop
Put a klemheist knot or some other friction hitch that is releasable under load above their belay device
Or some combination of the above
If all goes as planned, this makes a faster and safer rappel for just about everybody. Except the poor suckah’ who has to go last . . .
Here’s how it works.
This anchor as shown is great for pulling the rope because it extends the master point over the cliff edge. But it can be awkward to start your rappel.

Clip a locking carabiner to some point on the orange cordelette. There are several places where you could clip, here I’m using the shelf.
Another option is to basket hitch a long sling higher up on the tree, assuming the tree is strong to handle the increased leverage. (Having an attachment point higher up makes it even easier to start your rappel.)

Pull the rappel masterpoint quicklink up, and clip it to the locking carabiner. Doing this allows everyone except the last person to start their rappel right at the anchor. The last person removes the sling and carabiner, extends the master point to the edge of the ledge, and performs the somewhat awkward rappel start, leaving the rope in a better position for a successful retrieval.

Finally, here's a nice video by canyoneering expert Rich Carlson showing a few different ways to rig it.

Backside clove hitch: transition to rappel
The “backside clove hitch”? Is that something you might find in a San Francisco leather bar? Nope, it's a new approach to transitioning from climbing to rappelling. It has a host of subtle benefits, and it's a Crafty Rope Trick well worth adding to your toolbox.
Note - This post discusses techniques and methods used in vertical rope work. If you do them wrong, you could die. Always practice vertical rope techniques under the supervision of a qualified instructor, and ideally in a progression: from flat ground, to staircase, to vertical close to the ground before you ever try them in a real climbing situation.
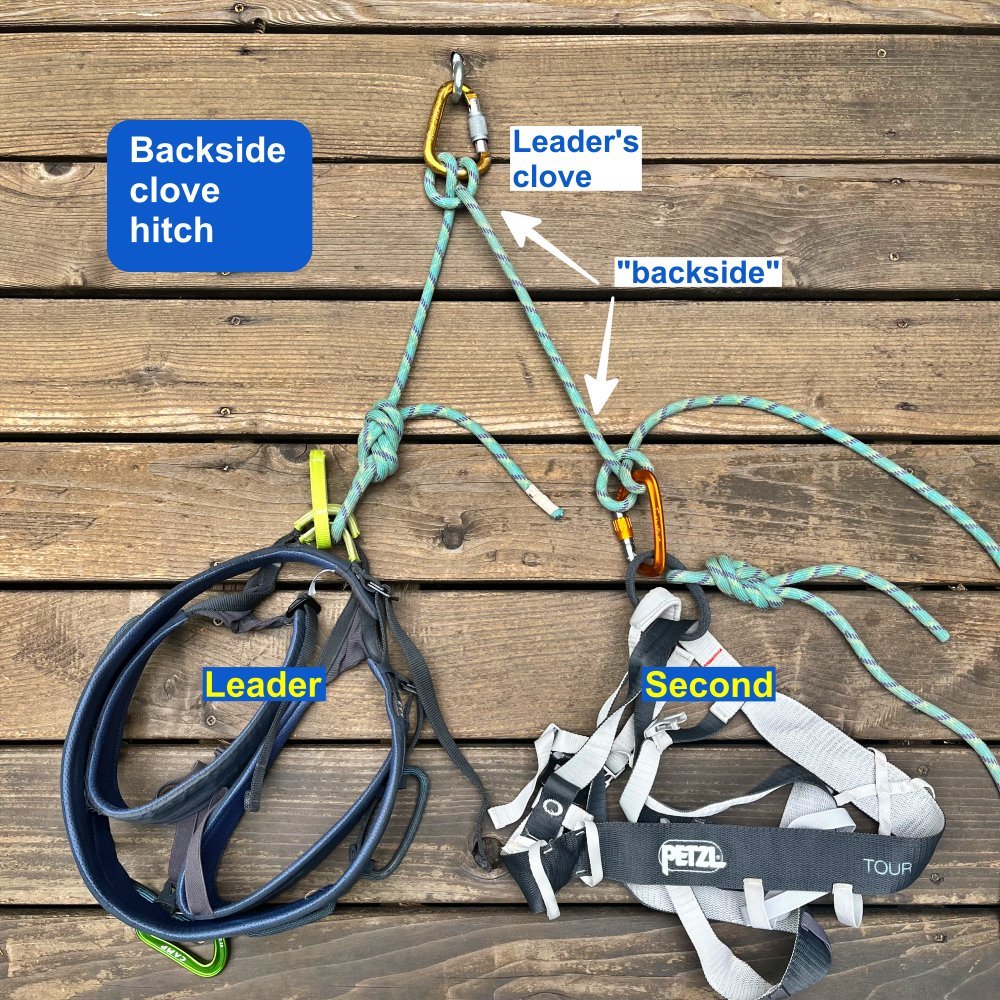
Using the backside of the leader’s clove hitch is a great way to transition from climbing to descending.
Advocated by IFMGA Guides Marc Chavin and Rob Coppolillo (authors of the excellent book “The Mountain Guide Manual”) this method uses the climbing rope coming off of the leader’s connection to the anchor as the primary anchor point for the follower, as opposed to the second clipping a tether to the anchor master point.
Lots of multi pitch routes require a rappel to get down. For many climbing teams, this transition period, from moving upwards to moving downwards, can be a bit of a cluster.
The traditional method is each climber using a tether/PAS to connect in close to the anchor, each person untying from their respective ends of the rope, threading the anchor and then each person rigging for a rappel separately. This can be awkward at tight stances, and often takes a LOT longer than necessary, especially with less experienced folks.
The backside clove hitch elegantly address some of these issues.
(Another term I've heard for this method is the “Backside Rappel Feed”, or BARF. I love it, but it hasn't caught on yet.)
It can take a bit of creative visualization to try to imagine how this works in your head. I have to say it took me a while before I got it figured out. But once I did, and realized the subtle benefits that come from this system, I knew it was going to become a regular part of my rappel routine.
I strongly suggest you try it on flat ground with a partner a couple of times to get the hang of it, and watch the video at the bottom of this page!
What are some benefits of the backside clove hitch?
1 - Cluster free anchor. By having the follower clipped to the backside of the leader’s rope, there’s no need for multiple leashes clustering up the anchor. You have plenty of room to stretch out and move around a bit, assuming the ledge allows you to do so. Your position isn’t limited by a short tether or PAS.
2 - Always using the dynamic rope to connect everyone to the anchor. Ropes are stretchy. Generally, tethers and slings, not so much. Stretchy is good. Use it when you can.
3 - (Close to) zero chance of dropping the rope. For a two person team to transfer to a rappel, of course one end of the rope needs to be freed up to pass through the anchor. With the backside clove hitch, this is simple: because the leader’s end of the rope is securing the entire team to the anchor, the follower’s end of the rope will always be the one threaded through the anchor. The leader remains tied to their end during the whole process. Rule number one in setting up a rappel is don’t drop the rope, and this method pretty much ensures that can never happen.
4 - Faster and less risky rappelling. After the follower threads their end of the rope and and pulls to the middle point, both climbers can rig for rappel. A low risk and fast way to do this is to rig an extended rappel with both climbers doing so at the same time. The extended rappel means climbers can check each other, which reduces risk. Because they both rig for rappel at the same time, and also increases speed, because the second can begin their rap the moment the first person is at the next anchor.
Here’s the general procedure:
When the leader is securely attached to the master point with the clove hitch, they tie a clove hitch or a loop knot (overhand, fig 8, butterfly, your choice) on the backside of their clove hitch connection. This hitch/knot gets a locking carabiner.
The second arrives at the anchor, and clips this locker to their belay loop.
The leader takes the follower off belay, and removes the belay device from the anchor.
The second unties, freeing up a rope end.
The team threads the rope end through the anchor, pulls it to the middle point, and tosses that strand.
Both climbers rig an extended rappel and a third hand backup.
Both climbers are now secured by their extended rappel. The second removes the hitch/loop knot and carabiner from the backside of the leader’s clove hitch. The leader unties, tosses down the second strand of rope, and cleans the anchor.
Do a safety check, and rappel.
In the video below, the second climber rappels first. However, there can be some advantages for the leader descending first. Here, the leader remains tied in the entire time, the second rigs their extended rappel above the leader. Doing this has a few extra benefits:
The leader can’t rappel off the end of the rope, because they are tied to one strand and it's blocked from above by the second.
It's a bit less rope management, because you only have to throw one strand instead of two.
You only have to tie a stopper knot in the one strand that you're throwing.
Whether you choose this method can depend on factors like the stance, team experience, and single pitch or multi pitch.
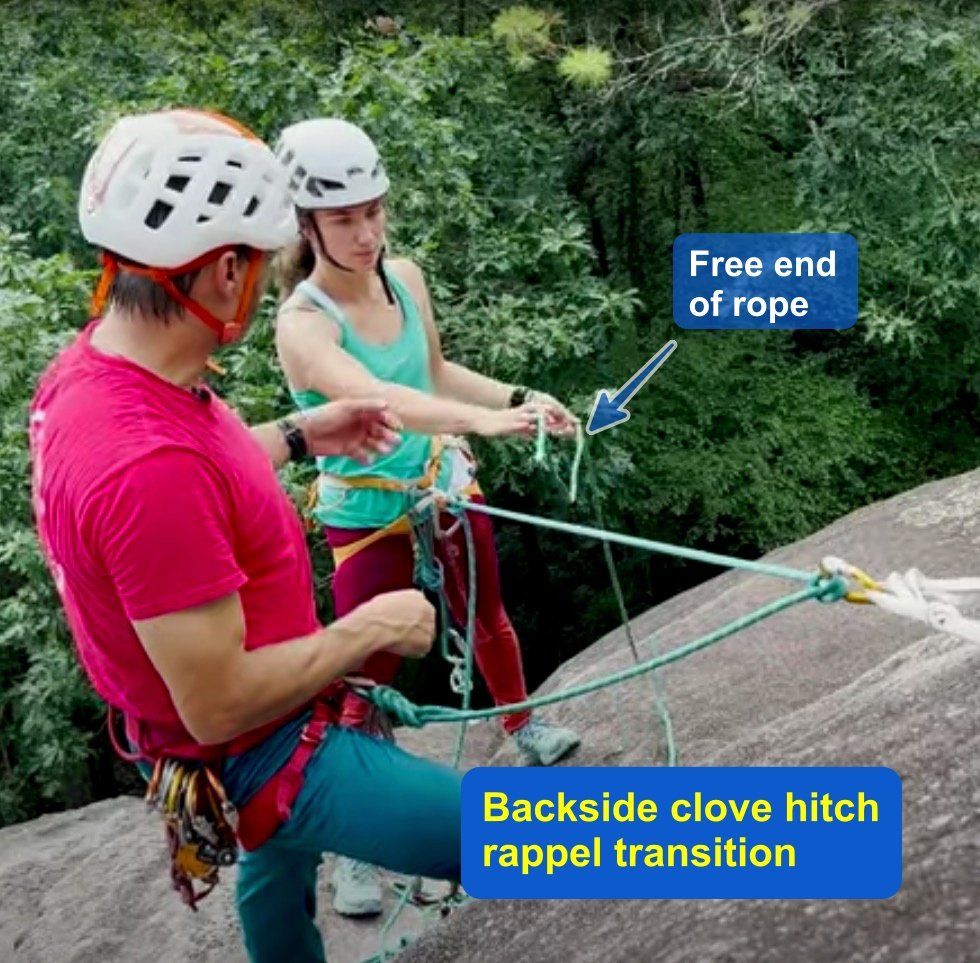
image: screen grab from https://youtu.be/feuVDCnS4g0
So, that's about it, It’s a fairly simple concept, that can make your transitions faster, smoother and safer. But it may require a big re-think of the way you're probably doing things, so absolutely practice in a controlled environment and see if it works for you.
As with most climbing techniques, it's a better show than a tell. Check out the video below from IFMGA Guide Karsten Delap showing the entire process.
In the video, Karsten also shares another clever use for the backside clove hitch method: removing twists from the rope.
If, for whatever reason, when the second arrives at the anchor there are twists in the rope, the second can temporarily clip to the backside of the leader’s clove as described above, untie from their end of the rope, remove the twists, and tie in again.


Learn the "V clove" anchor
Trying to build a three piece rock anchor with just one double runner? The “V clove” anchor is a Crafty Rope Trick (CRT) that will let you do this. Slick!
I first saw this clever technique from a video posted by Josh Beckner, an IFMGA certified mountain guide. A link to his video is below. Thanks Josh! Connect with Josh and the School for International Expedition Training.
When building a three piece gear anchor, many climbers will automatically reach for the cordelette. However, if all you have is a double length / 120 cm sling, and if your gear is pretty close together, here are a couple of ways to rig it.
One way is using a girth hitch at the master point, covered here.
Or, try the “V clove” anchor.
Will you use the V Clove very often? Maybe not. But for more advanced climbers, it’s a fine trick to add to the toolbox.
Note: if you have one gear placement that's noticeably better than the other two, it’s best to make that placement the one that gets clipped, not one of the two placements with the clove hitches. Doing this can slightly improve theload distribution, because the additional strand of sling can mean a slight increase in load going to this piece. (In the example below, that would be the placement on the right.)
Here’s how to do it.
Place 3 pieces of solid gear.
Clove hitch a double length / 120 cm sling to the left piece, with the stitching close to the clove hitch.

Add a second clove hitch to the middle carabiner. Try to get the stitching between these two clove hitches to keep it out of the way.

Next, clip the sling to the right carabiner.

Clip a master point locking carabiner to the two strands that are hanging down.

Tie an overhand knot, you’re done.

Check out the video below for full instructions, starting at 3:00.
How strong it it?
Ryan Jenks from HowNOT2.com tested this anchor. With a Dyneema sling, it broke around 15 kN.
While not as strong as some other methods, given that the maximum possible force in recreational climbing is around 8-ish kN, this anchor is definitely strong enough, IMHO.
Here is a link to his YouTube short video showing the testing.
Below is a screen grab.