

Alpine Tips

Rappel hardware pros and cons
It's best practice to run your rappel through some sort of metal connection to the anchor. There’s three common options for this; learn the pros and cons of each one.
You can set up a rappel (but NEVER a toprope!) by running your rope directly through the webbing. But, it's usually preferable to have some sort of metal connection to the rope, which gives a much easier rope pull and does zero friction damage to the anchor slings.
Keep in mind that the maximum force possible on a rappel anchor it is only about 2 Kn, so the hardware does not have to be especially burly, But it sure can give you more confidence if it is! (See lots more climbing gear strength ratings at this link.)
This usually means one of three things: a quicklink, a rappel ring, or a carabiner. Let's have a look at the pros and cons of each one.

1 - Quicklink
A quicklink (aka “maillon”) is a single link of metal chain that has a threaded sleeve, which can be opened and closed. They come in various diameters. Use the smallish ones (5mm) if you choose to take one on an remote alpine climb, and maybe a 10 mm big fat one if you're being a good Samaritan and replacing anchors at your local crag. The 8mm are a good in-between size for general use. They can be made with a zinc plating (for indoor use) or stainless steel. Please use stainless steel hardware for outside anchors!
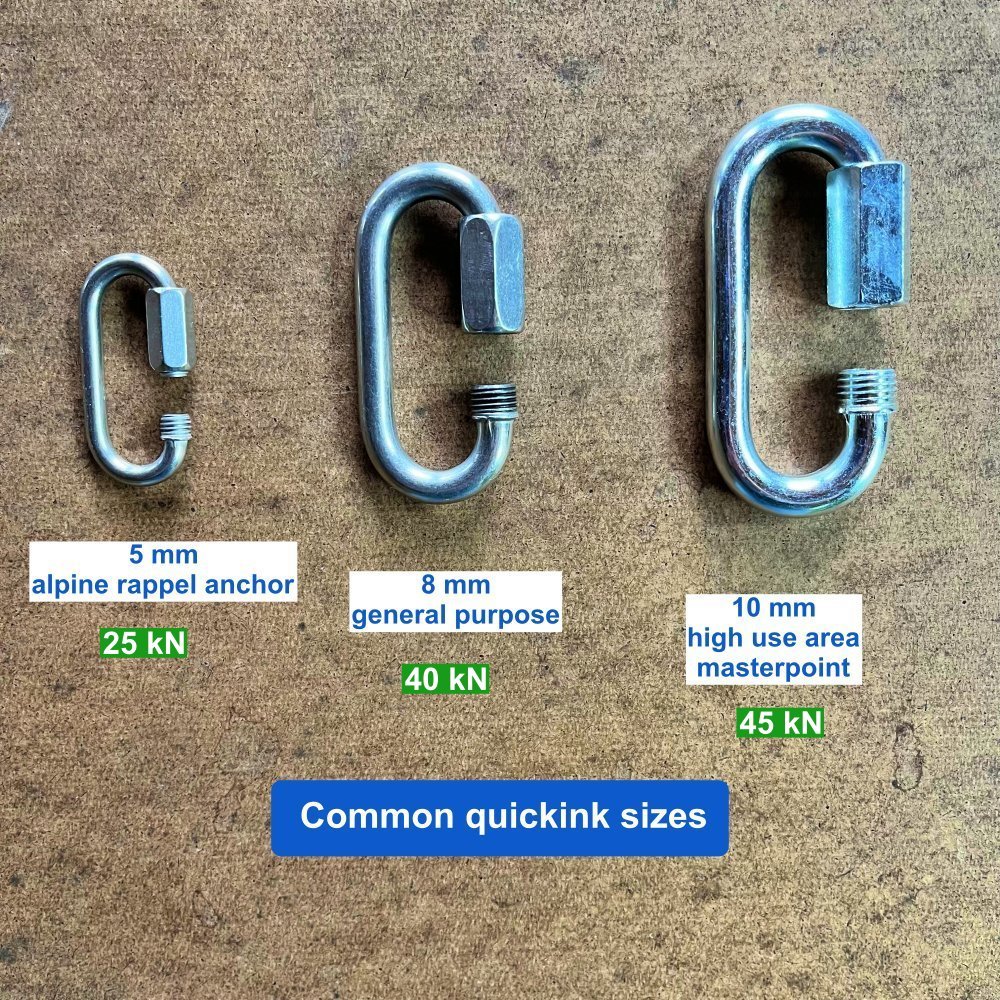
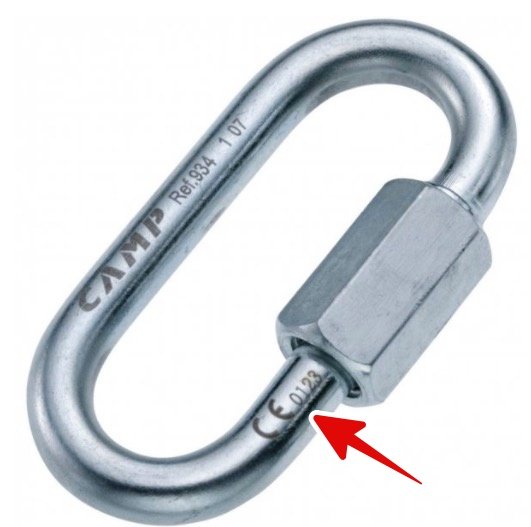
Note: When possible, use quick links that are CE rated for climbing. The Italian company CAMP sells them and they are inexpensive, insanely strong, and come in 5 mm, 8 mm, and 10 mm. We have a whole article on that here. This is a better option than random hardware store quick links of questionable lineage.
Note: It's best practice to close the sleeve of the quick link by screwing it down toward the ground. This means that gravity is helping keep the sleeve closed. A little pneumonic to help remember this is: “Screw down, so you don't screw up.” If you have a quicklink that you want to fix it more permanently, give it an extra turn with a pair of pliers; a multi-tool is your friend. And if you really want to secure it, add a few drops of thread lock.
If you’re doing Crafty Rope Tricks like rappelling with a knot block, then the very small diameter opening may make the quick link your preferred option because it can block the knot. This is an advanced maneuver that requires some specialized knots and training, beyond the scope of what I want to explain here. If you're curious about this type of rope trickery, see this YouTube video, “StaticBlocks - setting the rope length.”
It's probably not worth carrying a quick link as a “just in case” piece of gear on your harness on every climb. It's heavy, single use, and if you need an emergency rappel anchor, a carabiner usually works just fine.
Sidenote: if you’re retreating from a sport climbing route, please don't use a quick link to lower from. They are much harder to clean for the next person up. Try a carabiner instead.
A lightweight option is an aluminum quick link. These currently come in at 7 and 10 mm sizes. The 7 mm is not officially rated, but sources that say they break around 12 kN. Not anywhere close to the 40+kN of a steel 8 mm, but certainly adequate for a rappel anchor.
The 7 mm one weighs only 18 grams, which is dramatically lighter than the almost 80 grams of an 8 mm steel link.
These can be a bit hard to find online, but my buddy Ryan at howNOT2.com usually has them in stock; here's a link.

Pros:
Handy when you want to pass the quick link around several existing slings on an alpine anchor
Small narrow opening, which prevents the knot on a double rope rappel or knot block from ever passing through it
Inexpensive
Insanely strong; the 8 mm CE rated CAMP quicklink is rated to 40 kN!
Cons:
Most are hardware store varieties not rated for climbing, probably made in a random machine shop in China
Somewhat heavy, single purpose piece of gear
2 - Rappel rings
A rappel ring is a round, smooth ring, made of aluminum or steel. All are plenty strong and inexpensive. Again, like the quicklink, rings are something that you probably don’t need on every alpine climb. If you anticipate doing multiple rappels on a seldom climbed route, and weight is not a huge concern, you might want to bring a couple.
Pros:
Properly engineered for climbing and rigging, a single ring is plenty strong
Cons:
Can’t pass the ring around several slings on an existing anchor (Although you can girth hitch a rap ring around a sling, see this tip). Note that this girth hitch technique is more than a little sketchy!
Again, a single purpose piece of gear
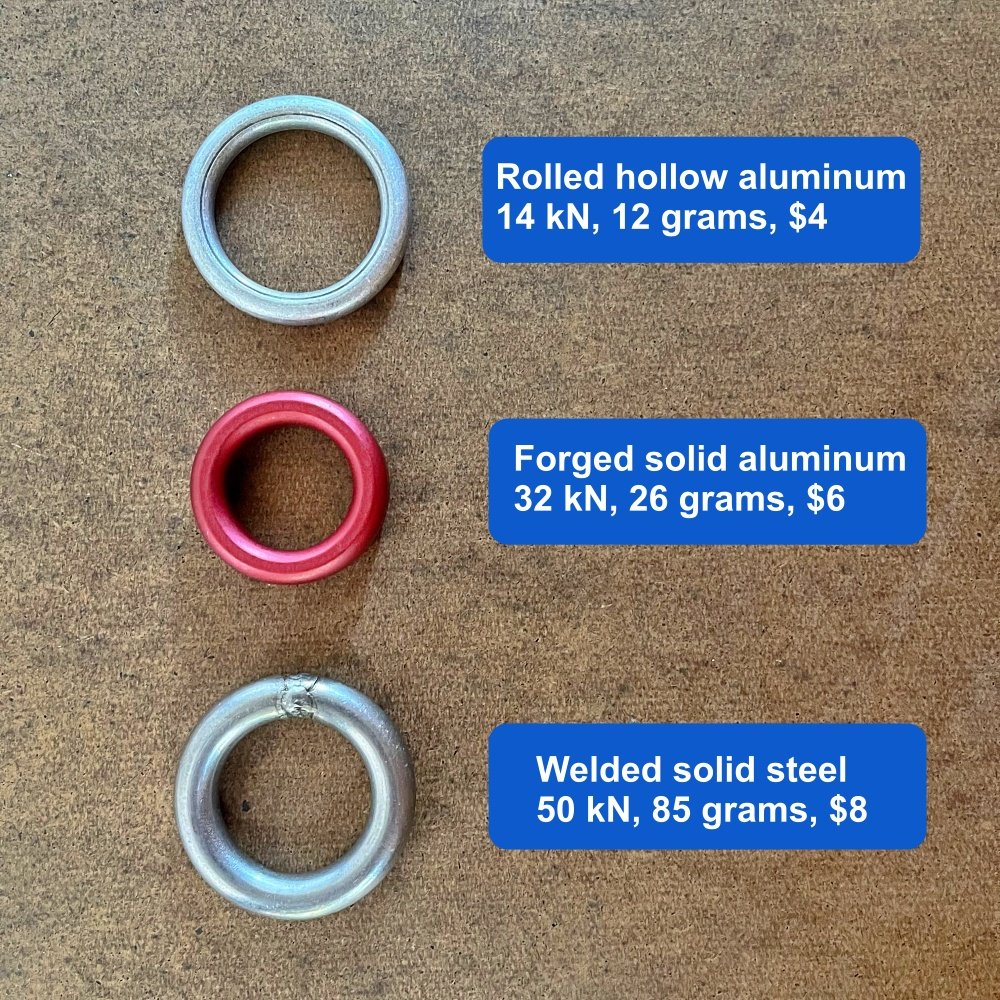
Rolled aluminum ring
These are made of rolled metal, as you can see from that thin line in the middle. They are hollow, and (per Andy Kirkpatrick) are only about one millimeter (!), which does not fill me with a great deal of confidence. However, when new, they are rated at 14 kN, even if they do not give me a warm fuzzy feeling if rapping from just one of them. If you find them in the wild, consider replacing them if you have something better. Or at least double them up. Try to use these only for rappelling and not lowering, that will help them last much longer.
Best use: retreat anchors, or on remote alpine raps that are not going to get much traffic and not on common routes. Apparently they’re also good for hanging hammocks. =^)
Yikes! This is what you don't want to find at a rappel station, and why hollow aluminum rings don’t belong on busy routes. These were removed from a popular route in Yosemite. Don’t be a cheapskate. Replace time bombs like this whenever possible. Ryan Jenks at HowNot2.com tested a worn out ring like this, and it broke at 1.5 kN! Death trap! Photo: shared by AMGA Certified Rock Guide Kevin Heinrich, used with permission, @kevhamrich

Photo: Kevin Heinrich, @kevhamrich
Forged aluminum ring
These are solid aluminum all the way through, unlike the hollow ring above. Plus, they come in cool anodized colors. =^) They are insanely strong, and cost just a dollar or two more than the rolled aluminum ones shown above. I would call these modern standard, and if you're considering aluminum rings, these are the way to go. This one is from SMC, they make some excellent gear. Cheap, strong, and light, I love it!
Best use: rappel master point in moderate use alpine routes, still not great to lower on. Just like a quicklink, you’re fine rapping off one of these.
Welded steel ring
Made by Fixe and other companies. Ridiculously strong. HowNot2.com tested two of these; one broke at 90 kN and the other at 47 kN.
Best use is in popular sport climbing areas (okay to lower from) not for distant alpine routes. Still fairly inexpensive, around $7-$8.
Rappel ring break test results from HowNottohighline

image: https://www.instagram.com/p/CmKFzXmvIqp/?hl=en
3 - Carabiner
Leaving a carabiner behind will tear at the soul of the frugal dirtbag climber, but come on, it's only about five bucks, relax. Remember all those clunker cheapo carabiners you probably got when you first started climbing? If you’re planning an alpine route where you anticipate lots of rappels, bring a couple of those along as a “leaver carabiner” and slowly dispose of them.
While a single carabiner generally fine to rappel off of, many people will prefer the extra security and use two regular carabiners with gates opposite and reversed. Or leaving a locking carabiner. Or, you can always use my favorite method: take one snapgate carabiner and tape the gate shut, making a cheapskate locker.
Pros:
You always have it with you
Multi purpose price of gear
Easy to clip to multiple webbing strands on an alpine anchor
Cons:
A bit more expensive than the other options
The wide gate might cause the knot connecting your rappel ropes to migrate through it, making pulling the rope more difficult. Knot blocks may not work. Be cautious with skinny double rope rappels
A single standard carabiner with the gate not taped is not the safest setup. Better to use a locker, two with gates opposite and reversed, or tape the gate shut
The cheapskate locker. A few wraps of tape completely secures the gate, and gives you peace of mind for a rappel. Leaving a little extra tape folded over makes it easy to remove.

So . . . Where does that leave us? It really comes down to personal preference. Each one of these is plenty strong, relatively inexpensive, and will give you a smooth rope pull. Personally, I dislike carrying special use pieces of gear that I may or may not use, so I usually use a “cheapskate locker” carabiner taped closed for a standard rappel. I’ll sometimes bring a quicklink if I anticipate a knot block or some other Crafty Rope Trick may be needed.

Ode to a Pink Tricam
Whether you love it or hate it, everyone seems to have some strong opinion of the “pinkie”, the size 0.5 Tri-cam from Camp! Some are even inspired to write a poem about it.
Ode to pink tricam poem, a classic and worth remembering!
I don't remember where I first heard this, but it's certainly good enough to share. Personally, I love the little buggers. No climb is complete until you sink the pink!
Ode to a Pink Tricam
Oh Pink's the one I love to place
when I'm alone way up in space
on some exposed and airy face.
They sink where other gear won't go.
When all you've got is manky pro,
This tricam saves your butt from woe.
But it's often hard to get them out;
They make your second moan and shout
And wave his nut tool 'round about
But that's why you're the one on lead
Your problems are a different breed
As long as someone does the deed…
"Oh quit your whimpering," you rumble,
"And get it out or there'll be trouble"
"Get to work now, on the double!"
Although it sometimes takes a while,
They do come out with vim and guile,
(or chiselling and curses vile.)
Pink will do what all the rest.
Won't do when they're put to the test.
Oh pink tricams are just the best!
-- Charles "Pinky" Danforth


How to attach a rappel ring to a sewn sling
It might first appear like a bit of rope sorcery - How can you attach a rappel ring to a sewn runner? Each one of them is a closed loop! Read and learn, young Jedi.
Post update: This is NOT a recommended method! It’s easy for the ring to come off the webbing and for the anchor to fail.
It's mentioned because it might be one of your only options, or you might come across an existing rappel anchor with a ring attached like this. You should be aware how it got that way, and the potential for it to become easily detached.
Try this yourself, see how easy it is for it to come undone.
So, although I've kept the original post below, I no longer think it is such a nifty trick. I’ll stick with leaving a carabiner behind, or second choice, a quick link.

My partner and I were heading down the West Ridge of Forbidden Peak in the Washington Cascades.
A series of rappel anchors in various states of disrepair were leading us steadily back to our camp.
When we got to one rat’s nest of several ancient but serviceable slings around a boulder, my partner looked at it with a critical eye and said, “Hey, let’s take a sec to beef up this anchor. I’m going to add a rappel ring to the best looking one of these slings.”
I paused. “Don't you need some webbing too, so you can thread it through the ring and add the webbing to the anchor?”
He looked at me like I had rocks in my head and said, “DUH, no! I’m just going to add the ring to the webbing that's already there.”
I looked back at him, even more confused. “How are you going to do that!” I demanded. “The ring is welded shut, the webbing is tied shut, and you’ll never untie it without pliers!”
He looked back at me, and shook his head with a little laugh. “Watch and learn, young Jedi, I'm about to show you a little trick,” he said.
The anchor looked something like this . . .

source: summitpost.org/nice-rappel-anchor/906562
Now, if you already know this little move, you'll probably be laughing at me. (That's OK, I can handle it.)
A little backstory. I’ve never been much of a fan of carrying rappel rings for alpine climbing. Sure, a rap ring gives you a nice smooth pull with less chance of the rope end hanging up.
But, for alpine climbing on an established route, where you’ll often find a tangle of pre-existing slings, I used to think carrying a rap ring was silly, because you couldn’t thread it through the slings that were already in place.
Given that situation, my usual choice was to take the oldest looking carabiner on my rack, clip it to every strand of the webbing, then close the carabiner gate with some tape to make a “cheapskate locker”.
Or, I’d occasionally carry a quick link, a threaded link of chain that can be opened, attached around multiple strands of webbing, and then closed up. But, this is a rather heavy and single use piece of gear, so I’d usually sacrifice a carabiner.
I learned a 3rd option that day on Forbidden, when I saw this little trick for the first time. It almost looked like a magic trick when my partner showed it to me, because I had it so firmly in my little head that a closed circle ring could not be threaded through a closed circle loop of webbing.
Well, technically it’s NOT threaded through the webbing, but attached via a simple girth hitch. This attaches the ring in a couple of seconds to a closed loop.
(Yes, I know some anchor engi-nerds are having a minor freak out right now and screaming “don’t you know girth hitching a sling decreases its strength by 30%”, blah blah blah. 11/16” webbing is rated to about 13 Kn, and the maximum possible force on a rappel is about 2 Kn, so I’m not worried about this in the slightest.)
And where did I get those numbers? From the climbing gear strength ratings post, which you can read right here.
UPDATE: Strong note of caution: Easy ON also means easy OFF!
If it takes you a second to attach this with a girth hitch, it's also going to take a mere second of inattention for this to potentially come off, or worse yet, come halfway off, without you noticing it.
After I first published this post, I got an email from a climbing friend. He told me a scary story about setting up a rappel on this exact situation, with a girth hitched rap ring. While he was getting rigged up, the runner got a little cockeyed. He was a moment away from leaning back on the ring when he realized it was completely unattached to the webbing, YIKES!
Here's another accident report from Cutthroat Peak in the North Cascades of Washington in April 2024. Suspected cause is girth hitched rappel ring. Here's the accident report.
Yes, best practice is to load test the masterpoint with a tether backup in place before you commit to it. But sometimes with darkness, stress, distractions, whatever, that doesn't always happen.
Here are three much more secure options for alpine rappel hardware: the cheapskate locker, a.k.a. taped gate carabiner, a quicklink, and a rappel ring that’s actually tied through the cord, instead of being girth hitched.
When properly placed, it’s impossible for the hardware to come off of the cord.

So, after all that, if you still want to girth hitch a ring onto cord or webbing, here's how to do it.
Closed loop of webbing and rappel ring.

Pass a loop of webbing through the ring.

Tuck the webbing loop behind the ring.

Pull it tight. Done, and ready to rap. Be SURE and double check this before you go.
Be sure and run your rope or clip yourself through the BOTTOM part of the ring and not the top!
If you don't like the looks of it, don't be a cheapskate, trade it for a carabiner.

Once more, for emphasis: if you clip the top of the ring in the photo below, seriously bad things are gonna happen!

What is open source mapping, and why should you care about it?
Tired of using ancient USGS topo maps printed decades ago that lack modern roads and trails? Discover the benefits of using “open source” maps, the Wikipedia of cartography.
Short answer:
Think of open source maps as the “Wikipedia of maps”.
Created through literally millions of contributors, open source maps are completely free, cover the entire world, and often more accurate and up-to-date than any map you could buy from a commercial company or government agency. You can find open source maps and a great interface for printing them at Caltopo.com, and on the Gaia GPS navigation phone app.
Check out the real thing at OpenStreetMap.org.
Long answer:
Historically, maps were typically made by a government agency within a country. For example, in the United States, the 7 1/2 minute US Geological Survey (USGS) topographic map series. These maps were pretty much the only ones available for many decades, and they definitely have their shortcomings. There was no shaded relief, newer roads and trails were often not accurate, and the maps were often not updated for many decades, if at all.
And, of course, the maps stopped at the borders of the country that made them. Want to go on a motorcycle tour in Bolivia? Finding maps for a Big Trip could be a hit or miss project, because who knows if the Bolivian government has a good cartography department.
The answer is Open Street Map. Inspired by the success of Wikipedia, this visionary product was founded in 2004 in the UK. It now has over 2 million users, many of whom regularly add features and improvements, to collectively create a single, free, open sourced map of the entire world.
(Note that map heights and contours are in meters, which might only pose a problem to the three countries in the world that do not use the metric system: Liberia, Myanmar, and the United States. )
What does this mean for you, the recreational user? It means that roads and trails are probably going to be more current and accurate than you’ll find on any other map, and that the entire world is mapped with a consistent look, legend, and standard. This makes the maps especially useful for international travel.
Open source maps come in several flavors, so let's look at a few examples.
The maps below are from the main visitor area for Mount Rainier National Park, and are screen grabs taken from Gaia GPS, our favorite backcountry navigation GPS app.
Open Street map example
USGS topo map example
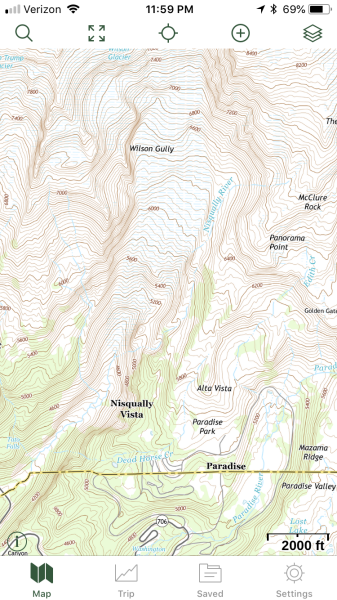

Above on the left is the standard US Geological Survey topographic map. Note the contours are great, but the roads are rather hard to see, and trails are sadly nonexistent. No trails, LAME! Not too helpful for the backcountry.
Above on the right is Open Street map for the same area. Notice we have nice road for driving, a bit of vegetation shading and even some trails, but no contours.
Open Cycle map example

Open Topo map example

Above on the left we see Open Cycle. This is often a great choice for hiking, because it shows shaded relief (which makes gullies and ridges much easier to see), labeled contours, and hiking trails in easy-to-see red, along with well marked roads.
And finally, above on the right we see what is often my go-to layer, Open Topo, which has shaded relief, labeled contours, some vegetation coverage such as rock, snow, or forest, more detailed streams, human made structures, and current roads and trails. The trails are printed in black and are a bit hard to see, and the text is tiny, which are small drawbacks.
So, next time you’re looking for a good map source in your favorite mapping software, be sure and have a look at any map layer with the word “Open” in the title.
Becoming a contributor is easy. You can be out on a hike or bike ride, in the woods or even on a little trail in your neighborhood. You may notice that the trail you are walking on is not on your open source map on your phone. Time to record a track of your own and add it!
Record a GPS track, upload that track when you get home, trace right over the top of it with various line symbols, and boom, in a minute or so you’ve made your own small contribution to a single map of the world. You may find doing this feels surprisingly rewarding.

What's a "global" compass?
Headed for New Zealand or Patagonia? That compass you bought in North America might not work. Here's two solutions.
If you live in the northern hemisphere, and are considering a trip to New Zealand or Patagonia, you might want to check out a so-called “global” compass.
What the heck is that, you might be wondering? My compass needle should always point to magnetic north no matter where I am, right? So why do I need a special compass to go to southern latitudes?
Well, your needle technically should still point to North, but here's the thing - when you’re closer to the magnetic north or south poles, the compass needle in a regular compass can dip and start to drag on dial of the compass, making it useless. Global compasses have a taller dial and can accommodate this. Unfortunately, they are also a bit more expensive, so don't buy one of these unless you need to.
(If you do plan to travel to a far off corner of another hemisphere, another option is to purchase a compass locally when you get to your destination, which should work just fine when you're there.)
A fine choice for a global compass - the Suunto MC-2G

image: backcountry.com
As far as I know, they Finnish company Suunto Is the only manufacturer who makes a global compass. These Suunto compasses have the capital letter “G” In the title, indicating it is a “global” compass.
An excellent option is the MC-2G, which is simply the global version of the popular MC-2. This compass has all the high end features, including adjustable and declination, deciding mirror, and a clinometer.
Don't ask me why I having a taller dial should cost an extra $20 or $30, but apparently that's how it works. As of autumn 2018, the MC-2G costs between $60-$80 online.

Protect your fixed rope with a klemheist
If you have a fixed rope loaded over an edge, giving it some protection can be an excellent idea. Here's how to do it in a few seconds with a 4 foot runner.
If you need to quickly pad a fixed rope that’s running over a sharp edge, try this trick.
Take a 4 foot or longer runner, ideally a less expensive nylon sling rather than a $$$ spectra one.
Tie a klemheist knot with as many wraps as you can around the rope.
Slide this knot over the point where the rope contacts the edge.
Any abrasion will rub on the cheap runner, hopefully not your rope sheath. If you really want to anchor it in place, tape the klemheist knot to the rope.


What's the best tent color?
When shopping for a new tent, consider to how you might feel when you’re storm bound for a few days inside. Color has a strong effect on your mood. Yellow is probably going to treat you better than green or blue.

image: from the always awesome book, “glacier mountaineering: an illustrated guide to glacier travel and crevasse rescue”, by Andy Tyson and Mike Clelland
Next time you’re tent shopping, pay attention to the color. Crawl inside (if possible) and think, “Would I want to be in this thing for several days in a storm? Color can have a big effect on your moods and spirits.
After a few soggy days in a green tent, one climber commented he felt “as though he had been swallowed by a frog.” Darker colors may be less visually intrusive in the backcountry, but balance this with how you feel inside it.
Mental attitude can be important on a tough route, and every little bit helps. Most folks prefer the more uplifting colors - ever notice how most expedition tents seem to be yellow?

image: mountainguides.com

Sunscreen: solid stick, not lotion
Sunscreen lotions can be a drag for climbing. Solid sticks are much better.
The modern approach to sun protection in an alpine environment is wearing a sun hoody to protect your arms and head, a visor hat to shield your eyes and forehead, and maybe a buff for your mouth and lower face.
But, you're still gonna have a few exposed spots on your face and that's when sunscreen is needed.
Sunscreen lotion sucks. It can freeze, leak in your pack, make your hands greasy when you’re rock climbing or cold when you’re snow climbing. (If you're going to use lotion, here's a tip: Squeeze it on the BACK of your hands and apply it that way when you’re rock climbing, so the greasy stuff stays off your palms.)
Sunscreen in a stick is much more convenient and less messy.
When you find one you like, buy a few so you can keep them stashed in different packs and jackets and don't have to hunt for it before a trip. Get the smallest one you can, many containers only weigh about 15 g. Careful about putting it above your eyes and then having sweat drip down, that's no fun.


How to always have dry socks with only two pairs
Dry Feet = Happy Feet! You can always have dry socks, even on multi day snow climbs, if you follow this tip.
On longer Pacific Northwest snow climbs such as Mt. Shasta and Mt. Rainier, (not to mention longer expeditions) keeping your feet in good shape can be a challenge. Even with modern boots, your socks and feet will get progressively more wet if you don’t take proactive steps to dry them.
Here’s a tip to have dry socks every day on milti-day snow climbs, while bringing only two pairs.
Wear a pair of socks (pair 1), get them wet.
Hang pair 1 up in the tent that night and all next day.
In the morning, put on pair 2.
That night, hang pair 2, and put pair 1 in the sleeping bag with you, and put a hot water bottle inside each sock (preferred), or put the socks on your belly. (This is a perfect use for a 20 oz. Gatorade bottle, a great water container we talk about in this Tip.)
Repeat indefinitely.

Bring two shirts for sweaty approach hikes
Headed on a snow climb that has a long approach followed by more technical climbing? Don’t “sweat” the approach - bring an extra base layer and swap it as you slow down.
You’re heading up Mt. Hood to try Leuthold Couloir in March. Your team is setting a good pace on the approach, and you’re sweating a fair bit, even after you strip down to your base layers and open a few zippers.
At Illumination Saddle where you stop for a break and to rope up, you are suddenly chilled by the wind that often appears at passes, even though you’ve put on your puffy belay jacket and hat. That damp first layer seems to suck the warmth right out of you.
Solution: Bring two shirts, one lightweight and one mid-heavyweight. Tackle the fast-paced approach hike in a lighter shirt. When you start the technical climbing (or arrive at base camp) which usually means moving more slowly, remove the sweaty shirt and replace it with a dry, thicker synthetic top.
The few seconds of discomfort from exposing your upper body to the elements are outweighed by the immediate warmth, comfort and psychological boost that comes from a fresh, warm shirt. If you take the rest of the climb at a more modest pace, the second shirt should stay dry.

Jim Bridwell’s Casual Rating System
The late great Jim Bridwell, Yosemite big wall pioneer, had a unique take on many aspects of climbing. Here's one of his more offbeat contributions - his greatly simplified rating system.
Are you confused when you read a guidebook climb description of “5.10c R M8 WI5+ Grade IV?” Yeah, me too.
For a refreshing simplification, have a look at Yosemite pioneer Jim Bridwell’s Casual Rating System, which describes any climb in just four categories.
NBD = No Big Deal
NTB = Not Too Bad
PDH = Pretty Darn Hard
DFU = Don’t F**k Up

Carry some Tyvek paper
Tyvek, the material used for strong envelopes and wrapping houses, can be handy as backcountry paper.
Tyvek, made from high-density polyethylene fibers, it’s ultralight, tear proof, very puncture resistant, windproof and waterproof. With these qualities, it’s should be no surprise that the stuff also has applications in the outdoor world.
I once met a guy backpacking in the wilds of central Idaho who had made himself some gaiters with Tyvek paper and a few safety pins! If you get a larger sheet, you could use it as a ground cloth underneath your tent. See if you can procure a scrap for free (with permission, of course) from a construction site, it’s also used as “house wrap”, installed underneath siding. (The ultralight hiking nerds have found slightly lighter ground cloth options, but Tyvek still works.)
Grab a piece of Tyvek from a repurposed envelope or from the post office, and cut it up into a few pieces, about 3” by 4”. Add it to your 10E’s kit along with a pencil stub. This is tear-proof and waterproof note paper, which can be handy in certain backcountry situations.
You can:
Jot down your philosophical insights that can be inspired by time in the wilderness, and maybe compose backcountry haiku.
leave a note for rescuers if you’re lost
take quick notes about key routefinding decision points
In a First Aid situation, write patient vital signs and send the note out with a runner (if you forgot your accident report form)

Four good reasons to have a UTM grid on your map
Having a 1 km checkerboard UTM grid printed on your map is a good idea for several reasons.
Here's a few good reasons why it's helpful to have a map with a printed UTM grid.
Plot a UTM coordinate onto your map
Determine UTM coordinates of any point on the map
Quickly estimate distance in kilometers between points
Provides north / south grid lines to more accurately measure a bearing from your map
Print free maps with UTM grid lines with the great mapping software CalTopo.
Here’s an example of a CalTopo map (MapBuilder Topo layer) with a UTM grid overlay:
Learn how to use the CalTopo from this YouTube video.

How to fix a ripped tent
Got a rip in your tent? Here’s how to fix it with tape, mosquito netting, and adhesive.
Here’s how to fix a rip in your tent.
Put duct tape on the outside, add seam grip (or similar liquid adhesive) to the inside, put on some mosquito netting on the wet seam grip, then put on another layer of seam grip. Once it’s dry, it’ll be stronger than the original tent.
Granted, these are not items you are likely to have on a short climbing trip, but you can take care of it when you get home. On a longer expedition, this may well be repair gear you want to carry.
This tip is from the excellent book, “1001 Climbing Tips” by Andy Kirkpatrick


Conditioning hikes - Tips for clothing, food and navigation
Heading out on a conditioning hike? Put a little thought into your clothing, food, and navigation to get more out of your day.
You can get a lot more out of your next “conditioning hike” (typically more than 8 miles and 3,000 feet elevation gain) than just aerobic exercise. Consider working on your clothing layers, food/water intake and navigation skills, in addition to getting a workout.
Clothing
Make a point of going out on training hikes on some of the wettest days. If it’s really storming, stay closer to home. Use these soggy trips as a way to test your clothing systems. Try different combinations of clothes, top and bottom.
Try starting out with less clothes than you think you need. You may be happily surprised at how little you need to stay warm. Remember, it’s often okay to be a little damp next to your skin, provided you’re moving and are staying warm. You may find that you sweat too much in that 3 layer Gore-Tex jacket, shortie gaiters work just fine even in knee deep snow, or that a base layer and light windshell are all you need when hiking fast.
Nutrition
On conditioning hikes, try different types of food and see what keeps your motor running. This is especially useful if you’re experimenting with carb-type energy drink mixes or eating energy gels (Gu) for 8 hours straight.
Start your food experiment right when you get up. Eat the same meal you’d plan for a multi day climb, which might be a couple of granola bars at 4:00 am or some instant oatmeal. (Personally, I find that instant oatmeal does not give me much energy, but adding a couple of scoops of quick dissolving whey protein powder improves things a lot.)
Did you finish your hike with 1 pound or more of extra food? You’ll want to bring less next time (an “extra” food ration of a 1 oz. Gu packet or two are all you really need).
Remember the yummy summit snack!
By making your food intake on a training hike day match what you’d really eat on a climb, you’ll have a much better idea what your body needs to operate well in the alpine world.
Navigation
Even on hikes where you know the trail perfectly, bring a topo map, compass and a GPS app like Gaia GPS on your smartphone. Plan on taking some extra time to practice navigation; it’s not a race out there.
When you get to a viewpoint, orient your map to the terrain (for example, if you’re facing south, hold the map so the south edge is furthest away from you.) Doing this aligns the map with the real world features you see in front of you. Identify terrain features like ridgeline and gullies and match them to your map. This helps you develop the skill to see contour lines and visualize what they represent in the real world.
Practice estimating distances. Pick out some real world features, guess how far away they are, locate them on your map, and use your map scale bar to determine the actual distance.
When at a known position on the map, use the map to determine your UTM coordinates. To do this, you need a UTM grid printed on your map, and the knowledge of how to estimate your position using this grid. (Learn more about UTM coordinates from this video.) Then get a GPS waypoint and see how close the coordinates match (within 200 meters is pretty good.)
Then, try the opposite. Pretend you don’t know your position on the map, get a GPS waypoint from your phone, and then plot that on your map and see if it matches your current location. (You can print maps for free with a UTM grid at caltopo.com. Learn how to use Caltopo from this video.)
As the saying goes, if you always know where you are, you can’t ever be lost. Get into the habit of keeping the map handy, referring to it often, and keeping track of your position. At any point on a hike or climb, you should be able to pretty much put a finger on your specific location on the map. Consider drawing your position / route on the map at every break, more often if traveling off trail in challenging terrain. Use a colored pencil for visibility.

Subscribe to CalTopo? Yes, it's worth it
Sure, you can use the free version of this superb mapping software, but for a modest subscription fee you get a few more very helpful features.
If you're new to CalTopo, watch this tutorial video to get started.

Here's a screen grab of the cost structure and subscription levels, as of autumn 2019.

Just click that “Upgrade” link! or: caltopo.com/join
The free version of CalTopo has a lot of functionality, but bump up to a $20 “Basic” level annual subscription and you get even more. In addition to directly supporting the provider of this great software (which for many years was just one guy in California, you also get a few extra perks.
1 - Print maps on larger size paper. Standard 8 1/2” by 11” paper is usually okay, but for a longer trip covering a bigger area, or a larger scale (a more “zoomed in” map) bumping your paper size up to 11” by 17” can be really helpful.
2 - Save more private maps. Have you made a map that you think is great, complete with carefully chosen waypoint icons and different line symbols and colors? You can save it exactly like you made it, so you or anyone else can use it in the future. (If you simply export your tracks and waypoints as a GPX file, you lose all the custom formatting.) Just click “Save this Map”, and everything on your screen is saved to the cloud. The paid subscription lets you save many more private maps than the free one.
3 - Better integration with Google Earth. With a Basic subscription, you can do some Google Earth fancy cartography tricks like making a linked connection between CalTopo and Google Earth. Make a change on your CalTopo map, and a few seconds later in your Google Earth window you will see that same change happen. Very cool for certain map geek applications.
If you're more of a power user, there are two additional levels of subscription, Pro and Desktop. The Pro version offers the extremely helpful weekly high resolution satellite imagery, which is terrific for trip planning and determining snow levels. This might be a bit beyond the needs of many casual recreational users, but if you spent a lot of time in the backcountry, it could be well worth it.
So, those are the main benefits, as I see them, and I love supporting CalTopo with a $20 annual subscription. When you consider that a single printed paper map can cost between $10 and $15, $20 a year for unlimited free mapping is quite the bargain.
Supporting this software by subscribing helps ensure this great resource will be around for a long time for all of us to enjoy.
Here’s an example map for the Leuthold Couloir route on Mt. Hood, Oregon, made with CalTopo. This uses the “Mapbuilder Topo” layer, has a 1 Km UTM grid, correct magnetic declination, map datum, and ratio and bar scale - pretty much everything you need. This prints on 8.5 x 11 paper, and took me about 90 seconds to make. =^)


Choosing a mountaineering backpack
Selecting a backpack for climbing can seem overwhelming. With these guidelines, you'll learn what modern features you need, and some you probably don’t.
There’s a dizzying number of choices when it comes to backpacks these days. Fortunately, with some guidance, you can narrow down the choices significantly.
Here’s a great article from outdoor gear lab that should be your first stop if you're contemplating a new backpack.
The Osprey Mutant 38 liter pack, an excellent choice.

photo: osprey.com

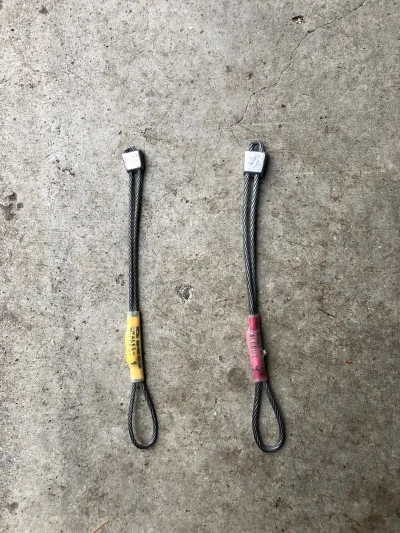
Intertwine stoppers for reachy aid placements
On your tiptoes straining for that stopper placement or rivet? Try this crafty trick to get a few extra inches.
Need to reach a few more inches for that aid stopper placement? Try intertwining the cables.
If you’re trying a reachy stopper replacement, you may not be able to see if the stopper fits well. Be sure and bounce test carefully before committing to it.
If you’re reaching for a rivet head, just slide the top stopper down to expose the wire loop.
It’s easy to do, but here’s a step by step.


Staying found: caution in semi-familiar terrain
Trails you know very well, and trails you've never been on it all, generally pose a low probability of getting lost. It's those “I-was-on-this-hike-a-few-years-ago-and-pretty-much-remember-where-it-goes” that can get you.
Think about the times you’ve experienced, shall we say “positional uncertainty” on a hike or climb, or even walking/cycling/driving in a city.
Was it on a close to home trail that you’ve hiked a dozen times before? No, because you know it so well. Let's be honest, you really don’t need a map and compass to do a hike you have this dialed.
Say you’re planning your once-in-a-lifetime trip to go trekking in New Zealand. Are you, the savvy outdoor person, going to research the heck out of your route, get appropriate guidebooks, maps, GPS tracks, and talk to the locals so you are super well prepared?
Of course you are. When you’re going somewhere completely unfamiliar, the only prudent thing to do is to go with a full quiver of solid navigational tools. Sure, you still might get lost even after all this, but you will at the very least be well prepared.
So, let’s consider all of the outings that fall in between these two bookends. Call them the semi familiar; aka, “I hiked this once about five years ago and I pretty much remember where to go, but I don’t remember every fork” type of trails.
These trails can lull you into a false sense of security, because it’s easy to get a little lazy and not get a proper map, download a track, or otherwise prepare for your trip, especially if it’s a more spontaneous outing. Looking back at the times that I have been a little turned around in the woods, it’s almost always these type of trips.
So, if you have an outdoor adventure planned, ask yourself if it falls into that middle ground of semi familiarity. If it does, you may want to be extra sure to research the route carefully at home, and also to bring various navigation tools (a guidebook, a map, a photo of the guidebook page on your phone, and or a GPS track to go with the Gaia GPS app on your phone) so you don’t have an epic.

3 tips for better running snow belays
Running belays on snow can be a lower risk and relatively fast way for a rope team to travel in steeper terrain. Here are three tips to make them more effective.

image: Climbing.com
General caution on running belays: Snow anchors are probably not as strong as you think they are. If things are getting steep and you think there's a chance of a fall putting significant impact on the picket, it's probably best to start climbing with belayed pitches, have your most skilled person climb a rope length and fix the rope, or perhaps turn around.
Having said that, there are some times when using a running belay is appropriate. Here's how to make the best of it.
1 - The Better Way to rack pickets
Many climbers don't give a great deal of thought how to rack pickets, usually just slinging them over their neck. Doing this is just about guaranteed to dangle, tangle, and strangle, and if you're doing a long running belay with more than about three, it gets even worse. This applies to the leader as well as the cleaner.
A much better method is to clip a carabiner through the third hole of the picket, and carry the pickets on your vertically clipped to your harness or pack shoulder straps. Here’s a separate post that describes how to do it, with some pictures.
The leader can carry pickets on their backpack quiver style, but you need to set them up in a way so they can't fall out.

2 - Consider a whistle
Running belays require clear communication between the entire climb team, to tell the leader to stop and place more pro, or for the team to stop while the last person cleans.
If it’s windy, the route goes around a corner, you have your hood cinched down tight, you’re wearing a windproof fleece hat, your ice tools are knocking off chunks of ice and snow, you’re mentally focused on a tough lead . . . or all of the above, it can be very hard to hear the calls for “pro” or “cleaning”. Consider whistle blasts to signal the leader to stop and place more gear. Wear the whistle on a short cord girth hitched to your pack strap and be sure you can get to it with gloves on and using one hand.
The leader doesn’t need to have this, but all of the following climbers should consider it.
3 - Running belays - Max party size is three
A simple rule of thumb for running belays is this - keep the party size to 2 or 3 people max on a rope. With more than 3 people, it’s almost always faster to fix the rope and have the everyone come up on a fixed line or simulclimb.
Reason: if the team always keeps one piece of pro between team members, with four people on the rope, the leader has to carry and place a LOT of gear!