

Alpine Tips

The frugal climber’s stick clip
Do you enjoy ankle breaking ground fall potential with the crux just before the first bolt? (Smith Rock Oregon, I'm looking at you!) Cool, neither do I. Enter the frugal climber’s stick clip. All you need is a stick, some tape, and a rock.

Premium Members can read the entire article here:
If your personal ethics allow it (and mine definitely do), stick clips are great.
Sure, those super long extendable fiberglass poles with some fancy carabiner-grabber-thingie on the end work sweeeet, especially for really high bolts.
However, for the frugal climber, there's the time-honored dirtbag method.
All you need is some a small rock and a stick. Tape or a rubber band are nice, but optional.
Left photo: tape method. This is my preference, it's a bit more reliable. Tip, tape the middle part of the carabiner as shown here, keeps it more stable. A sturdy rubber band or two works pretty much the same way. (Note that depending on the quality of your tape, this might leave some sticky stuff on your carabiner, which is not so great.)
Right photo: forked stick method. This is a bit more finicky, and you usually have to pull some downward tension on the rope to keep the top carabiner from flopping around. (Yes, in the photo it’s hard to see a stick there, but trust me, there is. =^)

Want to see a video showing how it’s done?
Join my Premium Membership to read the whole article.
Thanks for your support!


How to extend a quickdraw
Are you trying some super-steep sport route? Extending the quickdraws might make clipping easier. Here are two good ways (and two not-so-good ways) to do this.
If you're on some ultra-steep or reachy sport route that requires extended quickdraws, here are some ways to do it. And a couple of ways not to.
In addition to connecting quickdraws like this, you could also use a 60 or 120 cm sling.
Two good methods to extend a quickdraw:
Probably the easiest: remove the top carabiner from a second draw, and then clip the dog bone into the bottom of the first draw (left).
A more secure version: replace the carabiner with a quick link or locking carabiner (right).

Two not-great ways to extend a quickdraw:
Chaining together two non-locking carabiners is a no no. A fall could twist the carabiners together and cause them to unclip (left). It is okay to clip the bottom carabiner for a rest, and then clip the rope through the top draw when you continue climbing.
The quickdraws are extended correctly, but the rope is clipped to the wrong place. A fall with the rope clipped like this might damage the dogbone of the lower quickdraw (right)


Stick clip a preplaced quickdraw with the double loop slipknot
Do you need to clip a “project” quickdraw that’s already on a bolt? If you have a long stick and know how to tie this crafty double slipknot, it’s easy. Check out the article and video to learn how.

Do you need to clip a “project” quick draw that’s already on a bolt?
Provided you have a stick or something similar that can reach the bolt, and you know how to tie this crafty double slipknot, it’s easy.
From your tie in, pull at least enough rope to get from you to the first bolt.
Tie a double loop slipknot. (Yes, this is probably a new knot, but you’ll probably learn it after a couple of tries; watch the video below)
Put one of the two loops into a stick, trekking pole, or something similar, and tighten that loop down.
Push the stick up, and carefully slide the other open loop around the bottom carabiner of your quick draw.
Pull on the strand of rope going to the loop around the quick draw.
That slipknot will close and snap into the carabiner. Schweeeet, you’re clipped! Magic!
Pull down on the stick, and pull on the other strand of rope.
This should release the other half of the slipknot. If you did it right, voilà your rope is now in the draw with no knots in the rope.
Get a well-earned high five from your partner for knowing this crafty rope trick. 😀
It’s a better show than a tell, watch the video below.

Rigging the 2 strand "mega toprope"
If you want to rig a super long toprope with two strands, here's one way to do it, along with some precautions. Use a static rope for the second line if you have one, you may need to pass a knot when belaying, so be ready to do this, and have solid communication with your partner about the plan.
Note - This post discusses techniques and methods used in vertical rope work. If you do them wrong, you could die. Always practice vertical rope techniques under the supervision of a qualified instructor, and ideally in a progression: from flat ground, to staircase, to vertical close to the ground before you ever try them in a real climbing situation.
If you're not confident you can do this technique correctly, then go top rope somewhere else.
This Crafty Rope Trick comes from Adam Fleming @adam.fleming.climbs Adam is an AMGA Certified Rock Guide based in Utah.
Indian Creek Utah, and many other climbing areas, hosts some LONG pitches. Even with 80 meter ropes becoming more common, sometimes you'll need two ropes in order to return to the ground and toprope those mega 200' routes. Here's Adam’s preferred method. This is one of several ways to do it.
Before we get into the techniques, here are some important considerations:
This is uses some fairly advanced techniques, so pay attention! (But if you’re top roping 70+ meter pitches you're probably ready for it.)
The video link below shows the leader descending with a single strand, counterbalanced rappel with a Grigri. The counterbalanced rappel may be new for a lot of people. The leader is counterbalanced by the weight of the belayer on the ground, which means even though the leader is rapping, it's vital that the belay always remain ON. Talking it over on the ground and having complete agreement with your partner is vital for safety. As mentioned above, practice this in a controlled environment first! Remember, stay on belay the whole time!
The counterbalanced rappel is a good approach if the route is overhanging and/or traverses, because the leader can rappel directly to the ground without having to rappel through gear that might be difficult to unclip and then re-clip. If the route is more or less straight up and down and vertical or less, the standard two strand rappel with a tube device is probably fine.
A Flemish Bend or Double Fisherman's Bend is the preferred joining knot because it handles cyclical loading (subsequent loading and unloading) better than other common bends, such as the flat overhand bend. Adam uses the Flemish Bend (not to be confused with the flat-8) because it is easy to untie.
Ropes stretch! One popular 9.8mm rope has a static elongation of 8.6%. That means it could stretch over 34' at the start of a 200' pitch. Keep your climber extremely tight when they are near the ground and above ledges. Before the climber starts, they can “pre-stretch” the rope by fully weighting it, and the belayer can take in the slack through the Grigri.
A static rope can be used as the tagline and greatly reduce dangerous rope stretch. Be sure the climber always ties into the dynamic rope if you're incorporating a static rope.
Half/double/twin ropes stretch even more than single ropes and can be hard to control when lowering. Adam prefers single-rated ropes when using this method.
A Grigri (or similar Assisted Braking Device) is highly preferred for this technique. They allow you to more easily manage the additional stretch.
Have the first top-roper clean most of the gear but leave any necessary directionals, reclipping them while lowering.
Adam keeps the upper belay device on the rope when lowering climbers. This makes the transition when another climber ascends a touch faster and easier.
While this method can be done with a single belayer, it's often easier with a pair of belayers (one for each rope) who assist and check each other during the transition.
Regarding passing the knot when belaying. . .
The video below shows different techniques to pass the knot. You may think this is unnecessary, all you need to do is pull the knot up until it touches the anchor, have the climber on the ground tie at that point with a figure 8 on a bight and maybe a couple of locking carabiners, and off they go. When the climber reaches the anchor, the knot should be at the belayer, and you don't need to pass it. Easy, right?
Sounds good in theory, but . . .
When tying in short, the climber will have rope dangling down between their legs. This can be pretty annoying.
Because of rope stretch, the belayer very likely will have to pass the knot anyway. One option is to walk backwards from the base of the cliff to take up some of the rope, but in many places doing that’s not an option. You might get lucky and not have to pass the knot when belaying, but it's better to be prepared to do it with an extra device and ideally an extra person to help.
Like most fairly complex things in climbing, it's a better show than a tell. Here's a video from Adam showing how it's done.

How to clip a piton
When clipping a piton, try to clip and then rotate the carabiner so the gate is facing out and the load is along the spine. If that doesn't work, you might be able to skip the carabiner entirely by hitching a sling to the pin.
When clipping a piton, try to flip the carabiner so the spine is against the rock. The gate opening can be down (center) or up (right). Doing this aligns force along the spine of the carabiner, the strongest orientation.
If you clip with the carabiner gate facing the piton hole, the carabiner can be sometimes levered in strange ways, and could potentially even break under a heavy load. In the photo on the left, we can see this happening a bit. Depending on the style of carabiner and piton placement, this can be more or less pronounced.

And, if you find that the carabiner is being loaded in a way that you don't like no matter what you try, you can thread a sling or cordelette directly through the piton hole. Of course, avoid doing this if the piton hole is chewed up, as it might damage your sling.
Below are two examples from the German Mountain and Ski Guides Association (“Verband Deutscher Berg und Skiführer” or “VDBS”).
You can see more interesting VDBS approved anchors at this article.
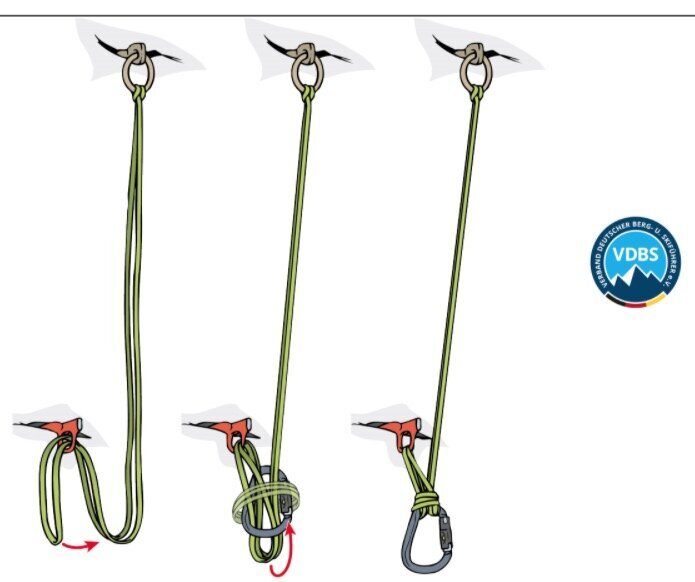
IMAGE CREDIT: CHRIS SEMMEL / VDBS

IMAGE CREDIT: CHRIS SEMMEL / VDBS

BD Gridlock with Grigri - are you using it wrong?
The Black Diamond Gridlock carabiner is designed to minimize cross loading. When using this carabiner with a Grigri, Black Diamond recommends that you clip the wide part of the carabiner to your harness, and the narrow end to the belay device: opposite the normal way you would use a carabiner.
The Black Diamond Gridlock is a popular belay carabiner, because it has a clever mechanism that (in theory) prevents your carabiner from being cross loaded. You would think the narrow end with the clip around it should always be put in your belay loop, right?
Apparently, not always. At least, that what Black Diamond says.

Lucky for you, the Alpinesavvy web gnomes actually read instruction manuals from time to time, even for carabiners.
The following is a screen grab from a PDF from the Black Diamond website, which you can see here. (You'll either need a magnifying glass or hit “control +” on your keyboard about seven times to make it big enough to read.)

image: blackdiamondequipment.com
Check out the first two diagrams. With the tube style belay device and a munter hitch, Black Diamond wants you to clip the carabiner in the logical way, with the small side toward your belay loop.
But look at the third diagram, with a Grigri. According to this, you're supposed to turn the carabiner so the small side is AWAY from your belay loop.
I don’t work for Black Diamond, so I can’t comment on the exact reasons for this. But, judging from the last diagram on the right, it appears that cross loading is a concern. Keep in mind the whole point of using a carabiner like this is to avoid across loading . . .
(And yeah, it’s a bit odd that BD is telling you how to use a belay device made by Petzl, but that’s a different conversation.)
Alpinesavvy offers ideas and information, not advice. If you use a Gridlock carabiner with a Grigri, consider yourself informed as to what Black Diamond wants you to do. Following manufacturer recommendations is usually good practice. But, you're free to use your belay device any way you like.

How to tie an improvised aider with slings
Need to do some improvised aid climbing to get past a tough section of rock? When the summit is more important than style points, here's a way to tie an improvised aid ladder out of a double and single length sling.
Variations of this have been around since pretty much forever, but the subtleties of putting the bar tack at the bottom and offsetting the top step are from the excellent aid / big wall book, “Hooking Up”, by Pete Zabrok and Fabio Elli.

Need to pull a few a few moves of “alpine aid” to get past a difficult spot? (There goes your onsight, sorry.)
Maybe it started raining, the rock is wet and slippery, and you decide that the best way to continue going up is the aid climb rather than free climb.
How about quickly making a “ladder” to help someone climb over the lip of a crevasse?
Here's how to quickly make an aid ladder out of two slings. (If you don't have a 120 cm sling, you can do the same thing with three 60 cm slings.)
While a skinny Dyneema sling works, it’ll be easier on your feet to use a wider nylon sling if you have it. (But hey, this is improv, use whatever you’ve got.)
Even if you have to make a few aid moves in a row, you should only need one aider. Basic sequence: Place some gear, clip the aider to it, climb up the aider steps, clip a carabiner or quickdraw from your belay loop to the gear and hang from it (aka fifi hook), remove your aider, repeat as necessary.
1 - Start with a 120 cm sling. Put the sewn part on the “bottom” of one half of the sling. The bar tacks cause the sling to open up a bit when it's hanging, making it easier to step into. It helps to actually put your foot in the sling and step (gently) on the bar tacks, to keep them in the right place and put a bit of tension on the sling as you do the next steps.
2 - Tie an overhand knot in the sling, about at the midway point.

3 - Pull down some sling material to make the top step offset a bit (this makes it easier to step into) and tie a second overhand knot, making a very small loop. The second overhand knot keeps the top step open. You could stop here if you’re fairly short and/or have great hip mobility. However, adding one more step to the aider makes this work much better.

4 - Girth hitch a single length 60 cm runner into the top of the double runner. Try to keep the bar tacks on the bottom as shown. Tie another overhand knot as before, with a little bit of extra material on one side, making an offset loop.
Schweeeet! Now you have a three step aider, and it's hopefully long enough for you to reach to clip a high placement and still reach the bottom step with your foot. If it's still a bit short, clip a quickdraw to the top to extend it a little bit.


What’s “nose hooking” a carabiner?
A “nose hooked” carabiner can fail at an extremely low load. Fortunately it's easy to notice and fix, so be aware of this potentially dangerous situation.
Nose hooking a carabiner is about what it sounds like: getting the “nose” of the carabiner stuck on a bolt hanger, stopper wire or webbing without the gate completely closing. Carabiners are extremely weak in this orientation and can break in a very modest fall or even bounce testing.
If you ever see a carabiner in this configuration, stop and fix it immediately.
Black Diamond did some testing on this, and carabiners failed as low as 2 kN, YIKES! (Side note, if you're a gear nerd and like to read about gear testing, the Black Diamond QC Lab Archives has some interesting reading.)
Nose hooked carabiner on a bolt hanger.

Nose hooked carabiner on a sling.

Fortunately, there’s a solution: use a keylock / notchless carabiner. The smooth, notchless nose makes it almost impossible to nose hook.
Just about every modern solid gate carabiner is made like this, but many wiregate carabiners are not. A few wiregate carabiners are notchless: the Camp Dyon, Wild Country Helium, DMM Chimera, and Petzl Ange (below) to name a few.

Petzl Ange notchless wiregate carabiner
And, related to this, is the reason why the top carabiner in a quick draw must be allowed some rotation in the dogbone sling and not used with any sort of a rubber device like a Petzl String. The rubber device can prevent the top carabiner from rotating and result in nose hooking or (below), levering the carabiner at a bad angle .

image: https://www.petzl.com/US/en/Sport/STRING--installation-and-precautions?ActivityName=rock-climbing

Bounce test to learn gear placement
Learning how to place rock gear, and want a little assurance that your pro might be able to take some real force? You can learn a lot without getting more than a foot or two off the ground by bounce testing at your local crag.
Starting out learning to place trad gear and build anchors? It looks like a decent placement, but is it really going to hold?
A great way to build confidence in your gear placements (as well as get lots of practice using your nut tool) is take a page from big wall climbing: bounce test your gear.
While a bounce test is probably going to put between 2 and 3 kN on your piece, quite a bit less than the maximum force of about 6 to 7 kN it might see in a big actual fall, it can definitely boost your confidence that you’re placing your gear correctly.
The image below is a screen grab from a video from our friends at HowNot2.com, showing the actual force generated during a static sling bounce test.

image: HowNot2.com, https://www.youtube.com/watch?v=gq3_DfyHg1A&t=781s
You may hear advice of “go aid climbing” to learn how to place gear. You don't need to.
Not a bad idea, but it does require lots of extra stuff like a rope, a patient belay partner, and aiders, fifi hook, daisychains, and probably ascenders. You actually don't need any of that; you can bounce test and get the same learning pretty much standing on the ground.
What you need: base of a cliff area with lots of various sized cracks to place gear, a few slings, a decent trad rack (can maybe borrow from a good friend), and a cleaning tool. Optional but recommended: a hammer and eye protection/safety glasses.
How to do it: At the crag, make a placement that you can reach from the ground, and clip a sling or two to the gear. Extend slings as needed so when you step in it, it’s about knee level. (You want to keep your feet close to the ground, because if the piece pops out, that means you won't take much of a fall.)
Give it a decent tug.
Did it move? Does the rock on either side look solid? Good.
Now, carefully step into the sling, and give it your bodyweight. (If the placement is near or above your head, you might want to cover the gear with your hand. If the gear pops, it’s going to zing out somewhere in the neighborhood of your eye; remember those safety glasses?) Did the gear move it all? If not, sweet, probably a good placement.
Now, start hopping the sling with increasing enthusiasm. Did the gear shift a little bit and then hold? Might be OK, but probably could be improved. Did it sprout wings, fly out of the rock and almost hit you in the eye when you jumped on it? Definitely needs more work.
Be sure and bring a cleaning tool and perhaps a hammer, or at least a baseball sized rock or big hex, so you can (gently) beat on those welded stoppers to be sure you take everything home. (You might not want to bounce test a Tricam, which are notorious for being hard to clean after they’ve been weighted.)
Avoid doing this with a very small cams and stoppers, you can damage these with too much force if the placement is less than perfect. If you do use them, accept the fact that some broken gear might be part of the cost of learning.
It’s one thing to put in a piece of gear, look at it, and hope it’s well placed. It’s quite another to jump on it with enthusiasm and know with more certainty. If you have a more knowledgeable friend to work with on this, they can critique your placements.
This also works great for the more specialized placements needed for actual aid climbing. Break out the cam hooks, Talons, micro stoppers, funky cam placements with only two lobes touching the rock, maybe even a piton if it's appropriate to bang into the rock in your practice area.
Here's a nice short video that shows the basic technique. Here, it's demonstrated using standard big wall equipment such as aid ladders and daisy chains, but pretty much the same procedure can be done very close to the ground with a few slings.
Finally, here's a video from our friends at HowNOT2.com showing the actual forces generated from bounce testing. (it's a long video, start at 13:00 to see the testing part.)

“Rock shoe rejuvenator” - rubbing alcohol
There's a quick and easy way to revive your rock shoe rubber - Give it a quick scrub with some rubbing alcohol (and maybe sandpaper.)
Rock climbers love that incredible stickiness from a brand new pair of rock shoes. But when dust, chalk, grime etc. get slowly ground into the rubber, it seems like you never quite get back the “grip-tion” of new shoes.
Well, you can, or at least get pretty close. Wipe down your shoe rubber some rubbing alcohol. Do this outside, as the fumes can be strong. A rag works better than paper towels.
Some gentle buffing with 80 grit sandpaper or a wire brush can help rough up the surface and make your shoes a bit stickier as well. Give it a try before your next hard boulder problem or red point attempt; every little bit of grip helps!

Safety for leader #2 on sport routes
If you’re leading a sport route at your limit, having the first bolt clipped increases your safety by eliminating a ground fall. With this simple rope trick, the first leader can pre-clip the first bolt for the second leader.
Heidi and Hans are out for a day of sport climbing, and they both want to lead all the pitches. They don’t have a stick clip. Heidi, being the stronger climber, feels fine with leading without the first bolt being clipped.
But Hans is leading at his limit. He wants to reduce his risk by having the first bolt clipped, eliminating any chance of a ground fall.
Here’s a simple way to do that, with the one caution that you need to have a bit of extra rope.
Say Heidi leads the route first. She climbs the route, clipping all the bolts, clips the anchor, and calls for a take and lower.
On her way down, she clips a quickdraw to her belay loop and to the rope running through the bolts; this is known in some circles as “tramming”. Doing this keeps her close to the rope and gear, which is especially helpful on traversing and/or overhanging routes.
Note the quickdraw clipped to the climber’s harness and the rope in this nice diagram from Petzl. Perfect tramming technique!

image: https://www.petzl.com/US/en/Sport/Recovering-quickdraws-in-an-overhang-while-descending
She calls for a brief take at each bolt and removes all the quickdraws, except the one on the lowest bolt.
When Heidi gets to the lowest quickdraw, she does not clean it, but instead keeps lowering to the ground. Doing this keeps the rope through the lowest quickdraw.

image: https://www.petzl.com/US/en/Sport/Recovering-quickdraws-in-an-overhang-while-descending
Heidi unties, but keeps the rope clipped through her quickdraw. Hans pulls the rope. The rope zings through the top anchor and falls to the ground, but now it’s clipped to the first bolt. This gives a “toprope” to the lowest bolt for Hans on his lead, with no chance of a ground fall.
Using this technique can be more helpful in climbing areas that often have hard moves right off the ground, or have first bolts that are especially high, or both. (Smith Rock, I'm looking at you!)
Using this “tramming” method guarantees that the rope end will fall to the ground, every time. If the route is fairly steep, without any ledges, shrubs, or anything else the rope may get hung up on, you can probably skip doing the tramming. Just leave the rope clipped to the first quick draw, have the belayer pull the rope, and the end should fall to the ground and stay clipped to the lowest bolt.
But keep in mind, if you do this, and the end of the rope does not cleanly fall to the ground, you're probably going to have to pull it through that lowest draw, and it won't be clipped anymore, which defeats the whole purpose.
Safety notes:
Caution #1: Doing this requires you have enough extra rope that is twice the distance from the ground to the first bolt. If your route is a real rope stretcher, or the first bolt is really high, this technique might not work.
Caution #2: The belayer should always be tied into the end of the rope, or at the very least have a knot in the end to have a “closed rope system”. This technique takes a bit of extra rope, and you definitely do not want to drop your leader. One more reason to get a 70 meter rope . . .

A simple belay back up on multipitch
You're on a hard, multi pitch climb. The next pitch above the belay goes straight up, and you know it's going to be tough for your partner. Here’s a simple way to prevent a potential catastrophe.
Scenario: You’re on a multi-pitch sport route with your partner, and it's right about the upper edge of your abilities. You arrive at the anchor bolts for pitch 1, build an anchor, connect to it, catch your breath, and look ahead to the next pitch.
You notice two important things: 1) the moves to the first bolt on pitch 2 look pretty hard, and 2) the first bolt is straight above the belay anchor.
You start running a little “what-if” scenario in your head:
What if my partner starts to lead pitch 2 and falls before they clip the first bolt?
What if they fall directly onto me?
If this happens, can I keep control of the brake strand of the rope? (and no, you're not using a Grigri or other similar auto locking belay device, but you probably should be.)
No, you’re not overthinking this. This exact tragic scenario happened at Smith Rock sometime around 2005. The leader fell onto the belayer, the belayer lost control of the brake strand, and the leader then fell to the ground and died.
Here's a simple tip that can make the situation a lot safer.
After putting the leader for pitch 2 on belay, the belayer pulls up enough rope for the leader to reach the first bolt, ties a clove hitch, and clips the clove to the anchor as a backup “catastrophe knot.” If the second were to fall onto the belayer, and if the belayer were to lose control of the brake hand, the clove hitch would prevent the second from falling to the ground.
(Now, this is still a factor 2 fall onto the anchor, which is never a good thing, but at least the leader will never be dropped and fall to the ground.)
As soon as the leader clips the first bolt, the belayer takes a moment with one hand to untie the clove hitch, and continues to belay normally.
There’s another approach to lessen a potential harsh fall in this situation. The belayer could lower themselves a few meters below the anchor, the leader for pitch 2 could clip the anchor for their first piece, and then they head for the first bolt. Because of the belayer in the lower position means more rope out, and the leader already has a bolt clipped at the anchor, any fall before the first bolt will be less severe.
Keep your eyes open, look ahead, thanks, and have a few Crafty Rope Tricks.
Oh, and next time, please bring your Grigri.