

Alpine Tips

Big wall beverage holder
Here's a way to repurpose some gear at your big wall bivy so you’ll never spill that precious can of . . . prune juice.
This tip come from big wall ace Pete Zabrok and his excellent new book “Hooking Up - The Ultimate Big Wall and Aid Climbing Manual”. Highly recommended for aspiring aid climbers!
One of the more vexing questions for big wall climbers is, “Where da heck do I put my beverage?! The last thing you want at your bivy is spilling that precious can of . . . prune juice, but there is a serious lack of flat spots to put it. (An extra chalk bag, of course without chalk, also works well with this.)
Fortunately, resourceful big wallers came up with a crafty solution.


El Capitan "Gigapixel Climbing Routes"
This amazing photo project stitches together more than 2,000 images into one single, super high resolution photo of El Capitan. Add onto this redlining of routes and over 2,000 more photos of a climbing team going up the nose, and you have some serious rock climber eye candy.

This made the rounds in Yosemite circles a few months back, but it’s such an amazing photo project that it deserves a wider audience.
The photography wizards Eric Hanson of Blueplanet VR and Greg Downing of HyperAcuity created an extremely high resolution, zoomable image of El Capitan, complete with red lining of routes and a climbing team in action on the Nose. You just need to see this, click the button below, zoom in, and be amazed.
The technical details of how this photo was created go something like this: a high definition camera took about 2,000 images of El Capitan, and then the images were stitched together to make one single super high res image.
Then, all the climbing routes were drawn on the photo.
And to top it off, another 2,000 or so photos were taken of two climbers on a one day climb of the Nose route, and these were added to the photo.
You don’t have to have ambitions of El Capitan to appreciate the technical expertise, creativity, and beauty of this project.
And, if you do want to climb El Cap, this could be a terrific planning and route finding resource.
(For example, you can see in this photo exactly how far down you need to lower down of the Boot Flake to properly execute the famous King Swing on the Nose :-)


Two clever ways to transition from aid to free climbing
When aid climbing, the transition from your nice comfy aider steps into free climbing a few 5.6 moves can be surprisingly terrifying. After you know these two clever tips from big wall expert Chris McNamara, it's a LOT easier.
The transition from aid climbing to free climbing can range from slightly awkward to semi-terrifying, but with the right techniques it doesn't have to be. (I REALLY wish I knew about these techniques on my first couple of walls!)
Fortunately big wall expert Chris McNamara made a great YouTube video showing how it’s done.
There are two methods shown here.
Method #1: clip a sling and stand in it. This works well when you have a few moves of free climbing followed by more aid.
Method #2: clip the rope to your ladder, and leave your ladder behind. This may be a better choice if you have free climbing with no more aiding, such as when you’re approaching an anchor.
Aid to free transition #1 - Use a sling as a ladder
Place a piece as high as you can.
Clip a double length sling to the gear, clip a carabiner to the sling, and clip your lead rope into this carabiner.
Key move: step into the bottom of the double sling. The sling effectively becomes a ladder step.
Reach down, unclip your previous ladder, roll it up to get it out of the way and clip it to your harness.
Stand up in the double sling and start free climbing.
Aid to free transition #2 - Use a ladder as a sling
Place a piece as high as you can.
Clip ladder to the gear.
Clip a carabiner onto the ladder pretty much anywhere, and clip the lead rope into that as protection.
Step up in your ladder, start free climbing, and simply leave the ladder behind. This is easier if you don’t use a tether on your ladder.
You can reach down and remove your lower ladder before you do this if you want to, or simply leave that one behind as well.
Check out both these transition methods from big wall ace Chris McNamara.

Andy Kirkpatrick - Tips on staying alive on a big wall
British big wall expert Andy Kirkpatrick has some battle-tested advice for staying relatively comfortable on a big wall, even when the weather goes sideways. These tips are from his excellent book, “Higher Education” - highly recommended reading!
British hardman Andy Kirkpatrick has not only climbed El Capitan more than 30 times, he’s also climbed remote big wall expedition routes in some extremely cold and harsh conditions all over the world. He knows a LOT about staying warm and coming back in one piece.
Most of the tips below are from his excellent big wall book, “Higher Education”, definitely recommended reading if you want to climb the big stuff.

image: “Higher Education” book cover, by Andy Kirkpatrick
Some solid big wall / aid tips from Andy:
This is hopefully painfully obvious, but always bring a rain fly for your portaledge, no matter how cheerful the forecast.
Always try to stay dry, or at least as dry as you can. “You will always be wet in a storm, but there’s a difference between damp and warm, and soaking and shivering.”
If you’re already warm and dry, do everything you can to stay that way. That means, don’t leave your nice dry portaledge to go out in the rain and fix a pitch. If you’re leading and starting to get wet, really think through whether you should be pushing on in the storm, or retreating back to your dry ledge.
Even in summer conditions, bring clothing like you’re on a winter alpine route. When you’re hauling 100 kg of gear, and you’ve got a 170 liter haul bag, bringing some extra warm gear that you already own is really not that big a deal.
What kind of warm gear? Synthetic sleeping bag, (never down) with a minimum rating of 20 Fahrenheit. Long underwear, top and bottom, at least one pair of warm socks for sleeping, fleece top, Das Parka type synthetic belay jacket, balaclava, gloves.
Use a bivy sack over your sleeping bag, in addition to the fly on your ledge.
Do everything you can to keep your sleeping bag dry. It's your largest piece of warm “clothing” and last line of defense. If all of your clothes are truly wet, consider wrapping the sleeping bag inside of a bivy sack over you like a blanket rather than you being inside the bag.
Avoid getting into a dry sleeping bag with wet clothes. Change into dry clothes first, or take off all your clothes and get into your bag.
Bring a small sponge to mop up water and condensation.
If you know a storm is coming in, make sure you have everything you need in or accessible to your ledge, so you don’t have to go out in the storm and burrow through your haul bag.

2 tips for hot weather big walls
Headed to Yosemite or Zion in the summer to try a big wall? It’s gonna be HOT! Here are two lightweight and inexpensive things to bring to make your vertical camping trip a little more bearable.
This tip come from big wall expert Andy Kirkpatrick. Check out his excellent book on big wall climbing, “Higher Education.”
Yosemite valley or Zion in the summer can be a reflector oven on a big wall. If you find yourself in the heat, here's two easy ways to stay a bit cooler.
small folding umbrella
water mist/spray bottle
Between some instant shade and evaporative cooling, you can stay a lot more comfortable at that multi-hour belay.
And, that will give you some time to think about why most people like to climb in Zion and Yosemite Valley in the spring and autumn. :-)
If you're in Yosemite in the summer and want to climb, consider heading to the higher elevation Tuolumne Meadows area.

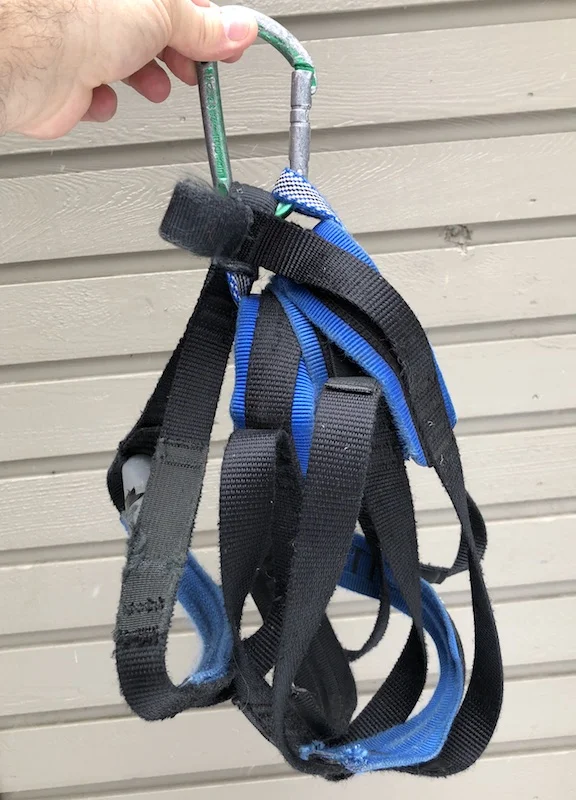
How to rack your aiders
Aid ladders always seem to be trying to trip you up. And when you're free climbing, you have to keep them tidy and out-of-the-way, but instantly accessible to transition back to aid. Here's a great technique to do just that, from expert climber Libby Sauter.
This tip was shown to me by Libby Sauter, expert climber and holder of the women’s team speed ascent of the Nose on El Capitan. Thanks Libby!
A good rule of thumb for just about any kind of climbing is never have anything hanging below your knees. So, what to do about those pesky aid ladders that always want to trip you up, when you're either gearing up at the base of the route, or transitioning between aid climbing and free climbing?
Here’s a crafty way to quickly roll up your aiders to get them out-of-the-way, yet make them instantly accessible to unroll when you need them. And if you do it right, there won't be any twists.
Take the second step of your aid ladder, and pass the hero loop under the step.
Repeat with the fourth step of the ladder, and again with the sixth.
Finally, clip the hero loop onto your aider carabiner. This should be a designated carabiner that always lives on the business end of your aiders.
You should have a nice compact bundle, looking like the photo below.
To deploy, just unclip the hero loop from the carabiner, and give a shake. The aider should fall down untwisted, ready to climb.
It’s a better show than a tell. Here’s a short video showing how it’s done.

Hauling directly from a Traxion pulley
Connecting your haul rope to the haul bags with a Micro Traxion (or similar progress capturing pulley) can make your life easier in a lot of ways. (Thanks to big wall expert Mark Hudon for this tip.)
Credits: This system is also known as the “far end haul”. I believe it was originally invented by legendary Yosemite dirtbag Chongo, and shown to me initially by Mark Hudon. Check out Mark’s great website for more on this.
Note the haul line going directly to the Petzl mini Traxion.
(Also note the haul line clipped in with a locker to the top part of the swivel as a backup.)
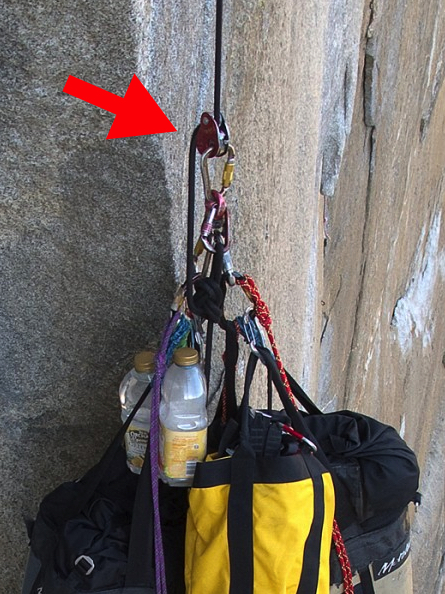
image: mark hudon
The traditional big wall set up to rig your haul rope to the haul bags is to pretty much connect them directly, something like this:
Figure 8 on a bight (or better yet, a butterfly knot, easier to untie after loading) on the end of haul rope
Locking carabiner
Swivel (optional but highly recommended)
Another locking carabiner attached to haul bag(s)
However, with the addition of just one more piece of (admittedly expensive) gear, you can make your life a whole lot easier in certain situations. All you do is add a progress capturing pulley, (aka PCP) like a Petzl Micro Traxion, to the locking carabiner upstream from the swivel, put your haul rope through that. Note that you set this up on the ground from the very first haul, and keep it on the system the entire climb.
Also note that you do not remove this PCP and use it as part of your hauling system, you need a separate PCP for that. (Yes, this sport is expensive . . .)
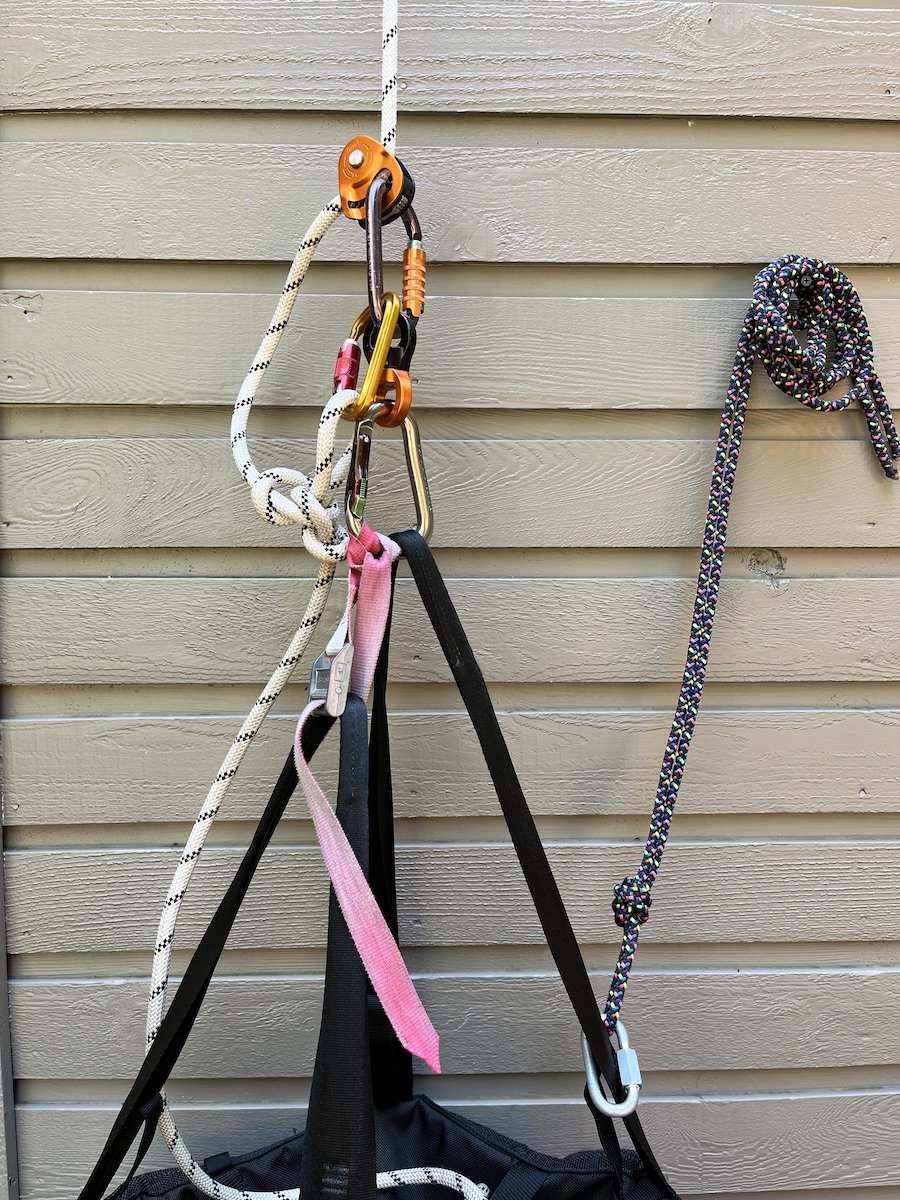
The rig looks like this:
Haul rope through Micro Traxion (make sure it’s threaded the right way, duh)
Micro Traxion to locking carabiner
Locking carabiner to top of swivel
Bottom of swivel to locking carabiner
Locking carabiner to haul bag(s)
Here’s a close up or one way to rig it. Note the haul line is clipped above the swivel with a locker as a backup to the Traxion. Docking cord is attached to the long haul bag strap with a quicklink.
No, the teeth on the pulley do not damage the rope. That was my first reaction, isn’t the rope going to get shredded? But nope, it does not. (You ARE using a burly haul rope with a stout sheath, right?)
About the only downside to this system is that you’re adding one more bit of gear that costs about $100. But the upsides can be significant.
Here's a fancier way to set it up, from big wall expert Skot’s Wall Gear.
Here, Skot is using a pair of rappel rings (gold) along with a combination swivel and locking carabiner (appears to be the Director Swivel Boss from DMM). This makes a more compact set up, with zero chance cross loading the rings. Sweeeeet!

PHOTO: @SKOTFROMTHEDOCK, HTTPS://WWW.INSTAGRAM.COM/P/C2NMW-BY0-3/
The far end haul
Having a Traxion on the load also lets you set up what’s called a “far end haul”, which at first seems like some sort of sorcery. The far end haul system allows you to lift your load with a theoretical 2:1 mechanical advantage (MA) by pulling on the “far end” of the rope, rather than from the primary anchor. Here's a detailed article on how to set it up, along with some how-to videos.

But, even if you’re not soloing, it has a few advantages.
You never again need to futz with the old school “water bottle knot protector” that slides up and down the haul line and gets in your way. If you don't have a knot, you don't need a knot protector, right?
You can pull all the extra haul line through the Traxion before you release the bags from their docking cords, and use the extra haul rope to lower out the bags. (Remember to tie that back up knot after you pull all the extra rope through the Traxion; it’s easy to forget this,)
You never have a loaded/welded haul rope knot to untie.
The far end haul can minimize rope abrasion, because the haul rope doesn’t move.
If you have to haul from a point or over a ledge with a LOT of rope friction, you can instead far end haul and have zero friction.
You can easily move the bags around at the anchor; more below.
Simply by redirecting the tail end of the haul rope through a higher anchor point, you can generate a 2:1 mechanical advantage to unweight the bags. This lets you do various shenanigans like transferring the docking cord from one part of the anchor to another. And I can tell ya, if you’re a beginning wall climber, you are just about guaranteed to have some flavor of anchor fustercluck that will require this, ask me how I know this!
If you didn’t have this set up, unweighting the bags once they are settled on the anchor is probably going to be a significant pig wrestle. You want to avoid pig wrestling whenever possible.
Here’s a video by wall ace Mark Hudon who shows exactly how to do this. Rather ingenious, no?

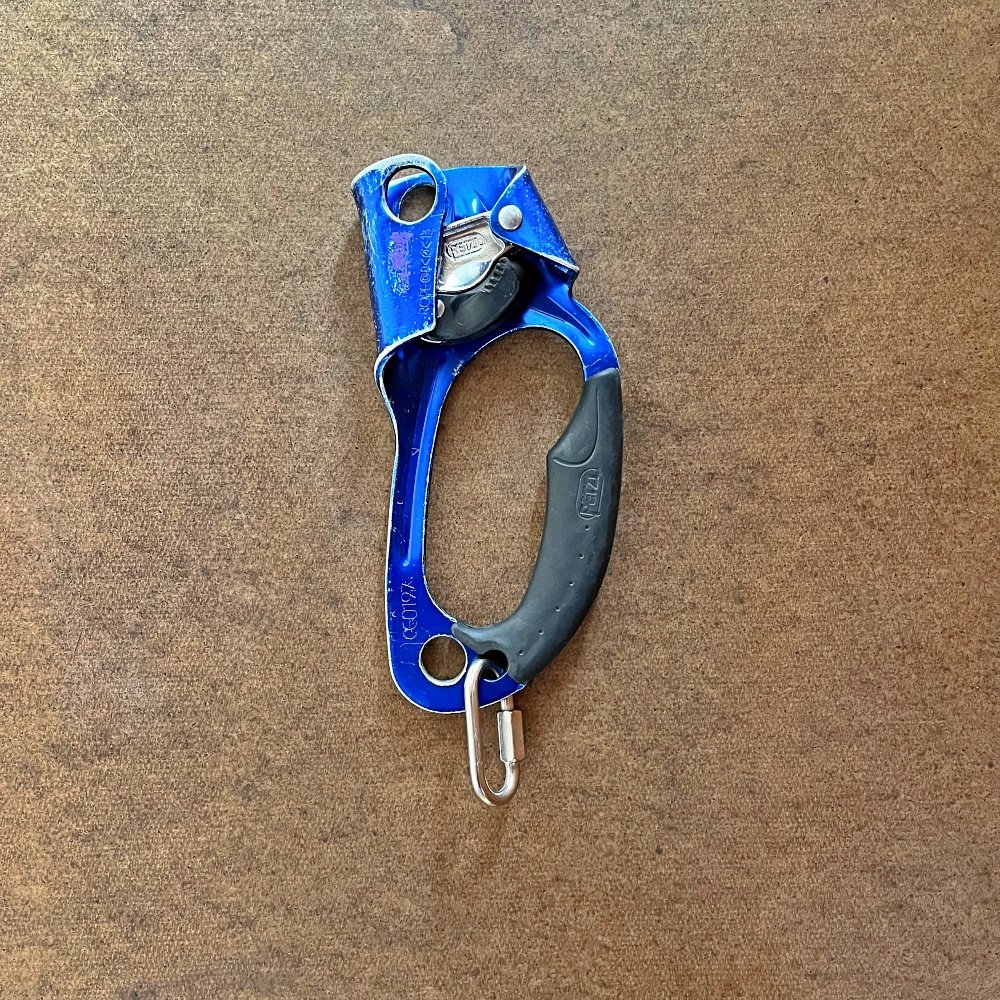
Ascender mod - quicklink in the small hole
Do you have an ascender with a pretty much useless little hole in the bottom? Yeah, so did I until I did this simple modification. Add a 5mm quicklink so you have a second carabiner attachment point, perfect for clipping your ladders.
Many styles of ascenders (the newer Petzl models being an exception) have two holes near the bottom. One is a big one that can fit a carabiner (or two), and the other is a small one that can’t usually fit a carabiner. This small hole can be used to tie a permanent tether from cord so you can’t drop your ascender, something more common on expedition-style climbing with a lot of fixed ropes. (Screen grab below from video about K2.)
Logical question: Why don’t ascenders have a slightly larger second hole so you COULD fit a small carabiner in it? I dunno! If anyone has the answer, please tell me.

image credit: youtube.com/watch?v=Ou3m2Ic4gFE
If you're a big wall climbing instead of on an expedition, here’s an easy enhancement you can do to make this little hole more helpful: add a small quicklink. This makes a handy second point of connection for a carabiner.
I use a Kong 4mm stainless steel link. Cost was about $6. These look pretty darn small, and are not rated or certified by any official CE of UIAA, but apparently the major access breaking load is 1400 kg, which is #SuperGoodEnough. These are a hard to find. I got mine at HowNOT2.store.
A 5 mm stainless link works fine as well. It is of course slightly bigger, and takes a greater variety of carabiner shapes. It also might inspire a little more confidence, so feel free to use 5 mm if you like =^)
Crank it down with pliers and add some Loctite thread locker if you have it.
For ascending and cleaning an aid pitch: use the large hole to clip your tether with a locking carabiner, and the quicklink to clip your ladder with a non-locking carabiner.
Of course, there are some other options to attach your tether carabiner.
Newer Petzl ascenders have one large hole in the bottom instead of one large and one small. This lets you clip both your tether carabiner and your ladder carabiner into the same hole.
You could also clip your ladder carabiner to your tether locker, but I find having them separated with a quick link is cleaner and less prone to twisting and other weirdness.
The foundation of aid climbing is having simple, safe, and easily repeatable systems that you don't have to think about too much. This is one small way to do that. Every time you are getting rigged to clean a pitch, you know exactly where your tether and your ladders get clipped.
Or, if you use a Grigri for an ascending system, you can put a pulley or a carabiner on this quicklink to give yourself a downward pull and a little mechanical advantage when you’re ascending.
Here's the set up for for seconding / cleaning an aid pitch. Tether and locker to big hole, ladder and non locker to quicklink. Simple, clean, easy to check.
This is one of several ways to do it; give it a try and see if it works for you.


The 2 to 1 “Z pull” haul, explained
On a longer big wall, with bigger loads, using mechanical advantage to lift your haul bags can be extremely helpful. Here's a deep dive into the 2 to 1 hauling system.
Credits for this idea, as best I can. The 2:1 Z pull haul is generally attributed to Chongo, a legendary Yosemite dirtbag who was famous for extended vertical camping trips on El Capitan with ridiculously large loads. Pete Zabrok, also no stranger to multiple week outings on the captain with huge loads, popularized it via a 2004 Tech Tip in Climbing magazine, and now climbers such as Mark Hudon have refined it further.
This technique is explained nicely in the comprehensive aid climbing manual “Hooking Up, by Pete Zabrok and Fabio Elli, highly recommended for all big wall climbers!
A few words on hauling, from the excellent book “Higher Education” by Andy Kirkpatrick.
“Hauling is potentially one of the most dangerous aspects of big wall climbing. This translates to ultra-caution in all parts of your hauling system and interaction with bags, haul lines, docking cords, and pulleys. If you rush and make a mistake, drop a load or have it shift where it's not wanted, you could easily kill someone or yourself. I try and teach climbers to view their bags as dangerous creatures, like a great white shark, rhino, or raptor that is in their charge. The ability to keep them calm and under your control comes down to paranoia, foresight, and heavy respect for the damage they can do.”
Think before you act. Before you connect or disconnect anything, always think a step or two ahead and anticipate what will happen and potential problems. “If I untie this docking cord, then the load is going to go there, and after that happens, I’m going to do this . . . ”
On big wall climbs taking two or three days with a team of two, you can probably use a traditional 1:1 hauling system. However, for climbs much longer than this, or a team of three, or when you or your teammate are significantly lighter than the bags, or if the hauling is on terrain less then vertical, or maybe when you simply want to suffer a lot less, you may well want to add some mechanical advantage. As the saying goes, you can work hard, or you can work smart. For a big load, a 2:1 haul is working smart. (If you’re taking a truly ridiculous amount of stuff and need a 3:1 or 4:1, you're probably an expert enough climber to figure that out on your own, so I'm not going to cover that here.)
Say you have a pair of haul bags that together weigh 200 pounds. If you rig a 2:1 haul, you (theoretically) can lift this load with only 100 pounds of force. The catch is, you have to pull twice as much rope in order to get the load to the anchor, but for many people that’s a fine trade off to make. Think of it this way: do you want to lift 200 pounds once, or 100 pounds twice?
Now, there is Google-load of information out there about 2:1 haul systems. But like most things on the interweb, especially discussion forums, the signal to noise ratio is not so great; you’ll have to wade through pages of the usual randomness to get anything worthwhile.
Well, good news you you, I’ve taken care of the sorting and sifting. This post is a summary of current (2020) best practices, clear photos, and some specific gear reccos for the 2:1 big wall haul.
I’ll be honest, the first time I saw this I found it pretty darn confusing, and wondered if it was really worth it. But once you get the components arranged correctly, and give a little thought to what is happening, and try some real world testing, you’ll get the hang of it. And, hopefully you will never have to use that all too common excuse for bailing, “The bags were too heavy . . .”
One of the best climbing diagrams ever made, IMHO. Drawing by Mike Clelland, first published in Climbing magazine (March 2004) article written by Pete Zabrok. Note, while the system has been refined in several areas since it was first published, this is still the core idea.
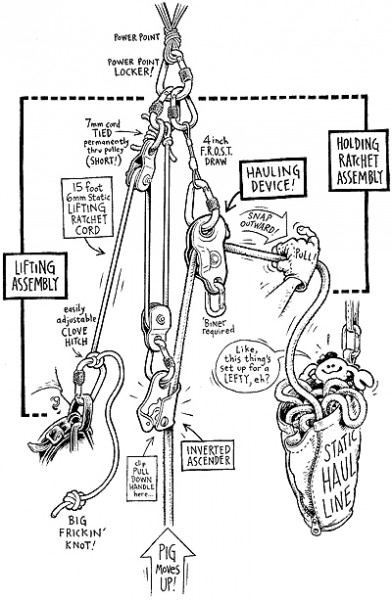
image credit: Mike Clelland
Big picture concepts:
Minimize stretch wherever possible
Use high quality/efficiency pulleys
Lift the load by doing squats using your body weight or pushing down with your legs, not by pulling with your arms
Practice a lot with real loads
Get it set up fast and haul the bags a few meters off the lower anchor ASAP so your follower can get to work
The basic set up is a 1:1 haul through a progress capturing pulley, such a Petzl Traxion. (This is a pulley that has a one-way rope grab on it like an ascender, that let you pull the rope through one direction but prevents it from sliding back.) Yes, these little suckers are expen$ive!
On the load strand of the haul line, you add on an entirely separate 2:1 lifting system. You raise the load with the 2:1 lifting system, and then pull the slack rope through the progress capture pulley.
In the rigging world, this is sometimes referred to as a “pig rig”, because you are “piggybacking” a 2-1 system on top of the main loaded rope. (And, that’s an entirely appropriate name for big wall climbing, because haul bags are affectionately known as “pigs”.)
General diagram of a 2:1 “pig rig”. (The black rope is the main static haul line. The gray cord is the 2-1 “Z cord.” Tilt your head to the left; it looks like a letter Z, get it?)
In the diagram below, the system is spread out over two anchors. It also works fine on one.
(Note: if you've taken a crevasse rescue or rope rescue class, you might think of a “Z drag” as being a 3:1 mechanical advantage. That is correct. However, in this case, the “Z” is a 2:1 system, with a change of direction pulley, as you can see below. Trust me, it's 2:1, don't let the “Z” in the name confuse you.)
Here's how it works.
The hauler pulls down on the gray cord, maybe by squatting in the harness.
This lifts the black rope, creating slack.
Pull that slack through with your hand, capturing the progress with the pulley on the right anchor.
Repeat!

Image credit: Andy Kirkpatrick, from his excellent book “higher education”
There are various ways to rig a 2-1 haul. Here's one.

Components
All parts live in a designated small stuff sack and stay clipped together between hauls, ready to deploy.
Large HMS locking “master point” carabiner
Short Dyneema dogbone quickdraw runner (hard to see in the photo, sorry.) Zero stretch, important! This could also be a large stopper or custom made metal quickdraw. This allows the carabiner and progress capture pulley below it (3 & 4) to rotate and align when pulling.
Locking carabiner
Progress capture pulley, here a Petzl Mini Traxion
The “tractor” pulley, so called because it’s doing the work
Quicklink, I think 8mm
Inverted ascender, here a Petzl Croll. Could be a Petzl Basic or similar small ascender without a handle.
The haulbag(s), aka “the pig”
Haul line, typically 70 meter, 10 mm, static rope
Handled ascender. Add this to the “pulldown” side of the haul line to make it easier on your tired wall hands. But remember, you want to be doing most of the hauling with your bodyweight and not your arms.
The Z cord - 7 mm cord, start with about 5 meters. If you find you have too much extra cord, trim some off. Could be a thinner 5.5 mm static spectra cord for a slightly more efficient pull. Be sure and tie a large stopper knot on the end to prevent your hardware from sliding off accidentally.
The “redirect” pulley, so called because redirects the Z cord downwards so you can use your body weight to lift. This pulley does not add any mechanical advantage. This should be a high quality pulley, see examples below.
Small loop of 11/16” webbing tied through the pulley. This webbing connection, rather than a carabiner, allows the redirect pulley to freely rotate and give a more efficient pull. It’s important to have this webbing loop small so the redirect carabiner is high, which gives you a longer, more efficient pulling stroke.
Not shown: Two carabiners with rounded cross sections on your belay loop. When you’re hauling, you can clove hitch the orange Z cord to both of these carabiners. Having two of them makes untying the loaded clove hitch easier. Old school oval carabiners work fine.
Another option is to clip an ascender with a stirrup of webbing or an aid ladder onto the Z cord, and pump down on the Z cord with your leg.
Here’s another way to rig this. Note the redirect pulley (orange) with an integrated swivel, smaller diameter static Z cord, a cable quick draw (zero stretch) and a Petzl Basic ascender. This looks a little simpler without the haul rope, but it's the same basic idea.
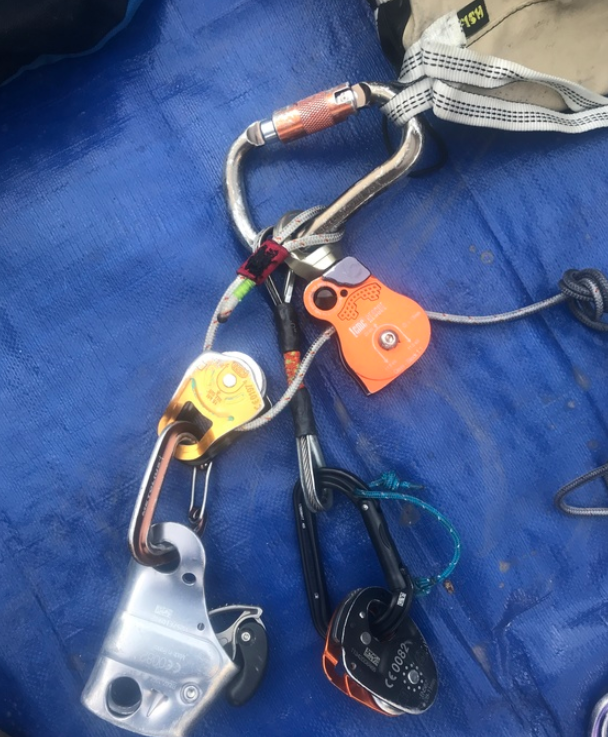
image: https://www.mountainproject.com/forum/topic/115790897/the-latest-greatest-21-hauling-kit
Side note: You might be tempted to use a rigging plate clipped to the master carabiner, because it has three things clipped to it and it's getting kind of busy. This would be a mistake. Reason being, that rigging plate is going to rock back-and-forth as it's loaded and unloaded on different sides, which will decrease your hauling efficiency.
Rigging plate - Do NOT use it in your 2-1 hauling system.

One of the beauties of the 2 to 1 haul kit is that you can set it up pretty much once, keep most of the components clipped together in the correct order, and leave it that way. It has its own small designated sturdy stuff sack (medium sized Fish “Beef Bag” works great). The haul kit is never taken apart, and is either being used or in the storage bag. Note that the hauling system hardware always stays clipped to the storage bag; can’t drop the bag if you do this.
Note that the leader does not have to take the haul kit up with them on lead. The leader can trail a tagline, and bring up the haul kit once they arrive at the anchor. Doing this saves weight and cluster on your harness. More on using taglines here.
At the belay, here’s what you do:
Build an equalized master point anchor from 2 bolts. (If the bolts look newish and extra stout, you can haul off just one, but I’ll leave that choice to you. Me, I like 2 bolts.) Use an “anchor kit” of several large locking carabiners, and maybe a pre-tied quad anchor or PAS that you and your partner can set up fast and the same way pretty much every time.
Clip the master point carabiner for the Z haul system to the anchor master point (or lone hauling bolt).
Run the haul rope through the progress capture pulley, engage the cam, and pull all the slack through the pulley. Then clip on the inverted ascender. Hopefully you have a rope bag; now would be a good time to start using it to stack the haul rope.
Extend your daisies or connection to the anchor so you are free to move. Find yourself a good stance and adjust the Z cord with the clove hitch on your harness. (Altenatively, clip an ascender to the Z cord, clip on an aid ladder, and press down with your leg.)
Start lifting your bags a few meters, so your partner below can get busy breaking down the anchor. (Once the bags have been lifted off the lower anchor, ONLY THEN you can take a break for a minute or two before you start the real hauling.)
A few notes . . .
As pointed out to me by wall ace Mark Hudon: Yes, you may be theoretically 2:1 efficient, but that can also mean 2:1 inefficient. Meaning, if you have 1 inch of slack in your lifting system, you’re actually losing 2 inches of lift with every stroke. When you push the lifting ascender down, be sure to Z cord comes tight to the clove hitch to your harness so there is no slack. Squat with your body weight. If you doing it right, there should be no pulling or lifting with your arms at all.
Practice, practice, practice with this system. Go find a retaining wall, a tree, a fire escape, an outside staircase, whatever, and load up a haul bag with water bottles or bricks or rocks, and really give it a work out. Which way should the master carabiner face (left or right off the bolt hanger) to be most efficient for you? Do you want to have the inverted ascender by your dominant hand or your weaker hand? How long exactly should the Z cord be? (This changes depending on your stance.) These are some subtle yet important adjustments that can only be found with practice. Taking the time to dial in your system will pay big dividends on the wall.
It's usually less energy to do more small squats than fewer big ones. Doing short little strokes might seem like it's gonna take forever, but you're probably going to expand less energy in the long run.
Ideally, you want your strong/dominant hand on the inverted ascender, and your weaker/non-dominant hand pulling the slack rope through the progress capture pulley. So, in the cartoon diagram at the top, and the labeled photo, this is set up for a left handed person. Experiment with this and see what work for you.
Ideally, both pulleys should be high efficiency, with sealed ball bearings with 1.5 to 2 inch aluminum sheaves/wheels. These will cost about $40 each, don’t skimp on these. If you have one pulley that’s better quality and/or has a larger diameter wheel, use this as as redirect pulley, and use the smaller or lower quality pulley on the tractor. The reasons for this get into some engi-nerd territory, but trust me, this is the best way to rig it. (But, don’t be a cheapskate, just spend an extra 10 bucks or so, get two high quality pulleys, and then it’s not an issue at all.)
When shopping for pulleys, go for quality from major manufacturers such as SMC, Petzl or CMI; they are used a lot by professional riggers and rescue teams. Look at the technical specifications. Stay away from cheaper pulleys that have plastic wheels (aka sheave) or bronze or nylon bushings. You want an aluminium sheave and sealed ball bearings. A small inefficiency in a pulley is magnified many thousands of hauling strokes over a single route, so the difference between say 70% and 80% efficient is significant. Fortunately you can have lightweight, high efficiency pulleys, you just need to buy the right ones.
Mark Hudon likes the 2" Single PMP and the Micro Single PMP, both made by SMC (Seattle Manufacturing Company). Some other good options would be the Petzl Rescue pulley or the CMI RP102.
Prusik minding pulleys (also known by the acronym of PMP) tend to be more expensive that regular pulleys. You don’t need a PMP in this system, because there are no prusiks.
When hauling, remove everything from your harness gear loops. You want to minimize extra weight when you’re repeatedly squatting and standing.
Bring a spare Z cord. If you're doing this over a ledge, the cord might get damaged. Bring a spare.
Practice will not only help you haul more efficiently, but it will help you get set up faster. This is important, because your partner can’t start to break down the anchor and begin cleaning until you haul the bags at least a meter or two and get them off the previous anchor.
If the leader wants to be extra courteous and helpful, they can break down the hauling kit when the bags are safely docked, package it back up in its stuff sack, and hang it on the first piece of gear for the next pitch, so the new leader can be sure and grab it. (If the second is using a tagline to pull up the kit when they need it, then no need to hang it on gear for the next pitch.)
Just like with any hauling system, you want to minimize friction in any way you can. If you have the option, build your hauling anchor as high up as possible, and try to eliminate or minimize the angle at which the rope may run over any rock edges. If the pitch is overhanging, lucky you. If you're pulling the bags up a slab, then you're theoretical 2:1 is going to act more like a 1:1. Prepare to suffer.
Wear gloves for big wall hauling. The Metolius 3/4 finger climbing gloves are great.

Here’s a video of Mark Hudon using this system to haul a big load on the first day on El Cap. Keep in mind Mark weighs about 130 pounds, but look at the great rhythm he has with the pull.

What size haul bag should I get?
There aren't a lot of manufacturers, nor whistles and bells when it comes to haul bags. The main choice is what size. Surprisingly, you can get a lot more room for a very small increase in weight and cost.
I think the short answer to this is the largest size that you can comfortably carry. If you're under about 5’5”, the larger bags are going to have shoulder straps and waist loops that may not fit your body very well.
How long are the walls you're planning to climb? Are you heading up a short outing in Zion National Park, where you're probably going to be on the wall for maximum one night? Then you can use a smaller bag. Or, are you heading up El Capitan on an outing of more than about three days? Then you probably want the biggest bag you can manage.
Haul bag sizing and pricing is kind of an interesting situation.
Let's look at Metolius, one of the most popular brands. Their largest two bags are called the El Cap and the Half Dome. (Costs are as of Feb 2019)
El Cap: 157 liters, weight 3.6 kg, cost $229
Half Dome: 125 liters, weight 3.4 kg, cost $219
So, for only $10 more money, and a weight increase of only 0.2 kg, you get an extra 32 liters of storage! For me, that's a no brainer. I'm getting the El Cap.
Below: the Metolius haul bag line up. From left to right, Half Dome is #3, El Cap is #4.
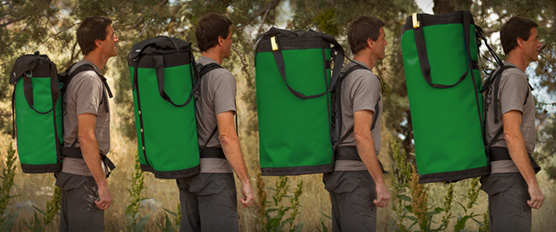
image: https://www.metoliusclimbing.com/haul_bags.html
Having some extra room in your haul bag, rather than packing everything into it like a Chinese puzzle, can make your life a lot easier.
And, of course, you don't want to fit everything in your haul bag anyway. For things like your portaledge, garbage bag, poop tube, wall bucket and your day bag, you probably will be using gear tethers anyway, like we described on this tip.