Alpine Tips
The brake knot for 2 person glacier travel
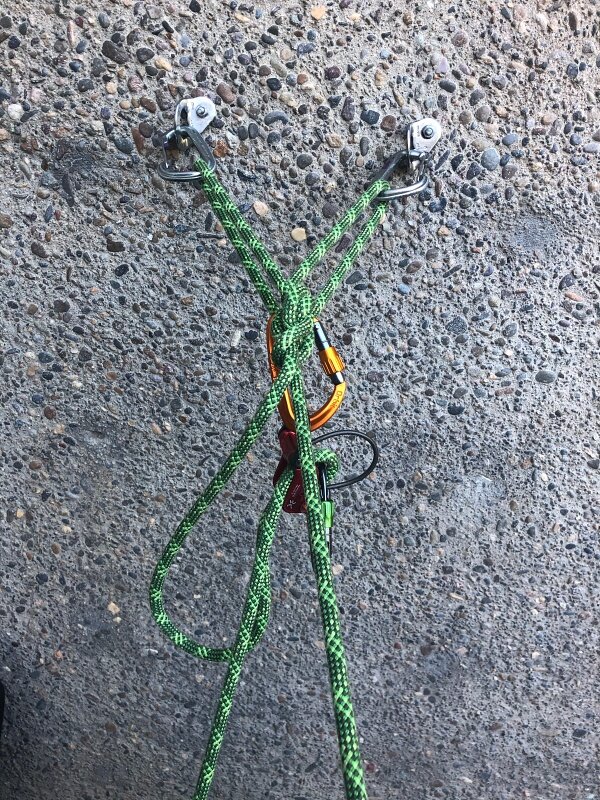
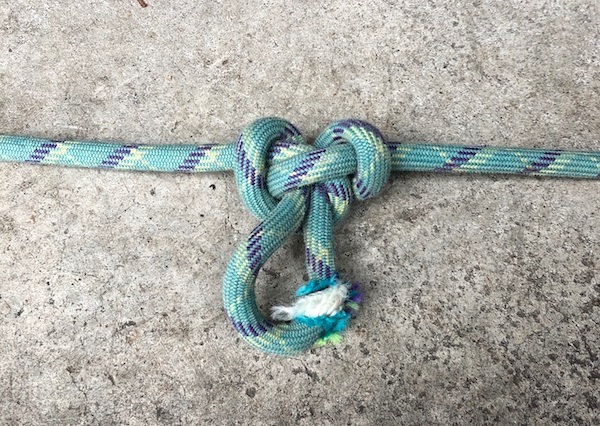
The brake knot, designed to add increased friction in the event of a crevasse fall, is the best choice for traveling as a two person team on a glacier.
For glacier travel, many experts feel that four is an optimum number on a rope team, with three slightly more risky. If you choose to travel as a two person team, each climber needs to be highly skilled in crevasse avoidance, crevasse rescue, and have all the necessary gear.
A two person team is harder, because stopping the fall and then trying to build an anchor with the weight of your fallen partner on your harness is a significant challenge.
Studies by ENSA (École Nationale de Ski et d'Alpinisme) or French National Mountain Guide School, determined determined that a few bulky brake knots in the rope between a two person team can significantly help with crevasse rescue, assuming fairly typical snow conditions on the surface - not completely bare, and not too loose and fluffy. The knots typically shorten the length of a fall, and make it easier for the person on top to hold the victim.
(On the flipside, the knots can complicate prusiking up the rope and rigging a mechanical advantage system, but the benefits of a shorter and easier to catch fall generally outweigh these shortcomings.)
The short version from ENSA:
“Our tests validated the effectiveness of this technique, and we strongly recommend climbers use it.”
IMAGE: HTTPS://WWW.YOUTUBE.COM/WATCH?V=QHW9AM7AHLA
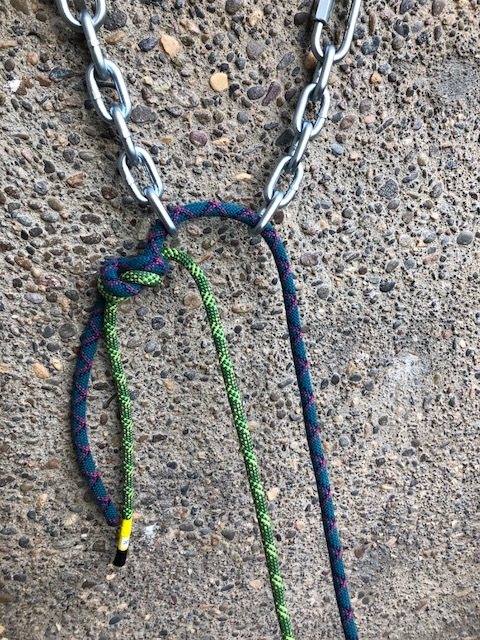
While a standard figure 8 on a bight loop or butterfly knot is effective, ENSA suggests using a “brake knot”. It creates a larger diameter, more spherical-shaped knot that offers more friction against the snow.
Here’s the method they recommend to tie the knot. Fortunately, it's a simple modification of the figure 8 on a bight, so it should be easy to learn and remember for pretty much anyone.
Tip - Don't make the loops too large, because this is just wasting rope.
Each brake knot takes about 1 meter of rope, so take this into account when setting your rope spacing. Tie the knots first, and then measure your 7-8 or so arm spans between climbers.
Start with a standard figure 8 on a bight, with a loop of about 1 foot.
Next, tuck the loop around the knot . . .
and finally, pass the loop back through the knot, then snug down each strand to dress it. The final loop created should be just a few inches tall.
The knot tying instructions starts at 6:20 In the video below, hopefully this link should take you right there.
And here's a nice video from Ortovox featuring some pro German guides who have much the same conclusion. It works!
Use the rope to make an anchor - 2 knots
If you're on multi pitch bolted routes, you may not need any anchor building supplies. The rope and a crafty knot or two are all you need.
Climbing multi pitch routes with bolted, side-by-side anchors? You might want to leave the cordelette and anchor slings at home. All you really need is the rope you’re attached to and two carabiners.
Many experienced climbers (like Peter Croft and Steph Davis) prefer this approach, because it's simple, clean, and requires less gear.
This can also be a good approach if the climbing is tough and run out right off of the anchor, and thus a greater chance for a leader fall to put a large amount of force onto the anchor and belay. Having the entire anchor made out of dynamic rope gives more stretch to the system and will lower the force on all the other components.
Because the leader is directly tied to the anchor, this generally works best of each partner is swinging leads every pitch. If you are not changing leads every pitch, it's usually easier to use a more standard sling or cordelette style anchor, because you have a single master point.
If you are going to use a rope anchor as described here, and are not changing leads, typically climbers will swap the ends of the rope at every belay. The easiest way to do this is to connect your harness to the rope ends with a figure 8 on a bight knot and two stout locking carabiners, rather than the standard rewoven figure 8 knot.)
Rescue geeks, I can hear you now: “But how are you going to escape the belay if you need to rescue your partner?” The answer is, yes, it’ll be a little more difficult, but you can do it. But, here’s a question to ponder - have you, or anyone you personally know, ever had to actually do this in real life? Climbers who use this method generally feel the simplicity, weight savings and lower cluster factor of tying in directly with the rope outweigh highly unlikely rescue scenarios.
There are many other options for using the rope to tie in directly. We cover one in another article, using just clove hitches, read about it here.
Here are two different knots you can use to tie directly to a two piece anchor.
1 - Bowline on a bight
This is my preferred technique. This is essentially a bowline knot with two loops rather than one. The knot is easy to learn, fast to tie, and easy to visually inspect to see if you did it right. You can adjust the size of each ear to equalize the anchor.
Typically, bowlines are not popular with many rope professionals for securing the end of a rope, because the knot can loosen up unexpectedly. However, in this application the bowline works fine, because the end is secured to your harness and can’t possibly pull through the knot.
John Long tried to popularize this in one of his rock anchor books about 15 years ago, but it never really seem to catch on. Too bad, it's a great knot. Maybe it was the cheesy name I think he gave it, the “atomic clip”. Just call it a bowline on a bight; that’s the common name and describes it perfectly.
Here’s a video showing how to tie a bowline on a bight.
Here's what it looks like, from the leader’s point of view.
You can clip your belay carabiner to the shelf (both of the loops to go to the bolts) to bring up your partner.
2 - “Bunny ears” Figure 8
This is a variation on the figure 8, familiar to every climber. This might take a little practice to tie neatly with no twists, and to get the length of the loops correct. This knot is popular with professional ropeworkers, who use it to secure one end of a fixed rope. (Tip: start with a larger bight than you think you need to, at least 2 feet.)
This knot has a cool feature of being able to slide the “ears” to two different lengths, to accommodate one bolt that may be a little higher than the other. This is actually sort of magical, you just need to play with it to see how it works. You need to do this when the knot is relatively loose. After you snug it down, the “slide” feature does not work.
One more thing: some people think that the bunny ears figure 8 is not redundant, meaning that if one strand were to be cut, it could conceivably pull through and the knot would fail. This has been tested many times and does not happen, so yes, the knot is redundant.
Here's a short article that covers it nicely, from Australian rigging expert Rich Delaney and Ropelab.
Here’s a video showing how to tie a bunny ears figure 8, by expert climber Beth Rodden. (She calls at the “super 8”, same thing.(
Here's what it looks like, from the leader’s point of view.
Same as with the bowline on a bight, you can clip your belay carabiner to the shelf to bring up your partner.
Try the "Super Munter" for lowering big loads
Need to lower two people at once on a rope, or some really heavy haul bags? The “Super Munter” hitch is an excellent choice.
The illustration and video in this article come from the excellent website RopeLab, run by Australian rigging expert Richard Delaney. RopeLab has a ton of great material for anyone who wants to dive into ropes, rigging, and mechanical advantage, check it out! There's a fair amount of quality free information, but getting an annual subscription unlocks the entire website. You can also connect with Richard on Instagram and his YouTube channel, where he has loads of concise, informative videos.
A variation of the Munter hitch is the "Super Munter", which adds a lot more friction and therefore control over your rope. It may not have much application in day-to-day climbing, but in certain situations, it is a very useful tool.
On a larger diameter rope, lowering extra heavy loads like haul bags or two people at once
On a smaller diameter rope, lowering a person or rappelling
Rappelling on a single strand, in any situation where you may want increased friction
I know, I can hear you now: “What about those evil twists that come from using a Munter hitch!?” Believe it or not, the Super Munter knot actually kinks the rope less, as one part of the hitch puts a kink in, and the second takes it out. (Granted, kinks in your rope it will probably be the least of your concerns if you use this during a rescue scenario, but it’s still a side benefit.)
Knots are always a better show than a tell, see the image below.
(Note in the image below, the brake strand ends up on the gate side, which is not optimal for a Munter hitch. If you tie it like this, be sure the brake strand does not rub against the carabiner gate.)
image: https://www.ropelab.com.au/munter-hitch
and here’s a video showing lowering 600 pounds with a super munter. (Starts at 2:30)
Uses of the butterfly knot
The butterfly knot is probably something you didn’t learn on day one of climbing school. But after the basics, it's a good one to add to your toolbox. Learn five climbing situations where the butterfly knot comes in handy.
The butterfly is generally not one of the standard climbing knots beginners learn, but it’s well worth learning once you have mastered the basics.
It's often referred to as an “alpine” butterfly, but I have no idea why. Let’s drop the “alpine” and just call it a “butterfly” knot, okay?
Photo: butterfly knot used to isolate a damaged part of the rope.
How is the butterfly knot useful for climbers?
The butterfly is generally easier to untie after it’s been weighted. Use it anytime you're significantly weighting a rope (like fixing ropes for a big wall, or tying off one end of rope for snow anchor testing or crevasse rescue practice.) Grab each of the "wings" of the knot and flex them back and forth to untie. Once you gain some experience with the butterfly knot, you may find that you use it to replace the figure eight on a bight in just about every situation.
It’s symmetrical and can be loaded on either strand. This makes it a good choice for the middle member(s) on a rope team. While a figure eight or overhand on a bight is acceptable for the middle person, it’s designed to be weighted in only one direction. As the middle person on a rope team, you don't know which strand will hold you in a crevasse fall.
It’s adjustable. If, after you make the initial loop, you decide it needs to be a little longer or a little shorter, you can feed the slack through the knot to adjust the size of the loop. (You can do this with a figure 8 on a bight, but it's quite a bit more awkward.)
It can be tied as a “brake knot” between rope team members for glacier travel, to help minimize the length of a crevasse fall. Any kind of crevasse rescue situation is more difficult with just one person doing the pulling, but if you tie a few knots in the rope between you and your partner, these can hopefully catch on the lip of a crevasse in the event of a fall, and minimize the length of the fall. (Yes, they can complicate the rescue, but that’s another topic.) Under the right conditions, this has been tested and proven effective. There is also another knot that has a slightly larger diameter called the brake knot, which may be preferable for two person crevasse travel, but the butterfly is acceptable.
It can isolate a damaged part of the rope. Through stepping on the rope with a crampon, an ice tool puncture, being loaded over a sharp edge or maybe rock fall, a rope might get some minor damage so you’re not comfortable using it anymore. With the butterfly, you can isolate the damaged part of the rope inside a loop of the knot and you’re good to go, with a near full strength and full length rope. (Now you need to figure out how to pass the knot while you are on rappel or belaying . . . but that’s a different topic!)
How about a directional / in-line figure 8?
This might be a useful knot in some sorts of rigging situations, but for recreational climbing I personally don't see a need for it. Anything the directional figure 8 can do, the butterfly can also do, so why bother?
That's not just my opinion, Australian rigging expert Richard Delaney feels the same way, check out the short video below.
And, because it's pretty much impossible to explain how to tie a knot in words, here is a short and sweet video from REI that does the job.
(It's not my preferred method, because this darn knot has probably more ways to tie it than just about any other, but it works fine. My advice: just learn one good way to tie this knot and don't confuse yourself with several.)
The Flemish bend for connecting two rope ends
The flat overhand knot (formerly known as the European Death Knot, or EDK) is a fine choice for general rappelling. But, if you’re rapping with an extra heavy load, toproping with 2 ropes, or just want a little extra confidence, here’s an excellent, easy-to-tie alternative.
The flat overhand bend (known for a long time with the now out-of-favor, tongue-in-cheek name of the "EDK", or "European Death Knot"), is a solid choice for tying together two rappel ropes.
Why is the flat overhand bend popular?
Quick and easy to tie
Easy to check if you tied it correctly
Strong enough, to do the job
As an “offset” knot, it tends to rotate and ride up over potential obstacles, like rock ledges, where many other knots might get hung up
But, let’s face it. Some people think it just looks sketchy. (How do you think it got that great nickname?) Doubters don’t care that 789,000+ happy rappels have been done on this knot with no issues; to them, it just doesn't look that stout. This can be especially true if you are tying it in Less Than Ideal (LTI) circumstances such as:
With two ropes of very different diameters, such as a 10 mm lead rope and a 6 mm tag line that you're using only to make double rope raps
With extra heavy loads, such as in a rescue situation, tandem rappel, or with a haulbag / heavy pack
Maybe when it's wet, dark, cold, or all of the above, and you just need a little extra mental boost to be SURE your rap knot is bomber
Or, maybe you have a scenario with a single strand, such as:
Big wall climbing, where it's common to have multiple single strands together so you can go up to a previous high point, or descend back to your bivy
Canyoning, where it’s common to rappel on a single strand
Rescue/retreat situation, when you tie two ropes together to descend a long way as quickly as possible, leaving the ropes in place to hopefully get later or be tossed by another team
Rappel situation down terrain where at least one person on the team can safely downclimb. Tie ropes together for all other team members to rappel, last person tosses the rope and climbs down unprotected
A knot that takes just a few extra seconds to tie, that uses a foundation figure 8 knot that every climber already knows, unties easily after loading, and can be a lot more confidence inspiring is called the Flemish bend, or a rewoven figure 8 bend.
(Knot geek terminology detour: a "bend" is the term for a knot that attaches the ends of two ropes together.)
This knot is fast to tie, works bomber with ropes of two different diameters, is easy to check if you’ve done it correctly because all climbers are familiar with a rewoven figure 8, can inspire confidence when doing a sketchy rappel, and super strong, even on one strand. And who doesn’t want a little more that sometimes?
Considering using the Flemish bend if you have a very clean pull for your rappel, without many obstacles. If your rappel is blocky and has potential places where the rope could get hung up, it's probably better to go with a flat overhand bend (or maybe a “stacked overhand”, which is simple 2 overhand bends tied next to each other) to minimize the chances of the rope getting caught.
Another perfectly fine option is the classic double fisherman's knot. I prefer the Flemish bend because it's faster and simpler to tie, easier to inspect, and easier to untie after loading.
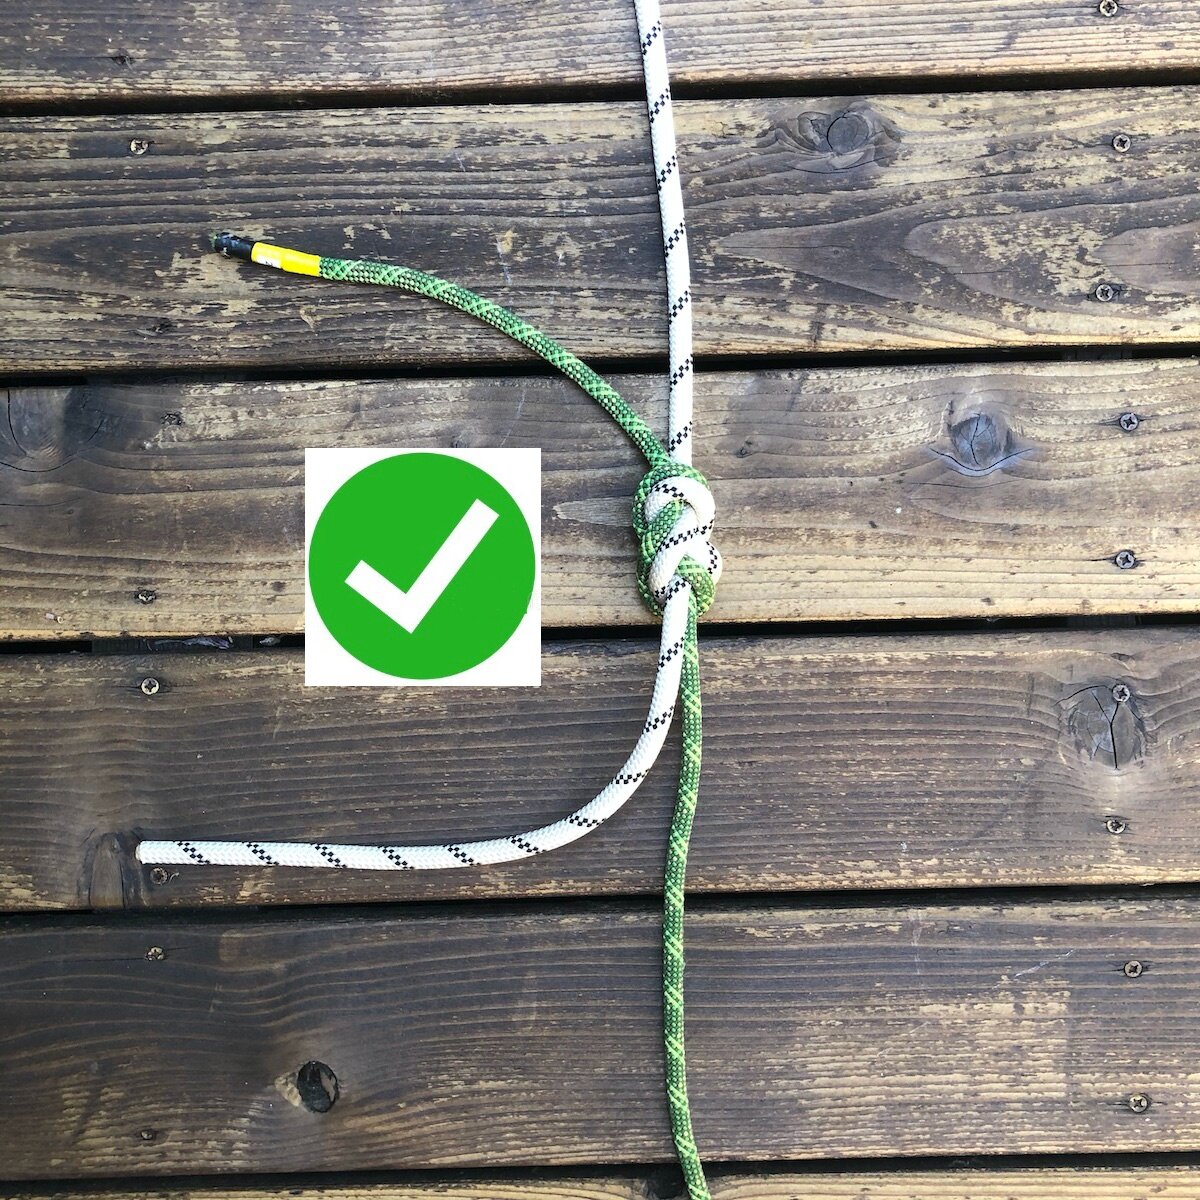
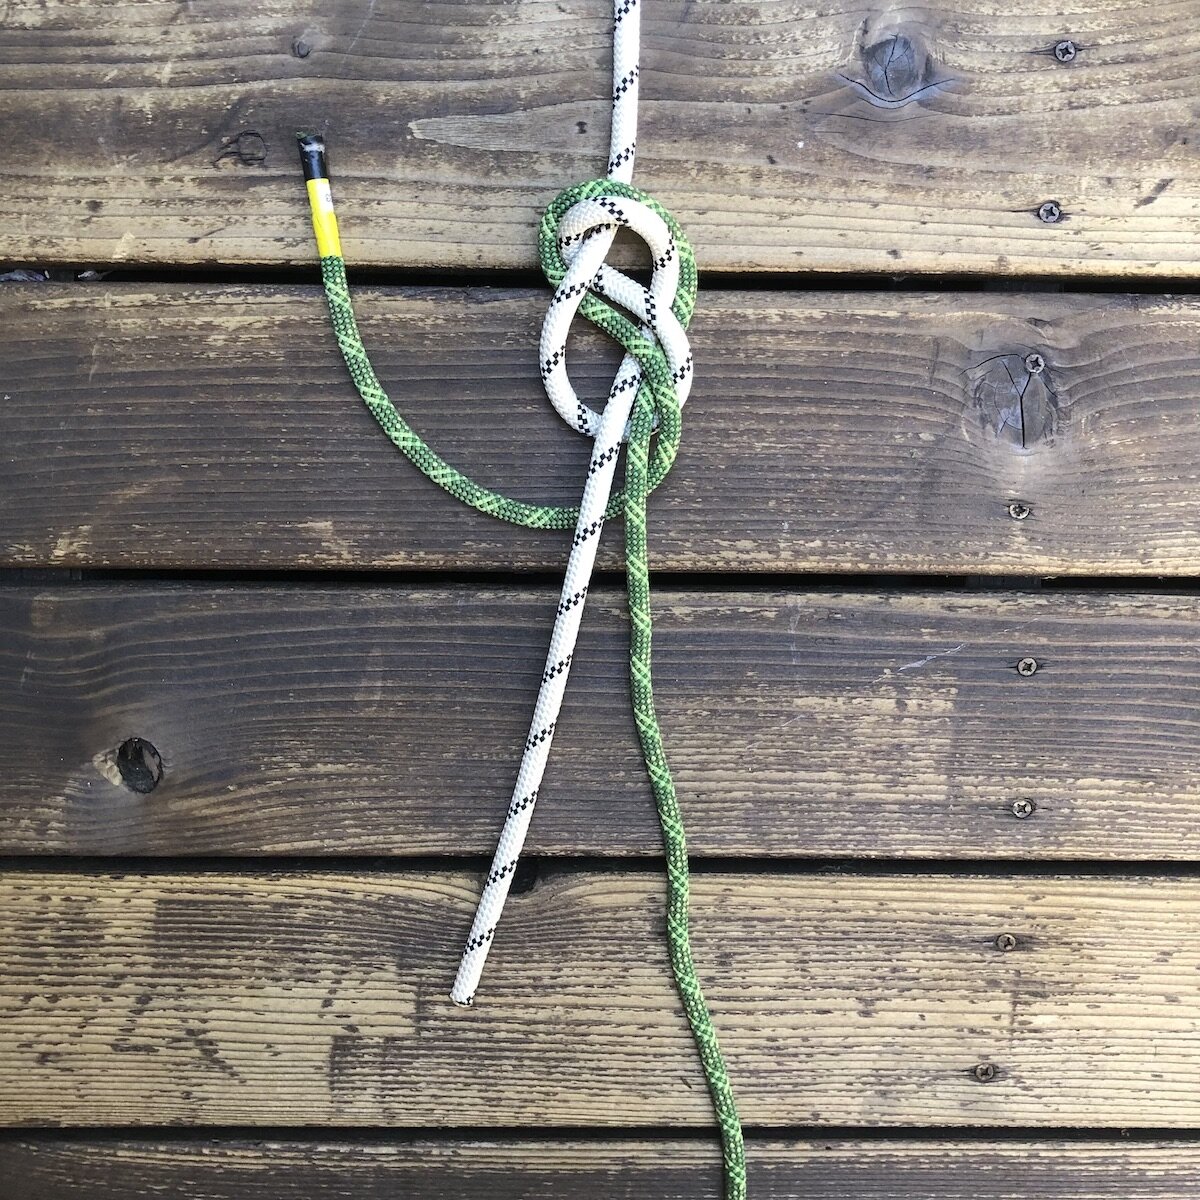
Important note: The Flemish bend is completely different than the flat figure 8 bend, which looks similar but has both ends of the tail coming out the SAME SIDE of the knot.
The Flemish Bend has the rope tails coming out of OPPOSITE SIDES of the knot.
In most parts of the world, it's considered best practice to not use the figure 8 bend. The knot can roll when loaded, has caused fatal accidents.
Apparently it is quite popular in the French alps, for reasons the rest of the world does not understand yet.
Here’s a study, from Tom Moyer, that shows the relatively low loads in which the figure 8 bend can fail.
So, let's learn how to tie it correctly.
Here's a nice video showing how. (The overhand backup knots are optional, I didn’t use them below.)
Step by step instructions:
1 - Tie a figure 8 knot near the end of one of your ropes, with about a 1 foot of tail - no longer.
2 - With the end of your other rope, start retracing the figure 8 knot.
3 - Continue retracing . . .
4 - Complete the retrace, and check for about a 1 foot of tail. If you're a little short, you can push through a bit of rope to adjust the length.
Important: the ends of the ropes should be pointing in OPPOSITE directions when you're done if you've tied it correctly.
5 - “Dress it and stress it”. Remove any twists and pull the slack out of all four strands, just like you would for a rewoven figure 8 tie-in knot. There we go, all snugged down and ready to rappel.
Is it a knot, hitch, or bend?
Does every climber need to know these definitions? No. But for the Type A personality, (which is probably most of us climbers) the difference between these three different terms is actually quite interesting.
Not all “knots” are true knots. Technically, a true knot is capable of holding its form on its own without another object such as a post, eye-bolt, or another rope to anchor it.
Example: Figure 8 on a bight
A hitch, by contrast, must be tied around something to hold together; remove the thing it’s tied to, and a hitch falls apart.
Example: clove hitch. Unclip this from the carabiner, and you don't have a knot at all.
A bend is a knot used to join two rope ends. Example: flat overhand bend
(Formerly known as the "EDK", or "European Death Knot"; let's not use that term anymore, OK?)
In practice, we use “knot” as an umbrella term to cover all these types, but the distinction is useful to know.
If the context makes it unclear what you mean, you can use the term “hard knot” to distinguish a true knot from a hitch or bend.
Shorten a sling with carabiner wraps
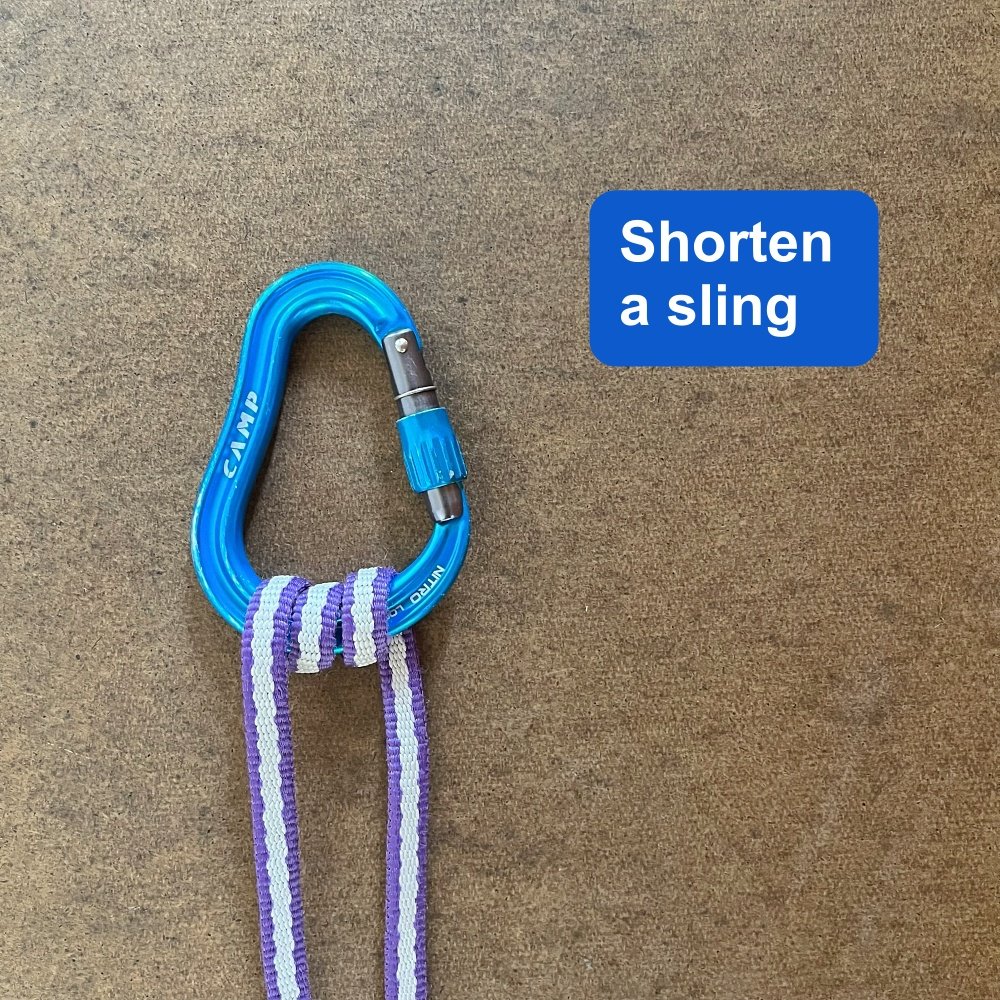
Sometimes, to better share the load on an anchor, it's helpful to shorten a sling just a centimeter or so at a time. Here's a nifty way to do it.
Often it's handy to temporarily shorten a sling or cord by just a cm or two, typically done when anchor building. Doing this can help fine-tune anchor load distribution by shortening the arm that's going to your strongest piece, adjust a cordelette if the direction of pull has changed a bit, or shorten one sling if the bolts you’re clipping are not quite in the same horizontal plane.
One easy way to do it is to simply wrap the sling a few times around the carabiner. With a skinny Dyneema sling like this, each wrap shortens the sling about 2 cm.
Probably best not to use more than two wraps. If you need to shorten your sling more than that, it’s probably time to rerig your anchor.
Other methods: put some twists in the sling, or tie a clove hitch.
Safety note: Don’t do this unless you're dealing with a completely static anchor. If you do this on lead the sling loops can loosen in such a way as to slip down over the gate and then when loaded can open the gate. That may be hard to visualize, but if you take the setup below, and jiggle it around a bit as might happen on a long pitch, and then just keep randomly loading it, one of those extra wraps could loosen up, slide around, and potentially open the gate.
2023 Update:
I’ve received a few frosty comments on this technique over the years, most of them saying something along the lines of “this is going to weaken the carabiner, because you're putting the load closer to the gate”, or something like that.
I was curious if this has any merit, so I had my buddy Ryan at HowNot2 test this. Guess what?
It DID NOT weaken the carabiner
It DID weaken the sling.
Ryan did two different break tests on this with a Dyneema sling. First test the sling broke at 12.4 kN, the second test is broke at 15.4 kN. The sling was rated (I think) 22 kN.
Would this be different with nylon? Probably. Is this concerning? Maybe. Does it concern me? Not really, because these numbers are still significantly higher than you're ever going to see in any recreational climbing situation. But it’s still an interesting data point that I wanted to share.
I don't think I can embed this short form YouTube video in my webpage, so here's a link to see it yourself.
Screen grab from Ryan's video is below.
Pros and cons of the Garda Hitch
The Garda hitch is an old-school method to make a one-way ratcheting knot. This can occasionally be useful for hauling a light load, and in some self rescue scenarios. However, it does have a few significant downsides, and there are some modern tools that can usually do the job better.
Do you need to haul a small load? Did you forget your Petzl Traxion or Tibloc? Might be time to break out the old-school Garda hitch, aka “alpine clutch”.
The Garda hitch is a one-directional, self-locking hitch that lets you haul, but lets you relax your grip when you need a break, capturing your hauling progress.
To haul, simultaneously pull UP on the load side of the haul rope and DOWN on the brake side of the rope. Don’t just pull down on the brake side, because the garda hitch adds a LOT of friction. An informal test I did with a spring scale and a 10 pound barbell weight showed it took about 60 pounds of pulling force to lift a 10 pound weight through a Garda hitch; just 17% efficient. That is terrible!
The Garda hitch can work (reasonably) well when you create slack from doing something else, and then pull the slack rope through the hitch. If the rope has any kind of load on it, it's going to be very difficult to pull through. So, be sure you lift UP on the load side, and not just pull DOWN on the brake side.
Locking the knot is simple: just let go.
A few notes:
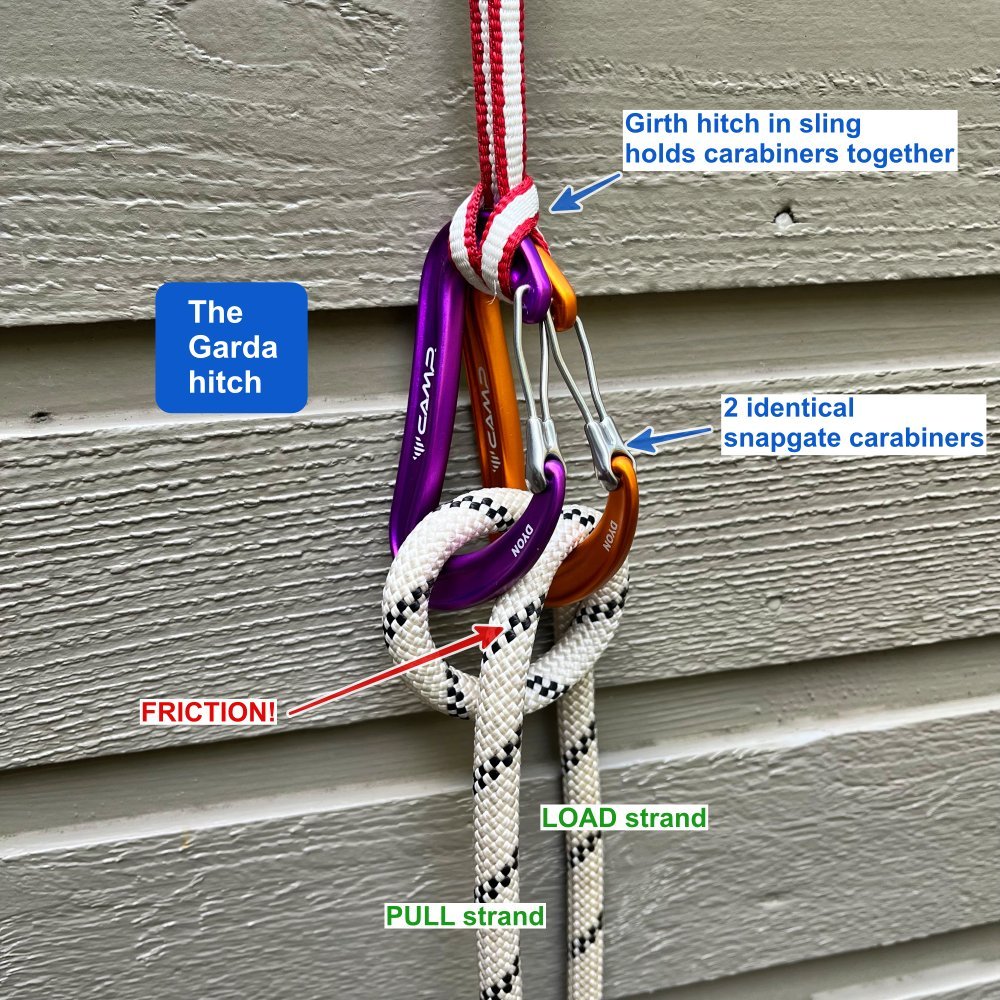
Ideally, use identical snapgate carabiners. Some people think it works better with oval carabiners, but personally I don't think they make much of a difference. Some people say only use D shaped carabiners.
Avoid locking carabiners with a sleeve, as the sleeves can prevent the rope from locking down properly.
Adding the girth hitch from the anchor sling is optional. In my experience, having the top of the carabiners held together makes the hitch better behaved. Try it with and without and go with what works for you.
While some sources suggest this can be used in a crevasse rescue operation as the progress capture, many folks think this is not such a great idea because the hitch can be a little squirrely if the carabiners are not properly oriented, it's very hard to release under load, and depending on how it's configured, it can add a LOT of friction to your hauling system. The few times I've used it, it's been for non-critical situations such as hauling up a backpack. (Having said that, I recently went to a crevasse rescue clinic taught by a pro guide, and he used a Garda as a progress capture in a 6:1, creating slack and then capturing it with the Garda.)
It's important to monitor the Garda hitch carefully. If you get a loop of slack rope above the carabiners, weirdiosities can happen and the entire thing can unclip itself! Yikes! (Another reason why I am not a fan of this for rescue purposes. )
Downsides to the Garda hitch:
Lots of friction. Yes I mentioned that, but it's worth mentioning again.
Very difficult to release under load.
A bit tricky to remember which is the load strand and which is the haul strand.
Depending on the carabiners used, it can be a little wonky and unreliable. Adding a girth hitch to squeeze the tops of the carabiners together, as shown in the previous photo, can help with this.
This hitch works best if the carabiners are hanging free instead of lying against the rock. When you start hauling, the rope will run along the spine of the carabiner, see photo below. If the carabiners are resting against the rock, it could have the rope rubbing against the rock, creating extra friction, or even do something weird to the carabiners or so they don't “lock” together as you expect them to.
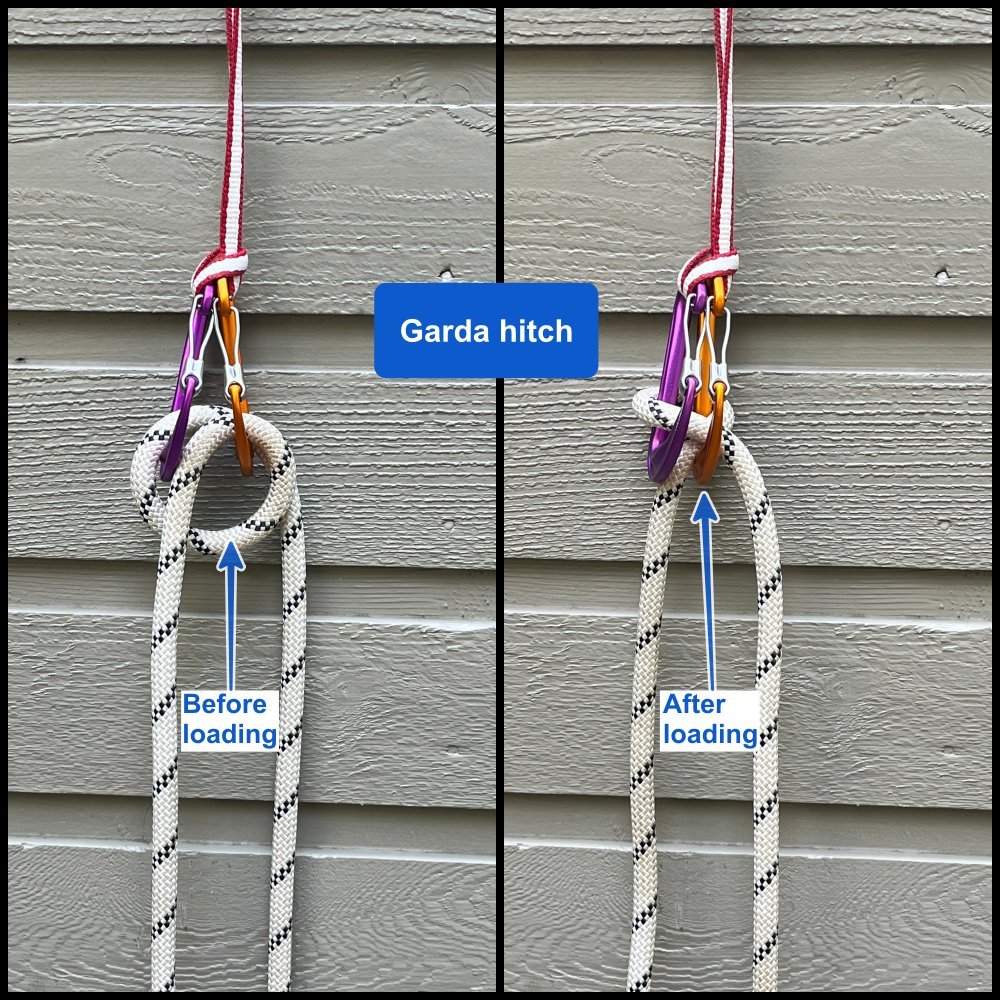
It usually flips after it’s loaded and looks completely different than how you originally tied it, which is a little unnerving! There is no other climbing knot that does this. See photo below.
Having said that, it can be used for crevasse rescue; in this case, to ascend a rope. Here's a great video on crevasse rescue techniques from some top German guides. Watch the video below, starting at around 3:15, to see the demonstration..
Here's how to tie it.
Start with two identical carabiners (non-lockers preferred) clipped to the anchor, gates facing down and out. Clip the rope through both carabiners.
In the photo below, the hauling rope is on the left (purple carabiner) and the loaded rope is on the right (blue carabiner).
in the haul strand of the rope on the left, make a loop as shown.
Clip this loop into the right side carabiner.
Done. If you've tried it correctly, the haul strand should be coming down between the two carabiners. Pull on this, and the load will come up. If you stop pulling, the load tensions the carabiners together, pinching the rope.


