

Alpine Tips

Tick removal made easy
Ticks. YUCK! I’ve heard stories of people actually going to the emergency room to have a tick removed, which is a little overkill. Here's a way to do it yourself. (Also works on your dog.)
Have a tick buried in someone’s skin (hopefully not yours)
Make a "lasso" slipknot out of dental floss, tighten it around the tick’s head, and slowly pull the little bugger out.

Ice axe + trekking pole for moderate snow ascents
Don’t ditch your poles when the going gets steeper and snowy. Having a pole and ice axe can be a great combo, especially when traversing.
Many climbers use trekking poles, but restrict their use to the approach trail or low angle snow. When the terrain gets steeper, most people put both poles in the pack and use only their ice axe. On moderate snow ascents, try using one pole in combination with your ice axe. Keep your axe in your uphill hand, and the extended pole on the downhill side. This is especially nice on traverses.
This technique has two benefits: One, you create a lot of additional stability with the downhill pole, adding greatly to balance and confidence. Second, once you get into the rhythm, you can lean a bit on the downhill pole and use some arm muscle to push uphill, taking some weight off your legs. Take some load off your legs, feel a lot more in balance, and climb faster - what’s not to like?
Here’s a photo of a climber traversing a moderate snow of about 35 degrees on the lower approach to the Cathedral Ridge route on the northwest side of Mt. Hood. Note the pole in the downhill hand, axe on lanyard in her uphill hand. She walks quickly, in balance, and the pole is there to keep her that way.

If you need any more evidence, here’s a photo of Ed Viesturs on the summit of Nanga Parbat, showing him with an axe in one hand and . . . you guessed it, a trekking pole in the other.


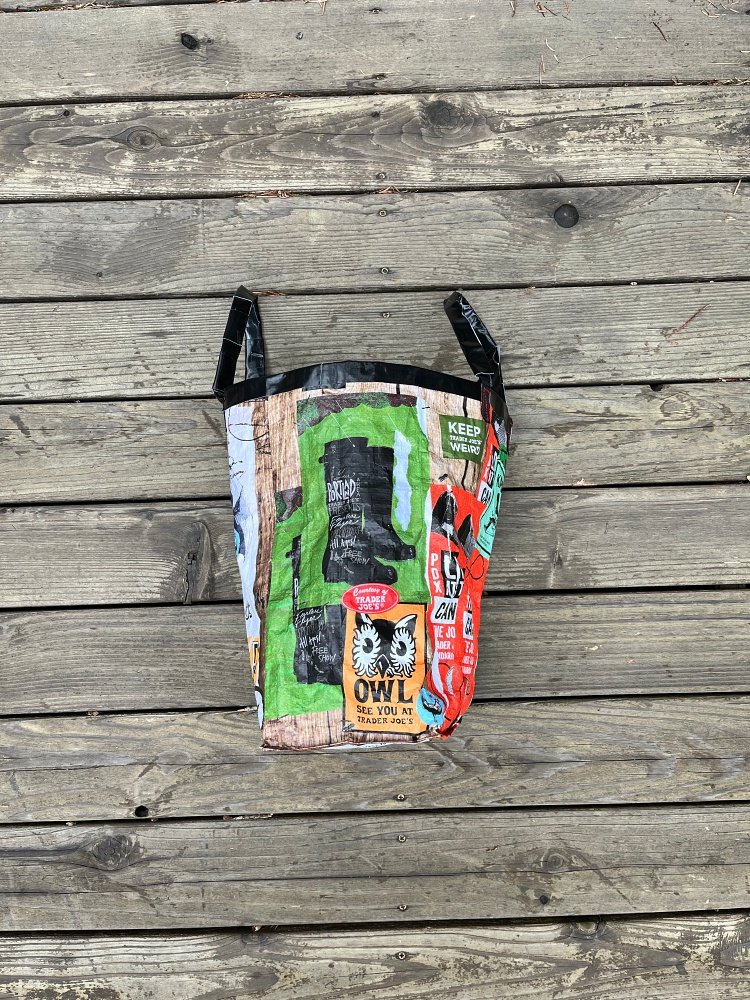
Use rope bags - decluster your big wall anchor
Having designated rope bags can keep your anchor a lot more organized.
Big wall anchors can turn into an incredible cluster if you don't stay on top of things and keep it tidy. An excellent way to do this is to keep the lead and haul ropes contained and feeding smoothly by using rope bags. It may seem like one extra bit of a necessary gear, but it can keep your big wall belays WAY more manageable and less tangled.
You have several options.
Low budget: Doubled grocery bags. Put one inside the other, Gorilla tape the handles together, and tape the two top edges together.
(This “double bag” trick is from the excellent big wall climbing book, “Hooking Up”, by Pete Zabrok and Fabio Elli, highly recommended for a big wall climbers.)


Metolius Big Wall stuff sack, size large.

image: https://www.metoliusclimbing.com/
Fish Gear makes some great rope bags. fishproducts.com > Product catalog > Big Wall
double and single Fish rope bags:

fishproducts.com

fishproducts.com

Aid climbing - bring a “beak” piton
Having a specialized “beak” style piton, even on an moderate big wall that’s otherwise hammerless clean climbing, can be a great secret weapon.
My partner and I were on the classic big wall route The Prow, on Yosemite‘s Washington Column. He was leading around the fifth pitch, which the route topo said had a few fixed heads. He was making pretty good progress, when the rope came to a halt and I heard a few mumbled curse words floating down.
“This friggin head has the cable broken off”, he yelled down. “Send up the pecker!”
I clipped it to the haul line, he pulled it up, and in a minute the rope started to thankfully move again.
When I was cleaning the pitch, I saw the spot that had stopped him cold. There was about a 8 foot section of blankness, with only a very thin crack and a copperhead with the cable broken off. The pecker saved the day - my partner had carefully looped it over the copperhead and stepped on through.

image: from the great aid climbing book “HOOking UP”, by Fabio Elli and Pete Zabrok
Even if you’re climbing an aid route cleanly, meaning without a hammer, having a “beak” style piton can come in very handy.
A beak piton (a shortening of the broader term bird beak) is a very thin piton with a V-shaped downward hook at the end. It looks a lot like a bird head, hence some of the clever names: Toucan, Tomahawk, Pecker etc.

Black Diamond Pecker piton blackdiamond.com
They’re designed to be hammered into extremely thin cracks, and have been a key piece of gear that have opened up many of the most cutting edge difficult aid climbs.
But, if hardcore A4 isn't your thing, having a beak piton with you even on a hammerless “clean” rated route (like C1, C2, etc) can be helpful.
Rather than hammering it into a very thin crack in traditional piton style, a beak can sometimes be gently hand placed in a very thin crack without a hammer.
In our case, hooking a beak over the top of the smashed in copperhead saved the day. If you come across this scenario even once on a route, it can stop you cold unless you have a way to get past it.
You can even place them in a shallow horizontal crack and use the tie off point near the head to minimize leverage. Granted, this is a creative and fairly uncommon placement, but it just might get you past that tricky part.
The Black Diamond Pecker is the one I have and it's great. It comes in three sizes, 1, 2, and 3. I suggest number 2. If you're going to be hammering them on a real aid route, be sure and tie a sturdy bit of cleaning webbing in the top hole. (Also, the steel cable that comes with the Black Diamond beaks is not very robust, so you might want to back that up with some webbing as well.)
The “Tomahawk” beaks made by Moses are another well regarded design. As you can see, these have a slightly different profile and a stout clipping loop.

image: http://mosesclimbing.us/home/tomahawks/
Finally, here's a great instructional video with some action photos and really nice animation showing how to use them in detail.

Lowering Out - Consider using a designated cord
Lowering out can be a bit nerve racking for the second, especially if you haven’t done it very often. Here’s a technique might speed up and simplify the process - use a designated lower out cord rather than the climbing rope.
This tip is from big wall expert Mark Hudon. See some more tips and El Cap Route photos at his website.

Monkey Face, Smith Rock Oregon, image credit: Wayne Wallace
Many aid routes have long bolt ladders, such as the first couple of pitches of Leaning Tower in Yosemite and Monkey Face (shown above) at Smith Rock Oregon.
If the bolts go pretty much straight up, cleaning them is easy. But if the bolts traverse, and/or the rock becomes overhanging, and/or (especially) if the leader decides to backclean, cleaning becomes more difficult. When you reach the offending bolt/protection you’ll know it, because of the sharp angle of the rope as it shoots off to one side.
As the second, you may curse your backcleaning leader with enthusiasm: You’ll be stuck at the bolt, unable to clean the quickdraw because of the rope tension pulling off to one side.
In this situation, the standard technique is to remove the top ascender/aider, reclip it above the piece, and weight that aider. In theory, this removes the tension from the rope below, letting you clean the gear. (It can be a LOT easier to do this if you have a Grigri, recommended gear for cleaning traverses.)
This works fine on moderate traverses, but not so well if it's more extreme. When the next clipped piece is 4+ feet to the right, because you’ll be left hanging in space, unable to reach the piece you were trying to get out. More importantly, your lower aider will likely have been sucked into the quickdraw in such a way that you will be unable to get it out without cutting the quickdraw . . . Plus, unclipping your ascenders and re-clipping them to tensioned rope heading off sideways can be a little tricky and introduces the possibility you didn’t re-clip them correctly, which could be a Big Problem.
For a shorter lower outs, or for cleaning a roof or a traverse, consider this: use a designated short lower out cord.
Note that on a lower out, you leave the gear behind. So, it works best through a fixed point. If you're going to lower it through your own gear, better not go too far or you won't be able to swing back to clean it! (Just about every big wall climber makes this mistake at least once . . .)
Using a designated lower out cord like this can be especially helpful when climbing with folks relatively new to aid climbing, who may not have the more advanced following / cleaning skills.
The cord I like is a simply 5 or 6 mm cord, about 15 feet / 5 meters. This works perfectly for cleaning the bolts on Monkey Face as shown in the top photo, as well as roofs and traverses.
(Mark suggests using a longer length, about 40 feet / 13 meters for lower outs on big walls that are under about 20 feet. Much longer than this, you're probably better off using the climbing rope in the traditional manner. Check the topo, and bring a cord of the appropriate length for the lower outs that you anticipate.)
Keep the cord bundled up out of the way on your harness until you need it. If the second knows that the pitch they’ll be cleaning requires a lower out, they can tie a figure 8 on a bight with the cord through their belay loop before they leave the belay. You should be looking at the route topo and knowing that a move like this is coming up, right? If you see the leader doing a pendulum, or maybe even a couple of horizontal hook moves, you should anticipate having to do a lower out.
Here’s a much better way to clean a traversing bolt ladder.
Once at the lower point (which is some sort of permanently fixed gear, like cord/webbing, bolt with hanger, piton, stopper. etc), here’s what you do:
Tie your lower out cord to your belay loop.
Clip a spare carabiner to your belay loop.
Attach a fifi hook to your harness. Yes, usually you only use a fifi for leading, but in some cases like this, it's pretty handy for cleaning as well. Just keep it on your harness all the time. (I prefer girth hitching it through the top tie in point.)
Note: in the photos, tethers, aid ladders and the often-handy Grigri are omitted for clarity.
If there’s a mess of old tattered webbing at the lower point, cut away the junk with your knife and leave only one good piece. If you don't, there's a chance your lower out cord is going to get stuck in the tat when you try to pull it. This is more likely to happen when you use the standard method with the rope, which involves passing ad pulling a bight through the lower out point, but still, do people behind you a favor and cut away the junk. If you want to be even more courteous for the next team, add a quick link or your least favorite carabiner.
Pass the free end of your lowering cord through the lower out point.
Tie a munter hitch on the lowering cord, and clip it to the free carabiner on your belay loop.
Hoist on the free end to pull yourself close in to the lower out point, holding your weight on the munter hitch.
This takes the tension off the rope you’re ascending, which lets you unclip the lead rope and clean the carabiner the leader probably left there.
Slowly lower yourself out with the munter hitch. You will hopefully now be hanging directly below the piece of gear the leader placed after they did the pendulum. Hopefully it was not more than about 7 feet away, because you can only lower yourself half the distance of the length of your cord. If you're not quite in the fall line, be prepared for a little swing. (Yes, this will be exciting!) Let go of the munter hitch, and pull your lower out cord through the lower out point and back to your harness.
Here's the basic set up, using an untied / open cordelette that's about 5 meters long. (It can be much longer, this short length was easier for the photo.) Tie the rope to your belay loop.
For clarity, the following photos don’t have the normal gear you’d need cleaning on a big wall, such as the lead rope, ascenders, aiders, daisy chains, etc.


Avoid trailhead theft with a “Climber’s Wallet”
Carrying your entire wallet and keychain on a backcountry trip is obviously unnecessary, but you also don't want to leave them inside your car at a sketchy trail head. Solution: the climber’s wallet.
Sadly, trailhead car break-ins happen from time to time. As you make plans to travel to remote areas, use some common sense when it comes to protecting your keys and cash. While leaving your wallet stashed in your car is not very smart, neither is lugging your entire keychain and wallet to high camp. Here’s a tip - minimize what you take on the climbing trip before you ever leave home.
Leave town with just a driver’s license, a credit card and maybe $40 in a ziplock bag. For keys, keep a house key and a car key on an additional key ring clipped to your larger key ring, so you can remove them easily for a climbing trip. Leave the other keys at home with the rest of your wallet.
(Tip: the amount of broken window glass on the ground at a trailhead is a good general indication of the safety of parking there.)
And, here's another preventative measure that some hikers have been known to use. Print out the following on a sheet or paper in large letters, and keep it on your dashboard when parked:
"Vehicle under video surveillance. Smile, so are you."
This will hopefully give anybody scoping your car a good reason to not mess with it. There are so many tiny and inexpensive video surveillance cameras out there these days, how do they know if you have one or not?
This is about all you need to carry when you leave the house for a hike or climb.


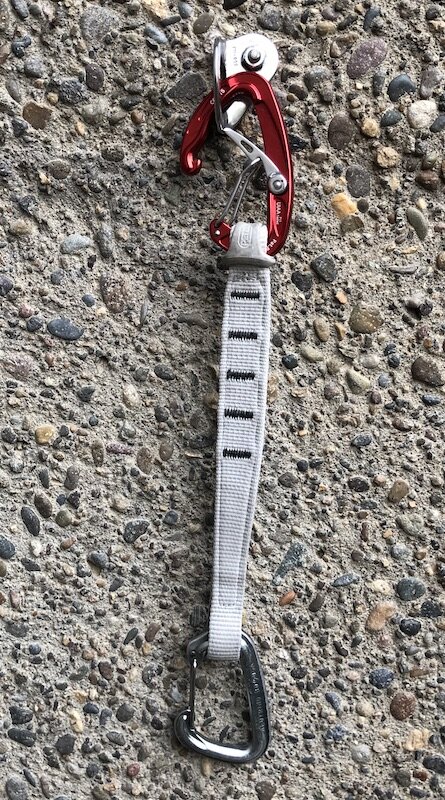
DIY - Make a “cheater” quickdraw for reachy clips
Does it seem like that bolt is always J U S T out of reach? How about aid climbing a bolt ladder that must've been drilled by somebody 7 feet tall? Here's your answer: the “cheater” quickdraw.
Are you feeling “height challenged” on some sport climbing routes, stretching on your tiptoes to clip that just-out-of-reach bolt?
How about aid climbing on a bolt or rivet ladder, where you’re sure the first ascensionist must’ve been Wilt Chamberlain’s big brother, because the dang bolts seem like they're 6 feet apart?
Here's your answer - the DIY “cheater” quickdraw.
It’s long enough to significantly extend your reach, and it has a magic carabiner at the top that clips a bolt hanger without you ever touching it. Here’s how to make it.
There’s two key items of gear you need to make the cheater quickdraw.
25 cm Petzl Express sling
Mad Rock Trigger Wire carabiner
The Petzl Express sling is wide, stiff, and sort of an old school looking “dogbone”. You want to use it here because it’s extra stiff from the sturdy webbing and wide bar tacks.
The Mad Rock Trigger Wire is a specialized carabiner that has a cleverly designed metal “trigger” that swings down and holds the gate open. Tap the little trigger into a bolt hanger and the gate immediately snaps shut. (Every time I use this carabiner I think of a mousetrap. =^)

Mad Rock Trigger Wire
Need to make one at the crag on the spot, without these two items? You can try taping two sticks to the webbing, and then prop the carabiner gate open with a twig. It might work, but then again, it might not. This is a fairly inexpensive project; the sling is about $8 and the carabiner is about $7, so it’s probably within budget.
(Kong makes a similar device, with the great name of “Panic”, but it’s about $40. I prefer $15, thank you very much.)
Note #1: Now, you can make this without using the Petzl Express sling. But most slings are not stiff enough to stand up on their own. If you use a different dogbone sling, you're probably going have to add some extra stiffener and some tape to the side of the draw to make it stand up properly. Try some plastic cut from a bottle. But hey, don't be a cheapskate, just get a Petzl Express draw and you'll be happy.
Note #2: Petzl draws come with a little u shaped rubber band thing (Petzl call it a “String”) that's designed to hold the bottom, or rope clipping carabiner, in place so it does not rotate. In this case, you need to use the “String” on the trigger wire carabiner, which is going to be on the top. This is not the ideal way to use the String, because it's possible that the gate can become unclipped or the carabiner can become loaded in a dangerous way, if the draw rotates as you climb above it. So, you should ideally swap out the stiffy draw with a regular one once you get up a little bit higher on your route.

Petzl string. image: http://www.gearexpress.com/petzl-string-10-packs.html
Note #3: If you can procure another “String” rubber band thingy, or even a stout DIY “rubber band” cut from a bicycle inner tube, add one of these to the bottom carabiner. This may give you enough extra stiffness so you don't even have to hold the draw, you can hold the bottom of the lower carabiner and give yourself about an extra 3 inches of reach.
Get this gear in Portland Oregon at Next Adventure. Support your local climb shop!
About to clip. Note the L O N G extra reach.

The trigger wire about to contact the bolt hanger . . .

and CLICK, you're safely clipped.

What's “shaded relief” on a contour map?
“Shaded relief” is a bit of cartographic wizardry that tricks your eye and brain into seeing the landscape in almost 3-D. It makes seeing terrain features like ridges and gullies much easier than with a standard topographic map. It's quick and free to print your own shaded relief maps with Caltopo.
Shaded relief, also known as terrain shading, is a very clever way to make contour maps appear more three dimensional. With shaded relief, terrain features such as ridges and gullies appear much more prominent and recognizable. The shading works some magic between your eye and your brain to make what you're looking at appear 3D. It's really quite amazing!
Below is an example of the Eagle Creek Trail in the Columbia River Gorge in Oregon. (The red line is the wilderness boundary.) This first map is from the standard USGS 7 1/2 minute topographic map, with no shaded relief. At first glance, most people will see this as pretty much a spaghetti pile, with no obvious ridges or gullies visually jumping out. (Yes, if you know a bit about reading contours you can probably make out some of the terrain features, but that’s a different topic.)

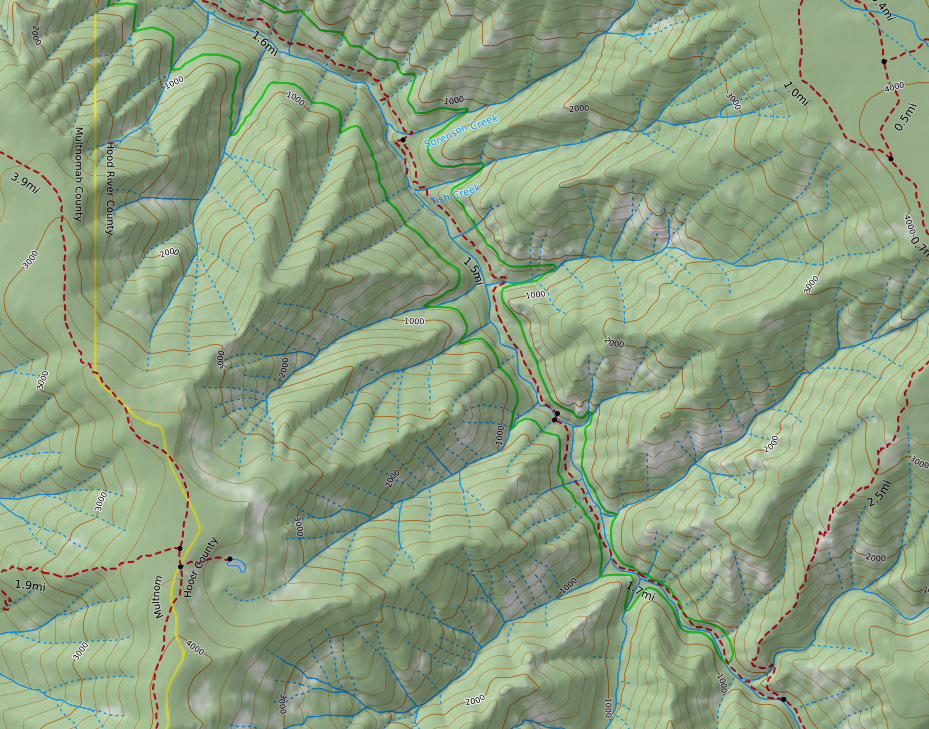
Now, here’s a screen grab of the exact same area, with about 20% shading added to the map.
Magic! Notice how the ridgelines and the stream drainages are much more obvious? Most people find this map MUCH easier to read.

Before modern mapping software, cartographers tried to achieve this by using hand drawn shading. This was incredibly labor-intensive, but achieved some beautiful examples of cartographic art. Here's an example of some amazing Swiss hand drawn relief shading, near Mount Everest.

Fortunately, mapping software today makes it easy to add with just a few clicks. Many commercially produced maps have some sort of terrain shading added, but it’s also easy to make your own maps for free that have this helpful feature.
Probably the easiest way is to use the terrific mapping software Caltopo. In Caltopo, a fast way to get terrain shading is to choose the map base layer called MapBuilder Topo, from the top right menu. This map layer is a great choice for any sort of outdoor recreation, as it has updated roads and trails, a little bit of vegetation shading, and terrain shading.
Learn to easily make your own maps like this with Caltopo from this YouTube video.
Here's an example of the same Eagle Creek area, made in CalTopo with the MapBuilder Topo layer. Note that the distracting red wilderness area boundary is now easy-on-the eyes green, and the red-dashed line trails are much easier to see.
Finally, let’s look at the old school USGS topo map one more time. Ask yourself - which map would you rather use? The answer should be pretty obvious.

Finally, here's a short video I made on how to do this in CalTopo.

Don’t use your compass in a car
A large metal object, like your car, and the delicate magnetic needle of your base plate compass, do not play well together. Read this cautionary tale.
It was about 10 years back, and I was driving some boondock road in Central Oregon.
I was on a dirt road that seemed to be running directly north south, but I was feeling a bit turned around. So I stopped the car and got out my trusty Suunto M3 baseplate compass, to make sure I was driving in the intended direction.
Sitting behind the wheel, I pointed my compass straight ahead, spun the dial to put red in the shed and . . . The compass indicated that the road was heading pretty much east/west! Very puzzling!
Then I had an idea. I got out of the car, walked to the other side of the road, and once again took a bearing on the road in front of me. The compass now showed the road running exactly north south, just like I thought. Keeping a close eye on my compass needle, I walked back toward my car. When I got a few feet away, sure enough, the needle started slowly moving randomly. As I walked around the car with compass in hand, that large block of metal continued twitching my compass needle.
So, here’s The Takeaway. Don’t use a baseplate compass intended for backcountry navigation inside or nearby your car or any other large metal object. (Compasses that come built into the car, such is the one that might be on your rearview mirror, are already calibrated by the clever Car Engineering Gnomes to be correct.)
And, related to this, avoid using the hood of your car as a place to lay out your maps, take bearings, and in general do any kind of work with your compass. It’s usually is the largest, flattest and most convenient place to look at a map. But as you now know, trying to do anything that involves the magnetic needle of your compass on the hood of your car is a Bad Idea.
What are some other metal objects that can interfere with your compass?
electric power lines
belt buckles
zippers
most any sort of electronics, especially cell phones and avalanche transceivers
Try this: Put your mobile phone flat on the table, and move your compass slowly toward it, especially near the bottom (speaker part) of the phone. You should see the compass needle swing dramatically.

Keep your tent fly all the way under your tent to avoid a waterbed
This one might sound like a no brainer, but so many people do this wrong - Keep your ground cloth all the way underneath your tent.
If you put a ground cloth under your tent that's larger than the tent footprint, then all of the rain that runs off your tent fly is going to be funneled underneath your tent. Not good, unless you like sleeping on a water bed, and testing the quality of your tent floor.
To avoid this, just set up your ground cloth so the edge of the tent, or tent fly extends beyond the ground cloth. Tuck the ground cloth in underneath the floor of your tent an inch or so if you need to.

Clean sport anchors by lowering - New AAC guidelines
When you finish a single pitch sport route, should the last climber rappel off, or be lowered? The debate on this can get pretty hot and heavy, but the momentum is swinging towards lowering. Read why and learn how here.
The sport climbing anchor debate of “should the last climber lower or rappel” debate has raged back-and-forth over many years. It’s not my wish to fan these flames.
But, shared here as more of an FYI, public service announcement, the American Alpine Club (AAC) has officially come out with the stance that they support lowering.
Summary of reasons:
Changing from one safety system to another (from belaying to rappelling), and the potential for communication errors regarding whether a climber is on or off belay, has contributed to many accidents. Here, the climber stays on belay the entire time.
The climber is never untied from the rope, which means they never have a chance to drop it.
No additional specialty gear, such as a rappel device, extra carabiners, daisy chain, tether, or PAS, is required.
The well intentioned rationale for rapping is usually to avoid putting wear and tear on the anchors, but the AAC calls this “. . . misplaced sense of stewardship that seeks to preserve anchor hardware.” Modern anchor hardware is extremely robust, and ideally meant to be easily replaced.
Here’s how to do it:
The second climber climbs the route, cleaning gear as needed.
The second climber arrives at the anchor, and clips directly to the masterpoint of the existing anchor. This connection can be made with either a quick draw, or a tether / PAS.
Remaining on belay, the second calls for slack, pulls up a large bight of rope, and feeds it through the anchor hardware meant for lowering.
The second ties an overhand or figure 8 on a bight, and clips it to their belay loop with a locking carabiner.
The second calls for “tension” or “take”. The second checks to see that they are being properly held by their belayer, the rope is threaded correctly through the anchor hardware, and their carabiner is locked.
The second cleans the anchor material from the bolts.
The second unties the rewoven tie in knot from their harness, and pulls the tail of the rope through the chains.
The second calls “ready to lower”, and lowers to the ground.
To clarify, this does not mean that a group of two or more should initially set up to top rope on the anchors. You should pretty much always do this on your own equipment. This scenario is only for the last person up the route, who needs to clean the gear and safely get back to the ground.
The AAC is certainly not saying that every sport climber should start to do this on all routes tomorrow, nor that it’s best in all situations. But for the AAC to make an official policy statement on this is a pretty big deal, many instruction schools and guiding companies are doing this already. So it’s important for the climbing community to be aware of this, regardless of your own thoughts on the matter.
Here's a nice graphic from Petzl that shows you the step-by-step:

image: Petzl.com
Here's a video from the American Alpine Club, showing this technique. The lowering procedure starts at about 3:10.
Here’s a nice video from AMGA Certified Rock Guide Cody Bradford, see how fast it can be?
While sadly Cody is no longer with us, his Instagram continues to stay up and is a great source of tips like this, check it out.
And here's a longer one, with IFMGA Guides, that goes over the steps in a bit more detail and a couple of different scenarios.

Dry out your tent after every trip
Don't you love that funky smell that old tents always seem to get after a few years? No, neither do we. Be sure and dry it out after your trip to keep it smelling fresh.
No matter how dry you think your tent is at the end of your trip, it’s always worth letting it hang for 24 hours in your house when you get home. Moisture can linger in strange corners of your tent, and it will soon create that unmistakable and hard to vanquish “moldy tent smell” if you don’t dry it out completely.
Never wash your tent in a washing machine, the agitator can damage it. Try handwashing with gentle soap in a bathtub, and air drying outside.
Read more detailed tent cleaning tips here.
This tip is from "1001 Climbing Tips" by Andy Kirkpatrick


Keeping track of a group in low visibility
Here are two simple and quick ways to be sure your team always stays together at night or in low visibility.
If it’s dark and/or a white out and you have a large group of people to keep together, here’s a couple of techniques. They might sound a little cheesy if you’re reading this on a bright sunny day, but each can bring peace of mind to the team, and some psychological comfort that everyone is part of the group and not isolated.
(Of course, the leader can remind people to take breaks when everyone in the group stops and not to randomly stop whenever they feel like it, which can easily lead to getting lost in the dark.)
1 - Assign everyone a buddy. After a break and when you’re ready to get going again, the leader calls out “buddy check”. Everyone on the team looks around and hopefully finds their buddy. If they see them, they don’t say anything. But if their buddy isn’t there, they give a shout to indicate someone is missing.
2 - Count off. Everyone on the team gets a consecutive number, and they shut out the number one at a time to make sure everyone is accounted for. Make one person the leader, “one”, so when they call “one”, everyone answers in order: “two”, “three”, etc.
This tip is partially from the excellent book "1001 Climbing Tips" by Andy Kirkpatrick


Try the "Super Munter" for lowering big loads
Need to lower two people at once on a rope, or some really heavy haul bags? The “Super Munter” hitch is an excellent choice.
The illustration and video in this article come from the excellent website RopeLab, run by Australian rigging expert Richard Delaney. RopeLab has a ton of great material for anyone who wants to dive into ropes, rigging, and mechanical advantage, check it out! There's a fair amount of quality free information, but getting an annual subscription unlocks the entire website. You can also connect with Richard on Instagram and his YouTube channel, where he has loads of concise, informative videos.
A variation of the Munter hitch is the "Super Munter", which adds a lot more friction and therefore control over your rope. It may not have much application in day-to-day climbing, but in certain situations, it is a very useful tool.
On a larger diameter rope, lowering extra heavy loads like haul bags or two people at once
On a smaller diameter rope, lowering a person or rappelling
Rappelling on a single strand, in any situation where you may want increased friction
I know, I can hear you now: “What about those evil twists that come from using a Munter hitch!?” Believe it or not, the Super Munter knot actually kinks the rope less, as one part of the hitch puts a kink in, and the second takes it out. (Granted, kinks in your rope it will probably be the least of your concerns if you use this during a rescue scenario, but it’s still a side benefit.)
Knots are always a better show than a tell, see the image below.
(Note in the image below, the brake strand ends up on the gate side, which is not optimal for a Munter hitch. If you tie it like this, be sure the brake strand does not rub against the carabiner gate.)

image: https://www.ropelab.com.au/munter-hitch
and here’s a video showing lowering 600 pounds with a super munter. (Starts at 2:30)

Avoiding burns in the backcountry
Fortunately there aren’t many ways you can suffer a burn in the backcountry. Here’s some easy ways to avoid it.
When pouring hot water into anything - cup, bowl, thermos, dehydrated meal - always put the receptacle onto a flat place, never hold it in your hand.
When you’re tending your stove, try to do it from a squatting position and not sitting. If you’re squatting, you can jump up and more quickly move away from spilled hot water or a flaring stove.
Lots of modern camp stoves might boil water in just a few minutes, but they are often tall and unstable. Try to secure your stove from tipping over by putting a few rocks around it to hold it in place.
Modern outdoor synthetic fabric such as fleece, polyester and capilene can be extremely sensitive to flame. As in, they can melt in a second or two, sometimes directly onto your skin, resulting in a serious burn. If you’re wearing these fabrics, be very careful around campfires and the intense flame of a camping stove.
Don’t step over a campfire or stove, step around it.
Also, sparks from a campfire can easily land unnoticed on your nice fleece jacket and instantly burn a small hole through it. Probably won’t hurt you very much, but it’s sure not helping your gear.
First aid for minor burns
Clean the affected area with cool water, not ice cold.
Cool the area by putting on fabric soaked with cold water. Don’t put ice or snow directly on the burn, this can cause frostbite and restrict circulation, which is needed for healing.
Moist dressings are fine for small burns (less than three percent of the body surface area). Use dry dressings on extensive burns.
Check every 24 hours.

Be cautious of “grade inflation” in climbing gyms
Don't let your head get big because you can climb “5.11” in the vanity gym. You may be in for a big surprise your first time outside.
Many outdoor climbing areas have a reputation for ratings that are relatively easier, or harder, than the generally accepted grade.
Red Rock Nevada? The bulletproof sandstone is sticky, the cracks eat cams, and the bolts are plentiful. You’ll probably feel like Superman and climb a grade or two above your normal level. (But, the climbs are long and committing and the rappels are prone to getting your rope snagged, so bring a headlamp!)
Joshua Tree California? Just about everybody seems to get spanked on their first day. Between the sharp rock that shreds your hands, and flaring cracks that don’t take gear very well, that “warm up” route can definitely feel like a lot harder!
Similarly, some indoor gyms have a reputation for “vanity grades”, meaning what they might call a 5.10 is really more like a 5.8 or maybe 5.9.
If this is the only place you climb, you may start to believe that your ability is higher than it really is. If you then head outside and try a route at this same rating, you may be in for a rude awakening.
To mitigate this: Climb at different gyms and get a sense of how the ratings vary on routes of the "same" grade.
On your first few trips outside, leave your ego in the car. Try routes that are a couple of number grades below what you think you can comfortably climb in the gym. Even if you can lead climb safely in a gym, try top roping a few pitches initially when you’re outside, and consider using a stick clip so you don’t deck before you clip the first bolt.
When making the transition from indoor to outdoor, it’s an important safety issue to have a realistic knowledge of your abilities.
Sure, you might feel like Superman in the "vanity gym", but wait till you try going outside.


How to sew with your Swiss Army knife
That sharp little pointy thing on your Swiss Army knife is good for more than you thought.
I’ve carried Swiss Army knives around for decades, and always vaguely wondered if the awl was good for anything more than punching a hole through the occasional stout object. Turns out, it definitely is.
With a little practice and some stout thread (or even dental floss) you can turn your Swiss Army knife into a miniature sewing machine for backcountry repairs.
Awls have been used for thousands of years. You may find, as I did, that learning how to do it is surprisingly rewarding, and may leave you astonished once again at the cleverness of human beings.
As with many hands on skills, it’s a much better show than a tell.
Here’s a nice YouTube video that shows you how.

Most common way to get lost in the Columbia River Gorge
People can get lost for any number of reasons, but there is one common factor in most “lost hiker” stories in the Columbia River Gorge. What do you think is the number one cause?

Quick, what situation do you think is responsible for more people getting lost in the Gorge than any other? (and the same probably holds true for many other parts of the world as well.)
Picture this scenario. It’s early April, you’ve felt stuck indoors after a long soggy Northwest winter, there’s a weekend forecast of clear sky, and you’re busting to get outside. You head out to the Gorge to try a tough trail that goes up approximately 3,000 feet to the plateaus of the Oregon side. You've hiked the trail a few years ago, but you don't quite remember where it goes.
No problem for the first 2,000 feet or so. The trail is obvious, and you’re feeling strong. But, as you continue to climb, snow patches appear, start getting thicker, and then your trail completely disappears under the snow.
Here’s your answer. Continuing on a trail that becomes covered with snow is the number one way people get lost in the Gorge.
If the trail you're on becomes snow-covered, it’s a great time to take a break and reassess your objective for the day.
How familiar are you with the rest of the trail?
Are you doing an up and back hike on the same route, or a loop that comes down a different way? (On an out and back, at least you can maybe retrace your footsteps.)
Do you have a solid GPS track on your phone GPS app or GPS receiver that you can follow, even if the trail becomes snow-covered?
The takeaway: When going on a hike where you anticipate snow at higher elevations, always be sure of your route, use a GPS track if you have it, and definitely consider turning around if the trail you were relying on is no longer visible.
(This tip was shared with me a while back from a Search and Rescue team member from Hood River. Now, I’m not sure if this is statistically accurate or not, as it only comes from this one source, but it is still a good cautionary tale.)

Glove tip - always bring 2 pair
Good rule of thumb for snow climbing: always bring two pairs of gloves at a minimum. They don't need to be name brand, especially your back up pair. Here's how to find some online.
While we all have wide range of cold tolerance for our hands, I consider at least two pairs of gloves for snow climbs mandatory. (Read the classic book “Annapurna” for some epic frostbite tales, if you need convincing.) If you ever drop a glove on a cold route and don’t have a spare (or at least an extra sock) you could be in serious trouble.
The gloves I bring on pretty much every trip are Showa Temres 282-02. They are inexpensive, waterproof, extremely warm, and work great. Here's a detailed article about these terrific gloves.

The second pair? Of course, the temperatures where you're climbing dictates your glove choices. In moderate conditions, a light windstopper or Powerstretch fleece may do the job.
For technical climbing in really cold conditions, many climbers bring three or four pairs of gloves.
The backups sure don't have to be name brand glove$ from the $pendy mountaineering $hop. Try an Amazon search for “cycling gloves”. Here’s a pair I got for road biking that do fine as a backup for climbing - stout fabric, windproof, and have touchscreen capable fingers. And, how can you go wrong for about $12?


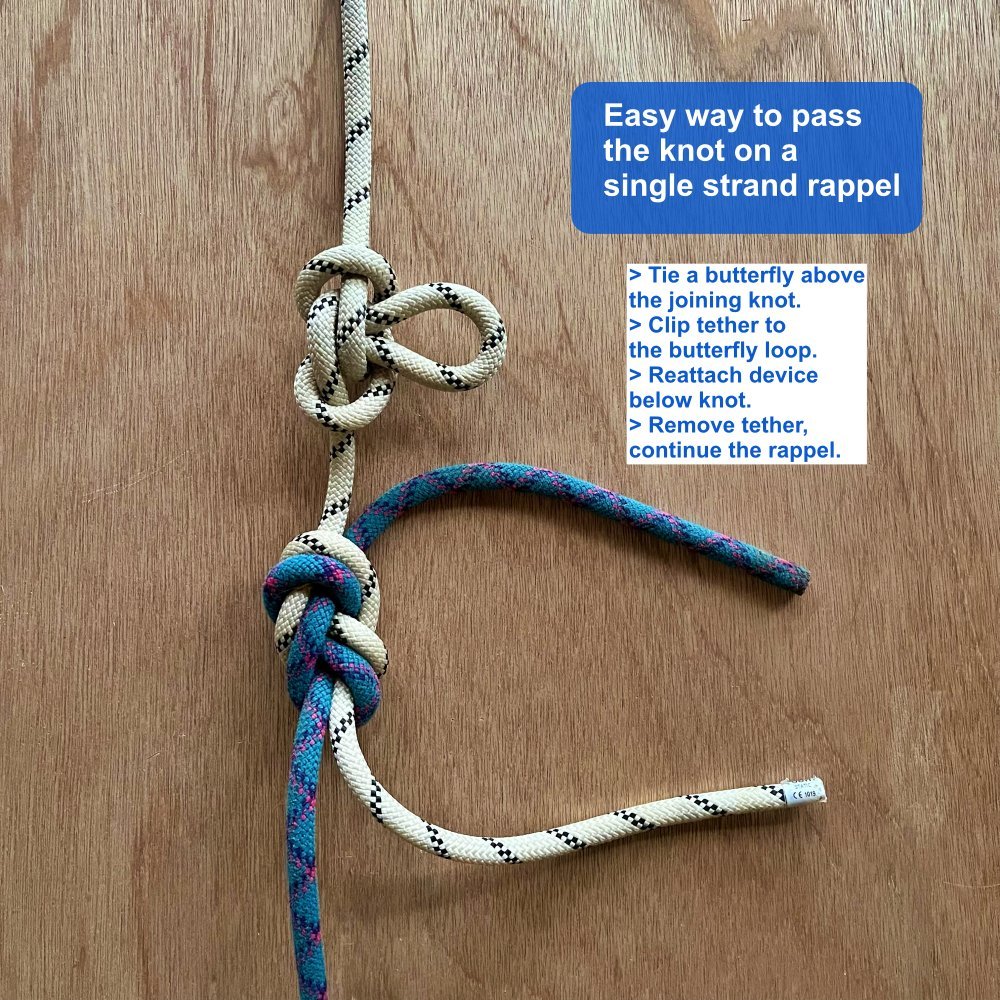
Easy way to pass the knot on a single rope rappel
It’s rare, but you might someday find yourself having to rappel two full rope lengths on a single strand. Here is a simple, fast and unconventional way to get past the knot.
Note - This post discusses techniques and methods used in vertical rope work. If you do them wrong, you could die. Always practice vertical rope techniques under the supervision of an experienced climber, and ideally in a progression: from flat ground, to staircase, to vertical close to the ground before you ever try them in a real climbing situation.
This tip was written with the help of Bryan Hall, who is certified by the Society of Professional Rope Access Technicians (SPRAT) at their highest level.
Short version:
You’re rapping on two ropes tied together in a single strand, and you need to pass the knot connecting the ropes to make it all the way down. (For some scenarios when you might need to do this, keep reading.)
Solution: Tie a butterfly knot just above the knot connecting your ropes. Use the butterfly loop as a ready-made clip in point when you’re passing the knot.
We're trying to keep it simple in this example, so we’ll assume you're on something less than completely vertical or free hanging terrain. On something less than vertical, you can momentarily “batman” down the rope to reattach your device as shown below, and hopefully also step up for a moment to unclip your tether.
If things are completely vertical, it gets a bit more complicated, more on that below.
What about passing the knot if you have a standard double rope rappel? Well, with some knowledge of Crafty Rope Tricks, you should pretty much never have to do this! Learn more at this article.
When might you need to rappel on two ropes tied together in a single strand?
You’re between one and two rope lengths up on a climb, and you have some sort of emergency situation: injured person, incoming lightning storm, impending darkness, whatever, and you just want to get to the ground ASAP and leave your ropes to get later.
You have two or more rope lengths below you on moderate terrain (4th class rock; steepish snow) that at least one person on your team is comfortable downclimbing without a rope. You send your whole team down on the two ropes tied together. The last person unties the rope, tosses it, and solo downclimbs. (or “downleads” by cleaning gear left by the next to last person. (Learn more about downleading here.)
You’ve fixed two or more rope lengths up to the high point on a big wall, and you’re rapping back down to the bottom. In a day or two, you’ll come back, ascend your ropes, and continue with the route.
You’re descending fixed ropes that someone else set up, like descending from Heart Ledge, Sickle Ledge or the East Ledges on El Capitan.
Anyway, those are some not-so-normal-but-entirely-plausible scenarios where you might need to pass the knot on a single rope. Can you think of any others?
Two ropes connected with a Flemish bend, with a butterfly loop in the “upper” rope so you can safely pass the knot. Try to tie this butterfly as close to the Flemish bend as you can.
The butterfly is one option; any bight knot will work. The Flemish bend is preferred for a single strand rappel over the flat overhand bend, which is a standard for rappelling on two strands.
1) Before you start down, girth hitch a clip a short (60 cm sling or PAS) tether to your harness, and clip it with a locking carabiner. Rappel down the upper rope, and stop when you get just above the butterfly.

2) Clip your pre-tied tether into the butterfly loop; remember to lock it. Nice, you're now secured to the upper rope with your tether.

3) Remove your rappel device from the upper rope. Yes, this will require you to get some kind of stance for your feet to unweight the rope a little bit. (If this steep or you're scared, you could tie a catastrophe knot in the bottom rope and clip it to your harness as a backup.)

4) Downclimb or “batman” down the rope until you're below the joining knot. Reattach the rappel device to the bottom rope.
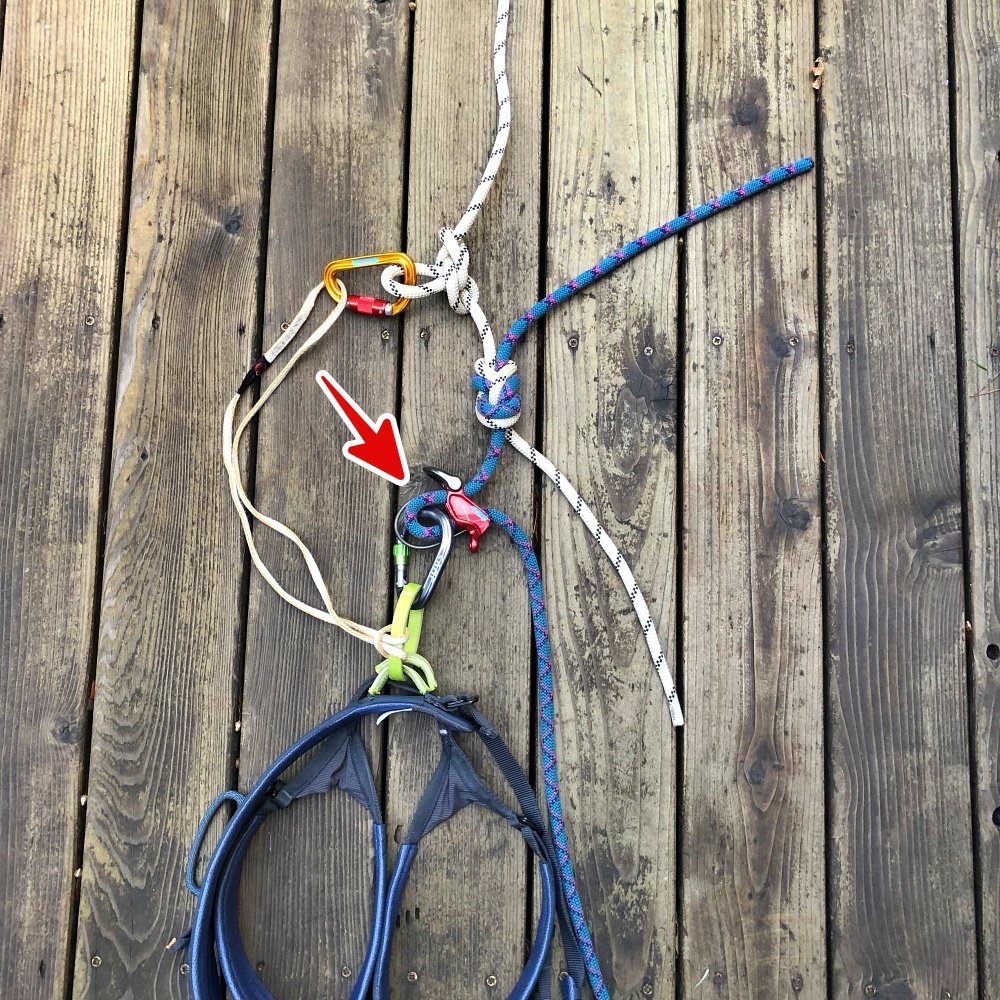
5) Unclip your tether and continue with the rappel. Schweeet, you just passed the knot!

Typically, this is set up with just a knot connecting the two ropes, such as a rewoven figure 8 bend, also known as the Flemish bend, or simply a flat overhand bend.
Sure, these knots are safe enough, but it sure doesn’t give you any assistance when you need to get past the knot. This is the beauty of adding the butterfly loop - you have a ready-made, secure point to attach a short, repeat, SHORT, leash to add an instant safety when you’re transferring your belay device from the top rope to the bottom rope.
This process is MUCH easier if you can find a small stance for your feet so you can momentarily take your weight off your rappel device. This should typically be possible on steep snow, ice, or low fifth class rock.
If you’re trying to pass a knot on a completely free hanging rappel, things get more complicated. You typically would add a friction hitch or ascender above the knot, weight that, remove your rappel device and reattach it below the knot, unweight the friction hitch / ascender, remove it, and continue rappelling. If you find yourself having to do this in a very steep terrain, you’re probably a caver or big wall climber, have an ascender, aid ladder or other helpful gear, and have already practiced this technique. Even so, the butterfly knot can still give you a handy place to clip for additional security.
What about using a flat overhand bend on a single strand?
If you use a standard flat overhand bend here instead of the Flemish bend or a more robust knot, you're probably gonna be fine. However, it's not best practice for a single strand rappel. Here's a much longer article examining this issue.
Safety note: keep your rope tails about 30 cm
Typically, when tying two ropes together for a rappel, you tie the knot with long tails, at least one foot. Some folks do it closer to two feet (the extra length doesn’t make them any safer or stronger, but it might add a little psychological boost.)
However, anytime when tying two ropes together like this, you want to AVOID using very long tails. Reason: the person rappelling could make the fatal mistake of reattaching their belay device onto the tail(s), instead of the actual rope. Yes, it has happened. It probably sounds like a mistake you would never make if you’re reading this indoors on a nice sunny day, but if it’s at night, raining, in a cave, you’re physically and mentally fried, whatever, simple mistakes like this can happen all too easily.
Here's a longer article on this topic.
The better practice is:
Tie your knot to connect the ropes, and keep the tails about 30 cm / 12-16 inches max (or, about the length of your forearm.)
Tidy the knot properly, then snug it down (aka “dress it and stress it.”)