

Alpine Tips

The Stone hitch
The Stone hitch (aka Stone or Stein knot) is a clever way to isolate each strand of a rappel rope. This knot is very secure when tied correctly, fast to tie, easy to check, and easy to untie after loading. Learn some applications for the Stone hitch and see a short video to learn how to tie it.
Note - This post discusses techniques and methods used in vertical rope work. If you do them wrong, you could die. Always practice vertical rope techniques under the supervision of a qualified instructor, and ideally in a progression: from flat ground, to staircase, to vertical close to the ground before you ever try them in a real climbing situation.

The Stone hitch (aka stone knot, Stein knot or Stein hitch) is a clever way to secure a rappel rope that makes two separate fixed strands. It's typically used in canyoneering, where it's common for all but the last person to rappel on a single strand.
Generally, it's good practice to keep things as simple as possible in rope systems, and not introduce too many whistles and bells. However, the Stone hitch is useful in some specific situations, so it can be a worthwhile tool for the intermediate / advanced climber.
When might the Stone hitch be useful?
Speeding up a group rappel. You can have one person descending on one strand of rope, and at the same time have another person rigging to rappel and getting a safety check. The moment the first person touches down, the second person can begin. This greatly increases efficiency with a larger group, especially beginners who may need more time to get set up.
Belay a rappel. Someone can rappel on one strand of rope, and be belayed on the other strand.
A climbing team has one Grigri and one ATC / tube belay device. When it's time to rappel, you tie a Stone hitch. The first person goes down one strand on a Grigri. The second person removes the Stone hitch and does a standard rappel on two strands with their ATC.
Good for overhanging and or traversing rappels, where the first person down may need to swing around and place gear. The first person can rappel on a single strand with a Grigri and go hands-free when needed, and be belayed at the same time on the other strand. (Advanced technique! See the link above for more details.)
Less risky simul rappelling. If for some reason you ever want to simul rappel, (for lots of reasons why you should not, read this article), and you have an unquestionably strong anchor, and you have more than two people, using a Stone hitch for everyone but the last person can give all the speed benefits of a simul rap with pretty much none of the risks, because the rope can’t pull through.
Rappelling in terrain with high rope-severing potential. If there's a chance for the rope to slide when loaded across a sharp edge, or if you have loads of rocks that could be dislodged onto the rope (here's an example) this can be a good way to safeguard everyone except the last person down. (Hopefully you don't find yourself doing this very often . . .)
Unfamiliar descent, or maybe at night. If you're not sure where the next anchors are, securing the strands for the first person down lets them re-ascend the rope with less risk. This gives the option to use one-strand tools like a Tibloc, Ropeman, or Grigri to ascend the rope.
Top rope solo rigging (mentioned in an Instagram comment). This gives you two two strands to climb on close routes, you have ascenders on one strand and use the other strand as a backup if you like, and you’re already rigged for rappel when you’re done for the day.
Notes . . .
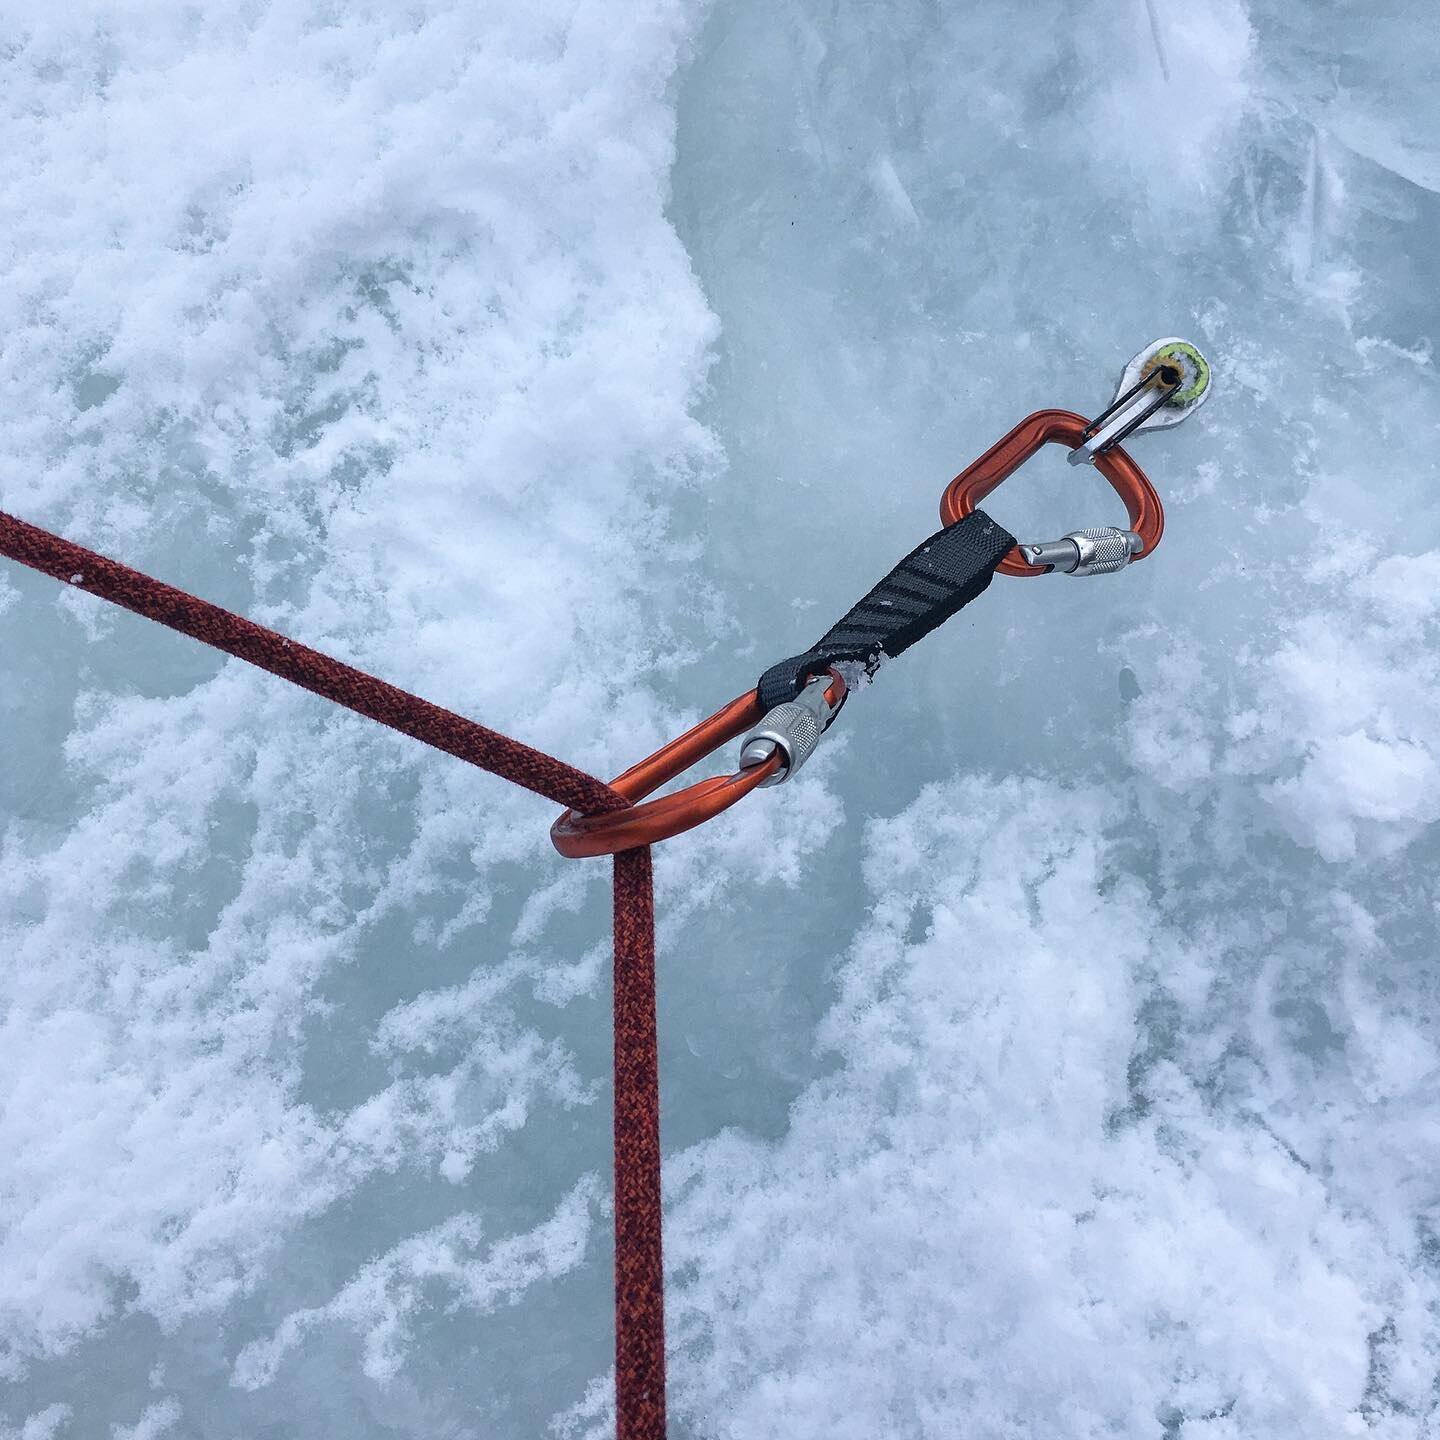
It is CRUCIAL to clip the locking carabiner to both the loop of the slipknot and one of the two strands of rope between the hitch and the anchor! If you don't do this, the carabiner could pull through the slipknot and the hitch will fail.
The Stone hitch is simple to tie, easy to check, very secure when tied correctly, and easy to untie after it's been loaded. There are a few different variations, including one with a figure 8 rather than an slipknot.
Of course there are lots of other ways you can fix one or both strands of a rappel rope, such as a knot block, clove hitching each strand with two additional carabiners into the anchor, etc. The Stone hitch is fast, elegant, and easy to untie, so it gets my vote.
Does this cross load the carabiner? It doesn’t. The carabiner is functioning the same way as when it's “blocking” a guide mode belay device (and you're comfortable with that, right?) Put the bottom curve of the carabiner into the hitch, not the gate. After you cinch the rope down, it holds the carabiner in the proper position.
Does this make the so-called “American death triangle”? Sort of, but it's not a concern here. The angle above the hitch is so small, that it only slightly increases the load on the anchor. It's only for a rappel, so the load to each half of the anchor will still be less than 1 kN, no worries. Learn a lot more about the “American death triangle” here.
You can use any flavor of locking carabiner for this, but a large mouth, HMS style belay carabiner makes it easier to clip the necessary strands.
Hopefully this is blindingly obvious, but the last person rappelling needs to remove the hitch and rappel normally on two strands of rope. Better remember to do this, or your rope will be stuck.
I will confess, I thought this looked extremely sketchy when I was introduced to it by my canyoneering friend. Rappel off a slipknot, are you insane!? But I have slowly become more comfortable with it, and it's pretty handy in some situations. One more tool in the toolbox for more advanced climbers, which is a good thing.
The Stone hitch can also be used with a two rope rappel. Tie it below the joining knot. Doing this fixes each strand of rope, allowing one person to rappel while the other person is rigging, This can be VERY handy with a large group to speed things along. Last person removes the carabiner, releases the hitch, and does a normal double strand rappel.

The Stone hitch gives a secure loop between the hitch and anchor point, which makes a convenient place to clip a tether when you're getting set up to rappel. In the photos and video below, the loop is very short. However, you could make it as long as you want. For example, if the anchor point was several meters away from the edge of the cliff, you could tie the hitch so it was right at the cliff edge. This makes a closed loop for your tether, so you easily rig a rappel even from an exposed position.

Check out this short video to learn more, including how to tie it.

Multi directional placement with two opposing stoppers
Rigging two opposed stoppers is a good trick to make a single multi directional placement. This is typically rigged with a clove hitch, which to be honest usually doesn't work too well. Here's an improvement: wrap the sling TWICE around the top carabiner, and then tension it. The double wrap holds the tension, letting you more easily tie it off.

Rigging two opposed stoppers/nuts in a vertical crack it's kind of an old-school trick, which dates back to the Paleolithic era before cams were invented. But even today, it can be a good tool for those times when you need a multi directional placement and are low on cams, or want to preserve them for further up the pitch.
Basically, it can make one good placement out of two lousy ones!
When might rigging opposed stoppers be helpful?
The first piece when leading a trad pitch, to prevent an upward pull from zippering out your gear.
Setting up a belay anchor that needs to take a potential upward pull, such as a fixed point lead belay
Top rope soloing, where you need to set an anchor to take an upward pull
Clipping a Micro Traxion or Tibloc for simulclimbing
You are starting out in trad climbing, have a small rack of expensive cams, and prefer to use them for lead climbing and not anchor building
This “opposing two stoppers” trick is typically done with a clove hitch. However, many people find the clove to be tricky to tie and snug down, and that the clove doesn’t maintain tension very well between the placements.
Here's an alternative that I prefer. The #CraftyRopeTrick here is to pass the sling TWICE around the top carabiner, with the second pass going BETWEEN the strands of the first pass. Then pull down to tension the sling. This double wrap maintains sling tension, making it much easier to tie a final half hitch to secure the whole thing.
Caveats . . .
You need a good stance and probably both hands to do this.
Although you’re using two pieces, because there's only one downward piece, this essentially counts as one placement. (In other words, this is NOT a two piece anchor.)
As shown here, this technique uses two stoppers, three carabiners, and a sling. (You can save one carabiner by girth hitching the bottom stopper, yes it's strong enough.) Often simple placing a solid cam can serve as a multi directional placement, plus it's faster and uses less gear. This is simply one more trick in the toolbox for more advanced climbers.
Questions, concerns, grumbles . . .
“Does this create a 2:1 ‘pulley affect’, doubling the load on the top piece of gear?” No. Because of the half hitch at the end, it doesn't. It’s a bit hard to describe, but give it a try and see for yourself.
“Does this create a vector/outward load on the gear which greatly increases the force on the placements?” It doesn't. The only force on the gear is going upwards or downwards.
“What if you did this in a horizontal crack?” Then you would have some odd vector angles on this anchor and it would probably not be so strong. But, if that's your only placement option, then you might have to do it.
“Good luck doing this on lead.” Yes, this does take a good stance and probably two hands to rig, so you're probably not gonna do it in the middle of some hard pitch. But as part of the anchor when you're hopefully on a ledge, usually not a problem.
Like most climbing techniques, it’s a better show than a tell. Check the video below to see how it works.

How to pack a cooler - pro tips
Nope, this is not a tip for alpine climbing, but it might come in handy next time you do a road trip. Here are some desert tested tIps for keeping your cooler organized, clean, and preserving your ice on longer trips where ice resupply is not an option. (Ever heard of “cooler soup”? It's something you don't want to try.)
Okay, let me say this up front: this is not a tip for alpine climbing, more for car camping and river trips. But everyone uses a cooler, and when you do, these tips may help a bunch!
If you're out for a night or two, then cooler packing is not a very big deal. However, on a longer, more remote road trip when you can't restock ice, or especially on multi-day whitewater river trips (a passion of mine) it's a lot more important. Rafters can be FANATIC about cooler packing and ice preservation - on a three week Grand Canyon trip, having ice left on the last day is the sign of a true pro. (I won't cover those very advanced tips here, because they don't apply to many folks.)
The following tips I’ve learned from a few expert river rats over the years, as well as some of my own trial and error. (And no, you don't need a $400 high end cooler!)
Give some or all of these tips a try on your next multi-day outing.
Freeze your own ice in plastic bottles
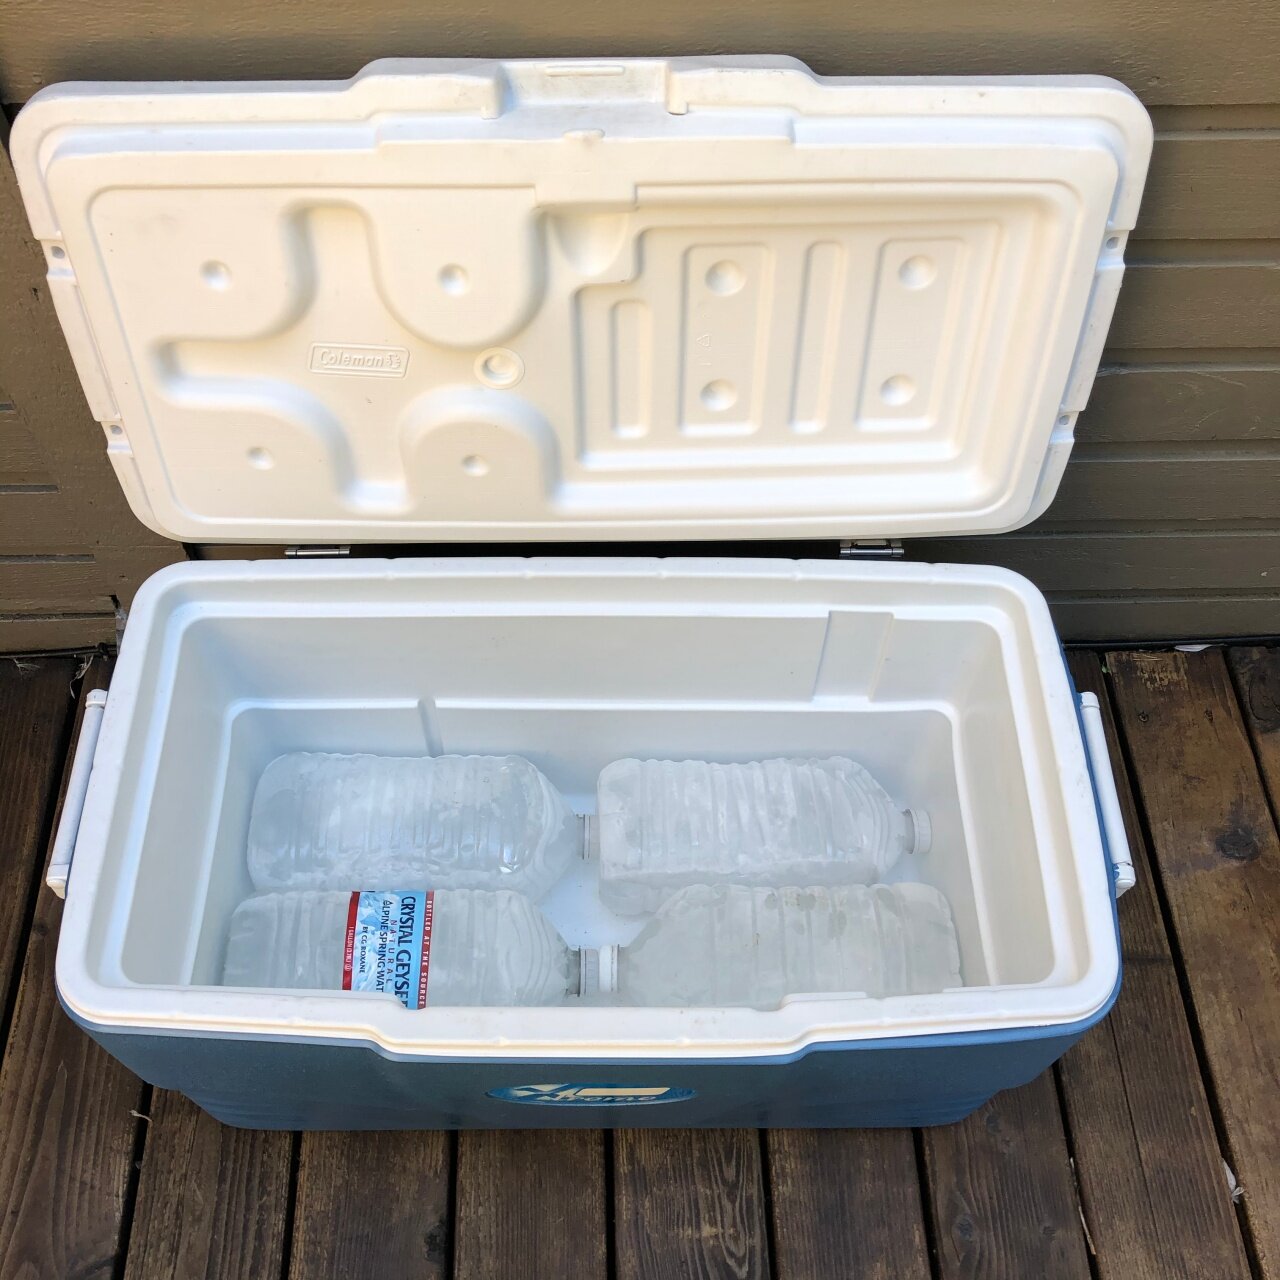
Freeze some plastic bottles for your ice supply, so you never have nasty melt water sloshing around the bottom of your cooler. One gallon Crystal Geyser bottles can be bought almost anywhere, are reasonably sturdy, and best of all are square-ish to fit nicely in a larger cooler. Mix and match water bottle sizes to fit the cooler you have. Empty two liter pop bottles are another good choice, and a bit more sturdy because they're built to handle carbonation.
Plus, when the ice melts, you have a big jug of cold water for drinking or cooking.
If you're don't have access to a freezer, block ice always lasts longer than ice cubes. However, most commercially available block ice you buy at stores is actually made from squished together ice cubes, and so it melts much faster than ice you freeze yourself.
Get resourceful on refreezing your bottles. If you're camping somewhere that's near a freezer, ask nicely, and you very well might be able to pop a few bottles in a restaurant freezer overnight to give you ice for the next few days.
Note on cooler sizes: bigger with more ice is better for ice preservation. It's physics: the more mass of cold you have, the longer it's going to last.
Consider saltwater in your frozen bottles
Salt water stays frozen for longer than freshwater.
Start with about 2 tablespoons of salt per 1 liter of water. If you have a strong freezer, you can experiment with adding an extra tablespoon or so of salt. You'll probably end up with kind of slushy ice instead of having it freeze all the way solid, but it’s still colder and will last longer than normal ice.
If you have a reliable source of drinking water, you could make all of your frozen water bottles saltwater.
If you want to keep some for drinking water, make sure you mark or color code the saltwater so you don't drink out of them. I’ve used color-coded 2 liter soda bottles; green means saltwater and clear is freshwater.
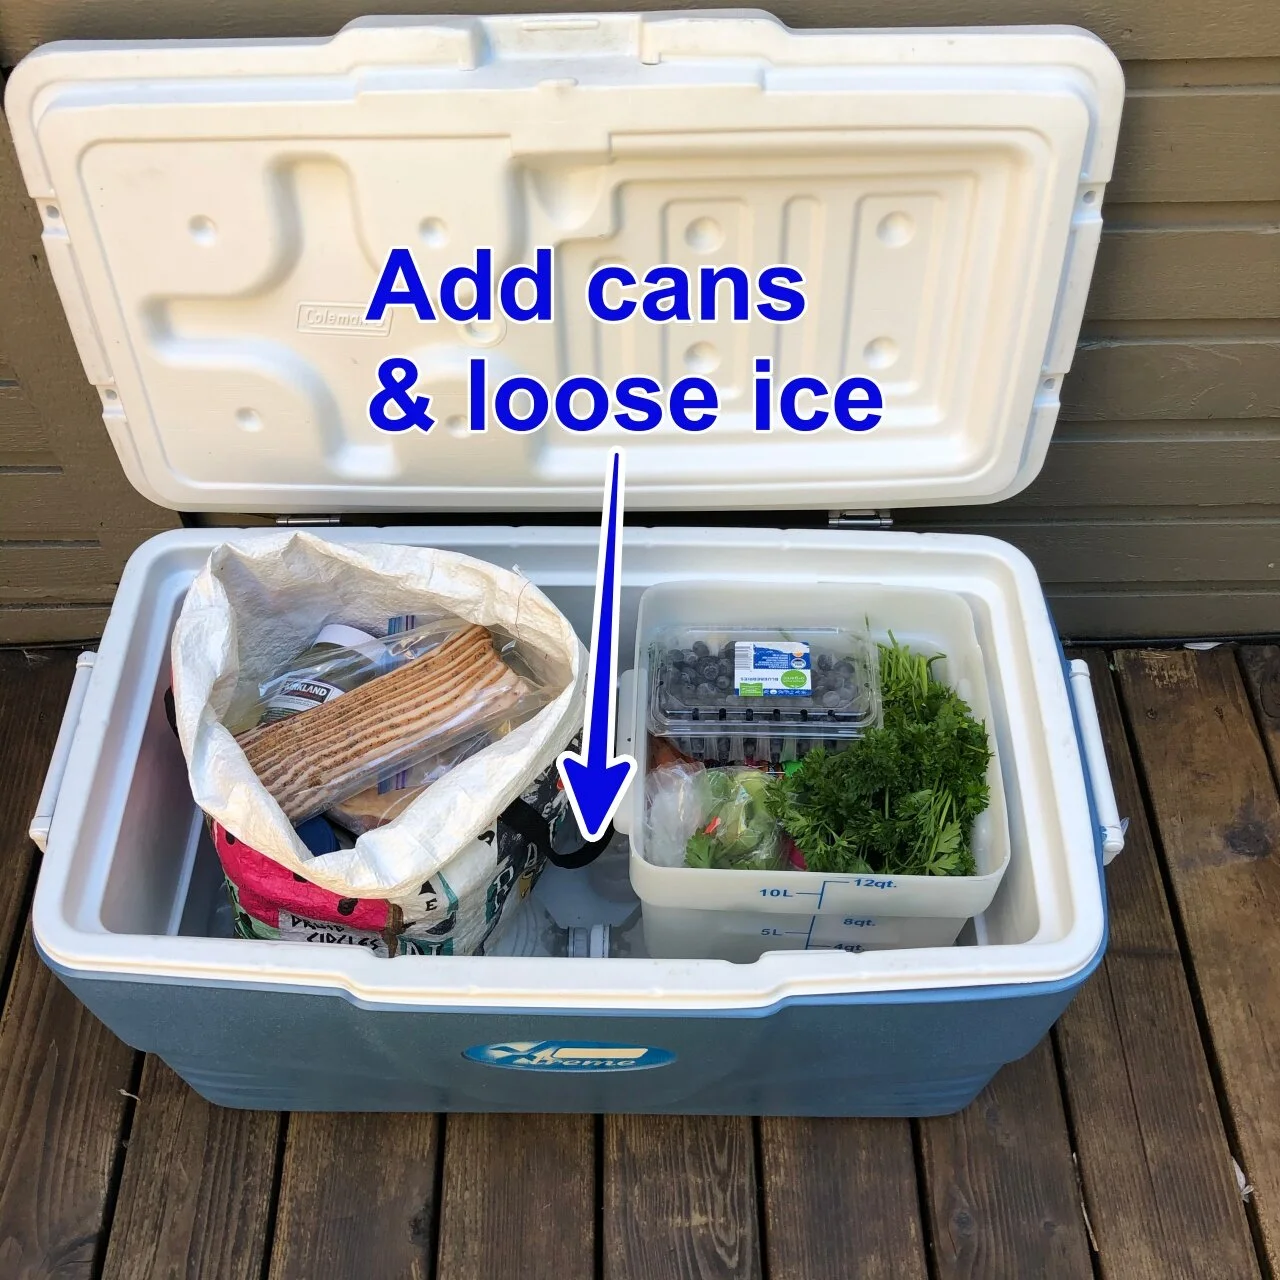
Use heavy duty shopping bags (or plastic containers) to keep food away from the ice
The last thing you want is your precious food taking a bath in yucky melted ice water, having delicate items getting crushed, or burrowing around to pull out the one thing you need that's worked its way to the bottom. Put all food into large container(s) or plastic reusable shopping bags.
Keeps food totally separate from any ice melt in your cooler.
Lets you quickly grab what you need minimizing the time the cooler lid is open, which helps a lot with ice preservation.
The downside is you lose a tiny bit of storage, but to me the trade-off is worth it.
Start with a couple of good quality reusable plastic shopping bags, like from Trader Joe's or Whole Foods. Note, these may not be completely waterproof, so you might want to test them first. New bags tend to be quite waterproof, older ones not so much. If you follow the previous suggestion of keeping your ice in plastic bottles, the shopping bag(s) will pretty much keep your food perfectly dry. Try to be gentle with delicate produce in these bags; easier said than done.
For plastic tubs, go to a restaurant supply or “Cash and Carry” type store. Google “restaurant supply”. The containers are typically round or square, and come in lots of different sizes. The square shaped ones obviously fit better in a rectangular cooler. Bring your cooler with you to be sure the containers fit.
For my cooler, a 12 quart container fits nicely. Cost, about $12. My main cooler can fit two 12 quart containers side-by-side, with loose ice in the bottom and narrow frozen water bottles in between. If you’re taking a large amount of food, use two containers side-by-side. Try dinner stuff in one and lunch stuff in another, so you can just reach in and grab it and pull out the container you need. Doing this minimizes the time the cooler is open on a hot day, which helps a lot with ice preservation. Put fragile food, like fruit, inside the plastic tub, it can protect it a bit.
If the container stands just a little bit tall for your cooler, don't be shy about cutting off the top to make it fit. A power jigsaw is perfect for this.
Getting ready to pack: Put the bottles in flat on the bottom and the food on top, fill the space between with loose ice cubes and cold cans. Fruit and veggies in the plastic bin (so they don't get squished), everything else in the shopping bag.

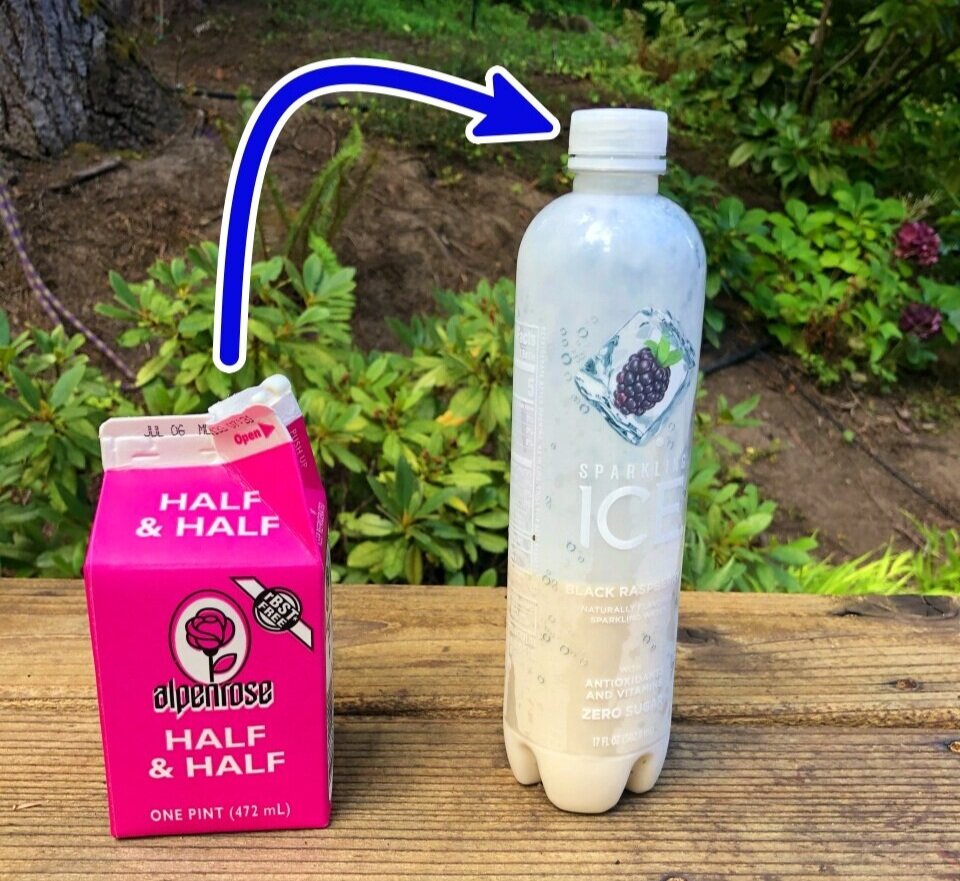
Transfer anything liquid from a “snaptop” into sturdy “screw top” containers
Salsa? Hummus? Forget those plastic tubs that they come in. When (not if!) the top comes off inside the cooler you’re going to have a TOTAL mess! (This is also known as ”cooler soup” =^) And yes, I've made that mistake; definitely not recommended.
Repackage into repurposed sturdy plastic screw top containers. Save the empty ones throughout the year, and by summertime you'll have a nice collection. Smaller rectangular containers stack really well and are space efficient. Sauerkraut containers (see the salsa photo below) are especially stout. Talenti ice cream comes in nice reusable screw top jars. Costco has a lot of items in large squarer screw top containers, such as mixed nuts.
Putting a paper container (milk, creamer, orange juice, etc.) straight into your cooler is also asking for trouble. It gets wet, the paper gets weak, and a puncture is highly likely. Instead, transfer liquids into sturdy empty plastic bottles. Tall skinny bottles are good; they save on space and are easy to grab from above. (And yes, you can freeze milk and half-and-half.)
Eggs? I crack them into a sturdy plastic bottle, pour some half-and-half and give them a shake. They can be frozen, and give perfect scrambled eggs with zero mess once they are thawed. Nine eggs plus half-and-half fit perfectly into a 20 ounce Gatorade bottle.

Cover your cooler with wet fabric, and/or try to keep it in the shade
Take an old, light colored towel, get it wet, and drape over your cooler if it's in the sun, like on a raft or the bed of truck. This gives some evaporative cooling and helps with ice preservation.
If you want to really get fancy you can make a “cozy” for your entire cooler out of mylar coated bubble wrap, called Reflectix. This also keeps direct sun off of your cooler and on a multi day trip can really help with preserving ice.
The main concept is to try to avoid opening your cooler in the heat of the day. When it's cool in the morning, pull out everything you need for lunch from the main cooler and maybe transfer it to something smaller.
Pre-chill or freeze as much food as you can
Coolers are good at keeping food cold, but not so good at making food cold. Avoid putting any warm or room temperature food, especially drinks, into your cooler. Buy your canned beverages already cold, or pre-chill them the night before in another smaller cooler or main fridge and then add to your main cooler the day of your trip. Try to freeze all meat before you put it in the cooler. (If you can prep slice the meat and even put a marinade on it before you put it in the cooler, bonus points for you. The vacuum sealer can be your friend here.) What else can be frozen, like pasta sauce, milk or scrambled eggs? Freeze everything you can.
On a related note, you can pre-chill your entire cooler. Take a few sacrificial bags of ice, put them in the cooler the night before your trip, and then load your pre-chilled food in the day you leave. (If you have access to a walk-in freezer or refrigerator, that makes it a lot easier.) This also works with a smaller flexible fabric type cooler, simply put the whole thing in your fridge or freezer the night before.
Bring an extra cooler just for ice
If you're on a long trip and you have the extra space, consider bringing an additional large cooler just for ice. As the ice melts off in the main food cooler, you can replace it, plus always have clean ice available for beverages.
For the “ice-only” cooler, duct tape the top closed to help eliminate any air drafts, and also reduce any temptation to open it before you really need to.
Bring an extra cooler just for drinks
If you’re planning a trip with lots of, ahem, beverage consumption, a good approach is to have one cooler for food that gets opened only at mealtimes, and an entire separate cooler for beverages, that has mostly loose ice. This keeps thirsty people from constantly opening and closing the main food cooler.
Empty space means warm air, which means your ice is going to melt faster. Ice is cheap. Buy an extra bag or two and fill up the whole cooler completely. If possible, pre-chill all beverages before you put them in the cooler
Add a cover inside your cooler
Cut a piece of closed cell foam pad to fit snugly inside of your cooler, to add a extra insulation. A folded wet towel put inside the lid does much the same thing, preventing your ice from getting blasted by hot air. This can also keep your food away from condensation or any meltwater.
Go a creek nearby? Put your cooler in it!
If you have a cold stream / lake nearby, keep your cooler in it. Of course be sure it doesn’t float away or tip over, that would be a problem. 😉
Did someone give you block ice? Put it in a dry bag
If you're on a river trip and someone donates a block of ice to you, you can put it inside a dry bag, and then put the dry bag in the cooler. This keeps all the meltwater contained.
Try dry ice
Consider using dry ice underneath your frozen water jugs. That can get you an extra day or two of cold. Note that some food does not do well stored with lots of dry ice, like many vegetables. This is more of an issue if you use all dry ice in your cooler. If you have mostly frozen water jugs and a little dry ice, it's gonna be fine.
Divide your food for sections of a longer trip
You're lucky enough to be on a LONG river trip, an extended desert adventure, or anywhere where are you can’t restock ice. Here's one approach:
You need two coolers. Ideally, one is large and well insulated.
Separate your food carefully (I mean carefully!) into the first half of your trip and the latter half of your trip. (Let's say we have a 10 day trip, so call days 1-5 “cooler 1” and days 5-10 “cooler 2”.)
Pack your food (using the tips mentioned above) in each cooler. Make cooler 2 the larger and more insulated one, so you can hopefully pack in a bit more ice.
On cooler 2, duct tape the top closed and write on the tape: “DO NOT OPEN until day 5!” Maybe even make a reflectix cover for it as mentioned above, keep it in the shade as much as possible, and whatever you do, don’t open it until all the food in the first cooler is used up. Simply not ever opening cooler #2 until day 5 is the biggest thing you can do to preserve the ice. The duct tape reminds people not to even think about opening it, as well as sealing up any micro air leaks.

Rappelling overhangs and traverses
Rappelling when you have an overhang and/or a traverse can be especially challenging. Main concept: keep yourself close to the wall by placing gear. Here are some more detailed tips about how to handle it.
Another masterpiece from the Alpinesavvy graphic design department . . . We’re hiring, hint hint. =^)
Rappelling overhanging and/or traversing terrain can be tricky! What if a rappel traverses off to one side to the next anchor (above), but gravity wants to take you straight down? Or how about, you go over the lip, and find yourself hanging in space, unable to reach the rock? How do you handle one or both of these?
(Note: You will hopefully climb for your whole life and never have to do this, because thoughtfully placed rappel routes should avoid such obstacles. But if you're adventure climbing, get off route, have an accident and need-to-get-the-hell-down right now, or have some other weirdness, this tip might save your bacon, so keep it in the tool kit.)
Solution: stay close to the rock, and your required direction, by clipping protection while rappelling.
Consider using some or all of these techniques to reduce your risk and stay close to the wall. Some terms below describe gear you might have on a big wall climb, but the same general ideas work for all rappels.
Especially if the route is overhanging, and if it’s a full rope length, talking/shouting commands (like “Off rappel!”) may be difficult to hear. Have a solid communication plan of silent rope pulls, FRS radios, or something similar so you can clearly communicate.
First person down takes the rack. If you have any sort of a stick clip or a cheater stick (which you might have on an aid climb) bring that as well. First person down keeps aiders and ascenders (if you have them) on their harness in case they need to ascend the rope.
Rig the ropes for a standard rappel, but then fix both strands to the anchor.
Here’s one of several ways to fix the rope. Note the Flemish bend that's joining the two ropes together. While the flat overhand bend would probably be fine here, the Flemish bend is definitely stronger and perhaps a better choice because you're putting all your weight just on one strand of rope.

Consider having the first person down rappel on a single strand with a Grigri. Doing this lets them pendulum as needed, go hands-free (with a backup knot) to place gear and sort out rope tangles, and ascend the rope if needed. Ascending might be required if they rappel past the anchor or find themselves hanging in space. Ascending the rope is much easier on a single strand.
If you don't have a Grigri, be sure and use a third hand autoblock backup.
First person down clips the other (here, white) strand of rope through a quick draw on their harness. This keeps the rope within reach.
First person down places gear (or clips bolts) as they go, to stay close to the wall and in the desired direction. Both rope strands are clipped to the gear.
Note: The first person should not extend these directionals with a long runner. You want to keep the rope as close to the wall as possible. Unlike lead climbing, when doing this can cause rope drag, there’s no rope drag when you’re rappelling. The second person down will be very happy you did not put long slings on your gear placements!
When the first person arrives at the lower anchor, they fix both strands of rope to the anchor with a few extra meters of slack. The slack allows the second person some extra rope to pull themselves closer to the rock to clean gear as needed, and possibly do a lower out. (The second person can also use an untied cordelette as a mini lower out cord, a crafty rope trick discussed in this article.)
SUPER IMPORTANT: The second person removes the knot that’s fixing both strands to the upper anchor.
The second person brings down any heavier backpacks and/or haul bags. Don’t put a heavy backpack on your back. Hang a medium weight pack from your belay loop, or for heavy loads, use the technique of “riding the pig”, as discussed here.
The second person rappels on a standard tube device with an auto block back up. They clean the gear as they rappel. When they get close to the lower anchor, the first person down can pull them in with the slack in the rope.
It is CRUCIAL to maintain control of the ropes at the lower anchor after the second person arrives. This is especially true for rappels that overhang, traverse, and/or in high winds. If you carelessly let go of both rope strands, they could easily swing or blow out of reach, potentially stranding you. Consequences could range from slightly embarrassing to completely lethal! You can minimize the chances of this happening by using the “J loop” technique, where the first person down ties both strands of the rope to the lower anchor. Learn more about the J loop here.
YIKES, don't let this happen to you! Image credit: Andy Kirkpatrick, from his book “Down”, shared with permission. Check out his website, andy-kirkpatrick.com

Image credit: Andy Kirkpatrick
Here's another tip for a traversing rappel: pull the rope strand on the side you’re traversing towards. In the diagram below, the rappel traverses to climber’s right. So, putting the knot on the right side of the anchor will likely result in less friction and easier pull. This applies to single and double rope rappels.
(This is why a knot block was not used in the photo above with the Grigri; it would put the pulling rope on the wrong side of the anchor.) Image credit: Andy Kirkpatrick, from his book, “Down”, shared with permission. Check out his website, andy-kirkpatrick.com

Image credit: Andy Kirkpatrick
Here’s a last ditch crafty rope trick if you ever find yourself free-hanging in space away from the rock. (Disclaimer, I have never tried this, but it sounds like it MIGHT work.)
You need to plan ahead a bit for this with a backpack, a heavy rack, etc.
Lower the backpack below you on an extra length of rope, cordelette, etc. Be sure it is securely tied to your harness so you can’t drop it. Start the backpack swinging back and forth, perpendicular to the rock. In theory, this pendulum motion will also start your body swinging as well, which may bring you in close enough to grab the rock or place some gear.
Have I done this? No!
Does it sound scary? Yes!
Do you want to be on a belay from the second rope or at least have a Grigri so you can go hands-free? Yes!
Is it better to avoid a shenanigan like this whenever possible by placing gear and staying close to the rock? Yes!

Backcountry GPS - map reading still required
A GPS device is an amazing backcountry navigation tool. But it still only gives you straight line bearing and distance to an objective, which is often not an option in the mountains. Augment your GPS with some basic contour reading skills to help you choose the best route.

map made from caltopo
We can get complacent when using GPS for city navigation, because the turn by turn directions are usually close to perfect. But in the backcountry, when your GPS only tells you distance and straight line bearing from one point to another, you often need to add some common sense and basic map reading. Let's look at an example.
You're camped at Lower Hopkins Lake and want to go to the unnamed lake. Using the Gaia GPS app on your phone (my favorite choice), you add a waypoint at the unnamed lake, and then use the “Guide Me” function to get distance and bearing from your current position.
Your phone tells you it’s about 2 miles and a bearing of 250 degrees from your camp to the lake.
Would it be a good idea to follow this bearing ? Why or why not?
A GPS bearing shows only the straight line distance and bearing between two points. It doesn't show what's necessarily a good route choice. Following a direct bearing of 260 degrees would get you into some steep terrain, shown by the contour lines on the hillside that are very close together.
A longer, but probably better route is the green line. It's less steep, which is shown on the map by contour lines that are a bit farther apart.
Do you need a printed map, or necessarily a compass, to get to the lake? Probably not. But the basic skills of reading contours can still come in handy, and even if a GPS device is the only navigation tool you carry. Following a direct line, especially in the mountains, is rarely the best choice.
Map by CalTopo, the best backcountry mapping software.

map made from caltopo
Want to learn the basics of how contour lines show real world terrain? Check out the video below.

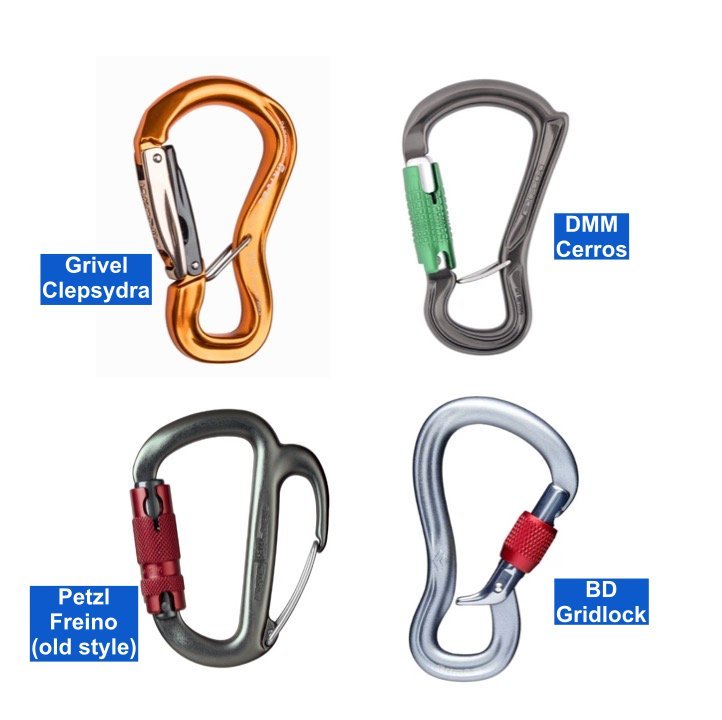
Try a "D" carabiner with your Grigri
Because the rope never touches your carabiner when you use a Grigri (or any similar assisted braking device), you can pretty much use any kind of carabiner you like. In fact, Petzl suggests that you don’t use an HMS carabiner.

Out of habit, many climbers always reach for a large, pear shaped, “HMS” belay carabiner anytime they are belaying. (In case you’re wondering what “HMS” means, it’s an acronym for the German, “Halbmastwurf sicherung”, which loosely translates as “Munter hitch belay” carabiner.
However, when using a Grigri (or many similar assisted braking devices) the rope never touches the carabiner. This means you can use pretty much any kind of locker you like. In terms of saving weight, having compact gear, and most importantly the carabiner behaving and staying in proper alignment, using a “D” carabiner may actually be a better choice.
In fact, Petzl recommends it. From the always informative Petzl website:
“Beware of pear-shaped carabiners, which in this application have a tendency to rotate and often become poorly positioned.”
Check out the carabiner recommendations below in this graphic from Petzl. Noticeably absent are the two large HMS carabiners from Petzl, the William and the Attache. (Of course, there are loads of other carabiners from other manufacturers that can be used with a Grigri; I'm using this nice diagram as an example.)
Personally, I’m a fan of the Petzl Sm’D (shown in photo at the top of page.)
To be clear, I’m not saying it's dangerous or incorrect to use an HMS carabiner with a Grigri. However, a “D” carabiner might give you slightly better performance, and be more in line with Petzl’s guidelines.

image: https://www.petzl.com/INT/en/Sport/Choice-of-carabiner-for-attaching-a-GRIGRI-to-the-harness
Here are a few more specialized carabiners that can work well with a Grigri.

Steve House on "Failing Well"
Expert alpinist Steve House has a great YouTube video series called “Alpine Principles”. One of them covers the important if underappreciated topic of how to bail, aka “failing well”. The main concept: Define success as going up, making good decisions, and coming down, not getting to the top at all costs.

Alpinist Steve House has a terrific video on “Failing Well”, part of his concise video series called “Alpine Principles”.
It’s a six minute YouTube video, highly recommended. Takeaways:
Bailing is an inherent part of alpine climbing. It’s a skill that improves with practice.
Making a smart choice and turning around is not shameful, but something to be respected.
Having solid bail technique can give you the confidence to try harder routes, knowing that you can retreat from just about anywhere.
Maintain awareness when ascending. The way up might also be the (unplanned) way down. Remember potential anchor points, problem areas and the correct way to go, especially if the route traverses.
Bailing is often done under stress, tiredness, darkness, bad weather, etc. All the more reason to turn up your focus to counter these compounding factors, and to practice in fair weather without these distractions.
Watch the video here.

What's in my pack: rescue gear by Karsten Delap
A search and rescue (SAR) team may head out on a mission without knowing what they might be getting into. Carrying some carefully selected gear can help you be resourceful and adapt to a mission that might be more technical than you initially thought. This article comes from rescue expert and IFMGA Certified Guide Karsten Delap.
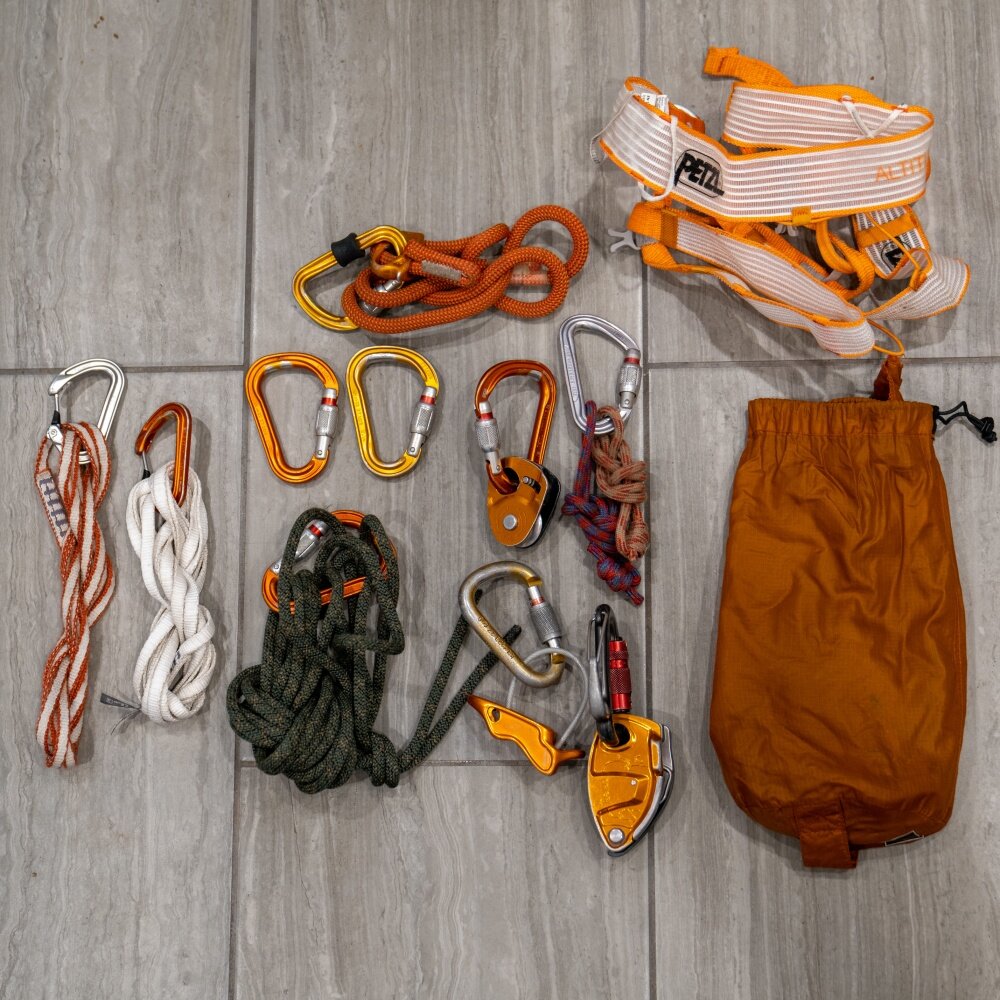
image: https://www.karstendelap.com/blog/what-i-carry-for-high-angle-rescue-in-my-search-pack - shared with permission
Say you’re on a search and rescue team. You probably have a “go pack” already loaded with the essentials of food, clothing, headlamp, first aid etc., but what about technical gear?
If your callout for a mission involves steeper terrain, having a small prepackaged kit of technical equipment can help you deal with unexpected contingencies. If everyone on your team carries something similar, this gives you lots of room to be resourceful and create more advanced lowering and raising systems if necessary.
Here’s what rescue expert Karsten Delap carries for those missions when you don’t quite know what you might be getting into.
Petzl Altitude Harness (The Petzl Tour harness is a bit cheaper and only a little heavier)
Petzl Connect Adjust personal lanyard
Petzl GriGri
Petzl Micro Traxion
Petzl Reverso (plaquette style device) with round stock carabiner
4 locking HMS carabiners
2 non-locking carabiners
two 5 mm prusik loops
120 cm sewn sling
180 cm sewn sling
21 feet 7 mm cord
small stuff sack to hold everything
Want to learn more about why Karsten chooses this specific kit, and what each item can be used for?

A complete guide to CalTopo: training.caltopo.com
CalTopo, the best backcountry mapping software, now has a comprehensive and user-friendly training website that covers every aspect of this mapping tool. After you learn the basics from some YouTube videos or practicing on your own, go here to take a deeper dive.
CalTopo is the best backcountry mapping software currently available. You can probably figure out the basic functions by pecking around and by watching a short tutorial video like this one; (disclaimer, it's great and it's mine. =^)
However, like a lot of software, it has some powerful features that are not so obvious. Well, good news! As of Dec 2020, the CalTopo team launched an entirely new training website that shows you every nook and cranny of this great navigation tool.
I know this software pretty well, and I still learned several great new tips just in the first few minutes of working on this training website, such as better use of folders, creating a custom layer, and using the new feature Map Sheets.
Here's a screen grab from the CalTopo training homepage.

Here’s the scoop, direct from CalTopo:
“We are excited to share the first section of our new training website (training.caltopo.com) dedicated to using CalTopo, on the web, mobile app, and desktop. We began by creating an All Users section that expands significantly upon our existing knowledge base and aims to address the basics of every function in CalTopo.
We will continue to expand this training site to include additional sections aimed at both First Response and Recreational users of the program. Existing sections will remain up to date as we add new features and improvements.
This training site is our primary resource for all CalTopo questions. Whether you are entirely new to CalTopo or just looking for the details of a specific task or tool, you will find answers in the CalTopo training site. We welcome you to take a look at the site and see if you learn something new!”

The offset quad anchor
The quad anchor, typically tied with a 180 cm Dyneema sling, is an increasingly popular choice for bolted anchors or ice climbing. Here's a variation, the offset quad. This gives you two clipping points at two different levels, which can be helpful in certain situations.

The standard quad anchor works great for many anchor setups where you have two reliable bolts or ice screws. (While you can use a longer cordelette, many people find that a 180 cm or maybe 240 cm Dyneema sling, that’s 10 or 11 mm and fairly new, to be a more compact and lightweight option.)
Here's a simple variation: the “offset quad”. Rather than the standard method of tying it with four loops of the same length, you tie it with a long lower loop and a shorter upper loop. This can be helpful in certain climbing situations, such as:
Climbing with more than two people
Low anchors, where you may want to connect to the lower loop and belay your partner off the higher loop, because it's more ergonomic
Big wall climbing, where multiple staggered clip in points can be helpful
Rigging a redirected lower, where you are lowering on a tube belay device and you need to redirect the brake strand through a higher point. Learn more about a redirected lower at this article.
Rigging a belayed rappel, where you want to redirect the belay through a higher anchor point. (Thanks to a clever Instagram reader for pointing this one out to me, I didn’t think of it.)
Small cautionary note: Check that the angle on the top two loops is ideally less than 90°, otherwise you can start multiplying the load on your anchor points. If the anchors are far apart and/or your sling is a bit short, perhaps you should consider another rigging method, like a standard quad.
Give the offset quad a try and see if it works for you!
Here’s a video from IFMGA certified Rock and Alpine Guide Karsten Delap showing how it's done:

GPS tracks: even better with waypoints
What's better than having a GPS track to help you stay on route? Having a route with waypoints added. This improves your situational awareness with “heads up” navigation, and minimizes time spent staring at your screen. (Saves phone battery too.)

A GPS track file can be a great help in the backcountry to help you stay on route. What’s even better? A track file with waypoints added. Why?
Because a GPS device (an app on your phone like Gaia GPS or a handheld GPS), can tell you distance and bearing between waypoints. This lets you break your trip down into a series of segments from one waypoint to another.
Use the “Guide Me” (or similar) function on your GPS to see the distance and bearing to the next waypoint. Then, set that bearing on your compass to get you started in the right direction, put your phone in your pocket to help save battery, and shift your attention “heads up” to the landscape around you, and away from your screen.
Compare this with a track without waypoints. Here, you don't have any distance and bearing between points, just a line on your screen. In more complicated terrain, or with low visibility, you may need to check your GPS every few minutes to see that you haven’t wandered too far left or right from the track. This runs down your battery, leads to “heads down” travel, and decreases your situational awareness by shifting your focus on your screen, and not the terrain.
One other benefit to adding waypoints, especially if you’re using our favorite desktop mapping software CalTopo, is with the Pro level subscription and up, you can easily make what CalTopo calls a “Trip Plan”. This is a very helpful table showing all of your waypoints, and the distance, elevation gain, and estimated travel time between each one. We cover this helpful tool and a lot more detail at this article.
Of course, some terrain is more suited to doing this than others. Traveling above timberline in an alpine setting is generally pretty easy, down lower in the trees maybe not.
Here's a screen grab of a CalTopo trip plan for a ski tour around Mt. Hood:


Fixing a rope: Two knots to know
Securing one end of a rope to two anchor points, a.k.a. “fixing” the rope, can be handy in certain climbing situations. With some clever rigging, you can simply use the rope, with no slings or other cordage required. Here are two standard ways to do it: the bunny ears figure 8 and the Y hang.
This tip was written with the help of Bryan Hall, who is certified by the Society of Professional Rope Access Technicians (SPRAT) at their highest level.
Plus, high fives to Mikey Stevenson at The Rope Access and Climbing Podcast for making the nice video below that shows how to tie these two knots.

If you need to tie (aka “fix”) one end of a rope to two solid anchor points, you have many options.
Make a single master point from a sling and two carabiners, tie a bight knot, and clip the rope to it
Clove hitch to one bolt, tie a bight knot to the other bolt
You could use more exotic flavors of the bowline to make it easier to untie.
The example below are common in the rope rigging world, where strength and simplicity are guiding principles. Climbers should find these pretty easy to learn.
While it's not so common in day-to day climbing, there are some situations when you may need to fix a rope:
Big wall climbing, such as leading a pitch or two from the ground or your bivy, leaving the rope there overnight, and then ascending it the next morning to get a head start.
Needing to descend from a climb quickly, for some emergency reason (injury, lightning storm, darkness, etc.). You fix the rope, rappel the single strand, leave the rope there and (hopefully) come back and get it later.
Top rope soloing - get in lots of climbing time without boring your belayer to tears. (Note, rope soloing is an advanced skill. Please get qualified instruction before you do this.)
Some type of instruction scenario, where climbers are coming up one rope, and then rappelling down on another rope, which may be a single fixed line.
Other kinds of specialized rigging, like photography, caving or route setting.
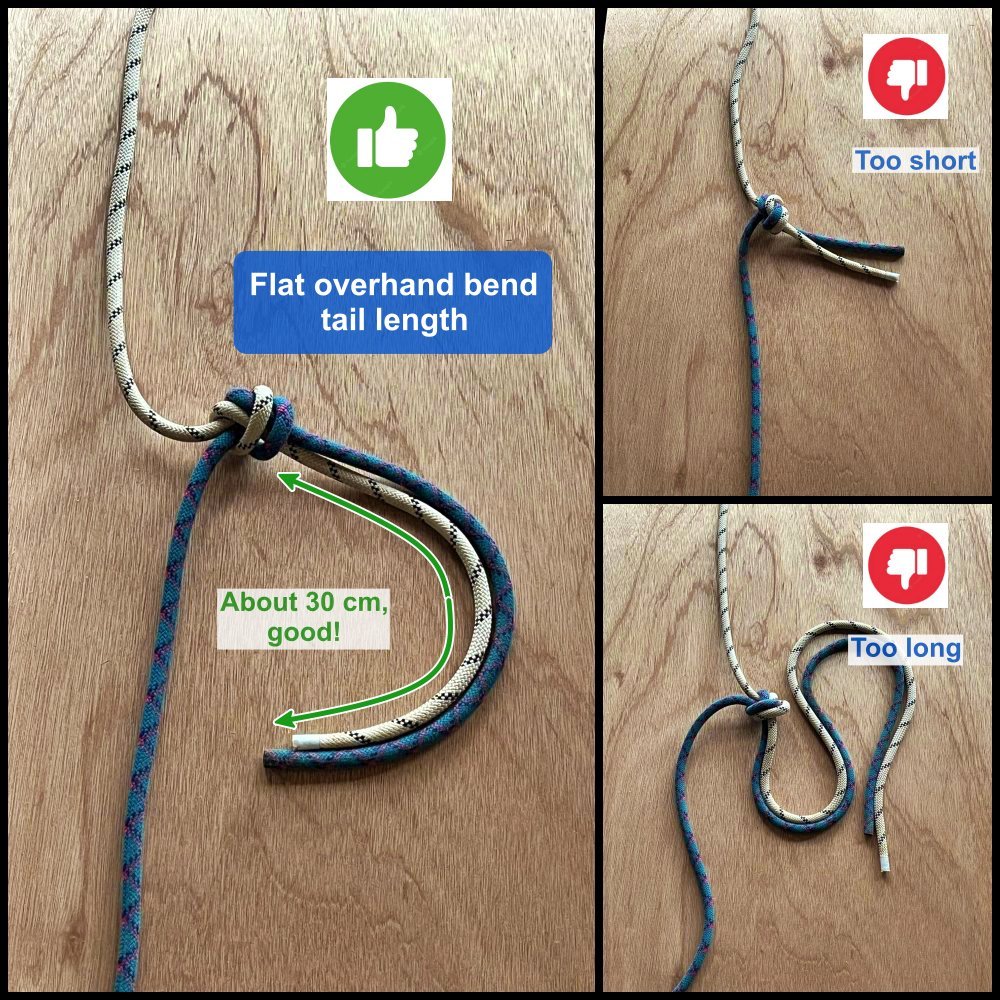
General safety note about rope fixing: Keep the tail of the knot about 1 foot / 30 cm, no longer. The length of your forearm is a quick guideline. That's long enough to make the knot secure, but not so long that someone might make the potentially lethal mistake of rappelling off of the knot’s tail instead of the actual strand of rope. Yes, this sadly has happened. Proper length tails prevent it.
We're going to cover two methods, the bunny ears figure 8 and the Y hang. Here’s a nice video from rigging expert Mikey Stevenson at The Rope Access and Climbing Podcast showing how it's done. (The instruction on the knots starts about 2:50). Check out Mikey's YouTube channel for lots more expert rigging videos like this.
Method 1 - ”Bunny Ears” Figure 8
The bunny ears works well to secure one end of a rope to anchor points that are more or less side-by-side. This is a variation on the figure 8 on a bight, but you end up with two loops Instead of one. This one may take some practice, especially dressing the knot properly so there are minimal twists. Tip: start with making a larger bight than you think you need.
One cool thing about the bunny ears figure 8 is that the ears are adjustable. You can feed a bit of slack from one loop and pull it to the other side. This can help distribute the load more equally between two anchor points. You can do this when the knot is loose; after you snug it down, you can't adjust the ears.
Some people are concerned that the bunny ears figure 8 is not redundant, meaning if one strand were to be cut, it would pull through and the other strand would fail. This has been tested, and it doesn’t happen, so yes, the knot is redundant.
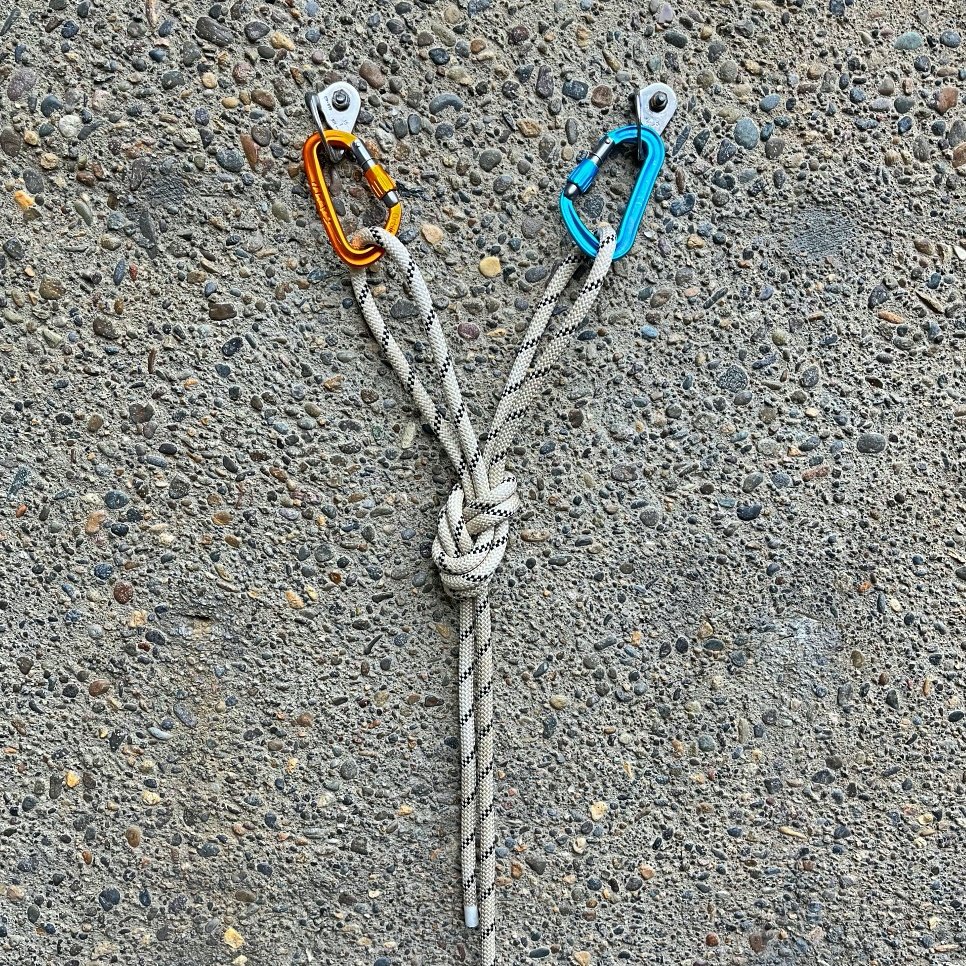
Method 2 - The “Y hang”
The Y hang can be helpful if the anchor points are vertically offset, if the load is coming from one side, or if the anchor points are side-by-side but somewhat far apart.
And, to be accurate, it's not really a single knot; it's a combination of two. That's why it's nice - it uses two knots every climber should be familiar with (as opposed to the seldom-used bunny ears figure 8.)
First, tie a figure 8 on a bight in one end of the rope. Make it tidy, with a small loop not much bigger than your hand, and a tail of about 12 inches / 30 cm. Clip it to the top anchor with a locker.
Next, tie a butterfly knot down the rope a bit. As shown in the video, the size of the loop can be adjusted by feeding rope into or away from the loop as needed. You will probably have to adjust it; tying a butterfly with the correct size loop on the first try is pretty rare.
Clip the butterfly loop to the second anchor point with a locking carabiner. When you weight the main rope, the load should be more or less equally distributed between the two anchors. (In the photo below it looks like there's a bit of slack going to the top anchor, but when the rope is weighted, the load is distributed pretty well.)
“Would a directional figure 8 could work here instead of a butterfly?” The answer is yes, but as far as I know it doesn't really offer any advantages. Australian rigging expert Rich Delaney said something to the effect of “a butterfly knot does everything a directional figure 8 can do”, and I tend to agree with him. IMHO, if you can tie a butterfly, there's not really a need for a directional figure 8 in recreational climbing.


What’s in my pack: backcountry ski kit by Colin Zacharias
Have a look what backcountry ski expert and IFMGA Guide Colin Zacharias carries for a day trip in this excellent YouTube video. (You'll never guess what the wine corks are for . . .)
I love “what’s in my pack” style videos (or second best, reading an article) by real experts.
Here’s an excellent one from Colin Zacharias. Colin is an Association of Canadian Mountain Guides (ACMG) and IFMGA certified guide, who has been ski guiding for decades. His gear is dialed, comprehensive, and fits nicely in a 30 liter pack.
Of course everyone will take away different things from a video like this, but here are a few cool tricks that were new to me.
How to use wine corks (?!) to make a rescue sled
Get a snow saw that can do double duty as a wood saw
Some specialized first aid gear for leg injuries more common with skiers
Check out the video link below to help get your ski gear dialed in.

Close your rappel system with the “J loop”
Hopefully you know the importance of “closing the rope system” by always having the rope ends tied either to a harness or a stopper knot. Here's an extension of that idea for multi pitch rappels: the J loop.
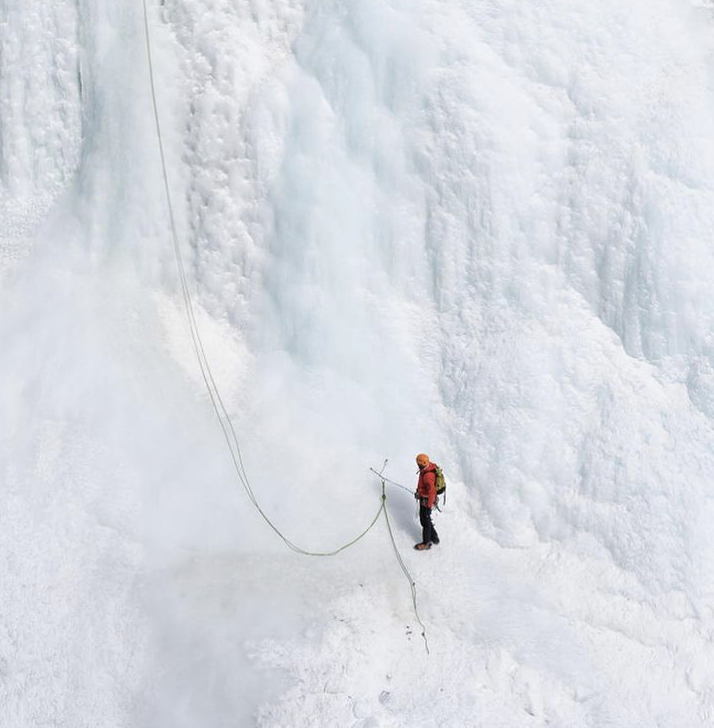
image: @seanisaacguiding, instagram.com/p/CJHp9lSjKBk/
On a multi pitch rappel, the first person down can add an important safeguard to the system by tying the rope strands to the lower anchor. This is known by some as a “J loop”, because it makes a big letter “J."
To secure the rope, you have several options. A clove hitch on each strand is a good choice. Because the hitch falls apart when you remove it from the carabiner, you don't have to remember to untie yet another knot. An overhand on a bight / BHK tied in both strands is also effective, because if you forget to untie it, you have a closed loop.
Avoid tying a separate bight knot in each strand. Why? Because it's all too easy to forget to untie it, start pulling the rope, and then realize too late that you have a knot above you, big problem!
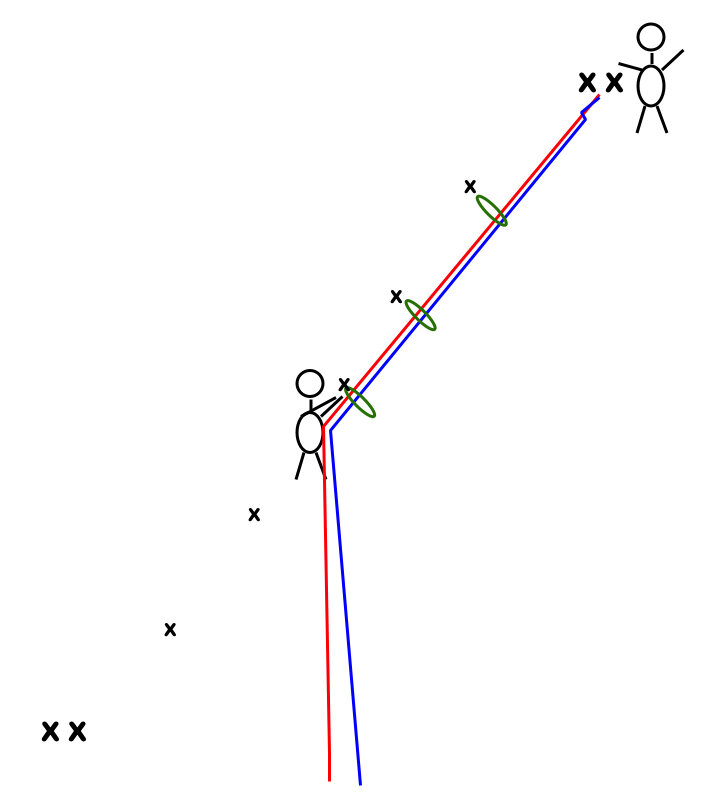
On a traversing rappel, you need to be VERY careful to always control the ends of the rope. Using J loop can help you avoid the potentially very serious problem shown in the diagram below.

IMAGE CREDIT: ANDY KIRKPATRICK
How does the J loop help reduce your risk?
Your partner can’t rappel off the ends of the rope, because it's tied to the anchor.
It makes it much less likely that the ends of the rope can swing or blow potentially out of your reach after your second arrives and goes off rappel, which could be a VERY serious problem if the rappel is traversing, overhanging, windy, or some combination of these.
It makes it much more likely that the first person down will remember to untie the stopper knots in the end of the rope. (After the J loop is tied, the stopper knots are no longer needed.)
In a traversing or overhanging rappel, the J loop helps guide your partner more smoothly into the anchor.
Finally, in the extremely unlikely catastrophe of the top rappel anchor failing, all may not be lost, because the rope is tied to the lower anchor.
Here's a nice diagram from Petzl showing the method. Note the BHK / overhand knot in both strands, and the end of purple, the pull rope, already threaded through the anchor master point. (The purple rope does not yet have a stopper knot in the end of it, that's the next step.)
image: https://www.petzl.com/US/en/Sport/Rappelling
For the first rappeller, the step-by-step procedure might look something like this. (This is one of several sequences that can work, not the only way.)
First person descending rigs for a standard rappel: using both strands of the rope, a stopper knot in each end of the rope, and an autoblock backup.
First rappeler arrives at the lower anchor. Clip tether to anchor. Keep your rappel device and auto block on the rope for now.
Feed 2-3 arm lengths of slack through your rappel device and auto block so your partner can get started.
Yell “off rappel”.
Optional but recommended: test pull. If your partner is not pre-rigged, do a test pull of the rope by pulling down a few meters on the pull strand to be sure it moves properly. Your partner above can answer this silent signal by pulling the rope back up. Be sure you have discussed this beforehand, so your partner up top knows what your test pull means, otherwise they might have a mild freak out. (If your partner is pre-rigged, you can’t do this step, because their auto block holds the rope in place.) If communication is difficult, note that the test pull can be a good non-verbal signal that you’re off rappel.
Tie a clove hitch in each strand and clip it with a locker onto some strong component of the anchor. Leave about 2 meters of slack to form the “J”. This slack allows you to do a test pull, and gives the second enough rope to descend.
Sweet, the rope is now secure in a J loop. Give yourself a high five. =^)
Untie the stopper knots in the end of each rope strand; you don't need them anymore.
Your smoking hot rappel device has now cooled off. Remove the rope from your rappel device and autoblock.
Pass the “pull” strand through the anchor, and tie a stopper knot in the pull end.
Wait for your partner to arrive. If for some reason they're not using an auto block backup, you can give them a firefighter belay. If they do have an auto block, there’s no need for the firefighter belay. That gives you a little break, whew! Use it to check the weather, grab a snack/water, get out your headlamp, scope the next rappel, read the topo, etc.
Once your partner arrives and is tethered to the lower anchor, untie the clove hitches.
Have a quick systems check: Both partners safely tethered, no twists or crosses in the rope, knot removed from the strand that’s going up.
Pull the rope slowly. Keep control of the end of the “up” strand until the last moment; don't let go of it and have it swing out of reach before you have to. (If the rope gets stuck as you're starting the pull, keeping control of the “up” strand greatly increases your options to solve the problem!)

Showa fishing gloves: the go-to for cold and wet?
Could these $20 Japanese fishing gloves become your go-to for winter sports? Many top climbers are increasingly saying yes. Let's take a closer look at Showa gloves, see an ice water “torture test”, and learn the one model you probably want to get.
Why are Showa fishing gloves great for cold-weather sports? How about: waterproof, durable, lightweight, warm, good dexterity, and incredibly inexpensive?
Could some of the best all-around winter gloves really be . . . fishing gloves from Japan that cost around $20?! Maybe yes.
In the last few years, more and more climbers have quietly started using some strange looking gloves from Japan. Made by Showa (and known in some circles as a “Smurf glove”, because of the garish blue color of many models) these just might become your go-to gloves as well.
I first heard of these from IFMGA certified guide Silas Rossi, in a YouTube video he made about his glove systems. In the midst of talking about his dozens of different gloves, at 4:17 he casually mentions, “The best all-around glove I probably use most days are these fishing gloves from Japan . . .”
Colin Haley is a fan as well. Here’s a “what’s in my pack” type article where he praises them, and below is a screen grab from his video of his solo speed record on the Cassin Ridge on Denali, with the gloves airing out at a break.
image: Colihn haley, screen grab from: https://www.youtube.com/watch?v=zD6YZkgUYHg
Also, backpacking expert Andrew Skurka has advocated these gloves for several years.
Apparently Japanese climbers already love these gloves. (This page is in Japanese, try right clicking and choose (“Translate to English”.)
So . . . if these expert climbers and backpackers, who demand top performance and test their gear ferociously, give these a thumbs up, there just might be something to it. So I got a pair to check ’em out.
At first glance, these look a bit like heavy duty gloves you might use for grubbing around in your garden. They’re made from an industrial looking fabric that's been hot dipped in some kind of waterproofing rubber. They have a light fleecy liner, which keeps your hands comfortable even when it gets a bit damp. They are billed as breathable and waterproof, but I think of them a bit more like a wetsuit glove - even with some internal dampness, your hands still stay warm.
You may not want to wear them under heavy exertion/sweating, like hiking or skinning uphill, as your sweat is going to dampen the glove a bit. Drying them can take a while, but like most gloves, turning them inside out helps a lot. (When you’re sweating, like skinning uphill, a better choice might be a breathable fleece glove.)
In colder conditions, some people have success wearing a simple nitrile glove as a vapor barrier liner underneath the Showa gloves. (I haven't tried this, but it sounds like a good system.)
The light fleece liner is going to get chewed up under heavier wear. When that happens, add your own lightweight liner gloves underneath the shell.
If you search online, you’ll see MANY different styles of Showa gloves (in some shade of blue) that all look about the same.
For snow sports and alpine climbing, there’s one model that’s most suitable:
Showa 282-02 Temres
This model differs from the others because it's 1) black and 2) has a nylon wrist gauntlet that cinches down on your forearm and helps keep out the snow. The many other models of Showa gloves do NOT have this wrist gauntlet. Those other styles might be suitable for cold-weather backpacking or rainy bicycle rides, but to help keep out the snow, the wrist gauntlet is a big help.
Although the fit is a little loose, because the liner is bonded to the shell, you have greater dexterity than you might think. Tying climbing knots, securing a harness buckle, swinging ice tools, good grip on the rope for belaying . . . no problem!
They are lightweight. A pair of the Temres (size large) weighs just 115 grams / 4 ounces.
Like lots of Japanese clothing, these are sized small by North American standards. My hands are a medium with just about every other glove, but a large here fits me perfectly. The gloves do come in XL and XXL sizes, so if you’re wondering, you might wanna go a size bigger. Heck, they’re inexpensive enough so you might want to buy two different sizes and just give away the one that doesn’t fit.
Are these going to be the perfect gloves for every single winter sport? No. For super-cold weather, you may want more insulation (and maybe mittens, which will almost always be warmer than a gloves). If you rappel a lot, you may wear through the palm. If you're actually rock climbing in them, you may need a thinner glove with more dexterity.
But maybe for 90% of the things you do in the snow, like digging snow pits, brushing snow off the tent, approach hiking, racking your gear, excavating your car, snowball fights, walking the dog, etc., this might be the ticket. I don't do snowmobiling, but they look perfect for that. And I've been on some very cold multi day whitewater trips when these would've been amazing.
As a test, I put on the Temres glove and stuck my hand in a bucket of ice water. (Bonus, 28° Fahrenheit air temperature with snow on the ground.) After 15 minutes, my fingers were toasty warm and completely dry! Try that with any other glove and see what happens.

Sounds good! How do I get some?
At this writing (Feb 2021) there’s only one place that I know in the USA where you can buy the Temres 282-02: Go2Marine.com in Bellingham Washington. (I’m sure they are wondering why the hell they’re getting hundreds of orders for Japanese fishing gloves but hey, good business for them.)
As a reminder, there are no ads, paid product promotion, or affiliate marketing links at AlpineSavvy. This link is mentioned only as a convenience for you.
You may have heard the car mechanic’s saying: “You can have it fast, good, and cheap. Pick two.” It seems gloves usually work the same way; There needs to be some sort of compromise along the way.
Happy surprise: the Temres 282-02 gloves deliver on all counts.

Top rope directional for ice and rock
For top rope climbing on rock and especially ice, having a directional placement off to one side of the anchor has many benefits. Learn them here from guest author, ACMG Guide Sean Isaac.
Photos and article (used with permission) are from Sean Isaac. Sean is an ACMG (Association of Canadian Mountain Guides) certified Alpine guide, a former professional climber, and author of the “Ice Leader Field Handbook” and “How to Ice Climb” (2nd ed.) Follow @seanisaacguiding for more great tech tips.
Using a directional protection point in top-rope ice climbing can significantly reduce risk and increase climber enjoyment. A top-rope directional should be used more often than not for many reasons.
One of the main ones: keep the belayer’s side of the rope away from the swinging ice tools of the climber. When rock climbing, it’s annoying when the belay rope slaps the climber in the back of the helmet, but in ice climbing this can be a major hazard. The climber can catch the belay rope behind them as they swing, which can result in either dropping the tool or putting a pick in the rope (I’ve seen both examples happen).
In addition, a top-rope directional helps to:
Keep the rope in line with the route and between ice tool placements (less chance of hitting the rope)
Keep the rope out of wet ice
Prevent a pendulum swing into hazards: ice pillars, hanging icicles, rock corners/dihedrals
Create two separate climbing lines from a single top-rope anchor
Keep the rope away from loose rock or sharp edges
Prevent swinging out away from the rock on steep mixed routes
Prevent climbers from going higher than you want them to (i.e. over a bulge, too close to an ice anchor, out of sight, etc)
Prevent the two strands of rope from crossing and twisting around each other
Almost any type of protection can be used as a top-rope directional including: ice screw, V-thread, tree, bolt or rock gear.
Some common concerns . . .
“Isn’t that some sort of American Death Triangle (ADT) vector, which increases forces on the main anchor and the directional?” It's not an ADT because the force doesn’t come to one point. Actually, having the directional decreases force on the main anchor, because the directional takes some of the force. For a good ice screw that can hold at least 10 kN, it’s not a concern.
“If the directional fails, doesn't it shock load the main anchor?” The directional should never fail. (If it's a warm day or the anchor is in direct sun and you're worried about the screw melting out, then making a V thread might be a better choice.) In the highly unlikely event that it fails, you're going to take a swinging lateral fall onto a very stretchy dynamic rope. Which could certainly be exciting, but not an issue for the main anchor.
Does it twist the rope? As long as the directional is below the elevation of the main anchor, the rope doesn’t get twisted. (In the small chance it does, try this simple trick to remove the twists.)
A caution: Be sure your rope is long enough. If you add a directional, this increases the length of rope required to lower to the ground. For an ice anchor directional of just a few meters as shown above, that shouldn’t be a problem. However, if it's a rock route with bolted anchors that are exactly placed, for say, a 30 meter climb, you might need more than a 60 meter rope if you add a directional. One more reason to always close your rope systems with a stopper knot.
If the directional is critical to avoiding a specific hazard, then a locker draw (below) can be a fine idea. (There are lots of other uses for a locker draw, learn them at this article.)

Using your phone to measure slope angle
Knowing the slope angle you're standing on can be helpful for assessing avalanche risk. The old school method of a clinometer on your compass can be a hassle. Instead, try a measure/level app on your phone.

Measuring slope angle, to assess avalanche potential or brag about how steep that final couloir was to your friends, can be useful in the backcountry.
The old-school way of doing this was with a sort of plumb bob on fancier compasses called a clinometer. Truth is, using one is often a hassle. You may find it hard to read the tiny numbers on the compass, and usually have to have your cheek down in the snow to be able to look at the compass. About the only advantage is that it doesn't need batteries.
A more modern and way easier way to check slope angle is with some sort of “Measure/Level” app on your phone. The iPhone has one built in to the operating system. Or, you can get a free measurement tool from BCA Backcountry Access. (Android folks, I'm sure you can find something similar.)
Open the Measure/Level app on your iPhone, and swipe to open the Level app. If you're walking / skinning uphill, simply put the phone flat on your ski, or on edge if going across the slope.
Note: Just knowing the slope angle is not the whole story as far as avalanche potential. Avalanches are often caused by micro terrain features that you may not notice by taking a quick measurement like this. Or, you could be on a safe slope, but there could be an unsafe slope above, with you in the run out zone.
At top is a photo showing how it's done, from the expert backcountry ski guides at Graybird Guiding. (Note, an uphill skin track of about 18° is thought to be about optimal, so keep that number in mind.)
Note that phones don't behave well in the cold. If you use it for occasional slope measurement, try to put it back in an inside pocket, ideally in your base layer between uses. Carrying an auxiliary battery at full charge, also kept warm, with a short charging cable, is highly recommended.
If you have an iPhone, this measuring tool is free as part of the operating system.
However, for just a few bucks more, you can get an iPhone and Android app that's quite a bit better. Search the App Store for “Avalanche Inclinometer” (made by Iterum LLC). As of winter 2024, this app is $3.99.
This upgrade has some handy and easy to read features: the slope value is color coded to remind you when you might be getting into higher risk terrain, you can tap to lock the screen, and it also shows your elevation, aspect, and coordinates. With a tap you can share all this information via email.


CalTopo pro tip: Travel Time and Travel Plan
CalTopo, the best backcountry mapping tool, has a very cool feature - Travel Plan. Draw a line or import a GPS track, then add waypoints on the line that break the trip into segments. Now, choose travel plan, and you get a table showing distance, bearing, elevation gain and estimated travel time between each leg of your trip.
CalTopo, the best backcountry mapping desktop tool, keeps getting better. CalTopo recently (autumn 2020) rolled out a very cool feature(s), “Travel Time” & “Travel Plan”. Let's learn how to use ‘em!
(If you’re new to CalTopo, get started with this tutorial video.)
CalTopo has four subscription levels: Free, Basic, Pro, and Desktop. I recommend the Basic for most users, but if you want the Trip Planning feature, you need the Pro or Desktop. See more details on the subscription levels here.
For this example, we’ll use a backcountry ski circumnavigation tour of Mt. Hood in Oregon.
The “Travel Time” feature is available for all subscriber levels. If you draw a line (right click on the map > New > Line, or use an imported GPX track), click on the line, and select Travel Time, you’ll see an estimation of travel time for that line. This time is estimated using the “Munter Method”, which considers distance, elevation gain/loss and travel mode. It’s a rough estimation, but can be a good starting point. (Learn more about the Munter Method here.)
(And, because I know you're wondering, yes, it’s same person who popularized the Munter hitch, Swiss guide Werner Munter! Thanks for both of these, Werner!)
A good way to test the accuracy of the Travel Time estimate is to draw a line covering a familiar hike or climb, and test the predicted time with your normal hiking time. For example, I did a test drive of the standard south side route on Mt. Hood. CalTopo predicted a travel time of 5.4 hours on foot, which is pretty much spot on with the standard 5 hours that's typical for a fairly fit climber.
Of course, alpine travel times can be extremely variable depending on fitness, snow depth, amount of crevasse negotiation, etc. This is a baseline for general trip planning, not the Holy Grail.
First, draw in your route or, in this case import a GPX track.
(Sidenote: AlpineSavvy has GPX tracks for more than 70 of the most popular climbing routes in the Pacific Northwest available for free download, you can get them here.)
Right click on the line, select Travel Time, and you should get a box that looks like the one below.

The Travel Time is moderately helpful. But for Pro level subscribers or higher ($50+ a year), you get another big level of Awesomeness, the Travel Plan. With this, you can add marker points along your track, click “Travel Plan”, and then get a table of very helpful route information between each point. Here's how to do that.
First, add some marker points (aka waypoints).
Right click on the line on your map, map, choose New > Marker. The marker points need to be pretty much on the line that you drew or imported.
It's good to add marker points that break up the route into reasonable sections. In this case, that’s significant ridge crossings or entering/exiting large glacier areas.
It’s helpful to give the marker points a common name, and then a number. This helps keep them organized in your GPS app, as well as letting you quickly see where the next one is sequentially when on your trip.

Additional cool feature: You can include Travel Plan break times by typing “30 min” (or whatever time you like) in the marker label field or marker comment field. Click the marker and choose edit to access the comment field. Example below.

Now, you can click the track, click Travel Time, then click Travel Plan.

Travel Plan creates a table like this. For each waypoint, it shows the latitude longitude coordinates in decimal degrees and the elevation. From one point to another, it shows vertical gain or loss, distance, true north bearing, estimated time, and cumulative time.
A few notes . . .
If your pace is significantly faster or slower than what the Travel Plan predicts, you can adjust this in the Travel Mode “Custom” drop down box.
You can print this out, take a screenshot, or save as a PDF (helpful if you want to share it with other people on your team.)
For a longer trip or multi day outing, you can create a single travel plan that covers multiple lines / tracks. That’s more advanced than I want to cover here; learn how on the CalTopo training website.

So . . . why is the CalTopo Travel Plan cool?
Backcountry travelers have been making travel plans like this for years. But, it required extremely exacting work of counting contour lines, measuring distances with the map scale bar, and some math that many people found to be about as enjoyable as chewing on tinfoil. Caltopo does the same with just a few clicks, and saves huge amounts of time and tedium.
Because you know distance and bearing between marker points, it helps you keep your GPS phone app mostly in your pocket, and follow a compass bearing (compasses, remember those?) and general terrain between points. In alpine terrain, it's usually easier to navigate to a specific waypoint, taking the path of least resistance, then try to stay precisely on top of a GPX track. Doing this helps save your phone battery, and increases your situational awareness, because you're paying attention to the landscape around you and not staring at a GPS track on your phone screen.
It lets you have a better sense of your pace and what a realistic turnaround time or a bail out point might be. Rather than having one strict turnaround time for a particular point of your trip, you can compare each leg with the estimated time to get a more detailed sense of your overall pace.
Related to the previous reason, it lets you share a solid travel time with an emergency contact person at home. Many unnecessary rescues are initiated because a hiker underestimated their travel time. This tool can give you a more realistic estimate, which you can hopefully share with your contact person, maybe sparing them needless worrying and even calling for an unneeded rescue.
Finally, if you want to get fancy and have some time on your hands, you can export the GPX track from CalTopo as a KML file, and then open the KML in Google Earth. If you do a fly around, it looks something like this. (Of course, this ski tour is more fun with more snow.) Enjoy!

Backcountry ski repair kit tips
Headed out for a backcountry ski trip? You’d better have a way to fix your gear. Here are some components of a robust repair kit that can handle just about everything. (Thanks to a few ski experts who contributed to this: Pro Guiding Service and Matt Schonwald.)
The bulk of this article comes from the experts at Pro Guiding Service in North Bend WA. Follow them on Instagram, Facebook, and check their website, proguiding.com. Photo and content shared here with permission.
Some other suggestions on this page come this article from Matt Schonwald, an AMGA certified Ski Guide, Avalanche Instructor and member of Northwest Avalanche Center’s Forecasting Team. Connect with Matt at BC Adventure Guides.
Backcountry ski repairs can fall into into two major categories.
Category 1: a bummer, but you can keep moving.
A broken ski pole
Lost ski pole basket
A tear in your clothing
A broken walk mechanism in your touring boot
A bent ski
A delaminating ski
A lost skin tail clip
A lost or torn skin tip attachment
A broken heel piece in a pin binding (this a category 1 if you’re a good skier)
Category 2: a major bummer and potential safety issue.
A broken toe piece in a tech binding
A toe piece torn off a ski
A ripped out binding
A lost skin

photo: https://www.facebook.com/ProGuidingService
Here's a repair kit that can handle just about all of these situations, and a few more.
A few notes . . .
This is more of a kit that a ski guide might carry on a longer tour or multi day outing. A few things, like the toe piece and cordelette, can probably be left at home if you’re on a shorter or less committing trip.
Just like sharing the contents of a first aid kit, no one‘s going to agree 100% with everything. This is more of a starting point to get you thinking about what gear you might want to carry.
Do you think this gear is too “heavy”? I don’t know the exact weight of everything posted here, but it can’t be much over 1 pound. If that amount of weight is keeping you from your objective, consider spending more time training and less time obsessing about shaving grams from your gear. =^)
(Reminder, AlpineSavvy has zero affiliate marketing. The links are provided only for your convenience.)
A few zip ties. Consider steel zip ties, they are stronger and can hold up better in cold weather. You can also get heavy duty zip ties that can hold about 200 pounds/100 kg.
Some 2 mm cord
A meter or so of wire; 16g is a good size; stainless steel is best so it won't rust in your pack.
Fabric repair tape; Tear-Aid (type A) tape is good.
Small roll duct / Gorilla tape; Consider cloth hockey tape. It sticks well to things that are wet and cold.
Epoxy; this may make the difference when you tear the toe piece off your ski. You can get single use epoxy packets that are more convenient to carry.
Assortment of hose clamps; two small ones for pole repair, and two large ones to clamp your boot to your ski in case your binding breaks. Large hose clamps not shown in photo.
Some sort of pole splint; 15 cm length of old ski pole tube with a slit cut lengthwise. I've heard of people using a section of aluminum can for a pole splint, never tried it.
Assortment of standard binding screws; if you have a quiver of different skis/bindings, be sure you bring screws that cover everything.
Helio coil inserts for torn out bindings screws; steel wool and epoxy can serve the same function.
A multi tool with pliers and wire cutter; the Leatherman Skeletool, 5 ounces, is a good choice.
Binding Buddy; heavy, but works well. Test it and be sure that it's long enough to reach every screw on your binding, sometimes the neck can be a bit short. The Topeak Ratchet is another option for a driver that has more leverage.
Assortment of driver bits to use with your Binding Buddy or Skeletool. #3 Phillips, #2 Phillips and T20 (Torx / star bit) can be a good start, but check all your gear and be sure you have bits for everything. It's not standardized. Some gear requires Allen screws, typically #4 or #5.
Allen wrench; if your boot has any Allen bolts
4 bolts and wing nuts and a 6mm cordelette for potential construction of rescue sled; sorry, no link for this.
Glop Stopper wax; Black Diamond, glide wax for your skins, carry a small piece, not the whole big block
Glide wax
Metal ski scraper
Tent pole splint; for fixing a broken ski pole, you can also cut a section from an aluminum can
Skin tip
Skin tail clip. Can't really improvise this.
Extra ski pole basket
Voile ski straps. Bring a pair, 24 inches is a good length. Good for loads of things in addition to the obvious holding your skis together. These are in addition to the ones you have to hold your skis together. Here's a whole article on Voile straps.
Finally, a sturdy bag to put it all in. You can go bare bones with a stuff sack, or something that zips open and has a few dividers like a bag for a first aid kit.
For longer or more remote trips, consider:
Two cordelettes of about 6mm/ 6 meters long. For general anchor building and rigging a rescue sled if needed.
A few carabiners

Flat overhand bend - how long a tail?
A flat overhand bend is a good choice for connecting two ropes for a double strand rappel. Pay attention to the tail length. You want it at about 30 cm, or the length of your forearm; not too short and not too long. Longer is not better, and has been the cause of fatal accidents.
A great knot choice to connect to rappel ropes for a double strand rappel is the flat overhand bend. (It was previously known by some as the “European Death Knot”, or EDK. Let's not call it that anymore, okay?)
Why is this a good rappel knot?
It’s known as an “offset” knot, because the body of the knot is offset from the line of pull. This can help the knot work its way around obstructions such as rock nubbins or ledges to lessen the chance of it getting hung up when you pull your rope.
Works well with ropes of different diameters (up to about 3mm difference). So if you want to connect a skinny 7.7 twin rope with a 9.5 single rope, no worries.
Super easy to tie and visually check.
It's plenty strong for any normal two strand rappel situation. (For a single rope rappels more common in caving and canyoneering, or for extra heavy loads, some recent research recommends a more robust knot. We’ll cover that in a future tip.)
It’s important to have the right amount of tail in the flat overhand bend. A good rule of thumb is about 30 cm / 1 foot.
Think of that as about the length of your forearm, or two hand spans. It's sort of the Goldilocks length, not too short and not too long. This length gives you a margin of error to prevent minor mistakes from becoming catastrophic.
If the tails are too short, the knot could potentially roll once or twice under an extremely heavy load and roll off the ends. A decent sized tail (hopefully) prevent this.
If you tie a sloppy, poorly dressed knot, a proper tail allows the knot to tighten up under load without pulling in the ends.
Not-too-long tails give you use of the full rope, which can be important in reaching the next rappel station if it's a real rope stretcher and you need every possible meter.
Proper length tails keep your nervous partner happy, and gives them room to add another overhand knot (aka stacked flat overhand bend) in the tail if they like, to give them a warm fuzzy feeling before they rappel. =^)
Many people think a longer tail is better. Not so. If the tails are too long, it increases the chance of someone mistakenly clipping their rappel device to the tails rather than the actual rope. While you may think this would never happen to you, this has caused fatal accidents to extremely experienced climbers, usually in darkness and/or from major exhaustion. Eliminate this potential mistake by having tails not too long, but just right.
If for some reason you’re ever fixing a rope (or using someone else's fixed rope) or tying two together like this, and the tails are longer than about 30 cm, at the very least tie a stopper knot in the ends, or tie them together, or do something to prevent someone from ever rapping off the ends.
Here are two accounts of tragic accidents where someone rigged a fixed rope with a long tail, and rappelled off the tail instead of the actual rope.
Fatal accident: Rappelling off the long tail of an anchor in Yosemite
Fatal accident: Rappelling off the long tail of an anchor in Baffin Island