Alpine Tips
Google Earth screen grabs - The best route beta tool?
Google Earth is great for wasting time at work, but it's good for a lot more than eye candy. Learn a few tricks about how to scope your route at home, complete with a route line and annotation added.
Most climbers know that Google Earth (aka GE) is a great tool for scoping out your route at home and getting a feel for the terrain. But, with a few other simple steps, you can take GE to a whole new level of usefulness.
Before we proceed, a couple of tips.
Have Google Earth Pro installed on your desktop computer. It's now free (it was $$399 before 2015!), and has some additional functionality over the web base software. And, it's a lot easier to navigate than the GE phone app. A desktop computer is easier to use than a tablet.
At least for my clumsy fingers, GE is MUCH easier to use if you have an external mouse with a scrolling wheel. Highly recommended.
Mt. Stuart WA Cascades, West Ridge route in Google Earth, with imported KML track and waypoints. That's what I'm talking about!
As we like to say at Alpinesavvy, having a map or photo is great, but having a map or photo with your route drawn on it is much better. And, when you can see your route in 3-D with high resolution satellite imagery, it gets even MORE better!
Here’s the general workflow, with a longer explanation below.
Find a GPX track file of your route.
Open it in Caltopo, and export it as a KML file.
Open the KML file in GE
Make a few screen grabs
Annotate your route in photo editing software (optional)
Print your images if you want, and/or save the edited image(s) to your phone or Google Drive for offline viewing and sharing with your team
Step 1 - Find a GPX track file of your route
You can get track files for more than 70 of the most popular routes in the Pacific Northwest right here at Alpine savvy at this link. If You want a peak that's not on this list, a good place to go is peak bagger.com. We cover how to find GPS tracks at Peakbagger at this article.
Note that if your GPX file has both lines and waypoints, the resulting KML export will have both of these features also. This is great for showing both the climbing route and point features such as water sources, good campsites, important trail junctions, etc. Pro tip - If you name your waypoints in Caltopo, such as (“climber trail junction”, “rappel” or “campsite”), these waypoint names will appear in Google Earth in your KML file. Very helpful!
Step 2 - Open it in Caltopo, and export it as a KML file
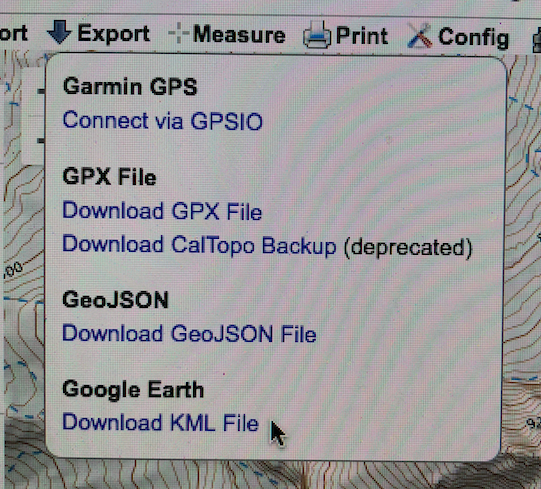
Caltopo is pretty intuitive. Go to Caltopo.com, import the GPX track, then choose Export > Download KML File from the drop-down menu on the top. (Alternatively, you can download a single zipped folder of KML files for most of the popular mountain peaks in the Pacific NW right from this website.)
Below is a screen grab of what this looks like in Caltopo.
Step 3 - Open the KML file in GE
A KML file (or Keyhole Markup Language, for you computer nerds), is a file of geographic data that plays well with GE.
Once you have the KML file on your hard drive, double click it to should launch GE and draw your KML file. (Or, you can launch GE, and just drag and drop the file onto the GE screen.) Zoom in close, and waste another 10 minutes of your life in GE land flying around your route. (Ever notice how it’s always a bright sunny bluebird day in GE land? Apparently it never rains there. =^)
Step 4 - Make a few screen grabs
So, you’ve zoomed and rotated GE around until you find a few good spots that show the key points of your climbing route.
Now it’s time to do a few screen grabs. GE makes this easy.
Zoom and pan to just the spot you want to capture.
Go to File > Save > Save Image.
Click the “Save Image” button at the top of your and it will save a JPEG image file to your hard drive. Don’t be shy, fly around and take several different shots. You don’t have to keep them all.
Tip: Take screenshots from a variety of different heights, from zoomed out several thousand feet in the air to zoomed WAY in, just hovering above your route. When you zoom way in close to the ground, you get a more realistic view of what you are really going to see, a big help in making route finding decisions. It can be a little tricky to find just the right spot, that's where the external mouse with the scroll wheel can come in handy.
Below - GE screen grab from the start of the Fisher Chimneys section, Mt Shuksan WA, a notorious place to have route finding difficulties. This shot is taken zoomed in quite low to the ground, and looking up the route This more realistic “human-eye” view like this can be a great help in the field.
And notice with the high resolution satellite imagery, you can actually see the climber trail, very helpful also.
Here's a more oblique, birds-eye view of another route on Mt. Hood.
Step 5 - Annotate your route in photo editing software (optional)
Most of the time having a simple redline in the photo from the KML file is going to be enough, but if you want to get fancy you can add additional route info / text onto the photo.
Open your JPEG in some simple image editing software. You don’t have to be a Photoshop wizard to do this. I happen to like some free software called “PhotoscapeX”, but there are many options.
Add in arrows showing hazards, maybe mark where the rappels are, add elevation to key decision points, show the descent route if it’s different than the way you went up . . . You get the idea.
Step 6 - Print your images if you want, and/or save the edited image(s) to your phone or Google Drive for offline viewing and sharing with your team
If you like hard copies, print out your screen grabs and bring them with you on your climb for reference. A color laser printer is more weatherproof than an inkjet. Be sure and put them in something to protect them from the weather, a 1 gallon Ziploc bag is perfect.
Email the photos to the rest of the people on your climbing team, so they have the benefit of your efforts.
Finally, get those photos back on your phone so you can reference them on the route if you need to. Email them to yourself, save to photo roll, or whatever crafty thing you like to do on your phone to save photos. Now you have a free and weightless back up to your printed photos.
(Or, as we cover in this Tip, a convenient way to keep a lot of image files like this handy on a climb or hike is to store them in Google Drive in a designated folder, and then select each of them to be available offline. This lets you view the photos when you don't have cell coverage.)
A slight caution: GE tends to flatten out pointy peaks
If the summit area is especially steep/pointed, at present (2018) GE may display it as significantly flatter than it is in reality. Do not be suckered into thinking that the most technical part of the climb is an easy walk up, always check route descriptions and look at a contour map to see for yourself.
Here's an example in the Oregon cascades, Mt, Thielsen, probably the “pointiest” summit in the whole state.
This is what it looks like in a Google Earth screen grab (Amazing detail, you can see the climber trail.)
This is what it looks like in real life - Quite a bit different! There is one pitch of 5.easy climbing at the top but it has about 2,000 feet of exposure, so pay attention.
Now, this procedure may sound a little complicated and time-consuming when you’re doing it for the first time or two. But trust me, when you get this down it takes literally a few minutes.
Google Earth is a great way to visualize the terrain before you leave town, and also have a great navigation tool en route in addition to your map, compass, and navigation brain.
Posting photos online? “Redline” your route
Posting photos of your latest mountain outing is great. How about making them a lot more useful by adding in some route info with simple drawing tools?
As we like to say here at AlpineSavvy: “A map or photo of the route is great, but a map or photo with your route drawn on it is better.”
You’ve just finished a climbing route that’s been on your tick list for a long time, you took a bunch of great photos, and you’re ready to post to social media.
If you have some good photos of the mountain and route, do everyone a big favor before you post: take a minute or so, use a simple photo editing tool, and “redline” your photo(s) showing exactly where you went. This turns your photo from a pretty picture into a useful tool for anyone who sees it. (And it sure doesn't have to be red, use any color you like.)
Drawing a simple line on a photograph can be done with lots of free or browser-based photo editing software. If you want to get fancy, you can add an arrow or some text annotation as well. (I’m a fan of PhotoScape X. It’s free, works on Mac and Windows, lots of features but still easy to use for simple things like text and arrows.)
Note that you don't even have to use your own photo for this. You can take a Google Earth screengrab, save it as a jpeg, and then draw over that. Examples are below.
It’s helpful to make a copy of the original photo before you start so you don’t mess with it.
Example: Here’s a photo of North Sister from the SW Ridge approach. Ho hum, pretty boring. But, add a simple line, and suddenly it's a LOT more useful. And, maybe add an arrow and annotation, which only takes another minute or so, to improve it even more.
Photo taken on route: North Sister OR, SW ridge. Yawn, not much help to anybody.
North Sister, SW ridge approach. Route redlined. Now we have something that’s actually helpful for someone else to routefind.
North Sister, SW ridge approach. Route redlined and key route beta added with arrow and text. (Gee, thanks for ruining my onsight!)
You can also do the same thing with Google Earth screengrabs. Here's an example of the Leuthold Couloir route on Mt. Hood.
Google Earth pro tip: You can easily save an image of your Google Earth screen from the menu. Try File > Save > Save Image. It even lets you add a title and description to your saved image, as you can see below.
Mt Hood, Leuthold Couloir route, Google Earth screen grab.
Mt Hood, Leuthold Couloir route, Google Earth screen grab, with route redlined.
Mt Hood, Leuthold Couloir route, Google Earth screen grab. Route redlined, and adjacent "off route" areas shown.
One other good way to use Google Earth screen grabs is to have your route drawn in with a KML file, and then zoom in close to the ground and take screen grabs looking up the route. This gives you sort of a virtual “climber’s eye” view that can be really helpful for route funding in the field.
If you want to learn how to use KML files in Google Earth, check out this video.
Here’s an example of the Fisher Chimneys route on Mt. Shuksan in Washington, on a section with notorious route finding difficulties. Zoomed close to the ground like this can give you a good reference for making better real world route choices.
Have a “plan B” for climbs - bring an extra guidebook
Toss that extra guide book in your car before a trip, case you need to suddenly change objectives.
There are many reasons why a climb may not “go”, from the route being too dry or too wet/snowy, wildfire closures, getting lost on the approach, or being attacked at base camp by a well organized gang of rock rodents.
So the weekend isn’t a total bust, consider bringing a guidebook or two for other nearby hikes or climbs in case the main destination doesn’t work out. If the primary climb goes, the guidebook stays in the car. That way, you may be able to enjoy an alternative destination, and still be able to salvage the trip. This becomes even more important with high gas prices and the longer a trip is from your home!
You can of course bring a physical guidebook. Or, it might be more convenient for you to buy a guidebook or two in Kindle format, and just keep that loaded onto your phone so it's always there.
Is there a wildfire near my climb? Check here
Use this great website to see all of the active wildfires in the Western US. Check this before you leave home in the summer - don’t let a distant fire shut down your trip.
A few years back, I was heading out the door out to try the West Ridge of Mt. Stuart in central Washington - an area notorious for summer fires. As we rolled out the driveway, I had a sudden thought. “Hey, I’m going back in and check for fires, I think I heard something on the news,” I said.
Sure enough, a call to the local US Forest Service office told me a fire had started the day before near the trailhead and all backcountry access was closed. If we hadn’t checked, we would have driven 5 hours for nothing. Even if a fire may be far away from your destination, the land management agency still may decide to close a big area. Don’t let this ruin your weekend, always call first!
Here are three websites and phone apps that can give you the most current fire information: 1) CalTopo, 2) Gaia GPS, and 3) Inciweb.
1 - CalTopo “Fire Activity” map overlay
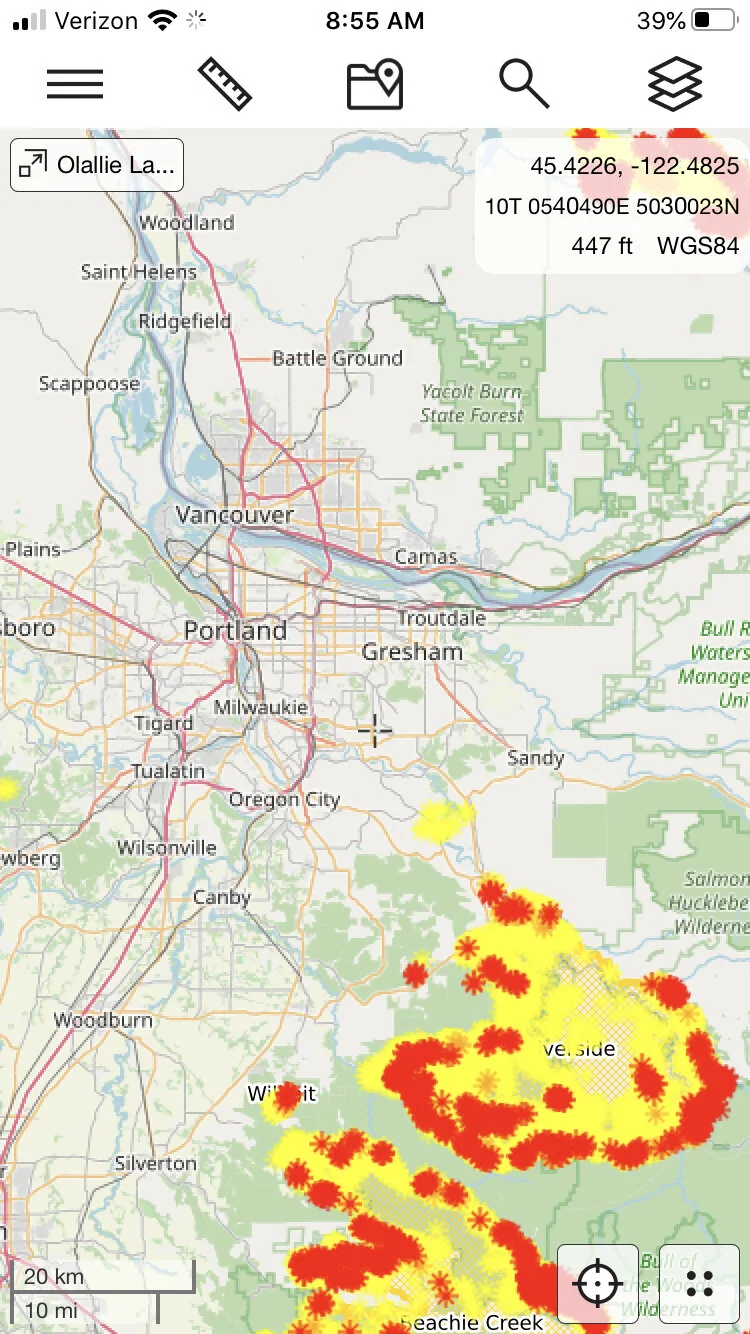
From the always awesome CalTopo, click on the map overlay “Fire Activity”. The fire data come from a variety of sources, typically satellite-based. It shows where the active fronts of the fire (red and orange) are, which can be more useful than simply seeing the area that's been burned. This is my new go-to for active fire info. You can read more details at the CalTopo website.
This works on both CalTopo platforms, desktop and phone app. Plus, it's free! (Fire maps below from Sept 2020.)
Here's what it looks like on the CalTopo phone app. Tap the “map layer” icon in the top right corner, and check the box next to “fire activity” to add this overlay to your chosen base layer, here Open Street Map.
2 - Gaia GPS
Gaia GPS is a good place to check, because in addition to fire coverage, it shows smoke coverage forecasts which can be helpful also. It takes a few clicks, but follow the steps below and you'll have it set up in a minute or so.
Go to gaiagps.com. If you don’t have an account, make one for free. (Normally Gaia offers weather information like this only to Premium level subscribers, but to their credit, they make fire and smoke maps free to everyone, thanks Gaia!)
1 - Click “Layers” on the left side menu.
2 - Click “Add Map Layers”
3 - Click the “Weather” icon.
4 - Select anything in the purple boxes you want to see by clicking the green “plus” icon to add it to your map.
Click the back button. Toggle on the layer you want to see. Here's the 24 hour smoke forecast, yuck (July 24. 2021)
Here’s is the current Air Quality map. (Yikes, let's not go to North Central Washington this weekend.)
Finally, here’s the current wildfires map layer.
3 - InciWeb
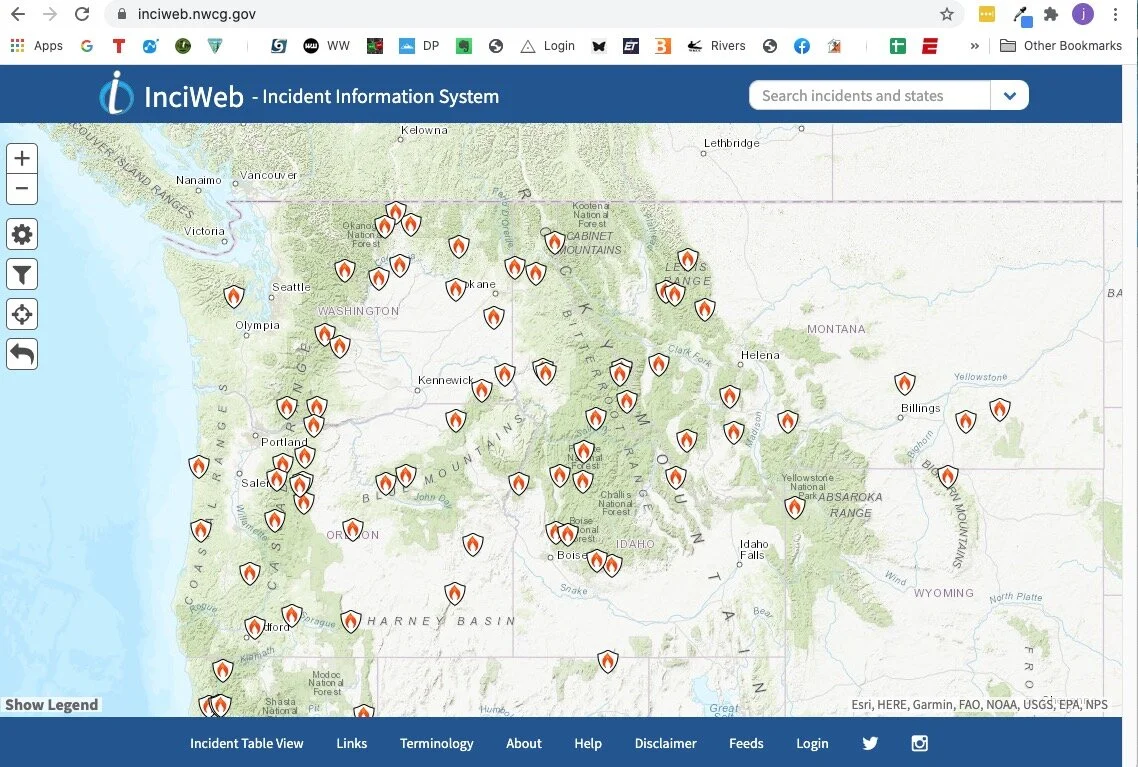
InciWeb is the “Incident information system” for active wildfires throughout the west. You can click on each icon for more detailed information about each fire, such as the location, the lead agency fighting it, start date, how big it is, containment percentage, and expected date of containment. It also has links about campground, road and land closures.
A screen grab from Sept 2020, a major fire year:
If you click on a fire icon, it brings up more specific information about that fire. If you scroll down the page a bit, there are some easy to miss tabs they can give you helpful info like evacuation announcements, area or trailhead closures, photographs, and more.
Bring a backup map as a PDF file
If you already have a PDF file of a map that you’ve made in Caltopo or other mapping software, why not save a copy to your phone? It’s free, fast and weighs 0.00 grams.
With modern mapping software such as Caltopo, it’s easier than ever to procure or make a PDF file of a good quality map. While you should of course have a printed map with you, why not also have a copy of the PDF on your phone?
(In addition to a map, you can take photos or scans of guidebook pages, or even an entire guidebook as a PDF file, if it's available. Or, you can really go for it and maybe purchase an entire guide book in Kindle format, and keep that on your phone as well.)
The map is free, a PDF file does not “weigh” anything, and it takes just a minute to add it to your phone. Having a backup copy of the map on your phone can be handy if your paper map is lost or destroyed, and it lets you share it with someone on your hike or climb who perhaps did not bring one. You can pan and zoom, and with a good pdf, be able to see even fine map detail.
Android people, I'm not sure about you, but there are several ways to view a PDF file on your iPhone. Here’s how I do it.
Save or download the map to your hard drive.
Email it to yourself and open the email on your phone with the native iPhone email app (not Gmail, Outlook, etc).
Tap the email to download the PDF, this should take a just couple of seconds.
Do a long touch on the PDF file. A window should open that gives different way to view or save it. I use the native iPhone “iBooks) app.
Tap “Open in iBooks”, and the pdf should open for viewing in iBooks.
Below - example .pdf map made in Caltopo of the Adams Glacier route, Mt Adams, WA. (This is a screen grab, the actual PDF file has a better resolution than this.)
Google maps pro tip - Full 3D in satellite view
Want to make Google Maps act like Google Earth, and view the whole world in fly around 3-D satellite view? Here's how to do it.
Here’s a very cool yet little known function in Google maps - Satellite view 3-D fly around, which makes Google maps behave pretty much like Google Earth. This is great for scoping out your next backcountry adventure. Super simple, here's how to do it.
(Open Google maps up a new browser tab and give it a try!)
Zoom into your favorite mountain in Google maps.
Change to satellite view by clicking the satellite icon in the lower left corner. (Yes, it still looks pretty useless, but wait, it gets better!)
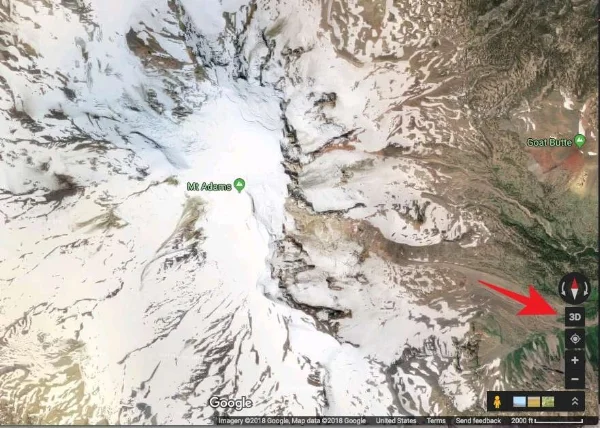
Click the “3D” button in the lower right corner.
Hold down the control key on your keyboard, and left click and drag.
Use the scroll wheel on your mouse to zoom in and out. (Yes, a mouse with a scroll wheel is a big help here.)
This gives you complete 3-D viewing. Click the 2-D button to go back into "direct overhead" view.
Before this feature, the only way you could do this was to zoom around in Google Earth, which takes longer to load and has a bit of a learning curve to effectively fly around.
Mt. Adams (WA) in 2D Google maps, standard view, YAWN!
Mt. Adams in 2D Google maps, satellite view. More useful! Click "3D" in the lower right.
Now we're cooking! Zoom and pan around the mountain like Google Earth, to see the satellite view in 3-D.


