

Alpine Tips

Why bother learning advanced techniques?
A good approach when learning climbing: have a small selection of standard techniques that you know 110%, that you use pretty much all the time. However, when your experience and skill increase, it can be good to have more tools in the toolbox in the rare event you might need them. Here's a great quote from Andy Kirkpatrick on this.
“I already know how to build an anchor, set up a rappel, and belay in the normal way. Why should I learn . . .
Five different ways to set up a top rope anchor?
Rappel with a carabiner brake?
Belay from above with a Munter hitch?
Ascend a rope with a prusik tied with a shoelace?”
British expedition and big wall climbing expert Andy Kirkpatrick has an answer, from his outstanding book, “Down”:


Cons (and pros?) of linking pitches
“Hey, it looks like these next two pitches are pretty short. How about we link them together? After all, we have a 70 meter rope!” It might appear that climbing one L O N G pitch is faster / more efficient than two short ones. However, there some downsides to linking pitches; learn ‘em here.
“The topo says the next pitch is 30 meters, and the one after that is only 25. Let's link both of those together!”

Are you itching to put your new 70 meter rope (or maybe fancy 2 way radios) to full use? Many people think they can save time (and maybe get some style / coolness points?) by linking pitches.
Linking pitches might sound faster, and occasionally it can be.
But it usually comes with some downsides:
Communication (verbal and visual) is more difficult
Increased rope drag
Usually need a larger rack; more gear is heavier
Potential of a longer fall because more stretchy rope is out
Potential of a longer fall because you may be short on gear and need to go farther between good placements
Risk of running out of the gear you need to adequately protect the climb
If you want to increase your climbing efficiency, it might be better to focus on improving your belay transitions rather than linking pitches. If you only spend a minute or so at each belay changeover, you may find that climbing the route as “designed” is actually faster and less hassle than trying to link pitches.
Some ways to increase overall efficiency:
When cleaning, keep the gear reasonably sorted and tidy.
The leader keeps the rope stacked carefully, coiled or knotted on a sling or carabiner, or even in a rope bag.
Swapping belay devices is a good trick for faster belay transitions.
Conversely, if you have challenging conditions, like low visibility or high wind, you may want to make the standard pitches even shorter, so you can maintain visual and verbal contact. Maintaining visual contact is an underappreciated way to increase team efficiency in lots of small ways. For example, the belayer can usually see when the leader has stopped and is starting to build an anchor, and then the belayer can start breaking down their system and getting ready to climb.
Consider using the so-called “silent system” of belay communication to minimize yelling and keep communications clear.
You MIGHT be able to climb more efficiently, by linking pitches if everything is in alignment, but it doesn’t always lead to a faster or less risky climb.
Did you climb a route in five pitches instead of seven? Sorry, that doesn't make you cooler. =^)

“Drop end 3:1” for crevasse rescue
The modern approach to crevasse rescue is to use a separate, unweighted rescue rope strand to pull out your unfortunate partner. Typically, this is done with a 2:1 “drop loop” system. Here's a variation with some improvements: dropping down one END of the rope, and hauling with a 3:1 mechanical advantage.
This article was reviewed by IFMGA Certified Guide Rob Coppolillo, co-author of “The Mountain Guide Manual” and author of “The Ski Guide Manual”. Connect with Rob: @vettamtnguides and his website.
Credit to AMGA Certified Rock Guide Ryan Tilley, who made a video about this method. Kevin Govan @govanathon and Pierre_Gtr @biderchurch also mentioned it to me.

There are two primary systems commonly used for crevasse rescue; the “drop loop C”, and the “Z drag.” While they each have their pros and cons, the drop loop C has become the modern standard. Here's a longer article with pro tips on the drop loop C.
“Drop loop C” - 2:1 mechanical advantage
Pro: Brake knots in the rope don’t interfere with your hauling system.
Pro: You can prepare the crevasse lip to more easily pull out your unfortunate partner.
Pro: Puts the lowest load onto the anchor; (approx 1x your pulling force.)
Con: You usually need to carry at least twice the length of rope that’s between team members to be able to drop a loop. This usually means a two person team needs at least a 60 meter rope.
Con: if the middle person falls in on a 3 person team, this might be a problem, because the end person may not have enough rescue rope to reach them.
“Z drag” - 3:1 mechanical advantage
Pros: You can set up the haul system with a small amount of extra rope. This can allow teams to travel on a shorter rope.
Cons: Pretty much the mirror image of the 2:1 system: Brake knots can cause problems, and the rope often cuts into the lip of the crevasse.
Cons: Puts a larger load on to the anchor, (approx 2x your pulling force.)
However, these aren’t your only options. What if you could combine these systems to get most of the benefits and few of the downsides?
That's what you get with a “drop end 3:1”.
Benefits of the drop end 3:1:
Lets you prepare the lip so the rescue line doesn’t cut into the snow.
Brake knots are not an issue, ignore them.
Gives you more pulling power than a 2:1. (Both systems are easy to convert to a 6:1 if you need too.)
Easily reversible to a lower if needed.
Requires a LOT less rope! No need to have twice the amount of rope between partners, like with a drop loop.
Can be easier to rescue the middle person (that dirty little secret of crevasse rescue that often is not discussed when using a drop loop C.)
Allows a team to use a shorter rope. For a two person team using the drop C method, to maintain adequate spacing, maybe tie 3 or 4 brake knots (which take about 1 meter of rope each) AND for each partner to carry at least twice the length of rope as rescue coils, you pretty much need a 60 meter rope at a minimum. (This is counterintuitive for most people; a two person team needs a 60 meter rope, while a three person team can use a 50 meter rope!)
This also lets a three person team use a shorter rope. For example, you could have a three person team on a 40 meter rope: (11-9-middle-9-11) 9 meters between each climber, and each end person carrying 11 meters of rope.
Allows a greater spacing between climbers with the same length of rope. For example, in an area with large crevasses, a three person team might choose to use a 60 meter rope, and have 14 meters between climbers (16-14-middle-14-16) with this system. With a drop loop C system, you'd need to do at least 20-10-middle-10-20, with 10 meters between each climber, in case of a middle climber fall.
You learn ONE primary system that works in just about every scenario, instead of learning two different systems that may not work in every case and can be confusing to learn and remember, years later, in the heat of battle.
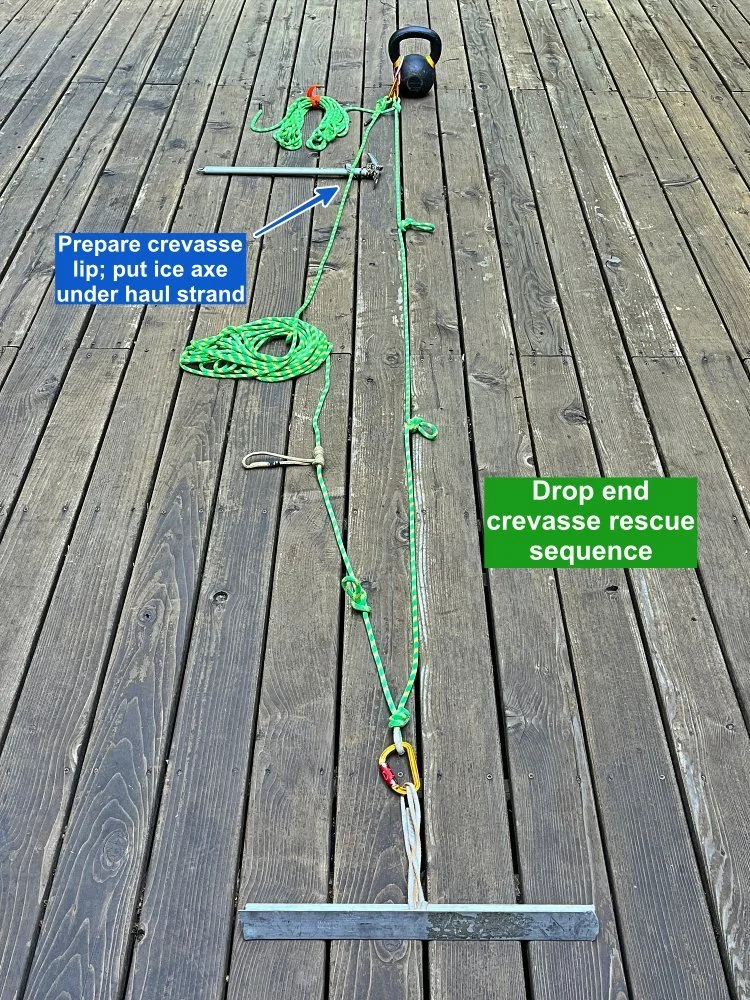
Drop end 3:1 crevasse rescue sequence (team of three):
Unfortunate Climber 1 falls in a crevasse. (The climbers on top remember that Climber 1 has the car keys, so they decide to pull ‘em out.)
Climber 2 (middle) and Climber 3 (end) on top arrest the fall.
Climber 2 builds an anchor and transfers the load by clipping their clip in bight knot to the anchor. Climber 1 is now secure on the anchor.
Climber 3 puts a friction hitch onto the rope to secure themselves, unclips from their clip in knot, and unties their clip in knot.
Climber 3, sliding their friction hitch along the rope to secure themselves, approaches the edge of the crevasse to check on climber 1.
Climber 1 calls up that they want/need to be hauled out.
Climber 3 ties a bight knot in the END of the rope, clips a locking carabiner to it, lowers the carabiner down to climber 1, and tells them to clip the carabiner to their belay loop.
Meanwhile, Climber 2 builds a 3:1 Z drag anywhere that’s convenient, such as on the backside of the bight knot that's clipped to the anchor.
Climber 3 prepares the lip of the crevasse a bit off to one side by carefully knocking off loose snow, and puts their ice axe onto the edge of the crevasse so the rescue rope won’t dig in.
Climber 2 and Climber 3 start hauling, climber 1 gets pulled up.
If this 3:1 for some reason doesn’t give enough pulling power, it's easy to convert it to a (theoretical) 6:1.
Assuming a 3 person team with a 50 meter rope, here’s the process in photos.
The rigging in these photos is compressed into a small area for the demo. In reality this is stretched out over much more rope.
The team is rigged and ready for glacier travel:
The middle person is clipped to the middle of the rope. (Side note: a good rope for glacier travel is a dry treated half rope. One good option is the Sterling Duetto 8.4 mm, which comes in convenient lengths like 30, 40, and 50 meters.)
The lead and end climbers, also clipped to the rope, are about 11 meters away (about 7 full arm spans, for me) either direction from the middle person.
The end climbers carry the extra rope (about 14 meters each) as rescue coils. This gives a rope spacing of 14-11-middle-11-14.
The team has brake knots between each climber to hopefully limit the fall distance. (This is optional for a three person team, but can be a good idea in some situations.)
Whoops, the lead climber (Klimber Kettlebell), falls into a crevasse!
The partners on top arrest the fall. The middle climber builds an anchor and transfers the load by clipping their clip in bight knot to the anchor. The end climber on top secures themselves to the rope with a friction hitch, unties their clip-in knot, and unties any remaining brake knots. This frees up all of the remaining rope (25 meters) to use for a rescue.

On the back side of the connection to the anchor, tie a butterfly knot as a secondary anchor point. This is optional, but has some benefits: it makes an easy-to-clip, uncluttered anchor point, can help keep rope strands from pinching/twisting/crossing, and makes it easy to build a 6:1 mechanical advantage system if you need it later.

Approach the lip of the crevasse carefully, you don't want to knock down a bunch of snow onto your partner. They’re already having a bad day, don't make it worse. Be sure you’re secured to the rope with a friction hitch.
Ask your partner what they need. In this case, let's assume they yell, “Pull me up!”
In the END of the rescue rope, tie a bight knot and clip a locking carabiner to it. Do not lock it.
Lower this locker to your unfortunate partner.
“Drop end”, get it?

Unfortunate partner clips locker to their belay loop and locks it. They are now secure on the “dropped” strand and are ready to be hauled out on this strand.

Prepare the lip of the crevasse.
If you can do this off to the side a bit from your unfortunate partner, that's a good thing.
Knock down loose snow that’s under the rescue strand, and put an ice axe or something similar under the rope so it doesn't cut into the snow. Onto the original strand your partner fell on, secure your axe so it doesn't fall in and get lost. (Securing the axe is not shown in the photo).
Pro tip: if you think you need to rappel into the hole to render assistance, it's easy to add your rappel device with an extension below your friction hitch, which greatly simplifies getting back out of the hole in guide mode. Here's a detailed article on that technique.
Build a 3:1 Z drag haul system with the rescue rope. Use the butterfly knot you tied as the anchor point. You need a progress capture in the system; here I'm using a Petzl Micro Traxion.
Pro tip: dig out a little hole with your hands under the Traxion pulley. This prevents snow/ice from jamming into the toothed cam. =^)
In this example, we assume that the two partners doing the rescue have a Traxion and a pulley to use. Using both of these, you get a calculated mechanical advantage of 2.7 to 1. Not quite a 3:1, but about as good as it gets. Quite a bit better than the calculated mechanical advantage of a drop loop C, which is 1.9 to 1.
Note that in the real world, the friction over the lip of the crevasse will further reduce the actual efficiency any hauling system.
Nice! You’re ready to haul.
Push the “tractor” friction hitch as far as you can toward the edge of the crevasse.
Start pulling on your 3:1. With a 3:1 system, the load on the anchor is two times the force of your pulling. So, keep that pulling force slow and steady by trying to walk slowly and continuously backward, rather than doing a “1,2,3 HEAVE,” type of pull, which can put a higher peak load on the anchor.
As your victim gets close, be sure to check on them often to be sure they don't get pulled up into the crevasse lip.
keep a good eye on them.
Reset the system as needed.

Here's a close-up of the 3:1 Z drag.

If you need more pulling power, it's easy to convert this into a 6:1 system.
There are various ways to do this, here's one that's pretty simple. Add a clove hitch, prusik loop or rope grab onto the pull strand, and clip the backside of the rope coming off of your secondary anchor to this.
You have now have a 2:1 on top of the 3:1, giving you a 6:1 theoretical mechanical advantage. To move the load 1 meter, you need to pull 6 meters of rope through the system.
This puts a load on the anchor of approximately five times the amount of pulling force you’re applying. If you're gonna use a 6:1, be sure your anchor system is as solid as you can make it. If you started with a single buried deadman anchor, you might want to add another one and try to equalize the two pieces.
The calculated mechanical advantage of this is around 4.7 to 1. If you had one additional pulley, you could put it on the purple carabiner, and increase your mechanical advantage to around 5.1 to 1. Friction at every change of direction reduces your efficiency. The more pulleys you can use, the better your efficiency.
Tip to increase pulling efficiency: if you have one pulley, it's best to put it closest to the strand that is getting the initial pulling force. In this case, I moved the pulley from the initial 3:1 friction hitch onto this new rope grab.

Here's a close-up of the 6:1 mechanical advantage rigging, called a “C on a Z”.
We built a 2:1 on top of the 3:1. This is called a compound pulley system. You multiply the two forces together to get a 6:1.
Here, I pretended I was a bit short on gear, so I used a clove hitch on the pull strand. Yes, resetting that means untying and retying, which is a hassle. Any sort of rope grab (prusik, Tibloc, Traxion) works better, but hey, be resourceful and use what you have.

So, that's a look at the drop end 3:1 for crevasse rescue.
It's fast to set up, it's one simple system that you can use in just about any scenario, it requires minimal gear, and you can easily increase it to a 6 to 1 if you need the turbo pull.
Is this “better’ than the drop C? Could the drop end 3:1 become the new standard practice?
Now I get it, there are many different approaches to crevasse rescue and I have no illusions that this is suddenly going to become to go to method. People are very attached to what they’ve learned. But methods evolve, better systems are invented, and it's good to keep an open mind about something that just might work better than the way you're doing it.
Give them both a try and see which one works for you.

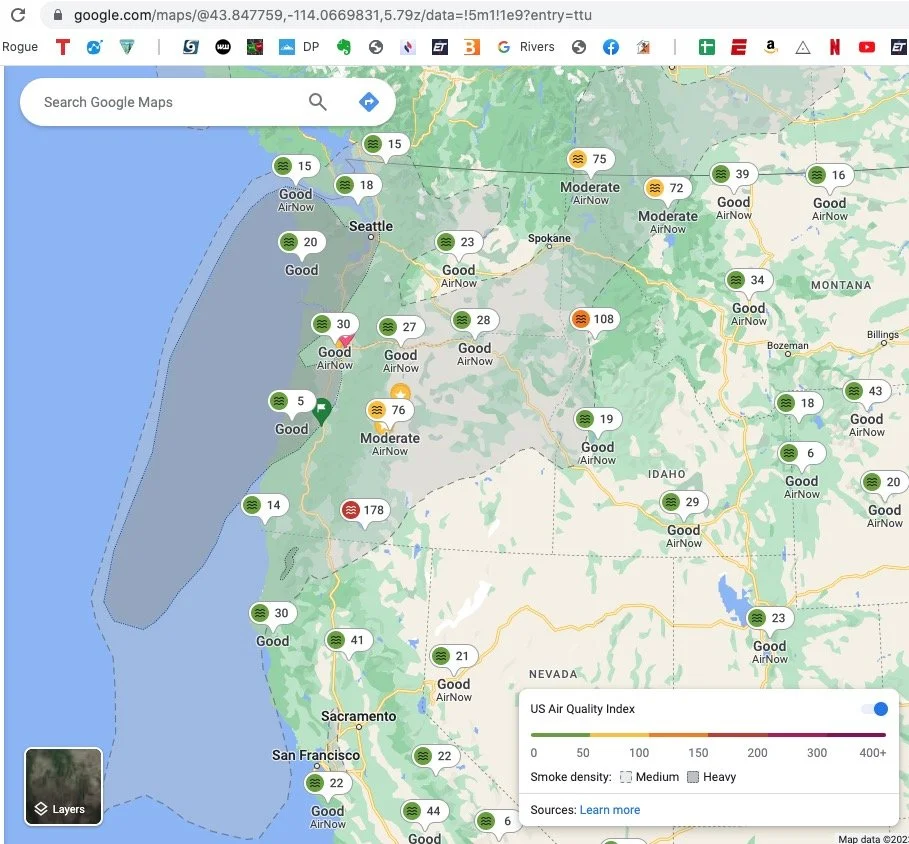
Google map for Air Quality Index (AQI)
Are you planning an outdoor adventure during summer fire season in the United States? Check this nice Google map of Air Quality Index (AQI) before you go to hopefully avoid unhealthy smoke levels.
For trip planning during summer fire season in the western United States, it’s good to check if your planned adventure is maybe in an area with unhealthy levels of smoke. Here's a quick way to find out.
Do a Google search for “AQI map”
This should show a link to a Google map with the familiar interface, and a nice legend at the bottom, with specific readings at different locations.
Be sure and zoom in on the map to see more detail for your area.
Example screen grab from August 2023, zoomed out view of the Pacific Northwest.
Zoomed in view of Central Oregon. Notice the increased detail of different areas.

Crevasse rescue: "drop loop C" tips
A popular approach to crevasse rescue is to use a 2:1 “drop C” as the primary mechanical advantage system. Learn some of the advantages of the drop C over the 3:1 Z drag, some easy hacks to make it work even better, and how to overcome a couple of potential problems.

There are many approaches to crevasse rescue. The traditional method of a 3:1 mechanical advantage “Z drag” was the standard, and it’s still worth learning.
(There's actually a more modern approach to the Z drag where you drop one end of the rescue rope to the victim and set up a 3:1. Here's a complete article about the drop end 3:1 method.
A popular (and modern) method is to use a 2:1 “drop loop / drop C” system.
Advantages of the 2:1 drop loop over the traditional 3:1 Z drag:
Can avoid the often significant problem and friction of the loaded rope cutting into the lip of the crevasse.
Puts the lowest possible load on the anchor. The lower the mechanical advantage, the less force goes onto the anchor. This could be a good thing in crevasse rescue.
Victim can assist by pulling on one strand of the dropped loop, more below.
If you have brake knots in the rope, you can bypass them.
It can be easier to set up.
Downsides:
Can require more rope (but with some crafty rope tricks, not always, see below.)
Notes . . .
With a 2:1 system like this, two reasonably strong team members on top should be able to pull out one person who's in the hole, especially if the victim can assist in the process by pulling down on the load strand of the rope. Doing this creates a little slack, and reduces friction on the lip.
In reasonable conditions, ONE fairly strong person on top may be able lift the person in the crevasse. The technique for this is rather than simply pulling with your hands, drape the rope over your neck, bend your knees, and do squats. If you can deadlift 100 pounds or so, you ought to be able to lift your partner. Remember, you have a (theoretical) 2:1 MA. Here's a short Instagram video clip demonstrating this.
Alternatively, you can lower a carabiner or pulley to your victim and have the progress capture on the top. There are pros and cons to both of these methods, we’ll cover those below.
Progress capture on top, or on the victim?
With the drop loop C, you have two options where to put the progress capture pulley: 1) You can lower it down on the rope to your unfortunate partner, or 2) you can have it up on top. There are a few advantages to having it on the top.
If you set it up backwards, you can easily fix it. A progress capture pulley like the Traxion has to be set up correctly, otherwise you will not be able to pull. This might seem simple when you're training on a nice sunny day, but in the pressure of a rescue it can be easy to set it up incorrectly. If you do that on top, it's simple to flip it around and correct your mistake.
It’s easy to reverse the direction of pull. If for any reason you decide you need to lower your victim, you can easily do this on top by disengaging the cam. It’s much more complicated to do this if the Traxion is on your victim. Important: when your victim gets close to the top, have someone monitoring them carefully to be sure they don't get pulled into the lip of the crevasse.
Less chance of snow/ice getting jammed in the cam mechanism. As the Traxion gets pulled up near the lip of the crevasse, there's a chance that snow could get jammed into the cam mechanism, and potentially cause it not to engage properly. Pro tip: If the Traxion is on top, you can dig out a little hole underneath with your hands so the pulley is pretty much hanging in the air, and is not in contact at all with the snow.
The victim can help out
With the drop loop system, half of the rope is being pulled up and half is not moving. If the victim is functional, they can help the process a lot by pulling down on the side that’s not moving. This greatly reduces the pulling force required by the hauling team on top. If you do this, be careful not to get your hand or glove sucked into the pulley.
Another option is that the victim can pull down or even start ascending on the original rope strand they fell in on. Doing this can pretty much completely remove their weight from of the drop loop C, which again makes hauling online easier for the people on top.
A 2:1 drop C creates the lowest forces on the anchor
In crevasse rescue, your anchor might be an ice ax buried in a quickly excavated T-slot. Depending on snow conditions, how deep you’re digging, and whether you stomped down the area in front of the ax, the strength of this anchor can vary a lot.
So, given that you're anchor might be less than ideal, it might be a good idea to have rigging that puts the least possible force on the anchor. That's what you get with a 2:1 - about 1x of your pulling force gets applied to the anchor.
To explain this, I’m going to take a quote directly from the outstanding book, “The Mountain Guide Manual”, by Rob Coppolillo and Marc Chauvin (pg. 216).
“When not moving, the climber is suspended on two strands and the friction on the lip removes forces on the anchor. What's the haul begins, only one side of the loop moves, meaning that only half of the friction needs to be overcome while the other half of the friction continues to aid the anchor.”
A redirect makes a 3X force on the anchor
You might be tempted to put a progress capture pulley on to the anchor, run the pulling strand through that, and then pull toward the victim. This can work. But, this redirect puts a load on the anchor that's about three times your pulling force. Minimizing load on the anchor in a crevasse rescue is usually a good thing, so be mindful of this.
Alternative way to rig it is with the progress capture on the anchor, but then you pull in line with the rope rather than a redirect. This minimizes friction, and put a load on the anchor only (about) one times your pulling force.

Friction hitches work for a progress capture
Check out this nice diagram from Ortovox. A prusik hitch goes on each side of the drop loop. As you pull up, the blue helmet rescuer advances the prusik, capturing the load. (See the video at bottom for a demo of this.)
If you look carefully at the close up diagram in the circle, you can see that this progress capture friction hitch is attached to the same friction hitch that is securing the blue helmet rescuer.
Here's a video that shows this in action. This particular technique starts at about 4:10.

image: https://www.ortovox.com/uk/safety-academy-lab-ice/chapter-3/rescuing-a-companion
Easily convert a 2:1 to a 6:1
If you need additional pulling power, it's easy to convert this drop loop 2:1 into a 6:1 mechanical advantage system. Here's an article about how to do that.
Clip an additional carabiner to the anchor to serve as a redirect. As mentioned above, this does increase force on the anchor, compared to your original 2:1.
Add a friction hitch, carabiner and pulley (if you have one) to the previous pull strand.
Clip the tail to the pulley. You created a 3:1 on top of a 2:1. Multiply these values together to get a 6:1 compound system. (If you have only one pulley, it should go on the part of the system that's closest to your hand that's doing the pulling. This creates the greatest efficiency in your haul system. This system also works if you only have carabiners and no pulleys, but it's less efficient.)

Here's a pro tip for rigging a drop C more easily, from IFMGA Guide Ben Markhart.
Add a locking carabiner to the pulley, clip a sling to this, and then clip another locker to the end of the sling. Instruct your crevasse rescue victim to clip the bottom locker onto their harness. This can be helpful in a couple of ways:
Provides a nice hand hold for the victim, which can help keep them more upright.
Can help “extend” the dropped loop rope if the rope is too short. (More on that below.)
(The downside to doing this is that the victim is not able to pull down on the half of the loop that’s fixed, which can make hauling for your buddies on top quite a bit easier. Like most things in climbing, there's a trade off.)

Check out Ben’s short Instagram video here.
Ben explains:
“Your instinct is to want to hold onto something, and it makes it lot more comfortable on your core muscles. So this makes people want to grab about 8-12 inches above the pulley if there is no extension, now the rope has to slide though your hand to haul and is easy to get sucked into the pulley if your not careful. This way you hold onto the sling, much more comfortable.”

screen grab from Ben markhart, https://www.instagram.com/p/Cd_OOQJJeHh/?hl=en
What if you don't have enough rope to reach the victim with a drop loop?
Solution #1: Extend the pulley
This is one of the most common concerns and potential downsides of using a drop loop system. Here are several solutions.
In the last photo above, I extended the drop loop with a 60 cm sling and a locker. How about extending it with something longer? Like maybe a cordelette, either in a tied loop or a single strand with a bight knot at both ends? Doing this extends the clipping point so it reaches your victim. Nothing in the rulebook says that the lowered pulley has to be clipped directly to the harness of your victim. Lower the pulley as far as you can, and extend it with whatever slings/cordelette you have the rest of the way if needed.
A possible downside to doing this is that the pulley might get wedged into the snow at the lip of the crevasse. If you knock down a lot of the loose snow and prepare the lip properly, this hopefully is not an issue.
Also, the anchor needs to be back from the edge at least the distance of your cordelette. If you don't do this, you will run out of rope to pull while your victim is still below the lip.

Solution #2: Your progress capture doesn’t need to be on the actual anchor
When you drop a loop of rope to your partner, one side of the “C” is fixed to the anchor, and the other side is what you pull on. If you don't have twice the length of rope between you and your victim, you can tie a bight knot anywhere on the fixed side of the “C” and clip your progress capture to this knot. This might let you stand in more convenient position, to maybe more easily monitor your victim. This can also mean that you don’t need twice the length of rope between you and your victim. Maybe only 1.5 times, as shown in the photo below.

What if the victim is unconscious, and can’t attach the pulley to themselves?
First off, if your partner is in really bad shape, your first step in rescue might be to rappel into the crevasse and try to do some first aid, at least be sure they’re breathing. If you do this, you might be able to attach a hauling system to their harness.
If you have a Petzl Tibloc, and can lean over the edge of the crevasse to reach free hanging rope, here’s an option. (If these two things are not possible, you might be better off doing a traditional 3:1 Z drag from the top, or maybe having a rescuer rappel down to the victim and attach the pulley.)
Put the drop loop through a Traxion (or a pulley) and engage the cam.
Clip the Traxion with a locker to a Tibloc installed upside down on the rope strand going down to your victim.
The Tibloc will (hopefully) slide down the rope toward the victim and stop when you run out of rope, or it rests on their tie in knot . Then you can 2:1 haul with a progress capture, without the pulley actually being attached to the victim. See photo below.

screen grab from: https://youtu.be/lsTihq92IlQ
Here's a nice video from some expert German guides showing how to do this, along with some other great techniques. This particular “lower the Tibloc trick starts about 5:30.
Tip for loading the rope correctly into the Traxion: “teeth to tail”
It's very easy to load the rope into the progress capture pulley the wrong way, especially if it's in a strange angle or you're stressed from a rescue.
A good mnemonic to remember the right way: “teeth to tail”. That means the toothed part of the spring-loaded cam goes to the tail of the rope, or the part that you need to pull. Here's a photo.


Does it matter which way carabiner gates face on an anchor?
Does it makes any difference which way carabiner gates face when you're building an anchor on two bolts? The short answer is no, it doesn't. Clip them in any direction that is convenient. The concept of “opposite and opposed” applies to carabiners on the master point, not when they’re clipped to bolts.

This might be the shortest article on my website. The answer is no.
Carabiner gates can face:
both to the left
both to the right
toward each other
away from each other
It makes no significant difference in the strength or security of your anchor for recreational climbing. The load in every case is along the spine of the carabiner which is the strongest configuration.
There are lots of things to pay attention to when climbing. This is not one of them!
The only time you need to be concerned about the direction of carabiner gates is when you put two of them together, which is called “opposite and opposed”. In that case you want to see an “X” made by the gates when they’re closed, and you want the spines on opposite sides. Just like the diagram below.

IMAGE CREDIT: HTTPS://WWW.INSTAGRAM.COM/P/CCXMVXDB58S/ / RICHARD DELANEY, ROPELAB, USED WITH PERMISSION

Don't trap the rope ends under a strand
On a double rope rappel, It's good practice to keep the knot tails from getting underneath either of the rope strands. If they do, it can add extra weight and friction and make it quite a bit harder to pull your rope. Simply have the knot tails hanging free and you should be fine.

If you have a rappel that starts on a lower angle slab instead of more free hanging, it's good to be mindful of where the rope tails are laying.
On the left, the rope tails are underneath a strand. The extra weight on the tails from blue can make it harder to pull green.
A better way to do it is on the right. Simply have the rope tails laying away from the two ropes and you should be fine.
This can become more of a factor if:
you’re on high friction rock like sandstone
if your rope is wet, which is common in canyoneering.

CalTopo pro tip - Custom terrain shading
CalTopo, the best desktop mapping tool for backcountry users, has a very cool feature - custom terrain shading. Once you get the hang of this, you can make custom map overlays showing slope angles, aspect, elevation, and more. It's fun and easy! Learn how from this tutorial.

CalTopo, the BEST desktop mapping tool for backcountry travelers, has a very cool, seldom used feature: custom overlays of various combinations of slope angle, aspect, elevation and canopy cover. The interface can take some practice, but once you get the hang of it, it’s easy and powerful.
(This is based on what cartographers call a “Digital Elevation Model”, or DEM. In simple terms, it’s a three dimensional model of the world used in digital mapping.)
If you'd like to follow along and try this yourself, create a free CalTopo account, which lets you access a majority of the mapping tools. If after trying DEM shading you think this software is terrific, please consider an annual subscription (starting at $20) to support the small team of developers making this great tool available, hint hint.
Here's how to use CalTopo DEM shading.
Are you doing some off-trail travel want to avoid areas that are excessively steep? Check out the example in the photo above: all slopes between 35 and 90° get a color.
Backcountry skiers can really get some benefit from this tool, so that's the example we’ll use from now on; the Wallowa mountains in northeastern Oregon, a popular place for ski touring. There are several yurts and huts that can be reserved for winter adventures. (I’ve never been, but I’ve heard great things about it.)
If you want to follow along and use the same area I am, here are the coordinates of the ski hut. Copy paste these into the CalTopo search box.
45.2037, -117.0938
First, let’s add shaded relief to the default base layer of MapBuilder Topo. It already has a little, but let's add a bit more so we can more easily see ridges, gullies, aspect, and terrain features.
From the “Map Layers” menu in the top right, click “Stack Base Layer”.

From that drop-down menu, click “Shaded Relief”.
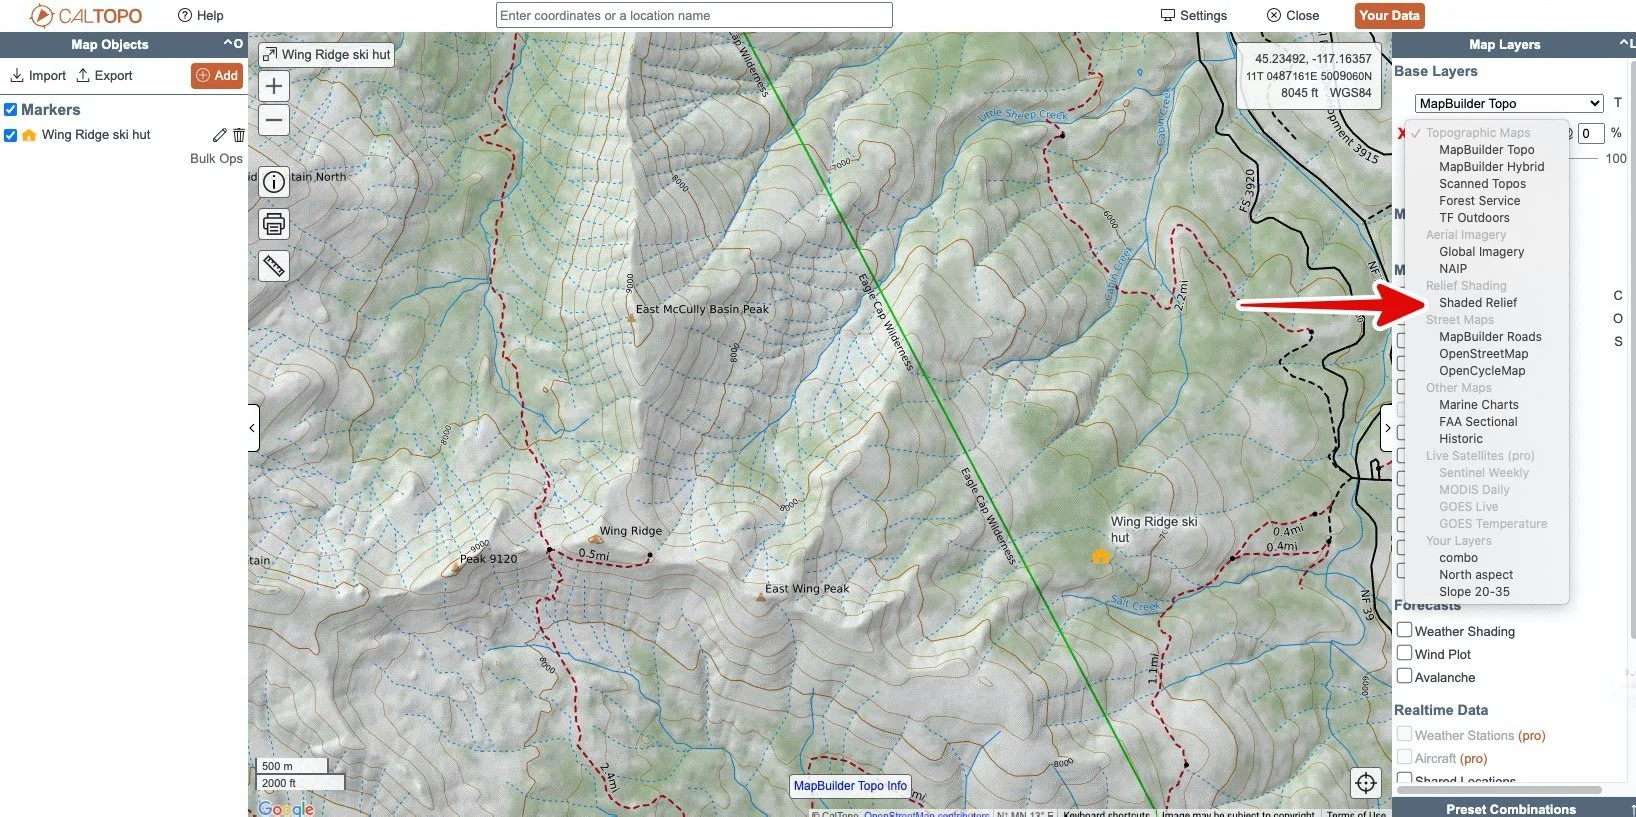
Play with the slider bar to adjust the opacity between zero to 100% . As you slide the bar to the right, you should see increased shading added on to your base map. I like something in between about 30 and 40%. Use what looks good to you.
Shaded relief is extremely cool, and it's a nice thing to add almost all of your maps!

Excellent, we have our base map with extra shaded relief. Let's add some custom DEM shading.
Say we’re headed in to the hut for a few days of skiing, and we’re interested in slopes that are north facing. Here’s how to show that in a custom DEM overlay.
Zoom in to your area of interest. Choose the “Add” button from the top left corner.

From the drop-down menu, select “DEM shading”

Here's where the magic happens: “Add a New Rule” to generate your overlay.
Check the box next to “Aspect”, and select “NW 315” to “NE 45” from the dropdown menu.
Click the Color box and set the color to red for both NW 315 and NE 45.
Add a descriptive name in the top left corner, here, “N aspect”.
In the “Overlay?” box, select, “No, Base Layer” from the drop down menu.
Click “Add Rule” to generate the code CalTopo needs to make your map.
Click “Save to Account”.
Finally, click “Save”.

Voilà! You should now see an overlay on your map showing all north-ish slopes colored red.
Notice that because we chose “Base Layer” in the previous step, our named overlay has been added as an overlay, sort of like tracing paper, over the top of the base map. You can see this at the top of the menu on the right side.
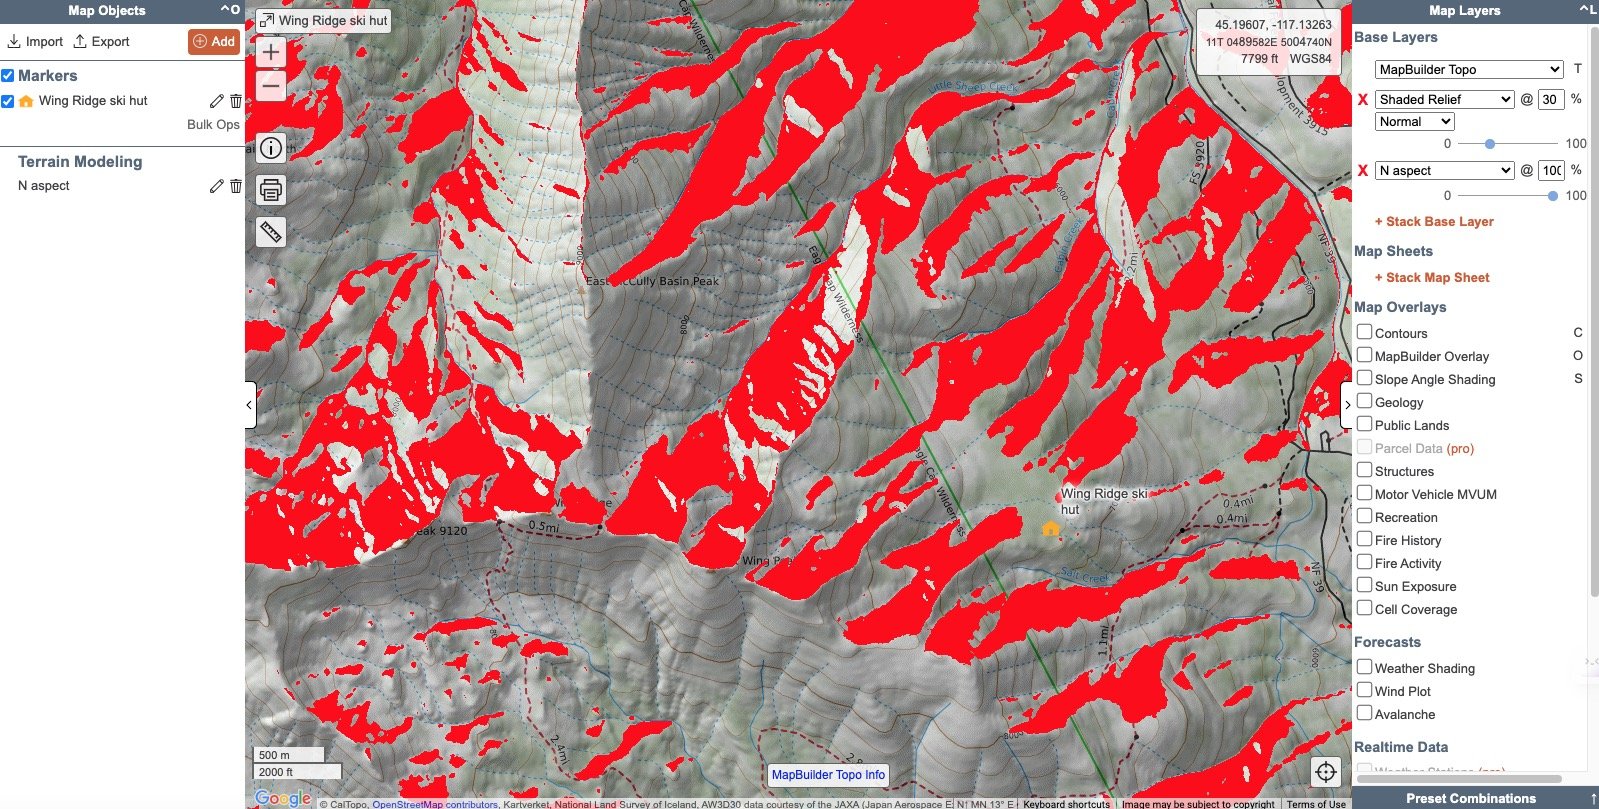
Ouch, that red is hard on the eyes! In the top right corner, use the slider bar to set the opacity to a lower level. I like something between about 30 and 40%. That's easier to look at, and lets you see underlying map features.

Because you clicked “Save to Account”, this custom overlay is saved. This is slick, because you can use this overlay on any future map without recreating the rule. Here's how to find it.
Click the orange “Your Data” button in the top right corner.

Then, click the “Your Layers” tab. You should see the layer called “N Aspect”.

To use any saved custom DEM shading in the future, open a map, select “Stack Base Layer” from the top right side, and click the drop down menu. You should see your saved layers under “Your Layers”.

Okay, are you getting the hang of this? Nice!
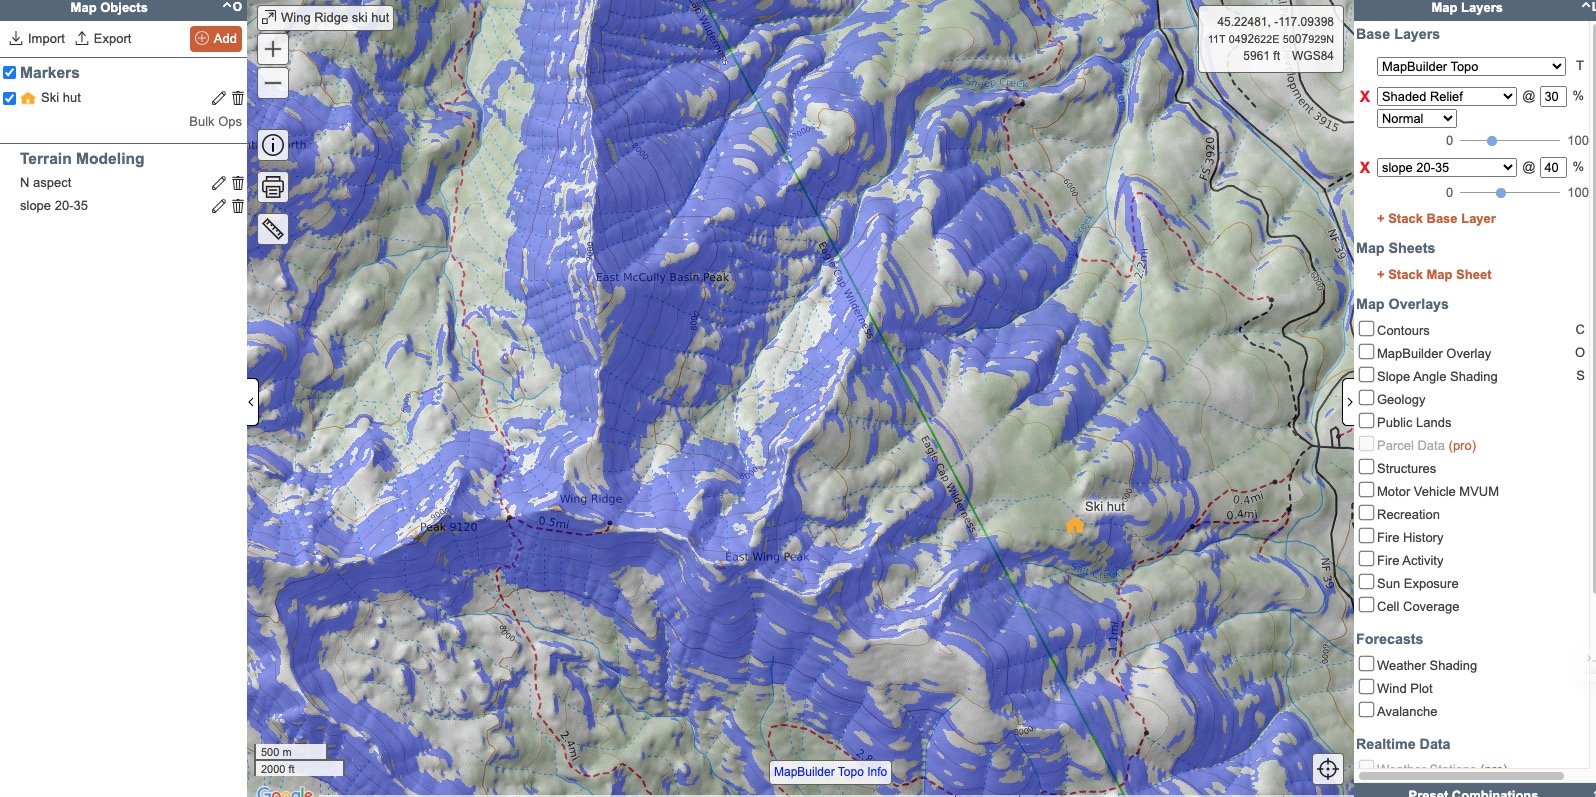
Let's make another overlay, this time for slopes between 20 and 40°.
As before, click the ”Add” button in the top left corner, select “DEM Shading”, and put the following into the “Add a New Rule” box.

That should generate a map looking something like this: all slopes between 20 and 40 degrees.
Maybe you're looking for flat places to camp?
No problem. Make a custom layer showing all areas with slopes between 0° and 5°.

Here’s the resulting map, showing flat areas with 50% opacity.

Let's make an overlay that shows a specific aspect AND slope.
Say you want to ski in the following terrain:
north facing slope
slope angle between 20 and 40°
Here’s the rule that generates an overlay for that.
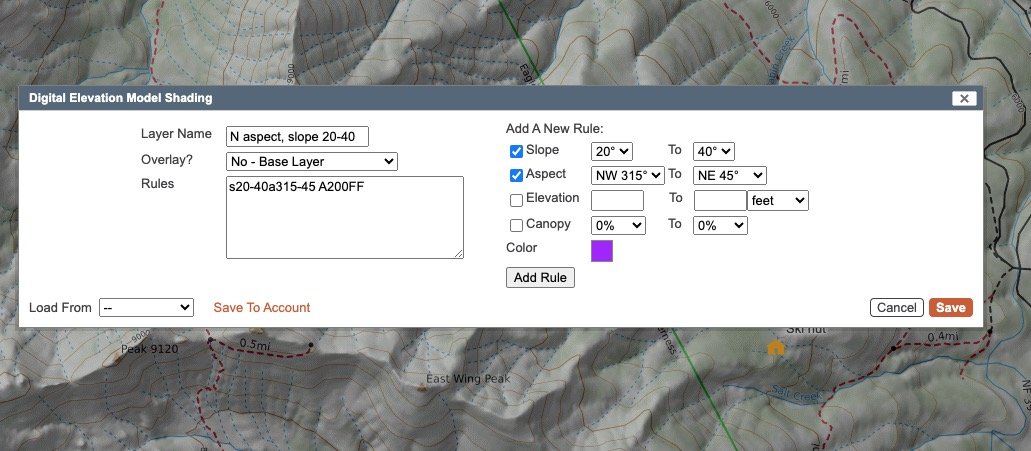
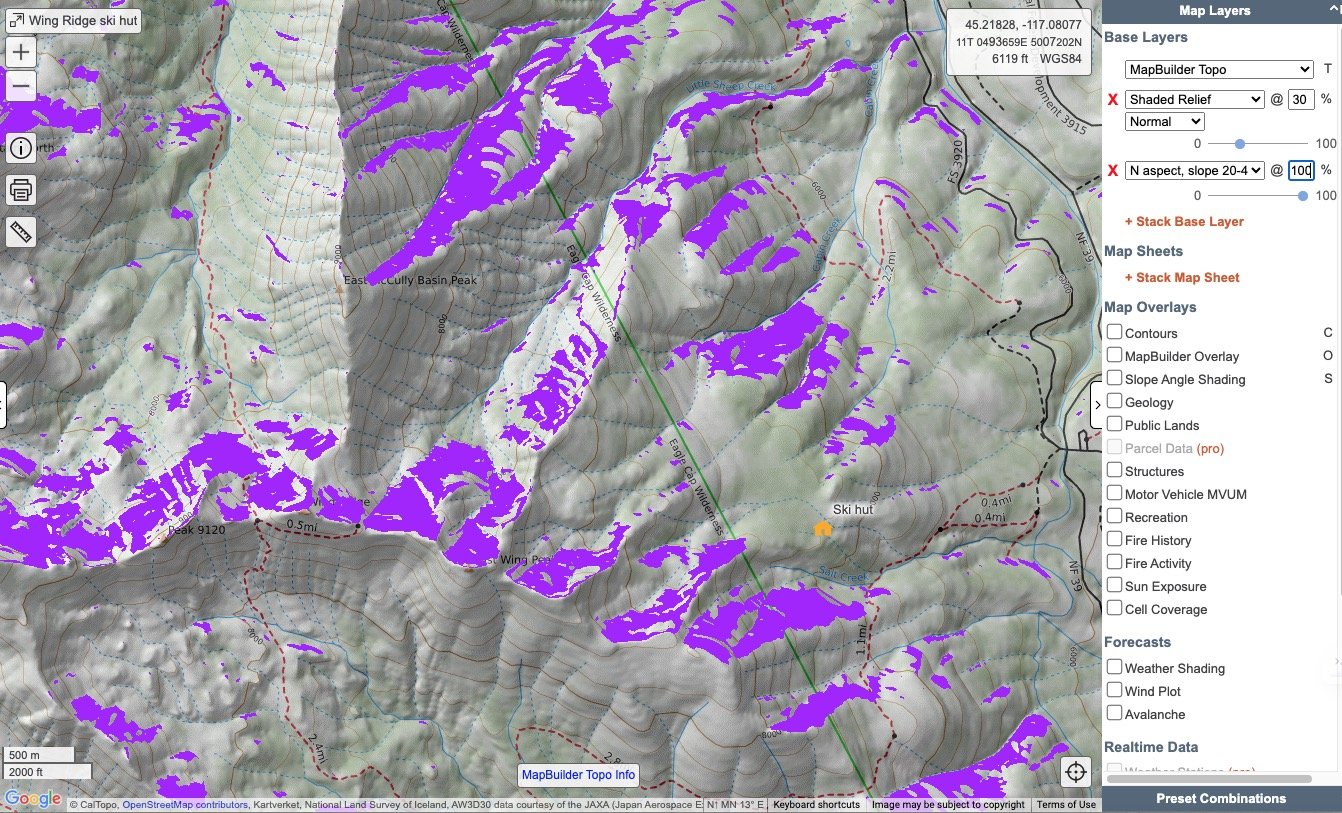
That rule generates this map: north facing aspect with slope angles between 20 and 40°.
Schweeeet, looks like there's some great terrain very close to the hut.
Create an elevation gradient DEM overlay
You can also use a pair of colors to create a gradient between a single condition, here elevation.
Let's make a gradient DEM shading with these elevations and colors:
Terrain between 5,000 and 7,000 feet, light green to green
Terrain between 7000 and 10,000 feet, green to purple
First, we make a rule for elevation 5K to 7K, and use the color picker to select light green to green. Click “Add Rule”, and the code is generated.

Next, create a second rule: change elevations from 7K to 10 K, change the colors from green to purple, and click “Add Rule”. Notice a second rule is added as a new line in the “Rules” box.
You can do this for as many different categories as you want. For example, if you wanted to show slope angle between 25 to 30, 30 to 33, 33-36, etc, keep adding rules and changing the colors.

The elevation gradient overlay looks like this. Nice! It looks even better on a big screen, give it a try!

So, that's a pretty detailed tutorial of custom DEM shading in CalTopo. Play with it, save your overviews, and, as suggested before, please consider a modest subscription (starts at $20 annually) to support the development team making this great tool available.
If you made it this far, here's a small bonus. Yes there's international coverage!
Here's a portion of the classic Haute Route from Chamonix to Zermatt, with that 20% to 35% slope shading added.


Backside clove hitch: transition to "self-thread" lower
The “backside clove hitch” offers several options for efficient transitions from climbing to descending. Here's one way to use this tool: the second is lowered with an ATC on the anchor and the rope through the anchor hardware. This sets up the rope perfectly for the leader to rappel.
Note - This post discusses techniques and methods used in vertical rope work. If you do them wrong, you could die. Always practice vertical rope techniques under the supervision of a qualified instructor, and ideally in a progression: from flat ground, to staircase, to vertical close to the ground before you ever try them in a real climbing situation.

Transitioning from climbing up to rappelling down is often a complicated and time-sucking part of your climbing day.
The traditional method of each climber using a leash to connect in close to the anchor, each person untying from their respective ends of the rope, threading the anchor and then each person rigging for a rappel separately can be awkward at tight stances and often takes a lot longer than necessary, especially with less experienced folks.
There are several different techniques to increase efficiency. Here’s one of them: lowering the second climber to set up the rope for the first climber to rappel.
The leader arrives at the top anchor, builds an equalized anchor with a master point (say a quad).
The leader clips their climbing rope with a clove hitch to the master point.
When the second arrives at the anchor, instead of clipping to the anchor hardware with a tether, instead they clip to another clove hitch on the backside of the leader’s clove hitch connection.
This frees up the second’s end of the rope.
The second unties, threads the rope end through the anchor hardware, and re-ties into the rope.
Next, you rig a lowering system for the second, typically with an ATC on the anchor.
Now , when the second is lowered, half of the rope moves through the anchor hardware, which perfectly sets up the next person to rappel. Hence the name, “self thread lower”, schweeeeet!
(This is closely related to the backside clove hitch transition to rappel, which we cover at this article.)
Like many things in climbing, this is a much better show than a tell. Watch the two video clips below to see how it's done.
Why lower instead of rappel?
Low angle, blocky, rope grabbing terrain that makes throwing a rope problematic.
High winds, which could cause some big problems if you throw your rope.
You may not know exactly the distance to the next anchors. Lowering can ensure the first person gets there and does not find themself dangling in space at the end of the rappel. (Then you probably need to do the #CraftyRopeTrick of an extended rappel, which we cover in this article.)
Maybe a beginner climber who’s not comfortable with rappelling.
Many climbers are hesitant about being lowered from above. Interesting that these same climbers have no concerns with top rope climbing, when you are lowered from below, so what's the real difference? Yes the rigging is a bit different, and you need to practice that for sure, but in the end it's functionally about the same.
For this to work:
You need to know your descent and be SURE you're able to make it to the lower anchors or ground with at least half of the rope left. (If you just climbed the pitch and the belayer did not pass the middle mark, you should be fine).
On a multi pitch rappel, you need to be sure that the first person down can safely secure themselves to the anchor, which might be a concern with a beginning climber.
You need to have a good middle mark on your rope.
Assuming these requirements are meant, you can see from the videos below what an efficient technique this can be.
It might appear that this technique puts extra wear and tear on the anchor hardware, because it seems you're lowering directly through it, which is generally not best practice. Turns out, this is not the case. Almost all of the friction from the lowering is happening on your belay device, and the rope is simply redirected through the anchor hardware that's higher up.
From AMGA Rock Guide Cody Bradford.
Sadly Cody is no longer with us, but his excellent Instagram account is still up, highly recommended for many other climbing tips like this. Rest in peace, my friend.
https://www.instagram.com/reel/CbqClsZhOXc/?utm_source=ig_web_copy_link
Nice YouTube short from Summit Seekers Experience showing this technique:

The "extended" rappel
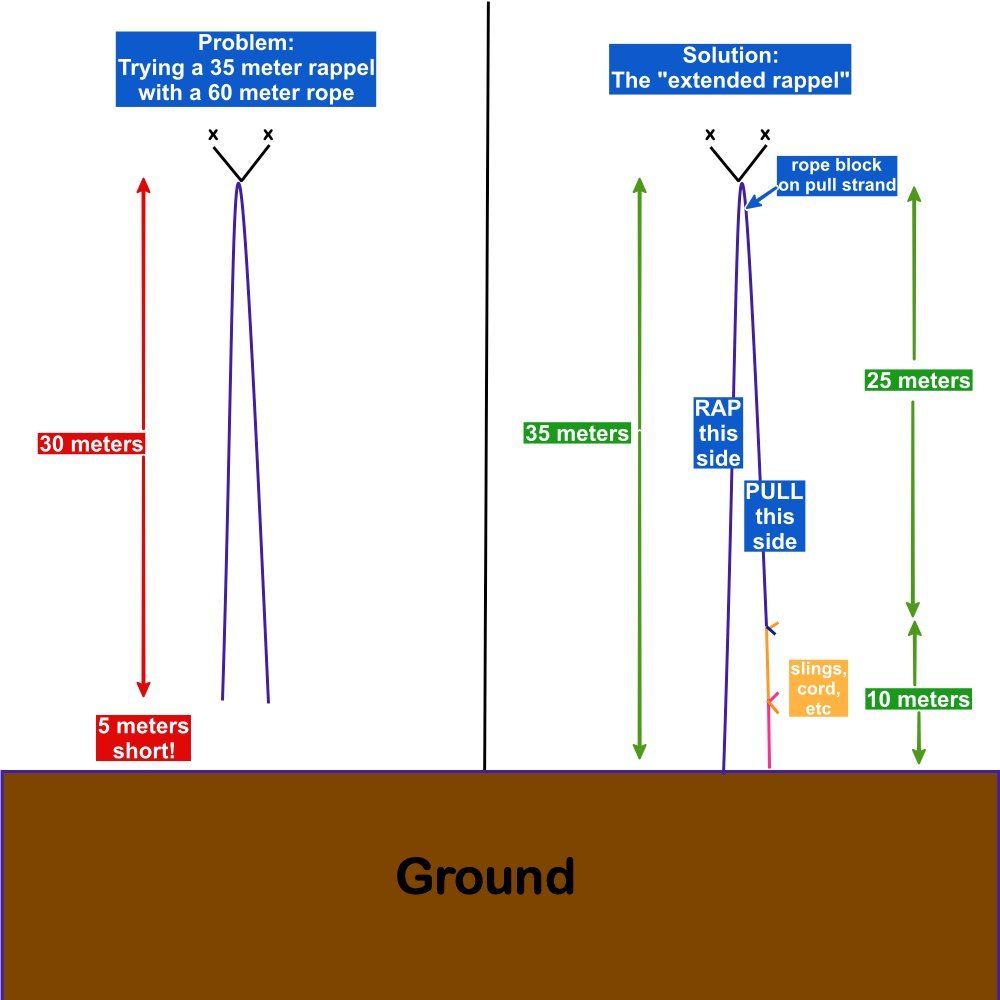
You and your partner have a 60 meter rope, but you need to make a rappel that was bolted for a 70 meter rope. Yikes, your rope is too short, whaddya do? One answer: the extended rappel. Learn how it works, along with some cautionary notes.
Note - This post discusses techniques and methods used in vertical rope work. If you do them wrong, you could die. Always practice vertical rope techniques under the supervision of a qualified instructor, and ideally in a progression: from flat ground, to staircase, to vertical close to the ground before you ever try them in a real climbing situation.
This article was written with collaboration from Sean Isaac. Sean is an ACMG (Association of Canadian Mountain Guides) Certified Guide, a former professional climber, and author of the “Ice Leader Field Handbook” and “How to Ice Climb” (2nd ed.) Follow @seanisaacguiding for tech tips. Thanks, Sean!
Here are articles on two closely related techniques that use rope blocks:
Your rope is too short, what do you do?!
You’re rappelling from a multi-pitch rock climb with a single 60 meter rope. All pitches on the way up were less than 30 meters except one that was 35 meters long. (You know this because your attentive belayer noticed the middle mark going through the device before the leader arrived at the next anchor. Another great reason to have a middle mark!)
Whoops, should've read the guidebook and brought the 70 m instead of the 60 m, but here you are.
How do you rappel and still pull your rope? (This is an unexpected situation, so you don’t have a pull cord/tag line, nor a clever tool like the Beal Escaper.)
Answer: the extended rappel.
Hopefully you don't find yourself doing this very often, but if it occasionally happens, this #CraftyRopeTrick could save the day. There are several variations on how to set this up. Here’s one.
Short version:
Instead of doing a standard rappel on both strands of the rope, you secure one strand to the anchor and make sure it’s absolutely long enough (here, 35 meters) to reach to the next anchor or to the ground.
Tie a rope block (knot or carabiner) on the short strand.
The long strand of the rope, which is 35 meters, reaches the lower anchor. The short strand of the rope (the pull side) is 25 meters long, and is hanging 10 meters above the lower anchor. Can you visualize this? Good!
The first person rappels single strand on the long side to the lower anchor.
The last person rappels single strand on the long strand, ideally on a Grigri so they can go hands free. They keep control of the short strand by clipping it to a quick draw on their harness.
When the last person reaches the end of the short strand, they start adding material (cordelettes, slings, etc.) to extend it. (“Extended” rappel, get it?)
Last person continues rappelling to the anchor. Retrieve by pulling the short side with your “extension” tied to it.
It's a tricky to take a decent photo of the rigging, so hopefully this diagram can help.
Conceptually this may sound pretty easy. In practice there are a lot of considerations to doing this efficiently and with the least risk.
The primary safety concern is making a block in the rope that absolutely positively cannot pull through the anchor hardware. The best anchor hardware for doing a rope block is small chain links, or small to medium sized quick links. With this type of hardware it is pretty much impossible for the blocking knot to pull through. Keep reading for more discussion of rope blocks, and here's a longer article about them.
Here's a more detailed explanation of each important step.
When might you need to do an extended rappel?
The route was bolted for a 70 meter rope, and you brought a 60.
It's a climb you've never rappelled before and have no beta.
Maybe the beta is wrong.
Maybe the beta is correct if you use THAT anchor.
Maybe the anchor that people used to rap from is gone or was moved.
More extreme situation: Your rope got damaged near the end, you had to cut off some of it and now your rope is too short to make the standard rappel stations.
What's a big potential problem with the extended rappel?
If you begin to pull your rope, the end of the “real” rope goes up out of reach, and then the rope gets stuck. You’re now holding onto your “extension” as the only way to fix the problem. If you're on the ground, you can walk away and hopefully go get another rope and deal with it. If you are way off the deck on a multi pitch rappel, you could be in a serious situation.
What’s another option to descend?
The simplest and maybe least risky way to descend, if you have access to another rope and you're within one rope length of the ground: Tie off one end of the rope, toss it and be sure it reaches the ground, rappel, and come back and get it later with another rope. Plus, if you don't have enough extra slings/cord to extend the short side of the rope, then this approach is pretty much mandatory. Yes, it's a hassle and would kind of suck, but certainly better than the alternative.
What if you don't notice your rope is too short at the top, but only after you find yourself dangling on both strands, short of the anchor?
Yikes, scary! That definitely complicates things. There's no simple universal solution to this that I know about. You're probably gonna have to get resourceful - put some pro in a crack and build a temporary anchor, or clip into a bolt. Good reason for the first person down to carry some gear to do this.
What's the ideal terrain to try an extended rappel?
Best if the rock face is smooth, clean, and vertical with minimal chances of your rope hanging up.
Setting the correct rope length
There are a couple of ways to do this. 1) Lower the first climber 35 meters to the next anchor, or 2) Fix one strand from the end, have them rap on this, tie off the bottom end of the rope and then pull up the rope from above to set the correct length.
If you don't know the distance of the next rappel, you can lower your partner and keep an eye on the middle mark of the rope. If the middle mark passes through your anchor before your partner reaches the lower station, then your rope is too short.
If you’re lowering your partner, follow standard safety procedures such as closing the system by tying a knot in the end of the rope (assuming it's not tied to you) and use a third hand / autoblock backup.
If you lowered the first person down, they can stay tied in to the end of the rope to be sure that the last person does not rap off the end, and that one end of the rope is for sure at the lower anchor.
Extending the pull side
Before the first person heads down, they hand off all of their extra slings, cordelettes, etc. to the last climber. If both climbers have one cordelette of about 5 meters, there’s your 10 meter extension. This strand of the rope is not load bearing, you're only using it to pull down the long strand.
To connect slings to one another, girth hitch them together, no carabiner required. To connect a cordelette to the end of the short strand of rope, you can use a flat overhand bend. (This is another good reason to carry an “open” or untied cordelette, rather than one that's tied into a loop with a permanently welded double fisherman's knot.)
Rather than monkey around with extending multiple slings while you’re hanging in space, it's probably less risky and easier to connect all the slings you plan on using up at the top anchor before you start rappelling.
The extended rappel relies on a rope block. While conceptually simple, there are lots of factors to consider.
Detailed look at one way to set up a rope block.
The rope block
This extended rappel technique requires the skill and knowledge to use what's called a rope block. This goes by various names: knot block, carabiner block, static block, Reepschnur. This creates an obstruction on one strand of your rappel rope, that cannot be pulled through the anchor master point. The rope can slide freely in ONE direction, but not in the other.
The golden rule of the rope block is that the block absolutely cannot pull through the master point on the anchor. If it does, the person rappelling will probably die or your rope will get hopelessly stuck.
Typically a knot block is tied with butterfly or a figure eight on a bight. If you need a larger block, you can tie a well-dressed clove hitch around the spine of a locking carabiner, that works also.
This is an advanced technique, popular in the canyoneering world. Like many other things in climbing, if you screw it up you can die, so pay attention and absolutely practice on safe flat ground before you ever do this in the real world!!
Anchor hardware concerns
This usually requires that the anchor master point is quite small, such as a chain link, quicklink, or a small bight knot tied in cord or webbing.
If you're rappelling through a carabiner or a large ring, the opening may be so large that a block may not work.
This is an excellent time to use a quick link on the master point, if you happen to have one.
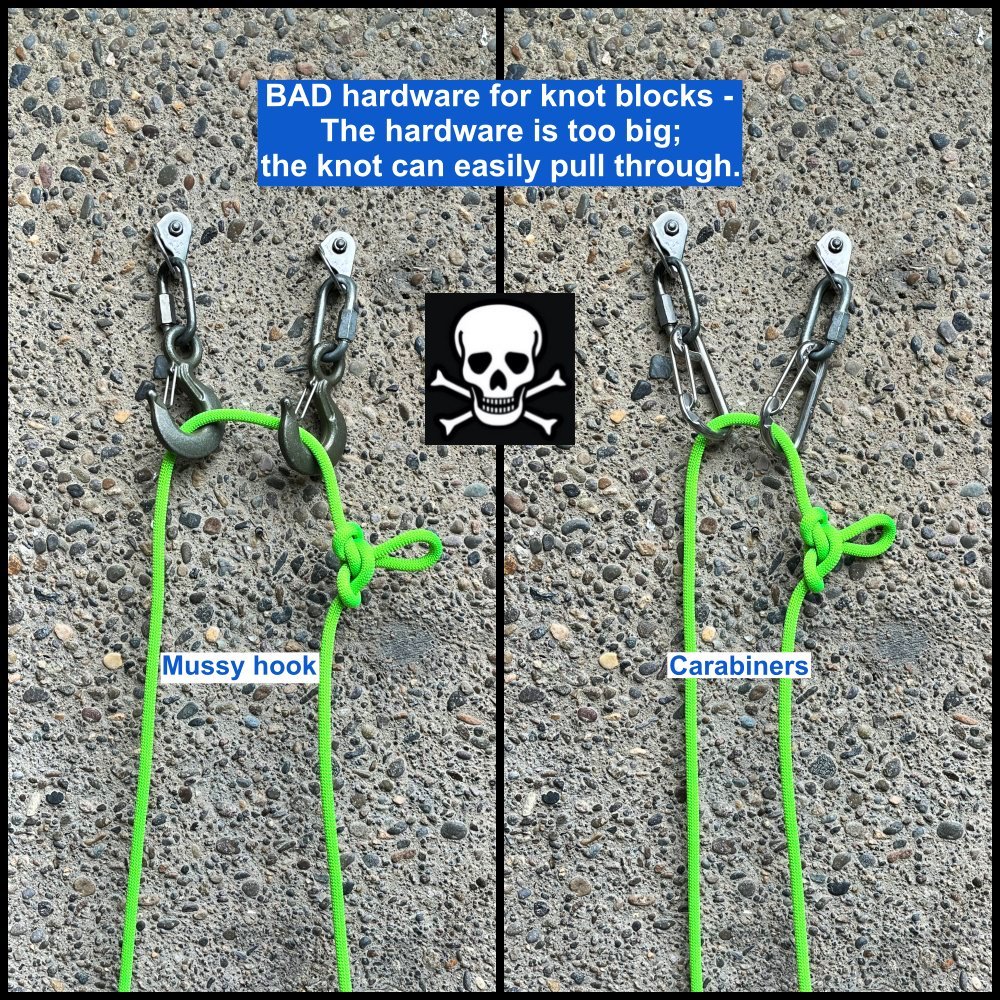
Below: knot block on large diameter anchor hardware, don’t do this!

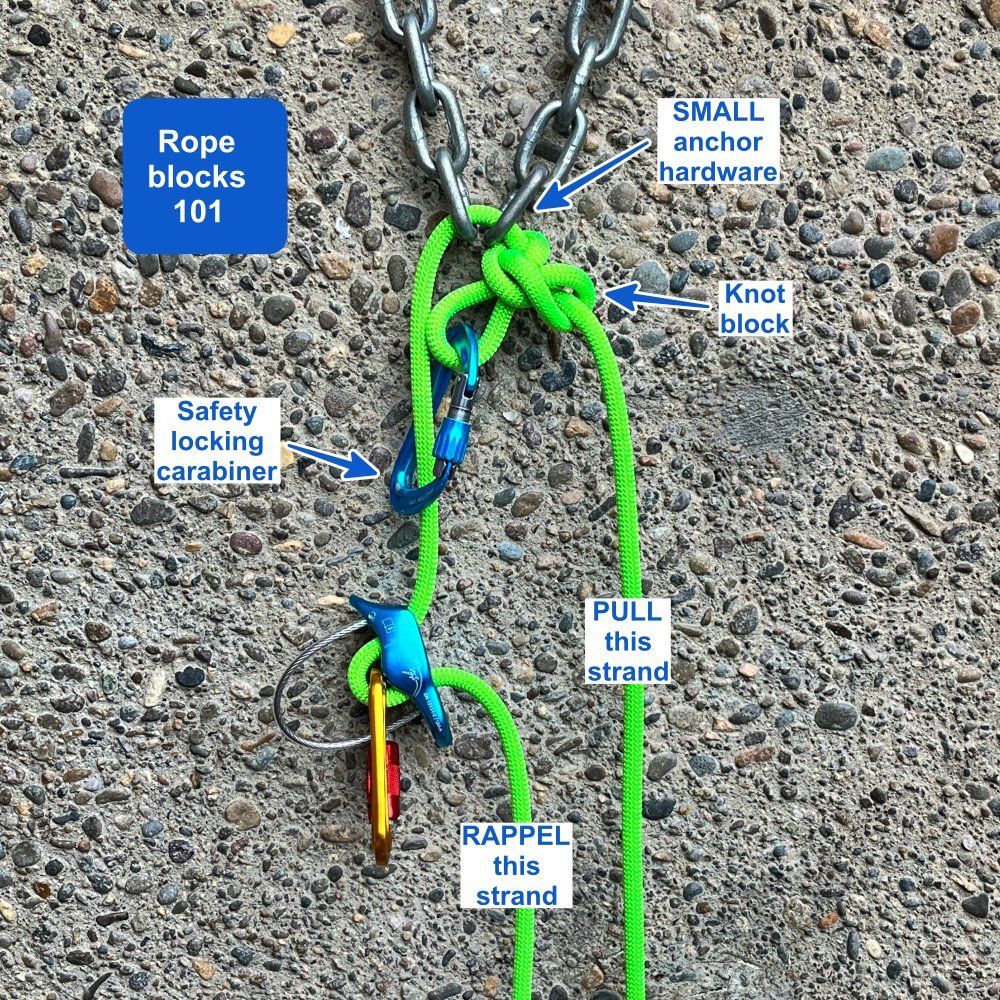
Rope blocks 101
A rope block (aka Reepschnur), is a technique where you block one strand of your rappel rope to prevent it from running through the anchor. This lets you do a single strand rappel on the other side. Conceptually it's pretty simple. In reality there are some nuances, and definitely some ways to lethally screw it up. Learn them here.
Note - This post discusses techniques and methods used in vertical rope work. If you do them wrong, you could die. Always practice vertical rope techniques under the supervision of a qualified instructor, and ideally in a progression: from flat ground, to staircase, to vertical close to the ground before you ever try them in a real climbing situation.
This article was written with collaboration from Ben Wu, AMGA Certified Rock Guide. Connect with Ben at www.benwu.photography.
Rope block. Knot block. Carabiner block. Static block. Reepschnur.
They all mean pretty much the same thing: creating an obstruction on one strand of your rappel rope, that cannot be pulled through the anchor master point.
The rope can slide freely in ONE direction, but not in the other.
Doing this lets you rappel a single strand on the “fixed” strand of rope.
Main climbing application: it allows a retrievable single rope rappel; you carry less rope and weight.
To retrieve your rope, typically you use a lighter line such as a 6 mm pull cord (like the Petzl PURline) on the free running strand of rope.
Like everything in climbing, there are some definite pros and cons to this technique. If you’re considering using it, it's good to be aware of all of them. So let's get into it!
Conceptually, it's pretty simple. In practice:
There are some subtleties to doing it correctly.
There are some downsides to it even when you do it correctly.
If you screw it up, you could die or get your rope hopelessly stuck.
For these reasons, I personally consider it an advanced technique that you absolutely should practice with a qualified instructor. And, even when you’re confident with it, I feel it should generally not be part of your regular practice. It can definitely get you out of a jam in certain situations, but there are enough moving parts that I feel it's not a routine technique for most recreational climbing situations.
Here are articles on two closely related techniques that use rope blocks:
Not to dwell on the potential problems, but here are two reports of fatal accidents from rope blocks gone wrong:
First off, let's be clear on the Golden Rule of a rope block: it absolutely, positively cannot pull through the rappel hardware.
If you have not closed the system by attaching the pull side of the rope to the rappel side of the rope and the block pulls through the hardware, you will probably die.
If you have closed the system and the rope pulls through, your rope will probably be hopelessly stuck.
Take a close look at the anchor hardware and the diameter of your rope. If there is the slightest chance that you think the blocking knot could pull through the anchor hardware, then don’t use a knot block! (Consider a carabiner block instead, more on that below.)
There are really only a few times in recreational climbing when you might want to use a rope block.
You’re using a pull cord to do full length rappels. In this case, a rope block is pretty much mandatory. (Yes, there are some advanced ninja rope tricks like using a Stone hitch and a Fiddlestick to use a pull cord a different way, but we're not gonna get into that here.)
Your rope is too short to make the rappel. Lower your partner to the next station, make a rope block, and then extend” the “pull” side of the rope with whatever extra cordelette, slings, etc. until your DIY extension reaches the next anchor station.
There are two other situations where people often think they need a rope block, but there are other techniques you can use instead.
You damaged your rope and need to rappel. You rappel on the good half of the rope and use the damaged half of the rope with a knot block as a pull cord. To avoid doing this, you can do a counterbalanced rappel, read about it here.
If both partners have a Grigri, and you both need to rappel. It's pretty unlikely that both partners will have Grigris and not a tube device, but I suppose it could happen. You could use the counterbalanced rappel technique described just above. If one person has a Grigri and the other person has a tube style device, there are lots of other options for getting both people down without using a knot block, see some of them here and a photo example below.
Potential problems of a rope block (and pull cords)
The big one was already mentioned, but it's worth saying again: if the knot pulls through the hardware, the entire system fails and you die, or your rope gets stuck.
You’re adding an extra knot and carabiner to your system, which are two more things that can potentially get snagged when you're pulling your rope.
There are increased steps and complexity, which can increase the chances of making a mistake. This is especially true because for most people, this is a non-standard system that doesn’t get used regularly. See accident reports at the top of the page.
If you're using a lighter weight pull cord, if you pull your rope and it gets snagged after the end of the climbing rope is out of reach, you only have a pull cord in your hands to deal with the problem. Not good.
Maybe you forget what side to pull, whoops. It can be good practice to establish which side you block and which side you lower off of and do this pretty much all the time. For example. “L”=Left=Lower, and “R”=Right=Retrieve.
If you're doing multiple rappels, you can’t do the standard trick of feeding the pull strand through the bottom anchor and then pulling the rope. Why? Because you’re pulling the skinny cord, but the thick rope needs to be the one through the anchor. This means you have to re-rig the entire system at each rappel station, which takes additional time.
Yarding on a 6 mm rope can be rough on your hands. Consider adding a Tibloc or Micro Traxion on the pull cord to make the pulling easier. Gloves are recommended.
Pulling the rope can be significantly harder, because you do not have a counterbalanced weight on the pulling strand to assist your pull.
You’re rapping on a single strand of rope, which might be uncomfortably fast. Be sure you know some ways to add friction to your rappel.
If you keep the safety carabiner clipped when you pull, it can add a significant amount of extra friction, making your rope pull more difficult. This can be especially true on a low angle slab.
If you keep the safety carabiner clipped when you pull, sometimes the ropes can more easily twist together, which can cause your ropes to get stuck.
If you keep the safety carabiner clipped when you pull, you've essentially created a closed loop that you then need to pull down. If the two sides of the rope making this loop happen to go on either side of some rock spike, boulder, shrub, ice blob, etc., the loop is going to get caught when you pull down your rope, causing your rope to get stuck. This is probably difficult to visualize, so check out the photo below. (Yes, it’s a flower pot, but I think you get the idea . . . =^)

Rope block backups, pros and cons
It's good practice to backup a rope block by clipping the blocking knot onto the rappel strand with a locking carabiner. In the unlikely event of the block pulling through the hardware, this will save your life.
The backup stays in place for everyone except maybe the last person.
If the block is closely inspected after being fully loaded, and you are 150% sure that it cannot pull through the hardware, then the last person has the option of removing it. In many cases, this is a good idea.
Removing the block for the last person eliminates several of the problems mentioned above.
This is a call that the last person gets to make. (Like most everything in climbing, this is a subjective choice, and not a black and white rule.)

What’s the best anchor hardware for a rope block?
Small-medium size quick links, chains or small rappel rings are the most secure hardware for knot blocks. The openings are small and it's pretty much impossible for a blocking knot to be pulled through them.
Lots of people like to hate on carrying quick links, but this can be an outstanding time to use one. Keep in mind that a 5 mm, stainless steel, CE approved, 25 kN rated quicklink from CAMP costs about $6 and weighs just 22 grams. So weight, cost, and strength are not issues with carrying quick links, provided you get the right ones.

Some not-so-great hardware for a knot block would be a carabiner or Mussy hook. These have larger openings and greatly increase the chance of the knot pulling through. Remember, the knot will shrink as it’s loaded.

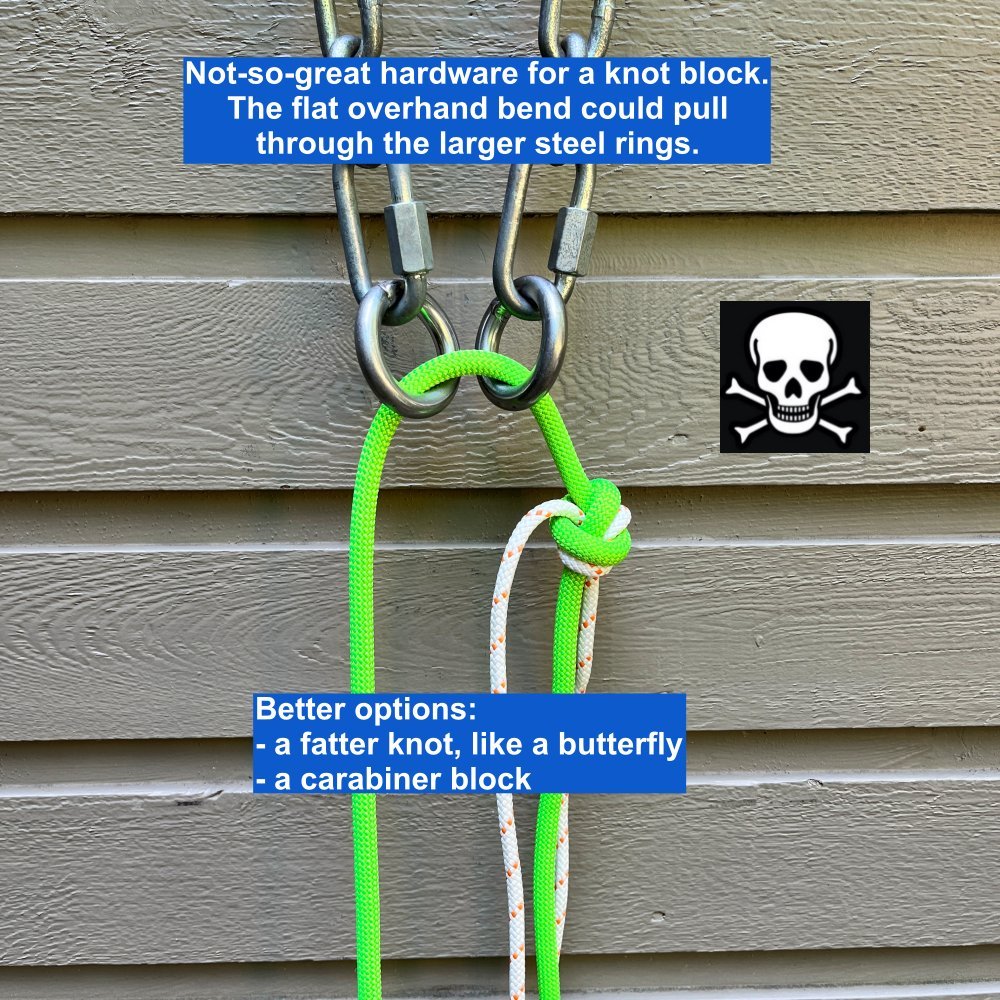
Nice diagram from the superb Petzl website. Small quicklink on the left, probably good. Large ring on the right, bad, the knot could pull through.

image: https://www.petzl.com/US/en/Sport/Multi-pitch-rappelling-with-a-single-rope?ProductName=PUR-LINE-6-mm
What about a carabiner block?
Another option is to put a clove hitch onto a large HMS locking carabiner to serve as a block. This can work if the anchor hardware is something larger, like carabiners or maybe a Mussy hook. This is definitely an advanced technique that I recommend practicing with a qualified instructor.
Take extra attention to tie the clove hitch properly and dress it well. Test it when you're done by holding the carabiner with one hand and pulling hard on each strand of rope with the other. If the rope moves, you might have tied a Munter instead, and that is a Big Problem (photo below). If your rope is larger diameter (10+mm) or has an old crusty sheath, the clove hitch may not hold very well. This technique works best with newer ropes that are of standard climbing diameter around 9-ish mm.
A carabiner block looks something like this. Note that the block is backed up by a bight knot clipped with a locker onto the anchor, with a bit of slack in it. The slack shows that the carabiner block is properly behaving. The last person can remove the blue carabiner and untie the bight knot. Or, if they are feeling extra cautious, they could clip the blue carabiner onto the left strand of rope as a back up. Again, this adds more hardware that can get hung up when you pull your rope, so it's a trade-off.
Is it OK to load a carabiner like this? Yes, it’s fine. You are not putting any two or three way loading on the carabiner. It’s holding body weight only, and there's no way the carabiner will be damaged rigged like this.

With a carabiner block, be SURE you tie a clove hitch and not a Munter hitch!

What knot should I use for the block?
An overhand on a bight, figure 8 on a bight or a butterfly can all work as a knot block. In these examples I’m using a butterfly. Be aware that all knots will tighten under load and become smaller. Remember the Golden Rule: if you think there’s the slightest chance of the knot pulling through the hardware, then don't do it!
A flat overhand bend (formally known as the “EDK”) can work, depending on the diameter of your rope, and if you're using small anchor hardware, like chain links.
An overhand on a bight is slightly smaller profile than the figurine or butterfly. This could be a good thing as it's less likely to snag one pulling down your rope, or it could be not so great if there's a slight chance of getting pulled into your hardware. Pros and cons to everything . . .
Will the blocking carabiner get damaged when I pull the rope?
Probably not.
Some people seem to be concerned that the carabiner clipped to the blocking knot is somehow going to fall and maybe be damaged when you pull the rope. Why does this not happen?
With any rappel much less than the full length of the rope, the carabiner will be pulled to the lower anchor and be in your hand before the other half of the rope even starts to fall down.
However, it may bounce around a bit on the rock and get dinged up on the way down. If this concerns you, you can use an older carabiner or a steel quick link. Or, if you have complete confidence in the knot and the anchor hardware, you can remove the backup carabiner for the last person.
What about rapping with a Grigri, don't I have to use a block to do that?
Nope. There are lots of different ways to rappel with a Grigri that don’t require a block. I have a whole article about this, read it here. Below is a photo that shows one of several simple methods.
If one person on your team has an ATC, you can simply tie off one strand of the rope for everybody with a Grigri, have them go down on one strand and then the last person unties that knot and rappels normally on two strands.

There you have it: my thoughts on the pros and cons of rope blocks.
Under ideal circumstances with proper anchor hardware, they can work pretty well. But as you can see there are a lot of subtleties to doing it correctly. Once again: I consider this an advanced technique that I highly recommend you practice in a controlled environment with a qualified instructor before you ever try it in the wild. Choose wisely, my friends.

The "hybrid quickdraw"
Did you intend to go trad climbing but changed your mind to clip bolts? Here's a way to change those floppy alpine draws into easy-to-clip “hybrid” quickdraws”.
This #CraftyRopeTrick comes from AMGA Certified Rock Guide Adam Fleming. Connect with Adam on Instagram: adam.fleming.climbs

Here's how to turn that 60 cm or even 120 cm sling into a sport draw.
Did you intend to go trad climbing, but changed your mind to try some sport routes?
Are you on a long multi pitch route that has a mix of bolts and trad gear?
If the sport climbing is at your limit, it can be pretty annoying to try to clip that bottom carabiner that always seems to be flipping around and facing the wrong direction. And you probably don't want to take a whole separate rack of sport draws just for the bolted part.
Here's a simple trick to help solve this.
Take a 60 cm sling, double it, then make a girth hitch onto the bottom carabiner. This locks the sling in place, similar to a sport quickdraw, and makes it much easier to clip. Adam call this the'“hybrid quickdraw”.
Check out a short video Adam made about this on his Instagram.

Hair /clothing caught in rappel device - whaddya do?!
Did you catch your clothing or even your hair in your rappel device? Ouch! This is fairly common, but it's also easy to fix if you know how. One more reason to carry a friction hitch or two and an extra sling.

You're midway down your rappel and whoops, your clothing / hair / packstrap / whatever gets caught in your rappel device. (This is actually a fairly common problem, and it’s happened to some of the best climbers.)
What do you do?
Fortunately the solution is pretty easy. Here's one approach.
Stop your rappel. You are using a third hand back up under your device, right? So push this up the rope as far as you can, and let it take your weight. If you don’ t have a third hand, you can use the classic method of wrapping the brake strand of the rope several times around one leg.
Tie a Klemheist hitch (as a foot loop) on the rope above your device. This is a great place for a cordelette if you have one. Use what you have. A short friction hitch loop with a girth hitched 120 cm sling works fine as well. Get resourceful. A klemheist will probably be better than a prusik because a) you can use any material you have to tie it, b) you can tie faster (maybe even without looking) and c) it can be a little bit sloppy and still hold.
Put 1 foot into your new foot loop and stand up. Now, your weight should be on the friction hitch / footloop and off of your device. Remove hair or clothing, and be sure the rope is properly installed in your rappel device.
Remove the foot loop hitch and continue rappelling.
Notes . . .
You may be tempted to get out your knife and try to cut away the problem. Yo, be careful! Sharp knives and ropes under tension can be a very bad combination, so it's probably better to try the method above before you use an open blade. If you have a small knife with scissors, that could be a slightly less risky option.
You can practice this with an old T-shirt, wig, Barbie doll, shoelace whatever, in a controlled environment, very close to the ground.
Of course, it's great to try to prevent this problem before it ever happens. Tuck away loose clothing and hair before you start rappelling, use a hair tie, and take extra caution if it's a windy day.
In the photo below on the left, I have a Dyneema sling girth hitched onto a Sterling Hollow Block. It's worth pointing out that Sterling recommends that you not do this. Personally, because this is only holding your body weight for a couple of seconds, I’m comfortable with it. But, if you want to follow manufacturer recommendations, connect the two with the carabiner to get full strength.
Two ways to make a friction hitch foot loop. Short friction hitch and 120 cm sling on the left, cordelette on the right.

All so you don't turn out like this person!

(image: @caiocomix

Anchor forces from lowering
Say you’re lowering your partner from a top rope anchor, with the rope running through one carabiner. As your partner descends, what's the load on the anchor? Is it your partner’s bodyweight, 2x their bodyweight, or something else?
The illustrations in this article (shared with permission) come from the excellent website RopeLab, run by Australian rigging expert Richard Delaney. RopeLab has a ton of great material for anyone who wants to dive into ropes, rigging, and mechanical advantage, check it out! There's a fair amount of quality free information, but getting an annual subscription unlocks the entire website. You can also connect with Richard on Instagram and his YouTube channel, where he has loads of concise, informative videos.
These diagrams come from a RopeLab online mechanical advantage quiz, which you can find here.
You’re top rope climbing with your partner. They’re climbing, and you’re on the ground belaying. The rope goes from your harness, up to the anchor master point, and then back down to your partner.
In this common configuration, the load on the anchor can change depending on:
who is holding the rope
if the climber is resting and not being lowered
if the climber is being lowered, through typically a carabiner or two
For example:
Your partner finishes the climb, and calls for take and lower. You lock off your belay device, they lean back, weighting the rope, and you lower them to the ground.
What’s the force on the anchor when you're lowering them? Many people think it has to be twice the weight of the climber. Say the climber weighs 100 kg. You, the belayer, need to counterbalance that force with 100 kg of your own. So that means a 200 kg load on the anchor, right?
Well, turns out it's not quite that simple. Let's look at a few examples to see how this works!
Question 1 - A person (weight 1 kN) is holding their own weight, on a rope that goes through a 90% efficient pulley on an overhead anchor. What is the theoretical force on Anchor A?

IMAGE: ROPELAB.COM.AU
Answer: 1.0 kN
If you’re statically holding your own weight like the diagram, the anchor sees the force of your body weight. It doesn't matter if it goes through a 10% efficient pulley or 50% efficient carabiner, the force on the anchor is going to be the same.
(To add another interesting variable to this, if there's any sort of ledge or friction between you and the anchor, that will further reduce load on the anchor. But for now let's assume the climber is free hanging.)
Question 2 - A climber (weight 1 kN) is LOWERED with the rope running through a 90% efficient pulley. What’s the theoretical (including friction) force on Anchor B?

IMAGE: ROPELAB.COM.AU
Answer: 1.9 kN
The anchor sees the force of the climber, plus the force of the belayer to hold the rope, minus the 10% friction at the pulley. So, the force on the anchor is not two times the weight of the climber. (Yes, top roping through a pulley doesn’t happen in climbing very often, and it can actually be a bad idea if your belayer weighs much less than you do, but we’re using it here as an example.)
Question 3 - A climber (weight 1 kN) is LOWERED with the rope running through a 50% efficient carabiner. What’s the theoretical (including friction) force on Anchor C?

IMAGE: ROPELAB.COM.AU
Answer: 1.5 kN
When lowering, the anchor sees the force of the climber, plus the force of the belayer to hold the rope, MINUS the 50% friction at the carabiner. The friction from the carabiner significantly reduces the load on the anchor. This is why a belayer who’s a lot lighter than their partner (usually) doesn’t get lifted off the ground when they lower their partner from a toprope.
Here's another way to think about it:
When you’re raising something, friction can be your enemy.
When you're lowering something, friction can be your friend.
Here, friction at the anchor reduces the load on the anchor AND transfers less weight to the belayer for them to manage. That’s a good thing!
What are some practical uses for this in the real climbing world?
Rappelling, and lowering yourself, put the same load onto the anchor. If you top out on a 1 pitch climb and find yourself at an anchor you think is sketchy, rappelling might be less risky than being lowered.
Being lowered by your partner will always put more force on the anchor then rappelling or lowering yourself.
Any additional friction in the system, such as the rope running over rocks or ledges, will further decrease force on the anchor.
Top roping through a pulley increases load on the anchor, and can make it more difficult to catch a fall because of the reduced fraction. Don't do this.
It's easy to test systems like this yourself. Just get a barbell plate of a standard amount (a round number like 10 lbs/kg helps) and an inexpensive digital scale like the one below. This scale is about $10.


Rack spare carabiners in a "football"
Big wall climbers need a LOT of spare carabiners. Here's a good way to keep them tidy - rack seven of ‘em together. (Like the 7 points for a touchdown in ‘Merican football, eh?)
I think I first heard of this tip from big wall ace Pete Zabrok. Pete wrote a great book on big wall climbing called Hooking Up, highly recommended!
Here's one way to help tame the entropy of your big wall gear harness.
Aid climbers need a LOT of free carabiners. Here's one good way to carry them.
Rack seven carabiners together. One to your gear loop, and then three more pairs hanging below that. This keeps them fairly compact and tidy. Seven, like the points for a touchdown in American football, eh?
Are you concerned that your fumbly fingers might accidentally unclip the top carabiner and then you lose all seven? An Instagram friend suggested racking 6 carabiners / 3 pairs, and making the top two opposite and opposed. This makes it less likely that he might accidentally unclip the whole thing. I think this is a pretty clever idea. So there you go, do it with six or seven, your choice!


How to extend a quickdraw
Are you trying some super-steep sport route? Extending the quickdraws might make clipping easier. Here are two good ways (and two not-so-good ways) to do this.
If you're on some ultra-steep or reachy sport route that requires extended quickdraws, here are some ways to do it. And a couple of ways not to.
In addition to connecting quickdraws like this, you could also use a 60 or 120 cm sling.
Two good methods to extend a quickdraw:
Probably the easiest: remove the top carabiner from a second draw, and then clip the dog bone into the bottom of the first draw (left).
A more secure version: replace the carabiner with a quick link or locking carabiner (right).

Two not-great ways to extend a quickdraw:
Chaining together two non-locking carabiners is a no no. A fall could twist the carabiners together and cause them to unclip (left). It is okay to clip the bottom carabiner for a rest, and then clip the rope through the top draw when you continue climbing.
The quickdraws are extended correctly, but the rope is clipped to the wrong place. A fall with the rope clipped like this might damage the dogbone of the lower quickdraw (right)


My favorite mini headlamp - the Petzl Bindi
Headlamp technology keeps getting more ridiculously amazing, with lighter weight, brighter bulbs, and better design. While for climbing having something with 500 or more lumen output is really nice, there's also a place in your pack (and around the house) for a headlamp with more modest specs and lower cost. My new favorite: the Petzl Bindi.
Full disclosure: Petzl sent me this for free. It replaces a Bindi that I bought that decided to go for a walk. That in no way biases my review; it's a cool product and I want to tell you about it. There are paid product promotions on Alpinesavvy. In the rare cases when I get a free product like this, I’ll always let you know.

Modern headlamp technology is ridiculously awesome, and there's basically zero excuses to not have one as part of your everyday carry kit at pretty much all times.
Petzl and Black Diamond have been duking it out in the headlamp arena for a very long time, and we, the lucky customers, benefit.
For mountaineering, or longer trips in colder weather, you probably want a headlamp with a larger battery and a minimum 500 lumens, like the Petzl IKO Core, or the 900(!) lumen Petzl Swift. But for more general purpose hiking, 10 essentials, dog walking, everyday carry type stuff, a headlamp that's lighter, less expensive, with less light output works just fine - like the Petzl Bindi.
Here's why the Petzl Bindi is my favorite mini headlamp:
A ridiculously light 35 grams.
Minimalist elastic cord headband, yet still comfortable and functional.
Three main light levels: low, medium, and high (high is 200 lumens).
Red light for maintaining night vision and not blinding your friends.
Flashing red strobe light for increased visibility (and signaling, I suppose).
Rechargeable battery via micro USB port. (Yes USB C would prolly be better . . .)
Battery indicator light flashes for a few seconds after you turn it off to show the approximate battery level, very handy.
Reasonably weatherproof for hiking in the rain, but not for scuba diving.
Two different ways to lock the switch so you avoid accidentally turning it on in your pack.
Superbly engineered gear, at a fair price of around $45. I think that this (or something like it) belongs in the pack of just about everybody pretty much all the time.
Another option from Petzl that's even lighter and less expensive, but with a lot lower light output, is the e+LITE. (Personally, I like to have the option of the 200 lumens when I need it, so the Bindi recently replaced my much older eLITE.)
Reminder, there are no paid product promotion or affiliate marketing links on our Alpinesavvy. I occasionally share gear that I think is great, and there's no financial benefit to me when I do so.

Rappel anchors - replace crap webbing
It's common to find a mess of cord and webbing at some alpine rappel anchors. Do yourself and everybody else a favor: cut away everything that's questionable and add some new material of your own to make an anchor that's more reliable and easier for others to inspect. Watch the video for a scary moment of what can happen if you don't!

image credit: Silas Rossi, @silasrossi
Yikes, what a mess! It's very hard to evaluate something like this. Take some time to cut out the junk and add your own good quality cord.
Check out this YouTube short video from IFMGA certified guide Karsten Delap. (Yes, the webbing is tied directly through the bolt hangers, which is not standard practice, but still should not be direct cause for failure.)
Double fatality at Tahquitz Rock, CA, Sept 2022
When rappelling, both climbers apparently clipped in to a single loop of old tied webbing. The webbing broke. Both climbers fell and died. (It was raining, so perhaps the webbing was wet and harder to inspect or notice that it was old. The webbing was tested post-accident to only 2-3 kN. ) Here’s the accident report from the SAR team, well worth reading.
Sadly, I could go on, but I think you get the idea.
Webbing or cord on existing anchors is guilty until proven innocent! Always inspect it before you use it!
Cord and webbing used in climbing is very strong and reliable when it’s new and tied correctly. But when it’s been in place for a while, subject to ultraviolet light, mountain weather, possible rockfall, and maybe nibbling by rock rodents, it can be dramatically compromised.
A big rat’s nest of cord, with multiple slings ranging in age and quality, is hard to evaluate and potentially dangerous.
Instead of adding one more piece of your own cord to the mess, do everybody a favor: cut out all the junk and leave just two or maybe three good quality pieces.
Especially for more adventure climbing or alpine routes where you’re away from properly bolted anchors, it's good practice to bring some extra cord or webbing (and ideally a knife) that you can leave behind, so you know there's at least one good sling for your descent.
My personal rule: I really try to avoid rapping off of a single piece of cord unless it’s something brand new that I just tied myself. Any single cord that I find gets a back up. (That might be a little conservative for some people, but we are all accountable for our own level of acceptable risk.)
This is a fine reason to carry a cordelette. It's inexpensive and easy to cut up to leave behind when needed.
So, how bad is old webbing?
Short answer: it can be horrendously bad. My buddy Ryan Jenks at HowNOT2 tested some ancient sun bleached tubular webbing that was out in the elements for many years. It broke at about 3 1/2 kN! You could generate this with a decent bounce test when you're setting up a rappel!
Compare this to New 1 inch webbing which is about 18 kN, and 7 mm cord, which is about 13 kN.

Here's my cheap hardware store checkout line lock blade knife that I've had for like 20 years. It's taped securely shut so it can never accidentally open. It doesn't need to be fancy. It's been used countless times to clean up a rat nest rappel anchors.


Start your anchor with a quickdraw
Arriving at an bolt anchor with a small stance? A good first step can be to clip a quickdraw. Then, either clip or clove hitch yourself to the draw. This partially secures you while you build the rest of the anchor, and you can use the top carabiner of the draw as part of the anchor. Works for both multi pitch and top rope.
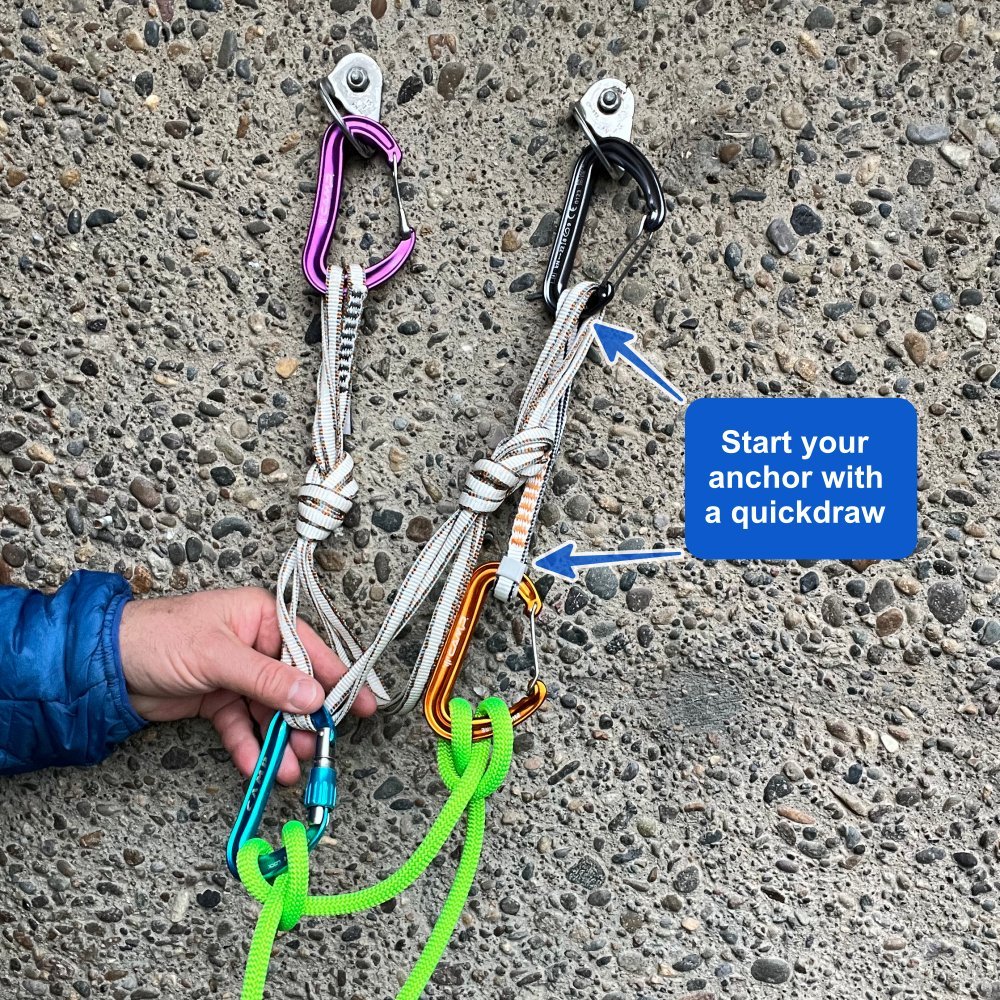
When you arrive at a bolted anchor, and the stance is fairly small, a good first step is often to clip a quickdraw.
If you have a decent place to stand, you might only need to clip the rope to the draw. if the stance is more marginal, you can tie a one handed clove hitch to attach yourself directly to one bolt. This gives you the temporary security you need to focus on building the rest of the anchor, whether it's for top rope or multi-pitch.
After clipping or clove hitching the draw, you stay on belay, still protected by your partner down below and all of the gear between you.
Here are two examples: 1) for a multi-pitch climb and 2) for a one pitch top rope.
For both examples, let's assume there's not much place to stand, so you secure yourself initially with a clove.
I'm using a pre-tied quad made from a 180 cm Dyneema sling, but the anchor could be pretty much anything you like.
After you build a proper anchor, you can use the bottom carabiner on the quickdraw as a place to hold your backpack, or maybe a sling with extra gear. It's probably NOT a good idea to use this as the first clip for the next pitch. That is a rather involved topic, and it's discussed a bit at the bottom of this article.
Method 1: Sequence for multi pitch anchor
What you need:
One quickdraw
Pre-tied quad, racked on one snapgate carabiner
One locking carabiner
Procedure:
Arrive at two bolt anchor.
Clip quickdraw to one bolt. For this example, the right bolt.
Clove hitch your lead rope into the bottom of the quickdraw. You’re secure at the anchor, but stay on belay, as you’re only clipped to one bolt. You are protected by your belayer and all of the gear you’ve already placed.
Clip the snap gate carabiner and the left arm of the quad to the left bolt.
Clip the right arm of the quad to the top carabiner on the quickdraw.
Clip the locking carabiner into two strands of the quad.
On the back side of the clove hitch connecting you to the quick draw, tie another clove hitch and clip it to the locking carabiner.
Take a breath and check everything: the locking carabiner is clipped to 2 strands, locked, and the clove hitch looks good.
Remove the first clove hitch you tied on the bottom of the quickdraw, and feed the resulting slack through the second clove hitch to adjust your position.
Schweeeet! Now you’re clove hitched to a locker that's on two strands of the quad. Add your belay device to the other two strands, pull up slack rope, put your partner on belay, and bring ‘em up.
Step 1: Clip a quickdraw to the bolt, and tie a one handed clove hitch to secure yourself temporarily. Stay on belay.

Step 2: Clip the quad to the left bolt with the snap gate carabiner it's racked on, and to the top carabiner of the quickdraw.

Step 3: Clip a spare locker to the quad, and tie a second clove hitch to the locker.

Step 4: Systems check - locking carabiner is clipped to 2 strands, locked, and the clove hitch looks good. Now you can remove the first clove hitch from the bottom of the quickdraw and feed some slack through the clove to adjust your position. Schweeeeet, you should be secured to the master point on the anchor. Give yourself a high five. =^)
Add your belay device to the other two strands of the quad, pull up rope, and bring up your partner.

Method 2: Sequence for one pitch top rope anchor
What you need:
One quickdraw
Pre-tied quad, racked on a locking carabiner
2 locking carabiners
Procedure:
Arrive at two bolt anchor.
Clip quickdraw to one bolt. For this example, the right bolt.
Clove hitch your lead rope into the bottom of the quickdraw. You’re secure at the anchor, but stay on belay, as you’re only clipped to one bolt. You are protected by your belayer and all of the gear you’ve already placed.
Clip the racking locker onto the left bolt and clip the left arm of the quad to this locker.
Clip the right arm of the quad into the top carabiner of the quickdraw.
Clip the two locking carabiners, opposite and opposed, onto the quad. Capture two strands of the quad with each carabiner. (It's even easier if these two carabiners are already in place before you start the pitch.)
On the backside of the clove hitch, clip the rope through both lockers and lock the gates.
Take a breath and check everything: Each locker should be clipped to 2 strands, gates locked, and rope running through them cleanly. If it all looks good, remove the clove hitch from the bottom carabiner of the quickdraw.
Schweeeet! You should now be clipped through both locking carabiners on the quad.
Call for “Take” and lower off.
Step 1: Clip a quickdraw to the bolt, and tie a one handed clove hitch to secure yourself temporarily. Stay on belay.
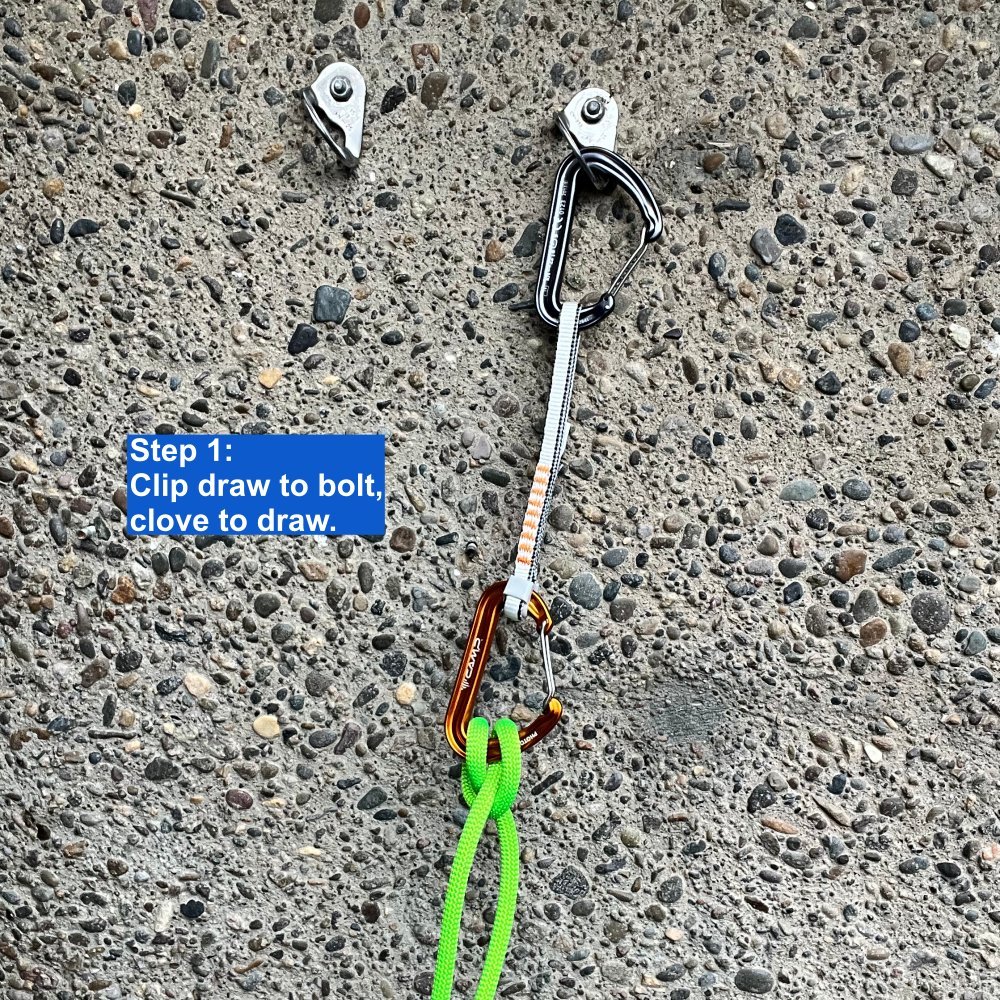
Step 2: Clip one arm of the quad to the left bolt with the racking locking carabiner. Note the two gold locking carabiners in the bottom of the quad. They are properly clipped with gates opposite and opposed, you can do this on the ground.

Step 3: Clip the other arm of the quad to the top carabiner of the quickdraw.
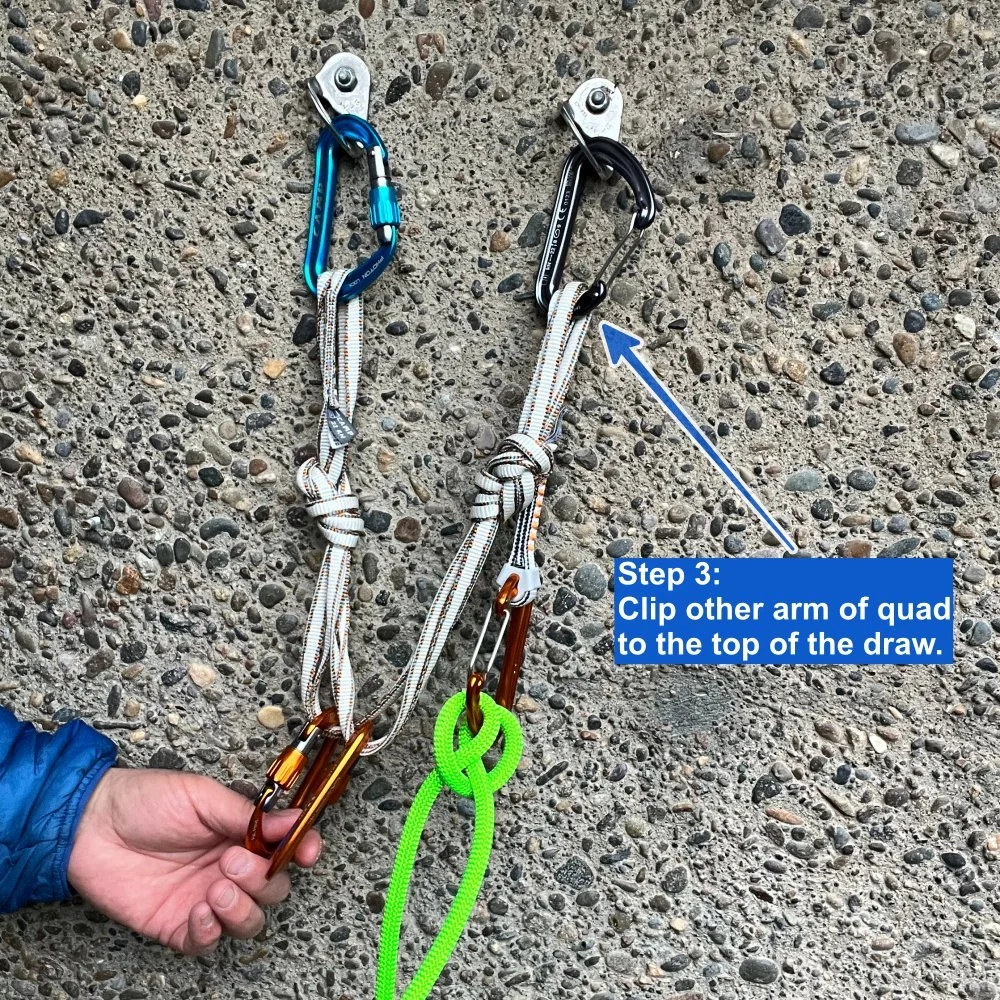
Step 4: On the backside of the clove hitch, clip the rope through both of the locking carabiners at the bottom of the quad. Lock the gates.

Step 5: Systems check - anchor looks good, all lockers are locked, each is clipped properly to two different strands of the quad. If it all looks good, remove your original clove hitch from the bottom of the quickdraw, call “Take”, and lower off.
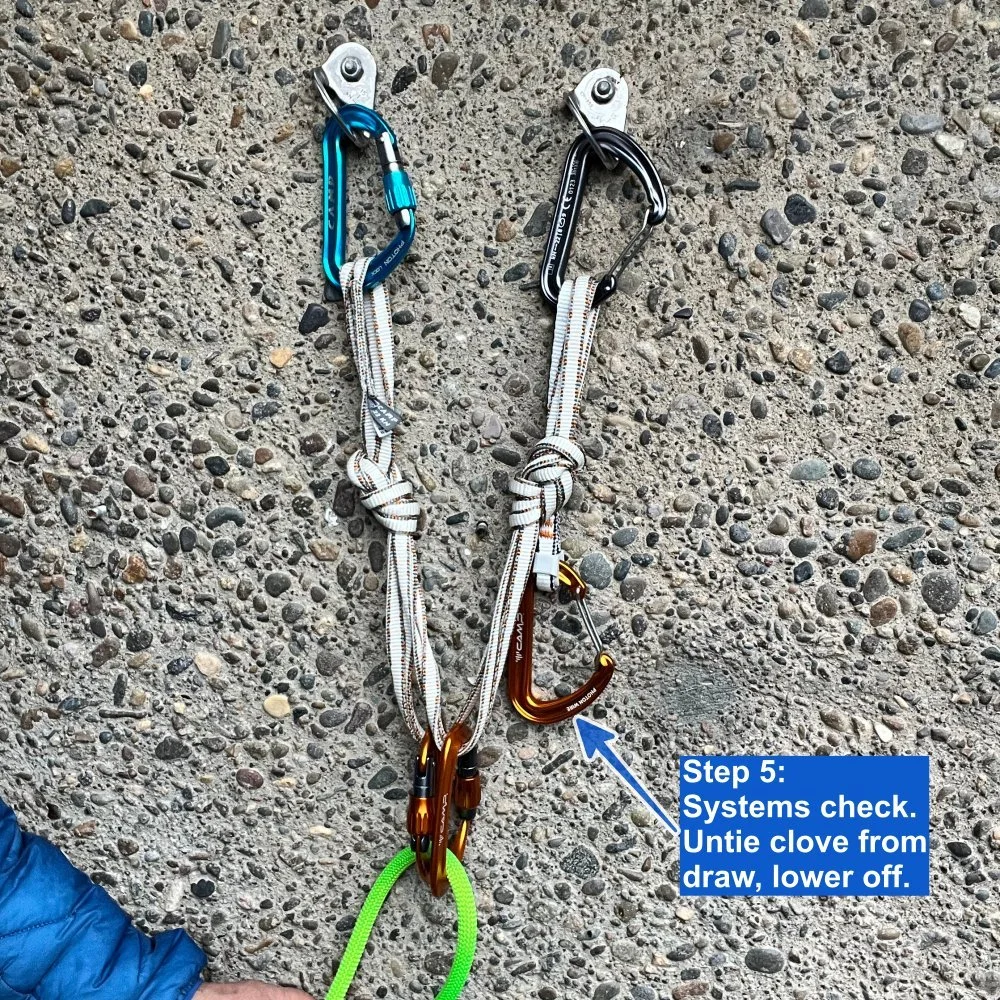
You might be tempted to also use that quickdraw as the first clip for the next pitch. This is a common practice for many people, but there are some reasons why it’s not such a good idea.
It doesn’t really protect against a factor 2 fall.
It creates a 2:1 pulley effect, here on the right bolt.
It will probably mean the belayer is going to be yanked HARD into that gear if a big fall happens.
So it really doesn't help much, and may actually create some additional problems.
Here’s an interesting article by expert Canadian climber Will Gadd that covers the pros and cons of this. Summary: doing this makes sense only in a fairly specific situation (unquestionably strong piece, and belayer clipped in a way so they can't get pulled into it). Will concludes it’s probably not a good idea to do it as a common practice.
If you’re concerned about the leader taking a big fall right off of the belay, probably a better approach is to use a fixed point lead belay. With this method you belay directly off of the anchor rather than from your harness. There's no pulley effect, and much less force put on the belayer. I have a detailed article about that, you can read it here.

Rope ascending with a Grigri and belay device
Do you need to do some improvised rope ascending? You don't need a designated waist and foot prusik cord. Instead, be resourceful with the gear you probably already have. All you need is a friction hitch, long sling, and a modern belay device like a Grigri or “guide-mode” style belay device.
Note - This post discusses techniques and methods used in vertical rope work. If you do them wrong, you could die. Always practice vertical rope techniques under the supervision of a qualified instructor, and ideally in a progression: from flat ground, to staircase, to vertical close to the ground before you ever try them in a real climbing situation.
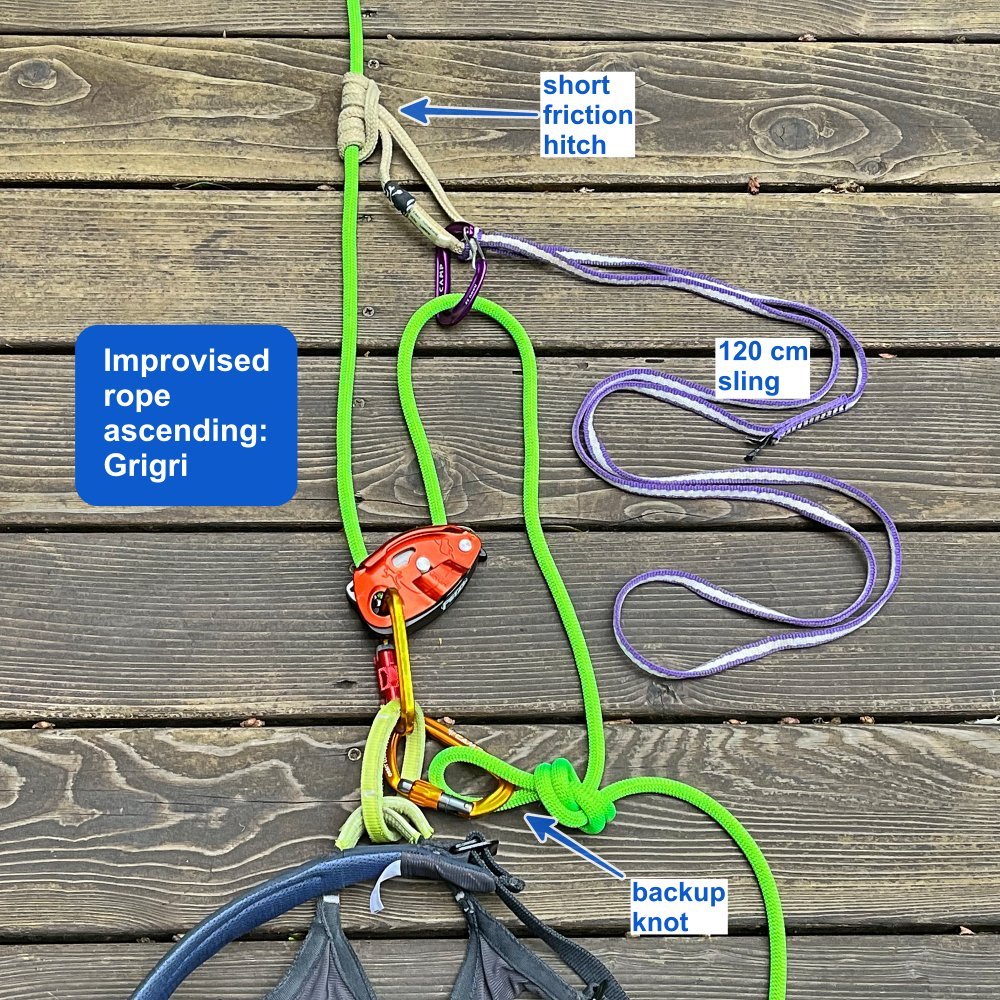
Hopefully you don't need to do this very often, but knowing some ways to ascend a rope without specialized gear (like handled ascenders and aid ladders) can be a useful self rescue skill. Why might you need to do this?
Stuck rappel rope (need to ascend it and fix the problem, yikes!)
Rappel down too far and miss your next anchor
Fall on an overhang or traverse, and are hanging in space or in unclimbable terrain
Can't make the moves and need to do some rope climbing to get past the hard part
Go up the rope to deal with an injured/scared partner
The old-school method was using some kind of dedicated foot and waist prusik loops. These can work, but they have some problems. It can be very slow and awkward, they are prone to tangling on your harness, and it's a specialized piece of rescue gear that you may always carry with you but never use. My opinion: in most cases, don't bother carrying them at all.
Another approach to rope ascending: creative use of gear you probably already have with you. With just this gear, you can get up a rope:
Grigri (or plaquette style belay device like an ATC Guide)
a short friction hitch
a double length / 120 cm sling
If you have some more modern tools, such as a Petzl Tibloc, Micro Traxion or Rollclip carabiner/pulley combo, this procedure becomes quite a bit easier. But for now let's see how to do it with the bare minimum of gear, okay?
A few notes:
The basic way this works: tuck your foot under your butt, stand in the foot loop to create slack, and then pull the created slack through the belay device.
Rigged like this, you have some mechanical advantage. It's not much, because of the friction every time the rope changes direction. Don't think you can do one arm pull ups and get yourself of the rope, you gotta use your legs. See the first point: stand up, create slack, pull slack through the device.
Interesting side question, what is the mechanical advantage here? Is it a 2:1 with a redirect, or is it a 3:1 because you’re lifting yourself? Well, there are some pretty smart people that feel pretty strongly one way or the other, but I'm gonna roll with rigging expert Richard Delaney from RopeLab. Richard says this is a 3:1. There are three strands of rope supporting the climber’s weight. For you to move up the rope 1 meter, you need to pull 3 meters of rope through the system. Yes, this may hard to get your head around, it was for me! Here's an article from moi and video from Richard explaining how this works.
Typically you're going to have less unwanted friction if you use a Grigri. This can depend on a rope diameter and whether the sheath is slick and new or old and crusty. If you have a Grigri, try that first.
If it's fairly low angle, you may not need the foot loop. Use the friction hitch as a handhold, lean forward, pull up with your arm, and pull slack through the device.
With the foot loop, it can help to take an extra wrap of the sling around your foot. This holds your foot in the sling so it doesn't slide out.
If the angle is quite steep, you may find it easier to clip a redirect carabiner into the friction hitch and clip the tail of the rope through the carabiner. That's what I show in the photos. This allows you to pull DOWN on the rope rather than UP, which can be more ergonomic if you're doing it for a while.
When ascending a rope, it's best practice to be connected to the rope in two places. My preference: every 6 meters or so, tie a backup bight knot in the rope below you, and clip it to your harness. You could also attach another sling from your harness to the foot prusik, but I find that to be annoying and tangle prone.
Think of rope ascending as a “movement sandwich.“ That’s a short movement of exertion, in between two periods of rest. Rest > move > rest. Rest > move > rest. Tuck your foot under your butt before standing, and use your legs. If your arms are getting pumped, you’re probably doing something wrong.
If it's vertical or overhanging, it may be more efficient to add a second foot loop with another 120 cm sling. This lets you push up with both your legs and can help save energy. On lower angle rock, it's not required.
Example 1: Improvised rope ascending with a Grigri
Sequence:
Set it up as shown below. Be sure the rope is loaded correctly in your Grigri.
Sit back in your Grigri. This is the “rest” position.
Slide the friction hitch as far up the rope as you can.
Put your foot in the purple sling, tuck your foot under your butt (important!), stand up, and pull the slack you created through the Grigri. Sit back down to weight the Grigri and rest for a moment.
Repeat. Tie overhand backup knots and clip to harness whenever you’re getting scared. =^)
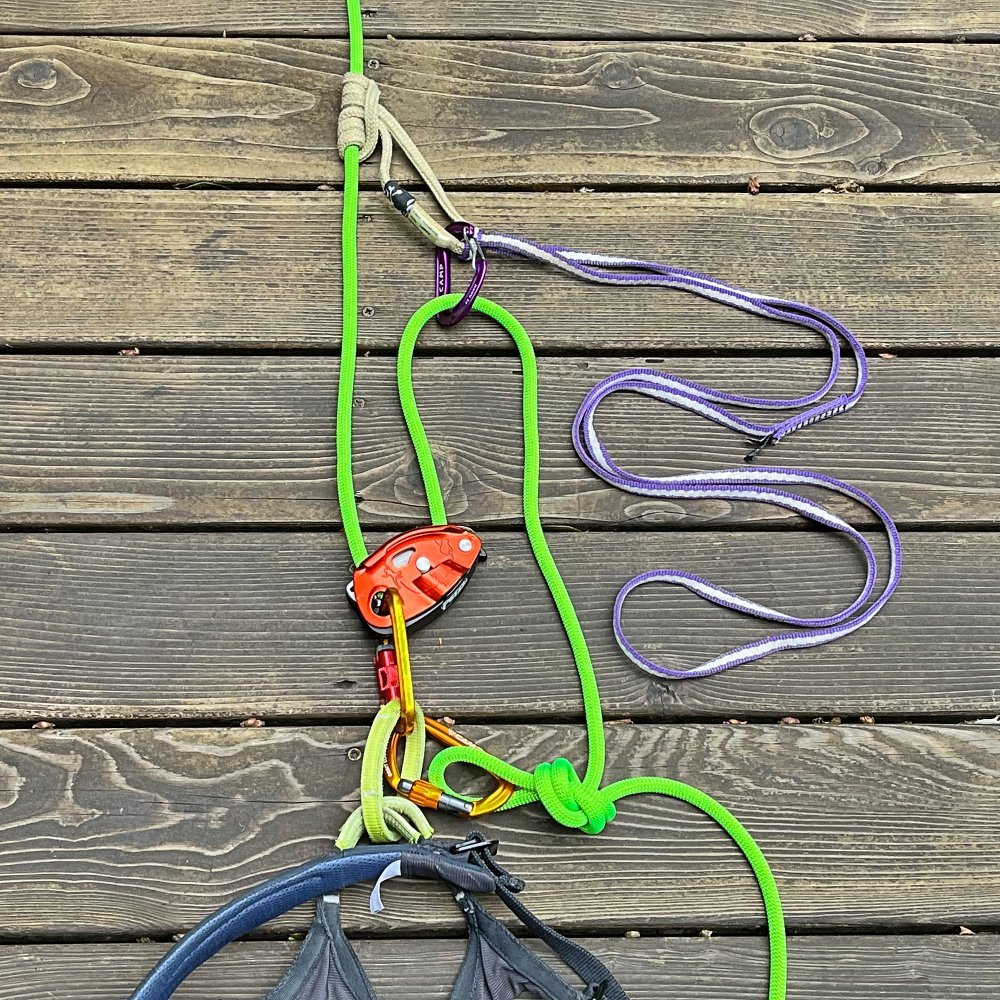
Example 2: Improvised rope ascending with a plaquette style belay device
Same sequence as above. Be sure you set up the rope correctly through your belay device, as shown below.
Sit back in your belay device. This is the rest position.
Slide the friction hitch as far up the rope as you can.
Put your foot in the sling, tuck your foot under your butt, stand up, and pull the slack you created through the rappel device. Sit back down to weight the device and rest for a moment.
Repeat. Tie overhand backup knots and clip to harness as needed.

Finally, here's a quick demonstration from IFMGA certified guide Karsten Delap, getting it done with a Grigri and a Tibloc.