

Alpine Tips

Don't pre-rig a rappel with a Grigri on top
The always terrific Petzl website has a specific caution against a pre-rigged rappel with a Grigri on top. Apparently, when the rope is loaded from below, occasional device failure can happen for the person above. Good news: there are some easy ways to eliminate this problem.
The pre-rigged (aka “stacked”) rappel, is a technique where both partners rig their rappel device at the same time, usually with an extension. Here's a complete article on it. A pre-rigged rappel increases efficiency and (usually) reduces risk.
Increases efficiency: the moment the first person is down the second person can start.
(Usually) reduces risk: the last person gets a safety check.
However, there’s apparently an unusual situation where this might actually increase risk: when the top climber has a Grigri.
The Petzl website awards this a skull and crossbones, which always gets my full attention!
I’d never heard of this until recently (Dec. 2023) , so I want to give it a shout as a potential issue. Thanks to Alpinesavvy fan @timmyycedar for mentioning this to mementioning this to me.

Check out the diagram below from the (always awesome) Petzl website.
The example from Petzl, and the one I show here, uses two Grigris. But it seems to me that the exact problem would still be present no matter what type of device the lower person is using.
Also, there’s no mention of rope diameter. It also seems to me that a smaller diameter rope might be more prone to this problem, I really don't know.
Here’s the caution from Petzl against doing a stacked rappel with certain flavors of the Grigri (bold text mine).
“With the GRIGRI + from 2017 and on, and the GRIGRI from 2019 and on, unblocking and a consequent fall can occur if the rope is heavily loaded below the user. Unblocking can occur if the rope is loaded with a weight equal to or greater than that of the person rappelling on the GRIGRI.
Examples of dangerous situations:
Multiple people rappelling in sequence, GRIGRIs pre-installed on the rope. If the person waiting in turn to rappel has their GRIGRI pre-installed on the rope, it can be inverted (and thus unblocked) by the weight of the person rappelling below them. So it will not be operational when the second person wants to start their rappel.
Bottom belay: the person performing the belay maneuver must not hang on the rope.
Rescue from below: The rescuer must not ascend the rope of a person who is stuck on rappel.”
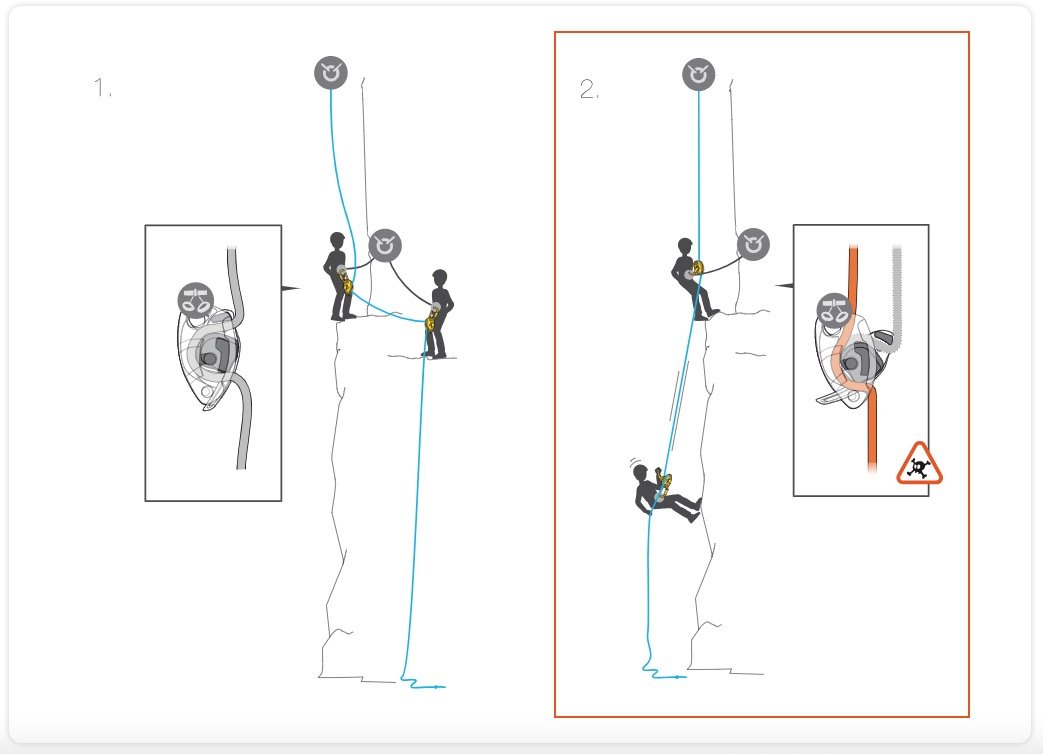
IMAGE: HTTPS://WWW.PETZL.COM/US/EN/SPORT/RAPPELLING-WITH-THE-GRIGRI?PRODUCTNAME=GRIGRI-PLUS
Apparently there are two other situations that can also cause Grigri failure. Check out the diagram below.
On the left, if someone gives an overly enthusiastic “firefighter belay” by putting their full weight on the rope, apparently that may cause Grigri failure.
Related to this, if someone is stuck on rappel and the climber at the bottom wants to ascend the rope, putting their full weight on it may cause Grigri failure.

IMAGE: HTTPS://WWW.PETZL.COM/US/EN/SPORT/RAPPELLING-WITH-THE-GRIGRI?PRODUCTNAME=GRIGRI-PLUS
OK, that's the doom and gloom stuff. Let's look at some simple ways to avoid this problem.
First off, this really only applies to descending a single strand of rope. It's pretty rare to do this in a normal climbing situation, so most people will never encounter this set up to begin with.
If one partner has a tube style device: set up your pre-rigged rappel so the first person down is always on the Grigri, and anyone else going down uses a tube device.
There are various other benefits for the first person down to use a Grigri, such as hands-free rope detangling, doing a pendulum if needed to reach an anchor off to the side, easily ascending the rope if needed, etc. Now we have one more reason to use this method.
If you MUST rappel single strand with two Grigris, there are other solutions.
Don't do a pre-rigged rappel, Easy!
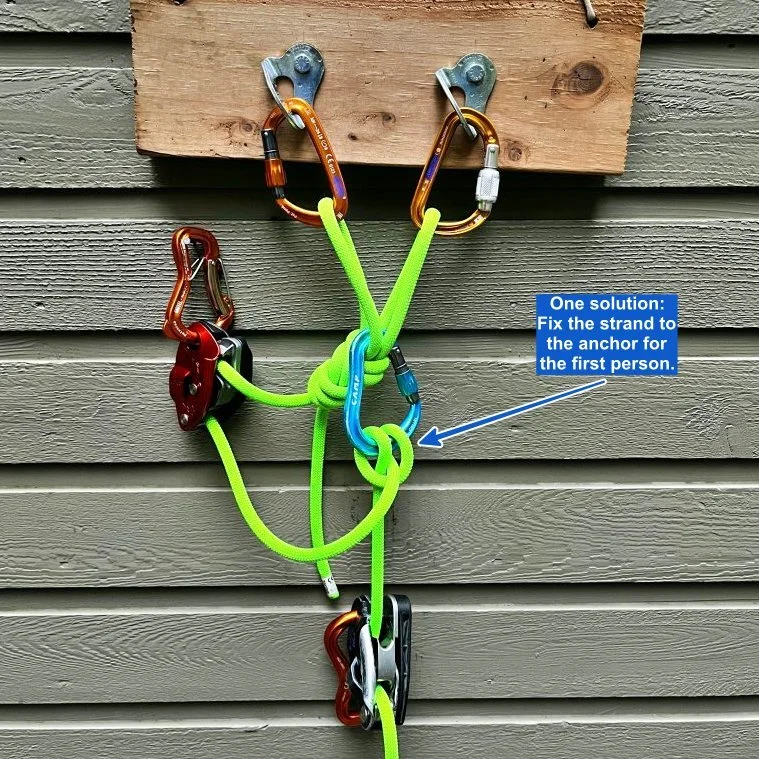
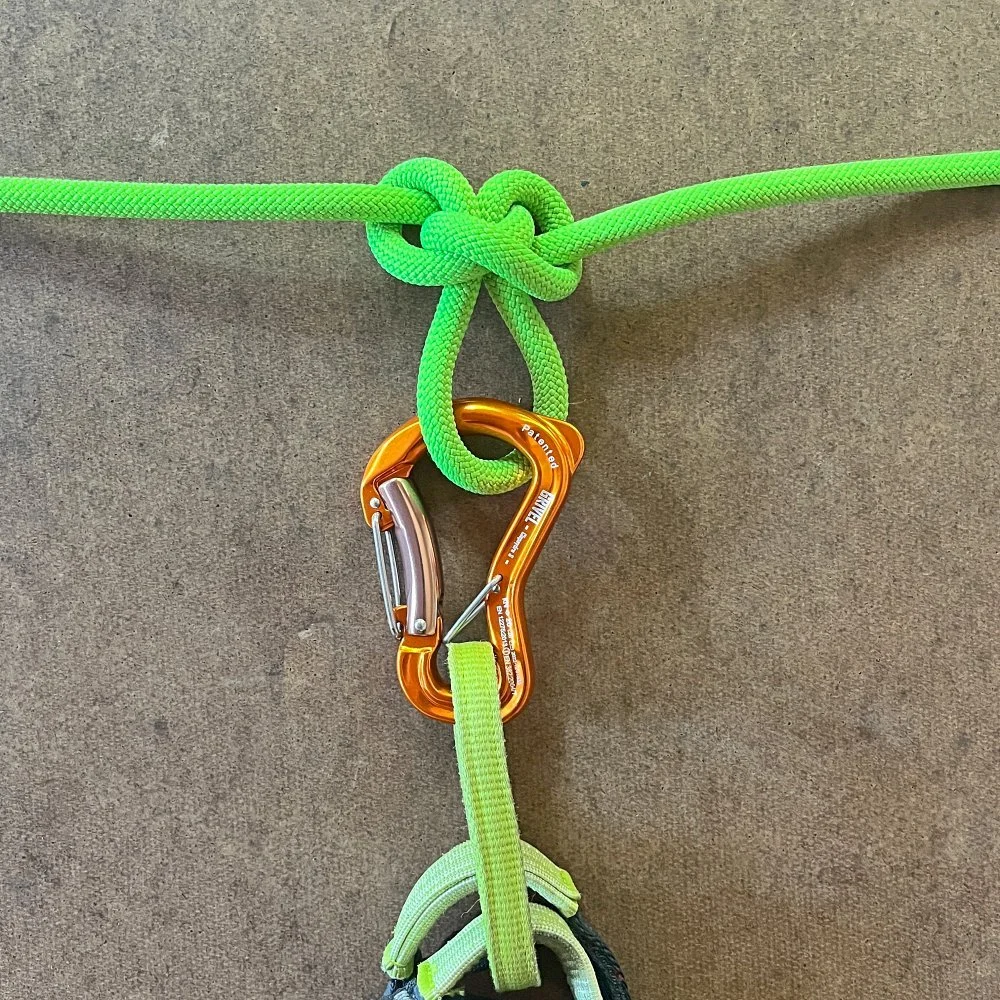
If you do pre-rig, you can tie the rope to the anchor with a clove hitch (blue carabiner) , as shown below. This means the weight of rappeler #1 goes on the anchor, and not onto rappeler #2. This eliminate any chance of Grigri failure. Rappeler #2 removes the clove, cleans the blue carabiner, and rappels.
Here is a video clip showing how the failure actually happens. This was sent to me by @govanathon, thanks!
(Actual failure / device inversion starts about 1:50.)

Quad anchor - 240 cm sling with bowline on a bight
If you have a 240 cm length sling, it can be annoyingly long to use on a two bolt anchor, especially rigged as a quad. Here is a clever way to rig it so your master point is high, and it's very easy to untie after loading: tie it with a bowline on a bight.

The standard quad anchor works great for many anchor setups where you have two reliable bolts or ice screws. Why is the quad cool?
Good load distribution
Minimal extension
Fully redundant
Quick to set up and break down; no knots to untie at each anchor
Super strong (would you believe 40+ kN?!)
Two independent and load distributed master points, which can be very handy
To make a quad, you have several options of materials and length. The original material, suggested by John Long in his book “Climbing Anchors”, was a cordelette. While there's nothing inherently wrong with this, it is big and bulky.
Modern sewn slings are a better choice. There are three lengths you could use for a quad: 120 cm, 180 cm, and 240 cm.
120 cm: too short, unless the anchors are very close to each other.
180 cm: the ideal for most cases, not too short and not too long.
240 cm: tied in a standard configuration is usually too long, putting the master point down low by your waist instead of up by your chest.
However, a 240 cm sling is a very handy piece of gear for lots of other things, and many people choose to carry that instead of a cordelette. You can sling it around a tree, you can equalize multi piece gear anchors, and if you use the clever rigging method shown here, it works great for a pair of bolts.
Rather than the standard method of tying an overhand or figure 8 on a bight to make your loops, instead tie a bowline on a bight. Advantages:
It uses up more material, which usually gives you a higher and more ergonomic master point. In the photo above, notice there are four strands on each anchor carabiner rather than the typical two.
A bowline on a bight is much easier to untie after loading, so at the end of the day you can easily untie your sling and give the material a rest.
This isn’t a standard climbing knot, but it's easy to tie once you get the hang of it. Here's a nice video that shows one way to do it.

A strong, simple and fast snow anchor
The T slot (aka deadman) anchor is usually a good choice when building a crevasse rescue anchor in snow. Here’s a quick enhancement that can double the strength.
Disclaimer: There is WIDE variability in the strength of snow anchors, due to factors like depth of the anchor, what you’re using for the deadman, temperature and water content of the snow, whether you stomp down (aka work harden) the snow between the anchor and the load, etc. A certain snow anchor flavor that tests to a certain strength in one location does not mean that result applies everywhere.
If you carry a picket, you have various options for building a snow anchor. With a very hard snow you can maybe use a vertical picket top clipped. With medium to hard snow, a vertical mid clip picket can work.
However, with softer snow, or if you choose not to carry a picket, about your only option is the “T slot” (aka deadman) anchor. This anchor can be made with gear like an buried ice axe, skis, or a backpack.
Here’s a way to (maybe?) double the strength of the T slot anchor, with a few seconds of work and one additional piece of gear: Add a vertical reinforcing placement to the horizontal placement.
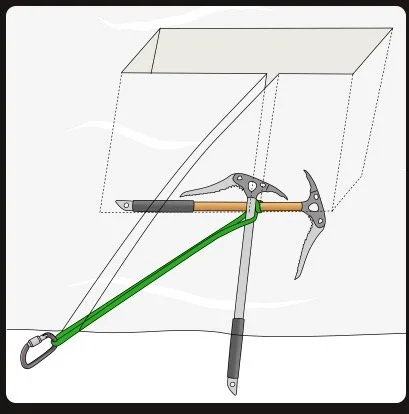
image (used with permission) : https://www.vdiffclimbing.com/glacier-travel-snow-anchors/
This does a couple of good things:
It makes the horizontal placement much harder to pull out.
If the horizontal placement, like an ice axe, shifts a little bit under load, it can prevent the clove hitch (that's on the horizontal axe) from slipping.
(If you use a picket and girth hitch the middle hole for the horizontal piece, you don't have to worry about the connection point slipping.)
The typical method to beef up a snow anchor is to build an entirely separate one, and try to connect / equalize them with cord. This is certainly effective, but it can take a lot more time and gear (more cord and carabiners) to build, and will probably end up pretty much the same strength as this one.
Sounds good. How strong is it?
My pal Ryan Jenks at HowNOT2.com tested this. He got about 8 kN, which is pretty impressive! Compare this to a single horizontal buried picket, which he tested at about 4 kN.
Adding the vertical picket to reinforce the horizontal one pretty much doubled the strength of the anchor, at least in this one test.
Keep in mind this was in high water content snow in the Washington Cascades. This usually conpacts very well and make some reasonably strong anchors. Your mileage may vary.
Keep in mind that a typical crevasse rescue anchor will only need to hold less than the weight of the victim when they’re hanging. (The friction of the rope passing through the snow reduces the load on the anchor.) When hauling with a 2:1, if the pull strand is not redirected, the anchor should see about 2–3 kN at most. So, in the typical crevasse rescue scenario, loads on the anchor usually are fairly low which is a good thing.
I’ve seen quite a few studies of the strength of horizontal deadman anchors, but this is the only one that adds the vertical element. If anyone knows of other studies, please email me; I’d like to add those to this article.
A few snow anchor testing resources . . .
Here's a link to the British mountain rescue magazine from (I think) 2018. They got results that were different. Like I said, your mileage may vary.
If you really want to nerd out on snow anchors, here’s a webpage that summarizes most of the publicly available studies.
HowNOT2 video showing snow anchor pull test results. Horizontal picket about 6:00. Reinforced horizontal picket, about 6:35.
Screen grab from the above video, setting up the reinforced picket.

Finally, for a very deep dive into snow anchors, here is a nice presentation from the Mountain Rescue Association featuring snow anchor expert Art Fortini.
Innovative Gear - Aideer Climbing
Aideer Climbing is a one-man show, crafted by Olle Hjort in Stockholm Sweden. Olle makes soft good for aid climbing, big walls and some industrial use.
This section of my website highlights small companies, inventors, artists and other superb humans who make exceptional climbing-related gear.
If you know a company that wants to be on these pages, please let me know.
I don't get any sort of advertising fees / benefits / kickbacks from these pages. I simply want to showcase cool companies to a wider audience.
Occasionally these companies may give me a product to review. If that happens, I’ll tell you.
Listings are alphabetical.
Aideer Climbing - Olle Hjort

Aideer Climbing is a one-man show, crafted by Olle Hjort in Stockholm Sweden. Olle makes soft good for aid climbing, big walls and some industrial use.
Aider Climbing website.
Preferred way to connect and order is through Instagram, @aideerclimbing
Olle was kind enough to send me a pair of his aid ladders for review, and they are beautiful! Sturdy in all the right places, lightweight in the other places, and literally half the weight of my older workhorse ones.
(If you’re lucky, or ask nicely, he might even sew a cool Swedish flag on for you.)
Currently, Aideer offers the following products:
aid ladders (let’s not call them “etriers” - French for “stirrup” - anymore, okay?)
Russian aiders (VERY cool and hard to find!)
big wall gear sling
“Collector of Dropped Objects” (CODI), a sort of large hanging basket designed to be strung below people who work at heights so they don't drop stuff
A few of his schweeeeeet aid ladders, ready for shipping.

If you're ready for battle on your next steep, scary big wall, you might want a pair of Russian aiders. They are very different than the standard ladders shown above, and Olle is one of the few people who makes them.

More for industrial use, here is the CODI (Collector Of Dropped Objects). If you're doing industrial type work where you don't want to drop anything, hanging this below your job site could be a fine idea.


Innovative Gear: Avant Climbing Innovations
Avant Climbing Innovations, based in Flagstaff Arizona, and founded by Brent Barghahn, focuses on specialty gear for top rope and lead rope solo climbing.
This section of Alpinesavvy highlights small companies, inventors, artists and other superb humans who make exceptional climbing-related gear.
If you know a company that belongs on these pages, please let me know.
I don't get any sort of advertising fees / benefits / kickbacks from these pages. I simply want to showcase cool companies to a wider audience.
Occasionally these companies may give me a product to review. If that happens, I’ll tell you.
Listings are alphabetical.
Avant Climbing Innovations founder Brent Barghahn free climbing El Corazon (5.13), El Capitan.

Avant Climbing Innovations, based in Flagstaff Arizona, makes specialized gear focused on top rope solo and lead rope solo climbing.
Avant Climbing Innovations website
Avant Climbing Innovations Instagram, @avant_climbing_innovations
Brent’s website and blog, with nice articles and photos of his adventures
Avant Climbing Innovations was founded by Brent Barghahn. Brent, a product designer, professional climber and humble bad-ass, knows a thing or two about hard climbing on big walls. He has some very impressive free ascents on El Capitan, such as El Corazon, El Nino, and Golden Gate. He is also an leader in spreading the gospel of proper technique and gear for lead and top rope solo technique. Oh yeah, and he has a few patents as well!
Top rope solo neck lanyard - If you ever done top rope soloing, you might've tried the DIY method of some sort of DIY bungee cord thing around your neck. This adjustable neck lanyard works a lot better.
Snack Pack multi pitch storage pouch - If you want to leave your backpack on the ground, but still have some room for a few essentials like snacks, phone, windbreaker, and headlamp, check this out. It's basically a smartly designed chalk bag with a nice closure and zipper to store a few extra goodies; plus it has a phone tether.
Flex-Link Anti-Crossload Protector - Cross loading your carabiner is not a good thing, especially when you’re rope soloing. This clever device keeps this from happening, and it looks like it could be helpful in lots of cases other than rope soloing.
Top Rope Solo Neck Lanyard

image: https://avantclimbing.com/
Snack Pack multi pitch storage pouch

image: https://avantclimbing.com/
Flex-Link - Anti-Crossload Protector

image: https://avantclimbing.com/
Learn more about Brent from these videos.
Great documentary video produced by Arc'teryx with Brent free climbing one of the hardest routes on El Capitan with Amity Warme.
An interview with Ryan Jenks of hotNOT2.com, with a deep dive into top rope solo technique.
Innovative Gear - Frn Collective
Frn Collective was founded by Jordan Cooper. Jordan crafts unique clothing and climbing products made from repurposed climbing ropes.
This section of Alpinesavvy highlights small companies, inventors, artists and other superb humans who make exceptional climbing-related gear.
If you know a company that belongs on these pages, please let me know.
I don't get any sort of advertising fees / benefits / kickbacks from these pages. I simply want to showcase cool companies to a wider audience.
Occasionally these companies may give me a product to review. If that happens, I’ll tell you.
Listings are alphabetical.
Great choice for a workshop if you ask me. Frn Collective founder founder Jordan Cooper working on a rope belt.
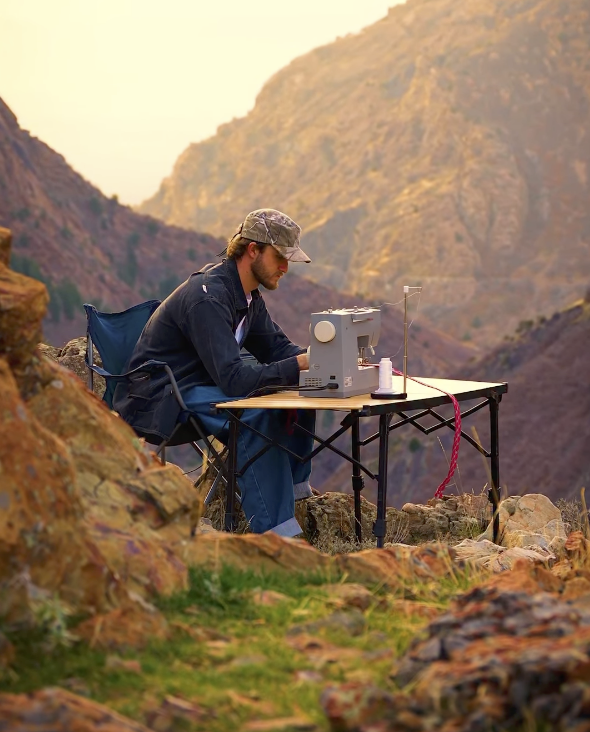
Jordan Cooper is the founder of Frn (like the plant) Collective, a one man operation based in Salt Lake City. Jordan makes hand crafted belts, chalk bags and more from repurposed climbing ropes.
Frn Collective website
Frn Collective Instagram @frn.collective
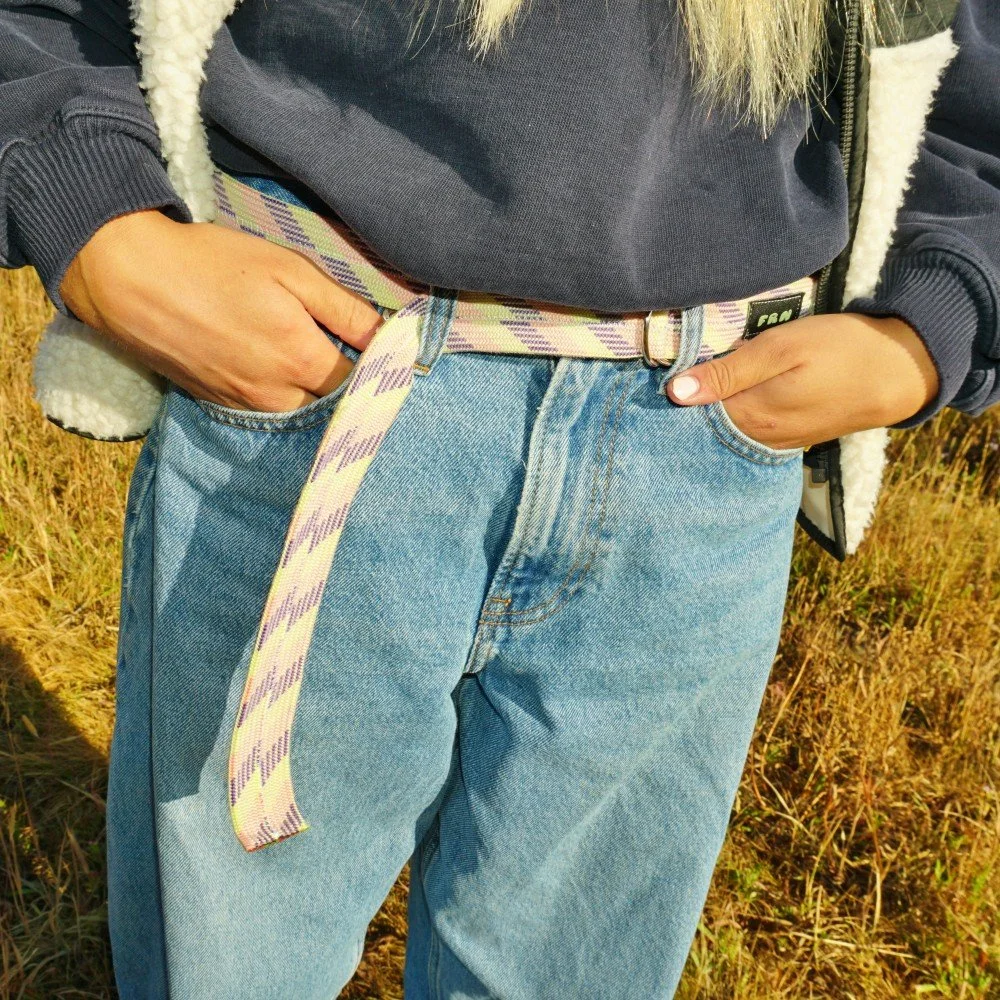
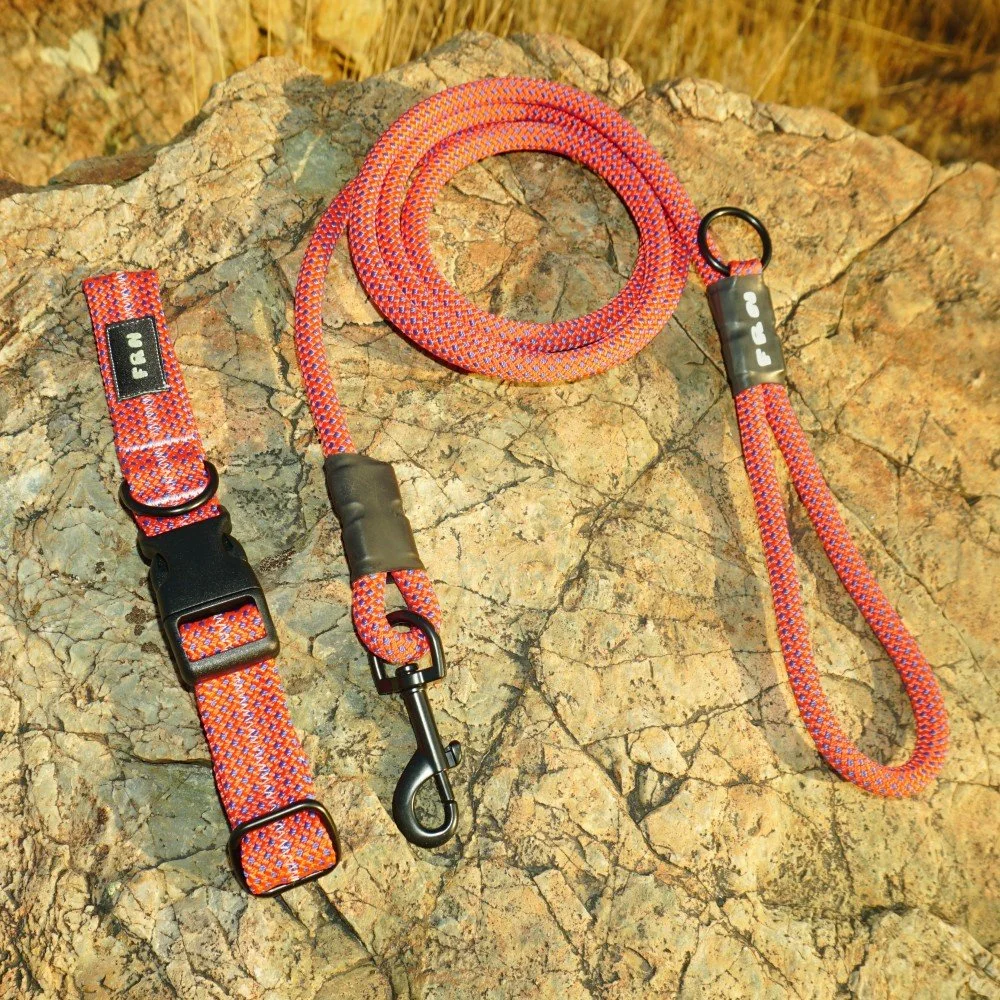
Don't get me wrong, I think a dog leash made out of an old climbing rope is a pretty good application. But if you get a bit more creative, you can do a lot more with the colorful rope sheath.
A cool belt made from a pair of retired rope sheaths.
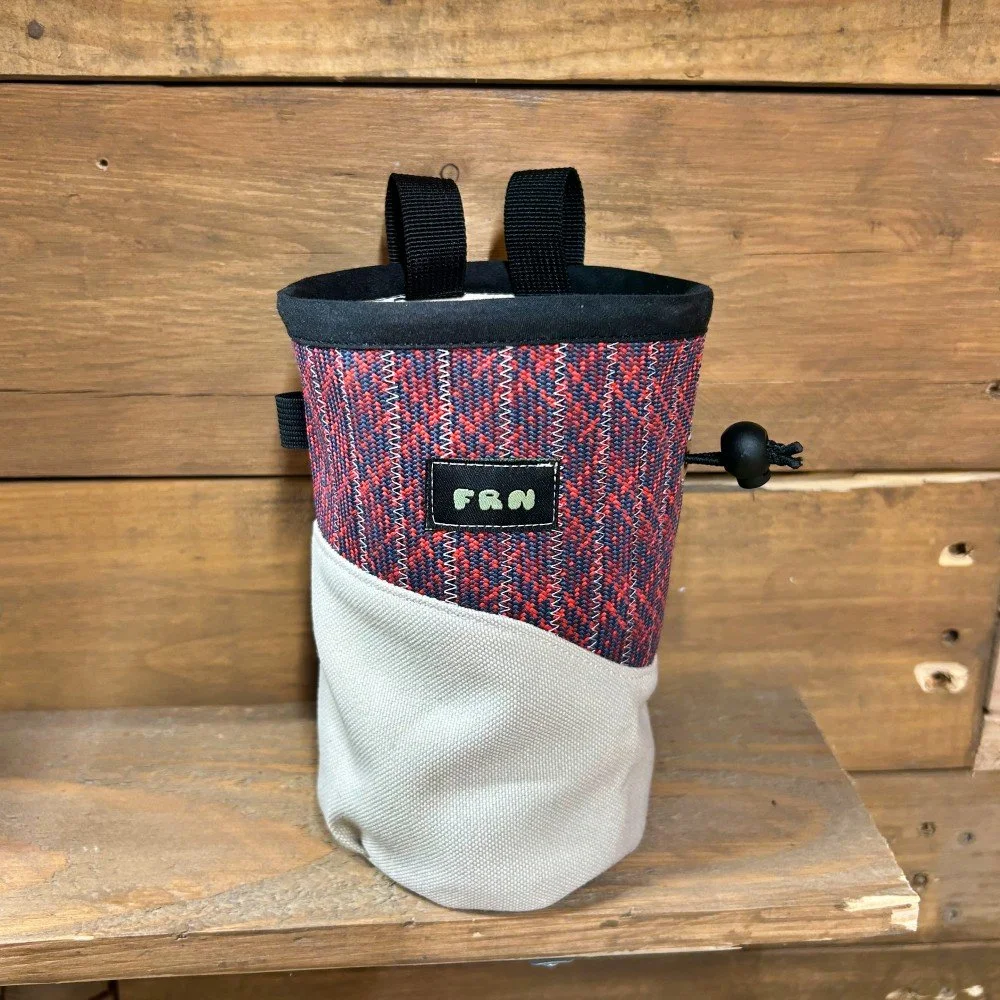
Nice chalkbag!
Keychains, anyone?

Matching leash and dog collar, sign me up!

Innovative Gear - Gear Perspectives
Gear Perspective, from Kingsburg California, specializes in gear for canyoneering. Several of their products cross over well to alpine climbing and ski mountaineering.
This section of Alpinesavvy highlights small companies, inventors, artists and other superb humans who make exceptional climbing-related gear.
If you know a company that belongs on these pages, please let me know.
I don't get any sort of advertising fees / benefits / kickbacks from these pages. I simply want to showcase cool companies to a wider audience.
Occasionally these companies may give me a product to review. If that happens, I’ll tell you.
Listings are alphabetical.
Good canyoneering gear can take you to some amazing places like this . . .

Gear Perspective, based in Kingsburg California near the beautiful central Sierra Nevada, has a focus on gear for canyoneering.
Gear Perspective website
Gear Perspective Instagram, @gearperspective
Here are some of their more popular offerings.
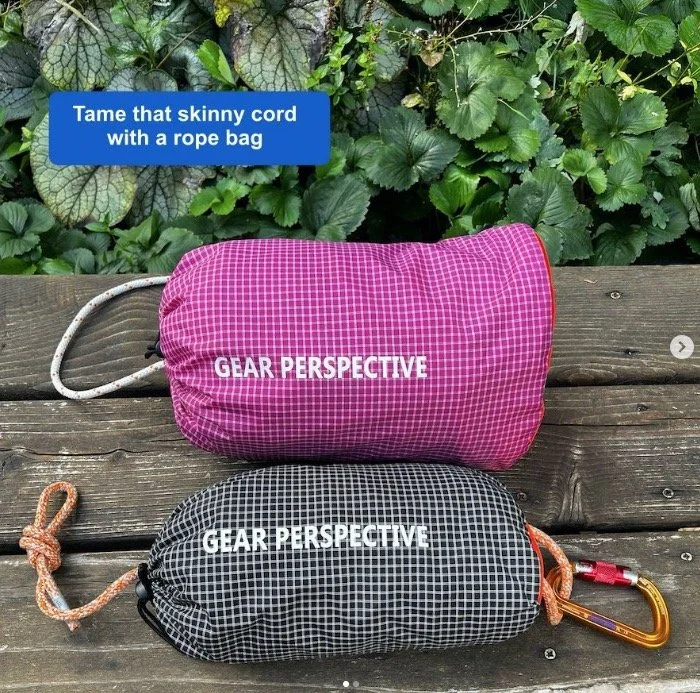
Micro 30 RADlineRope bag - This bag is the perfect size for 30 meters of 6 mm cord, such as the Petzl RADline. This makes it very helpful for Alpine climbers as well as canyoneering. It has double grommets in the bottom so you can tie a fixed loop, very handy for crevasse rescue. It was designed with collaboration from IFMGA guide Dave Searle, so you know it's solid. Gear Perspective gave me this bag for review, and I love it. They also make a larger version for a 60 meter 6 mm rope, if you have a longer tagline. (On their website it's under the “Search and Rescue” category.)
Shoulder / belt pouch - This is another one of their products that crosses over to climbing and backpacking. Keep your phone, energy bar, folded map and other essentials at the ready on your shoulder strap. Comes in lots of fun colors!
Double end rope bag V2 - Canyoneering folks have long realize the benefits of rope bags to keep your life tangle free. Some techniques benefit from having access to both ends of the rope in the bag, and this is designed for that.
60 meter and 30 meter rope bags (here, with 6mm rope)
Shoulder / belt pouch

Double end rope bag

image: https://gearperspective.com/

Innovative Gear - High Mountain Gear
High Mountain Gear is from Tacoma Washington. Founder Kyle Willis designs and sews small batch made-in-USA products for alpine and big wall climbing, much of it from re-purposed fabrics.
This section of Alpinesavvy highlights small companies, inventors, artists and other superb humans who make exceptional climbing-related gear.
If you know a company that belongs on these pages, please let me know.
I don't get any sort of advertising fees / benefits / kickbacks from these pages. I simply want to showcase cool companies to a wider audience.
Occasionally these companies may give me a product to review. If that happens, I’ll tell you.
Listings are alphabetical.
High Mountain Gear founder, Kyle Willis

High Mountain Gear is a small-scale gear manufacturer in Tacoma Washington. Founded by Kyle Willis, HMG makes some very cool products for big wall and alpine climbing.
High Mountain Gear website
High Mountain Gear Instagram, @highmountaingear
Kyle is a master at sewing and designing. He strives to use as much recycled and repurposed material as possible, such as extra sturdy sailboat sails.
HMG’s most innovative gear is the Taco portaledge system, the lightest portaledge (and fly!) currently available. Kyle was nice enough to send me one for review, and it's quite amazing. It's a sort of envelope into which you insert a Thermarest-style inflatable sleeping pad, and it's surprisingly comfortable.
High Mountain Gear also makes rope bags, which is pretty much mandatory to keep 6 mm tagline tangle-free. What I really like about his rope bags is the stiffness of the fabric, which keeps the mouth of the bag wide open when you're stuffing the rope, a big timesaver.
Related to the rope bag is the HMG ice screw cannon, a great way to store all of your screws and without them gouging anything else in your pack.
The Ski Guide Sled Tarp is an emergency shelter, and a way that you can hopefully drag out your injured partner if needed. Hopefully you don't need it for either one but if you do, you'll be glad you have it.
Check out some of their products below.
The Taco portaledge system

The High Mountain Gear rope bag - a perfect fit for 60 meters of 6 mm skinny rope

The HMG ice screw cannon

The ski guide rescue tarp


Innovative Gear - Hyalite Designs
Hyalite Designs is artist Katie McKinstry Stylos. Based in Montana, Katie creates amazing mountain landscape art from repurposed climbing rope.
This section of Alpinesavvy highlights small companies, inventors, artists and other superb humans who make exceptional climbing-related gear.
If you know a company that belongs on these pages, please let me know.
I don't get any sort of advertising fees / benefits / kickbacks from these pages. I simply want to showcase cool companies to a wider audience.
Occasionally these companies may give me a product to review. If that happens, I’ll tell you.
Listings are alphabetical.
Hyalite Designs founder Katie McKinstry Stylos in the studio.

Hyalite Designs is Katie McKinstry Stylos. She’s a Montana-based artist who creates unique and beautiful landscape art from repurposed climbing ropes.
Hyalite Designs website, including gallery of previous work
Hyalite Designs Instagram, @hyalite_designs
Katie designs and creates one-of-a-kind mountain scenery art from retired climbing ropes.
She lives near the ice climbing mecca of Hyalite Montana, and when she's not in her studio, you can probably find her climbing up frozen water in the nearby canyons.
Instagram is a great place to see more of her art and find out how you can buy one yourself. (I don’t yet own her art, but I certainly hope to someday.)
Here are some photos of her art, from her website and Instagram.


Innovative Gear - Moses Enterprises
Based on the central California coast and founded by Theron Moses, Moses Enterprises as an expert manufacturer of custom big wall hardware like cam hooks, Tomahawk pitons, and more. Don't start up a big wall without these goodies!
This section of Alpinesavvy highlights small companies, inventors, artists and other superb humans who make exceptional climbing-related gear.
If you know a company that belongs on these pages, please let me know.
I don't get any sort of advertising fees / benefits / kickbacks from these pages. I simply want to showcase cool companies to a wider audience.
Occasionally these companies may give me a product to review. If that happens, I’ll tell you.
Listings are alphabetical.
That is one impressive collection of big wall hardware!

Theron Richards is the man behind Moses Enterprises, a California central coast based designer and manufacturer of specialized big wall hardware
Moses Enterprises website
Moses Enterprises Instagram @mosesclimbing
Theron is an expert machinist and metal worker. His gear is considered mandatory for many modern aid routes.
One of his most popular products is the iconic Tomahawk beak style piton. This is hammered into very thin cracks on traditional aid routes. You can also hand place them over existing features like small constrictions and broken off copperheads.
Another great product is the classic cam hook. These are great for clean aid climbing because you can place them in a thin (usually vertical) crack, watch them magically cam as you put weight on them, letting you make very rapid progress up what used to be slow travel. Again, pretty much mandatory gear on any big wall. (Personally, I have a couple of cam hooks usually tied onto my ladders.)
Tomahawks, cam hooks, Logan hooks, and rivet hangers
(generously donated to folks helping with a cleanup in Yosemite, nice!

For connoisseurs of the aid climbing dark arts, Moses offers copperheads and various flavors of chisels.


Innovative Gear - RopeLite
RopeLite is Douglas Ray, a Seattle-based climber who makes spliced lightweight specialized cordage for climbers and rope rescue applications.
This section of Alpinesavvy highlights small companies, inventors, artists and other superb humans who make exceptional climbing-related gear.
If you know a company that belongs on these pages, please let me know.
I don't get any sort of advertising fees / benefits / kickbacks from these pages. I simply want to showcase cool companies to a wider audience.
Occasionally these companies may give me a product to review. If that happens, I’ll tell you.
Listings are alphabetical.
RopeLite founder Douglas Ray

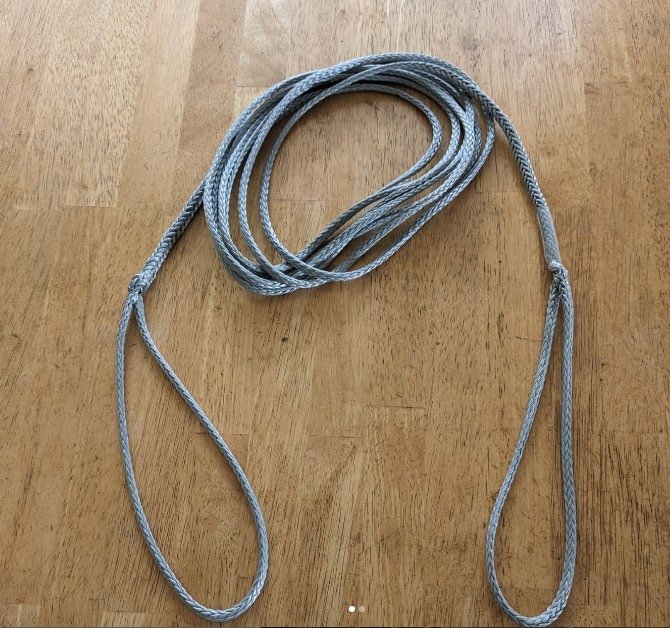
Douglas makes specialized and extremely lightweight friction hitch cords, bridles for carrying a litter, and more. Because the ends often have a spliced eye and not sewn in a loop, his equipment offers a great strength to weight ratio.
He also does custom orders. If you need something cool that he doesn't sell, get in touch.
Doulas sent me a hitch cord to review, and it's pretty impressive. It makes a solid friction hitch on 6 mm Petzl PURline, which is notoriously difficult to use with most friction hitches.
Here are some photos of RopeLite gear, from Douglas’ Instagram and website.
RopeLite Technora hitch cord

Adjustable litter bridle

Custom project for crevasse rescue
5 meter piece of cord with a 25 cm spliced loop on each end. Each end loop can make a prusik on ropes as small as 6mm. Or you can make a friction hitch anywhere in the middle. Weight: only four ounces / 113 grams

Innovative Gear - Skot’s Wall Gear
Skot's Wall Gear is the one man show of Skot Richards, a big wall expert and California-based designer and producer of big wall climbing gear. His Alfifi is a near mandatory gear for aid climbers.
This section of Alpinesavvy highlights small companies, inventors, artists and other superb humans who make exceptional climbing-related gear.
If you know a company that belongs on these pages, please let me know.
I don't get any sort of advertising fees / benefits / kickbacks from these pages. I simply want to showcase cool companies to a wider audience.
Occasionally these companies may give me a product to review. If that happens, I’ll tell you.
Listings are alphabetical.
Skot Richards product testing on El Capitan

Skot Richards is a one person, California-based designer and producer of big wall climbing gear.
Skot’s Wall Gear website
Skot’s Wall Gear Instagram, @skotswallgear
Skot is a multi talented guy! A veteran of many El Capitan climbs, he designs, sews, and does metal and machine work to constantly improve his products.
His flagship gear is the Alfifi, which is a combination adjustable tether and stout steel hook. This makes many different aspects of aid climbing faster and more efficient, such as top stepping, cleaning traverses, and even leading without connections to your ladders.
Skot sells some key gear to dial in your 2:1 hauling system, such as the perfect length of low stretch Zed cord, and a zero-stretch wire quickdraw. (Side note: here's my detailed article about the 2:1 haul system.)
He also offers the service of custom sewn webbing loops onto your hooks, which is something you probably don't realize you need until you try his.
Skot also offer several flavors of aid ladders, with the nice design feature of a designated clipping point for your tether.
The Alfifi

Zed cord

Custom sewn loops for your hooks

Aid ladders


Innovative Gear - Traverse Equipment
Traverse Equipment is Charlie Lane, out of Bellingham Washington. Charlie offers a cleverly designed backcountry ski repair kit that should be able to handle just about any repair. In addition, he has a video going over the kit, and their partner Cascade Mountain Ascents has a very detailed article about the kit components and how to use ‘em.
This section of Alpinesavvy highlights small companies, inventors, artists and other superb humans who make exceptional climbing-related gear.
If you know a company that belongs on these pages, please let me know.
I don't get any sort of advertising fees / benefits / kickbacks from these pages. I simply want to showcase cool companies to a wider audience.
Occasionally these companies may give me a product to review. If that happens, I’ll tell you.
Listings are alphabetical.
The Traverse Equipment ski repair kit
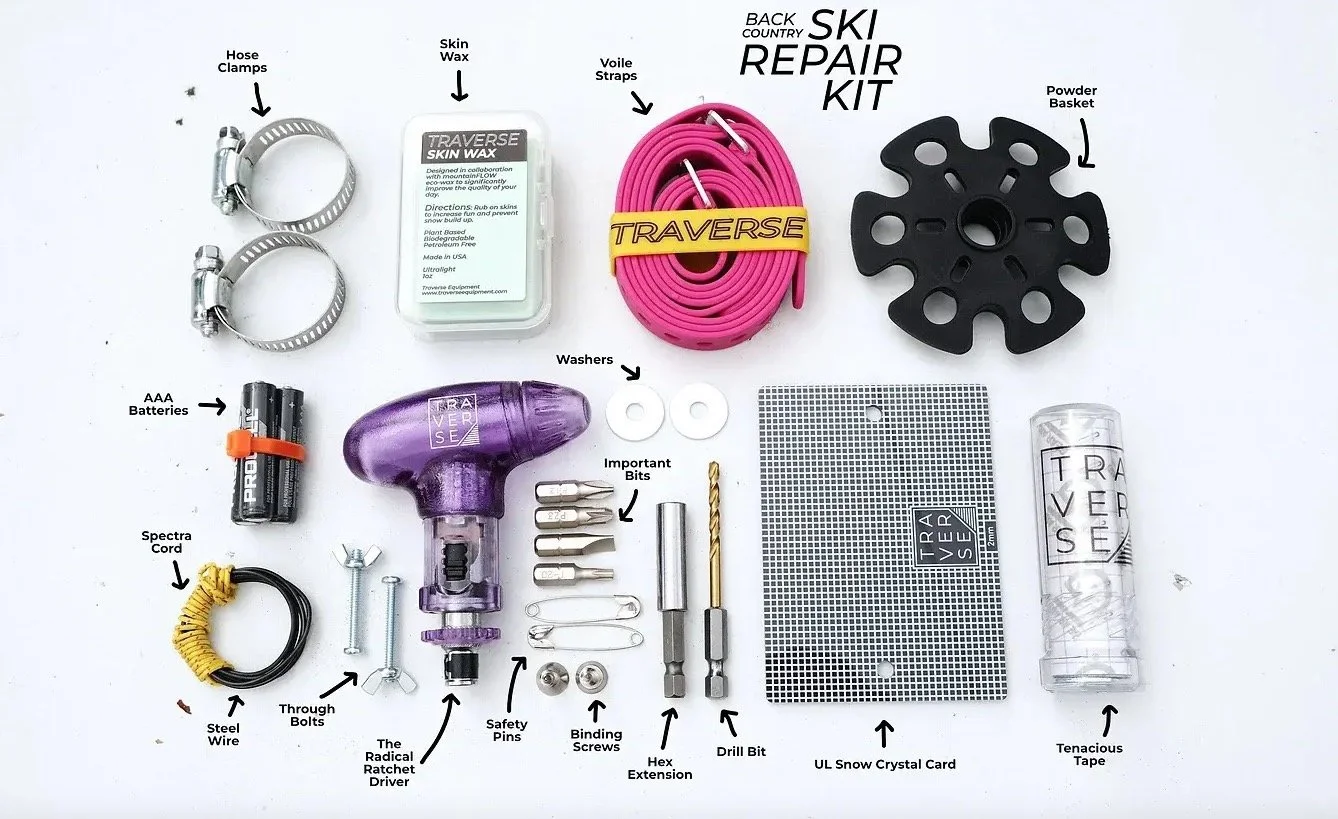
Traverse Equipment is Charlie Lane, out of Bellingham Washington. Charlie's main product: a very thoughtfully designed backcountry ski repair kit.
Traverse Equipment website
Traverse Equipment Instagram, @traverseequipment
You carry a first aid kit for your body. You also need a “first aid” kit for your skis. The proper tools, along with some occasional MacGyver-like creative repairs, can probably get you back to the trailhead, or maybe even continue a multi-day tour.
Not bringing a repair kit? You minor problem could suddenly become a major big deal.
Fortunately, Traverse Equipment has you covered - they sell a very refined ski repair kit that should cover most basic repairs. For longer tours you may want to take a few more things.
In addition to the kit:
Their research and development partner, Cascade Mountain Ascents, has an incredibly detailed repair article on their website that goes through every piece of equipment in the kit and talks about some ingenious ways to make some major repairs. Even if you have a kit already, I'm sure you'll learn a few new crafty tricks to fix your gear by reading this article.
Charlie has a nice YouTube video showing the purpose for everything in the kit, link below.
Innovative Gear - Zartman Rigging
Zartman Rigging is Ben Zartman, a New England based sailor and splicing expert. Ben makes creative and strong spliced soft goods for climbers, as well as a micro belay/rappel plate designed for 6 mm rope.
This section of Alpinesavvy highlights small companies, inventors, artists and other superb humans who make exceptional climbing-related gear.
If you know a company that belongs on these pages, please let me know.
I don't get any sort of advertising fees / benefits / kickbacks from these pages. I simply want to showcase cool companies to a wider audience.
Occasionally these companies may give me a product to review. If that happens, I’ll tell you.
Listings are alphabetical.
How about a sling with zero seams or stitching?

Ben is an expert and splicing high-tech cord, such as Dyneema. While more labor-intensive than sewing, this results in a overall stronger product with no seam or stitching. This is much more common in the sailing world than in climbing, and Ben uses this skill to craft some very interesting gear. (Even better, it’s UIAA certified.)
One thing on Ben’s website that really caught my eye are the Seamless Friction Loops. You know when you're trying to make a friction hitch with a small loop, and the darn stitching always gets in the way? Not a problem with a loop when it's spliced. See photos below.
Another cool looking product is the Seamless Micro Loop. One minor hassle of big wall climbing is trying to fit /tie chunky cord or webbing onto hooks. These micro loops look perfect, low profile, quick girth hitch, good to go.
Seamless friction loop - no stitches to get in the way
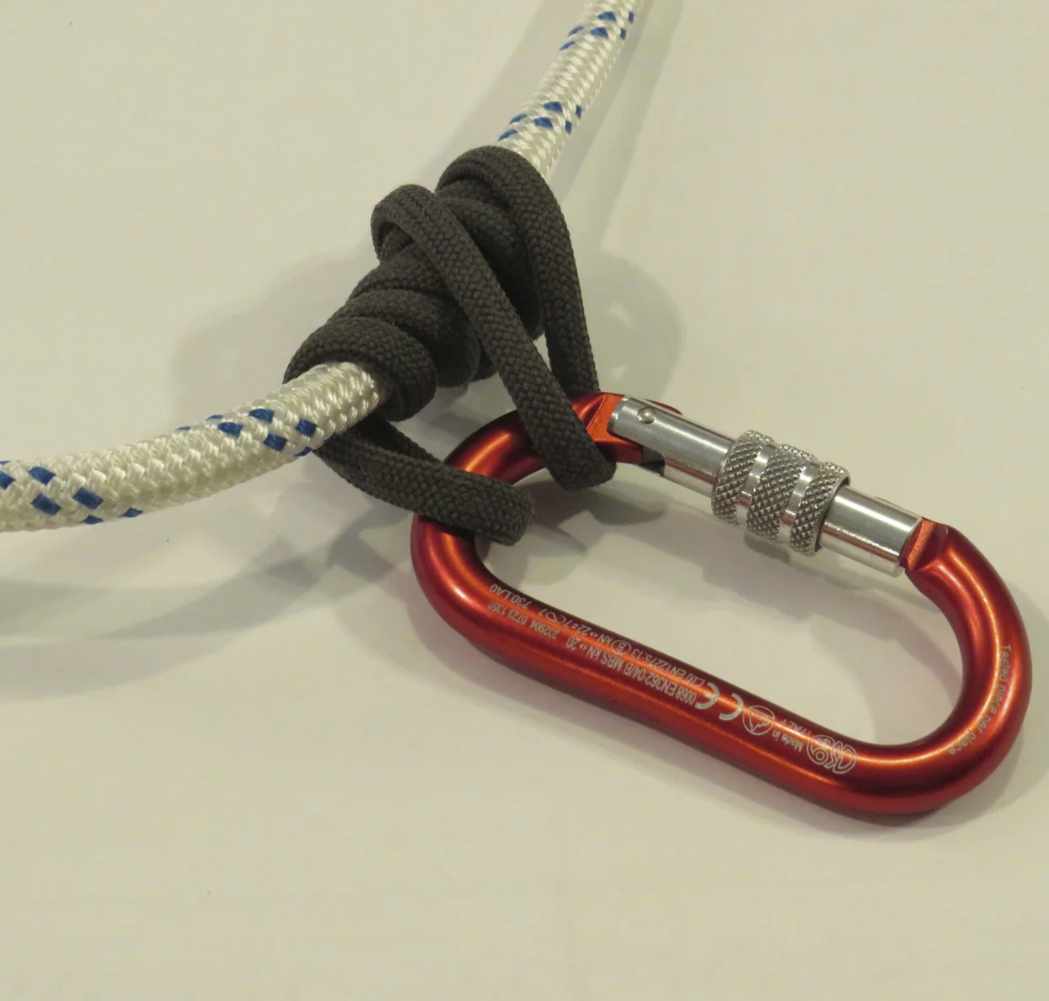
image: https://zartmancruising.com/
Seamless Micro Loop - perfect for hooks
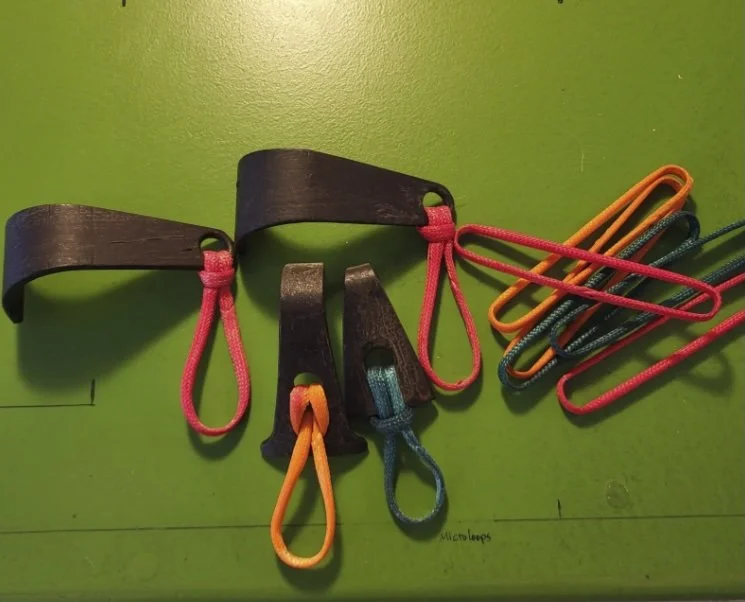
image: https://zartmancruising.com/
Seamless slings - Super strong and again, no seams

image: https://zartmancruising.com/
It's not all soft goods. Check this out: the “micro” belay / rappel plate designed for 6 mm cord.
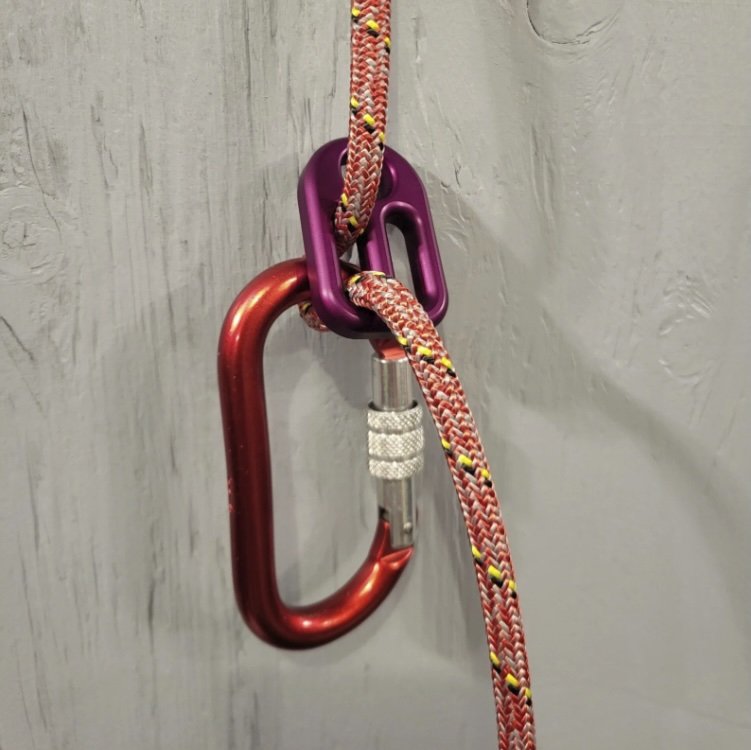
image: https://zartmancruising.com/

What's in my pack: ski touring gear by Graybird Guiding
What does a pro ski guide take for a day tour? Check out this detailed list from Shane Robinson and Graybird Guiding.
This post come from Shane Robinson and Graybird Guiding, a Seattle based guide company that not only leads some sweet ski trips, but also has an Instagram full of solid tips. Connect with them at their website and on Instagram. Check out their hashtag #sknowmore for specific backcountry ski tips.

In the pack:
Mountain Hardware 40 liter pack. It’s big enough for a full guide kit or bigger ski mountaineering objectives but can compress down for more average days. Bonus: helmet fits inside most days.
trauma kit (cpr & extreme bleeding) separate from first aid kit and more accessible
general first aid kit
Alpine Threadworks rescue sled & bivy
downhill gloves
headlamp
puffy coat for added warmth or as an emergency layer
Trew Gear Anorak shell
extra buff
helmet
goggles
extra wool hat
thermos for hot water/tea
rescue shovel
probe (ideally 300cm long)
Leatherman multi-tool
sunscreen & lip balm
snow saw, with teeth that can also cut wood if needed in an emergency (not pictured)
Garmin InReach (not pictured)
cordelette, double length sling, and a couple carabiners (not pictured)

Actually wearing:
hat with visor
sunglasses
avalanche transceiver

vRigger - Rope rigging software
Calling all rope nerds and gear heads: check out vRigger! It’s specialized and very cool software that lets you design, test, and teach rope rigging. Here’s an overview of how it works, and a discount code when you’re ready to try it yourself.
Full disclosure: vRigger sent me this software for free. That in no way biases my review; it's a cool product and I want to tell you about it. There are no ads, affiliate marketing or paid product promotions on Alpinesavvy. When I get a free product like this, I’ll always let you know.
vRigger offers a 10% discount to Alpinesavvy Premium Members. Learn about Premium Membership here.
What’s vRigger? Very cool Windows software that lets you design, teach, and test rope rigging.
It may appear that it's a drawing program. But the real power under the hood is the ability to specify load and pulling forces to see how your system actually behaves in the real world.
They have a nice series of tutorial videos showing how to use every part of the software.
The “Getting Started” video is a good overview, to see if it's right for you.
I use vRigger in two main ways:
Setting up different mechanical advantage hauling systems to see the efficiency and forces anywhere in the system.
General purpose drawing and diagrams relating to rigging.
You can insert carabiners, pulleys, rope grabs, friction hitches, etc. to build just about any kind of rigging or hauling system you can dream of. They have a large “library” of pretty much every sort of rigging device available. (And, if they don't have the exact piece that you need, you can create it yourself.)
Drag one component on top of another, and they auto-magically snap together to build your system.
For example, here's a diagram that I made for an article on the three types of mechanical advantage (illustrating that a theoretical 2:1 will always be less in the real world, because of friction, rope stretch, and other hard to quantify variables.)
This shows the difference in efficiency in a 2:1 haul system, between using a pulley on the left and a carabiner on the right.
After you specify the weight of the load (here 100 kg, you can use ‘Merican freedom units as well) it automatically calculates the forces involved all throughout the system, depending on the rigging and load! Cool!
An interesting take away from this diagram: using a lower friction pulley is more efficient to move the load, but it also puts a higher load on the anchor. It's one thing to read about this in a theoretical way; it's another to see the actual numbers like this.

Here's something all climbers should know about: how changing the angles of your anchor “arms” can change forces on the anchor. These numbers dynamically update and change as you click and drag the anchor around.
Hint, you should never build a climbing anchor like this! You can see that there's no more load sharing, but in fact load magnification. If you ever make a Tyrolean traverse, be sure the anchors on either side are unquestionably strong, because they're gonna get a big load!
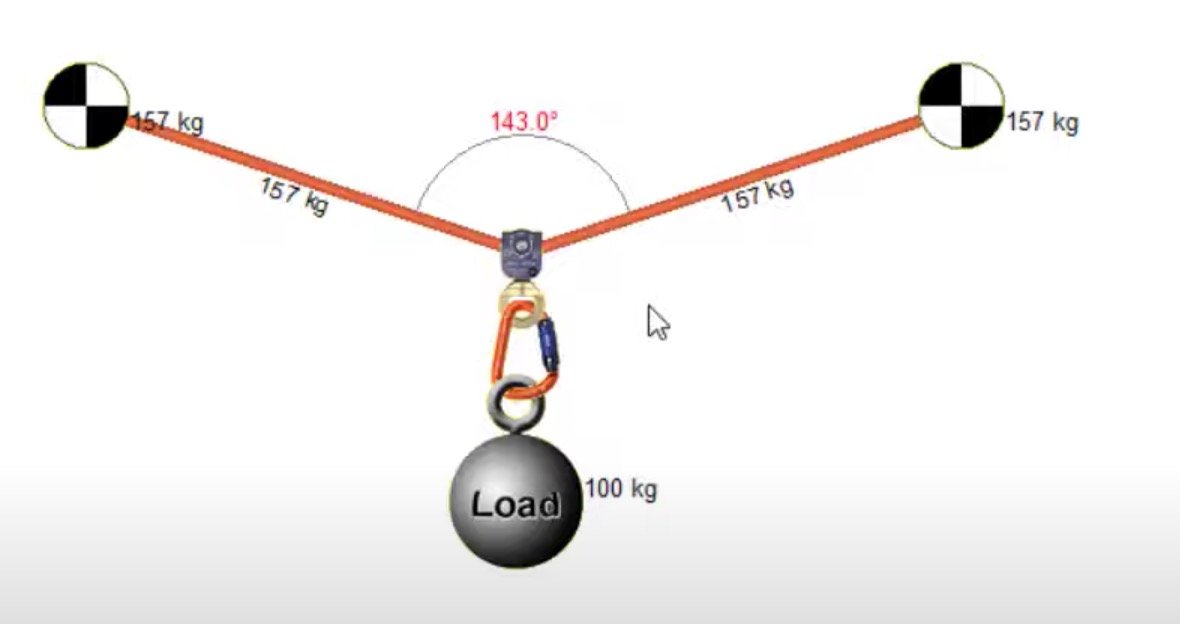
image: https://www.youtube.com/watch?v=CRxd2NPDpcw
It’s not all engineering stuff. You can make more general purpose diagrams like this. Click and drag on the points and lines to create bends in the rope.
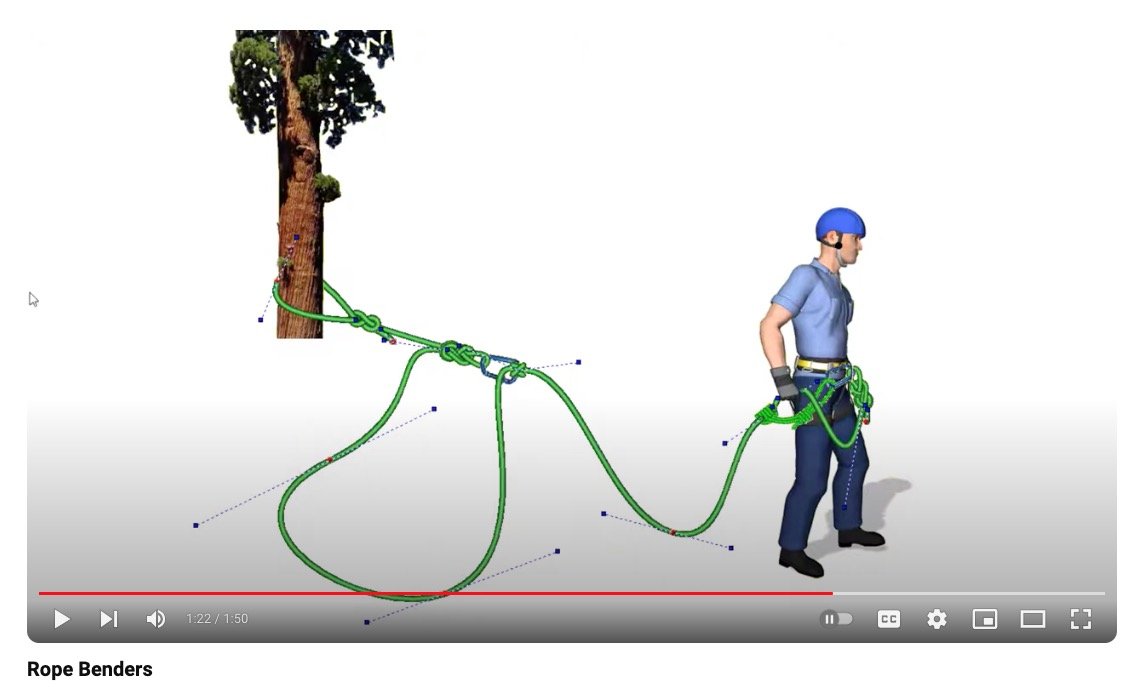
image: https://www.youtube.com/watch?v=gWBWtQzHwQc
There is a very convenient section of “sample files”, which are essentially premade diagrams for common rigging. This is a big timesaver. Here's an example, some typical mechanical advantage set ups.

There are even gear libraries for specialized applications such as industrial, rope access and theatrical.

So, that's a quick overview of vRigger. While I’m only using a small portion of the capabilities, hopefully you get a sense of how helpful is it for visualizing, drawing, and determining forces of different rigging systems.
If you want it yourself, use the discount code “AlpineSavvy” when ordering for a 10% discount.

Grivel Clepsydra S - the best carabiner for glacier travel?
For glacier travel, it's usually best practice to clip, not tie, to the rope. The Grivel Clepsydra carabiner just might be the best tool for the job: the twin gates will never freeze or jangle open, and the keeper gate prevents cross loading. Plus, it has a bonus feature as part of a minimalist hauling system.
The Grivel Clepsydra is a very unique carabiner. It has a few features that make it perfect as your clip-in for glacier travel. (It comes in two sizes; here I’m featuring the small (S).)
Why is the Clepsydra S great for glacier travel?
No chance of cross loading means you only need one carabiner to clip to the rope
Unique Grivel twin gate means it’s always secure, can’t freeze shut, and can’t wiggle open during a day of glacier tromping. (Yes, the twin gate takes a little getting used to, but you'll figure it out.)
You can use the small end as a prusik-tender in a hauling system (photo below)
Small, fairly lightweight
When you’re not glacier climbing, it works perfectly with a Grigri, as the little “horn” prevents the carabiner from being cross loaded
The standard recommendation for clipping to the rope for glacier travel is to have two opposite and opposed carabiners, at least one of them locking. With the Clepsydra, you only need one.
Before I got this carabiner, I used the Black Diamond Gridlock. This works pretty well, but the screwgate can loosen up over a day, plus as an HMS carabiner, it’s larger than necessary.
Here's how to use the Clepsydra as a “prusik minder” in a hauling system. The small end of the Clepsydra keeps the prusik hitch from being pulled through.


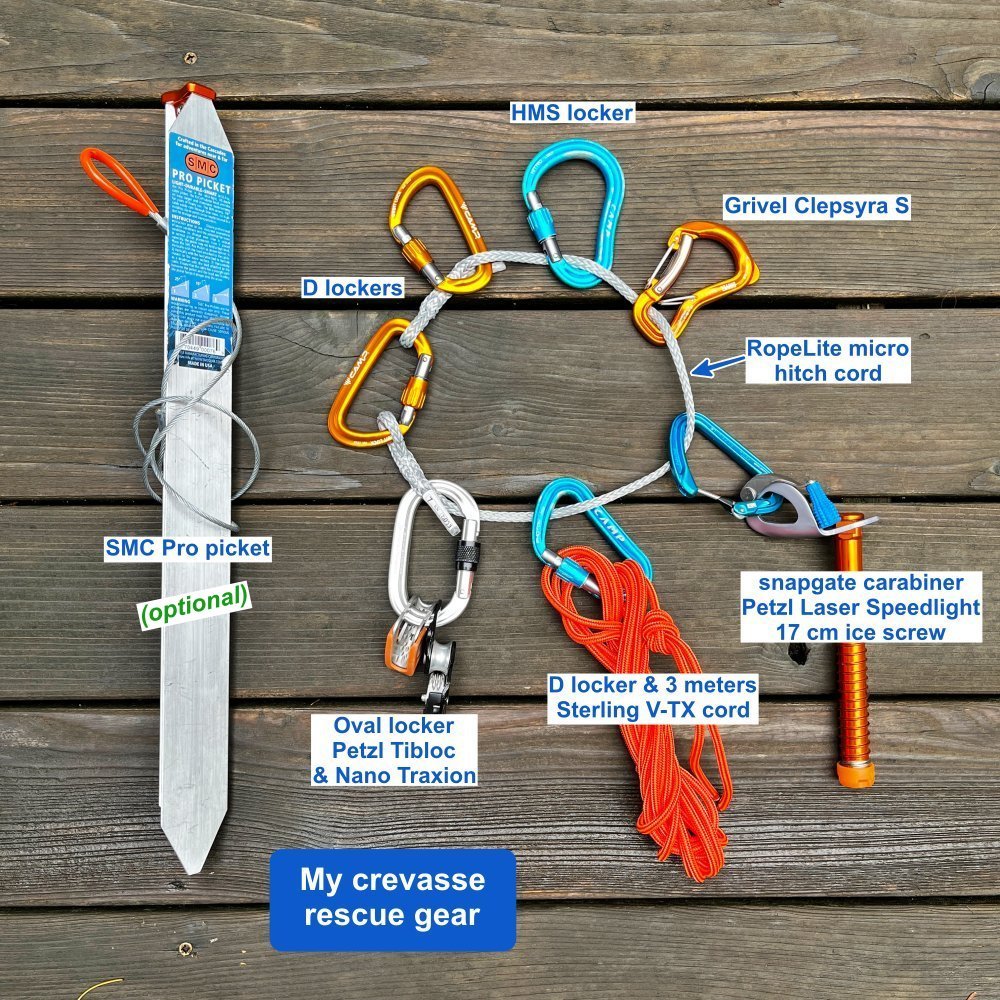
My crevasse rescue gear
There are many approaches to crevasse rescue and many choices for what gear to bring. You need light weight, multifunction, and hopefully have teammates with similar kit to have an effective rescue. Here's my go-to crevasse rescue gear.
There are many different approaches to crevasse rescue, and a near infinite combination of gear that you could carry. The basic requirements are 1) being able to climb the rope if you fall in, and 2) rescuing your partner if you’re the lucky one on top, and they can’t climb out. Fortunately, modern tools and techniques lets you do both with a minimum of gear and weight.
The gear requirements can change depending on team size and general skill level, but here’s a pretty good starting point.
This is pretty much the bare minimum. The idea is with a three of four person team, if everyone carries more or less the same basic kit, rescuers can combine gear as needed.
If you're on a two person team (which is generally considered experts only) you might want to carry a few more items, like maybe another locker, or a120 cm sling.
My crevasse rescue gear
6 locking carabiners: Grivel Clepsydra S, Black Diamond oval, large HMS and three “D” - The Clepsydra works great to clip yourself to the rope, because you can never crossload it, and the gate is very secure. Also works as a progress capture with a a prusik, if you don't have any progress capture pulley like a Traxion. The oval locking carabiner is a time-tested workhorse, and plays well with devices like the Traxion and Tibloc. A larger HMS locking carabiner is helpful if you need to clip other things to it. Finally the D lockers covers any other secure connection you might need. (Yes, I probably have one more locker than I need, but Murphy's Law of rescues is you always need one more locking carabiner.)
1 small snapgate carabiner - you need to rack your screw on something. You can use a non-locking carabiner for non-critical connections, such as the “tractor” in a 3:1 Z drag.
Petzl Tibloc - handy and lightweight ascender and rope grab.
Petzl Nano Traxion (or Micro Traxion) - the modern standard for crevasse rescue gear. Yes, they are expensive, but so helpful in so many situations, they are pretty much becoming everyday carry.
17 cm aluminum Petzl Laser Speed Light ice screw - if you can get down to ice, this can be your anchor on the top. If you fall in, you might be able to place the screw and clip yourself to it to take your weight off of the rope, which can make life for your partners on top a LOT easier when they set up the rescue. Don't bring a screw shorter than about 16 cm.
About 3 meters of Sterling V-TX cord - typically used for equalizing a second anchor, ascending a rope, or securing yourself to the rope system. (Amazing cord; 5.4 mm and rated 15 kN). You don’t need the standard (7 mm 6 meters long) cordelette on a glacier.
Short friction hitch - for climbing up the rope if you fall in, and for making a “tractor” on your hauling system. Here I’m using a spliced eye 5mm hitch cord, which grips well on 6 mm rope. This is made by a cool company called RopeLite; check ‘em out for custom spliced ropework solutions. (There are many other options, such as a loop of 6mm cord or a Sterling Hollowblock.)
What about that picket? Pickets can be very helpful in building a snow anchor but they're not required. Pickets are commonly carried in North America, South America and New Zealand, but not so much in Europe. A more minimalist approach involves making a T-slot anchor with your buried ice axe, skis, or backpack. But to me the axe is a crucial piece of gear, and I'm not too excited to bury it in the snow in case I need it for something else.
When I do carry one, it's the SMC Pro Picket. This is reasonably lightweight, has a pointy end for going into the snow and a reinforced top for bashing on with a hammer. The nicest feature is a permanently attached metal cable on the middle hole, which is how pickets have maximum strength in either vertical or horizontal placements. (That means you need one less 120 cm sling.)
What I don’t bring: pulley, belay device, several “just in case” extra carabiners, designated waist or leg prusik loops. Need another pulley? Grab the Traxion from your partner. Need to rappel or give someone a belay? Use a Munter hitch on your HMS carabiner. The carabiners above are more than enough. And forget those old-school designated waist and leg prusiks; you can easily ascend a rope with the gear shown above.
Where to carry this gear? You want the gear you need to climb a rope easily accessible on your harness or pack gear loops, not inside your pack. For ascending a rope with the gear shown here, I’d keep the orange cord and the oval carabiner with the Tibloc and the Traxion on my harness at a minimum. The rest can probably go inside your pack. I’d also keep the screw on my harness. If you fall in, you might be able to place it and clip to it, removing your weight from the rope as mentioned above.
Harness: A minimalist mountaineering harness, I like the Petzl Tour. Leave that sport climbing harness with the five gear loops at home. You want lightweight, no padding because you have on lots of clothes and (hopefully) are not gonna be hanging in it, with leg loops that open so you can easily put it on while wearing crampons or skis.
Rope: Varies on team size and skill level. Good options include:
30 meter, 6 mm Petzl RADline
40 meter, 7.7 mm Sterling Dyad
50 meter, 7.1 mm Edelrid Skimmer (which is currently the lightest dynamic rope on the market)
The diameter, length, and static vs. dynamic issue of the “best” rope for glacier travel is a BIG topic. Here's a link to some articles on my website that take a closer look. 1) Petzl 6mm static RADLine, 2) static rope for glacier travel.
So, that's my kit. Simple, lightweight, everything has a function. With this I can build just about any flavor of mechanical advantage hauling system I might need, like a 2:1, 3:1, and 6:1.
Some examples of 6:1 systems are here.
Minus the picket, this is what everything weighs.


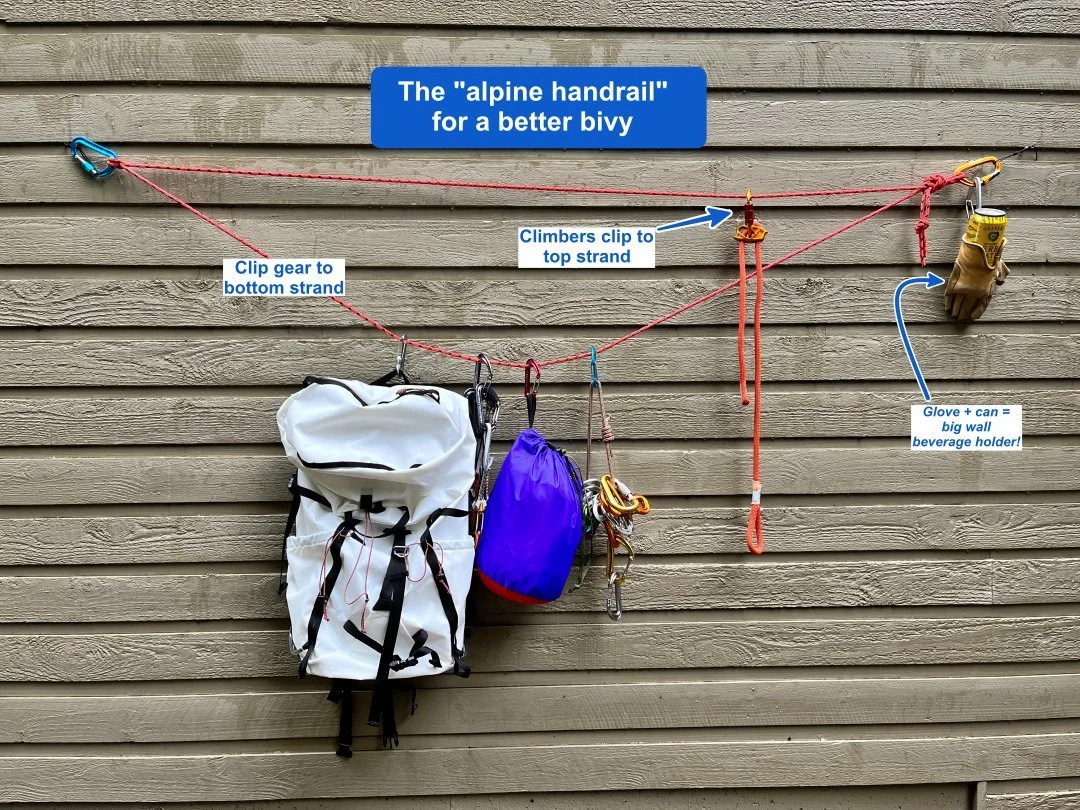
Use the "Alpine Handrail" for a better bivy
The alpine bivy - like camping, only different! If you're spending the night on a small-ish ledge, here's a great way to secure both yourself and your gear.
Credit for this tip: blog post from Andy Kirkpatrick, shared with permission.
If you're spending the night at an exposed ledge, you hopefully have some room to move around and also to organize your gear. You want to do both without any concerns of falling off or dropping anything.
One solution: the “alpine handrail”.
Build a second anchor off to one side of your ledge away from the main anchor. It's ideal if these anchors are bolts. If not, be sure the anchor can take a sideways pull.
Tie a B I G figure 8 on a bight with a loop that's big enough to reach both anchors. In the photo I'm using a cordelette. On a larger ledge, use your climbing rope. Or tie two cordelettes together; get creative.
Tie two additional knots, and clip those to each anchor. In the photo on the left we have a clove hitch, which makes it easier to tension in the top strand.
Now you've made a sort of two story handrail. Make the upper rail fairly tight and the bottom one looser.
Use the upper rail to clip yourself with a tether, and the bottom rail to clip all your gear. You can move along the top rail without having to unclip to move past anything (other than your partner).
Because you made a loop, if any anchor fails, everything won't slip off of one end of the rope.
But what about that horizontal rope strand on the top? Doesn't that make sort of an American Death Triangle (ADT) / vector pull, maybe putting a large load on the anchors?
Excellent question! Short answer is yes, it kind of does, but it should not be a concern if you're on a reasonably sized ledge. That top strand is only if you make a careless stumble, or to keep you stable when you're sleeping.
If you are at a full hanging belay, where you’re putting a real load on the anchor all the time, you want to have a more typical anchor with a distributed load, NOT like this.
Besides, the so-called “death triangle” is probably not as bad as you think. Here's a whole article on it.
Extra points for using your climbing glove as a secure spot to hold your well-earned canned beverage. =^)


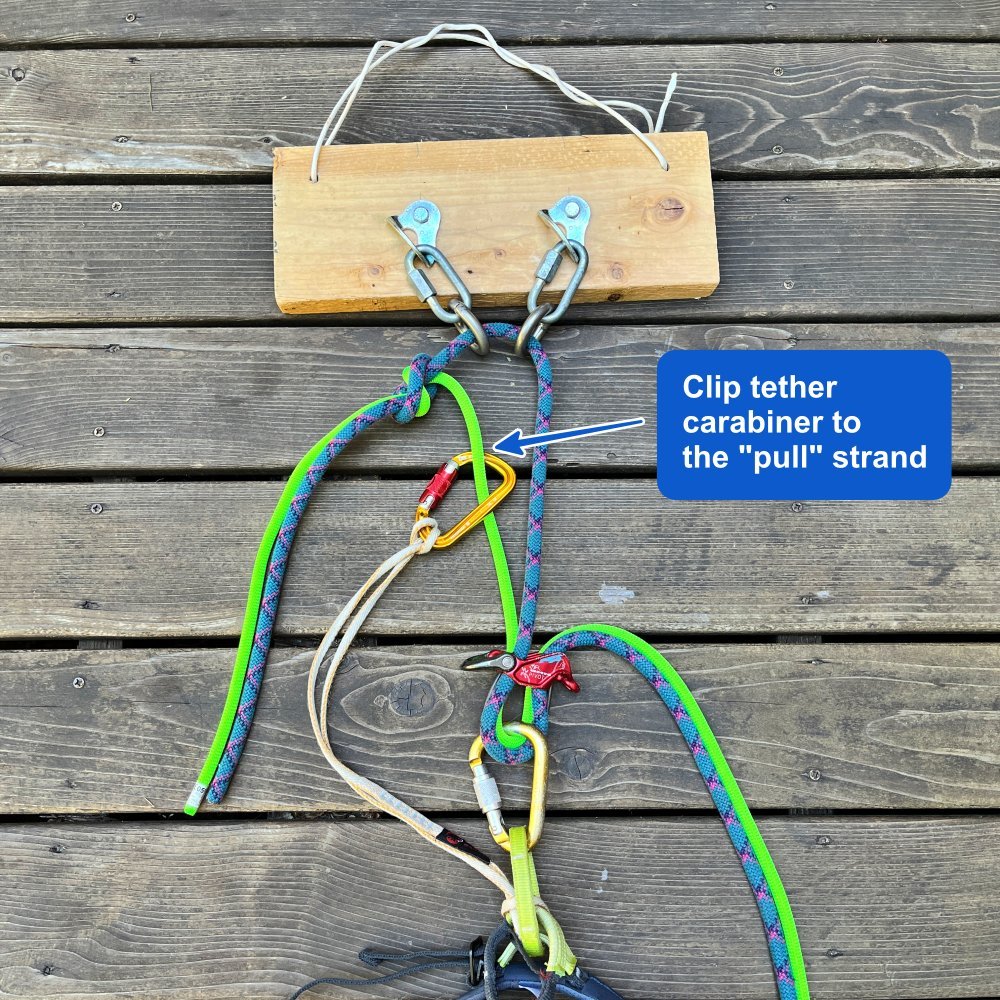
Double rope rap: clip tether carabiner to the “pull” strand
“Dang it, which rope strand do we need to pull, I forgot!” Here's a simple way to remember. As you start your double rope rappel, clip your tether carabiner to the rope that needs to get pulled.
For a double rope rap, of course it’s super important to pull the side that has the knot!
Nine times out of ten, you’ll be able to remember just fine. But for multipitch rappels, when you’re threading the lower anchor before pulling and swapping the rope that gets pulled every time, it’s dark, you’re tired after a big day, the weather is challenging, adrenaline-induced brain shrinkage, or whatever, this tip gives you one less thing to pay attention to.
After you unclip your tether carabiner from the anchor, clip it onto the rope that needs to get pulled (here, that’s green).
The carabiner politely slides down the rope above your device. At the bottom, there’s no question about which rope needs to get pulled; it’s always the one with your tether carabiner.
This isn't just for the last person. If the first person down does this, they can start threading the correct pull rope through the lower anchor.
Note: in the photo, I decided to not show a rappel extension to more easily see the rigging. Typically I use a rappel extension and third hand back up.