

Alpine Tips

Rigging your rope for glacier travel
Here's a fast, clever and easy-to-remember way to ensure proper spacing between team members when traveling on a glacier. Plus, a diagram and photo to show actual distances for three and four person teams.
Image: from the highly recommended and hilarious book, “The Illustrated Guide to Glacier Travel and Crevasse Rescue, by Andy Tyson and Mike Clelland. Anyone setting foot on a glacier would do well to get this book. The method shown is a bit outdated, but it's still a great drawing!
(There are a few different book editions with different covers. They're all good, get whichever one you can.)
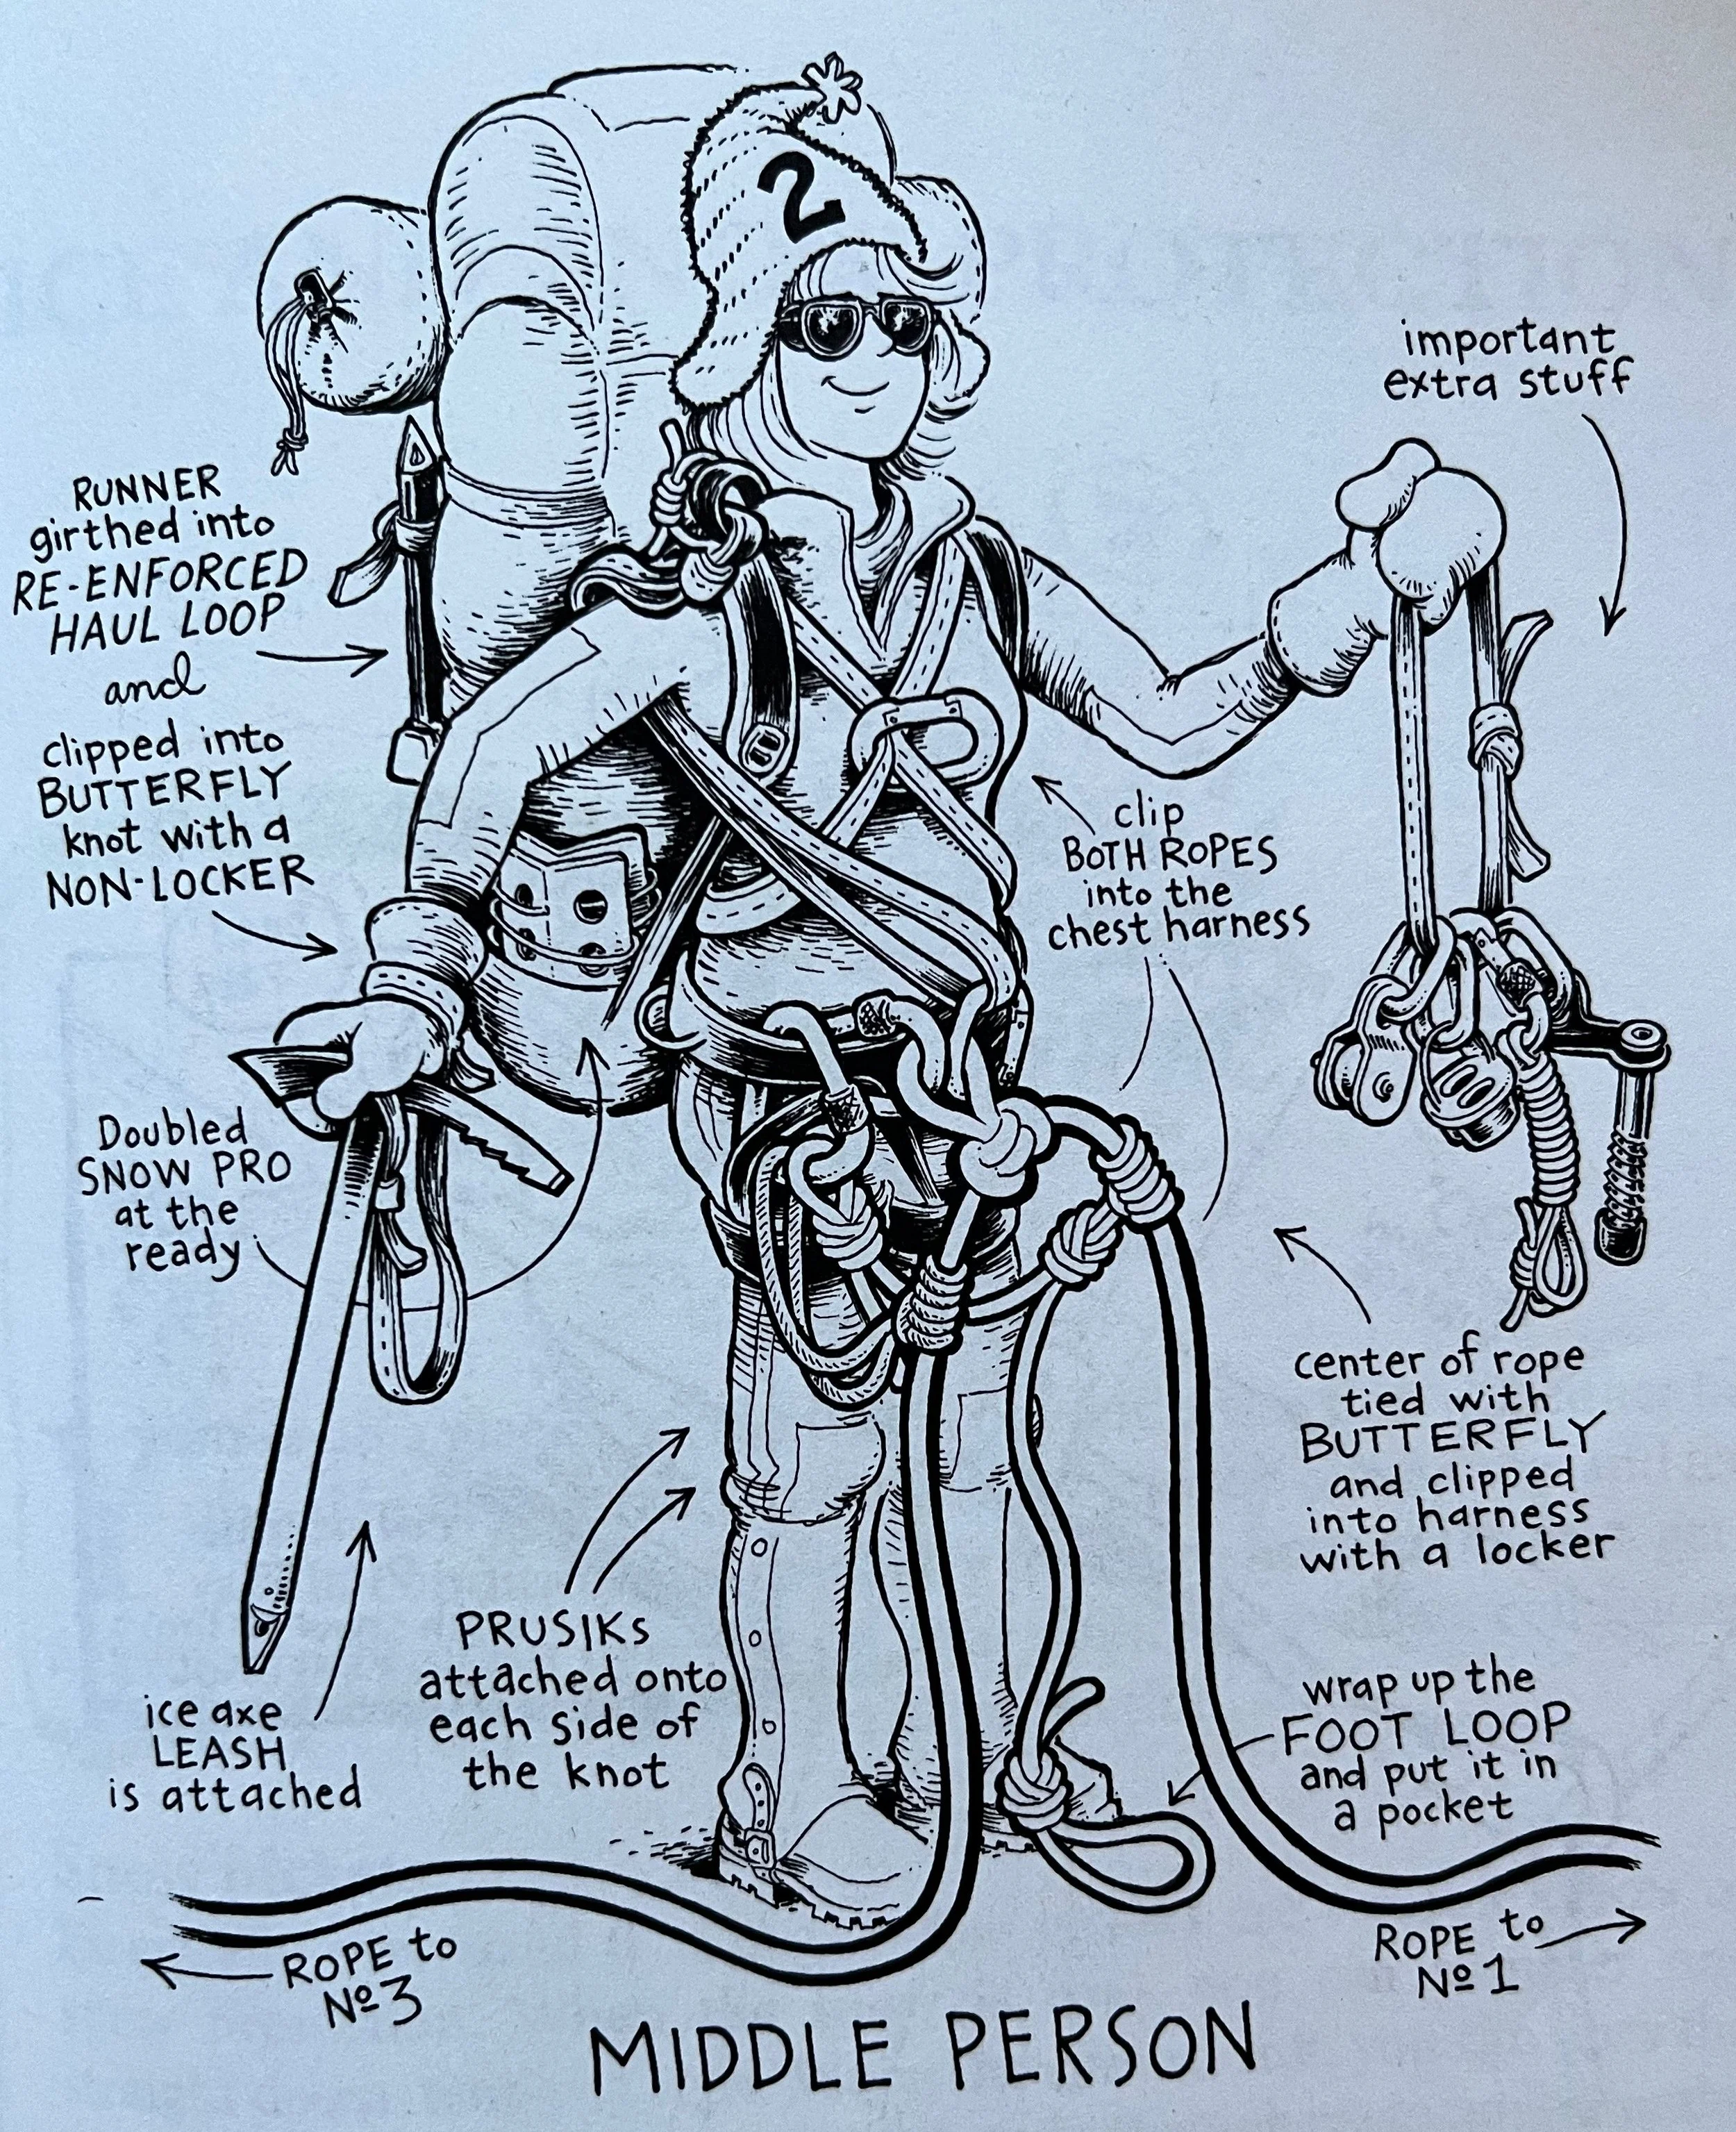
credit: Mike Clelland
I remember when I first learned crevasse rescue WayBackWhen, it was pretty darn simple. Two people tie to each end, one person ties to the middle, and off you go! 50 meter rope, 25 meters between everybody.
Turns out that has a few problems:
Communication can be difficult because people are further apart.
All the extra rope gets hung up on ice blobs and snow-sickles.
How do you do a rescue if the middle person falls in?
Happily we’ve moved into the modern era, where you climb a bit closer together (at least in my neighborhood, the Pacific Northwest), and the end people carry extra rope to initiate a rescue. But, that still leaves a few questions:
What distance should you have between climbers?
It sort of depends on the potential size of the crevasses you may be facing, but for moderate sized crevasses typical of the Pacific NW, here’s a quick and easy to remember how to set up the rope spacing. It varies a little bit, depending on the size of your team.
Take the number of people on your rope team, and subtract that from 10. That gives you the number of double “arm spans” between climbers
2 climbers: 10-2 = 8 - 8 arm spans of rope between climbers
3 climbers: 10-3 = 7 - 7 arm spans of rope between climbers
4 climbers: 10-4 = 6 - 6 arm spans of rope between climbers
Notes . . .
This is known in some circles as the “10 minus equation.”
If you’re on a two person team, it’s best practice to tie 4-5 brake knots in the rope between each climber. It's optional for 3 and 4 person teams, but if the terrain is hairy then go ahead and tie some.
Generally, you want to put the least experienced person(s) in the middle, and the two more experienced/skilled people on the end. The end people will be more responsible for route finding and probably initiating a rescue if you need one.
Note - there are lots of different ways to rig your rope team for glacier travel. This is one of many that works. In areas with larger crevasses, like Alaska and the Himalaya, you’d probably want more distance between people than what I’m describing here.
Pro tip: If you're doing an alpine start, rig your your rope with knots and coils the night before. It's one less thing to do at 0:dark:30 by headlamp when you're sleepy.
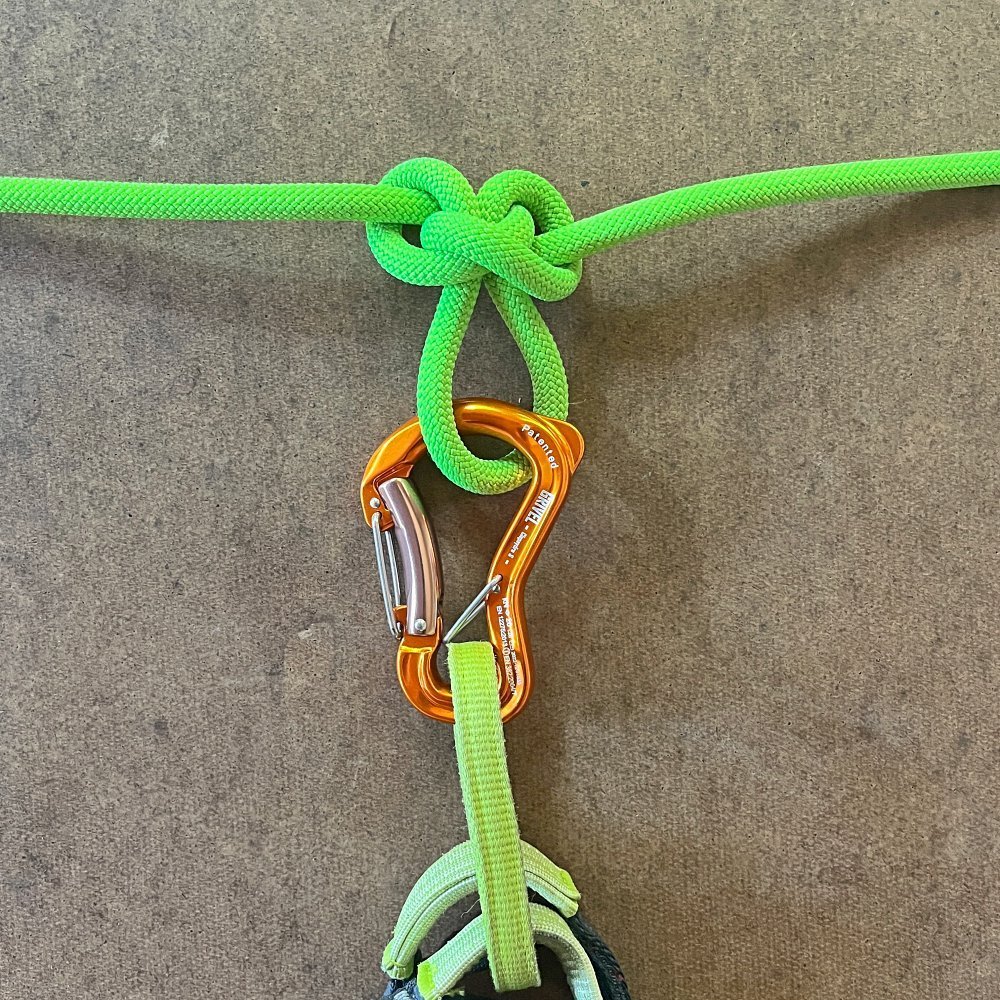
Generally, it's best practice to have all team members clip to a knot with a locking carabiner, rather than tying the rope through the harness. Doing this allows you to unclip from the rope more easily, which is convenient when performing a rescue.
The end people need a good way to secure the extra rope. Some people advocate stuffing it in your pack. Bad idea, because every time you want to get in and out of your pack you have lots of annoying rope coils. Much better is to secure the rope in a small butterfly coil, I like to secure the coil with a Voile ski strap. Yes, I know how to tie off a butterfly coil, but using a ski strap is faster and easier. I don’t like the coils around my neck unless there’s a good reason to do so, like moving from glacier to rock, where you need to take in coils and walk close together.
The standard approach to clipping to the rope is to use two carabiners, opposite and opposed usually with at least one a locker. Here's my alternative, using the odd-looking Grivel Clepsydra S carabiner. It has a wire clippy thing so it can never be cross loaded, and it has a double gate that will never freeze shut or wiggle open during a day of tromping around on the glacier. It's my new favorite.
A team of two can require a longer rope (60 meter minimum) than a team of three or even four.
Yes, this is a little counterintuitive! If you're using the modern standard of a drop loop C, that means you need about twice the distance between climbers at a minimum for a typical rescue. A party of three or four will ideally build an anchor at the closest team member to the fallen person. This allows them to use the rope between the other team members for the drop loop and thus they can carry fewer rescue coils on each end. A team of two is probably not able to do this.
This means that it's best practice for a two person team to be on a 60 meter rope at a minimum, while a three person or four person team can probably use a 50 meter rope.
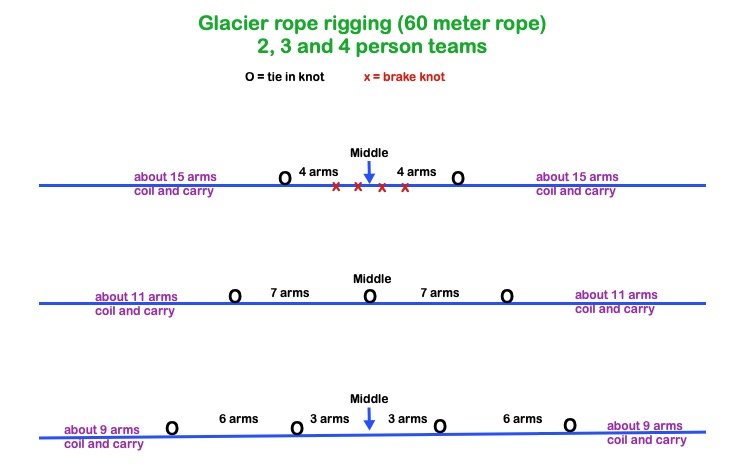
Check out the below diagram for a two person team. With 8 arms spans between climbers, and with 4 brake knots which each take about 1 meter, that leaves just 15 meters in rescue coils for each person to carry.
The good news is, if your drop loop turns out to be a little bit short, it's easy to extend it with whatever extra slings, cordelettes, etc. you might have available. This means that a two person team does NOT always need to carry twice the amount of rope between climbers. (Another alternative for a two person team with a shorter rope is that they do not use a drop C and instead use a drop end 3:1, which comes with its own set of problems and benefits. Here's a detailed article on this technique.
Either way, the bigger picture, if you’re a two person team in serious crevasse terrain, you absolutely have to have your systems dialed and be completely self-sufficient to perform a rescue. Two person glacier travel is recommended for experts only.
Rope rigging for a THREE person team (with at least two experienced climbers):
Find the middle of the rope, tie a butterfly knot for the middle person.
Measure about seven full arm spans from this middle knot towards one end, and tie a butterfly knot. Repat for the other half of the rope. These are the clip in points for the two end people. The end people coil the remaining rope for use in a possible rescue.
If you have only one experienced person on your rope team, then the novices should probably clip in starting at one end of the rope with seven arm spans between them, and the more experienced person should carry all the the remaining rope. Let’s hope they don’t fall in . . .
Rope rigging for a FOUR person team:
Find the middle of the rope.
Measure three arm spans to the right of the rope middle, and tie a butterfly knot.
Measure three arm spans to the left of the rope middle, and tie another butterfly knot.
Finally, measure six arm spans from each of these knots toward end of the rope, and tie your final two butterfly knots for the end climbers. Again, the two end climbers should ideally be more experienced people capable of route finding and crevasse rescue. They also carry the remaining rope, either coiled over their shoulder or stuffed into a backpack.
Distance wise, this works out to be about 10 meters between climbers.
(Note the orange Voile ski strap securing the coils for the climber on the right, a quick and secure way to tame extra rope.)

Check out the nice video from AMGA Guide Jeff Ward to see how this works.
DIY tether with the Kong Slyde
Tethers are not for everyone, but many people find their instant adjustability to be handy in lots of different climbing situations. Some of the more specialized ones can be quite expensive. Here's a low cost DIY version, using the cleverly designed Kong Slyde.
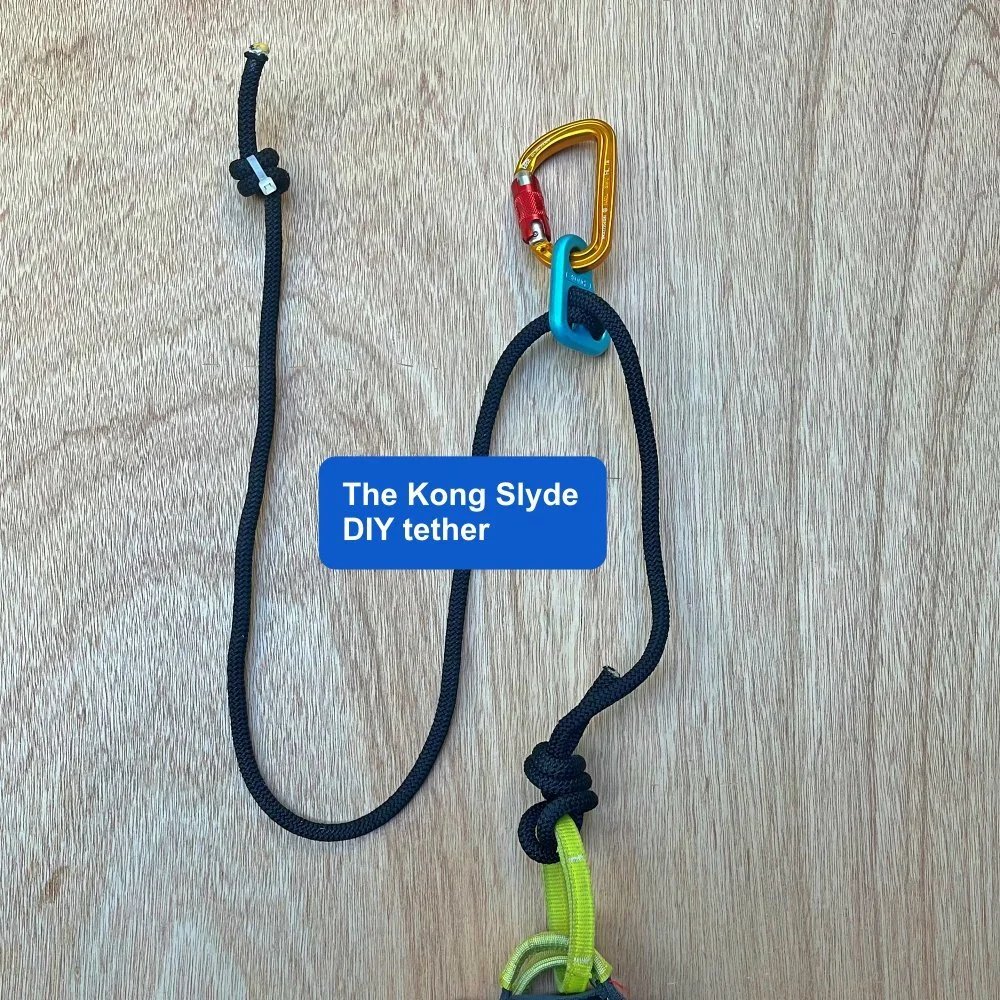
Kong Slyde + 2 meters of rope = low cost adjustable tether.
This clever device works much the same as the Petzl Adjust tethers, but costs a lot less, around $12. Kong has it in the “aid climbing” category on their website, but I think it’s better as a personal tether.
Note:
Not all carabiners fit in the Kong Slyde. Some wider D shaped lockers may not fit. Here I’m using the Petzl Sm’D twistlock, which fits great and has a twistlock for extra security.
8.5-ish to 9ish mm dynamic rope is the best choice for this. Anything smaller the strands can invert and the Slyde fails! Much bigger and it’s really hard to pull the rope through. Dynamic is good because, ya know, it stretches.
My friend Ryan at HotNOT2.com tested different rope flavors, and he likes the Beal 9.1 mm Joker rope for smoothness and adjustability. Buy that rope by the foot, along with the Slyde, at his sweet online gear store.
You can buy rope by the foot from Arbsession. Arbsession can add custom sewn eye splices into your rope, which could be nice. I have not tested this rope myself with the Slyde, but the diameter looks about right.
Two meters of rope will give you a tether that's probably a bit on the long side, but that's better than having it too short. Feel free to trim it down if needed after testing. For me, I'm about 5’ 10” / 180 cm, and these measurements work for me. If you're much taller, you probably want to add a bit more rope.
Start with 2 meters of 8.5mm or 9mm rope.
In the tail end of the cord, tie a stopper knot. Cinch it down well. I took the extra step of securing it with a zip tie so it can never come undone.
Correctly thread the cord into the Slyde, see photo below.
In the other end, tie an overhand on a bight, with a loop that's just big enough to girth hitch through your belay loop. Dress and cinch down the knot. Done!
To extend the Slyde, grab it with your palm down, and the rounded end of the Slyde pointing toward you. Tilt your hand up and push forward, and the Slyde should extend. Little hard to describe, watch the short video clip below. Practice and you’ll get the hang of it.

Check out this short video on using it.

Rope ascending with the Petzl Traxion
The Petzl Traxion is a handy device for many different climbing situations, including ascending a rope. Here are a few different ways to set it up.
Note - This post discusses techniques and methods used in vertical rope work. If you do them wrong, you could die. Always practice vertical rope techniques under the supervision of a qualified instructor, and ideally in a progression: from flat ground, to staircase, to vertical close to the ground before you ever try them in a real climbing situation.

The Tibloc micro ascender and the Traxion progress capture pulley are a pair of versatile tools from Petzl that are handy in a variety of self-rescue scenarios.
They work especially well for those (hopefully rare) times when you unexpectedly might have to ascend a rope (working WAY better than a trasditional prisik / friction hitch.)
Important:
When ascending a rope with any kind of toothed device like this, keep the rope tight between you and the anchor at all times. Do not allow slack rope between you and the anchor. A fall or slip with even a tiny amount of slack rope can generate enough force to damage the rope. Petzl has done some sobering studies on this, read them here.
The Tibloc has a reputation as being hard on ropes. Using a rounded stock locking carabiner, and not suddenly weighting the device, can help minimize this.
With both of these methods, you need two points of connection to the rope (your tie in knot doesn’t count). Never rely on just one ascender. A failure may happen for one of three reasons: the ascender comes off of the rope, the ascender fails to properly grab the rope (mud, ice, etc) and your tether carabiner can become unclipped. The simplest backup: Every 5 meters or so, tie a overhand on a bight and clip it to your belay loop with a locker. (More often if you’re scared.)
As mentioned above, definitely practice with this in a controlled environment close to the ground before you ever try it for real!
Let's look at three different methods. If you have this gear, try them both and see which one works for you. (The standard figure 8 tie knot is omitted for clarity.)
Tips:
Think of rope ascending as a “movement sandwich.“ That’s a short movement of exertion, in between two periods of rest. Rest > move > rest. Rest > move > rest. Use your legs. If your arms are getting pumped, you’re probably doing something wrong.
What carabiner to use? With both devices, a wide gate HMS belay carabiner (or oval locker, if you have one) is usually the better choice, as it aligns the load better. A “D” locking carabiner is acceptable.
Method 1: Traxion attached to your harness, Tibloc is the foot loop

Sequence:
Girth hitch a 60 cm sing to your belay loop.
Put Traxion on rope, with teeth facing down.
Clip the sling to it with a locker.
Next . . .
Clip the Tibloc to the rope below the Traxion.
Clip a 120 cm sling, this is your foot loop.
To climb the rope: Put your weight on the Traxion. Push the Tibloc as far up the rope as you can. Bend your foot under your butt, stand up in the foot loop, and simultaneously slide the Traxion up the rope. Sit back on the Traxion to rest. Repeat as necessary.
Tie a backup bight knot and clip to harness every 5 meters or so.
Method 2: Tibloc as a foot loop, Traxion attached to your harness

Sequence:
Clip Tibloc to rope. (if you don't have a Tibloc, you could use a cordelette tied in a friction hitch shortened with an overhand knot for your foot.)
Clip a 120 cm sling to the Tibloc; this is your foot loop.
Put Traxion on rope, and clip to your belay loop. (Clip the Traxion “Teeth toward Toes”, i.e., teeth pointing down.)
To climb the rope: slide the Tibloc up the rope as far as you can, bend your foot under your butt, stand up in the sling, and simultaneously pull any slack rope through the Traxion.
Tie a backup bight knot and clip to harness every 5 meters or so.
From the (always awesome) Petzl website. It looks like this diagram shows an extra backup sling running from the Tibloc to the harness. That's another way to do it if you don't want to tie backup knots, as this provides a second point of connection to the rope.

image: https://www.petzl.com/US/en/Sport/Pulleys/MICRO-TRAXION
Method 3: Traxion as a foot loop, Grigri as progress capture
If you have a Grigri, you can use that is the progress capture.
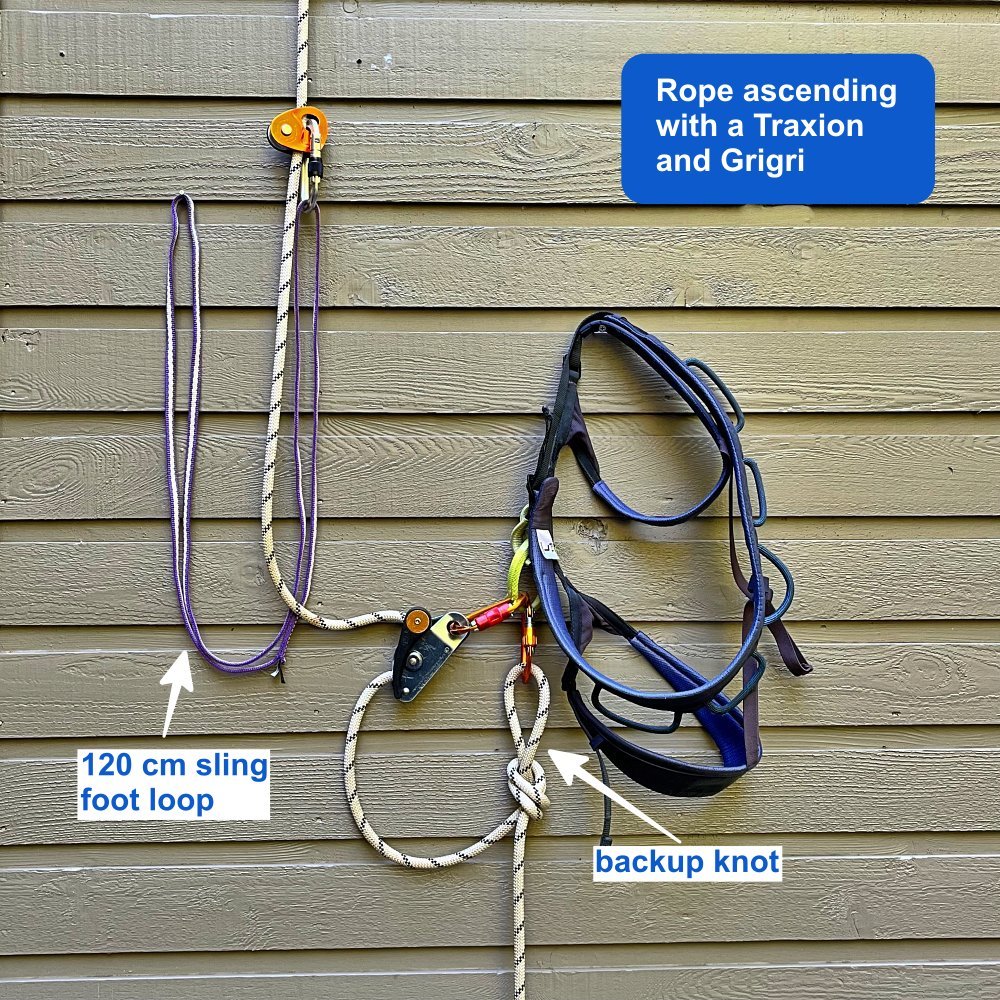
Sequence:
Clip Traxion to rope, with teeth facing down.
Clip a 120 cm sling to the Tibloc; this is your foot loop.
Put Grigri on rope, and clip to your belay loop. Be sure the rope is fed correctly.
To climb the rope: slide the Traxion up the rope as far as you can, bend your foot under your butt, stand up in the sling, and simultaneously pull any slack rope through the Grigri.
Tie a backup bight knot and clip to harness every 5 meters or so.
And finally, if you're on low angle terrain and maybe want to bend a few safety rules, you could clip a Traxion to a fixed rope, clip it to your harness with a 60 cm sling, and use the carabiner /device to pretty much Batman up the rope.
Check out this Instagram video that shows an IFMGA Guide demonstrating this (pretty-darn-fast-but-probably-not-approved-by-Petzl) method.

Where do you carry your satcom device?
A satellite communication device can be a critical tool in managing a backcountry emergency. A pretty simple question: should you carry it inside or outside the pack? Here's a pretty comprehensive list of pros and cons for both approaches, along with my preference.

A satellite communication device, such as the Garmin inReach, or the one I prefer, the ZOLEO, are increasingly popular for backcountry users (and pretty much mandatory for guides).
What sounds like a fairly simple question: where do you carry it? There aren’t many options.
Inside your pack
Outside your pack, clipped to a shoulder strap
Outside your pack, in a pocket of your clothing or maybe in a padded pocket on a pack strap
If you have a device like this, what's your preference?
To a certain extent this is a pedantic question. In the bigger picture probably doesn’t matter too much. Everyone can do what they want, “Hike Your Own Hike”, blah blah blah. However, I’m coming at this from the point of view of a climber, where there is almost always a range of best practices, and not so much as a hiker, where personal choices like this ultimately may not matter very much.
I have my preference, but I have no agenda to convince people to do it. With this article, I simply want folks to think through what they're doing and realize the pros and cons to different approaches.
(Here, we're talking about a device that's only for emergency comms, and not for GPS navigation. If using any device for actual navigation, you almost always want to have it outside the pack and accessible.)
Reasons for storing a satcom device INSIDE the pack (my preference):
In a nutshell: Security is more important than accessibility.
Why clip an expensive and potentially mission-critical piece of equipment on the outside of the pack, where it has a much higher likelihood of getting damaged or lost? You don’t clip your iPhone to a backpack strap, why would you do this for a satcom device?
I’ve asked many mountain guides and search and rescue professionals this question. Every single one of them says they keep it on the inside of their pack or maybe in a pocket, never on the backpack strap. What does that tell you?
The fewer things clipped to and jangling around on the outside of your pack, the better.
You're going out in a group and at least one other person has one, so the reason for immediate accessibility decreases.
My device, the ZOLEO, maintains satellite connectivity just fine when it’s inside my pack, including sending location pings at preset intervals.
If you do take a fall, it gets ripped off of your pack, you're injured and you really need it, you may not have access to it.
Reasons for carrying a satcom device OUTSIDE the pack (on a shoulder strap):
(Not my imagination, I've heard these reasons from other people.)
You feel the need for immediate access to the device, no matter how unlikely that situation might be, outweighs potentially losing it or damaging it. (This sentiment seems more common for solo hikers.)
If you’re using it for texting a lot, if you have it on the outside of your pack, you can more easily hear the chirp of an incoming text. (For me, sending non-critical texts is the last thing I want to do when I’m in the backcountry, so this is not an issue for me, but it might be for you.)
If you're using it to send check-in (“all is well”) messages, it's easier to grab it off your pack and send one on-the-go than potentially forgetting to do so after you get to camp.
You've seen pictures in social media or ads about satcom devices clipped to pack straps, and so you think that's how it should be done. (I think it’s a subtle marketing ploy by the satcom companies to indirectly encourage the pack strap. Looks better in social media, and free advertising for their device. Not much of that happening if it can’t be seen inside your pack.)
The devices come with a handy little square shaped carabiner, which seems designed to clip onto the flat webbing backpack strap.
To show potential hostile people that you have one, which will hopefully deter any sort of a threat.
If you're in an emergency situation and you get adrenaline-fueled brain malfunction, having it on the outside of your pack might remind you or your partner that you actually have one and you can use it. (Don't laugh, this happened to a friend of mine in a canyoning accident. One of them had a satcom device and they had to deal with a serious accident for a LONG time before they remembered that they had the device.)
“I can get to it more easily in a crazy catastrophe, where I might not be able to get into my pack”. Yes, I can see this might be true if you’re in some sort of boating accident, like ‘man overboard’ in the middle of the ocean or something. But realistically, what’s the scenario when this could happen if you’re hiking or climbing? You could probably come up with some crazy contrived scenario, but if it's a 1 in 100,000 chance of happening, why are you even concerned about it? If you’re so severely injured that you can’t unzip a pocket of your backpack, you’re probably not gonna stay alive long enough for search and rescue to be much help anyway.
One scary story: a PCT backpacker attempted a sketchy river crossing at high water. They were pushed off their feet, ditched their backpack to swim safely to shore, lost their pack, and were then in a serious situation. (This person did NOT have a sat com device). Yes that would suck, but c’mon, how often does something like that happen? If you were in that situation, perhaps you might have the foresight to remove your satcom device from your pack before you did something sketchy and attach it to your body?
If you’re unconscious out in the woods and someone else walks by and finds you, they might see the device on the outside of my pack, hopefully know how to properly use it, and call for help. I suppose that's remotely possible, but extremely unlikely. With logic like that, you’d carry your first aid kit dangling around on the outside of your pack, but no one does that.
So, that pretty much summarizes the pros and cons for both approaches. Like I said, ultimately the more important thing is probably that you have one and know how to use it, either to assist yourself or someone else. If you have some other reasons, feel free to email them to me and I'll consider adding them to this article.

The far end haul, explained
The far end haul is a #CraftyRopeTrick that sets up a redirected 2:1 mechanical advantage haul that happens at the load end of the rope, not at the anchor end of the rope. The far end haul is used in big wall climbing, and can be handy for self rescue. Plus, it's just plain fun to set up to see how it works!
The far end haul haul for big wall applications is generally attributed to Chongo, a legendary Yosemite dirtbag who was famous for extended vertical camping trips on El Capitan with ridiculously large loads.
Having a Petzl Traxion (or similar progress capture pulley) on the load also lets you set up what’s called a “far end haul”, which at first seems like some sort of sorcery. (This load can be you, or another person pack, haul bag etc.)
Usually, hauling happens from the top end of the rope next to the anchor. However, with the far end haul, you to lift your load with a theoretical 2:1 mechanical advantage (MA) by pulling on the “far end” of the rope next to the load, rather than from the primary anchor.
This rig can be useful for big wall soloing / hauling. If you’re hauling your bag from the top, and it gets stuck, you can rap down to it, lift up a little bit by setting up a 2:1 MA with an ascender and a pulley, and free the bags.
I learned from a caver that this is also called a “traveling haul”, used in rescue to raise someone up a large drop. (Hope I never have to do that!)
It also has some self-rescue applications, and can be really helpful for moving your bags around at the anchor, see video below.
To rig the far end 2:1, clip an ascender (or a prusik if you’re short on gear) on the loaded strand of the haul rope, clip a carabiner with a pulley onto the ascender, and pull down on this redirect. Your bodyweight should lift the bags with this theoretical 2:1 MA and the micro traxion will “climb” up the rope and capture your pulling progress, sweet!
In the photo below I'm using a handled ascender. You could use any kind of ascender here like a Tibloc, a second Micro Traxion, Ropeman, etc. The pulley is optional, but definitely helps increase your efficiency when pulling.

Note the real mechanical advantage you will have in the real world when you try this. Below are pull test results with a 10 lb weight from another Alpinesavvy post, mechanical advantage in the real world. You can see that about the best you can do with the far end haul pulley is 1.3 to 1. And if you don’t have a pulley, you probably shouldn't even bother putting the redirect through a carabiner, as the mechanical advantage falls below 1:1. (Note, DMM Revolver carabiners don’t really do anything to reduce friction over a regular carabiner, avoid using those.)

But, even if you’re not soloing, it has a few advantages.
The far end haul can minimize rope abrasion, because the haul rope doesn’t move.
If you have to haul from a point or over a ledge with a LOT of rope friction, you can instead far end haul and have zero friction.
You can easily move the bags around at the anchor; more below.
Here’s a video by wall ace Mark Hudon who shows exactly how to do this. Rather ingenious, no?

9 phone apps for wilderness navigation
There are lots of handy tools you can keep on your phone to help with wilderness navigation. Here are some of my favorites. Better yet, pretty much all of them are free and weigh 0.0 grams!
There are lots of handy tools you can keep on your phone to help stay found. Here are some of my favorites.
Better yet, pretty much all of them are free and weigh 0.00 grams! (This is geared toward iPhone, ‘cuz that’s what I have.)
In rough order of importance:
GPS - GaiaGPS, Caltopo and Fatmap are all popular options. Find one, learn it. Cost, about $20 a year.
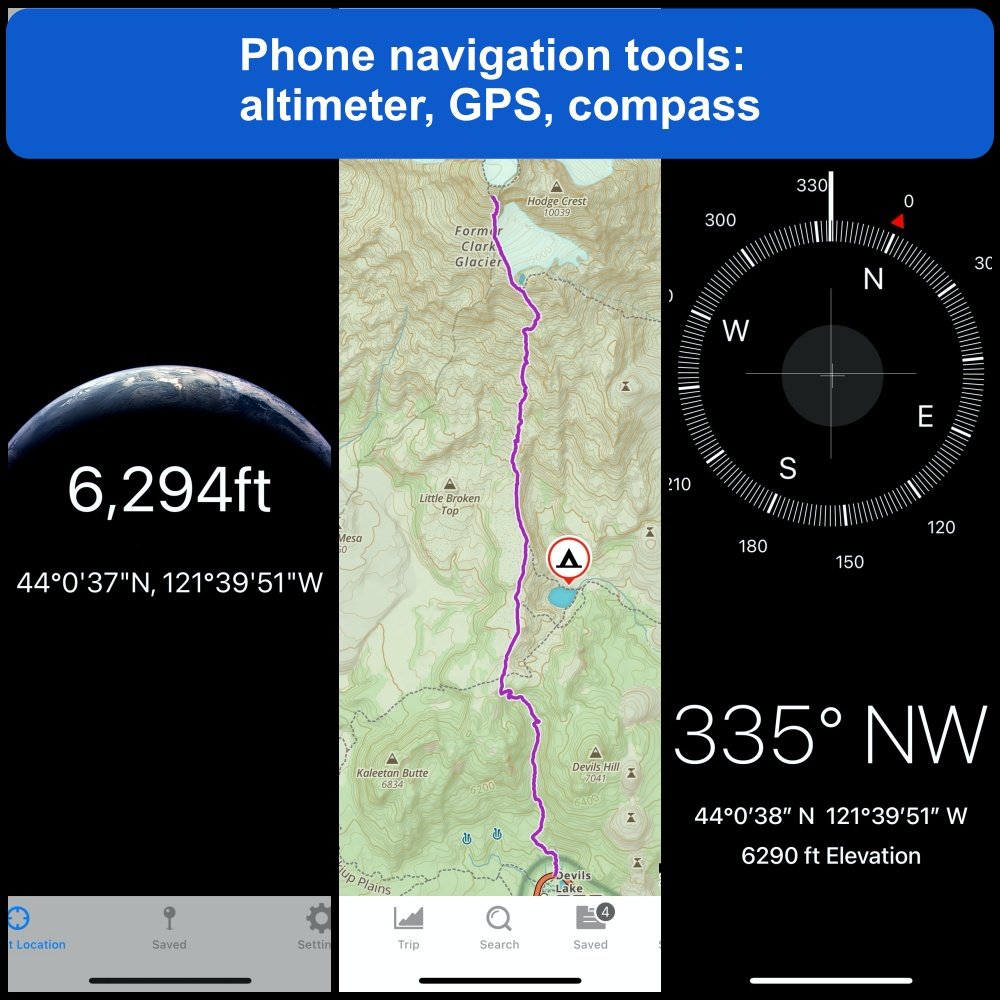
Compass - The iPhone has a great built-in compass. Cost, free.
Altimeter -There are lots of altimeter apps. Cost, free.
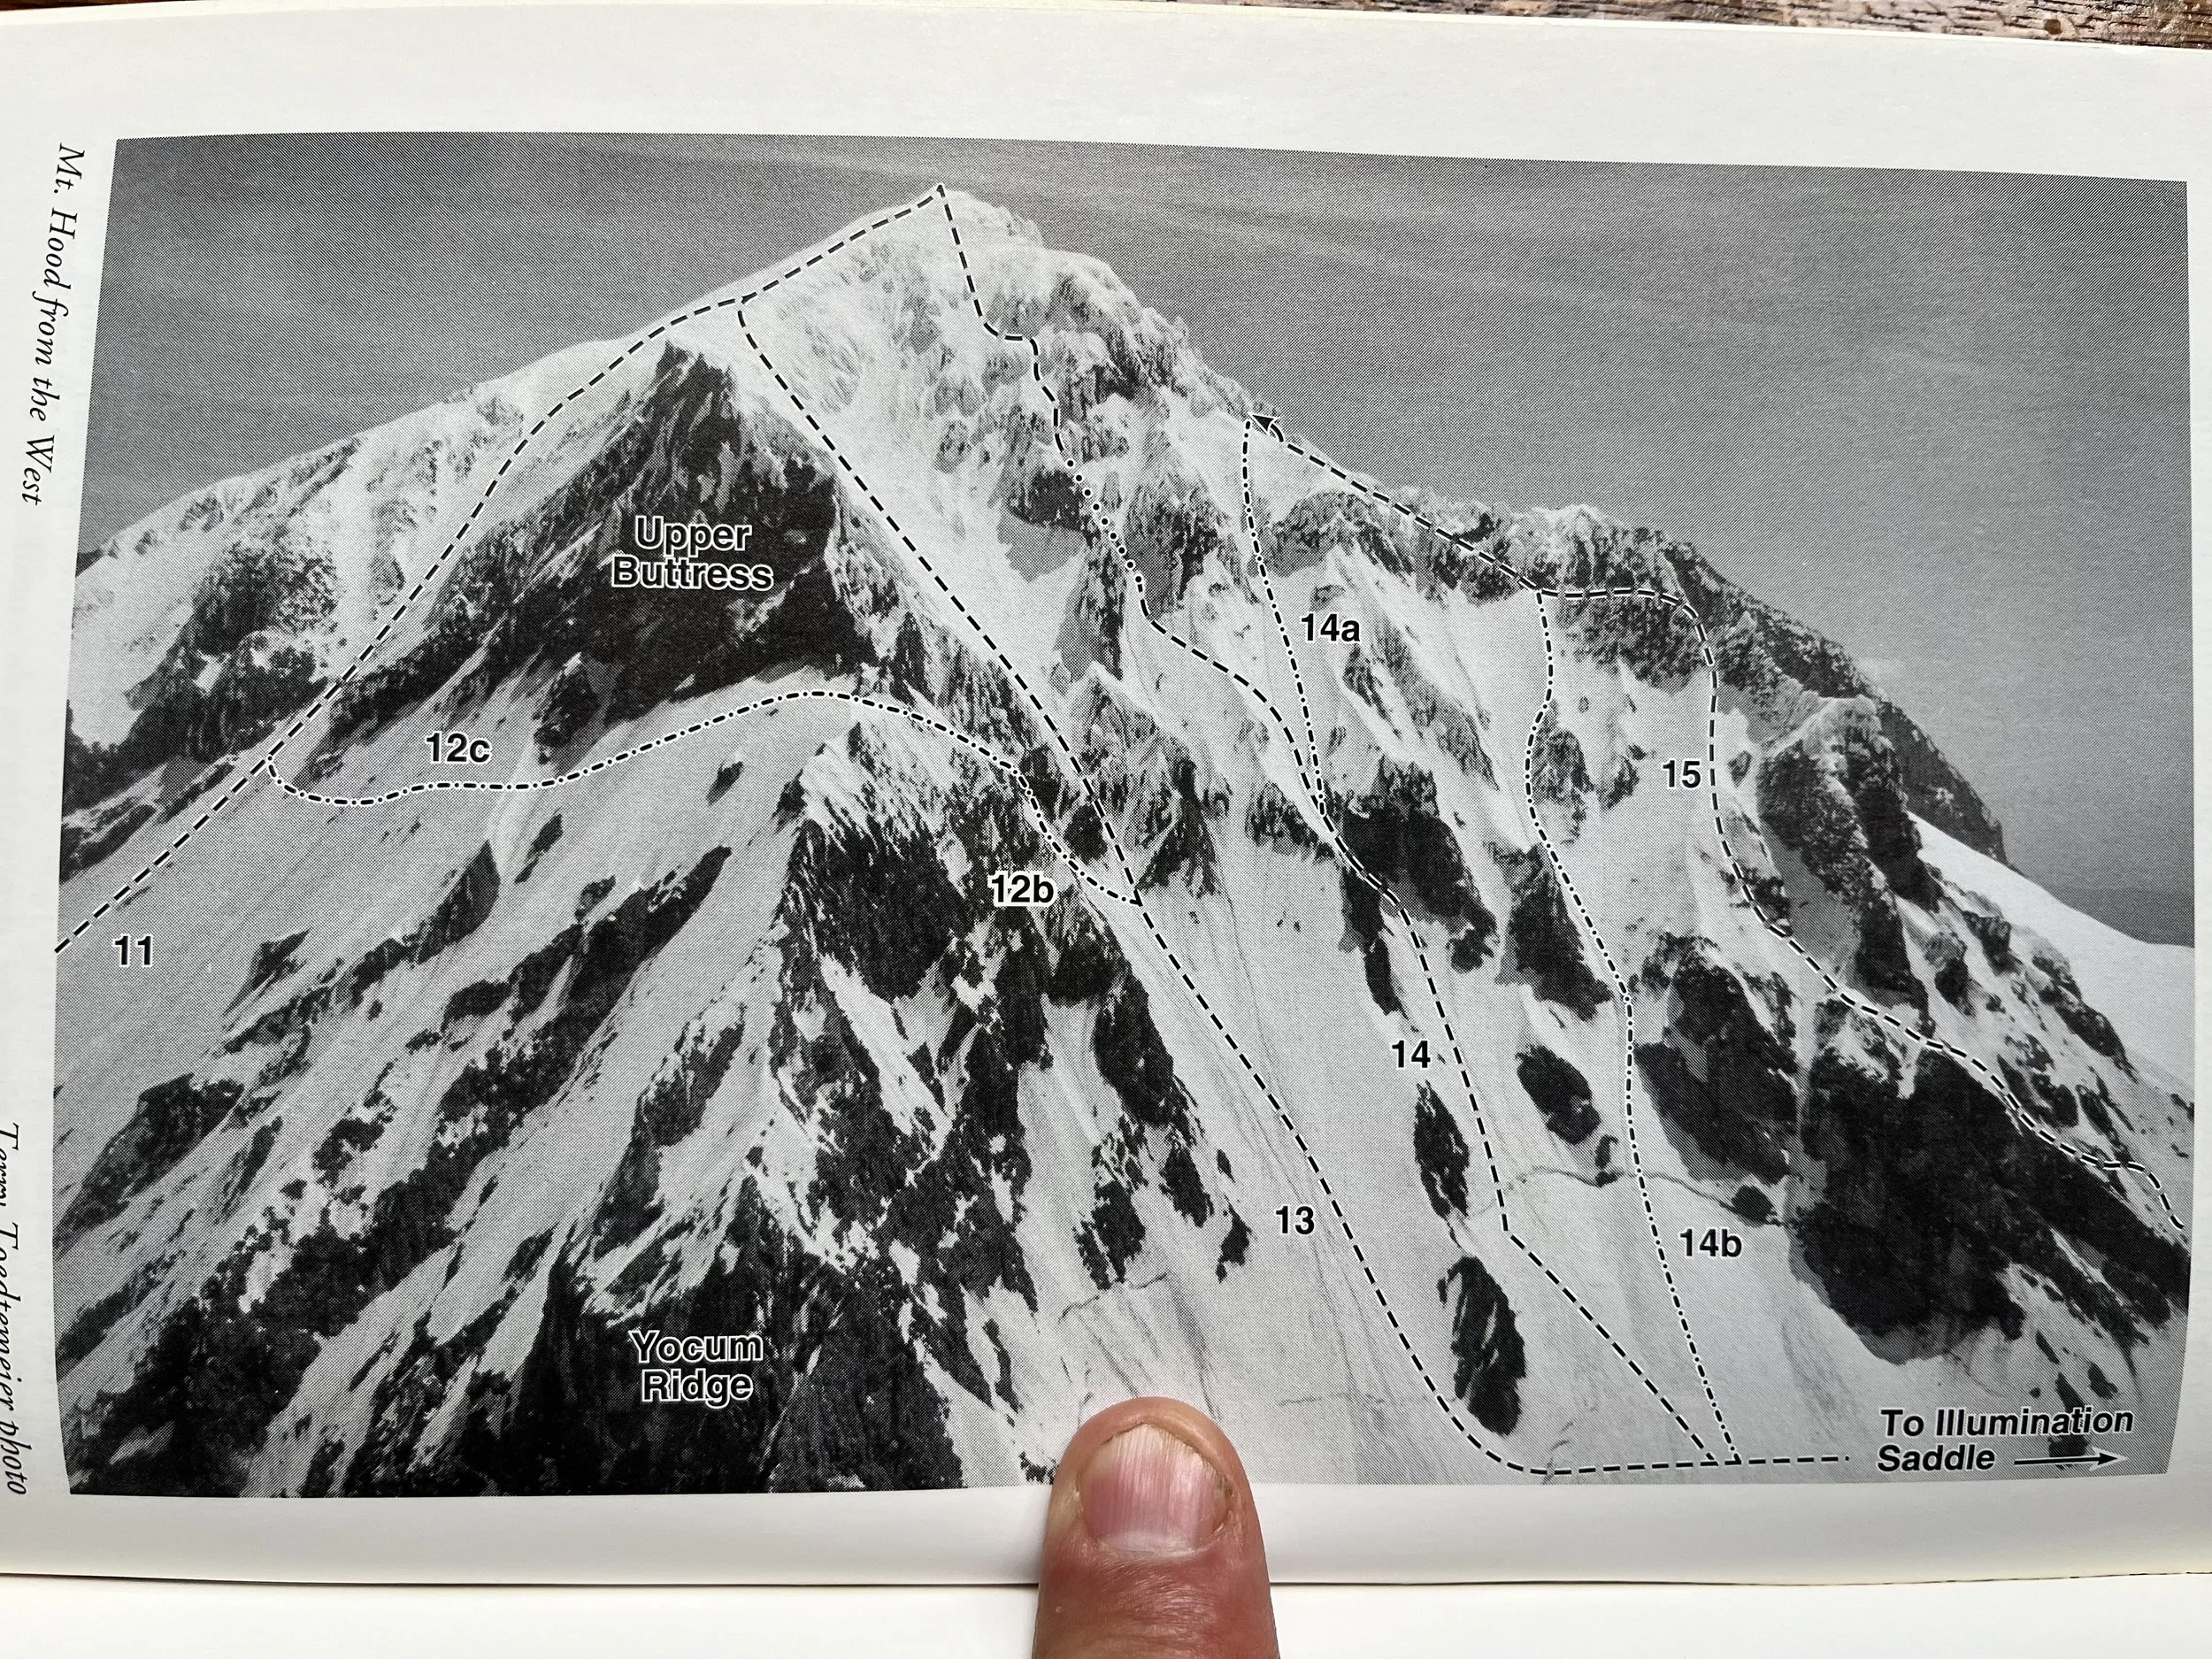
Photos - Take photos of guidebook pages. Download a photo of a redlined route, save it to your phone. Take photos of your route when climbing, red line or annotate. Save Google Earth screengrabs. Cost, free.
Kindle / pdf reader - Save a PDF of a map. Download an entire guidebook (or wilderness first aid book!) as an e-book. Cost, free.
Inclinometer - The iPhone has a handy inclinometer, under the “Measure” tool. Great for assessing avalanche potential and bragging to your friends about how steep your ski slope was.
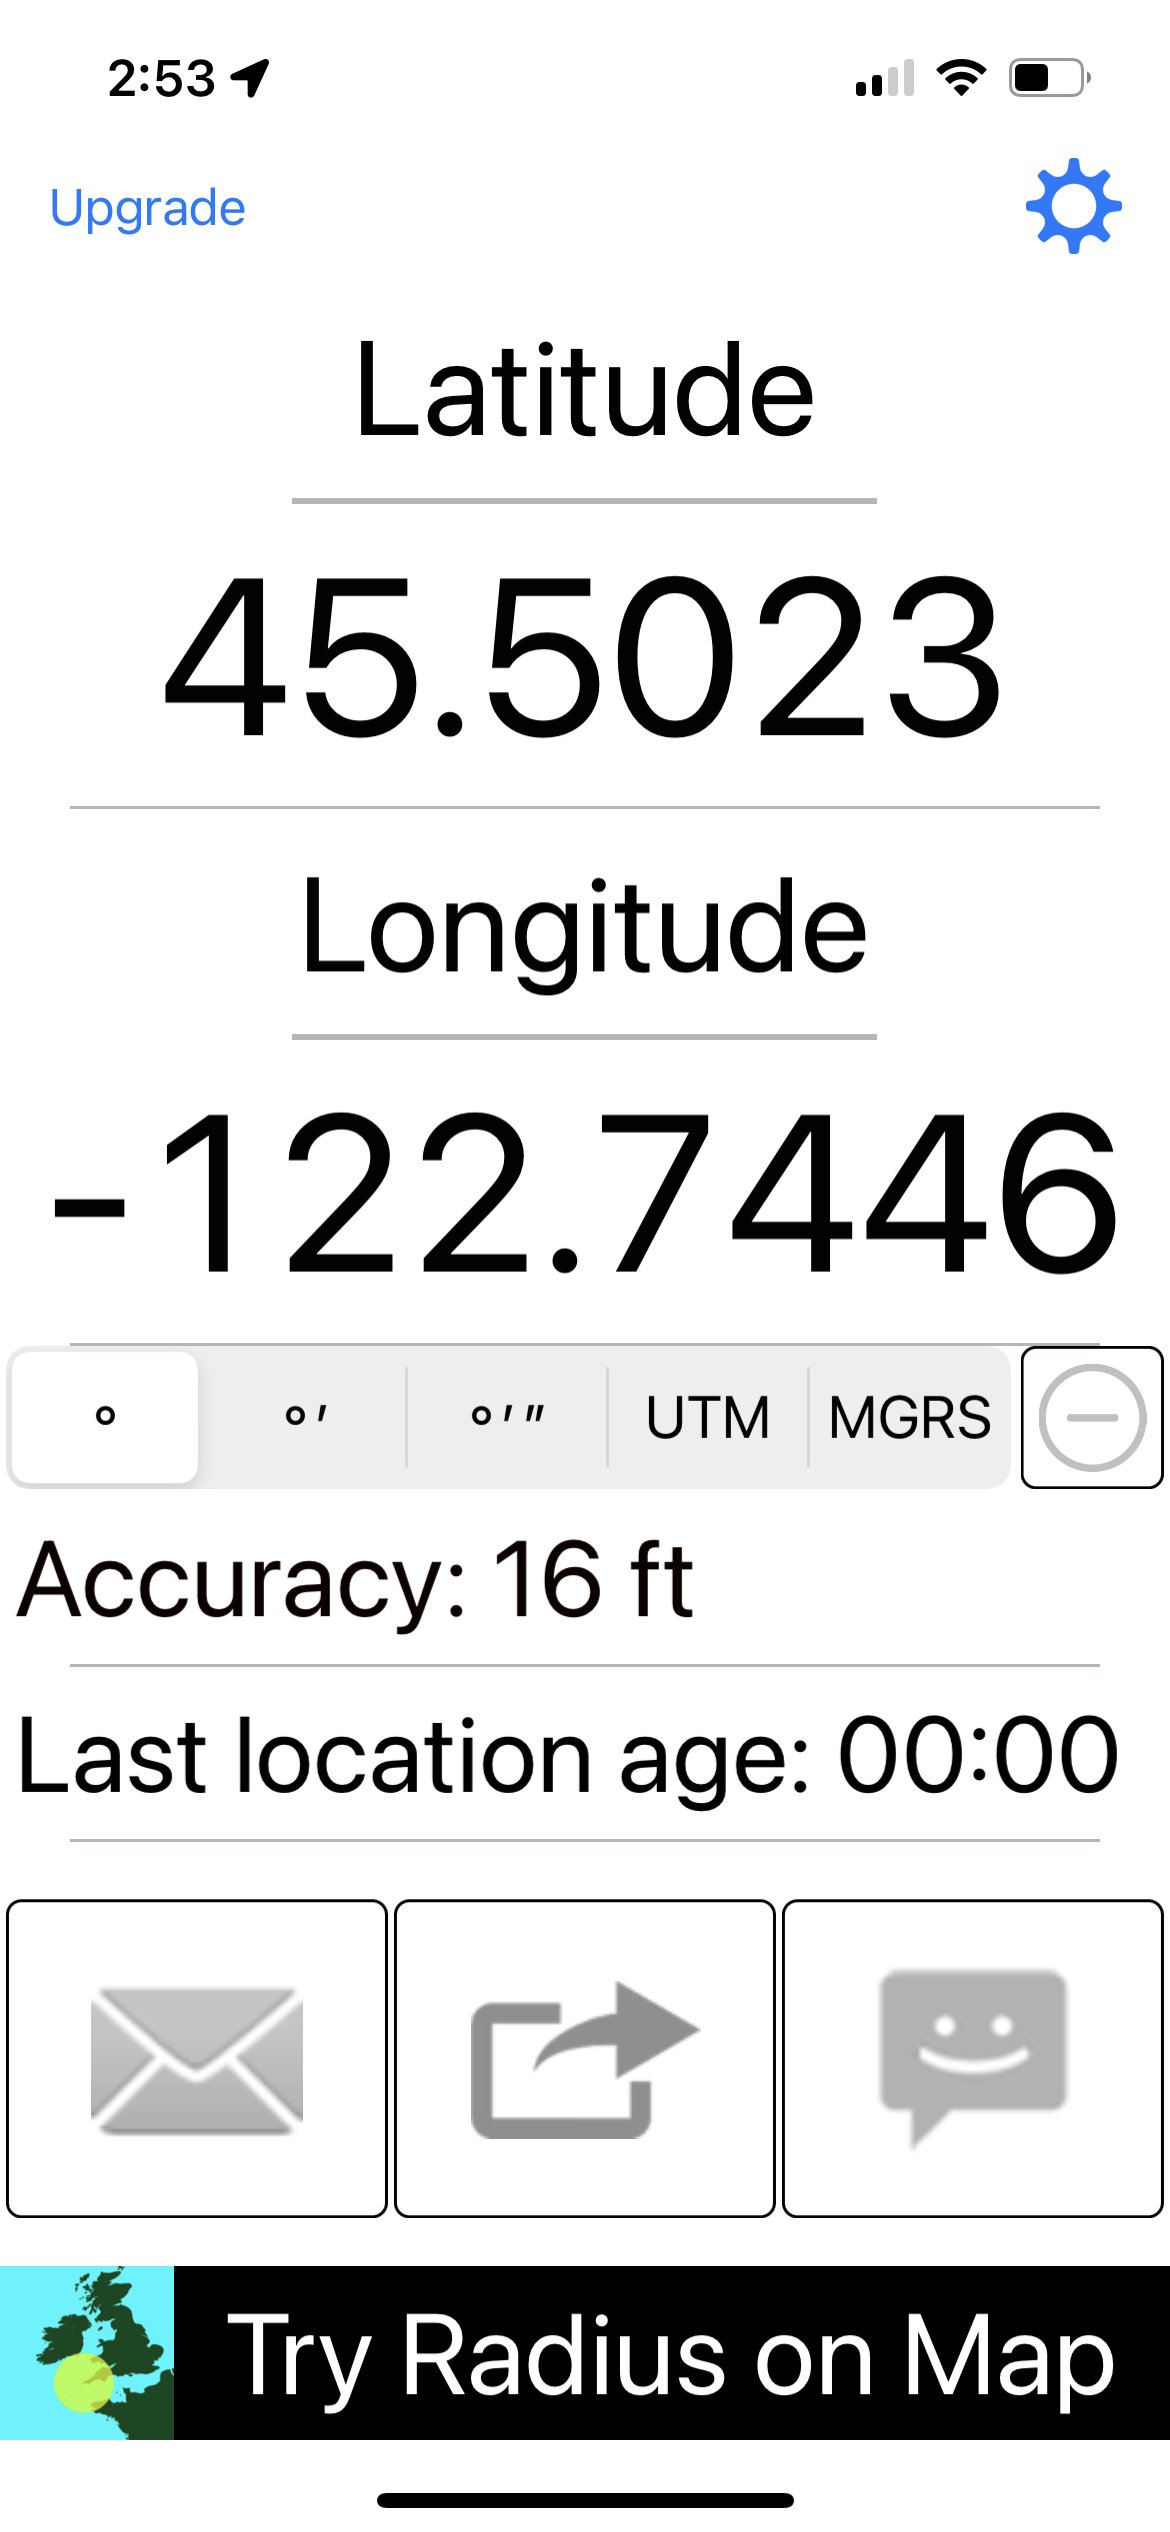
Show & share my coordinates - clearly display your coordinates, email or text them along with a message. Extremely helpful to show your exact location if you have a backcountry emergency and a cell connection. This is one of several ways to get coordinates from your phone. This app is called “My GPS Coordinates”. Cost, free.
Barometer - Newer phones have barometric pressure sensors. Rising or falling barometric pressure can indicate a potential change in weather. Cost, free.
GPS Diagnostics - kind of nerdy, but occasionally useful. If your GPS is acting up, you can use this to see the quality of your satellite connectivity. Cost, free
GaiaGPS

Compass

Altimeter

Photos
Screen grab from web, Google Earth screen grab, guidebook photo


Kindle / Book reading app / PDF reader
Make a PDF map in CalTopo. Email it to yourself or AirDrop to your phone. Save in Books or Kindle.

Inclinometer

Show & share my coordinates
(Tip - you only need 4 decimal places.)
Barometer

GPS Diagnostics


Mobile phone SOS texting via satellite
Big news for emergency backcountry communication: As of Nov 2022, iPhone 14 users in North America can send an SOS text via satellite, no cell coverage or extra hardware required. Expect expansion to other countries, other phones and expanded services soon, this is huge.

As of Nov 15 2022, you can send an emergency text (in the US and Canada) on an iPhone 14 via satellite - no cell coverage required. If you’re outside cell coverage and run your car into a snowbank, crash your mountain bike, have a climbing accident, or simply get lost, your potential epic may have a MUCH better ending.
You knew it was coming; I've been predicting and waiting for this advance for a long time. It’s starting with Apple, and it's very likely Android will soon follow. This is a great use of technology that will definitely save lives, and will surely be welcomed by Search and Rescue (SAR) teams.
Map of cell phone coverage from all carriers in the western United States, (from a GaiaGPS screen grab)
You can see substantial portions of Nevada, Montana, Wyoming, Idaho, Colorado Rockies, Oregon and Washington Cascades, and the California Sierra lack cell coverage. That's where most of the fun is!

image: GaiaGPS screen grab
Apple iPhone 14
Here's how it works:
This service is for emergency communications only, and not for normal calls, texts, or data.
To begin, dial 911. If you can't be connected through the cell network, satellite connectivity is initiated.
For best results, you need to point your phone toward a satellite in the sky. Your phone walks you through this. Having a clear view of the sky and minimal tree cover is best.
There are some programmed screens that walk you through the process of requesting emergency help, check the screen grabs above.
Very cool: There's even a demonstration mode, so you can practice going through all the steps before you (hopefully never) use it for real. This demo mode uses real satellite connectivity so you can see how it works in real time. Settings > Emergency SOS > Try Demo.
If you have a predefined emergency contact on your phone, that person can also be notified, and be included in the ongoing text chain between you and 911. (Settings > > Emergency SOS > Set Up Emergency Contacts in Health > Create Medical ID). Check the last box for “Share During Emergency Call.”
If you're in an area where emergency services can receive text messages, the text message will be sent directly, otherwise it will go to a relay center with Apple-trained specialists that will be able to place an emergency call for you. (Note that many 911 call centers in the United States can’t receive text messages directly; I know, that’s pretty sad . . .)
If you don’t have an emergency, you can share your location through the “Find My” function to show others where you are. This could be used similar to the “Here’s my coordinates, everything‘s OK” check in function that comes with standalone satcom devices.) See photo below.
This service will be free for two years, and then Apple will probably start charging some sort of subscription fee.
Starting December 2022, this service will be available to certain European countries - France, the UK, Ireland, and Germany. (Expect the rest of Europe to soon follow.)
Apple says the service might not work in places above 62° latitude, such as northern parts of Canada and Alaska.
Globalstar is Apple's satellite operator.
Read more: Detailed explainer article
Here's a photo of how you can share your location via satellite in a non-emergency. This could be used as a daily check-in with concerned folks at home, for example.

image: https://www.dcrainmaker.com/2022/11/apple-iphone-satellite-sos-emergency-explainer.html/amp
Here's a nice video that shows the process.
T-Mobile and Starlink . . . someday
In August 2022, T-Mobile announced a partnership with Starlink. Starting with the next generation of Starlink satellites, to be launched next year, T-Mobile 5G service will include satellite text messaging.
Now, if this was just Elon Musk tossing out his latest dream-of-the-future that’d be one thing. But it was announced at a major T-Mobile promotional event, so I’d like to think that carries a little more weight.
Here’s a summary of how it’s supposed to work, as best as I can piece together from several web articles:
T-Mobile’s “vision” is for it to be included for free in the carrier’s “most popular plans.”
For lower cost data plans, some sort of monthly service fee will probably apply.
Two way text messaging is offered initially. Voice and limited data may come later.
Service will be “everywhere in the continental US, Hawaii, parts of Alaska, Puerto Rico and territorial waters.”
Your current phone can use the satellites, no additional hardware required.
T-Mobile says, “There may also be a considerable delay of half an hour or so until the message is sent or received.” (Whoops, that doesn't sound so good.)
Anticipated timeframe: mid 2023
Read more: T-Mobile website
Sounds like if you have an iPhone 14 and your carrier is T-Mobile, you might have access to both of these options?
Whether or not you choose to switch to T-Mobile, love or hate Elon Musk, or don’t want to upgrade to the latest iPhone, I think we can all agree that this is a great use of technology that will absolutely save lives.
What if you already own a dedicated satcom device, such as a Garmin inReach, or my favorite, the ZOLEO?
That probably depends on the remoteness of your trips, how long you stay out, the potential risk of your activities, and what your texting needs are.
The iPhone is (for now) geared towards emergency communications only.
If you . . .
have anxious loved ones at home who want a daily check-in text that “all is well”
park your camper van/truck in the boonies for a week and need to stay in touch
are a social media star and want to post to your fans from your latest through hike or expedition
need weather forecasts in remote areas
Then may want to hang onto your satcom device.
However, most everybody else will probably choose their phone. Doing this avoids carrying an extra unnecessary device, and saves you $$$ - the initial several hundred dollar cost of a satcom device, plus the monthly subscription fees (which can definitely add up). I think all data carriers and phone manufacturers will offer a similar service in the next few years, this is just the initial wave.
If I were the head of Garmin or Zoleo, I’d be a pretty nervous right now. Finding yourself suddenly competing with Apple and Elon is generally not a good thing.

How to use the Beal rope marker
A middle mark on your rope is very important, for both setting up rappels and for safe lowering from one pitch routes. Yes, you can probably use a Sharpie pen, but an easier and longer lasting option is the Beal rope marker. Here are a few tips how to use it, including the not so obvious way to open the bottle.
Most quality ropes these days come with a middle mark from the manufacturer. But . . .
Some don’t
Even if yours did, it can fade over time.
Why is a middle mark important?
It helps you set up your rappel more quickly and safely.
Short rope warning. If you’re single pitch climbing and the belayer notices the middle mark passing through their belay device BEFORE the climber has reached the anchors and plans to lower off, that’s an immediate sign that your rope is too short! STOP, get creative, and next time, bring a longer rope and RFG (Read the Friggin’ Guidebook).
(Hopefully you know the importance of using a closed rope system, which means the ends of the rope are always tied either with a stopper knot or into someone's harness to prevent dropping your partner when lowering or rappelling off the ends of the rope, two of the most common climbing accidents.)
Even if you have a “bi-pattern” rope with a sheath color or pattern that changes in the middle, it can still be a good idea to mark it. Most bi-pattern ropes are extremely obvious, but some are more subtle. Depending on the color and pattern, the change can be hard to see in low light or with a headlamp (ask me how I know this.)
There's been a L O N G debate on the interwebs about the safety of using things like Sharpie pens and laundry markers to mark the middle. We’re not going to rehash those here.
One solution that most people should be comfortable with: go with a recommended product from one of the largest rope manufacturers in the world. The French company Beal offers a rope marker that has a specially formulated ink in a handy dispenser that's designed for use on climbing ropes.
The Beal rope marker is approved by Beal, Edelweiss, Blue Water, Roca, PMI, New England, and Lanex. There are some big names here that are not mentioned: Mammut, Edelrid, and Sterling, to name a few. If you have one of these other ropes, you may want to contact the manufacturer and see if this marker is approved.
(Another option is the rope marking pen from Black Diamond.)
As far as I know, there has never ever been a case of a climbing rope breaking because of some aftermarket middle mark. But there have been dozens of cases of people rappelling off the ends of the ropes, or dropping their partners when lowering because their rope was too short. Let's focus on a solution to the real problem and not invent imaginary ones.
A few tips . . .
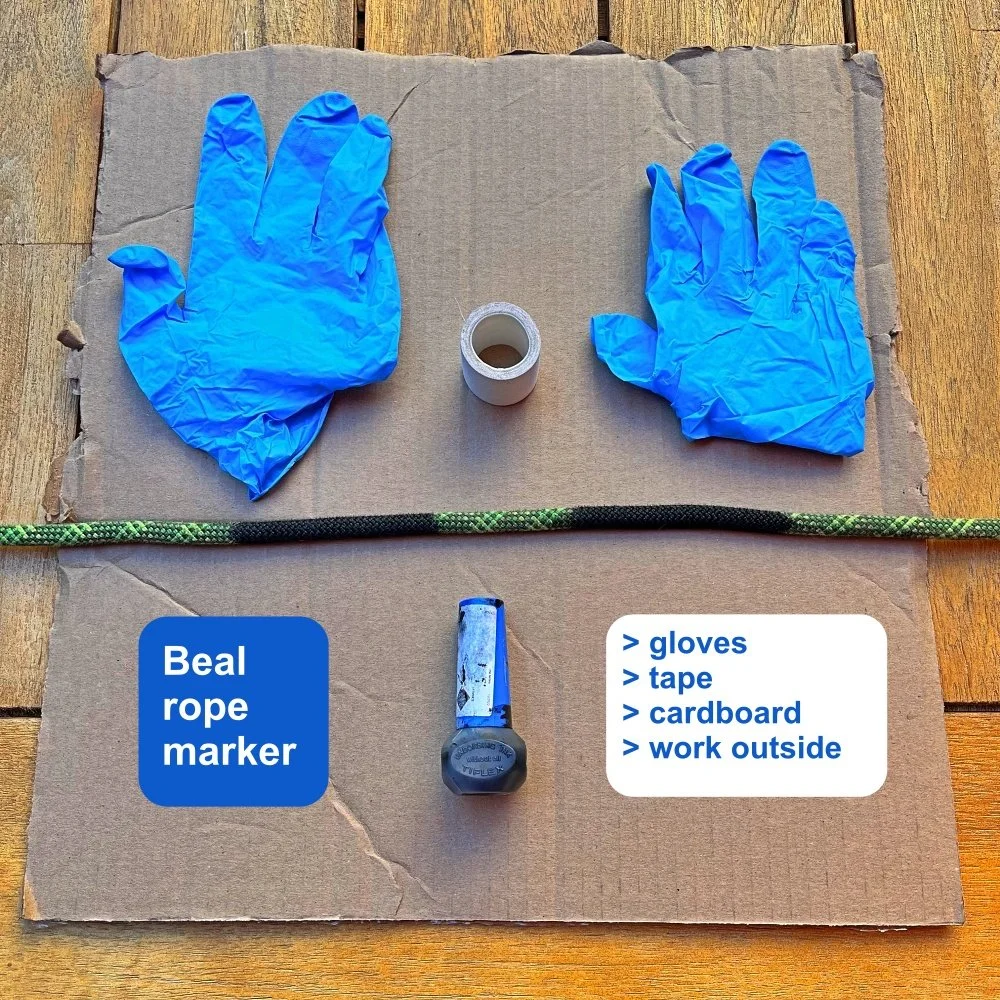
Before you start, recommended items are: 1) exam gloves to protect your hands, 2) tape to make a clean line, and 3) something to protect your work surface (like cardboard) from the ink. Do NOT do this on your kitchen table! I suggest working outside. It’s gonna be messy.
To unscrew the dispenser cap, you turn it CLOCKWISE, not counterclockwise. (Silly me, I almost broke the bottle turning it the wrong way.)
Remove the stopper, screw the dispenser cap back on (counterclockwise!) and roll the ink onto your rope. Let it dry, ideally in a well-ventilated ideally outside place for a couple of hours. Done, give yourself a high five.
You have enough ink to do many ropes, invite your friends over.
I've marked a lot of ropes with Sharpie pens, and this Beal marker works much better.
Here's a short video showing the process.

Stick clip a preplaced quickdraw with the double loop slipknot
Do you need to clip a “project” quickdraw that’s already on a bolt? If you have a long stick and know how to tie this crafty double slipknot, it’s easy. Check out the article and video to learn how.

Do you need to clip a “project” quick draw that’s already on a bolt?
Provided you have a stick or something similar that can reach the bolt, and you know how to tie this crafty double slipknot, it’s easy.
From your tie in, pull at least enough rope to get from you to the first bolt.
Tie a double loop slipknot. (Yes, this is probably a new knot, but you’ll probably learn it after a couple of tries; watch the video below)
Put one of the two loops into a stick, trekking pole, or something similar, and tighten that loop down.
Push the stick up, and carefully slide the other open loop around the bottom carabiner of your quick draw.
Pull on the strand of rope going to the loop around the quick draw.
That slipknot will close and snap into the carabiner. Schweeeet, you’re clipped! Magic!
Pull down on the stick, and pull on the other strand of rope.
This should release the other half of the slipknot. If you did it right, voilà your rope is now in the draw with no knots in the rope.
Get a well-earned high five from your partner for knowing this crafty rope trick. 😀
It’s a better show than a tell, watch the video below.
Haul bag rigging 101
There are lots of different approaches for rigging your big wall haul bags. Some old school methods still work pretty well, but there are a few more modern approaches that might make things a lot easier.
Thanks to big wall ace Quinn Hatfield @sprint_chef for the “connect two bags with quick links” tip near the bottom of this page.
A few words on hauling, from big wall expert Andy Kirkpatrick:
“Hauling is potentially one of the most dangerous aspects of big wall climbing. This translates to ultra-caution in all parts of your hauling system and interaction with bags, haul lines, docking cords, and pulleys. If you rush and make a mistake, drop a load or have it shift where it's not wanted, you could easily kill someone or yourself. I try and teach climbers to view their bags as dangerous creatures, like a great white shark, rhino, or raptor that is in their charge. The ability to keep them calm and under your control comes down to paranoia, foresight, and heavy respect for the damage they can do.”
There are MANY different ways to set up your bags for hauling. While some traditional methods have served big wall climbers fairly well for a long time, there are some more modern approaches that may make your life a lot easier. Try these different systems, and see what works well for you!
A more traditional / old school hauling setup looks something like this:
Cut off plastic bottle as a knot protector (lifted up here for the photo, in practice you slide the bottle down over the knot)
No swivel
End of haul rope tied directly to master hauling carabiner
Carabiner connects the short strap to the master point carabiner
Bag clipped to anchor with a sewn pocket daisy chain

old school haul setup
Let's look at a few potential issues with this set up.
Nothing really wrong with the plastic bottle. (Sidenote, big wall expert Andy Kirkpatrick suggests using an oil funnel from a car parts store instead of a plastic bottle. The oil funnel has a long, tapered neck that can allow it to slide past obstructions more easily. I haven't tried it but it sounds sensible.)
No swivel. A swivel is somewhat optional and costs a bit, but can definitely save your bags from twisting your rope.
End of rope tied directly to master carabiner. Again, nothing really wrong with this, but if you need to lower out your bags you're going to need an entirely separate rope to do so.
That red carabiner connecting the short haul bag strap to the master carabiner? That can be a BIG hassle with a heavy bag when the master haul carabiner is loaded, because you have to pretty much lift the weight of the bag and have one hand free every time you want to clip or unclip. There are much better ways to attach these two straps.
Finally, that evil sewn pocket daisy chain! That sucker can be very difficult to unclip, especially if the pitch above is traversing. Much better practice is to use a releasable docking cord, more on that below.
Here’s a more modern way to rig your haul bag.
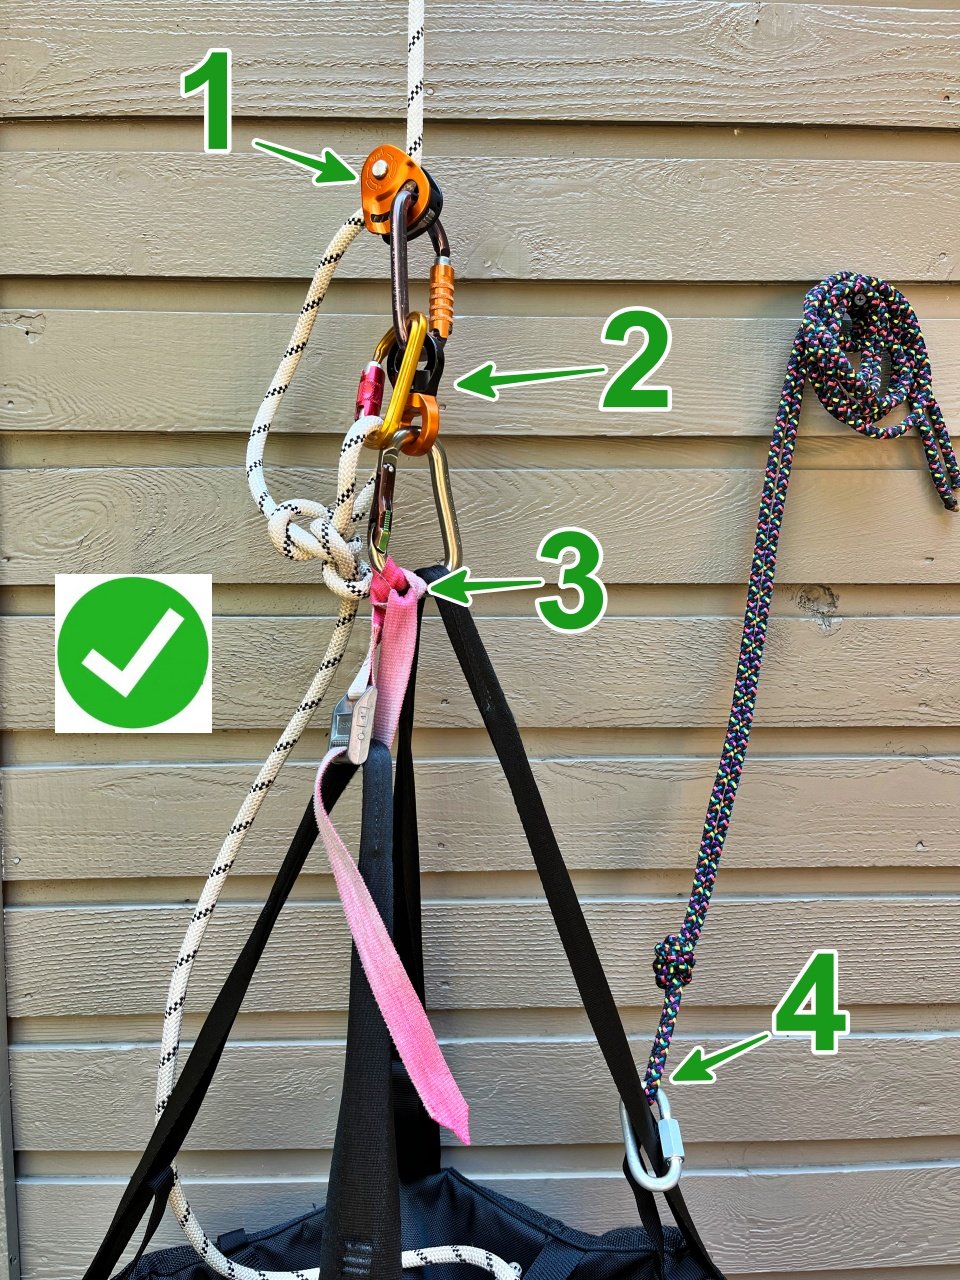
A progress capture pulley such as a Petzl Traxion is attached to the haul bag, not a bight knot. Yes, you haul directly from the pulley. No, it doesn't damage the rope. The pulley gives you a lot more flexibility. You can lift up on the bags with a 2:1 mechanical advantage to transfer them from one anchor point to another, you can use the extra haul rope as a lower out line, you can do a “far end haul” with a 2:1 mechanical advantage if needed, and you don’t need the inverted plastic bottle as a knot protector, because there’s no knot. This is a good place for a triple action carabiner. Yes, the Traxion is expensive.
A swivel goes between the Traxion pulley and the master carabiner. Way less twisting of your rope.
A cam strap connect the long strap and the short straps. This means you never have to lift the full weight of the bags to clip and unclip the carabiner. Clove hitch the cam strap (a 3 footer /1 meter) to the haul point carabiner so you can’t drop the strap. Good place for a triple action (or here, a Magnetron) HMS carabiner. (Side note on the cam strap: After I took this photo, I found out that skotswallgear now makes a very nice 3 foot long cam strap for exactly this purpose, and that's what I'd recommend. Check it out here, scroll to the bottom of his store to see it.
A docking cord attaches the bag to the anchor, not a daisy chain. The docking cord is typically a doubled length of 7 or 8mm cord (about 15 feet / 5 meters) that's attached to the long strap of your bag. With this you tie some sort of releasable hitch onto the anchor, and that holds the weight of your bag. You can release the bag when this hitch is fully loaded, which is a HUGE improvement over hanging your bag from a sling or daisy chain. (Attaching the docking cord to the long strap rather than the hauling carabiner means that when the bag is docked, everything else is slack).
Here's one more tip on where to tie your docking cord (which I unfortunately learned after I shot all these photos). Most haul bags have some sturdy sewn tabs around the opening. If your tie your docking cord to one of these tabs, and around one of the straps, this lets you dock the bag higher up on the anchor, which often makes accessing the bag more convenient.
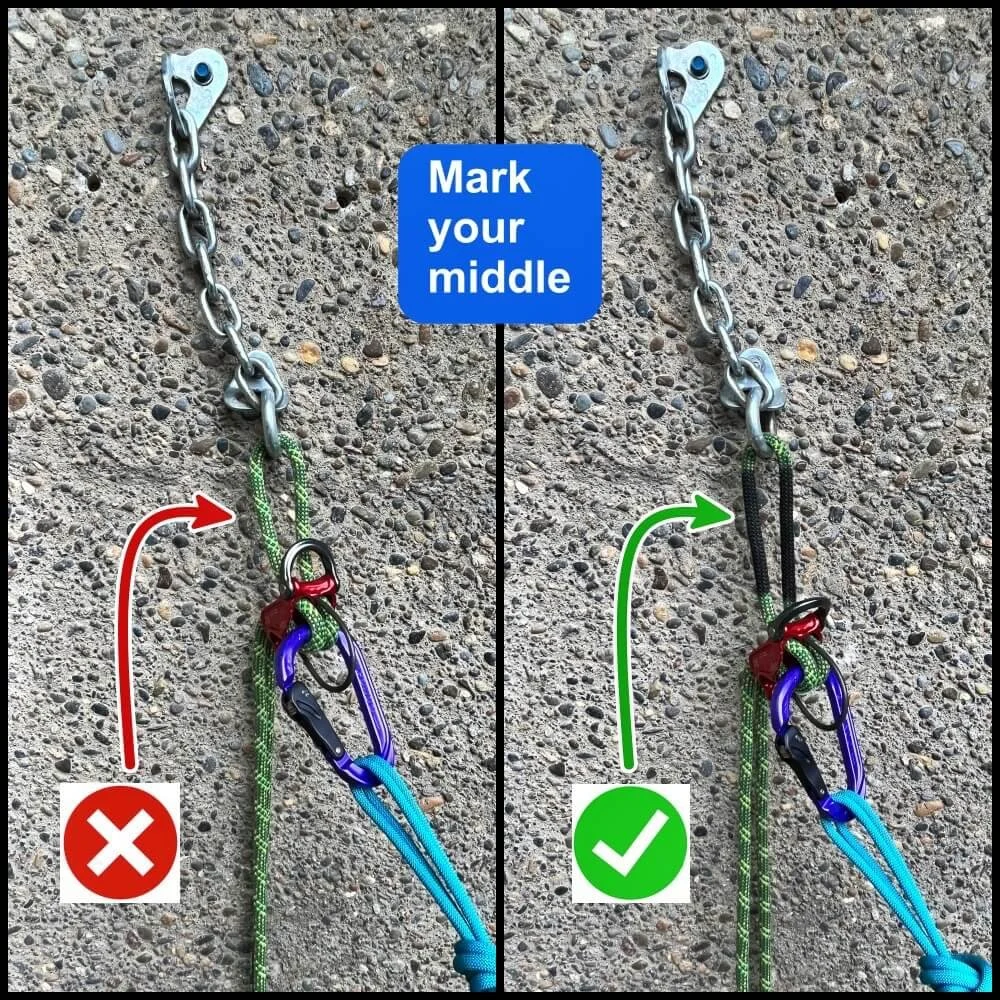
Tip: Clip a bight knot to back up the Traxion ABOVE the swivel
Just below the Traxion, tie a backup knot (here a butterfly) and clip it with a locker to the carabiner attached to the Traxion. This backs up the Traxion, and gives you a knot you can use to lower out. You can loosely stack all the rest of the unused rope in the top of the bag, or let it hang free.
If the Traxion cam were to open up on some rock nubbin when you're hauling, this backup knot prevents you from losing your haul bag.
Note: It's important to clip this bight knot ABOVE the swivel, and not below it. If you clip the bight anywhere below the swivel, there's a good chance when your bag twists, all of your extra haul rope is going to get twisted around the bag also, no bueno.
Check out the photo below of the correct (left) and incorrect way (right) to do this.

What about two bags?
There are LOADS of different ways to rig two haul bags. The basic concepts (that’ve worked for me) are:
Most folks like the bags side-by-side, but some prefer a smaller bag hanging below the primary bag. Try both and see what works for you.
It’s good to be able to spread the bags laterally if you need to wrestle them around.
You don't want them hanging too far down, so you have to reach uncomfortably low from the anchor. (This is not so important during the day at intermediate anchors, more so at the bivy.)
All connection points need to be unquestionably strong.
You need to able to unclip and separate the bags from one another if needed.
A docking cord connects the bags to the anchor. You can have a separate docking cord on each bag (as we do here) or go with with one single docking cord from the master haul carabiner.
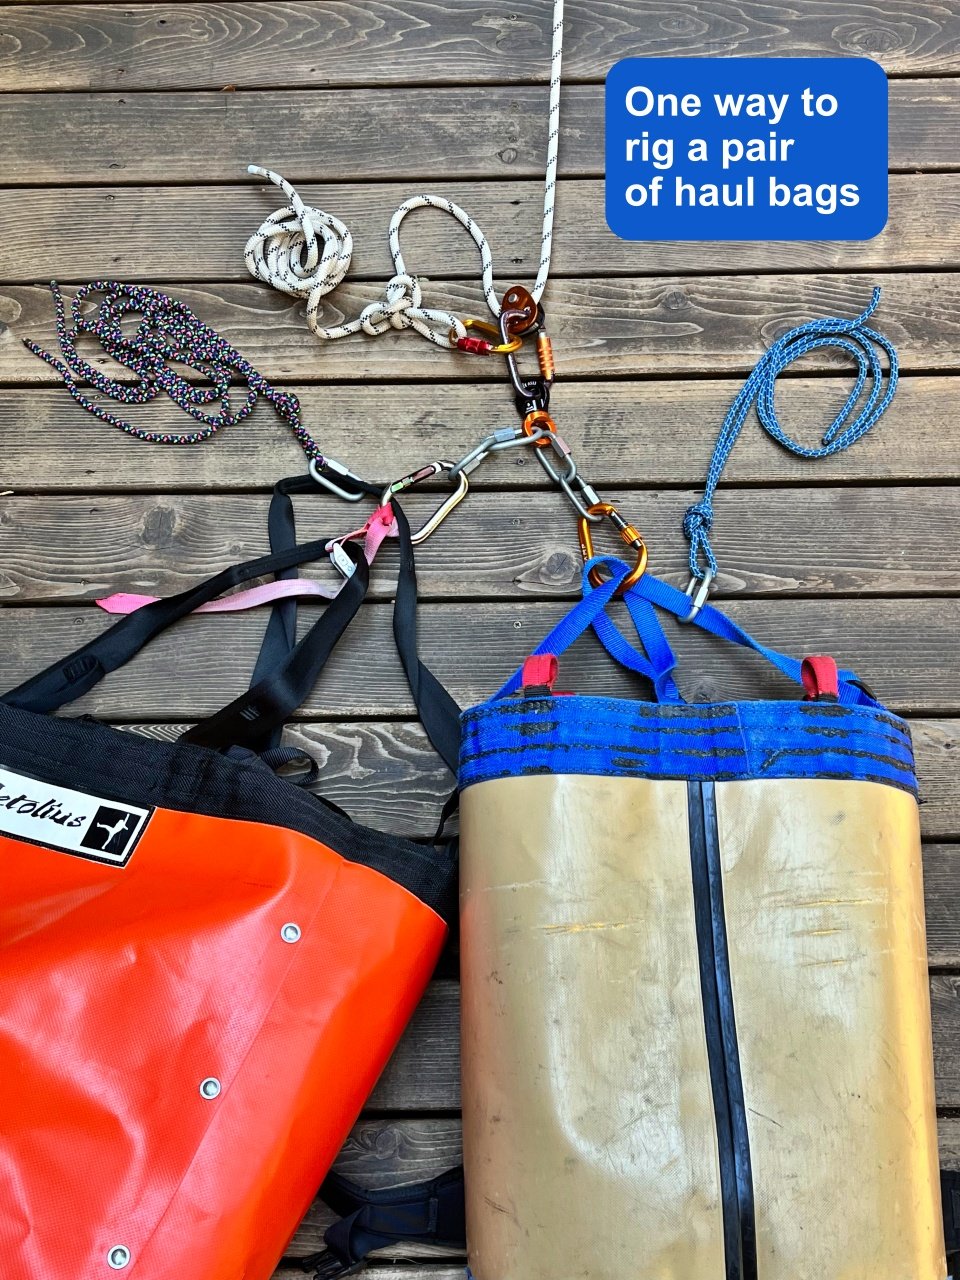
Here’s one way to set it up. From the top down:
Haul rope running through Traxion progress capture pulley, backup knot below traxion, knot clipped with a locker above the swivel
Triple action locking carabiner
Swivel
2 pairs of quick links in swivel. The quick links are unquestionably strong, and give a nice lateral spread to each bag at the belay. (Thanks to Quinn Hatfield for this quicklinks tip.)
HMS locking carabiner attached to long strap on each bag. (Feel free to tape the gates closed if you want to be 110% sure they’ll never open.)
Docking cord attached with quicklink to each bag
On left bag, a 3 foot long camstrap (red)
Here's a close-up:

Here's a fancier way to set it up, from big wall expert Skot’s Wall Gear. Here, Skot is using a pair of gold rappel rings along with a combination swivel and locking carabiner (appears to be the Director Swivel Boss) from DMM. This makes a more compact set up, with zero chance cross loading the rings.

photo: @skotfromthedock, https://www.instagram.com/p/C2nmw-By0-3/
Other hardware for haulbag rigging . . .
There are cool swivels that allows you to open one side. This creates some interesting options; for example you could maybe cut up a PAS tether to get small sewn loops of Dyneema or maybe a pair of quickdraw dogbones, and use these instead of the quick links. I haven’t tried these but looks like they could work.
Here’s a photo: the Petzl Micro swivel and DMM Focus swivel.


Petzl makes a nifty product called the Ring Open. This is a rigging ring that you can open (with a tiny Allen screw, I think), letting you attach a fixed loop. I don't have one of these, but it could be a cool option for setting up your haul bag system.
Like I said at the start, there are many, many different ways to do this. Start with the basic principles, and find a system that works for you.

Director Swivel Boss from DMM. This is the carabiner shown Skot’s photo just above. With this, you can use inexpensive rappel rings instead of the more expensive Petzl Ring Open.

The far end haul
Having a Traxion on the load also lets you set up what’s called a “far end haul”, which at first seems like some sort of sorcery. Here's a detailed article and a couple of how to videos on this technique.

The pre-rigged rappel anchor and belay
Transitioning from climbing to rappelling can take a LONG time. One way to increase your efficiency is for the leader to pre-rig the rappel before they bring up their second. Here's how to do it.
Note - This post discusses techniques and methods used in vertical rope work. If you do them wrong, you could die. Always practice vertical rope techniques under the supervision of a qualified instructor, and ideally in a progression: from flat ground, to staircase, to vertical close to the ground before you ever try them in a real climbing situation.

When you need to rappel the same route you just climbed, the transition at the top can often be a big time suck.
The traditional method of each climber using a tether/PAS to connect to the anchor, each person untying from their respective ends of the rope, threading the anchor, tossing each rope strand, and then each person rigging for a rappel separately, involves a LOT of steps and (usually) waiting. It can also be awkward at tight stances and can take a LONG time, especially with less experienced folks.
Here’s one way to increase your transition efficiency: If you know you need to rappel the route you just came up, the leader can take a minute or so on top to pre-rig the rappel BEFORE the second starts to climb. With this method, you can start rappelling in just a minute or so after the second arrives at the anchor. This can especially be a timesaver if your second is less experienced.
This method is closely related to the backside clove hitch rappel transition; read more about that method here.
I first saw this technique demonstrated by IFMGA Certified Guide Rob Coppolillo. Rob calls it the “BARF” anchor, because the rope from the “BA”ckside of the leader’s tie-in is rigged for “R”appel by “F”eeding it through the anchor, hence the great name. It hasn't caught on yet, what do you think?
As mentioned above, this is absolutely something to practice on the ground in a controlled environment, ideally under the eye of a qualified instructor, before you ever try it in the real world. This process might sound a little complicated, but after you think it through and practice it a few times you’ll see that it’s pretty straightforward.
This might appear to give an uncomfortable belay, but that's not necessarily the case. If your tether of your extended rappel is reasonably long, it works out to be quite comfortable, and you're not twisting your back too much.
Hopefully this is blindingly obvious, but this only works if you are descending a pitch that's less than half the length of your rope. (Which, if you’re considering rappelling the route, should definitely be the case!)
If your second has belayed you to the anchor, and the middle mark of the rope has not yet gone through their belay device, this method will work.
Conversely, if you pull up the rope, and you reach the middle mark before the rope goes tight on your second, this method will work.
If either of these two things are not happening, your rope is too short and you should probably not be rappelling this route!
Advantages:
Fast and efficient transition from climbing to rappeling
Cluster free anchor. No need for multiple leashes clustering up the anchor. You have plenty of room to stretch out and move around a bit, depending on stance. Your position isn’t limited by a short tether or PAS.
Always using the dynamic rope to connect everyone to the anchor. Ropes are stretchy. Stretchy is good.
Only need to toss one rope strand, because the second can stay tied in and takes one strand down with them.
No need to tie a knot in the end of the rope, if the second raps first. This is because the second stays tied in, and the partner is blocking the other strand from moving with their pre-rigged rappel.
What you need:
An easy-to-see middle mark on your rope. Add one if your rope doesn’t have it or if it’s worn away. The Beal rope marking pen is great for this. In the field, you can use tape as a temporary middle mark.
A rappel extension and anchor tether with a locking carabiner. Consider pre-tying this with a 120 cm sling to your harness before you leave the ground; you know you're going to need it, so why not have it ready to go in advance?
Ideally a second rappel device, plain tube style device works fine. Or, you could bring up your second on a munter hitch, see example below..
Here’s the sequence:
This might sound complicated when you first read through it, but once you get your head around the whole process, the steps go very quickly, as you can see from the video link below.
(There are several variations to doing this. I'm going to mostly describe the sequence that Karsten shows in his video.)
Leader arrives at anchor, and clips their tether to one bolt. (This assumes a reasonable ledge to stand on. If it’s a full hanging belay, you can clip another tether into the second bolt so you’re redundant on two pieces.)
Leader calls off belay.
Leader feeds a bight of rope through the rappel chains.
Leader pulls a few meters of rope through the chains, and ties an overhand on a bight. (This knot does two things: it becomes your stopper knot in the end of one strand, and it ensures that the rope can’t pull back through the chains, which might cause you to drop it. Always secure your rope when rigging to rappel!)
Leader unties their retraced figure 8 tie in knot.
Leader pulls rope until middle mark is at the anchor chains.
Leader clips rappel device to their rappel extension, leader feeds both rope strands through device, and goes on rappel.
Leader ties a double strand overhand on a bight (aka “BHK” knot) below their rappel device. (This BHK blocks them in place above the knot, and also gives a convenient place to clip their second plaquette style belay device (e.g., Petzl Reverso) to bring up their second.)
Leader clips their second belay device to the BHK loop, pulls up slack rope, and puts their second on belay. (Lacking a second device, leader could belay with a Munter hitch.)
When second arrives at the anchor, they rig for rappel. (In the video, the second rigs above the leader. Another option is for the second to rig below the leader. If they rig below, the second remains tied in to the end of the rope, so there’s no need to toss it.)
Leader ties a stopper knot, and tosses the one strand of the rope that’s not tied to the second.
Whoever is lower on the rope rappels first.
Like most things in climbing, it’s a much better show than tell. Check out the video below from IFMGA Certified Guide Karsten Delap to see how it's done, from start to finish.
Karsten shows two methods to descend in the video. The first one is lowering your partner, the second one is having your partner rappel. The whole video is great; start at about 6:10 if you just want to see the method in this article.
There are a lot of details in this video, and you may find it easier to watch it full screen in YouTube.
Here's a slightly different way to set it up. In this photo, the anchor is a tree far back from the edge of the cliff, and the leader wanted to stand near the top to have visual contact with his partner. Photo credit, Dave Lottman.
Set up the rappel on the tree
Rappel back to the edge of the cliff
Tie a BHK below the device
Put partner on belay with a munter hitch on the BHK
When his partner arrives, the second gets lowered on the munter hitch, and then the leader unties the BHK and is immediately ready to rappel. Slick! Check out the Instagram reel here.
This is the same set up as shown above, only with a much longer distance between the anchor and the belay, and using a munter hitch instead of a second device.

image credit: @northeast_alpine_start, https://www.instagram.com/p/CoueDaOgg5L/?hl=en

Long approach hike? Push harness leg loops to the side
Do you have a long approach hike and don't want to take a backpack? Here's a simple tip to make that long walk more comfortable while wearing your harness.
My partner and I were at the trailhead, ready to hike in a couple of hours to a moderate five or six pitch moderate alpine rock route in the Sierra backcountry. We had an early start, there were streams for water on the approach and hike back, it was going to stay light late into the evening, and the weather forecast was dry and sunny.
The route was up a long ridge and down the other side, so bringing two backpacks and leaving one at the base was not going to work.
We opted to bring one small pack that the second carried on route, and could be hauled on steeper pitches if necessary. The pack barely fit the rack, two wind shells, and a few snacks. There was no room for shoes, the rope or harnesses. So, we wore the harnesses on the hike in. One person carried the pack, and the other backpack coiled the rope.
If you're going to have a long walk with your harness on, it can be a LOT more comfortable to push the leg loops off to the side. Doing this avoids any chafing or rubbing from the leg loops on sensitive anatomy.
Many harnesses have a plastic clip on the back of the leg loops. Unbuckling this clip can make this even easier.


Great series on climbing history by John Middendorf
American big wall expert and product designer John Middendorf wrote an outstanding series of articles on climbing history in Europe and North America. The historical photos/diagrams are amazing and his writing is solid, definitely worth a look. See them all at his website, bigwallgear.com
Here’s an excellent series of long articles, photos and diagrams of climbing history in Europe and North America, by American big wall expert and product designer John Middendorf.
Excellent writing and historical photos, highly recommended!
On your first visit, you can click the “Subscribe” button on the right side of the webpage to get free updates to this ongoing series.
John has more articles than what’s below, so check the archive section of his website, bigwallgear.com to see all of them.
(For details on his product design and portaledges, go to bigwalls.net)
Below are a few screen grabs from some of the terrific illustrations.

image: bigwallgear.com

image: bigwallgear.com
Did you know early forms of carabiners were used by climbers as early as 1890? I didn’t.


The “meat anchor”: what is it, how do you use it?
If you’re ever in the mildly desperate situation of having to rappel in moderate terrain that one person can hopefully downclimb, and there's no anchors on top, it might be time to pull the “meat anchor” out of your bag of #CraftyRopeTricks.
Photo credit: diagram by Andy Kirkpatrick, used with permission. From his excellent book “Down”, highly recommended!
This article was written with assistance from my expert canyoning friend Kevin Clark, author of “Canyoneering in the Pacific Northwest: A Technical Resource” Lots more on meat anchors in his book.

If you’re ever unfortunate enough to find yourself at the top of some terrain that needs to be rappelled, but has zero anchor building possibilities, you might want to pull the “meat anchor” out of your bag of tricks.
A meat anchor is where a person(s) is the actual anchor, so other people can rappel (or maybe be lowered) directly off of them.
The meat anchor is also known as a “human anchor”. It’s a variation of the classic sitting hip belay.
A meat anchor is often used in canyoning, where you often encounter a wide variety of terrain, with much of it possibly down-climbable and relatively short by alpine climbing standards.
The least skilled and/or heaviest person goes first. The most skilled climber (and hopefully the lightest climber) goes last. In a larger group, the anchor can be backed up by other team members when the first/heavier people are descending.
A meat anchor can also be used to belay someone who is downclimbing, or lowering, if necessary. (You’ll have a lower load on the anchor if they rappel.)
Of course, if you’re able to brace your feet on something, or sit your butt down in the snow, this can be remarkably strong and improves the security of your anchor.
Got more than two people? Share the load. Have them sit in a “train”, clipped to each other's harnesses, and have them back each other up. They can also sit side-by-side, and equalize the load off of each other's harness.
What else helps to decrease the load? Having the rope go over a ledge (which can decrease forces on the anchor up to 66%), having the rappeller go slowly with minimal bouncing, and have the rappeller begin as low to the rock as possible.
Here's a scenario that might be used with a larger group.
You come to a drop that you think is downclimbable, but aren't 100% certain. Set up a meat anchor (backed up), then an experienced party member downclimbs on belay. One of three outcomes:
They report back that it's an easy downclimb, so toss the rope down for them to coil, and everybody downclimbs.
They report that it can be downclimbed, but it's spicy - and might be better for the newbies to rappel. Newbies rappel off the human anchor and best climber goes last.
They have to be lowered, so it's a rappel for every one. Maybe the human anchor stays in position and have people start rappelling, while another person starts rigging an anchor nearby.
You're probably thinking, “What about the last person, what do THEY do? Of course, this doesn’t give many good options for the last person going down. Hopefully they’re able to downclimb. This often might be the case with a guide-client scenario, or a more experienced trip leader with beginners.
The first person down can place protection anywhere they can find it, and clip one rope strand to it. Then the last person can downclimb and clean the gear, while being belayed from below.
This technique is known in some circles as “downleading”, and it can be a good strategy whether or not you’re doing a meat anchor and want to safeguard the descent for the last person. Here’s an article on downleading.
So, this is a Crafty Rope Trick you’re hopefully not doing on a regular basis, but it might get you out of a sticky situation.
Photo: meat anchor with multiple “anchor points”

image: https://www.mountainproject.com/forum/topic/114012583/transition-to-canyoneering

The ZOLEO satellite communication device
A satellite communication (satcom) device can be a crucial tool for communicating with search and rescue if you have a backcountry emergency, and handy to check in with concerned people at home. There's a new player in the field that offers several advantages over the competition. Check out the ZOLEO satcom device.
Alpinesavvy was provided with a free ZOLEO satcom device. This in no way affected my opinion and review. There are no ads, paid product promotions or affiliate marketing links on Alpinesavvy. Whenever I get a free product for review, I'll always tell you about it.
ZOLEO is offering a coupon code with free activation for Alpinesavvy readers. Use the code ALPINESAVVY for a $20 USD discount. (This deal comes as a courtesy from the ZOLEO team. I get $0.00 from this offer.)

An emergency satellite locator/communication device was once something pretty much reserved for sailers, pilots, or extreme expeditions - if your ship is sinking, your plane is going down, or polar bear is gnawing on your leg, you could press the SOS button and (hopefully) someone could more easily find your remains.
The older style, called a Personal Locator Beacon, or PLB, is designed for emergency use, one-way transmit only. Push the big button, and your lat-long coordinates and an SOS is (hopefully) sent via satellite to the appropriate local search and rescue (SAR) team.
The main problem with this type of device is that the SAR team has no idea what your actual situation is, so they don't know what kind of resources to send. Do you need a helicopter for a life threatening emergency, or did you just break your ankle and can wait a day or so for a rescue team to walk in?
The newer style of satellite communication (satcom) devices offer two-way text capabilities, which is a significant improvement. Satcom devices are now a much more mainstream, every-day-carry item for many people, even on a casual day hike.
As I write this in summer 2022, the most well-known satcom device is the Garmin inReach. I’ve used this device several times, and it works fairly well. However, there are newer competitors on the market, and after testing one called the ZOLEO (yes, all caps), I think it offers some solid benefits over the inReach.
The primary design principle of the ZOLEO is to have the best possible messaging experience, without trying to also be a GPS navigation device. I think they succeeded. For actual navigation, I prefer a phone app like Gaia GPS, a printed map, and a compass. Zoleo was named “Product of the Year” at the Third Annual Outdoor Retailer Innovation Awards in Jan 2021, that's pretty impressive!
Before we get into the specifics of the ZOLEO, let’s look at the bigger picture of satcom devices in general.
There are four primary ways to use a two way satcom device. In order of importance:
1 - Request help in an emergency. You can text back-and-forth with SAR to tell them the exact details about your problem. (Pro tip: this makes SAR teams VERY happy!) SAR not only knows your exact position, but also what resources they need to help you. When you push the SOS button, the device sends your message and coordinates to GEOS (the international emergency response coordination center.) GEOS then notifies your emergency contacts and coordinates with emergency responders in your area.
2 - For a delay, but no emergency, you can text your at-home contact something like: “Everything’s fine, but we’re running late. Do NOT initiate a rescue.” Preventing an unnecessary SAR mission is hugely important, and it's a big benefit of a satcom device that many people may not fully appreciate.
3- Using the “check-in” feature to send a quick text to a few trusted contacts at home, usually saying something like “All good, here's my location.” While this is probably the most common use, let’s remember this is strictly optional. It’s really meant for anxious or concerned people at home, and does not directly benefit the backcountry traveller. (People have been adventuring for thousands of years without making “check-in” calls, so it's a luxury, not a necessity.)
Side note on all satcom devices like this: sending check-in notifications is fine, but don’t let a lack of check-in become the basis for a rescue. If your satcom device breaks, gets lost, dropped in the lake, or runs out of power, and you’re fine, the last thing you want is to trigger an unnecessary “rescue” because you didn’t send your daily check-in. This has happened often! Make it clear to anyone receiving your check-in messages that LACK of communication does NOT mean you have a serious problem.
4 - Treating it pretty much like texting on your phone, and sending any sort of text that doesn’t fall under the previous three categories. Long distance hikers can connect with other hikers. If you’re car camping in the boonies, you could text someone else the coordinates of your campsite so they can meet you, etc. You get the idea.

Using the Zoleo for daily check ins on a recent trip down the wild and scenic rogue River in southern Oregon.
What separates ZOLEO from the competition? In rough order of importance:
ZOLEO uses whatever available technology is available (and least expensive) to send or receive messages: Wi-Fi, cell tower, or satellite. This allows a seamless thread of conversation if you move from remote backcountry, to cell coverage, to in-town wi-fi. If you're a long distance hiker or like to car camp in remote locations, this is a very handy feature. Messages sent through the ZOLEO over cell or Wi-Fi do not count toward your monthly limit. Plus, messages sent via cell or Wi-Fi are pretty much immediate. With Garmin, you have to bounce back-and-forth between your phone and satcom device to continue the same conversation.
You get a unique email and SMS number (for texts only, not voice calls) with your ZOLEO. Simply share this email or SMS number with anyone, and they can use any device (computer, tablet or phone) to send you a regular text, without you having to initiate a text thread. This is simple, intuitive, and results in fewer missed messages. Compare this to the awkward Garmin inReach system, where you need to first send a text to someone from the device in order to receive a text back from them. This may sound like a minor difference, but it’s actually a pretty big deal.
“Progressive SOS” feature. When an SOS is declared, ZOLEO users receive step-by-step status updates throughout the incident via the ZOLEO app. You’ll know what’s happening at each step, from pressing the SOS button to the time help arrives, as opposed to just pressing the SOS button and then hoping like hell the technology is working. This is the single most important function of the device, so why not make it more intuitive?
Well designed app. For people who will be contacting you more often, they can download the free ZOLEO app. This allows the most characters per message, and, if they’re on your list of preferred contacts, they can receive check-in notifications and (if activated) Location Share+. You and your designated contacts can use one single app for all your communication.
Longer messages. If you and your contacts use the ZOLEO app, messages can have up to 950 characters. Otherwise, emails are limited to 200 characters and SMS messages are limited to 160 characters. Garmin inReach Mini has a 160 characters limit per text.
Here's a screen grab example of the progressive SOS feature.

General ZOLEO features:
Retail price: $200. Weight is a bit over 5 ounces/ 150 grams. Size is very similar to a deck of playing cards.
It doesn’t have a screen. It has four different colored LED lights and some audible alerts, to tell you the basics like battery charging, whether a message was successfully sent or received, etc., so you don't have to look at your phone. The blinking lights are surprisingly intuitive. (I've seen more than one Garmin InReach with a cracked screen, so the screenless ZOLEO could be considered a benefit.)
ZOLEO has three core features: SOS function, preformatted check in message, and two way text messaging. The SOS and pre-formatted check in message work on the device itself, and don’t require your phone. But, you can use the phone app for both of these functions if you prefer. To send and receive texts, you use your phone and connect to ZOLEO via Bluetooth. Yes, you need a functioning phone to send a text message. (You did bring that auxiliary battery and charging cable for your phone, correct? If you're hiking with a partner(s), have them download the app as well so you can both use the device in case one phone is kaput.)
One touch check-in button. Reassure concerned people at home without excessive fiddling with electronics. You can set up to five check-in contacts on the ZOLEO app. Simply press the “check mark” button on the device, and your contacts will get a message like ”I’m OK”, and your latitude longitude coordinates. This will probably be the most common use of the device, and it's nice that it's so easy, literally one touch.
Impressive battery life. Specs say more than 200 hours, even with checking messages every 12 minutes. That’s 20 days if you have it on 10 hours a day, or about eight days if you left it on all the time. The internal battery recharges to full strength in just two hours via micro USB cable. If you're moving in and out of cell coverage, simply leave the device turned on to make sure you catch all your messages. (Having said that, I am a huge fan of always carrying an auxiliary battery and appropriate charging cables, so I’d encourage you to do the same.)
Weather updates. Via satellite. Zoleo uses DarkSky to get weather info. These weather updates count against your total number of messages. I used this several time during my testing. Weather updates came through in just a few minutes, quite impressive.
Location Share+. Added in 2021, this lets you automatically share your location with up to five check-in contacts, on a selectable interval from every 6 minutes to 4 hours. You and your check-in contacts use the ZOLEO app to view the most recently reported location and “breadcrumb” trail on a map. Personally, I don't see this is being very necessary for most hiking and mountaineering, but if you're a pilot or sailor, it could be more important. This feature is an extra $6 a month.
Not just for camping. Keep it in your car for times when you’re driving outside of cell coverage. It's more than an emergency notification device; depending on where you live or recreate, it could be your primary way to connect to the world.
International travel. Heading on a trek to Nepal, Peru, Kilimanjaro, etc.? This could be a great way to stay connected on your trip. Use the device and a single app to stay in touch, without any concern with your phone being compatible in the country you're visiting, changing SIM cards, etc.
Waterproof, rugged, no screen to break, grippy plastic on the outside. Small clip on the top for a carabiner to wear it on the outside of your pack, but I see zero reason to do this. It doesn’t help with satellite connectivity, but it does greatly increase the chance you're going to lose it if you're bushwhacking. I keep it stashed in the top pocket of my pack, which still allows satellite connectivity if you're sending back-and-forth messages with someone during the day. (I see lots of pictures of people wearing satcom devices clipped to the outside of their backpack, and I never understand why.)
Uses the Iridium satellite network, the largest and most reliable. Keep in mind that these satellites move around. If you have a poor connection, wait a few minutes and a new satellite might move into position; in theory, there should be a satellite overhead about every 10 minutes. If you're in a deep canyon and or dense tree cover, satellite connectivity may be affected. Try to have a clear view of the sky. As mentioned just above, there's no need to have this out in the open to work, inside the top of your pack should be fine. Related note, be patient. Messages can often take several minutes to be sent and received. It's never going to be as fast as cell or Wi-Fi.
The ZOLEO app is available in 7 languages (Italian, German, Swedish, Danish, Finnish, Norwegian and French). From the ZOLEO website, spring 2022: “ZOLEO will only accept credit cards with a billing address in the following countries: Canada, United States and its territories, Australia, New Zealand, Denmark, Finland, Norway, Sweden and the United Kingdom. Additional countries will be added over time.”
In addition to the device, you need to choose a subscription plan. There are three levels, depending on how text-happy you are. Data plans start at $20 a month, after three months you can suspend your plan for $4 a month. When you suspend your plan, you keep your dedicated phone number and email address. The amount you pay for the subscription plan is really what the long-term cost of ownership is about, so it's worth taking a close look at this. I won't summarize it here, check the ZOLEO website for details.
So, that's my take on the ZOLEO. It's not a device for everyone. If you hike on mostly frontcountry trails, and you have cell coverage most of the time, any sort of satcom device is probably not needed. But, if you do higher risk activities with off-trail travel in remote areas away from cell coverage (and especially if you lead trips and are responsible for other people) I feel a ZOLEO is well worth the cost, reduced risk, and peace of mind.
Think of it this way: If you use a satcom device just ONCE to help you, a teammate, or another person / group with an emergency situation, isn’t it well worth whatever you spent on it?
Don't just take my word for it. Here are some ZOLEO reviews from solid sources.

What’s that peak? Find out with the PeakFinder app
Try an augmented reality app like PeakFinder to learn the names of visible mountains.
What's the name of that mountain? Climbers have wondered this forever, and now finding the answer is a lot easier.
With an augmented reality phone app like PeakFinder, you can find out in a moment. (Yes, it does show lots of hilltops you may have no interest in, but it does well with the big ones too. )
Photo by my pal Wim Aarts, taken from the amazing viewpoints in the Inyo Range, looking westward at a good portion of the central Sierra Nevada.
If you're ever near Bishop CA, visiting the Inyo Range, enjoying this view and seeing the ancient Bristlecone pine forest is highly recommended.

photo credit: wim AArts

Haul bag straps: connect ‘em with a cam strap
Big wall haul bags usually come with a long strap and a short strap. You haul from the long strap, and need to hoist up the short strap to level and close the bag. It's that hoisting up that's the hard part! Make this a lot easier - replace the traditional carabiner with a cam strap.
Big wall haul bags usually have a long strap and a short strap. The haul rope is connected to the long strap. The short strap is connected / clipped in some way to the long strap. In theory, this allows you to access your bag with all the weight hanging on the long strap, by unclipping the short strap.
The traditional way to do this is with a second carabiner, as shown on the left.
Looks nice in theory, but in reality this is often a serious hassle. If the weight of the bag is loading the master point carabiner, to clip and unclip that red carabiner on the short strap, you may need to hoist the entire weight of the bag, and have a hand free to work the carabiner. With a moderate bag this may not be a problem, but with a full load it can be very awkward and unnecessarily strenuous. Imagine doing this with a 100+ pound / 50+ kg bag, no thanks!
A better method is shown on the right, using a cam strap. Let’s learn how that works!

Instead of that pesky carabiner, use a cam strap to close your bag.
Get a 3 foot cam strap. You can get a two pack of 3 footers for about $15, here's a link for REI. (This is NOT an affiliate marketing link, I simply offer it for your convenience.) Or get a 4 foot and cut it to size.
Tie a clove hitch in the cam strap, and clip it to the haul point carabiner. The clove keeps the cam strap secure so you don’t drop it. Try to keep the buckle close to the carabiner.
Run the cam strap through the short haul bag strap, then back up through the cam buckle.
Now, simply pull down on the cam strap with your bodyweight. Nice, you've created a little 2:1 mechanical advantage. This hoists up the short strap and secures your bag, nice and level.
The cam strap is releasable under tension, making opening the bag just as easy. No more strenuous pig wrestling to unclip that short strap carabiner, schweeeet!
Sidenote: if you’re thoughtful about gear packing, you should hopefully not be diving in and out of your main haul bag during the day. In the morning, try to pull out everything you need for the day, and put it in a smaller day bag or a wall bucket that you use for things like snacks, water, sunscreen, wind shell, etc.
Here’s a more elegant way to do it, with this cool cam strap design from skotswallgear.com. Skot sews a small loop right next to the buckle, so you can clip it to the carabiner rather than using a clove hitch. Note that the strap then passes through the carabiner as shown on the left photo, and then down and through the lower bag strap. (At least that's how I think you're supposed to use it. :-)
Skot was nice enough to send me one for review, thanks!
Skot makes lots of well-crafted big wall gear, like the famous Alfifi, lightweight and easily adjustable tethers/daisys, rope bags, custom webbing for hooks, and more. Check out his website to see it all.

If you use a docking cord that’s tied to the long strap rather than clipped to the master point carabiner, this means that both straps should have no tension on them after the bag has been docked at the anchor. This allows easy access to your bag, regardless of what system you use to close the top. Lots more on docking cords at this article.

Finally, here's a short video showing how it works.

What's in my pack: Rainier gear by Mark Smiley
Check out what IFMGA Certified Guide Mark Smiley takes for a two day Rainier climb up one of the standard routes. (This is a free preview from Mark's new online class class on alpine climbing. Learn more from his website, mtnsense.com.)
This gear list is a free excerpt / preview from Mark's new online course, “The Ultimate Guide to Modern Alpinism”. I haven’t taken it, but I have taken a couple of his other online courses, and they were excellent. Check out all of Mark's offerings at mtnsense.com.

Emmons Glacier, Mt Rainier. Photo by Vaqas Malik
There’s nothing a gearhead likes more than a detailed packing list from an expert climber. Here’s what IFMGA Certified Guide Mark Smiley likes to pack for a two day Mt. Rainier trip up one of the standard routes (Emmons or Disappointment Cleaver). (I've climbed Rainier several times and sure wish I had a few things on this list.)
Of course you don't have to bring everything listed, but it's a pretty good starting point.
Here's a link to the original “course preview” article Mark posted for free on his website, where he names some specific brands that he likes and goes into a bit more detail.
Clothes
Wool t-shirt
Sun hoodie
Thin wind shell
Light puffy
Big puffy
Waterproof shell jacket
Buff
Hat with visor for sun protection
Thin gloves for hot day on glaciers
Showa Temres gloves for cold and wet
Second pair of cold-weather gloves (if forecast is for nastiness)
Softshell pants
Waterproof pants
Socks
Boots (Single layer, with integral gaiter)
Climb gear
Helmet
Sunglasses
Goggles
Headlamp (400 lumen minimum)
Lightweight harness (Edelrid Prisma Guide)
Steel crampons (Mark likes the CAMP Skimo Pure Nanotech crampons, very lightweight)
Ice Axe (50 to 70 cm)
Trekking poles
One mid clip picket
One ice screw (aluminum, 16 or 19 cm)
Petzl Nano Traxion progress capture pulley
Petzl Tibloc
Four lightweight carabiners
Three locking carabiners
Two 120 cm Dyneema slings (or cordelette)
Rope (50 or 60 meters, 8.4 mm dry treated)
Avalanche transceiver
Shovel
Avalanche probe
Pack and camping gear
55 liter pack
2 liter water bag
Steripen water purifier
Lip balm (several tubes)
Sunscreen (small tube or stick)
Satellite communication device
Backcountry navigation app, with GPX file of route loaded onto phone
First aid kit
Sleeping bag (down, 20 degrees)
Compression stuff sack
ThermaRest NeoAir XLite Sleeping Pad
Compact pillow
Two person mountaineering tent
Earplugs
Canister stove (MSR Reactor or Windburner, not Jetboil)
One freeze dried dinner and one breakfast
Spoon
Lunch food, whatever works for you

Try the "T-Step" to stand tall in your aiders
Getting into your second step on your aid ladder on steep terrain can be a strenuous and awkward hassle with the traditional fifi hook. Instead, try the “T-step” method to stand easily in your second step with no fifi.
Note: This method is generally attributed to Ron Olevsky, aka “Piton Ron”, a big wall pioneer who has put up many classic aid routes in Zion National Park. I think Ron’s technique is slightly different than the one shown here, but it's the same general idea.
When leading an aid pitch, it's generally most efficient to stand as high in your aid ladders as you can. (As they say, everything looks better from the next higher step.) But dang, especially on steep rock, it's not quite as easy as it sounds!
If you’re using a traditional fifi hook and trying to stand in your second aider step, on vertical or overhanging rock, you need to maintain a delicate yet strenuous balance of opposing forces.
Your feet are pressing DOWN in your aiders, and your upper body straining UP against the inverted fifi. This often makes your harness creep towards your ankles, not good.
If the fifi sling is even a bit too long, it puts your center of gravity farther out from the wall, which makes you have to maintain a lot more core tension to stand upright, and often the unwelcome sensation that you’re about to topple over backwards.
If you release tension on the fifi for a moment, it could just fall away from the placement that you're pulling against, which really makes things exciting.
Does that sound uncomfortable and not very fun? You’re correct!
When aiding in the traditional manner, this is about what it feels like when you're in the top or second ladder steps . (Drawing credit, from the amazingly talented Mike Clelland.)

image: Mike Clelland, Climbing magazine
Modern tools such as the Alfifi, which is basically a fifi hook welded onto an adjustable tether, can make this process a bit easier, but it still is generally pretty awkward. Overall, standing in your second step in steep terrain is not easy nor intuitive for most people.
Here’s an alternative, simple way to comfortably stand in the second step of your aiders, on vertical rock to overhanging rock, without any sort of a fifi, that eliminates just about all of these problems - the “T-step”.
The effectiveness of this has to do with a few variables such as your height, your shoe size, what kind of aider ladders you’re using, the steepness of the rock, etc. For me, using Yates or Aideer ladders, with a size 10 shoe, and standing about 5’ 9”, I can stand easily in the second step on vertical or slightly past vertical. Your mileage may vary, give it a try and see what it feels like.
Here's how to do it.
1 - Place some gear, clip a single aid ladder to the gear, and stand in the second step with either foot; for this example, your left. Remember to aid climb like you free climb; use your hands in the crack or rock features to step up; don’t just pull on your aiders or gear.
2 - Point the toes of the foot that's not standing in the ladder, here your right, 90° away from the foot that's standing in the ladder. Then, slide your right foot over your left foot. The arch of your right foot should be about over the toes of your left foot, making a shape like the letter “T”. (T-step, get it?) The aid ladder should be between your right calf and left shin. You might have to put your left knee against the wall for a moment and bend your left knee backwards for a moment to make room for your other foot to slide in. Doing this creates a sort of lever that keeps you from toppling over backwards.
3 - Now, you should be able to stand comfortably in your second step, largely being held in place by the muscle of your right calf. You do NOT need a fifi hook, your pelvis is in very close to the rock so you have a good center of gravity and better reach, and you should not feel any strain on your abdominal muscles. Overall, you should be fairly relaxed and comfortable. This is a bit tricky to describe in words, but once you try it you'll intuitively get it. It really feels like a bit of magic the first time you do it!
Doing this, I’m easily able to reach about 5 feet between gear placements.
Stand tall and gain a lot of reach, no tricky three-way balancing and messing with adjustable daisy chains or fifis, and you don't feel like you've done 100 sit ups after you finish leading a pitch. What's not to like?
It might sound odd reading about it, but give it a try. Once you learn how to do this you might get rid of that fifi hook for almost everything.
As with most things in climbing it's a better show than a tell. Watch the video above a few times to see how it works.

Reverse your crampon straps
Ever wonder why the buckle for crampons is on the outside of your ankle, where it requires some spine-twisting contortions to properly thread the buckle, that you can barely see? Yeah, me too. Here's a simple modification you can do on most crampons: by reversing the straps, making it easier and more ergonomic to put ‘em on.
Credit for this tip goes from British Guide Sam Leary, who made the video at the bottom of the page where I first saw this clever trick.
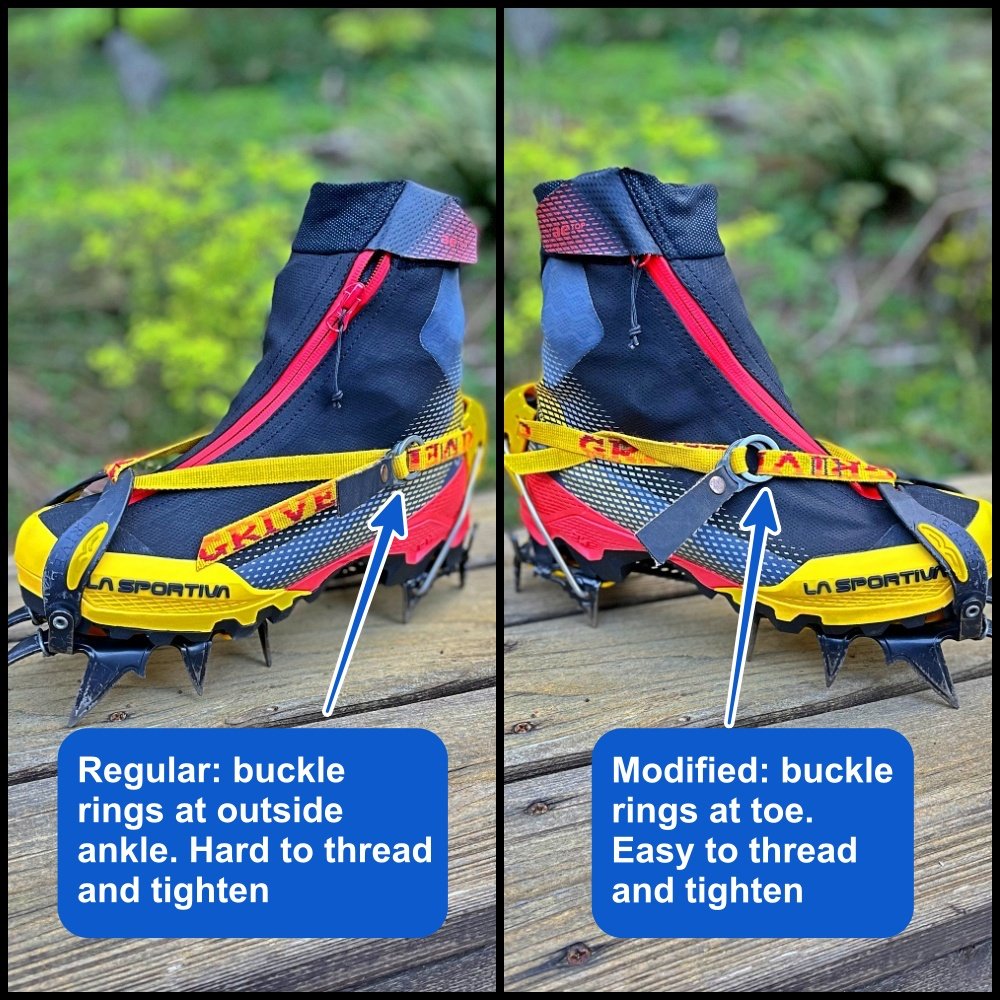
Short version: remove the straps from your crampon heel levers, and reverse the straps. This lets you move the buckle rings to your toe, rather than your outside ankle, which makes threading the strap through the rings and cranking it tight MUCH easier.
It’s time to put on crampons on the side of a dark, steep icy mountain. It’s cold, you have gloves on and lots of puffy layers. You plunk the crampon into the snow, carefully insert your foot, clip down the heel lever, . . . and then attempt the spine torquing, black belt yoga position of twisting to the outside of your boot, trying to thread the strap through the double rings that you can’t really even see . . .
At this moment, you may think, “why the HELL are crampons designed to be put on in this incredibly awkward way?!”
Good news: there’s an easy modification (for most crampons) that makes this process a LOT easier.
Disclaimer #1: The industrial designers at crampon companies (who are of course far smarter than I am) may not approve of this.
Disclaimer #2: This does not work with all styles of crampons. A quick look at yours should tell you whether it works, or not.
Disclaimer #3: If you try this modification and screw it up, your crampon straps might become unusable. Do not try this on the mountain, and you probably shouldn’t try the night before a climb either. You’ll need a few simple tools like scissors (and probably) needle nose pliers. Read this article, watch the video at the end, and be fully aware of how this works before you ever try it for yourself.
Crampons with a heel lever are typically set up with the strap threaded counterclockwise on your left crampon, and clockwise on your right crampon. With this set up, the buckle is on your outside ankle, and you pull the strap forward, or toward your toe, to tighten.
We’re going to reverse this. Instead:
Thread the strap CLOCKWISE on your left crampon, and
COUNTERCLOCKWISE on your right crampon.
This lets you put the buckle up near your toe, where you can see what you’re doing with no contortions and double back the strap with ease. You also tighten the strap by pulling toward your body, which is more ergonomic.
Doing this also puts the buckle on the outside of your foot, which is where it should be, so you don’t accidentally loosen it by clipping the inside of your ankles together.
You could move the buckle to the front without removing it from the heel lever. But if you do this, the buckle will be tensioned on the inside of your foot. This is no bueno, because you’re much more likely to kick it unintentionally with your other foot and release the tension on your strap.
I’m showing it here with my Grivel G12 crampons, so I can’t speak to other brands. According to the video below, it works the same with Petzl and some models of Black Diamond. (It does not work with my Black Diamond Contact universal crampons, because the strap is sewn in to one of the holes on the rear cup and can’t be unthreaded to do this.)
Notes:
For my Grivel G12s, I found that cutting the crampon strap with scissors to make sort of a “V” point, rather than a 45° angle, made it quite a bit easier to thread through the heel lever.
After you make this cut, melt the ends of a strap in a flame and when melted, give it a quick squeeze with pliers to make sort of a hard tip.

When you’re completely done with this project and the straps look good, you MIGHT, repeat might, want to cut off some of the excess extra strap, assuming you’re not going to use these crampons with any larger boots (like ski boots) or loan them to anyone with size 15 feet.
You will probably need needle nose pliers to pull the crampon strap through the heel lever. Take it slow, be patient. A small flat blade screwdriver can help push the strap through too.
Before you thread the strap through the heel lever, lay it all out and figure how the strap is going to lay on your boot, ideally with no twists. With the Grivel‘s, the black leather tab needs to end up lying flat against your boot, on top of the other ring. The way it ended up working for me, the strap is not showing the Grivel logo on the inside of the boot, and it is showing the logo on the outside of the boot. This way means no twists when you’re done. If you do and up with a half twist, it’s certainly still going to work fine, it’s just not as aesthetic as it could be. So, take some time before you thread that heel lever and see that everything is lined up correctly with no twists. “Measure twice, cut once”, as they say.
Do one boot at a time. If you mess it up on the first one, you have your original strap on the other crampon as a reference.
Here's what mine looked like when I was done. The buckle is threaded through the toe piece, and is easily tightened to the outside of the boot by pulling back toward you.

The video below shows this process in detail. Watch it before you try it! Thanks to AMI (Association of Mountaineering Instructors) Guide Sam Leary and LeadingEdge Mountain to show you how it works. She has lots of other solid Youtube instructional videos, give her a subscribe.