

Alpine Tips

What's in my pack: Gear obsession by Colin Haley, part 2
Expert American alpinist Colin Haley is known for a few things: an expertise for routes in Patagonia, and a tremendous obsession with climbing gear. Check out this great video interview where he offers a free ranging commentary on equipment he’s designed, customized, and uses regularly.

Premium Members can read the entire article here:
I have another “What's in my pack” article featuring Colin, about his clothing systems. You can check that out here.

Check out this great interview with American alpinist Colin Haley, as he takes a deep dive into his obsession with climbing gear.
The link to the YouTube video is below.
Here are a few quotes and highlights I thought were especially interesting.
I added a time stamp for the video so you can find that part fast.
“I personally tweak out about climbing gear to a very small level of detail." =^)
“There are trade-offs to everything. Every gear choice is maximizing some quality at the expense of some other quality.”
What piece of alpine climbing clothing did Colin have a big role in designing for Patagonia? (M10 pant, 18:00)
Colin often wears a hard shell pant and a soft shell jacket on his climbs, which is the exact opposite of most people. Why is that? (Because it's more common for your butt to be in the snow than your torso. 19:50)
What’s the small Slovenian company that makes some of Colin's favorite functional and low-cost pitons? (climbready.eu, 20:15)
What's Colin's favorite old-school bit of tech for listening to “mountain motivator” music on a route? (Ipod Shuffle, 23:50)
Why is a top quality headlamp such a crucial piece of gear? (Colin calls is the “1 essential,” because it lets you keep pushing on when it gets dark, to maybe find a much better place to bivy. If you don't have a good headlamp, you’re stuck as soon as it gets dark. 51:30)
The complete article has answers and time stamps to these questions:
What are the pros and cons of internal tent sleeves versus external?
What are some considerations for choosing the correct crampons?
What’s a simple way you can keep your tent from blowing away when you're out climbing?
What's the one type of climbing gear that Colin thinks has the most potential for improvement?
What’s a clever modification Colin did to his helmet to make it more suitable for cold weather climbing?
What modification did Colin make to his crampons that he really likes?
What's Colin's favorite water bottle?
Which climb did Colin learn the most from?
Get the answers to all these, and the time stamps to the video for each one . . . and the link to the video itself at the Premium Member article.
Join my Premium Membership to read the complete article.
Thanks for your support.


How strong is it? ANCHORS (Part 1)
So how strong is the girth hitch master point? How about if one strand gets cut? Can you girth hitch a sling to a carabiner (and survive?) Here's an overview of various flavors of anchor rigging, and links to actual break testing.
Premium Members can read the entire article here:

This section of my website is where I satisfy some of my curiosities (and hopefully some of yours) about the actual breaking strength of anchors, gear, and knots.
If you're new to this part of my website , I suggest you start at the overview page, and then bounce back here.
What's on this page?
What are the forces on the anchor when rappelling?
How strong is an overhand knot anchor in a nylon sling?
How strong is an overhand knot anchor in a Dyneema sling?
How strong is a girth hitch master point anchor with Dyneema?
How strong is a girth hitch master point anchor with Dyneema, if one strand gets cut?
How strong is a girth hitching a Dyneema sling to a carabiner?
How strong is a girth hitching a Dyneema sling to a bolt hanger?
1 - What are the forces on the anchor when rappelling?
If you bounce around on the rappel rope like a special forces cowboy, you can generate between 2 and 3 kN as a temporary peak load.
When you rappel smoothly, the load to the anchor is pretty much your body weight.
Source / testing: Youtube: What can go wrong when connecting two ropes? [dubbed]
Something we've all wondered when leaning back on a rappel anchor that’s Less Than Ideal . . . How strong does this thing really need to be? The gear experts at Edelrid did some testing, here's the answer.
Takeaway: rappel smoothly without bouncing to minimize force on the anchor.

2 - How strong is an overhand knot anchor in a nylon sling?
About 26 kN.
Source / testing: YouTube, You aren't supposed to tie a knot in this, Start around 15:50
One of the most common ways to make an anchor. Simple, easy to check, fast, redundant, and probably hard to untie.

3 - How strong is an overhand knot anchor in a Dyneema sling?
About 21 kN.
Source / testing: YouTube, You aren't supposed to tie a knot in this, Start around 11:00
While many people prefer to avoid tying knots in Dyneema, many folks think it's no problem. Again, this is a common and simple way to make an anchor.
Dyneema is less strong than nylon, but it's still #SuperGoodEnough for climbing. (Just don't expect to ever untie it . . .)
Takeaway:
If you double a sling like with the basket hitch, you get double the strength.
When you tie a knot in the doubled sling, you reduce the doubled strength by about half. So in the end, that leaves you with something close to the MBS for the original material.
We see this in both the nylon and Dyneema sling in the last two examples.

4 - How strong is a girth hitch master point anchor with Dyneema?
About 27 kN.
Source / testing: YouTube, Are climbing master points made with a girth hitch or clove hitch REDUNDANT??? Start around 7:00
The girth hitch master point is a modern standard for many climbers. Good to know it's super strong! And yes, it's redundant if one strand gets cut. Read my whole article on it here.

How strong is a girth hitch master point anchor with a cut strand?
How strong is a girth hitching a sling to a carabiner?
What about girth hitching a sling to a bolt hanger?!
Join my Premium Membership to read the rest of the article.
Thanks for your support!

How strong is it? OVERVIEW
We've all wondered - how strong is it? The Alpinesavvy web gnomes scoured the web to find some break testing for common (and not so common) gear, knots and rigging. Start here for an overview, and then head over to the more detailed articles.

Most climbing gear is tested and rated by Official Entities such as the CE and the UIAA. This is great! It gives us confidence that gear from brand-name manufacturers is made to the highest standards.
But not everything climbers use is covered by these ratings.
What about anchor rigging and knots?
What about rated gear that's old, a bit worn, a bit abused, but still hopefully serviceable?
What about gear that may be appropriate for climbing, but may not be officially rated by these agencies?
These are important questions.
My friend Ryan Jenks from HowNOT2.com has made an entire YouTube channel and brand based on breaking and testing climbing gear. (Give his YouTube a follow if you’re not already.)
The thing is, he's almost too successful. He's done so much testing that sometimes it's difficult to find the exact topic you’re interested in.
(To be fair, YouTube does a pretty good job of indexing his articles. If you go there and search for the term you want, you might find a video that covers it.)
So, I took some select tests (mostly from Ryan) and made a series of articles covering anchors, gear, and knots.
It's nowhere close to an exhaustive summary of all possible gear and rigging. It's more of a collection of Ryan's test results about which I was personally curious.
To keep things manageable, I have about 7 results on each article. As my curiosity continues (or I get submissions from Alpinesavvy fans like you) to add to this page, I will add part 2, part 3, etc…
I have links to sources and test results where appropriate.
If you have a new break test question / idea (and hopefully have a source for test results), please let me know about it and I might include it.
If you join Alpinesavvy as a Premium Member, you’re entered into monthly gear giveaways and regular discounts from Ryan’s store, hint hint.
Disclaimer: Yes, some of these test results are limited by the number of tests, to a specific manufacturer, they might be a static pull and maybe not drop tower, or vice versa, your mileage may vary, and blah-blah-blah. It's designed to give you a data point, not to apply universally to every situation. And as Ryan likes to say, this is entertainment, not science.
Basic premise #1 - What’s a kilonewton (kN?)
Let's start with the basics. A kilonewton is a metric unit of force, equal to the weight of about 100 kg or 225 pounds.
The way I like to think of it: one kN is the average weight of one NFL football player, more or less.
So, imagine this: A skinny 8 mm dynamic sling that's rated to 22 kN can hold about 22 football players all hanging off of it at the same time!
Yes, that is kind of crazy to think about! Yes, most all of the gear we use is impressively strong!

Fun facts . . .
the “N” is capitalized in “kN” because it refers to the last name of Sir Isaac Newton.
There are only three countries in the world that don’t use the metric system. Myanmar, Liberia, and ‘Merica. Metric measurements are the international standard of pretty much everything, especially climbing, and that's what this ‘Merican is using.
Basic premise #2 - What's the maximum force possible in recreational climbing?
About 9 kN.
Source: Engineer and climbing book author Craig Connally, from his book, The Mountaineering Handbook.
This is a somewhat challenging question to answer, but arguably the most important when it comes to talking about the strength of our gear and systems.
If the maximum possible force that you can ever create outside is around 9 kN, to me it seems kind of silly to argue about things like, “you shouldn’t girth hitch a Dyneema sling to a carabiner, it makes it weak!”, when it turns out it actually holds about 18 kN. (Which is stronger than your rope . . . )
A few things to keep in mind . . .
This maximum force can only happen in the very rare case of a factor 2 fall onto the anchor, which 99% of climbers will never experience.
There are various ways to avoid a factor 2 fall. Probably the best one is to place solid gear as soon after the anchor as possible on a multipitch climb.
This number will probably always remain somewhat theoretical, because you can't test factor 2 falls with a real humans, because they’ll get injured.
Testing in a drop tower with a concrete weight creates forces much higher than can happen in the real world . That's largely because of the squishy human body. Learn more about that here.
Here are some realistic scenarios involving real people, tested by Petzl and HowNOT2. Spoiler: Factor one fall, maximum force about 6 kN on the top piece of gear. Here's my article on that.

Climbing Tips: Do This, Not That (Part 5)
Five more quick tips on best practices. This post covers: 1) When to untie your rappel stopper knot, 2) the proper direction for a Grigri when belaying from the anchor, 3) how not to carry your satcom device, 4) how to shorten a sewn loop daisy chain, and 5) why to keep your anchor low on a tree.

Premium Members can read the entire article here:
In this article:
First rappeller to the ground - untie the stopper knots
Grigri direct belay from anchor - handle away from the rock
Carry your satcom device securely stowed away, not on your pack strap
Shorten your sewn pocket daisy chain the correct way
Tree anchors - Keep the slings low
1 - First rappeller to the ground - untie the stopper knots
Once you’re on the ground, there’s no reason to have a stopper knots in the rope.
So here's a task for the first person down: untie them!
This completely eliminates the very common problem of the final person reaching the ground, with some relief and maybe distraction, somebody starts pulling the rope, and . . . you see the knot rising above you, maybe out of reach, and you instantly have a Big Problem.
(Ask me how I know about this, I've done it a couple of times!)
If the first person down removes the knots, this will never happen.

2 -Grigri direct belay from anchor - handle away from the rock
When belaying up your partner directly off the anchor with a Grigri, try to rig it so the Grigri handle is away from the rock.
If the Grigri handle is against the rock, it might prevent the cam from properly engaging. It also might be harder to grab the handle if you need to lower your partner.
(Most of the time your Grigri will probably be free-hanging in space and not rubbing against the rock, but this is still something to watch for.)
You may need to add an extra short sling or locking carabiner to do this, depending on the anchor configuration.

Here's an attention-grabbing caution from the Petzl website.

image: petzl.com
3 - Carry your satcom device securely stowed away, not on your pack strap
If you carry a satellite communication device, put it securely in your backpack or maybe a well zippered pocket.
Don't carry it jangling around on your packstrap.
You wouldn't carry your phone bouncing around on your backpack strap attached with only a carabiner. Why would you do it with your satcom device?
Security is more important than accessibility.
I have a detailed article that talks about the pros and cons of different ways to carry your satcom, device; check the link above.

Wanna learn the correct way to shorten your daisy chain?
What are the pros and cons of having an anchor down low near the ground when you're using a tree?
Join my Premium Membership to read the rest of the article.
Thanks for your support!

The “fish eye” anchor
A double loop bowline on a bight is a good starting point for various types of anchors. Here's one application, the “fisheye”. Make a three-piece anchor with a 120 cm sling? Yep! Learn all about it here.
Premium Members can read the entire article here:
This article was written with advice and peer review from IFMGA Guide Joshua Jarrin. Connect with Joshua on Instagram, @Joshua Jarrin
Check out this photo.
It's from a 2022 training manual published by ENSA (École Nationale de Ski et d'Alpinisme) or French National Mountain Guide School.
IFMGA Guide Joshua Jarrin Joshua sent it to me.
I already knew about the rigging on the left, a bowline on a bight for a two piece vertical anchor.
But what about that diagram on the right, for three placements? That got my wheels turning, and I started experimenting . . .

Image: ENSA
A double loop bowline on a bight (aka “BoB”) tied in a 120 cm sling can be a great starting point to build a solid anchor.

That nice round bowline loop? Looks something like a fisheye, I suppose, hence the name as explained by Joshua.

image: By Lowe - Naturalis Biodiversity Center, Public Domain, https://commons.wikimedia.org/w/index.php?curid=41730469
It's especially useful when you have vertically offset anchors. Clip the fisheye loop to the bottom anchor, and clove hitch the sling to the top anchor. Typically, this is used with two offset bolts or maybe two ice screws.
This is known as a series anchor. All of the load goes onto the bottom placement, and the top placement is for a backup. Equalization, no, redundancy, yes.
Here's a series anchor on two vertical bolts.

What’s cool about the fisheye anchor?
Tie the double loop bowline on the ground. Keep it place and use it all day.
Uses a standard piece of gear (120 or 60 cm sling) that most everybody carries, as opposed to a 180 /240 cm sling or cordelette.
If using bolts that are close together, you can probably use a 60 cm sling.
Efficient use of materials. You can make a solid 3 piece anchor with a 120 cm sling, which normally is kind of tricky.
Unlike a pre-tied quad, this has zero welded knots to untie either on your climb or at the end of the day. Bowlines are easy to untie, even after a bog load.
Unlike a pre-tied quad, this adjusts easily just for anchors that are vertically offset (like the photo above.)
How about a fisheye with three anchor points instead of two?

Let's break this down, step by step.
Step 1: Get out your pre-tied fisheye loop in a 120 cm sling. Place three pieces of gear, ideally fairly close together.

Step 2: Clip the fisheye loop to the bottom piece of gear, which is hopefully the strongest.

Step 3: Girth (or clove) hitch one strand of the sling to the middle and top pieces of protection. Adjust the hitches as needed to minimize slack between placements.
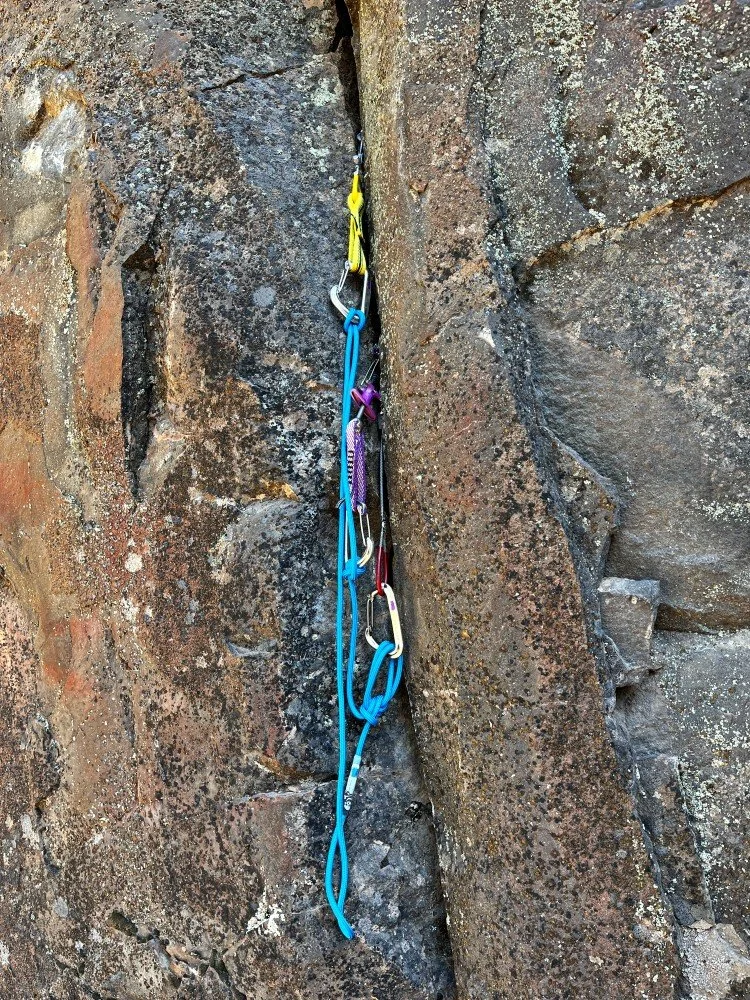
Step 4: Clip master point carabiner into the fisheye loop.
Optional bonus: the extra slack in your sling makes a clip in point for hanging a backpack, rope coils, etc. Tie an overhand in the extra as shown in the photo, if you want to keep everything redundant.

How does the fisheye anchor work in two horizontal placements?
What are some handy things you can do with the extra bit of sling?
What are the pros and cons of a girth hitch versus clove hitch?
How does this compare to the girth hitch master point?
How about a video on how to actually tie it?
Join my Premium Membership to learn these extra tips in the rest of the article.
Thanks for your support.

Using the “T method” to calculate mechanical advantage
It's easy to get crosseyed looking at a pulley system and trying to figure out the mechanical advantage. Fortunately, there's an easy way to calculate it, requiring the math skills of a third grader. (Yes, you can do this.) Let’s learn the “T method.”
Premium Members can read the entire article here:
For climbers, mechanical advantage (MA) systems are used in self rescue, and in big wall climbing to lift heavy haul bags. They're also helpful for getting your truck out of the ditch, pullings stumps in your garden, hoisting sails on a boat, building pyramids, and other useful life applications.
Even if you have a basic understanding of how they work, some of the more esoteric ones make most folks (like me) get cross-eyed counting all the strands and trying to figure out the MA!
Fortunately, there is a pretty straightforward way to figure out the theoretical MA of any system, using math that you learned in the third grade: The T method.
The method assigns a T (Tension) value to each rope segment. You add up the tensions at various points in the system to determine the overall mechanical advantage.
It's particularly useful for more complicated systems beyond a basic 2:1 and 3:1.
Here’s how the T method works.
Start with “1”. Begin with a value of 1 “tension” at the point where you pull on the rope. Think of tension as how much force you (and maybe your pals) are pulling on the haul strand.
Follow the tension. Trace the tension through each pulley and other components of the system.
Adding the tensions:
At each pulley (aka change of direction), the tension on the rope entering and exiting the pulley is EQUAL.
At the pulley “eye” (aka, the thing the pulley is clipped to) the tension is the SUM of the tension on the rope entering and exiting the pulley. For example, if 1 tension enters the pulley, then 2 tensions are applied to whatever the pulley is clipped to. If 2 tensions enter the pulley, then 4 tensions get applied to the pulley clipping point.
When tensions join (e.g., at a prusik hitch), you ADD the values.
Mechanical advantage:
The final tension value at the load is the mechanical advantage of the system.
Does this sound a bit dry and complicated? That's how I felt when I first heard of it.
But, after you try it a few times, it's quite simple. If you're even slightly a mechanical advantage nerd like I am, it's actually kind of fun!
Let's look at some examples of a 2:1, 3:1, and a 6:1.
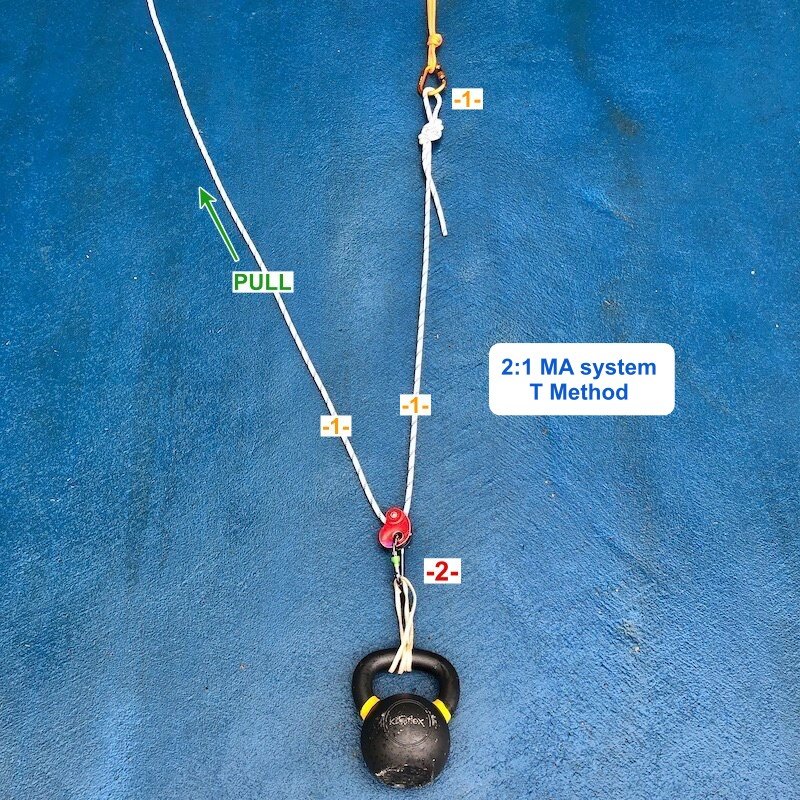
Let's start with the easiest system, a 2:1 (aka the “C pull”)
To move the load 1 meter, you need to pull 2 meters of rope through the system.
In a theoretical frictionless world, you could lift a 100 kg load by pulling with about 50 kg of force.
(Note: in this example, the progress capture pulley is attached to the load, not the anchor.)
Begin with an input of 1, you pulling on the rope.
That input force of 1 is doubled to 2 when it changes direction at the red progress capture pulley. That gets applied to the load.
The input force of 1 comes out the other side of the red pulley, remaining at 1, and then goes onto the anchor.
Summary of a 2:1 MA system:
2 units of tension go to the load.
When you’re pulling, 1 unit of tension goes to the anchor.
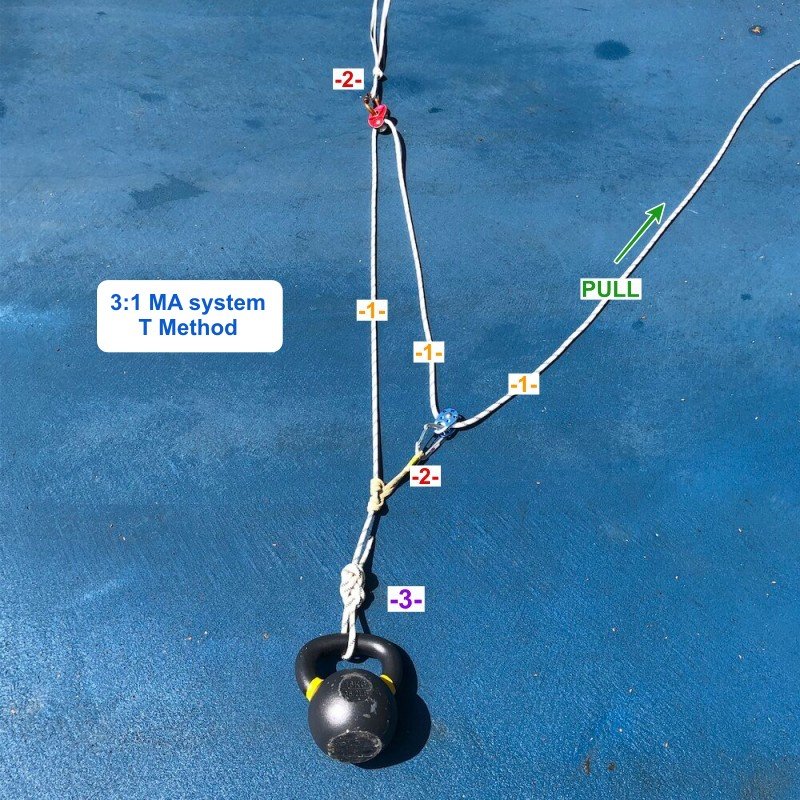
Got that? Good, let’s look at a 3:1 system (aka the “Z pull”)
To move the load 1 meter, you need to pull 3 meters of rope through the system.
In a theoretical frictionless world, you could lift a 100 kg load by pulling with about 33 kg of force.
Begin with an input of 1, you pulling on the rope.
That input force of 1 is doubled to 2 when it changes direction at the blue pulley. That gets applied to the prusik that the pulley is clipped to.
The input force of 1 comes out the other side of the blue pulley remaining at 1. That travels to the red progress capture pulley on the anchor, where it's doubled to 2.
The input force of 1 continues at the left side of the red pulley down toward the load. Here it says “hello!” to the yellow prusik, which has a force of 2.
We add these together to get 3, the force applied to the load.
Summary of a 3:1:
3 units of tension go to the load.
When you’re pulling, 2 units of tension go to the anchor.
OK, you got all that? Sweet! Let's step it up to a 6:1.
In this example, we’ll start with a 3:1 Z drag, and then make a 2:1 C pull (with a separate cord) on top of it. This rigging is also known as a “C on a Z”.
To move the load 1 meter, you need to pull 6 meters of rope through the system.
In a theoretical frictionless world, you could lift a 100 kg load by pulling with about 17 kg of force.
How want to learn how to apply the T method to figure out a 6:1?
What's the difference between theoretical and real world MA?
How can real world MA improve by using pulleys in different places?
How about a link to a great YouTube video that describes the T method in even more detail than this?
Join my Premium Membership to read the rest of the article.
Thanks for your support.

Rappelling into the unknown
At some point, all climbers will have to rappel down an unknown route. Here are some solid tips to hopefully get you down in one piece, without creating too many (epic) stories to tell later.
Premium Members can read the entire article here:
Some tips in this article came from collaboration with Adam Fleming. Adam is an AMGA Certified Rock Guide based in Utah. Connect with Adam: @adam.fleming.climbs, and his website.
I also posted this question on Mountain Project and got some helpful answers from a variety of people. I’m not going to credit all of them directly, but if you're reading this and see your words below, thank you!
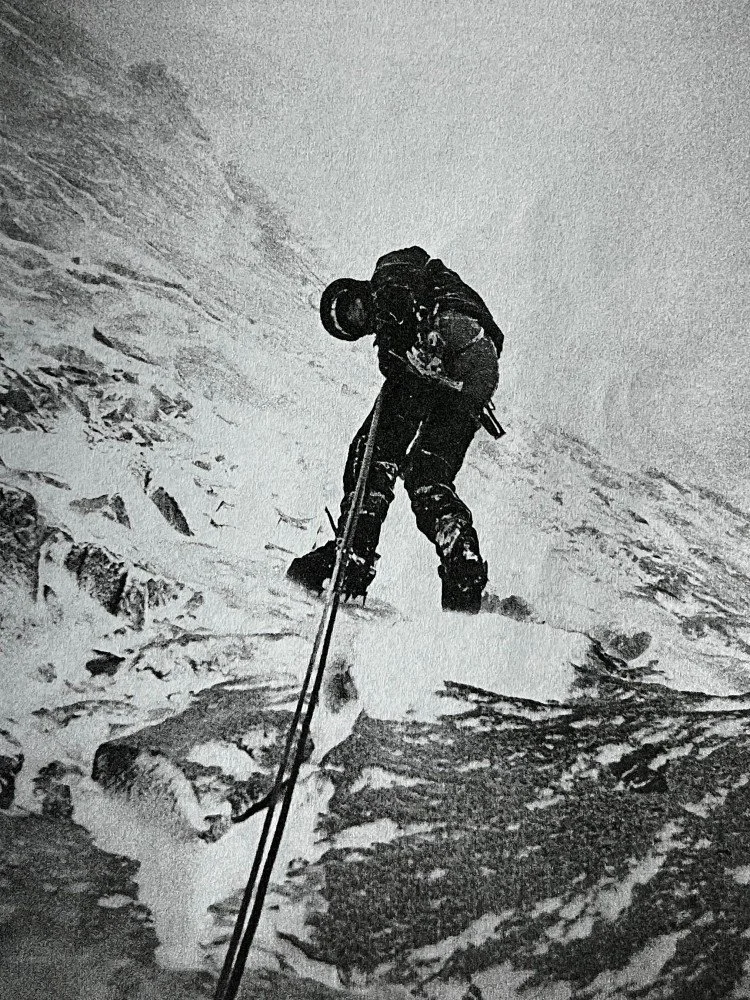
photo: Andy Kirkpatrick, from his excellent book “Down”, used with permission
All alpine climbers have to deal with rappelling down an unknown or unfamiliar route.
Maybe it's an established rappel route, but you don't know where the anchors are.
Perhaps you’re heading down a “non-standard” rappel route, and you know you're gonna have to deal with anchor building as you go down. (Also known as, potential epic in progress . . . =^)
Before we get into it, I'm gonna give a shout for Andy Kirkpatrick’s outstanding book on everything to do with getting down mountains.
Appropriately called “Down”, I consider this mandatory reading for any climber. (You can tell by the beat-up cover and the many bookmarks that I've read this many times!) Support your local independent bookstore.

Keep track of the big picture.
Whatever it is, it's easy to get drawn into the micro details of route finding and lose track of the bigger issues. As you descend, keep asking yourself these questions to keep track of the overall picture:
How far have we descended?
How far off the ground are we?
How long until dark?
How much gear do we have left?
First, let's have a look at the “established rappel route, but you don't know where the anchors are" situation.
Check the route topo, or any other source you might have access to, for descent beta. Are you looking for bolted stations or natural anchors? How long a rope do you need? Can you do it with one rope or do you need two? How many total rappels are there? Is it an older route that might have been bolted with a 50 meter rope that was standard at the time, or a newer route that might use something longer? Having an overview like this in your mind before you start down can help a bunch.
Rappel slowly, and expand your awareness to look down, left, and right. Try to think like the first person down the route making the anchors. Where would you put them? What's a logical spot, like ledges? Focus on those.
In soft rock, sometimes rope marks, or grooves toward one side, might tell you where the next anchors are.
If you come across a gear anchor that has a pre-equalized sling pointing to one side or another, that probably tells you which way you should be heading for the next anchor.
All existing anchors are guilty until proven innocent, especially if the route doesn’t get much traffic. Check everything you come across thoroughly. Be prepared to cut out old crap webbing and add your own good stuff.
Second, let's look at the more complicated situation: heading down a “non-standard” rappel route.
Examine the terrain (and the beta) before you commit
Practice making retreat anchors
First person down takes the rack
Use “block rappelling”
Consider lowering the first person
Be prepared to ascend the rope
Consider rigging with a Munter Mule Overhand (MMO)
Be ready to “extend” your rappel rope if needed
Dealing with loose rock
Look for natural anchors
Can you downclimb?
Can you traverse to another better rappel route?
Consider the “shiver bivy”
Leave the rope
Examine the terrain (and the beta) before you commit
If you commit to going down a gully, or side of a ridge line, you may be very attached to that choice. So think carefully before you do it!
Personal story: Coming off the summit of Mt. Thomson in North Cascades of Washington, my buddy and I saw a perfect rappel anchor on a stout tree that headed off down a gully. We rigged it, rapped it, pulled the rope . . . and realized a minute or so later that we were definitely off the standard route. A very sketchy traverse got us back to safe ground, but it was NOT fun!
We followed someone else's error instead of reading the topo / route description, which would've (correctly) told us to continue on the ridge another 50 meters or so to a short and easy rap.
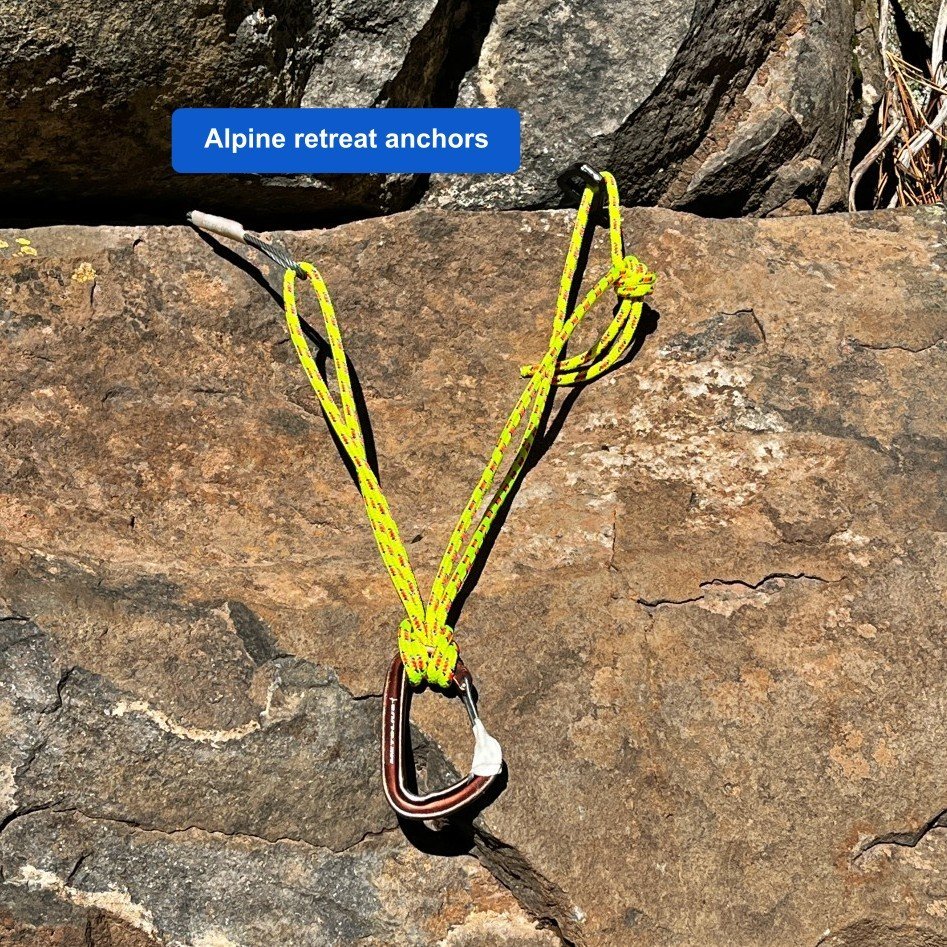
Practice making retreat anchors
There are a few special techniques you can pull out of your #CraftyRopeTrick toolbox when you need to build rappel anchors.
I cover lots of them in my articles on alpine retreat anchors, Part 1 and Part 2.
Bring 6-ish meters of 6 mm cord in the bottom of your pack, and/or be ready to cut up your cordelette.
Bring a knife.
Wrap a bit of athletic tape around the spine of a few of your least favorite carabiners, to leave behind as your masterpoint as a “cheapskate locker.”
Here's one method to equalize two placements for a retreat anchor: Stopper and a piton, about 2 meters of 6 mm cord, flat overhand bend to connect the ends, girth hitch master point, cheapskate locker: good to go!
Practice alternative anchor techniques like this on the ground before you ever have to use them for real.
First person down takes the rack
The first person down might well have to make their own anchor, so it makes sense that they should have the rock gear with them, and most of the extra cord / webbing, and a knife.
If you're doing this in the dark (extra bonus points!) give the best headlamp to the first person down.
Use “block rappelling”
Block leading when going up means the same person leads several pitches in a row, rather than alternating leads every pitch. This can also be a good practice when rappelling multiple pitches. Typically this will be the most experienced person, but not always. This allows one person to have all the gear that they need and not be handing it back-and-forth, and to get into the mindset of focus, efficiency, and minimizing risk.
Consider lowering the first person
The first person down might need to pendulum back-and-forth to reach an appropriate anchor, build a new anchor, or climb back up the rope if they go too far. For all of these situations that require use of your hands, it’s probably less risky for them to be on a proper belay from the top.
This can also be helpful if you’re heading down with lots of loose rock around you, because anything you kick down can't fall and potentially damage the rope that's below you.
Here’s a much more detailed article I have about lowering your partner.
There are a couple of ways to lower your partner.
The simplest: lower them on one strand. Of course, this requires solid communication so they don't get lowered too far. Might be a good place for some radios, or at the very least good visual line of sight.
Another option is slightly more complicated but gives sort of the best of both worlds. You can tie off the middle of the rope at the anchor to isolate each strand, have the climber rappel single strand while being belayed on the other strand. This gives the rappeller full control over where they stop, with the security being on belay from above so they can go hands-free to swing around, build an anchor, climb up the rope, etc.
A bonus for this method is that the second strand of the rope is carried down by the first person, with no chance forward to get tangled, blown around, etc.
Be prepared to ascend the rope
If you need to go back up the rope for any reason, it's good to rig in advance to make this as easy as possible. As mentioned above, if you’re rapping a single strand with a Grigri, ascending a rope becomes quite a bit easier.
There are several ways to do this, I cover them in this article.
If you’re rappelling double strand on an extended rappel device, here's a simple technique that allows you to ascend the rope, covered in this article.
Carry a friction hitch or two (especially one that slides easily like a Sterling Hollowblock) and be ready to use it.
Consider rigging with a Munter Mule Overhand (MMO)
In some cases, such as if you think you might need to rappel more than half the length of your rope, rigging with an MMO on the top anchor can be a great idea.
Doing this allows, the first person down to rap single strand, with the rope locked off at the top by the MMO.
If the first person down finds an anchor before they get to the end of the rope, great.
If they don't, their partner up top can release the MMO and lower them down on a the Munter hitch a bit more until they hopefully find an anchor spot.
If the first person went too far, and they can climb up a bit, the Munter allows them to be easily belayed up.
If you anticipate doing this, the first person down should be tied into the end of the rope rather than relying on a stopper knot.
So now what happens to the person up top? That's the next tip!
Want to learn more tips about descending an unknown route, such as:
“Extending” your rappel rope
Dealing with loose rock
Look for natural anchors
Can you downclimb?
Can you traverse to another route?
Consider the “shiver bivy”
Leave the rope
Join my Premium Membership to read the rest of the article.
Thanks for your support!

Climbing Tips: Do This, Not That (Part 4)
Five more quick tips on best practices, with links to my detailed articles. This post covers: 1) rappel anchor backups, 2) route hardware bolting tips (stainless steel!), 3) using “rack pack” carabiners, 4) a crafty Klemheist hitch variation, and 5) how to rack an adjustable tether so it won’t trip you up.
Premium Members can read the entire article here:
In this article:
Backup that single strand rappel anchor
Use modern hardware when maintaining or establishing a route
Use color coded “rack pack” carabiners for your cams
Klemheist ver 2.0: stitching IN the knot
Rack your Connect Adjust with a slipknot
1 - Backup that single strand rappel anchor
At some point in your climbing adventures, you’ll probably come across a rappel anchor like what's in the photo below on the right.
Do you want to rely ONLY on a single strand of skinny cord in any part of your climbing system? I didn't think so. So don't settle for that in a rappel anchor.
If you find an anchor like this, you can back it up by simply tying another piece through the existing ring / quicklink.
This is one more good reason to carry some spare 6 mm cord. It's useful for all kinds of things. For a stout tree like this, you need about 2 meters of cord for each strand.
(For the redundancy police, who may be concerned about that single point, non redundant rappel ring, don't worry about it. It's rated to 30+ kN and it’s never gonna break.)

2 - Use modern hardware when maintaining or establishing a route
I volunteer for the High Desert Climber’s Alliance, my Local Climbing Organization (LCO) in central Oregon, and assist with their bolt replacement projects at Smith Rock State Park.
The photo below shows some side-by-side hardware from a recent project: we pulled the old crusty expansion bolt and hanger on the right, and replaced it one of these beautiful stainless steel glue ins on the left.
Use stainless steel in just about every outdoor environment. (The exception might be titanium in a coastal area.) Stainless steel corrodes much more slowly. This applies to the “internal” hardware that’s in the rock, as well as the “external” hardware, like hangers, quicklinks, rings, and chains.
The old argument of “galvanized (non-stainless) is cheaper and/or easier to buy” doesn’t apply anymore. Online stores such as HowNOT2 offer a huge variety of top quality bolting supplies, and they buy in such quantity that the stainless steel hardware is about the same price as galvanized. (HowNOT2 basically sells it at their wholesale cost.)
HowNOT2 also has a great selection and prices on the best epoxies for glue in bolts, which are insanely strong and will usually last much longer than expansion bolts. In many cases, glue ins are preferable.
Finally, if you want a deep dive into anything to do with installing bolts, check out the latest edition of the Bolting Bible, also by HowNOT2. It's the most comprehensive resource available on the topic, and it's completely free.

3 - Use color coded “rack pack” carabiners for your cams
For decades, I racked my cams on whatever small wire gate carabiners I could scrounge up. There's certainly nothing wrong with this, and it works fine.
However, now that most cam manufacturers (generally) make similar colors in similar sizes, it satisfies some strange OCD compulsion of mine to match the racking carabiners with the color of the sling.
My gear rack feels more grown up! =^)
This also has a more practical application: you can glance down and more quickly grab the correct size off of your harness.
The cost is pretty much the same, so why not get the color-matched carabiners?

How can you tie a Klemheist hitch to easily ascend a rope?
How about a trick to easily shorten your Connect Adjust?
Join my Premium Membership to read the rest of the article.
Thanks for your support!

Stirrups for rope ascending
Aid climbing requires lots of fixed rope ascending. The traditional way to do this is using your ”lead” ladders. However, an adjustable, comfortable and lightweight stirrup is a superior tool.
Premium Members can read the entire article here:
Back in the day, I saw a superb slideshow by big wall legend Hans Florine, holder of multiple speed records on El Capitan, about his vertical adventures. One was a video clip of him jumaring up a fixed rope at a ridiculous speed. It looked like he was jogging up a flight of stairs!
What was he standing in? Nothing more than a DIY stirrup of 1 inch webbing, with an overhand knot tied in each end. Clip one end to your ascender, make a sort of girth hitch out of the other end and cinch it down on your foot. Cheap, simple, efficient!
I may cover that DIY hack in a future article, but today, let’s look at a more refined tool that’s a lot more comfortable and adjustable - stirrups.
The ones I like: these sweet custom stirrups from Skot's Wall Gear.
Skot Richards is a big wall expert and one-man operation who sews everything himself from his shop in California. I like supporting his small business, innovative gear, and commitment to “Made in USA”, and I hope you do too.
(Skot was kind enough to send me these stirrups for review. In the rare cases I’m offered gear for a review like this, I’ll always tell you about it upfront. I only tell you about gear that I think is great, and never because I might get it for free.)

Almost ready to jug this rope.
(Not shown for clarity: two tethers connecting my harness and each ascender, see photo below. Those are important!)

Big wall ascending overview . . .
In big wall climbing, the rope is typically fixed by the leader and then ascended by the second, who cleans the gear.
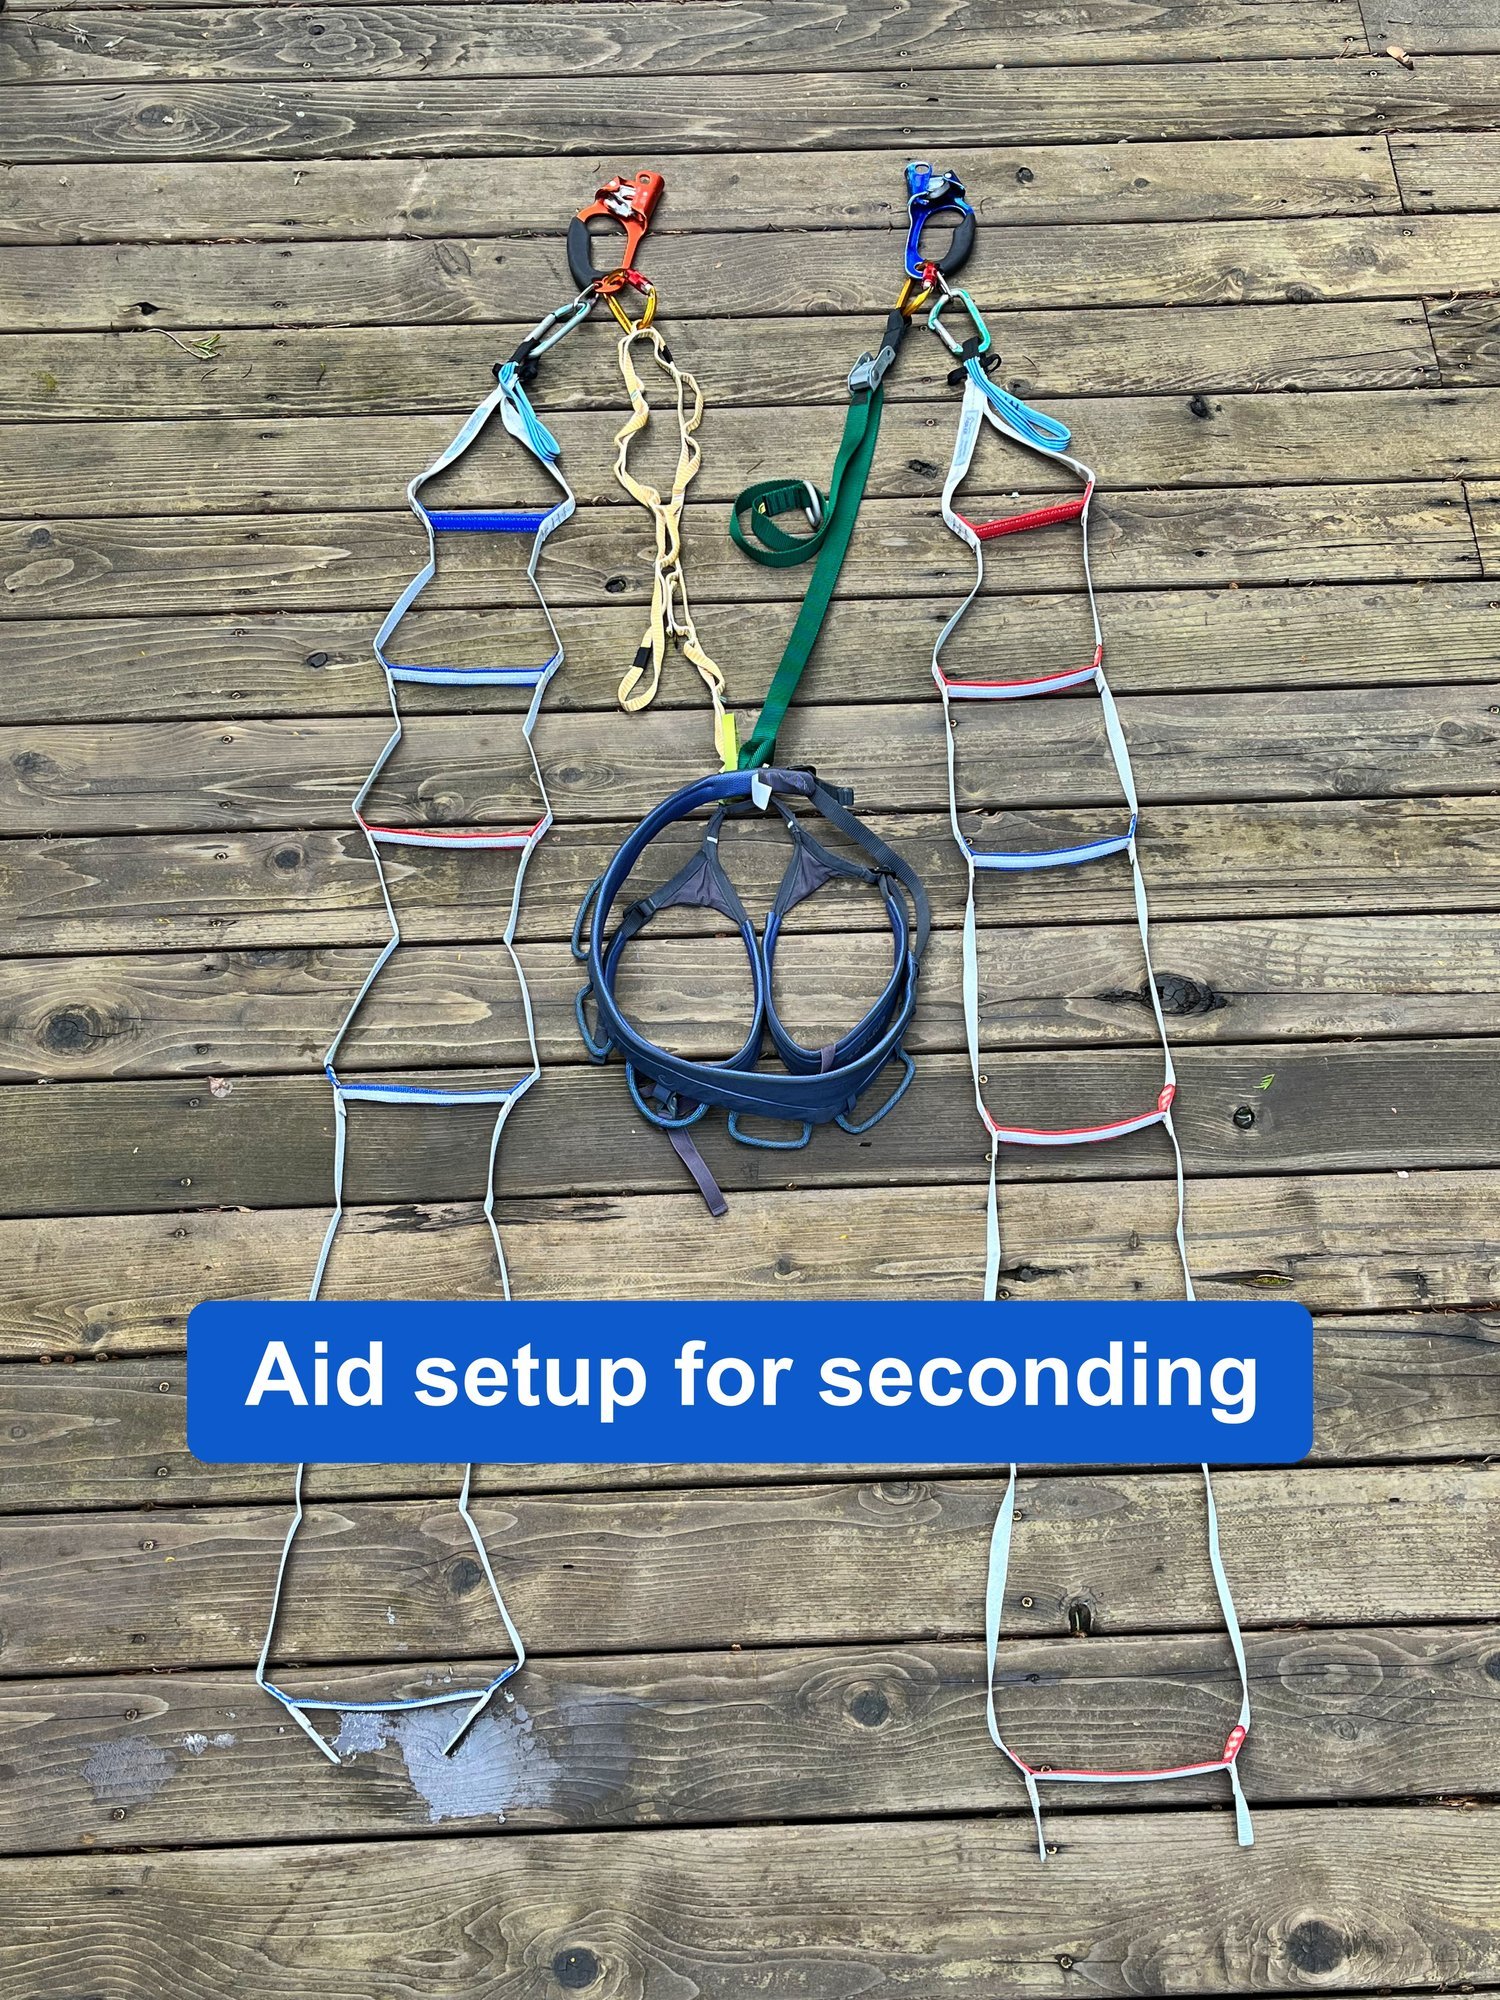
There are three main components to a standard ascending system for big walls:
Two handled ascenders on the rope
Two tethers of some flavor, each attached an ascender with a locking carabiner
Two of something for you to stand in, which traditionally is your aid ladders
Here's a photo of the typical set up.
However, using your “leading” ladders for rope ascending has a few problems.
Main problem, your foot wants to wriggle out of the ladder every time you step up. Some ladders have a bit of elastic sewn underneath one of the bottom steps to try to deal with this, but that’s a bit of a bother. (Yes, once you get skilled at ascending, it’s easier to keep your foot in the ladder step, but it still is a bit of a balancing act.)
Especially on skinnier ladders with narrow steps, it's not so comfortable for your foot.
You can't fine-tune the height of the step for optimum efficiency.
The unused steps are flapping around below you, occasionally snagging on things and generally in the way.
The ladders are often heavier than necessary. This is especially true with some of the more robust, older style ladders. It may not seem like a lot of weight, but every time you slide that ascender up, you’re lifting the weight of the ladder. Multiplied by 3,000 times to get to the top of El Capitan, and that's a lot of weight.
A more modern way to ascend a rope: replace your aid ladders with a pair of dedicated foot loops, a.k.a. stirrup.
Stirrups solve all of the above issues:
They have a strap to lock your foot in place
The bottom of the stirrup has wider webbing, so it's more comfortable
They are easily adjustable, so you can fine tune the length
Nothing dangles down below your foot
They are lighter than your ladders
Bonus: relatively inexpensive, about $30 each.

Why does one stirrup need to be longer than the other?
What do you do with your lead ladders when you’re cleaning?
How do you dial in the all-important distance of the tether to your ascender?
Join my Premium Membership to read the rest of the article.
Thanks for your support!

Is a small anchor angle better? Maybe not!
A basic guideline for anchor building: narrow angles are good, wide angles are bad. While that’s generally true, it turns out in some cases, a very narrow angle is not so good for load sharing. Check out a recent article and video by Over the Edge Rescue on this. (Warning: anchor nerds only.)
Premium Members can read the entire article here:

In Anchor Building 101, you probably learned the importance of the angles between the “legs” of an anchor.
The general concept: The smaller / narrower the angle, the better load sharing between the legs.
For example . . .
With an anchor leg angle of around 30° or less, each leg gets approximately 50% of the load.
About the maximum angle you ever want between the anchor legs is 90°. In that case, the force going on each leg is about 70% of the load, not so good.
So (as the theory goes) keep your angles as small as possible in order to best distribute the load to each leg.
While that’s generally a good principle to follow, it turns out for ideal load sharing, it may not be that simple.
In fact, a smaller angle can at times actually increase the load on the anchor legs!
A recent web article and video (links below) by Grant Prattley, a New Zealand rigging expert with Over the Edge Rescue, shared an interesting theory and load cell testing that puts a new spin on this idea.
Short version: the "ideal" angle of 30 or so degrees works mostly in theory only, and not so well in the real world.
In real world applications, the load may shift a bit from side to side, or your original rigging is not perfectly balanced between the left and right anchor legs. Let's call this an “error.”
When even a small “error” of about 5% happens with a 30° anchor leg angle, it quickly shifts a majority of the load onto one leg of the anchor.
However, when this same 5% error happens with a 50° anchor leg angle, you maintain much better load distribution between each leg.
Grant presents a pretty compelling argument that the optimum angle for a two point anchor is between 45° and 60°.
Curious about those bolts in the photo?
They’re called Practibolts, and they are a great way to practice anchor rigging on just about any magnetic surface, such as your refrigerator or here, a dry erase board.

Does anchor angle really matter for most recreational climbers?
My short answer: not really. Bigger picture, it's usually more important to pay attention to the quality of your placements rather than the rigging you use to connect them.
If you have two good bolts, then the angle between them really doesn't matter.
If you follow the general anchor rule of “narrow angles are good, anything over 90°, not good”, and you'll be fine.
However, in some cases when load sharing might be important, like when, try as you might, your placements may be lousy, or you have a giant load like pulling your truck out of the ditch, paying attention to small rigging details like this might be important.
Sometimes I dive into more esoteric parts of anchor building on my website, and this is one of those times. =^)
I’ll leave you with that as the takeaway.
If you're interested in a deeper dive, including the math, check out Grant's entire video and article on his website.
(To be honest, given the number of clever engineer people who are attracted to climbing, I’m a bit surprised that it took this long for this to be recognized. But hey, credit to Grant, he took a close look at this and explains it thoroughly in the video and article.)
Want direct links to the detailed article and video?
How about a trick to use your fingers to estimate the angle of your anchor when you're actually climbing?
Join my Premium Membership to read the rest of the article.
Thanks for your support!

Rappel tips for tricky terrain
In most rappels, getting the rope down is pretty straightforward: give each strand a toss and hope for the best. However, challenging terrain and conditions may require some specialized techniques. Here are a few.

Premium Members can read the entire article here:
Note - This post discusses techniques and methods used in vertical rope work. If you do them wrong, you could die. Always practice vertical rope techniques under the supervision of an experienced climber, and ideally in a progression: from flat ground, to staircase, to vertical close to the ground before you ever try them in a real climbing situation.
The standard rappel practice of “toss-rope-with-a-knot-on-each-end-and-hope-for-the-best” usually works fine in friendly conditions.
But, if you have any one or combination of these potential rappel problems:
high winds
traversing and/or overhanging rappel
low angle
vegetation, deep cracks, or other rope eating features
then the typical rope toss might cause some issues.
Here are some alternative rappel methods for these difficult conditions. (Listed in my rough personal order of preference. )
Rope bomb
Lower your partner
Rope bag
Saddlebag
Tie both ends to your harness
Lower down both rope ends with a weight
Let's take a closer look at each one.
1 - The “rope bomb”
I wrote a detailed article about the benefits of “casting” your rope, like casting a fishing lure; a sort of weight on the end that spools off the rest of the line.
That's the idea here. Flake each half of the rope into two piles, then make a small butterfly coil with roughly 1/3 of the rope. This is the “weight”. Now, you can toss this with some force down the route, and with any luck this will carry down the remaining rope.
In my opinion, this is preferable almost all of the time! Instead of chucking off half of your rope in one big coil and hoping it's going to feed out smoothly, which it hardly ever does.

Image credit: Andy Kirkpatrick, from his great book “Down”, shared with permission
2 - Lower your partner
Everyone is fine with being lowered by their partner when top roping from the ground or in the gym. But for some reason, the technique is rarely used by recreational climbers when it comes to being lowered from above. (It's more common in a guided situation, especially with a partner who may not be comfortable rappelling on their own.)
However, with a little practice, it's perfectly safe to do, and can easily get the first person down along with both ends of the rope, no problem.
Attach the ends of both ropes to your belay loop, with either a tie in knot or locking carabiner, your choice. Your partner lowers you on one strand directly from the anchor.
To lower your partner, you can use one of several different methods: a redirected tube style belay device, a Grigri, or a Munter hitch.
Pros - pretty much guaranteed to get the rope down smoothly.
Cons - Potential communication issues if you can't see or hear each other. (Radios could be helpful.) Lowering someone past the anchor could cause some problems. Lowering from above is an unfamiliar technique for most folks and requires practice to do safely.
Here is a more detailed article I have on lowering your partner.
Here is one of several ways you can be lowered; with a Grigri. Note the redirected brake strand, this is important.

3 - Rope bag
Yes, my partner laughed at me, but I did bring a plastic grocery shopping bag on one climb where I knew we're gonna have some low angle rappels and it was pretty awesome. Trader Joe's shopping bags cost one dollar, are surprisingly sturdy, rolls up about the size of a burrito, weighs about 40 grams, and easily holds a 60 meter rope.
I never noticed it in my pack, but it made life a lot easier when we had to do multiple low angle raps. We flaked the rope into the bag (which took about two minutes) and then I hung it from my harness with a sling. The rope fed out beautifully.
Just because people don't do it very often doesn't mean it's a bad technique! (Personally, I found it easier than saddlebagging, which we’ll discuss next.)
Below, Trader Joe's ”improv rope bag”, easily holding a 60 meter rope.

Since I've been yapping about the book “Down” throughout this article, I thought I'd give it a more formal plug here. Andy Kirkpatrick's book is an outstanding deep dive into the topic that I think is helpful for most everybody who plays in the mountains.
Support your local independent bookstore and buy it there. Here's a photo of my well thumbed and bookmarked copy.

How can you rig a snag-free saddlebag?
Have you tried the technique of tying both ends to your harness?
What conditions might be helpful to lower down both ends of the rope tied to something heavy?
Join my Premium Membership to read the rest of the article.
Thanks for your support!

Climbing Tips: Do This, Not That (Part 3)
Quick tips on best practices, with links to my detailed articles. This post covers: anchor shelf on a tree, “casting” (not throwing) a rappel rope, block leading tip, proper tails on flat overhand knots, and a caution on girth hitched rappel rings. (Premium Members can read all of ‘em.)

Premium Members can read the entire article here:
In this article:
Cast, don’t throw, your rappel rope
Block leading - don’t “trap” the leader
Caution with girth hitched rappel rings
Flat overhand bend - tail about 30 cm
Cordelette on a tree: the “shelf” is different
1 - Cast, don’t throw, your rappel rope
Try to avoid tossing one big coil of a rappel rope and hoping it's going to pay out smoothly down the cliff face. Most of the time it won't.
Think of casting a fishing line. There's a weight (lure) on the end. The line is carefully spooled on the reel. The weight is cast over the water, and the line smoothly follows it from the reel. No snags, no snarls.
“Casting” rappel ropes uses the same concept. Create a weight with one end of the rope, and flake the rest of the rope carefully. Toss only the weighted end, which should carry down the rest of the rope. Only toss one strand of rope at a time.
Doing this might take a little more time initially, but it is usually a good investment because it saves you from declustering the ropes later on.

2 - Block leading - don’t “trap” the leader
Block leading refers to the practice of one leader leading several pitches in a row. If you do, this, be sure that the leader attaches to the anchor in a way that allows them to easily get out of it.
In the left photo, the leader clove hitched themselves to the master point carabiner, and then added the Grigri between the clove and the gate. This “traps” the clove hitch, making it pretty much impossible for them to get out of the anchor to lead the next pitch!
A better choice is shown on the right. Here the leader is connected to the master point carabiner with a carabiner and a clove hitch. Now the leader can easily unclip and continue with the next pitch.

3 - Caution with girth hitched rappel rings
If you come across a girth hitched rappel ring, be very careful how you clip it.
If you clip it on the BOTTOM of the ring, it's safe.
If you clip on the TOP of the ring, when you weight the ring it's gonna completely detach from the cord/sling and Yer Gonna Die (YGD)!!!
There was a recent serious accident in the North Cascades related to this exact issue. (Link in my article) \
Please do not set up anchors like this. If you find one in the wild, be careful.

I recommend avoiding any sort of girth hitching a ring around a sling like this. The more standard methods shown in the photo below are more secure and easier to check.
When rigged like this, you can clip a tether to any point on the metal connection and you're gonna be safe.

Why is about 30 cm the ideal length of tail for a flat overhand bend?
When you put a cordelette around a tree and you want to use the shelf, how is that different than a two point anchor?
Join my Premium Membership to read the whole article.
Thanks for your support!

DIY - Ice tool tethers
Tool tethers prevent the gigantic problem of dropping an ice tool on a long alpine route. The commercial ones work fine; however they can be a bit expensive. Here's a way to make your own.
Premium Members can read the entire article here:
Ice tool tethers are pretty standard on longer alpine routes for good reason - a dropped tool from on a long, high route can be a serious problem.
Most major gear companies offer some version of a tool tether. They cost around $50. Here’s a DIY alternative; make your own for about 30 minutes of time and $10 in materials.
One simple way to make tethers is simply with 5 or 6 mm cord. The problem with that is that the cord wants to droop down below your waist, which is a potential tripping hazard. With the bungee cord, when there's slack on the tether, it shortens up.
I'll show you how to do it (as long as you don't make fun of my vintage Petzl Aztars, okay?)

Tools and materials to make an ice tool tether:
12 feet / 4 meters of 1/2 inch tubular webbing
12 feet / 4 meters of 1/8 inch elastic cord
Coat hanger
Athletic tape
Two small carabiners (be sure they fit into the holes at the bottom of your ice tools)
Patience!
Straighten out a wire coat hanger. Tape the elastic cord thoroughly to one end of the coat hanger. Use the coat hanger to wriggle the bungee cord all the way through the webbing. Be patient, this can take some fiddling.
Tie an overhand on a bight in one end with a small loop, and clip it to a carabiner. Don't worry about an exact fit; you can trim off a bit of the extra when you're done if needed.
Adjust the length one “arm” by sliding the webbing along the bungee, scrunching it up as you go. My arms are about 24 inches, with no stretch.
Create a harness attachment loop by tying a loose overhand on a bight in the webbing. This loop can be fairly small because it only needs to fit a carabiner. Do not snug this knot very tight, you're probably gonna need to adjust it later.
From the attachment loop, repeat step three, scrunching up webbing along the second arm until it’s the same length as the first. Tie another overhand on a bight in the second arm.
Give it a test drive. Adjust the length of the arms and the position of the attachment loop as needed until it feels comfortable. You don't want to have your tether impede your normal swing. It might appear to be short, but because it's clipped to your belay loop and attached to your tools with carabiners, you get a bit more length.
When it all feels happy, snug down the knots and trim off any extra webbing and elastic cord.
Give yourself a high five for saving $40. =^)
Do I need a swivel?
What about girth hitching directly to your belay loop?
Can I rest on this tether with my full body weight?
Join my Premium Membership to read the whole article that answers these questions.
Thanks for your support!


Need a stronger anchor? Try a basket hitch
Want to boost the strength of your rigging? Simply doubling the strands into a basket hitch can dramatically increase the strength, which could be helpful in some situations. See the test results here.
Premium Members can read the entire article here:

A basket hitch (and no, I don't know why it's called that) is pretty simple. It’s a loop of loop of webbing, cord, or rope, doubled into a “U” shape.
Takeaway: a basket hitch more or less doubles the breaking strength of whatever material you’re using, because the load is shared over four strands instead of two.
For most climbing situations, this doesn't really apply much, because the maximum possible forces in any recreational climbing situation are never going to be more than about 9 kN. If you're using a sewn sling that has a Minimum Breaking Strength (MBS) of 22 kN, no worries.
And, even clipped in the regular end to end method shown below, the 28 kN where it broke is probably stronger than your carabiner!
But in a few cases that I can think of, knowing a trick to increase the strength of your rigging might be helpful:
You need to use some skinny 5 mm cord for some kind of anchor building or application that it's not really designed for, and you want to squeeze some extra strength from your material.
If you want to do something involving possible LARGE forces, such as pulling your car out of the ditch, dropping a big tree limb, or detaching a wrapped whitewater raft off a rock.
My friend Ryan Jenks, the mad scientist gear-breaking genius behind the great YouTube channel HowNOT2, did some break testing on this.
Here are Youtube screenshots of the results of three different break tests. He’s using a standard sewn 8 mm Dyneema sling, rated with an MBS of 22 kN.
Photo 1: The sling gets a “normal” end-to-end pull. It broke well above the 22kN MBS, which is a good thing.

Photo 2: The same 22 kN sling, this time doubled with a basket hitch. With this rigging, it more than doubled the MBS.
Want to see the ACTUAL break test results for the basket hitch?
Join my Premium Membership to read the whole article.
Thanks for your support!

Climbing Tips: Do This, Not That (Part 2)
A series of quick tips on best practices, with links to my detailed articles. This post covers: quad anchor tips, pre threading your haul pulley, the twist-free Munter rappel, how to cut webbing, and a caution on ‘open” slings. (Premium Members can read all of ‘em.)
Premium Members can read the entire article here:
In this article:
Quad anchor - keep the knots low
Pre-thread the haul pulley
The (mostly) twist-free Munter hitch rappel
Cut webbing at a 45 degree angle
Don't put rubber bands or tape on an “open" sling
1 - Quad anchor - keep the knots low
With a quad anchor, if you’re using a cordelette or longer sewn sling like a 180 cm or 240 cm, it's good practice to tie the knots low down as shown. This will give perfect equalization, but minimizes extension if one arm of the anchor fails.

2 -The (mostly) twist-free Munter hitch rappel
Rappelling on a Munter hitch usually makes evil pigtails/twists in your rope. This can be a serious problem when you pull your rope, because the twists can get caught at the anchor.

However, if you flip your rope back over the carabiner like the photo below, this greatly reduces the rope twists.

3-Don't put rubber bands or tape on an “open" sling
Almost all quickdraws have some sort of a little rubber band thing on the bottom carabiner. This makes it easier to clip.
Some people think that doing the same thing on a “open” sling or alpine quickdraw might also be a good idea. Don’t do this!
If you clip that bottom carabiner back onto the sling, it can configure itself so the entire load is resting only on the rubber band and not on the sling! Yes, there have been two accidents that I know about caused by this.
It's a little hard to describe, but if you play around with it, you can figure it out.

The same applies to a personal tether. Do not put tape or a rubber band on a sling that you use for your tether. If you want to make it a bit easier to clip, use a girth hitch, or maybe better a clove hitch, to hold the carabiner in place.

How can you set up your haul system faster, and never drop the rope or your progress capture pulley?
Why can it be helpful to cut tubular webbing at a 45° angle instead of a 90° angle?
Join my Premium Membership to read the whole article.
Thanks for your support!

What are the “Screaming Barfies”?
Don't you love it when your cold hands feel like there's 100 needles in each one, and to top it off, you feel like throwing up? Nah, me neither. But that's a pretty good description of the aptly named cold weather ailment, the “screaming barfies”. Learn what causes it and how to (maybe) prevent it.
Premium Members can read the entire article here:
This recently landed in the Alpinesavvy Inbox . . .
Hi John,
I’m enjoying your regular climbing tips, as always. I have a topic suggestion for your first aid section: the dreaded screaming barfies.
Experienced climbers might get through the throbbing pain and frequent nausea with a mixture of cursing and laughter, but for beginners or anyone who hasn’t experienced this before, it can be a pretty scary experience.
When you consider the chance of this unexpected pain, nausea, and fear leading to a mid-climb mistake or lapse in judgment, the stakes get a little higher. For beginners in steep terrain, who might already be at the edge of their comfort zone, pain, fear, and nausea can spiral downhill pretty quickly.
I haven’t seen this topic mentioned very often in wilderness medicine and climbing education contexts, so I think it’s worth raising some more awareness. Being able to anticipate this can help climbers recognize the need for earlier rewarming, and also be ready to provide the support and psychological first aid their partners or students might need.
David P.
David, excellent suggestion! Let's have a look.
If you like cold weather sports, you’re probably familiar with a not very fun (unless it's happening to your partner and not you) medical condition with a spectacular name, aptly called the “screaming barfies.”
“Screaming”, because that may be your reaction to the few minutes of pain, and “barfies”, because sometimes you throw up!
What causes the screaming barfies?
The condition happens when blood flow to the extremities is restricted due to cold temperatures and physical exertion, such as gripping ice tools tightly or holding hands above the heart for extended periods.
When your circulation improves and warm blood returns, the nerves react sharply, causing a tingling or burning sensation that can be so overwhelming it triggers nausea or even vomiting in some cases. The nausea is believed to be caused by the nervous system's response to extreme pain, which stimulates the brain's emetic center responsible for inducing vomiting.
The good news is the pain doesn't last long (1-5 minutes) and goes away on its own.
How to prevent the screaming barfies?
Do what you can to maintain blood flow and warmth in the hands.
Use a multi-glove system, keeping thicker gloves for belaying and thinner ones for climbing to avoid over-gripping. Regularly shaking out hands below the heart, loosening grip on tools, staying hydrated, and keeping the body core warm can help.
Check out my recent series of posts from Canadian ice climbing expert Wild Gadd on how to keep your hands and feet warm, lots of good general tips in there.
Bad news: it sucks for a few minutes, and it can be distracting to your focus and performance.
Good news: it doesn’t put you in long-term danger, and may provide a few minutes of amusement and possibly entertaining video footage for your climbing partner. =^)
Hopefully, you can laugh about it later. Remember, it doesn't have to be fun, to be fun.
“Schadenfreude” (German) - feeling pleasure in response to another's misfortune. “Schaden” (damage) and “Freude” (joy).
Want to see more references about the screaming barfies?
How about a “schadenfreude” video of some poor sucker who has it?
Join my Premium Membership to read the whole article.
Thanks for your support!

Ice climbing - environmental “red flags”
As ice climbing season winds down, it becomes more important to consider environmental conditions as potential hazards. Here are five of them. Guest post from IFMGA Guide Kel Rossiter.

Premium Members can read the entire article here:
This post (shared with permission) is an Instagram post from Kel Rossiter, an IFMGA guide and owner of Adventure Spirit Guides. Connect with Kel on his website and Instagram, @adventurespiritguides
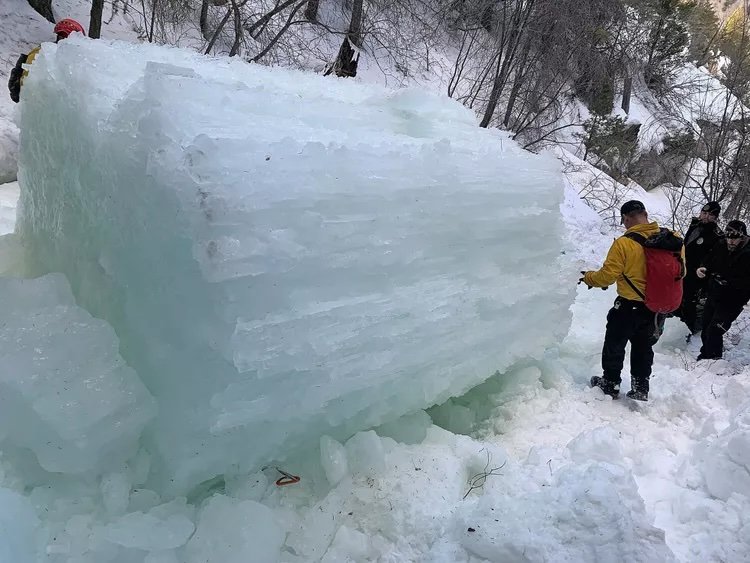
Photo: Capt. John Crowley/Duchesne County Sheriff's office
Kel Rossiter writes:
“We're moving into transition season here for ice climbing. Recently, I was asked to name the environmental factors to get my attention relating to hazards. These are the five I came up with.
The field of avalanche science has a lot to teach the climbing community in terms of risk analysis. One tool they use are the “red flags” - things like wind, heavy snowfall, etc. that should serve to get skiers attention when deciding when and where to go.
There are similar red flags in ice climbing. I came up with five, there are likely more.
Nighttime temperature above freezing
Daytime temperatures above about 40F/4C
Rain
See Premium Member article
See Premium Member article
The first three red flags have to do with warming, obviously not good for ice, which substantially increase overhead hazards.
Red flag number four . . .
Red flag number five . . .
None of these red flags are showstoppers for me. But if several of these are stacking up, it's a sign to me that I might need to change venues to shady places, a place with less overhead hazards, etc. And although I did throw out the number of 40°F/4 C, this is of course not an exact science.
There are other hazards in ice climbing, such as avalanches, cold temperatures leading to frostbite and hypothermia, and high consequence of falling. These are different than an environmental red flag, meaning hazards that have a direct effect on the ice I intend to climb.”
Want to see the environmental hazards #4 and #5?
Join my Premium Membership to read the complete article.
Thanks for your support!


Alpine retreat anchors - Part 2
Retreat (aka bail) anchors or not something you hopefully do very often. But when you need to, there are some specific requirements. See examples of strong and simple rigging here.
Premium Members can read the entire article here:
Note - This post discusses techniques and methods used in vertical rope work. If you do them wrong, you could die. Always practice vertical rope techniques under the supervision of a qualified instructor, and ideally in a progression: from flat ground, to staircase, to vertical close to the ground before you ever try them in a real climbing situation.
The techniques shown below are NOT standard anchor building practice. For normal anchors, clip a carabiner to your gear placements before you clip the sling/cord. These examples are retreat anchors for bodyweight rappelling only, when you want to conserve your gear.

Be it challenging weather, poor conditions, route finding errors, or general loss of mojo (a.k.a. “ambition exceeding ability”), there can be lots of valid reasons to turn around on an alpine route. It may not be something you actively planned for, but it needs to be handled with the same level of focus and detail as any other part of your climb.
When you retreat / bail (and yes, it’s “when, and not “if”), be it a one pitch sport climb or a major alpine adventure, the objectives should be similar:
Get to the ground in one piece
Have each rappel anchor simple to build and easily strong enough to rappel on
Leave a minimum of gear behind
Let's be clear on one thing: this is no time to be a cheapskate. Yes, we hate to leave gear behind, but if you HAVE to leave your beloved #3 Camalot for a rappel anchor, then do it without hesitation. The simple question is, what's your life worth? At the same time, you don't want to over build your anchors, and leave behind gear that you might need lower down if multiple rappels are required.
What are the forces on the anchor when rappelling?
I recently came across a nice video from the meticulous gear testers at Edelrid. (Have a look at their “Edelrid Knowledge Base” on YouTube, they have lots of goodies there.)
Check out the screen grab below from one of their videos.
Short version:
If you bounce around on the rope like some special forces cowboy, you can generate between 2 and 3 kN as a temporary peak load.
When you rappel smoothly, the load to the anchor is pretty much your body weight.
Takeaway: rappel smoothly without bouncing to minimize force on the anchor.

Image: screen grab from https://www.youtube.com/watch?v=A7rKGDxrdTA
There are lots of ways you can rig a retreat anchor. Here's a good one.
Simple (easy to check)
Fast to rig
Plenty strong enough for rappelling
Requires minimal gear
Place two pieces of solid gear fairly close to each other (here a stopper and a piton). Starting with about 2-3 meters of cord (here, 6 mm), pass the cord through both anchor points as shown.

Tie a flat overhand bend to make a loop.
Tighten the knot, leaving tails of at least 3 inches / 8 cm.

Pull down the cord, making a “U” shape.

Girth hitch masterpoint on a taped gate carabiner. (Lots of other options here. If you have enough cord, you can tie an overhand knot. If you want to use a quicklink or rappel ring, that works. I'm showing my favorite method to keep things consistent.)

This approach is fast, requires minimal fiddling with knots, and uses a small amount of cord. Efficient use of materials is the main benefit to the girth hitch master point.
Potential downside, you need to leave behind some hardware to make the girth hitch. (If you had another foot or so of cord, you could tie an overhand on a bight and rappel from that rather than the girth hitch.)
If you're new to the girth hitch master point, yes, it's legit and yes, it’s redundant. Read a more on the girth hitch anchor here.
What if the anchors are farther apart?
What if you want to use a sling instead of cord?
Tying a cord directly to a stopper wire? How strong is that?!
Join my Premium Membership to read the whole article.
Thanks for your support!

Alpine retreat anchors - Part 1
Retreat (aka bail) anchors need to be strong enough for a rappel, use a minimum of gear and cordage, and be simple to rig. Learn the principles here.
Premium Members can read the entire article here:
Note - This post discusses techniques and methods used in vertical rope work. If you do them wrong, you could die. Always practice vertical rope techniques under the supervision of a qualified instructor, and ideally in a progression: from flat ground, to staircase, to vertical close to the ground before you ever try them in a real climbing situation.
Be it challenging weather, poor conditions, route finding errors, or general loss of mojo (a.k.a. “ambition exceeding ability”), there can be lots of valid reasons to turn around on an alpine route. It may not be something you actively planned for, but it needs to be handled with the same level of focus and detail as any other part of your climb.
When you retreat / bail (and yes, it’s “when, and not “if”), be it a one pitch sport climb or a major alpine adventure, the objectives should be similar:
Get to the ground in one piece
Have each rappel anchor simple to build and easily strong enough to rappel on
Leave a minimum of gear behind
Let's be clear on one thing: this is no time to be a cheapskate. Yes, we hate to leave gear behind, but if you HAVE to leave your beloved #3 Camalot for a rappel anchor, then do it without hesitation. The simple question is, what's your life worth? At the same time, you don't want to over build your anchors, and leave behind gear that you might need lower down if multiple rappels are required.
Alpinist Steve House has a terrific video on “Failing Well”. “Success on a climb is going up, making good decisions, and coming back. That's the outcome we should be attached to. To me, that’s what ‘fail well’ means.”
Six minute YouTube video, highly recommended. Takeaways:
Strategic retreat is an inherent part of alpine climbing. It’s a skill that improves with practice.
Having solid retreat technique can give you the confidence to try harder routes, knowing that you can retreat from just about anywhere.
Maintain awareness when ascending. The way up might also be the (unplanned) way down. Remember potential anchor points, problem areas and the right way to go.
Retreat is often done under stress, tiredness, darkness, bad weather, etc. All the more reason to turn up your focus and awareness to counter these compounding factors.
Some general guidelines for retreat anchors . . .
Use two equalized pieces whenever possible. Sure, the classic climbing books are full of epic stories of rapping off of a single stopper or piton. One that’s perfectly placed should be sufficiently strong, but that shouldn’t be your first choice unless things are really desperate.
Try to avoid using multiple pieces of the same size in a single anchor; you might need that same size lower down.
Use static equalization. This is probably not the time for a sliding X anchor. Your gear may not be the greatest, and there's only two pieces, so you want to minimize any potential shock loading at one piece fails.
This anchor is only for rappelling, so the “rules” change a bit. The belay anchor general principle of striving for “three good pieces“ doesn’t necessarily apply to a rappel anchor. If you rappel smoothly on a dynamic rope, the anchor will only see about 1-2 kN, and the direction of force will always be down. So good news, your anchor doesn’t need to be multi-directional or tremendously strong. However, we're still aiming for some other core anchor principles of strong (enough), redundant, load distribution, and no extension.
The examples below don’t use carabiners on the gear. You’d never make a proper belay anchor like this as regular practice, but it's acceptable for an emergency rappel anchor. It's fine to run cord or webbing through stopper wires for a rappel anchor; it holds 8+ kN. (See previous point, the rules change a bit.)

Rappel smoothly to minimize forces on your anchor. Don't jump / bounce around like some special forces cowboy.
Keep your rigging simple. You should really only need one or two variations on the basic theme, so no need to get overly fancy. You're probably going to be doing this under a bit of stress, and bailing on marginal anchors is not something most people practice very often. Keeping your rigging clean and simple makes it easier to check and to remember.
You're going to need a fair amount cordage (and maybe a few slings) so plan ahead. 6 mm cord (rated to about 7.5 kN) is cheap, light and easy to carry, so consider that if you anticipate making a lot of anchors. Tying those pesky knots always seems to take up more cord than you think! Plan on about 2.5 meters of cord per anchor. You can get away with a bit less if the gear placements are right next to each other, or if you use some clever knots like a girth hitch master point. If you and your partner each carry about 10 meters of cord, that's enough for a LOT of anchors.
Use your cordelette. Six meters or so of cord (7mm is the standard) makes a cordelette for the way up; you can think of that is equal to about 2-3 potential anchors for the way down. If you and your partner each carry a cordelette, together that should be good for about 5-6 anchors.
Recycle your old cordelette. If you climb a lot, you probably wanna retire your lead cordelette from regular anchor duty after about a year. Great, you now have some material for emergency anchors. Keep the old one in the bottom of your pack for that purpose.
What about webbing? Tubular webbing can work as a retreat anchor, but it has a few downsides compared to cord. 1) Webbing strength drops off quickly if it gets damaged, unlike cord that has more of a protective sheath. 2) Webbing is more easily degraded by ultraviolet light. 3) Webbing usually requires tying a water knot, which can be a little finicky and a hassle to tie if you have gloves and/or cold fingers. For these reasons, cord is usually a better choice. (See an example below of how to use a sewn sling.)
Carry a knife, so you can cut up your cordage (or maybe even an end off your climbing rope) to make an anchor. Also, a knife is useful for cleaning up any rat nest of old sun-crusted cord and webbing you often find at alpine anchors. Good rule of thumb, if you add cord to improve an existing anchor, remove the oldest piece(s) and take it with you.
Don't have a knife? It’s remarkably easy to cut through rope or webbing with a small length of 2 or 3 mm cord. Tie a bight knot in each end, clip the loops to a pair of carabiners for handles, and then rapidly saw back-and-forth through the material that's under some tension. You’ll cut it through in a few seconds.
Look first for a tree or rock horn. Give it a good kick first to assess its strength. You can drape a sling or tied loop around this and use it for a rappel, with no gear left behind. Note: use caution with putting the rope directly around/over a tree or rock horn; the friction could make pulling the rope difficult or impossible. Using natural protection of course preserves your hardware.
Consider shorter rappels. Doing two shorter rappels, using natural protection is going to preserve more gear than one long one.
Look for fixed gear on the way up. Remember where it is; you might need it on the way down.
Be wary of the “bail trail”. Don't be tempted to depart from your route to go towards a retreat anchor that someone else has left. If your route description says “belay from the ledge”, and you see some sketchy looking stoppers equalized with a shoelace on terrain that looks clearly off route, that probably means it's a bail anchor and not a belay anchor intended for ascending.
Be on the lookout for down-climbable terrain, and consider the technique of “down leading”. Here, the first person raps single strand, places his gear on the way down, and clips the rope to the gear. The second person ties in to the end, down climbs, cleans the gear as they go, and is belayed by the person below. Here's an article on that technique.
Leave a cam if you have to. Yes, your life is worth it. If you have a perfect placement for a larger cam, versus fiddling around trying to equalize several different stoppers, go for the one cam and get the hell down, especially if you have multiple pitches to go and it's starting to rain, getting dark, etc.
Stoppers and a piton or two are good choices for retreat anchors. Stoppers are inexpensive, strong, easy to check if you have a good placement (well, the bigger ones, anyway) , easy to bounce test, and can be set in rock that’s dry, wet, icy, or muddy. If you have a ice tool hammer, feel free to use it to smack on the piton as well as the stopper. To weld in a piton or stopper, you can beat on it Neanderthal-style with a fist size rock (and maybe your nut tool). But a hammer is always going to be better. No one's going to be cleaning it, so don't be shy.
If you find a fixed piton, see if there’s a nearby stopper placement you can use to equalize the two pieces.
Are things getting pretty desperate? You can cut your rope and leave it if you need more material for the anchor. You can also fix your rope and do the last rappel on a single strand if you don't need the rope for anything else.
Pitons!
You don't wanna carry too much metal with you, but a knifeblade and a “Universal” piton can be great to leave behind for anchors.

Knifeblade and CAMP universal piton
There's a lot more to learn about retreat anchors!
What’s a “Universal” piton, and why is it cool?
Are Tricams good for bail anchors?
What’s a cheapskate locker, and why should I carry one?
Can I run the rope directly through the cord?
Why a metal connection for the rope?
How can I back this up?
All good questions! Join my Premium Membership to learn the answers in the complete article.
Thanks for your support!

Climbing Tips: Do This, Not That (Part 1)
A series of quick tips on best practices, with links to my detailed articles. This post covers: anchor hooks, extending a quickdraw, using a rebelay to protect a fixed rope, “alpine equalization” with cams, and how anchor hardware can twist your rope. (Premium Members can read all of ‘em.)
Premium Members can read the entire article here:
In this article:
Anchor hooks: gates facing out
How to extend a quickdraw
Protect a fixed rope with a rebelay
“Alpine Equalization" Don't clip the thumb loop
Anchor induced rope twisting
1 - Anchor hooks: gates facing out
In a typical anchor with carabiners, it's usually good practice to place them opposite and opposed. However, with anchor hooks (aka Mussy hooks), it's typically best to have them both facing OUT, away from the rock.

Why is this?
The American Safe Climbing Association has installed thousands of these anchors throughout the US. They recommend gates out. Click the article link above to read the longer reasons; here’s the short version:
“Anchor hooks are placed with gates out for a couple reasons. If opposed the inward facing hook tends to gouge into the rock and scar it up, along with orienting strangely to wear much faster on the nose or even get pushed into the bottom of the wiregate. If they are extended with chains to lay flat and opposed the rope gets pinched behind the hooks and wears unnecessarily/grooves the rock.“
2 - How to extend a quickdraw
A steep or reachy sport route may require extended quickdraws.
It's good practice to extend them as shown in the photo below. Of these two, the quick link is more secure. Or you could have a locking carabiner in the middle (left photo) to add further security.

The methods shown below are not so great. In the left, the carabiners could be twisted and unclipped in a fall. On the right, the rope can rub over the top of the dog bone, not good.

3 - Protect a fixed rope with a rebelay
If a fixed rope is running over an edge, it's quite easy to damage the rope, especially with a larger load.
An easy way to fix this: a rebelay. To make a rebelay, make another anchor point (by placing gear or clipping a bolt) below the edge that's being loaded. Pull up a bit of slack, tie a bight knot, and clip that bight to the lower anchor. Now, when the rope is loaded, no force goes to the section of rope over the edge.
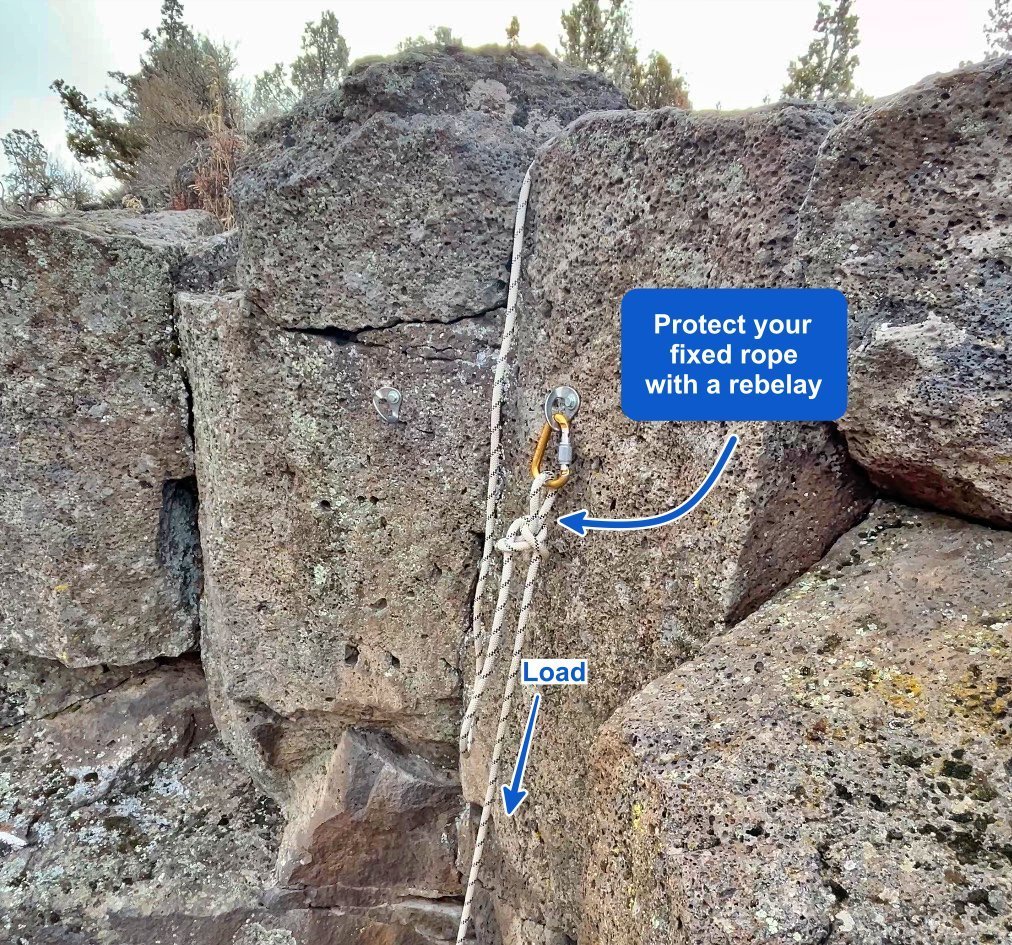
For “alpine equalization”, where should you clip the cam?
What anchor rigging can cause rope twisting, and hoe can you fix it?