Alpine Tips

CalTopo pro tip: Travel Time and Travel Plan
CalTopo, the best backcountry mapping tool, has a very cool feature - Travel Plan. Draw a line or import a GPS track, then add waypoints on the line that break the trip into segments. Now, choose travel plan, and you get a table showing distance, bearing, elevation gain and estimated travel time between each leg of your trip.
CalTopo, the best backcountry mapping desktop tool, keeps getting better. CalTopo recently (autumn 2020) rolled out a very cool feature(s), “Travel Time” & “Travel Plan”. Let's learn how to use ‘em!
(If you’re new to CalTopo, get started with this tutorial video.)
CalTopo has four subscription levels: Free, Basic, Pro, and Desktop. I recommend the Basic for most users, but if you want the Trip Planning feature, you need the Pro or Desktop. See more details on the subscription levels here.
For this example, we’ll use a backcountry ski circumnavigation tour of Mt. Hood in Oregon.
The “Travel Time” feature is available for all subscriber levels. If you draw a line (right click on the map > New > Line, or use an imported GPX track), click on the line, and select Travel Time, you’ll see an estimation of travel time for that line. This time is estimated using the “Munter Method”, which considers distance, elevation gain/loss and travel mode. It’s a rough estimation, but can be a good starting point. (Learn more about the Munter Method here.)
(And, because I know you're wondering, yes, it’s same person who popularized the Munter hitch, Swiss guide Werner Munter! Thanks for both of these, Werner!)
A good way to test the accuracy of the Travel Time estimate is to draw a line covering a familiar hike or climb, and test the predicted time with your normal hiking time. For example, I did a test drive of the standard south side route on Mt. Hood. CalTopo predicted a travel time of 5.4 hours on foot, which is pretty much spot on with the standard 5 hours that's typical for a fairly fit climber.
Of course, alpine travel times can be extremely variable depending on fitness, snow depth, amount of crevasse negotiation, etc. This is a baseline for general trip planning, not the Holy Grail.
First, draw in your route or, in this case import a GPX track.
(Sidenote: AlpineSavvy has GPX tracks for more than 70 of the most popular climbing routes in the Pacific Northwest available for free download, you can get them here.)
Right click on the line, select Travel Time, and you should get a box that looks like the one below.

The Travel Time is moderately helpful. But for Pro level subscribers or higher ($50+ a year), you get another big level of Awesomeness, the Travel Plan. With this, you can add marker points along your track, click “Travel Plan”, and then get a table of very helpful route information between each point. Here's how to do that.
First, add some marker points (aka waypoints).
Right click on the line on your map, map, choose New > Marker. The marker points need to be pretty much on the line that you drew or imported.
It's good to add marker points that break up the route into reasonable sections. In this case, that’s significant ridge crossings or entering/exiting large glacier areas.
It’s helpful to give the marker points a common name, and then a number. This helps keep them organized in your GPS app, as well as letting you quickly see where the next one is sequentially when on your trip.

Additional cool feature: You can include Travel Plan break times by typing “30 min” (or whatever time you like) in the marker label field or marker comment field. Click the marker and choose edit to access the comment field. Example below.

Now, you can click the track, click Travel Time, then click Travel Plan.

Travel Plan creates a table like this. For each waypoint, it shows the latitude longitude coordinates in decimal degrees and the elevation. From one point to another, it shows vertical gain or loss, distance, true north bearing, estimated time, and cumulative time.
A few notes . . .
If your pace is significantly faster or slower than what the Travel Plan predicts, you can adjust this in the Travel Mode “Custom” drop down box.
You can print this out, take a screenshot, or save as a PDF (helpful if you want to share it with other people on your team.)
For a longer trip or multi day outing, you can create a single travel plan that covers multiple lines / tracks. That’s more advanced than I want to cover here; learn how on the CalTopo training website.

So . . . why is the CalTopo Travel Plan cool?
Backcountry travelers have been making travel plans like this for years. But, it required extremely exacting work of counting contour lines, measuring distances with the map scale bar, and some math that many people found to be about as enjoyable as chewing on tinfoil. Caltopo does the same with just a few clicks, and saves huge amounts of time and tedium.
Because you know distance and bearing between marker points, it helps you keep your GPS phone app mostly in your pocket, and follow a compass bearing (compasses, remember those?) and general terrain between points. In alpine terrain, it's usually easier to navigate to a specific waypoint, taking the path of least resistance, then try to stay precisely on top of a GPX track. Doing this helps save your phone battery, and increases your situational awareness, because you're paying attention to the landscape around you and not staring at a GPS track on your phone screen.
It lets you have a better sense of your pace and what a realistic turnaround time or a bail out point might be. Rather than having one strict turnaround time for a particular point of your trip, you can compare each leg with the estimated time to get a more detailed sense of your overall pace.
Related to the previous reason, it lets you share a solid travel time with an emergency contact person at home. Many unnecessary rescues are initiated because a hiker underestimated their travel time. This tool can give you a more realistic estimate, which you can hopefully share with your contact person, maybe sparing them needless worrying and even calling for an unneeded rescue.
Finally, if you want to get fancy and have some time on your hands, you can export the GPX track from CalTopo as a KML file, and then open the KML in Google Earth. If you do a fly around, it looks something like this. (Of course, this ski tour is more fun with more snow.) Enjoy!

Backcountry ski repair kit tips
Headed out for a backcountry ski trip? You’d better have a way to fix your gear. Here are some components of a robust repair kit that can handle just about everything. (Thanks to a few ski experts who contributed to this: Pro Guiding Service and Matt Schonwald.)
The bulk of this article comes from the experts at Pro Guiding Service in North Bend WA. Follow them on Instagram, Facebook, and check their website, proguiding.com. Photo and content shared here with permission.
Some other suggestions on this page come this article from Matt Schonwald, an AMGA certified Ski Guide, Avalanche Instructor and member of Northwest Avalanche Center’s Forecasting Team. Connect with Matt at BC Adventure Guides.
Backcountry ski repairs can fall into into two major categories.
Category 1: a bummer, but you can keep moving.
A broken ski pole
Lost ski pole basket
A tear in your clothing
A broken walk mechanism in your touring boot
A bent ski
A delaminating ski
A lost skin tail clip
A lost or torn skin tip attachment
A broken heel piece in a pin binding (this a category 1 if you’re a good skier)
Category 2: a major bummer and potential safety issue.
A broken toe piece in a tech binding
A toe piece torn off a ski
A ripped out binding
A lost skin

photo: https://www.facebook.com/ProGuidingService
Here's a repair kit that can handle just about all of these situations, and a few more.
A few notes . . .
This is more of a kit that a ski guide might carry on a longer tour or multi day outing. A few things, like the toe piece and cordelette, can probably be left at home if you’re on a shorter or less committing trip.
Just like sharing the contents of a first aid kit, no one‘s going to agree 100% with everything. This is more of a starting point to get you thinking about what gear you might want to carry.
Do you think this gear is too “heavy”? I don’t know the exact weight of everything posted here, but it can’t be much over 1 pound. If that amount of weight is keeping you from your objective, consider spending more time training and less time obsessing about shaving grams from your gear. =^)
(Reminder, AlpineSavvy has zero affiliate marketing. The links are provided only for your convenience.)
A few zip ties. Consider steel zip ties, they are stronger and can hold up better in cold weather. You can also get heavy duty zip ties that can hold about 200 pounds/100 kg.
Some 2 mm cord
A meter or so of wire; 16g is a good size; stainless steel is best so it won't rust in your pack.
Fabric repair tape; Tear-Aid (type A) tape is good.
Small roll duct / Gorilla tape; Consider cloth hockey tape. It sticks well to things that are wet and cold.
Epoxy; this may make the difference when you tear the toe piece off your ski. You can get single use epoxy packets that are more convenient to carry.
Assortment of hose clamps; two small ones for pole repair, and two large ones to clamp your boot to your ski in case your binding breaks. Large hose clamps not shown in photo.
Some sort of pole splint; 15 cm length of old ski pole tube with a slit cut lengthwise. I've heard of people using a section of aluminum can for a pole splint, never tried it.
Assortment of standard binding screws; if you have a quiver of different skis/bindings, be sure you bring screws that cover everything.
Helio coil inserts for torn out bindings screws; steel wool and epoxy can serve the same function.
A multi tool with pliers and wire cutter; the Leatherman Skeletool, 5 ounces, is a good choice.
Binding Buddy; heavy, but works well. Test it and be sure that it's long enough to reach every screw on your binding, sometimes the neck can be a bit short. The Topeak Ratchet is another option for a driver that has more leverage.
Assortment of driver bits to use with your Binding Buddy or Skeletool. #3 Phillips, #2 Phillips and T20 (Torx / star bit) can be a good start, but check all your gear and be sure you have bits for everything. It's not standardized. Some gear requires Allen screws, typically #4 or #5.
Allen wrench; if your boot has any Allen bolts
4 bolts and wing nuts and a 6mm cordelette for potential construction of rescue sled; sorry, no link for this.
Glop Stopper wax; Black Diamond, glide wax for your skins, carry a small piece, not the whole big block
Glide wax
Metal ski scraper
Tent pole splint; for fixing a broken ski pole, you can also cut a section from an aluminum can
Skin tip
Skin tail clip. Can't really improvise this.
Extra ski pole basket
Voile ski straps. Bring a pair, 24 inches is a good length. Good for loads of things in addition to the obvious holding your skis together. These are in addition to the ones you have to hold your skis together. Here's a whole article on Voile straps.
Finally, a sturdy bag to put it all in. You can go bare bones with a stuff sack, or something that zips open and has a few dividers like a bag for a first aid kit.
For longer or more remote trips, consider:
Two cordelettes of about 6mm/ 6 meters long. For general anchor building and rigging a rescue sled if needed.
A few carabiners

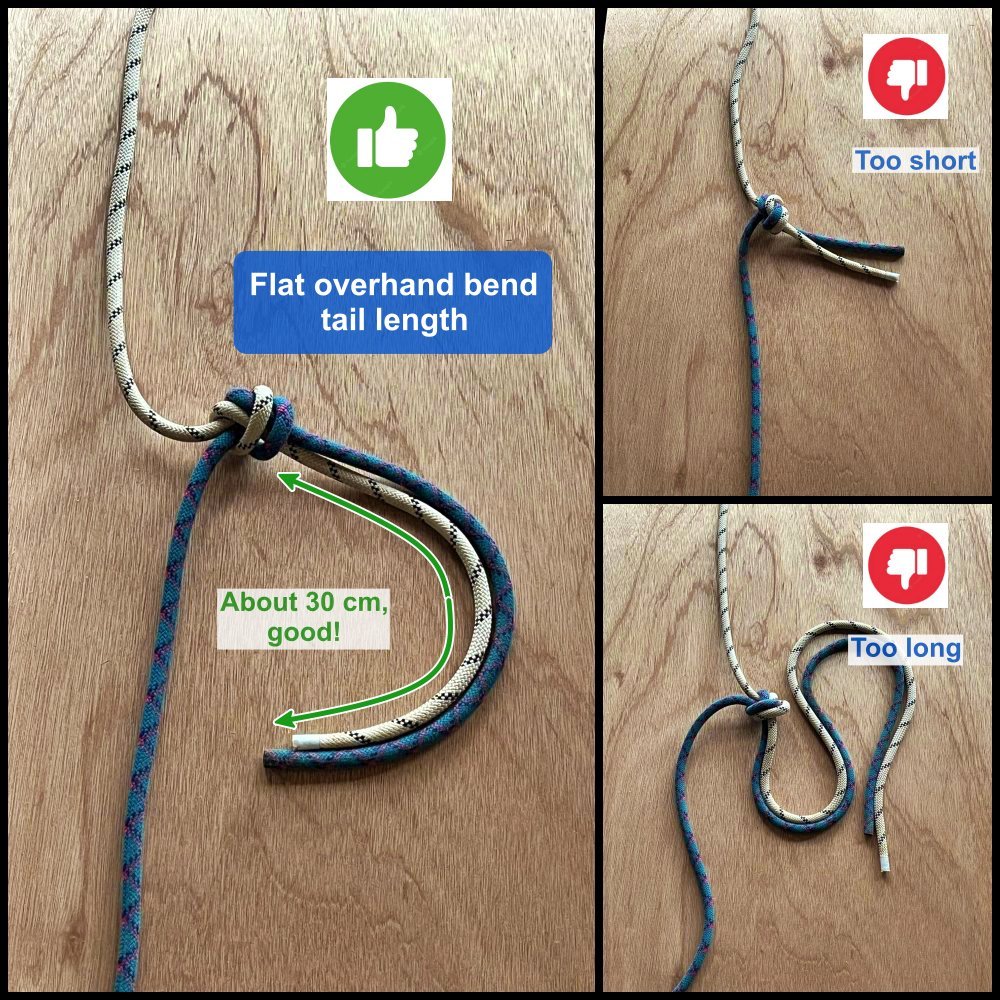
Flat overhand bend - how long a tail?
A flat overhand bend is a good choice for connecting two ropes for a double strand rappel. Pay attention to the tail length. You want it at about 30 cm, or the length of your forearm; not too short and not too long. Longer is not better, and has been the cause of fatal accidents.
A great knot choice to connect to rappel ropes for a double strand rappel is the flat overhand bend. (It was previously known by some as the “European Death Knot”, or EDK. Let's not call it that anymore, okay?)
Why is this a good rappel knot?
It’s known as an “offset” knot, because the body of the knot is offset from the line of pull. This can help the knot work its way around obstructions such as rock nubbins or ledges to lessen the chance of it getting hung up when you pull your rope.
Works well with ropes of different diameters (up to about 3mm difference). So if you want to connect a skinny 7.7 twin rope with a 9.5 single rope, no worries.
Super easy to tie and visually check.
It's plenty strong for any normal two strand rappel situation. (For a single rope rappels more common in caving and canyoneering, or for extra heavy loads, some recent research recommends a more robust knot. We’ll cover that in a future tip.)
It’s important to have the right amount of tail in the flat overhand bend. A good rule of thumb is about 30 cm / 1 foot.
Think of that as about the length of your forearm, or two hand spans. It's sort of the Goldilocks length, not too short and not too long. This length gives you a margin of error to prevent minor mistakes from becoming catastrophic.
If the tails are too short, the knot could potentially roll once or twice under an extremely heavy load and roll off the ends. A decent sized tail (hopefully) prevent this.
If you tie a sloppy, poorly dressed knot, a proper tail allows the knot to tighten up under load without pulling in the ends.
Not-too-long tails give you use of the full rope, which can be important in reaching the next rappel station if it's a real rope stretcher and you need every possible meter.
Proper length tails keep your nervous partner happy, and gives them room to add another overhand knot (aka stacked flat overhand bend) in the tail if they like, to give them a warm fuzzy feeling before they rappel. =^)
Many people think a longer tail is better. Not so. If the tails are too long, it increases the chance of someone mistakenly clipping their rappel device to the tails rather than the actual rope. While you may think this would never happen to you, this has caused fatal accidents to extremely experienced climbers, usually in darkness and/or from major exhaustion. Eliminate this potential mistake by having tails not too long, but just right.
If for some reason you’re ever fixing a rope (or using someone else's fixed rope) or tying two together like this, and the tails are longer than about 30 cm, at the very least tie a stopper knot in the ends, or tie them together, or do something to prevent someone from ever rapping off the ends.
Here are two accounts of tragic accidents where someone rigged a fixed rope with a long tail, and rappelled off the tail instead of the actual rope.
Fatal accident: Rappelling off the long tail of an anchor in Yosemite
Fatal accident: Rappelling off the long tail of an anchor in Baffin Island

Shaded relief - helpful, and a fun optical illusion
Shaded relief, a.k.a. hill shading, is a cool cartographic trick that helps you see topographic maps in more 3-D. While it’s very helpful to see features like creek drainage and ridgelines, it also is a cool optical illusion - if you turn the map upside down, the creeks and ridges reverse! It's a better show than a tell; check out the examples in the article.
An ordinary topographic map can look like a big bunch of squiggles, and it takes practice to “read” the contour lines to make out landforms like ridges and gullies. A clever bit of cartographic wizardry known as “shaded relief” (aka hill shading, or terrain shading) tricks the brain into seeing terrain features such as ridges and gullies more in 3-D, extremely cool!
Here’s a side-by-side example of the exact same terrain. The top map is the standard topographic map, and the contour lines mostly look like a spaghetti pile. On the bottom is the same area with shaded relief added. You can clearly see the streams and ridgelines, nice!

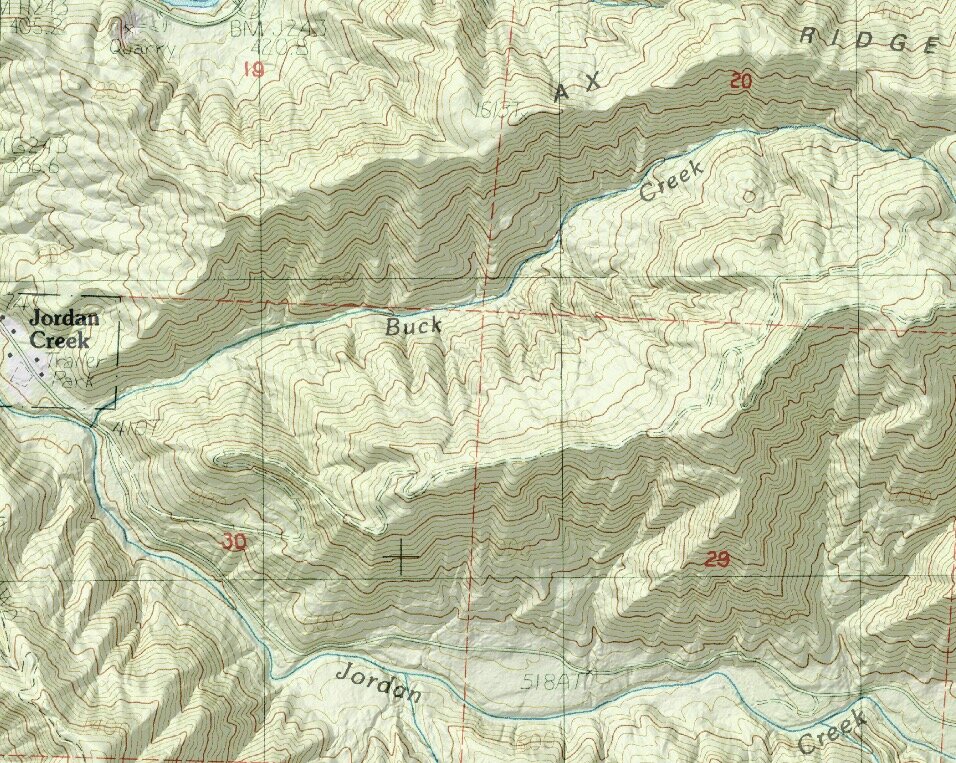
So, here's the fun optical illusion part. If you turn the shaded relief map upside down . . . The streams appear to be ridges, and the ridges appear to be the drainages! Check out the map below. Jordan Creek and Buck Creek appear on a ridge . . . but you know creeks don't go on ridges! If you're seeing this on your phone, you can take a screenshot and turn it upside down also.
Pretty cool, no?

This does have some occasional practical use in the field. If you have a shaded relief map, and you rotate the map so south is at the bottom (called orienting the map, which you might do when walking south) be aware of this illusion, because what you see on the map might well trick your eye.
Some navigation experts claim that you should not use shaded relief at all because of this potential for error. I disagree. The huge increase in legibility for the average user is a massive benefit that far outweighs the potential eye trickery when you may occasionally view the map upside down.
You can create shaded relief maps like this for free from the great mapping website Caltopo.com. Lots of Caltopo is free, but for a modest $20 annual subscription you can access even more. If you love maps, please consider a subscription to support the creators of this very helpful mapping tool, hint hint.
Learn to use Caltopo from this YouTube video.

How to clip a piton
When clipping a piton, try to clip and then rotate the carabiner so the gate is facing out and the load is along the spine. If that doesn't work, you might be able to skip the carabiner entirely by hitching a sling to the pin.
When clipping a piton, try to flip the carabiner so the spine is against the rock. The gate opening can be down (center) or up (right). Doing this aligns force along the spine of the carabiner, the strongest orientation.
If you clip with the carabiner gate facing the piton hole, the carabiner can be sometimes levered in strange ways, and could potentially even break under a heavy load. In the photo on the left, we can see this happening a bit. Depending on the style of carabiner and piton placement, this can be more or less pronounced.

And, if you find that the carabiner is being loaded in a way that you don't like no matter what you try, you can thread a sling or cordelette directly through the piton hole. Of course, avoid doing this if the piton hole is chewed up, as it might damage your sling.
Below are two examples from the German Mountain and Ski Guides Association (“Verband Deutscher Berg und Skiführer” or “VDBS”).
You can see more interesting VDBS approved anchors at this article.
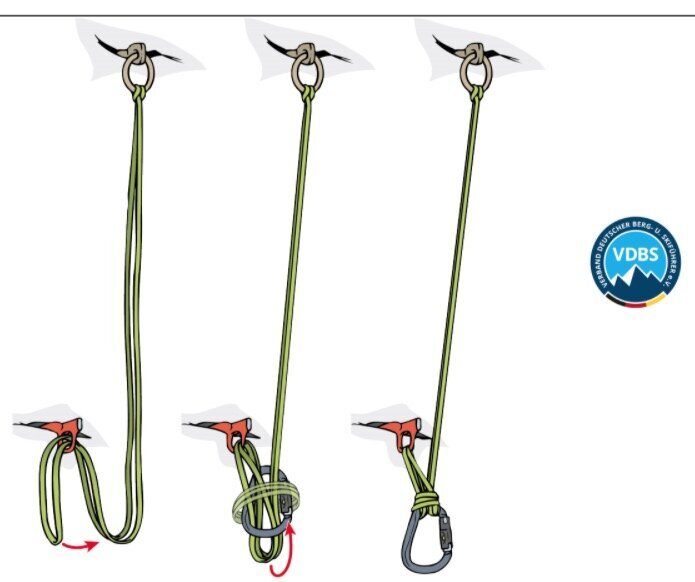
IMAGE CREDIT: CHRIS SEMMEL / VDBS

IMAGE CREDIT: CHRIS SEMMEL / VDBS

Aiding - Clip gear as high as you can
Aid climbing, they say, is a game of inches. When leading, you can get extra reach out of each placement if you try to clip your aider as high on the gear as possible. With a cam, this usually means the thumb loop.
When leading on aid, standard practice to get maximum reach is to try to clip gear as high as you can.
Let's start with a bolt. Typically, you clip your ladder directly to the bolt is shown below on the right, as this gives you maximum reach. If you clip a quickdraw first, and then clip your ladder to the top carabiner of the quick draw, you're losing a few inches. Pretty much all modern both hangers have enough room for two carabiners, that's why this works.
Sometimes you may have strange hangers that can only accommodate one carabiner, or maybe you're leading a roof where it makes more sense to clip the quick draw first, but those situations are pretty rare.

When you place a cam, you usually (depending on cam design) have three different options of where to clip it:
the racking carabiner
the sling
the wire loop
The wire loop is generally best for aiding, because it gives you the highest reach. (Note that some cams, such as the Metolius Master cam, don’t have a wire loop.)
Note that clipping the wire loop decreases the rated strength of the cam by about 1-2 kN, due to the sharper angle. But, it's just for your body weight and not for taking a fall, so in this case it's fine.
Let's look at these three clipping options in the photo below.
Left: Aid ladder clipped to the racking carabiner of the cam. Not ideal, you're losing about 8 inches of reach. Clip it higher if you can.
Center: Aid ladder clipped to the sling. Slight improvement, but let's see if we can get a little higher.
Right: Aid ladder clipped directly into the wire loop. This gives you the most reach, and is usually the best option.

While most modern cams are designed with wire loops that can handle your body weight and even maybe a bounce test without getting too abused, older ones (below) may not. Repeated aid climbing can damage the cable housing and potentially kink the cable a bit. Newer style cams with more robust thumb loops generally don't have this problem. Here's a photo of my beloved old orange Metolius that’s not in the best condition. =^(


How does your belay device affect impact forces?
Many climbers avoid using a Grigri (or similar device) when trad climbing, because they think the sudden braking action is going to dramatically increase the force on the top piece of gear. Is this something to worry about? Petzl did some testing on this, and the results are (mostly) reassuring.

“You should NEVER use a Grigri for trad climbing, because it puts too much force on the top piece of gear.”
Have you heard some version of this?
There are plenty of (often very experienced) climbers who trad climb with a Grigri, and they're not ripping gear out of the crack every time they take a fall, so what's the deal? (Actually, using a Grigri for alpine rock climbing has a host of benefits, which we cover at this article.)
I've also heard absolute numbers tossed around, such as, “Using a Grigri increases the force on the top piece of gear by 30%.” Percentage increase in force is not nearly as important as the actual force. For example, if the force on the top piece of gear goes from 2 kN to 3 kN, that's a large percentage increase, but a rather small numerical increase.
Fortunately, the clever gear testing gnomes at Petzl did some testing on this, and the results are interesting!
Petzl compared falls of increasing severity, using real live belayers and climbers. They measured the force on the climber, the top piece of gear, and the belayer.
Check it out here, or click the button below.
(There's a nice video of the test climbers catching big whippers, always fun to watch!)
It's important to note that falls involving real people have a much different (usually lower) forces then those typically measured in the harsh environment of a drop tower. This is typically due to belayer displacement, squishy human bodies, and some rope slipping through the device as braking is applied.
(With real people, you can't really test past factor 1 because someone's probably going to get hurt.)
Keep in mind these are not absolute rules for every kind of rope, belay device, etc. From the Petzl web page: “The results are influenced by slippage in the belay device and therefore by the belayer's grip. Variability is thus high: these results cannot be generalized to all situations and allow us only to quantify, in a broad sense, the influence of the belay device.”
If your French is a bit rusty: the gray dot is the top piece of gear “l‘ancrage”, the blue dot is the force on the climber “grimpeur”, and the black dot is the force on the belayer “l’assureur”.

image: https://www.petzl.com/US/en/Sport/Influence-of-the-belay-device?ActivityName=rock-climbing
For a Grigri belay with larger fall factors (0.7 and 1.0) the force on the top piece of gear is about 2 kN higher than a belay with a Reverso. The highest force measured overall was 6 kN (factor 1, with a Grigri, on the top piece of gear). Not catastrophically huge, but potentially concerning, depending on the quality of that top placement.
However, for the more common lower fall factor of 0.3, the Grigri generated only a very minor increase in force on the top piece of gear. That’s good!
Comments . . .
The takeaway: provided you can keep your fall factor relatively low, and you have good placements in good quality rock, using a Grigri for trad climbing is fine.
It's not the Grigri that's solely responsible for increased force, but more the amount of dynamic rope in play to help absorb the force.
Fortunately, high fall factors are rare and usually avoidable. Here are some ways to mitigate them.
If you're on a multi pitch route and looking at marginal gear and/or hard climbing right off the anchor, it might be best to belay with a tube style device or munter hitch. Once the leader has a few good placements and has some dynamic rope in the system, fall forces should remain low, belaying with a Grigri should be fine, if you want to (carefully!) change belay devices
A downside to using the Reverso (or similar device) is that by giving a softer catch, your climber might fall farther. This can obviously be a problem if there's a ledge or (ground) below them.
Want to learn more? See these articles that cover similar studies by Petzl.

Anchor overview - a German perspective
The German Mountain and Ski Guides Association (VDBS) published a short PDF file of recommended anchor building practices. Many of them are strikingly different than those used in many parts of the world. Let’s learn some new anchor setups!
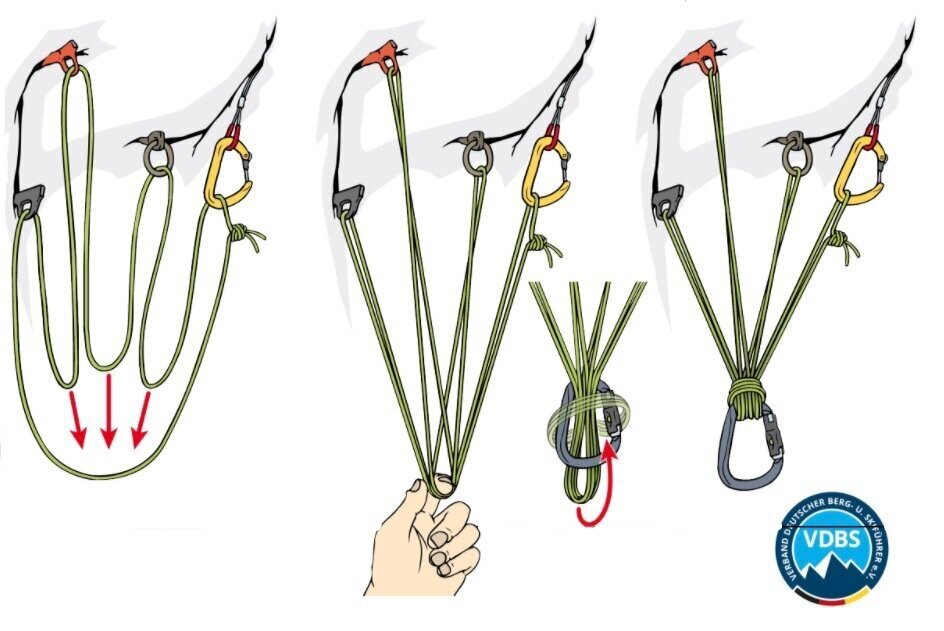
image credit: Georg Sojer / Chris Semmel / VDBS
The German Mountain and Ski Guides Association (“Verband Deutscher Berg und Skiführer” or “VDBS”) has a well deserved reputation for professionalism and technical expertise.
German Mountain Guide / Bergfuhrer Chris Semmel published an interesting PDF file that summarizes some modern, “VSBS approved” approaches to anchor building.
Many of them are quite different than what's used in the United States, so let's have a look!
Suggestion: When we encounter a technique that’s different from the one we currently use, it’s good to keep an open mind. There are few absolutes in climbing, “gotta do it this way or else”. Most everything else is somewhat subjective. Always practice new methods on the ground first, ideally with a qualified instructor.
A few notes . . .
All images on this page are credited to Georg Sojer, Chris Semmel and the VDBS.
Side note: Georg is a superb and funny cartoonist! Follow him on on the Insta: @sojercartoon
Many of these anchors originated in the “South Tirol”, (Dolomites) which is in northern Italy and not Germany, but credit still goes to Chris and the VDBS. Let's not get hung up on country of origin here, okay?
Graphics with the “VDBS “ logo are the recommended practice. Graphics without the logo are “alternative” methods.
The images are screen grabs from a zoomed in PDF file, so sorry if the quality is not so great.
I'm sure there are some native German speakers reading this who might take issue with some of my translation. I had help from a friend who is self-professed 90% fluent, so any mistakes I blame on him. =^) Let's stay focused on the image content and not get bogged down in tiny translation errors, okay?
Alpinesavvy tries not to offer advice, only ideas and information. I’m absolutely not saying that you should go out and start using these techniques tomorrow, especially without knowing the context and having appropriate instruction. I say again, having appropriate instruction. (Doing this may require a trip to Europe, lucky you.)
I'm not posting every graphic in the entire document, rather the ones I found personally interesting. I encourage you to check out the whole PDF file yourself; click the button below.
The title of the PDF: ”Standplatzlogik VDBS 2019 - Ausbildungsstandard VDBS & Alternativen”
This translates as “Belay stance logic - VDBS training standards and alternatives.” This title alone caught my attention. It's “Professional German Guide Training Standards”, not, “random stuff I saw on the Internet that might work for anchor building.” =^)
Let’s get to it!
Anchor 1 - Let's start off with something not familiar to Americans, a single bolt.
Yes, that's right, one bolt, no redundancy, that's all you got, better get comfortable with it. It's probably a glue in, it's probably about 20+ cm long, and you can probably hang a bulldozer off of it, but it's still one bolt.
It appears that the leader is cloved hitched directly to the yellow carabiner, and brings up the second with a Munter hitch on the black carabiner.

image credit: Georg Sojer / Chris Semmel / VDBS

image credit: Georg Sojer / Chris Semmel / VDBS
Anchor 2 - Here's an anchor set up more familiar to the rest of the world, “two solid fixed points”
Do you see a sling, a quad, a cordelette, or any attempt at equalization? Nope! If you want to build an anchor using the rope, this is about as simple as it gets. All the load is obviously on the left bolt, with the right bolt only serving as a backup in the (1 in 100,000?) chance that the left bolt fails.
This reflects a different approach to anchor building in areas that have top-quality twin bolted anchors - there's really no need to try to equalize.
(Note, the rope is tied to the belay loop and not the harness tie in points. Not a standard practice in the US and not recommended by most harness manufacturers, but apparently acceptable to the VDBS, so in this case I'm gonna call it good.)

image credit: Georg Sojer / Chris Semmel / VDBS
Here's another approach, in the diagram on the right. Instead of clove hitch, you can make a bight knot and belay from that.

image credit: Georg Sojer / Chris Semmel / VDBS - https://drive.google.com/file/d/1rpPxbNOHjCQNFZmnI-qB9iEXun7Q4Qyf/view
Side note: Check out how the rope is tied to the harness in the diagram above: to the belay loop! This is definitely not standard practice in North America, but maybe in Germany?
Have a look at the screen grab below from the Edelrid website. It clearly shows that tying to the belay loop is acceptable.

image: https://media.edelrid.de/images/attribut/54507_GAL_Gurte_Sport_ANSICHT.pdf
Anchor 3 - The fixed point belay
Again, used with two solid bolts, and again, this puts all of the load on the left bolt with the right serving as backup. This time, instead of using the rope and two clove hitches to connect the bolts, you use a double length (120 cm) sling instead. The sling is tied with a double loop bowline on the left, and either a clove hitch with the end clipped, as shown on the left, or a simple overhand knot, as shown on the right.
This technique can be used here as shown, to bring up your partner(s), and it can also be used to belay the leader directly from the anchor. AlpineSavvy has a detailed article on the fixed point belay technique, read it here.
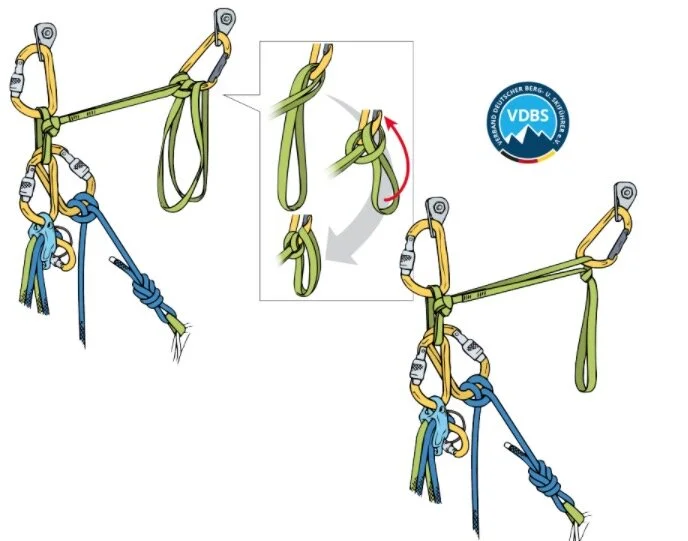
image credit: Georg Sojer / Chris Semmel / VDBS
In the right side margin is this text. It's highlighted, I'm guessing it's pretty important. =^)
Yellow: “Dyneema at the belay as linear connection sling with double bowline: width starting at 10 mm recommended (careful with older 6 or 8 mm slings) In red: “NO old dyneema slings with knots at the belay”

image credit: Chris Semmel / VDBS
Takeaway: (I would guess that the applies to using Dyneema slings for any kind of anchor, not just a fixed point as shown.)
Dyneema slings are fine to use when building an anchor.
It's best practice to use slings that are 10+ mm.
It's okay to put knots in them, provided the slings are relatively new.
Anchor 4 - Swinging leads with a rope anchor
Now, this is interesting. Lots of people think that if you build an anchor with the rope, you can’t block lead. You have to swap leads, because there's nowhere for the second to easily secure themselves.
Well, the set up below lets you swap leads!
It took me a minute or two to digest what was going on, look at the photo below and think it through. Using the quick draw on the top bolt is the key move.
This one is fairly complicated and definitely one to practice on the ground first!
Left: The second is belayed up on the light green rope with a munter hitch.
Center: The second clove hitches into the upper carabiner on the bottom bolt, removes the bottom carabiner, passes the rope behind the connection to the leader, and then clove hitches to the top carabiner of the quick draw.
Right: The leader is put on belay with a munter hitch from the bottom bolt, and clips the quick draw as the first piece for the next pitch.

image credit: Georg Sojer / Chris Semmel / VDBS
Anchor 5 -Now we're getting into alpine anchors, with “2 fragile fixed points”.
(See, your German is getting better already!) “Standard for load distribution.”
Notice, static equalization only. No sliding X, so no chance of suddenly loading the remaining anchor. An overhand knot on the left, and a girth hitch on the right. Yes, a girth hitch, it's fine to use that at the master point. Get used to it, you're about to see a few more. Learn more about the girth hitch master point here.
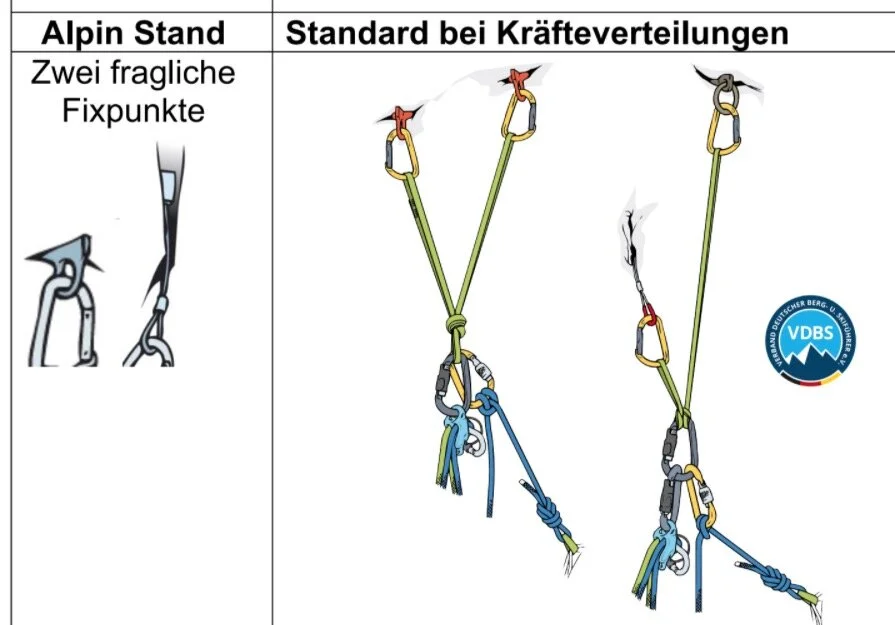
image credit: Georg Sojer / Chris Semmel / VDBS
Anchor 6 - Girth hitch on the ring at the top, pass a bight through the piton at the bottom, and then girth hitch the master point carabiner.
Many people would assume this anchor would require three carabiners, but in fact you only need one. You can rig this same anchor if you find yourself at a chain anchor and are low on carabiners; learn how from this article.

image credit: Georg Sojer / Chris Semmel / VDBS
Anchor 7 - Look, another girth hitch at the master point!
Also note, this is tied with an open, or untied cordelette. This lets you thread one end through the two pitons and the ring, and then re-tie the cord.
This can be a good method on rock that has a lot of fractures, pockets, or protrusions, because there are fewer carabiners that might be loaded sideways at strange angles.
Historical and geographical note, this style of anchor originated in the Dolomites in northern Italy, where there are lots of fixed pieces of gear in often marginal rock with lots of strange bumps and protrusions. This area is called the “Sud Tirol”, or South Tirol.
Can you see how the cord is tied into a loop? Looks like that's called in German a “paketknoten”, or “parcel knot” which is kind of a 1.5 overhand bend. (Personally I'm fine with a standard flat overhand bend here, although probably with slightly longer tails than what’s shown.)

image credit: Georg Sojer / Chris Semmel / VDBS
Here's a similar version, this time with a caption in English. (For any of you still wondering whether a girth hitch at the master point is a valid technique, hopefully you're convinced by now.) This is from a PDF file called: “Standplatzübersicht VDBS DAV 2020”
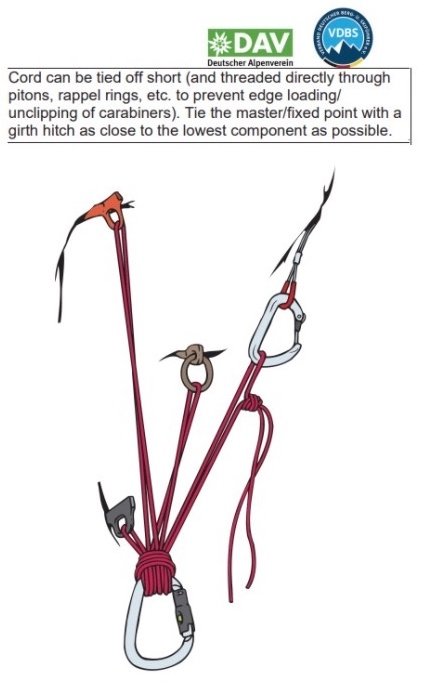
image credit: Georg Sojer / Chris Semmel / VDBS
Here’s how to tie the Paketknoten / parcel knot.
Anchor 8 - Hopefully you never have to make a five piece anchor, but if you do, you might want to remember this technique.
The clove hitches require a lot less cord compared to the traditional cordelette, where you’d have to pull down loops between each piece of gear.
(There’s a three-piece variation of this, called the “V clove” anchor, here's an article about it.)
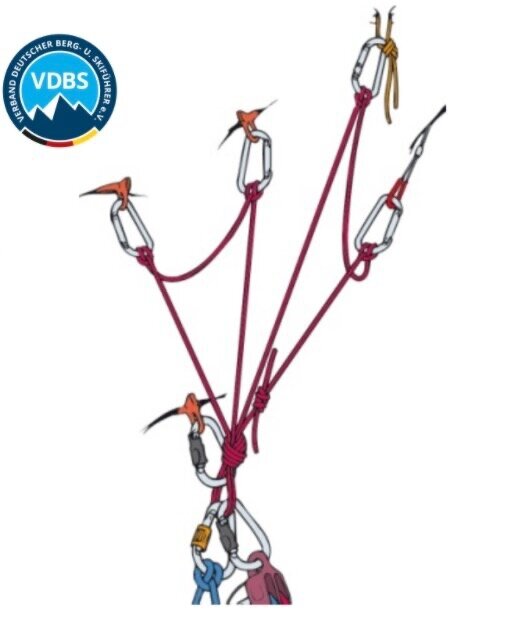
image credit: Georg Sojer / Chris Semmel / VDBS
That's about all. Hopefully this may have broadened your perspective a bit on acceptable anchor building practices.
Again, anchors are often dependent on context and intended use, so it can be a bit tricky to extrapolate from a single diagram what are appropriate real world uses.
Please seek qualified instruction for learning critical skills like this.
And finally, if you've read this far, everyone has at one point wished for an octopus anchor =^)

image credit: Georg Sojer / Chris Semmel / VDBS - https://drive.google.com/file/d/1rpPxbNOHjCQNFZmnI-qB9iEXun7Q4Qyf/view

The "easy-to-clean" toprope anchor
Are you top rope climbing with someone who doesn't know how to clean and lower from an anchor? Here's a simple way to rig a top rope to make cleaning and lowering safe and simple for the last person.
Modern “clip & lower” anchor hardware like fixed steel carabiners and Mussy hooks allow faster and simpler transitions from climbing to lowering, and are a great development at many popular climbing areas. However, they are still catching on, and many routes will have a chain anchor without clip & lower hardware. That usually means you need to build your own anchor of some sort, because it’s generally bad practice top rope directly through the anchor hardware. (Hopefully you know that already . . .)
Typically, the most experienced person will lead the route, which means the beginner climbs second and cleans the anchor. Of course, learning to safely clean and lower is an important skill to learn eventually. But if you're climbing with someone who does not have it down, here’s a way to rig your anchor to keep it simple and low risk for the last person up.
Important cautionary note at the bottom of this article, please read all of it!
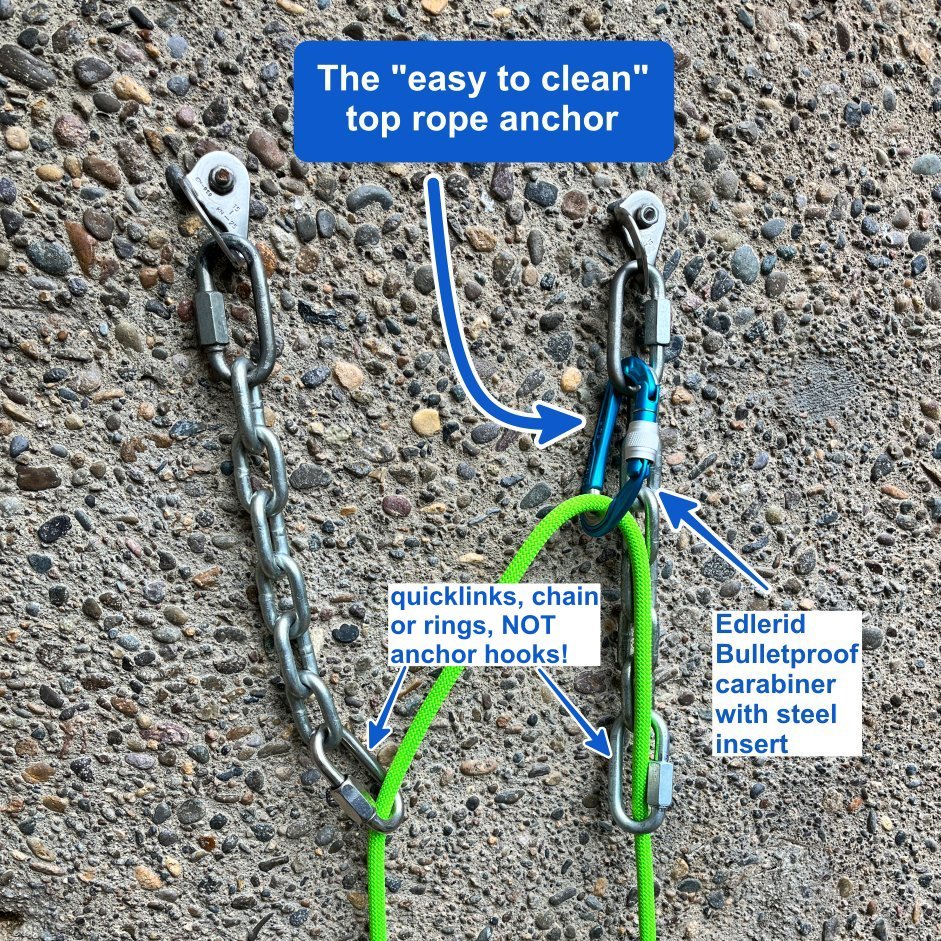
The first person leading the route, usually the most experienced, can rig the anchor is shown. You can now top rope off this anchor all day, and all the wear-and-tear from the rope goes your bottom carabiner, not on the fixed hardware.
If you’re toproping a lot, you might want to use steel carabiner or maybe the cool Edelrid “Bulletproof” carabiners. These are aluminum and have a steel insert at the bottom where the rope goes, meaning they will last much longer.
Notice how the carabiner is clipped through the quick link which means it's facing out, perpendicular to the rock. This can help minimize rope twists.
For the last person up (typically less experienced) to clean the anchor, it couldn’t be much easier. They simply clean the carabiner and call for a take and lower.
To clarify, lowering directly from the anchor chains is only for the LAST person, not everyone who’s top roping the route. Avoid top roping through fixed gear.
Concerns, grumbles, FAQ . . .
“You should never top rope through fixed gear.” That's generally true. It might seem like that's what's happening here, but it's not. As soon as the rope is weighted, all the force goes onto the carabiner and there's no significant wear on the rings.
“It’s not equalized.” That’s correct, because it doesn’t need to be. You're climbing on two modern bolts, each of which is rated to at least 25 kN. In the extremely unlikely (1 in 100,000?) event that the left bolt were to fail, the rope will be caught on the right bolt. (If equalization is important to you, simply clip a second carabiner into the quick link on the right side hanger.)
“If the bolt fails, it’ll shock load the other one. ” Not a concern. This is a top rope anchor with your stretchy dynamic rope absorbing almost all the force of the very modest fall, if a very unlikely bolt failure ever were to happen. (Again, if this concerns you, just clip a second carabiner to the right bolt.)
“Do I need a locker?” Not really. A standard snap gate carabiner is fine here. If the rope were to detach from the carabiner, it’s still going through the rings. But if it makes you happy to use a locker, go for it.
“Lowering through chains is bad, rappelling is better.” With modern anchor hardware that's inexpensive and easily replaceable, it’s now preferred practice (in most areas) for the last climber to lower, not rappel, from the anchor. This anchor is set up perfectly for that: large long-lasting 50 kN stainless steel rings at the bottom, connected to a quick link for easy replacement. This is per the recommendation of the American Alpine Club.
Caution: Don't do this on “open” anchor hardware (like anchor hooks)
This technique should only be used on “closed” anchor hardware, such as a ring, quick link, or chain, where there is no possibility of the rope coming unclipped. Do NOT use this technique on “open” anchor hardware, such as anchor (aka Mussy) hooks, carabiners, or a ram’s horn / pigtail.
In autumn 2023, there was a fatal accident in Alabama. It involved a beginning climber who was cleaning an anchor hook anchor, that had a locking carabiner added to minimize wear on the hooks. The carabiner was removed, somehow the rope unclipped from the hooks, and she fell.
Short version: for anchor hooks, do NOT add a carabiner on the anchor for the rope. If you do toprope through your own equipment, extend quick draws or slings BELOW the level of the hooks, and put the rope through your own gear that way. This reduces, but does not eliminate, the risk of the above accident happening again.
Also, NEVER have someone clean an anchor who is not 110% solid on the correct procedure. The proper learning sequence should be: 1) instruction on the ground, until the person can demonstrate several times in a row the correct sequence. Then, 2) doing it with an instructor off the ground, hanging at the actual anchor, where they can be directly supervised. (This means NOT yelling instructions from the base of the cliff!)

Here’s an analysis of the accident from IFMGA Certified Guide Karsten Delap.
Here's another video from Karsten showing some ways to build your own anchor with your own gear, and then transfer to the anchor hooks when it's time to lower off for the last person.

Printing backcountry maps in CalTopo
CalTopo is a top choice for backcountry mapping software for many reasons. One big one is the ease of printing. Let's have a closer look at some of the print features of CalTopo, some obvious and some a little more hidden.
CalTopo, my favorite backcountry mapping software, has a lot of great features. (While many of them are free, you can get a lot more with an annual subscription, which I strongly encourage you to do.)
One CalTopo highlight is superb map printing. Let's have a closer look.

1 - CalTopo generates a “geospatial” PDF
Rather than just spitting out a file to your printer, CalTopo generates a PDF file. (There is a JPG option, but I hardly ever use it.) This makes it easy to save the PDF to your computer, the cloud, and/or email it. This might sound like a trivial feature, but it's really handy. Tip - the “Generate PDF” button opens a new browser tab that shows the PDF. Remember to save or print this file; if you close the browser tab, it's gone and you have to generate it again. You can also save this PDF to your paid account, making it easy to share and organize.
Plus, it's not just a “dumb” PDF file, it's what's termed “geospatial”, or “geo-referenced”. This means that it has real world coordinates embedded in the file. This lets you to use the PDF map in various types of phone GPS apps, such as Avenza, as your base layer. (Personally this is not something I use, but some people find it handy.)
2 - Choose your paper size (depends on subscription level)
A free CalTopo account lets you print only on one paper size. But as you move up in subscription levels, it gives larger and larger printing options. At the basic $20 a year level, you can print on 11” by 17” paper, which is a very convenient size for lots of backcountry trips. By adjusting map scale to a custom number (such as using 1:30,000 rather than 1:25,000) and paper size, you can often print a map for a fairly large area on a single sheet of paper. (Pro and Desktop subscription levels allow printing on pretty much any size paper you want.)
3 - Print at any map scale you want
Many types of mapping software don't give you any option to choose the scale, and they don't tell you what scale the map is even when it does get printed. CalTopo does both. At the top left side of the print dialog box, there’s a dropdown for five or six common map scales. You can also choose your own, under “Custom”. (I often use this feature to make custom orienteering maps, which are often a 1:10,000 scale.)
4 - Choose your DPI (depends on subscription level)
DPI, or dots per square inch, determines the overall quality of your printed map. The default DPI is 200, which is fine for most weekend climbing and backpack trips. Higher subscription levels (Pro and Desktop) give you access to a 300 and 400 DPI option.
5 - Print a UTM or lat/long grid
Having a printed UTM grid on your map can be helpful for several things. It can help you estimate distance in kilometers, lets you plot UTM coordinates from a GPS onto your map, determine your UTM coordinates from your map, and give you a grid that's pretty closely aligned to true north, which can make measuring compass bearings on your map a bit more accurate. You can toggle this grid on or off with one click. I usually choose to have it on.
6 - Print multiple pages
One of the most powerful features in CalTopo is the ability to print multiple map pages, and do so in any combination of landscape or portrait that you want. For example, on a multi-day backpack trip you would probably need to print out several different pages to cover your trip at a reasonably large scale. If your trail runs north-south, you can print in portrait mode. If the trail changes to more east-west, you can print a few pages in landscape. Also, the red box that shows the actual print area is idiot proof and accurate. Click and drag the red print area boxes to determine how much overlap you have between map sheets.
7 - How to print it
Always protect a printed map from the elements. At the bare minimum, use a 1 gallon Ziploc freezer bag. Having the map in a plastic bag also makes it much more resistant to tearing.
It's best to print your map on a color laser printer if possible. Typically I save the map from my desktop computer onto a thumb drive, take the thumb drive to my local office store, and use the color laser printer there for a buck or two.
8 - Other helpful map information
On the bottom margin, CalTopo prints just enough info to be helpful, but not more than you need. You get a scale bar in miles and kilometers, the UTM zone, a ratio scale (like 1:25,000) the map datum (defaults to WGS84), and the correct magnetic declination for your location (declination is often incorrect on older printed maps).
One unique feature of CalTopo maps is a QR (Quick Read) code, printed on single page maps only. If you point your phone camera at the QR code, it can save the map as a PDF onto your phone, very cool! (You can even do this off of a computer screen, you don't even have to have the printed map in front of you.) This means one person can make a PDF map, email it to everyone else on the climbing team, and they then can print it, and/or save the map to the phone with the QR code. I'm a big fan of always carrying a digital backup of a paper map on my phone, and this is a super easy way to do it.
Here’s an example of the bottom of a CalTopo one page map, showing datum, UTM zone, two scale bars, ratio scale, QR code, and declination diagram.

Finally, here's an example of the finished product, for the Disappointment Cleaver route, Mount Rainier.
1:25,000 scale
11 x 17" paper (prints nicely on 1 page)
1 km UTM grid
MapBuilder Topo layer


2mm cord cuts 9mm climbing rope
You don't need a knife to cut a rope. A few feet of very thin cord pulled through a rope under tension is all you need. Watch the video here.
You don't need a knife to cut (okay, melt) a climbing rope.
Take a meter or so of any kind of thin cord. In the video I'm using 2mm but I've also done it with 5mm.
Tie a bight knot in each end, clip the loops to carabiners for handles.
Rapidly saw back-and-forth through the material that's under some tension. You’ll cut it through in a few seconds.
Check out the message from an Instagram friend below, they used it to cut through a tether. Pretty much any cord can cut through any kind of soft good if you do it fast enough.
This should also be an outstanding reminder of one of the few “Nevers” in climbing: Never set up a top rope through any kind of cord or webbing. When you lower your partner off, all of that friction, and resulting heat, can potentially cut through or severely damage your anchor material!
This is more than a party trick. Here's a message I got the Instagram after I posted this.


BD Gridlock with Grigri - are you using it wrong?
The Black Diamond Gridlock carabiner is designed to minimize cross loading. When using this carabiner with a Grigri, Black Diamond recommends that you clip the wide part of the carabiner to your harness, and the narrow end to the belay device: opposite the normal way you would use a carabiner.
The Black Diamond Gridlock is a popular belay carabiner, because it has a clever mechanism that (in theory) prevents your carabiner from being cross loaded. You would think the narrow end with the clip around it should always be put in your belay loop, right?
Apparently, not always. At least, that what Black Diamond says.

Lucky for you, the Alpinesavvy web gnomes actually read instruction manuals from time to time, even for carabiners.
The following is a screen grab from a PDF from the Black Diamond website, which you can see here. (You'll either need a magnifying glass or hit “control +” on your keyboard about seven times to make it big enough to read.)

image: blackdiamondequipment.com
Check out the first two diagrams. With the tube style belay device and a munter hitch, Black Diamond wants you to clip the carabiner in the logical way, with the small side toward your belay loop.
But look at the third diagram, with a Grigri. According to this, you're supposed to turn the carabiner so the small side is AWAY from your belay loop.
I don’t work for Black Diamond, so I can’t comment on the exact reasons for this. But, judging from the last diagram on the right, it appears that cross loading is a concern. Keep in mind the whole point of using a carabiner like this is to avoid across loading . . .
(And yeah, it’s a bit odd that BD is telling you how to use a belay device made by Petzl, but that’s a different conversation.)
Alpinesavvy offers ideas and information, not advice. If you use a Gridlock carabiner with a Grigri, consider yourself informed as to what Black Diamond wants you to do. Following manufacturer recommendations is usually good practice. But, you're free to use your belay device any way you like.

Grigris for alpine climbing
Many climbers love their Grigri for sport climbing, but think that it's 1) too heavy and 2) single purpose to bring for a long alpine route. Is this really true? Let's take a closer look at why bringing a Grigri might be a smart move for alpine climbers.
Thanks to AMGA Certified Rock Guide and Assistant Alpine Guide Derek DeBruin for assistance with this article. Connect with Derek: Facebook and Instagram
Also, thanks to Blake Harrington for this article which covers some of the same key points made in this one.
Have you ever heard some version of this?
“Grigris are great for sport climbing, but not for alpine routes. They’re too heavy and single purpose.”
This a common dismissal from many climbers, but it really true? Let’s have a closer look at these objections and see some of the ways a Grigri (or similar assisted braking device, aka ABD) might just earn a place on your alpine harness.
Now to be clear I'm not saying a Grigri is always the best choice for every route that could be considered “alpine”. If you climb with double ropes, or in conditions where your ropes might get very wet or icy, a Grigri will probably stay at home. But for a team of two, with mostly rock climbing, with a single rope, it can be a pretty sweet setup.
(Yep, I know there are some cool belay devices such as Edelrid’s Giga Jul, Mammut’s Alpine Smart, etc. Today we’re talking about the Grigri.) We’ll cover some of those other devices in another article.)
North Ridge, Mt. Stuart, Washington. About 25 pitches, and a great route for a Grigri. Photo credit, Steph Abegg (used with permission). Steph has a SUPERB website with loads of great beta, annotated photos and trip reports, check it out!

North Ridge Mt Stuart. photo credit: StephAbegg.com
First, the “it’s too heavy” issue.

Well, check that out! A Grigri and one locker can actually be LIGHTER than a plaquette and two lockers!
Of course your real world weight is going to vary a bit depending on your belay device and carabiners, but we’re really only talking a few grams between different systems. Do you really think you're gonna notice that on your harness?
Okay, weight isn’t an issue. How about functionality?
A two person team climbing on a single rope with one Grigri and one plaquette style belay device (such as a DMM Pivot, my favorite) can have a lot of benefits. Some of them are pretty obvious, others perhaps not so apparent.
Wait a sec, I heard you shouldn’t a Grigri for trad climbing, because it increases forces on the top placement . . .
Good point! One possible concern with a Grigri and trad climbing is that the Grigri can put more force on the top piece of protection when catching a fall. The better question would be, how much extra force are we talking about, and is it concerning? Let’s check out the nice graph below from Petzl.
With a low fall factor of about 0.3, the difference is negligible. As fall factors increase past about 0.7, there can be an extra 2 Kn or so on the top piece of gear. So, we can see that the potential problem is not with the Grigri, but rather the fall factor.
If there’s a reasonable chance of a high factor fall (climbing is hard off of the belay and there's not many gear placements), there are various solutions. One simple one: the climbers switch devices just for that pitch.

image: https://www.petzl.com/US/en/Sport/Influence-of-the-belay-device?ActivityName=Rock-climbing
1 - Reduces belay risk
With this system, typically the leader is always belayed with the Grigri and the second is always belayed with the plaquette in guide mode. On alpine routes where the belayer needs to use semi-downtime to change clothes, check the topo, grab some food/water, etc., you can be momentarily hands-free and still have a (fairly) secure belay. If you really need to go really hands-free, just tie a quick bight knot in the brake strand as a backup.
2 - Reduces rappel risk
At first glance, you might wonder how this system works for getting down, because the Grigri can only use one strand of rope. There are several different ways to descend with a Grigri - 1) fix one strand of rope, 2) self-lower, and 3) knot block. Of these, fixing a strand of rope will usually be the most practical.
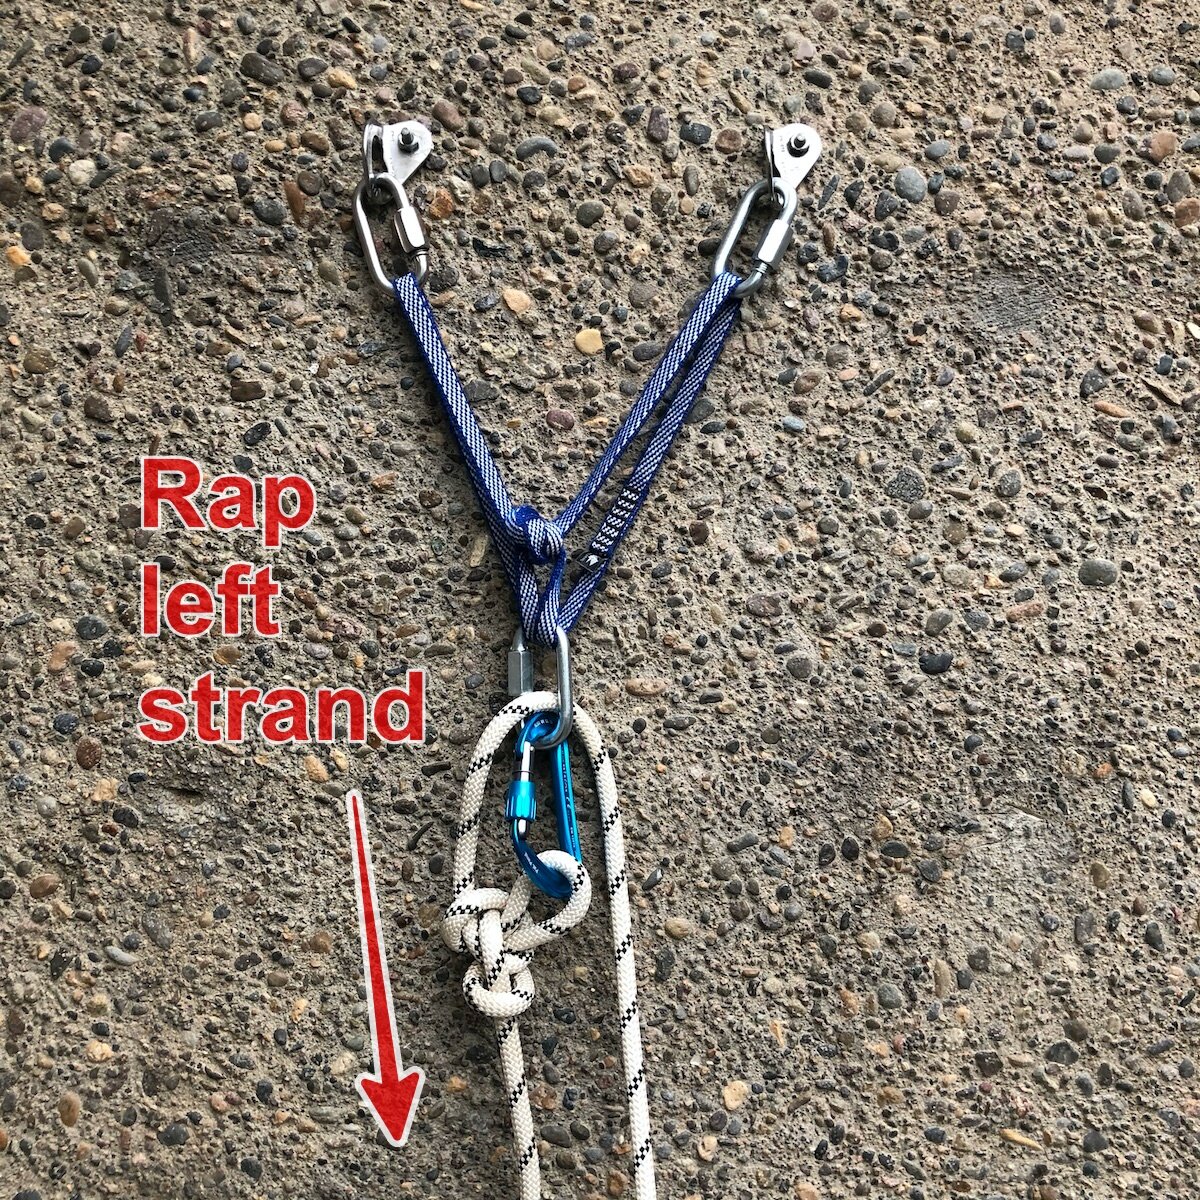
With this system, the rope is threaded for a normal rappel, one strand gets fixed to the anchor, and the Grigri partner raps first. There are LOTS of ways to rig this. Here’s a simple method: add a locking carabiner to the master point and fix the rope with any sort of a bight knot. A Figure 8 or overhand is fine. In the example below I used a butterfly because it's often easier to untie after its been loaded.
The first person descending with the Grigri has a few advantages over a normal two strand rappel. They can go hands-free to to sort out rope clusters, find the next anchor, pendulum around if needed, and any other shenanigans that are less risky when you don’t have to always be concerned with keeping a tight grip on the brake strands. And, if the first person rappels too far past an anchor, the Grigri is easy to convert into an ascending system to go back up the rope, see next step.
If the wind is really whipping around, the first person can descend on a Grigri and can tie in to the end of both rope strands, keeping them under control and minimizing the chance they’re going to get blown around and cause problems.
Once the first climber is secure at the lower anchor, the second person unties the bight knot, removes the locking carabiner, and rappels normally on two strands with the plaquette.
Another approach, which can further increase speed and reduce risk, is for the second climber with the plaquette belay device to use an extended rappel and pre-rig their device on the rope. If after doing this they add a third hand autoblock under their device, both strands of the rope are essentially locked in place. The first person with the Grigri can descend on either strand.
Note: Many people think that simply pre-rigging is enough to lock the rope in place for the first person down. This is not always the case. If you have a smaller diameter, slick sheathed rope, a heavier first person, minimal friction from rock, etc., the rope can start to slowly creep through the device. Adding the auto block stops this from happening. You could also stop any “rope creep” by tying a Stone hitch or a BHK (overhand on a bight in both strands) below the rappel device.
As with all new rappelling systems, always practice in a controlled environment before you ever try it on real rock.

3 - Simplified belay changeovers
When the second arrives at the anchor, they are already secure on the plaquette, so there's no real need to clove hitch to the anchor, use a PAS/tether, etc. ( At an exposed stance, the leader can add a quick bight knot on the brake strand for some extra security if needed.) If you're swapping leads, the new leader racks up, gives their Grigri to the previous leader, goes on belay, cleans the plaquette device and carabiners, and begins the next pitch. Simple, efficient changeover.
4 - Easy rope ascending
If the second needs to ascend a fixed rope, it’s easy to rig an efficient system with the Grigri, a small ascender such as a Petzl Tibloc and a double length runner as a foot loop. (Or a regular handled ascender and pre-tied webbing foot loop if you think you’re going to be doing it a lot.) In low angled alpine terrain, you may not even need the Tibloc; just push off the wall with your feet to make upward progress.
On a hard alpine route, especially if you have a rope gun, it might end up to be faster to have your stronger climber lead the really hard pitches, and the second ascending directly on the rope, just like on a big wall.
Here’s an article with complete details and video examples of how to do this.

5 -Simul climbing (for advanced climbers only!)
You know those expert teams climbing El Capitan in a few hours, who are pretty much always in motion and never really stop to belay? The second climber is almost always attached with a Grigri (as well as being tied into the end of the rope.)
You don't have to be a Yosemite speed climber for this technique to be effective. Long, moderate routes such as the 25+ pitch North Ridge of Mt. Stuart (photo at top) can be ideal for this, provided you and your partner are solid and experienced with the techniques.
The Grigri lets the second quickly feed out or take in a rope as necessary. Being able to fine tune the amount of rope between the second and the leader can be a tremendous help when simul climbing. Is the leader moving faster than you are? Throw them some slack through the Grigri. Is the leader slowing down and you’ve got a big loop of slack in front of you? No problem, pull that slack back through the device. (A kiwi coil, if you have the free hands to make one, to take up slack can be a good idea on lower angle terrain, so you don't trip on the rope.) You get the idea.
If the leader needs a proper belay through a few hard moves, the second can climb up to the next protection, or place some where they are, and give a proper lead belay. If the leader is using a progress capture device such as a Tibloc or Ropeman on the pro, it would be a fine idea to add this in after, not before, the hard moves. (In case you're wondering, this is a legit technique, read more about it here.)
These few suggestions are just scratching the surface of a very advanced application. If you want to learn the nuances of simul climbing, I highly recommend professional instruction from a certified guide.
So, that's my take on using a Grigri in the alpine. There is no significant weight penalty, and it's useful for a lot more than just belaying. If you’ve never rappelled on one or used it as an ascender, please practice in a controlled environment with a competent instructor before you ever do it for real on a big route.

"Summit flattening" in Google Earth
Google Earth is a great tool for scoping your route before you go, but it does have an occasional bug: Summits that are especially pointy can sometimes appear to be “flattened”. Look at a few examples of this effect, and know that it's good practice to look at many different sources of route information, especially topo maps and photos.
Google Earth (“GE”) is a wonderful tool for trip planning. However, there's a rather annoying bug for alpine climbers - mountain tops that are especially pointy can sometimes appear much flatter than they are in real life. This can make a technically difficult summit appear to be just a casual walk up, which could obviously get you in trouble if that's the only navigation tool you’re using. Let's look at an example.
Here is a photo of Mt. Thielsen in southern Oregon, a popular route. This view, from the Pacific Crest Trail, clearly shows the dramatic and steeply pointed summit block. (The route goes up the right skyline.)

image: Wikipedia, By Claytontullos - Own work, CC BY-SA 4.0
And, here's what the summit block looks like close up.
Definitely not a casual walk up. Most people use ropes and rappel. What’s not shown is the thousand or so foot drop just behind the guy in the red shirt.

image: adamschneider, https://www.oregonhikers.org/forum/viewtopic.php?t=16436
Here's a topographic map that shows the true steepness.

image: Caltopo, US Forest Service 2013, 25% shaded relief
Let's compare that with a few screen grabs from Google Earth of Mt. Thielsen.
Wait, what happened to the pointy summit? Looks like a casual stroll to the top!

More of a close-up . . .

Here’s a view from the increasingly-excellent-if-slightly-expensive mapping software Fatmap. Fatmap uses a different 3D terrain model than Google Earth, and the summit appears much as it does in real life.

image: fatmap
However, Google Earth doesn’t “flatten” every pointy peak. Here's a final example, the iconic Matterhorn Near Zermatt, Switzerland - looks perfect!

So, a good rule of thumb: If you’re climbing something steep but it doesn't look that way on Google Earth, always check other photos and topographic maps to make sure you have a true understanding of the terrain.

Double loop bowline for a rappel tether
Using a rappel extension is a good idea for a lot of reasons. Here’s a crafty way to tie it with a double loop bowline. This gives you a strong connection, double loop redundancy, and it's easy to untie when you're done.

Using a rappel extension is a good idea for a lot of reasons, which we cover in detail here. Why might you want to use a rappel extension?
Easier to use a third hand / autoblock backup
Lets you use a stacked, or pre-rigged, rappel
Easier to rig your rappel device correctly, especially if you have on lots of clothing
Less chance of clothing getting caught in the rappel device
There are lots of ways to rig it, but I sure learned a new one from Mark’s class. It has a few benefits and is definitely a Crafty Rope Trick (CRT)!
A double loop bowline, tied through the belay loop (or tie in points). Why is this cool?
Easy to untie after its been loaded, much more so than an overhand knot.
Two redundant loops - for anyone who’s not too excited about rappelling off of a single loop of webbing, this is an elegant solution.
Because it's tied in a loop and does not cinch down like a girth hitch, it's fine to use this on your belay loop. Using your belay loop instead of your harness tie in points can make this more comfortable when it's loaded. If you prefer your tie in points, that works fine too.
Concerns . . .
“OMG, a ring loaded bowline, you should never do that, Yer Gonna Die!” If the end of the rope is anywhere near the knot, that’s probably correct. But here were using a sling, not a rope. In this configuration, it breaks at about 18 kN. As with all knots, tie it correctly and dress it well. When rappelling you're going to put around 1 kN on this sling, so no worries.
“OMG, a knot in Dyneema, you should never do that, Yer Gonna Die!” I feel that knots in Dyneema are acceptable in most climbing situations, which we cover in this article. But if you don’t, feel free to use a double length nylon sling; that works fine too.
“OMG, you’re attaching a tether to the belay loop! You're not supposed to do that!” Even though a belay loop is rated to 15+ kN, some folks are still hesitant to girth hitch a sling directly to it. But notice, that's not what's happening here. A girth hitch cinches down on the belay loop (and if you leave it pretty much permanently attached to your harness, which is NOT recommended) and can conceivably damage the loop through repeated rubbing in the same spot. However, this is a tied loop, not a girth hitch, which puts zero significant strain on your harness. But, having said that, if you're more comfortable using your two tie in points, go for it. We cover it at this article.
How strong a ring loaded bowline in Dyneema?!
Double loop bowline in Dyneema sling being ring loaded, breaks around 20 kN. From HowNot2 (about 6:30 in the video). A belay loop usually breaks around 15 kN, so think about that for a moment . . .

Here's how to tie it. This will probably be a new knot for most people, but it's simple and once you get it down, you can literally tie in a few seconds.
You’ll need a double length/120 cm sewn runner and your harness. First, a step-by-step with photos. There’s a video link at the bottom.
Pass the runner through your belay loop, from left to right. Keep the stitching at the far end of the sling away from you.
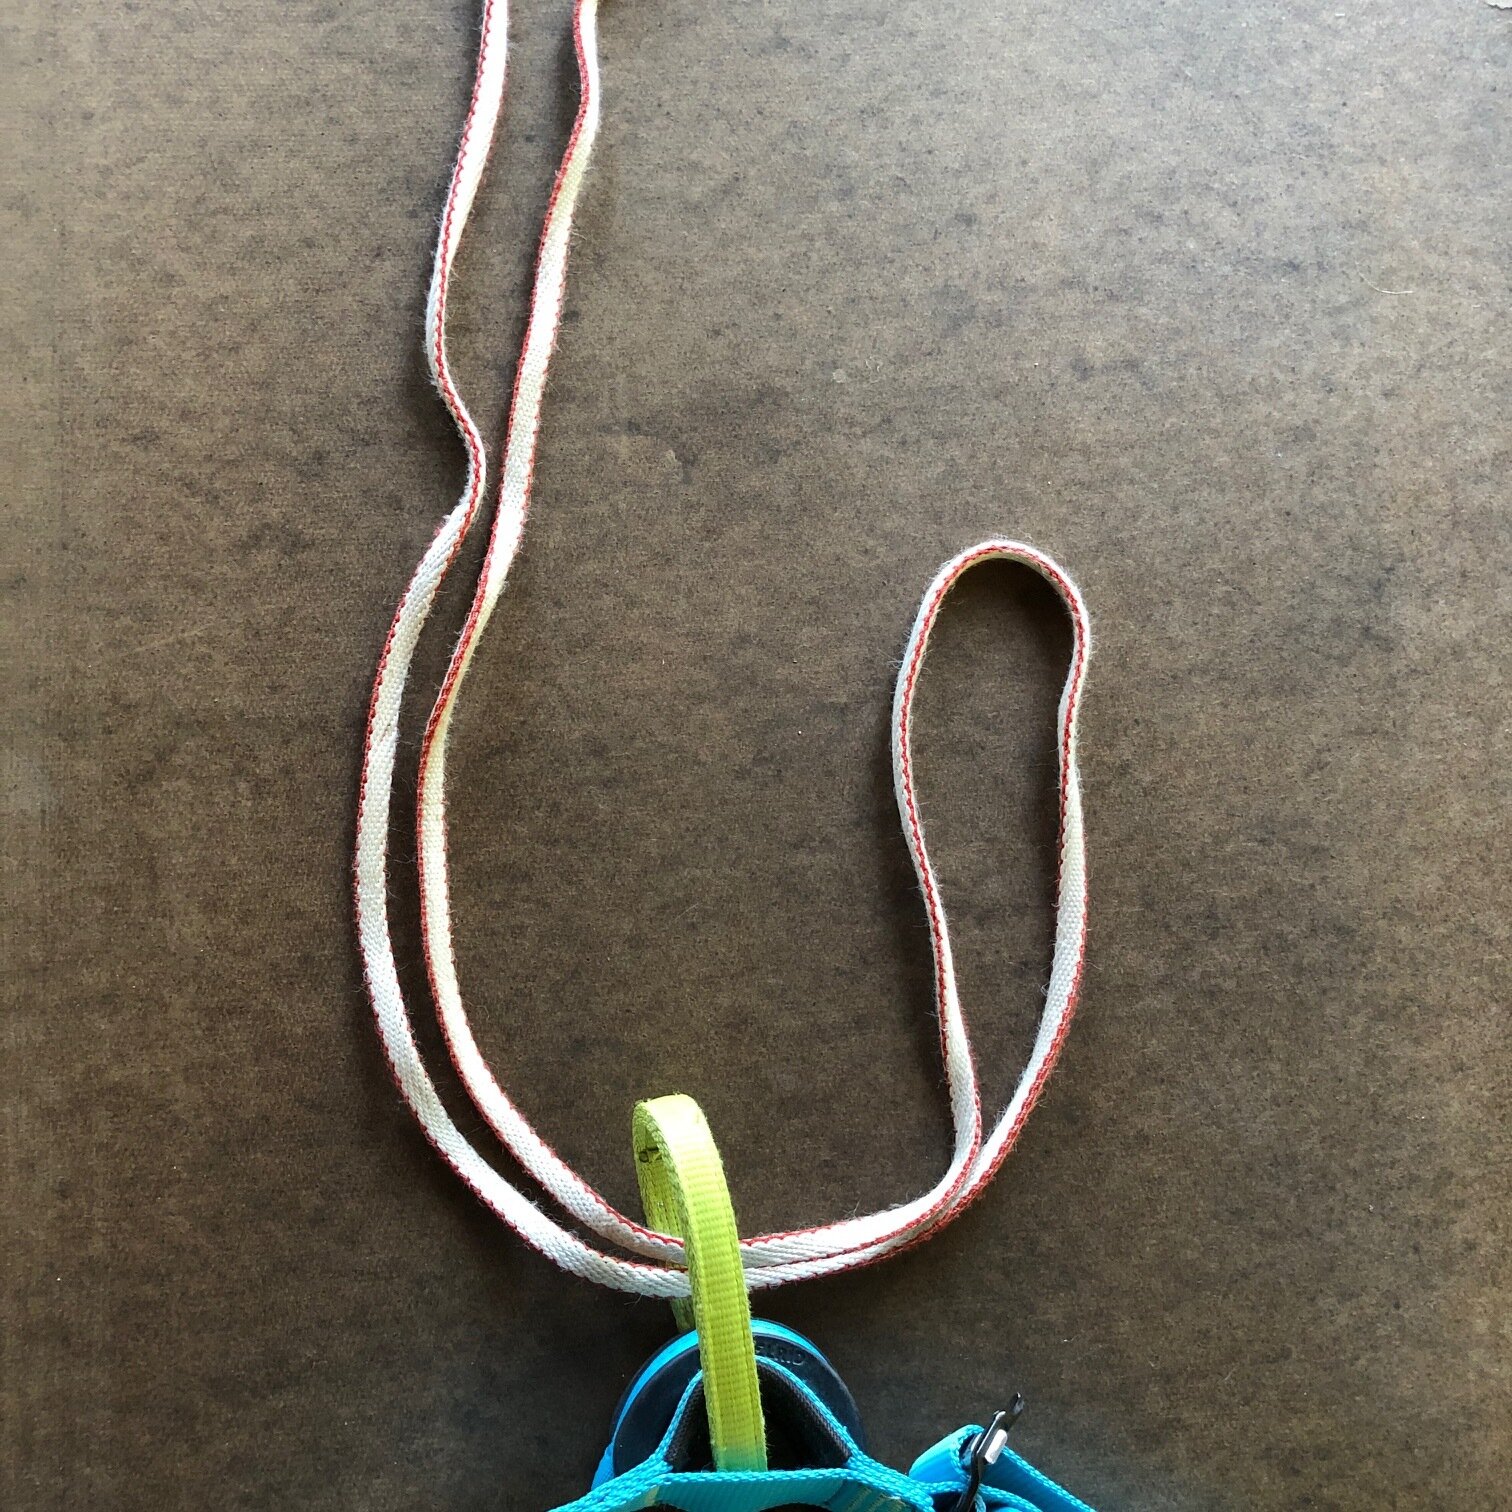
Cross two strands over to make a loop as shown. Important - Make the loop just as shown here, otherwise the knot will fail.
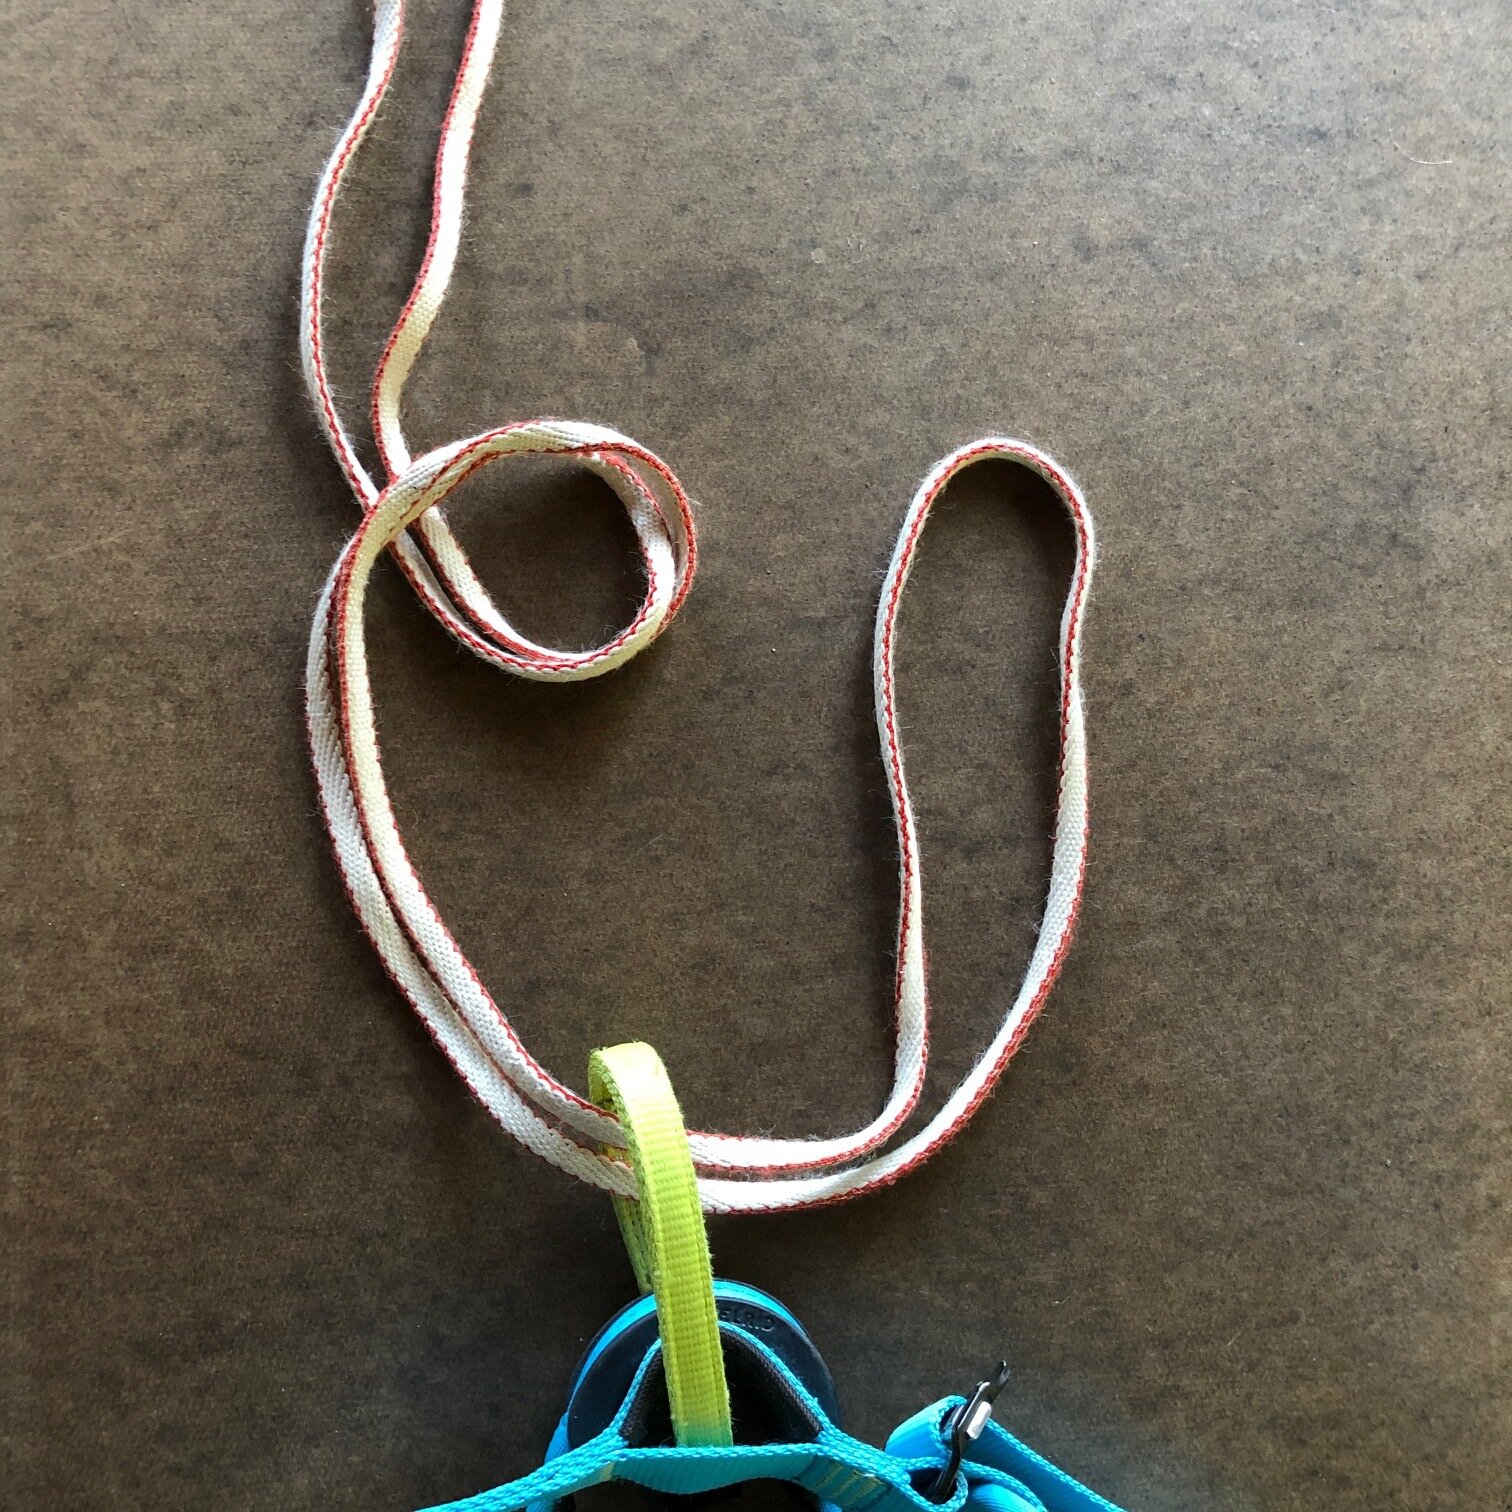
Pass the end of the sling up through the loop.

KEY MOVE: Instead of “running it around the tree” like a regular bowline, pass it “over the top of the tree” by passing the long tail through the small loop.

Pull on the right side of the double loop and the long tail. Voilà, you should have a bowline.

Dress the knot and snug it down. To test it, pull hard on the large loop. If you tied it wrong, the knot will collapse, or turn into a slipknot, or do something weird other than be a solid loop. (Like all knots, once you have it right, practice it 20 or so times until it gets into your muscle memory.)
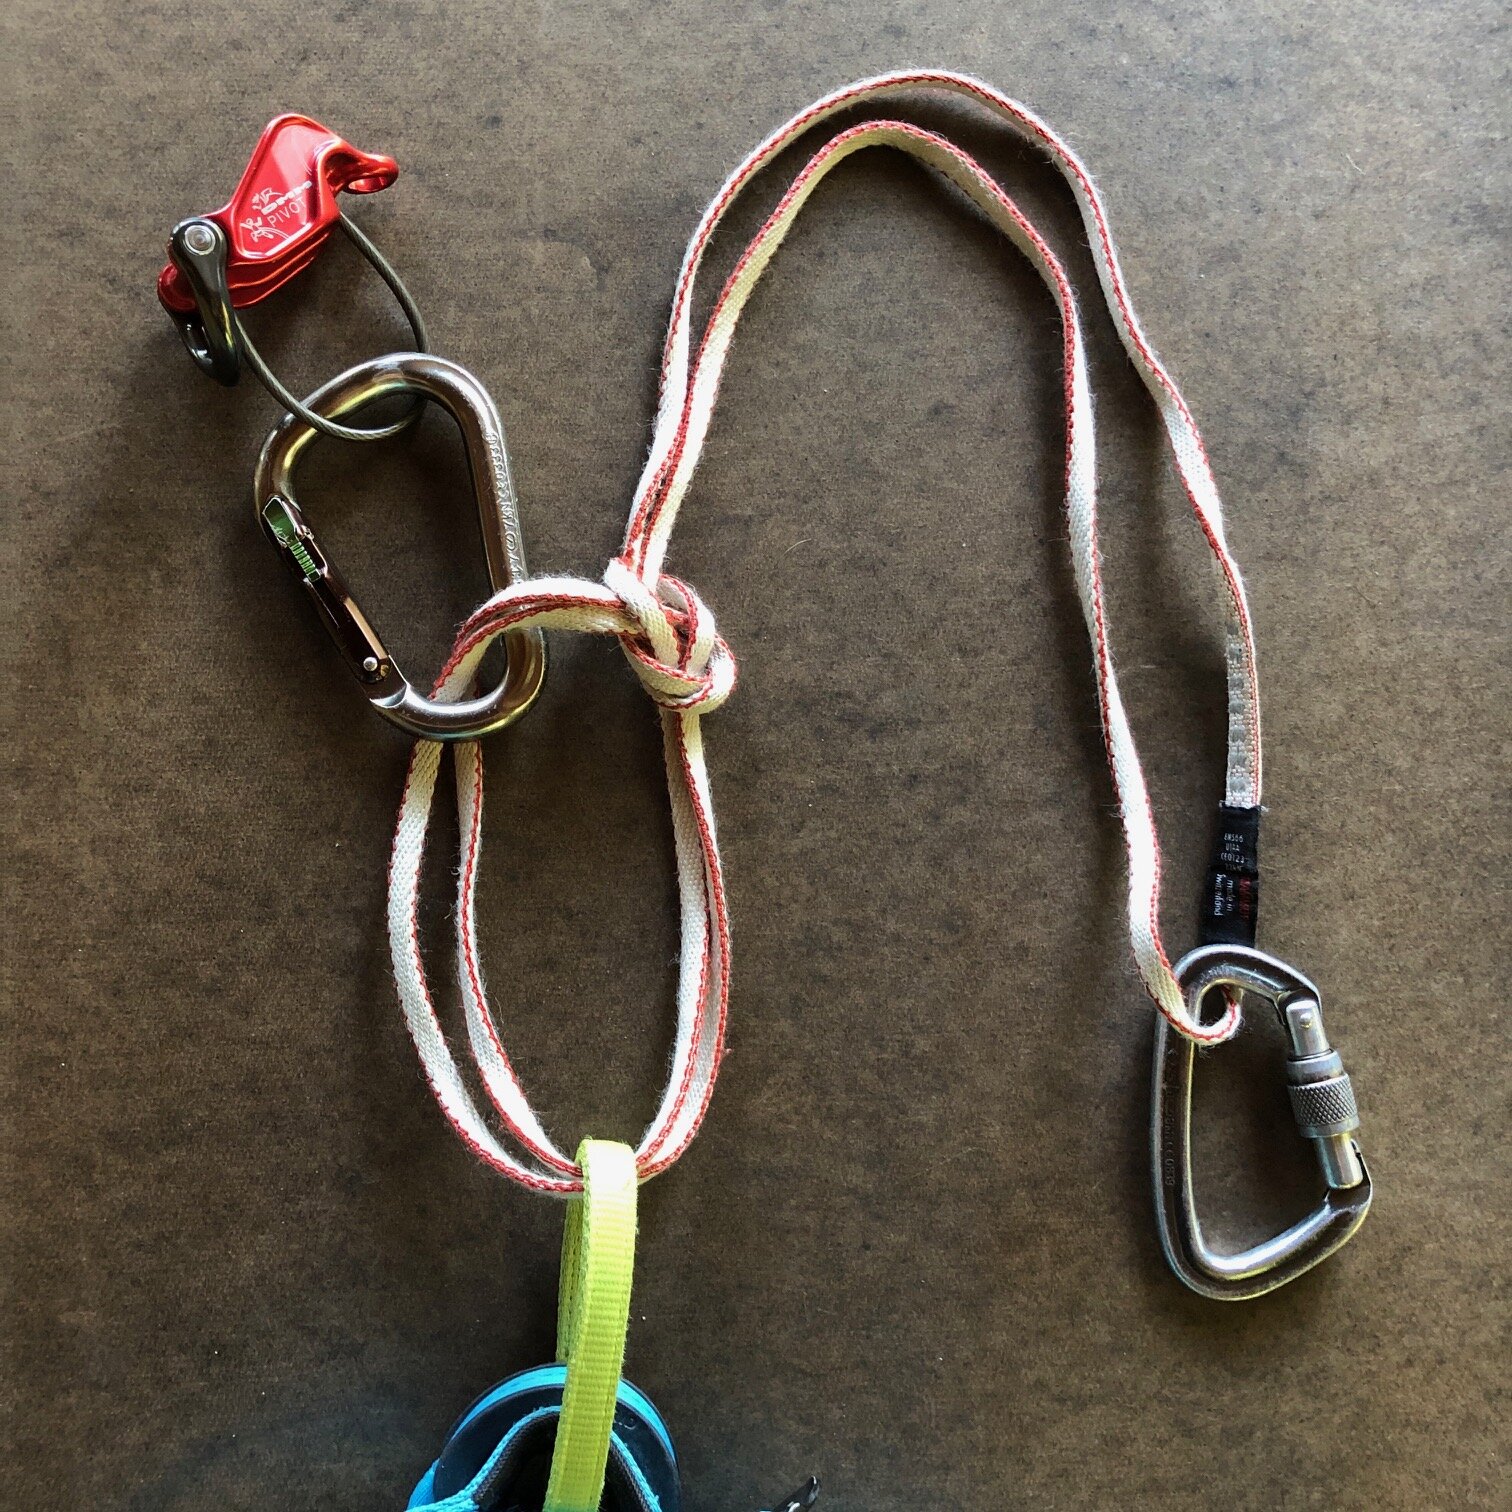
When it's dressed and ready to go, it should look about like this:

Attach a locking carabiner and rappel device to the double loop, and your anchor tether locking carabiner to the end of the single loop. You're ready to rappel.
A video:

Making a GPX track file in Google Earth
Google Earth offers more than eye candy for looking at your favorite mountains; you can use it to draw waypoints and tracks, and then export both of them as a single GPX file for use on your backcountry trip. There are a few tricks to it, here's a walk-through tutorial on exactly how to do it.

What a great time to be a backcountry navigator! The bounty of amazing and free navigation resources has never been better. If you know the basics of how to use a few of them, there's not much excuse to get lost anymore. I’m a huge fan of CalTopo mapping software to do at home trip planning, and this usually includes creating GPX files to use on my phone in the field.
However, there can be times when creating a track with the 3-D viewing aspect of Google Earth (called GE from here on) can be helpful. However, I’ll be honest here: While GE is great for viewing, the drawing tools can take some getting used to. I mostly prefer to use CalTopo (especially the Google satellite imagery map layer, which is identical to what you get in GE) whenever I can. But, for times when you want to look at smaller terrain features, such as which of several ridges or gullies might be the easiest to go up, GE can be the winner. So, here's a tutorial on how to draw waypoints and tracks in Google Earth. It might sound a bit complicated if you haven't done it before, but if you're reasonably computer savvy you'll get the hang of it in a few minutes.
Notes on terms: Google Earth refers to a single point as a “placemark”, and a line as a “path”. We’ll use those terms from now on.
I'm doing this in Google Earth Pro, which I recommend. It's free and has a few different features than the browser based version of GE.
Short version: Make a folder in GE for your trip. Draw placemarks and paths in GE. Right click on the folder, save as KML file. Open CalTopo, import KML file, check it, export as GPX file, done.
Long version: Let's go through it step-by-step. For this example, we’ll use the Leuthold Couloir route on Mt. Hood, Oregon USA.
Suggestion: when you're learning to do this on your own, don't start with steep mountain topography. Find a park near your house that you know pretty well, ideally with some roads and trails that you can see from the satellite. Drop some placemarks, make a few paths, see how it generally works without the complications of doing it in 3-D. After you get the hang of it, and then go find some steeper mountains to practice.
Step 1 - Zoom into your area of interest, and make a folder for your placemarks and path.
It’s possible to do it without a folder if you just want to draw one path, but if you want to draw any more than that, such as placemarks plus the route, you need to contain them all in one folder so they export as a single file later on. So, let's do that. In GE, Choose “Add > Folder” from the top menu, and name your folder. You should see it on the left side.

Step 2 - Add some placemarks along your route.
These help keep the path drawing (next step) more accurate. You can keep the placemarks after you draw the line, or delete some or all, your choice. The simplest would be two, a trailhead, and a destination.
Zoom to where you want to add a placemark, using all the 3-D features of zoom, pan, and tilt until you just the right spot. When is looks good, click the yellow “thumbtack” icon along the top row. Drag it to the right position, then click “OK” in the pop-up box. (If you want to change the name or position after this, right click on a placemark icon or the placemark name from the left part of your screen, and choose “Get Info.”)
If you know where your route goes, then you can add proper names of placemarks in the correct location. If you're not sure of the route, you can still add placemarks. Zoom in close in GE, and draw placemarks at places like “base of ridge” or “top of gully”. Below, I added about five placemarks that show important progress points of the route.

Step 3 - With a few placemarks to guide you, draw a path.
When you're ready to start drawing your line, click the “Add Path” icon at the top. You should see a pop-up box with some properties of the line. I like to change the color to red or magenta at this point and not use the default of white, because you can't see the white line when you're drawing over snow.
Also, somewhere counterintuitively, you need to keep this dialog box open and available while you’re drawing your path. So, after you name your path and change the line color, drag the box off to one corner of your screen, so it's out of the way but you can still see it.

You will soon discover that the wonderful zoom, pan, and scroll viewing options in GE do not work nearly so well when you're trying to draw a line at the same time. So, try to adjust your viewing angle in GE before you start so it shows where you want to go as clearly as possible.
You can change the viewing angle with the up down left right buttons on your keyboard, and also with the GE view controls in the top right corner. Don't try to scroll or click and drag on the screen while you're drawing the line, because you'll be sure and screw up your line. (I did say this was a bit annoying, right?)

While you can click and drag to draw freehand, this gives you a zillion different line points and makes it hard to edit. I prefer to click one by one to draw the line. If you draw a vertex that you don't like, tap the keyboard delete button to remove it. You have to click OK in the dialog box to complete the line and stop drawing.
If you have a more complicated route, draw in one section of it at a time that you can clearly see. Then, change the view for the next segment of the route, right click on the path, choose “Get Info”, and then you click to extend the path for the next part of the route. (A bit hard to describe in words, try it yourself and you'll get the hang of it.) You can also use “Get Info” to drag a vertex into a new position. So, don't stress when you're drawing if a vertex isn't exactly in the right spot, you can adjust them later.
When you're done, you hopefully have something that looks about like this:

Step 4 - Save folder as KMZ file
A KMZ / KML file (which stands for Keyhole Markup Language, for you software nerds) is a file containing geographic data that is the native GE format. (A KMZ is the compressed version of a KML; they're both basically the same thing.)
Right click on the folder name on the left side of your screen, and choose “Save Place As.” Save as a KMZ file to your hard drive.

Step 5: Import the KMZ file into CalTopo
Let's import the file into CalTopo, and check to see that it looks good. If we like it, then we can export it as a GPX file for use in a smartphone mapping app like GaiaGPS or on a handheld GPS device.
Go to CalTopo.com, tap the “Import” menu from the top, and select your file.

When it imports and draws, it should look something like this. That looks pretty good! Notice that the path and placemarks were imported exactly as they look in GE, with correct labels and colors.
Note: When you export as a GPX and open it in a phone app or handheld GPS device, it's quite likely the icons and line color might change. Don't worry about that, the geo-data is in exactly the right place, it just might look a little different.

Step 6 - Export as a GPX file.
Now, the final step is to export the file as a GPX file and save it to your computer, ready to use in the field. Click the Export button at the top of the screen in CalTopo and save to your hard drive. (CalTopo uses the term “Download File” on the drop-down menu. Don't let that throw you off, think of it as a “Save As”.)
Now you have a GPX file to use on your device in the field. If you’re a fan of Gaia GPS (like I am!), the easiest way to get this onto your phone is to go to GaiaGPS.com, log into your account, click your account name in the top right corner, choose “Upload” from the drop-down menu, and upload the file. In a minute or so it should auto-magically synchronize with your phone.
BOOM, you’re done! Give yourself a high five!


Petzl Sm’D carabiner - there’s a keeper cord hole
Ther Petzl Sm’D carabiner is a compact locker with a bonus - it has a hole designed for a keeper cord.
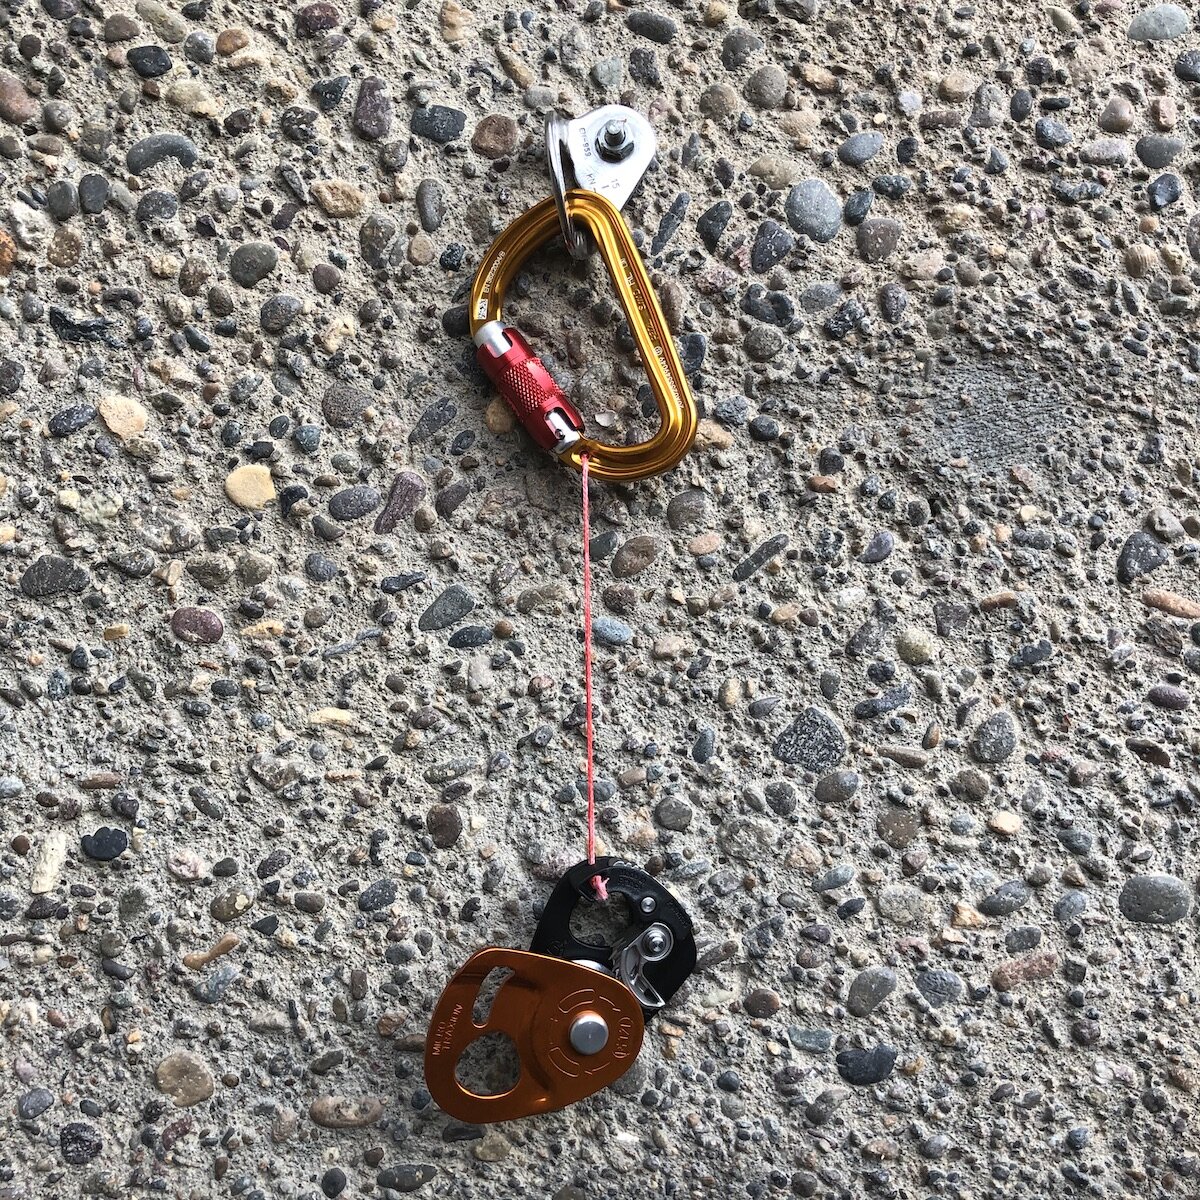
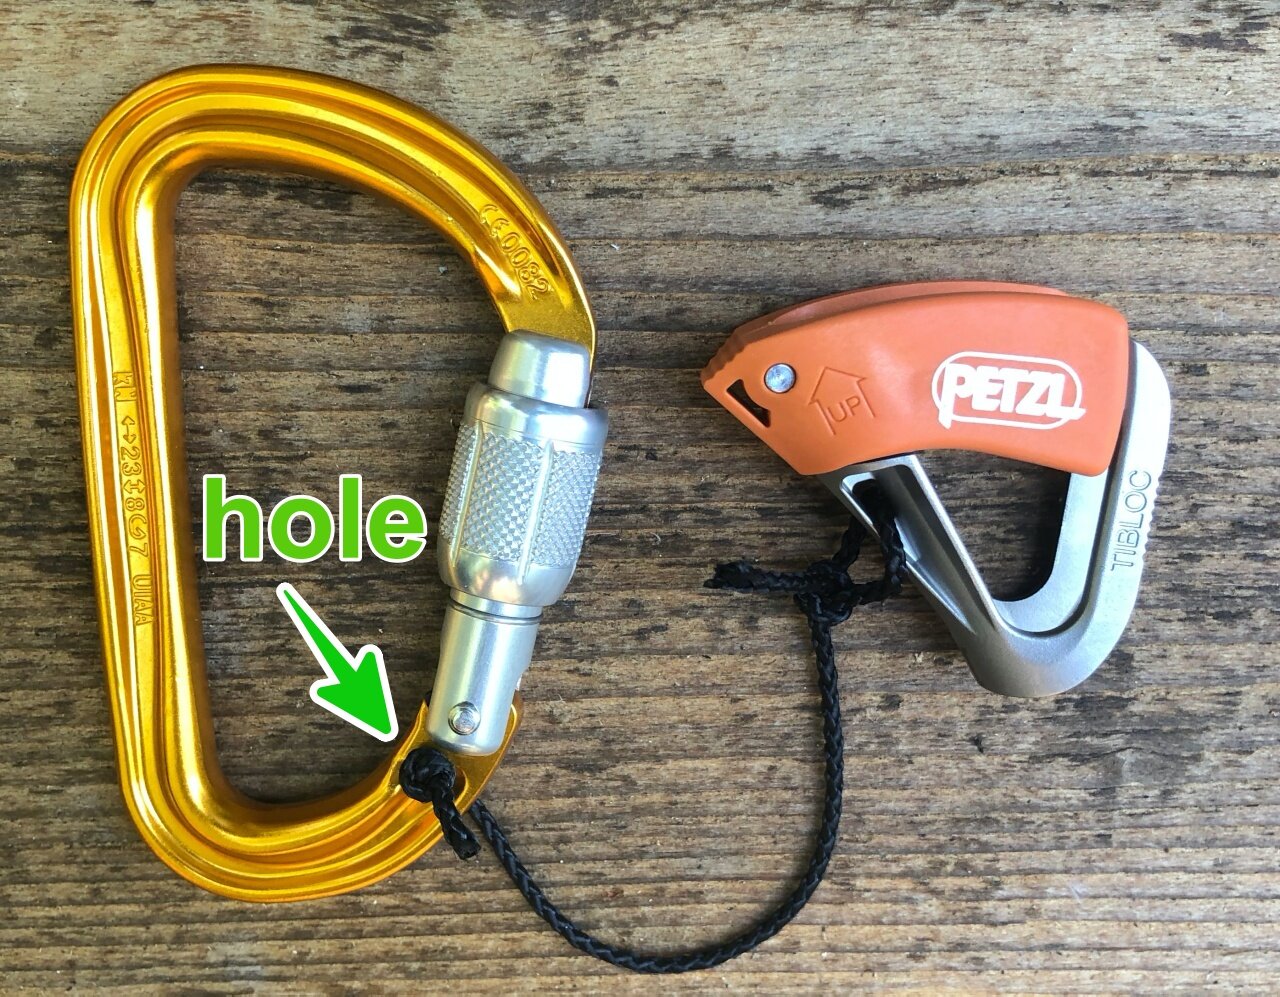
The Petzl Sm’D carabiner is a compact, lightweight locking carabiner available in screwgate or double action sleeve. It's a great choice just about anytime you need a smaller locking carabiner, plus it has a bonus feature: near the base of the gate, there’s a tiny hole. As far as I know, no other carabiner offers a hole like this, and it's pretty darn handy.
This hole allows you to tie off a keeper cord to better secure expensive hardware such as a Grigri, progress capture pulley like the Micro Traxion, or mini ascender like a Tibloc. Of course, you can tie a bight knot on a keeper cord and just clip it to a carabiner, but then it’s flopping around and can hang up on things. This method is a bit cleaner.
And, hopefully this goes without saying, but the cord is only to keep you from losing the gear if you drop it. Clip the hardware to the carabiner and clip the carabiner to your harness. The cord is there only as a backup in case you’re an occasional fumble-fingers.
I've heard some people voice concern that this hole might weaken the carabiner. Let's trust the ace Petzl engineers on this one, shall we? The carabiner is just as strong and properly rated as anything else you will use. Do you think Petzl would sell this if it wasn't bomber?
Photo: A Petzl Tibloc secured with some #36 bank line. Bank line is heavy duty twine rated to more than 300 pounds, and useful for all kinds of things. Read more about it here.
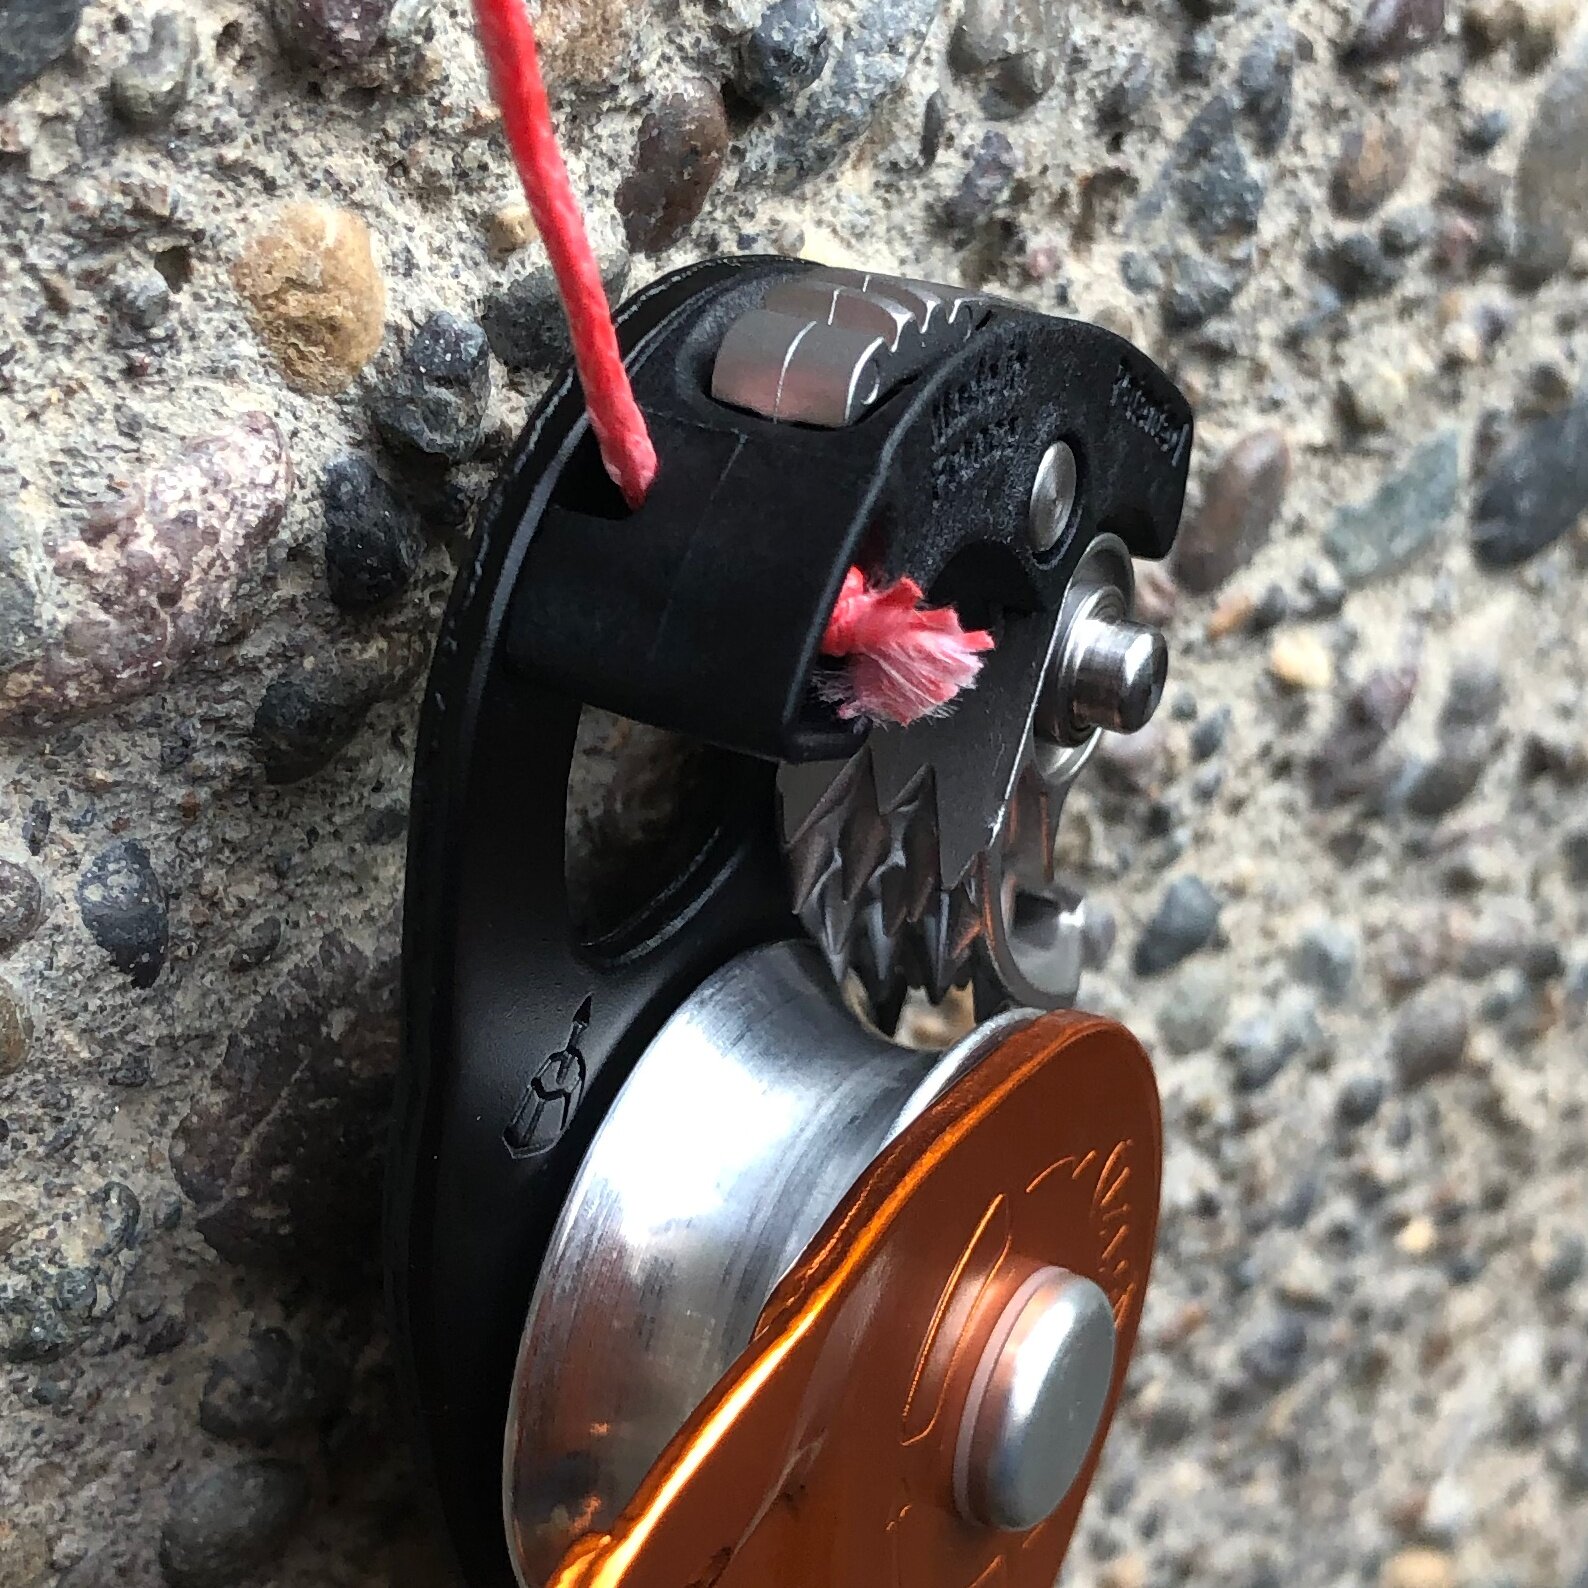
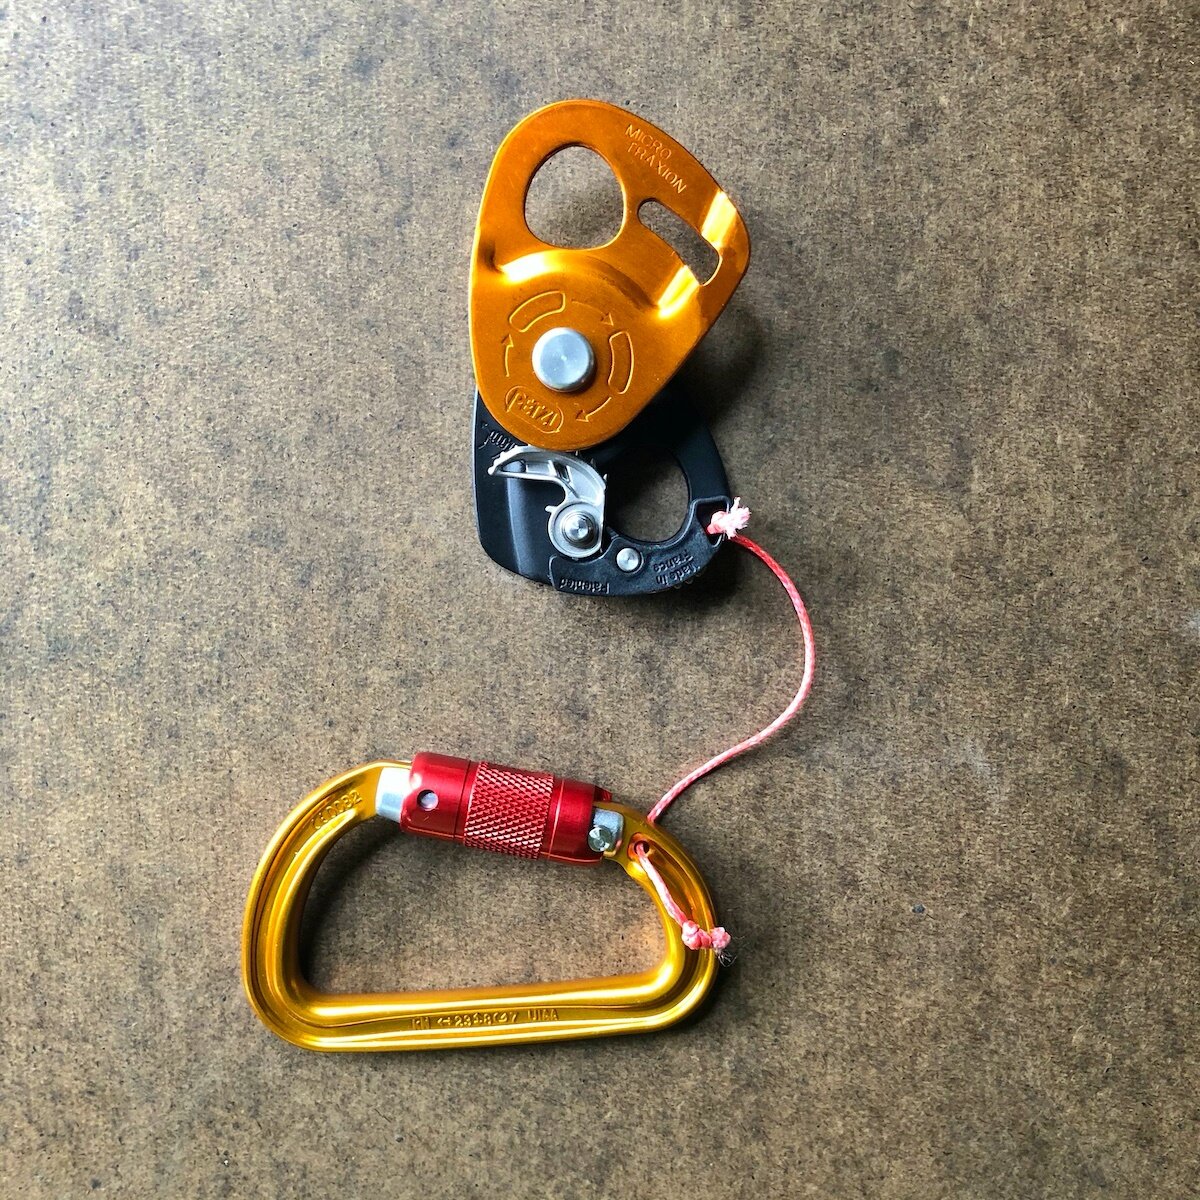
Here’s a Petzl Micro Traxion progress capture pulley connected to an Sm’D carabiner with some 1.3 mm dyneema / spectra / UHMWPE string. A mere 1.3 mm, but rated to 580 pounds, amazing!
Pro tip: the Micro Traxion actually has a hole designed for a keeper cord. (I’ve found a lot of folks with Micro Traxions don't even know this hole is there =^) You need a string with a very small diameter to fit through that keeper cord hole in the pulley, that's why I suggest this 1.3 mm dyneema string. You'll also probably need a safety pin or something similar to work at through this tiny hole.
Here’s a link where you can buy dyneema string like this. Bonus, it can also work for repairing the trigger wires of cams. Share some with your friends, you’re going to buy quite a lot of it, like about 10 meters.
Finally, you can add a keeper cord to the Petzl Grigri. But, this requires that you drill a hole into the device, and doing so is not an approved practice by Petzl. So, I’m not going to give details on how to do it. If you choose to make this modification, Google is your amigo.

Repair a cam with trimmer line - tutorial
Got a broken wire on a cam? You might be able to fix it with some cord from a weed whacker and some simple hand tools.
Photos (used with permission) are all from Pacific Northwest climber Dave Hill, thanks Dave!
Original idea from British expedition climber Andy Kirkpatrick.
Got a frayed or broken wire on a cam? You might be able to make a quick fix with plastic trimmer cord from a weed whacker. (Other options are Dyneema string, and bicycle brake cable with small swages.) Trimmer cord comes in different diameters, experiment to see what works with your equipment. This example is for a Black Diamond cam. Other makes and models might have a slightly different procedure.
How long you can expect a trimmer cord repair to last? Good question. While some people have got years of use out of a fix like this, others might consider it more as an temporary “field repair” than a long-term solution. It’s probably a good idea to replace the trimmer cord with something more substantial once you get home.
Black Diamond replaces cam trigger wires for about $15, not sure about other manufacturers. (Web search: “Black Diamond cam repair”.)
Finally, here’s a link to a PDF tutorial from Metolius of how to repair their Master Cams with Kevlar cord, sent to me by @dumbanchors.
What you need:
wire cutters
needle nose pliers
lighter / flame
weed whacker cord - get a couple of feet from your neighbor with all the tools, or from a yard maintenance person


A better way to tie the figure 8?
The figure 8 knot (rewoven or on a bight) has a reputation for being difficult to untie after taking a heavy load. But, the problem might be with how you’re tying / dressing it, more so than the knot itself. There’s a subtlety that can make a big difference; learn it here.
Here are two seemingly identical figure 8 knots. But, there’s a subtle difference that can affect how easy it is to untie after loading. Can you see what it is?
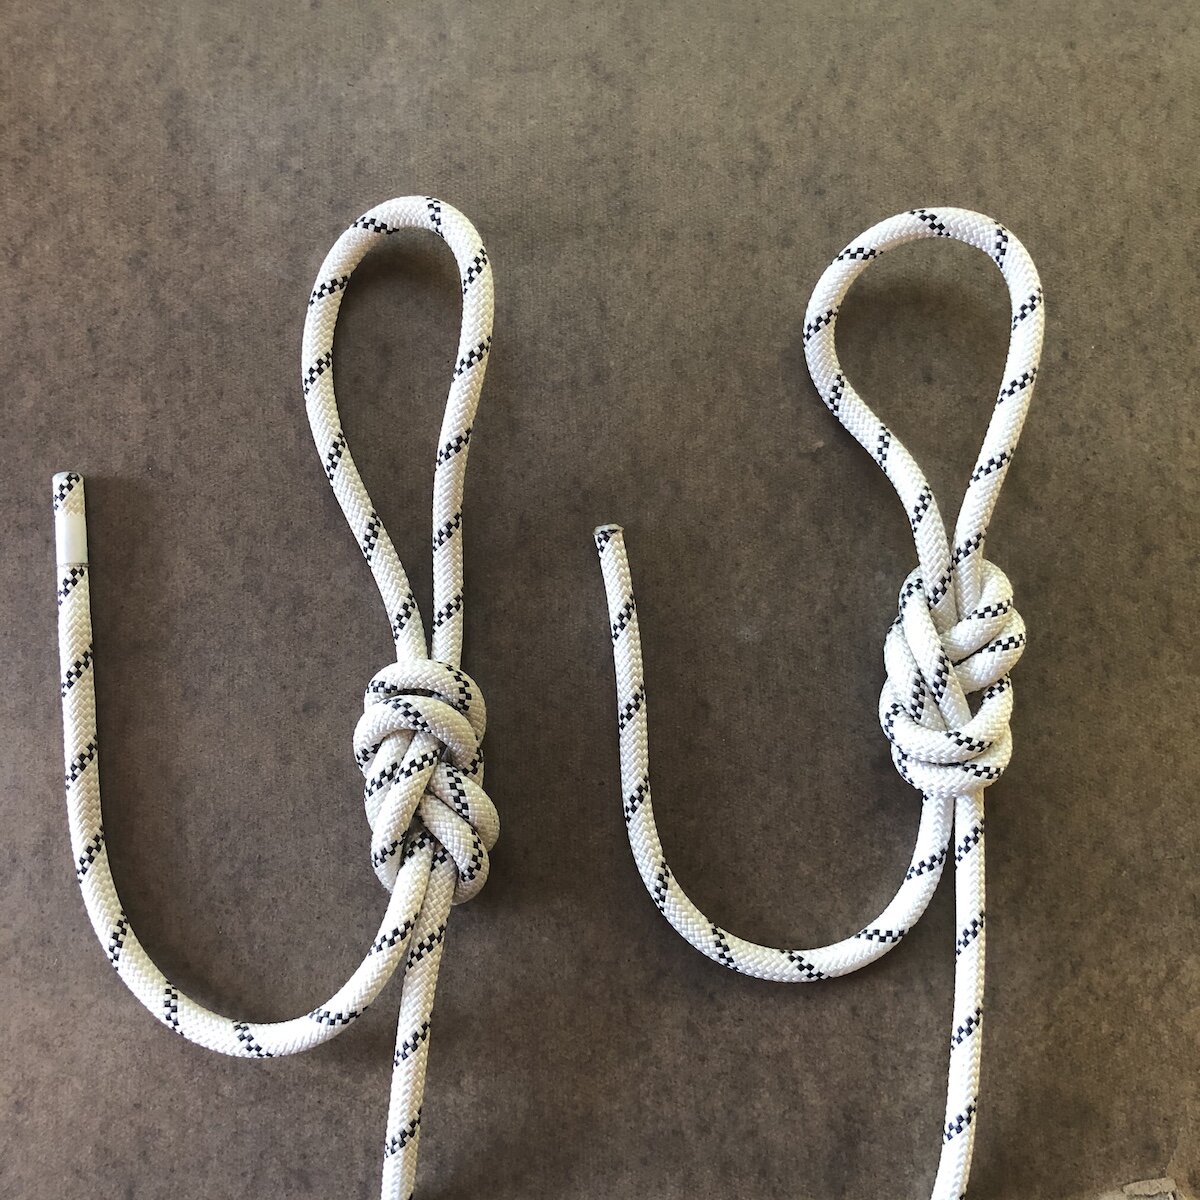
Let’s add some tape so we can more easily see what's going on. (Note the skull and crossbones hockey tape, my favorite for marking soft goods like slings! =^)
The load strand on the left comes out on the OUTSIDE of the knot. The load strand on the right goes through the MIDDLE of the knot.

Most people find the knot on the left to be significantly harder to untie. (It can depend a bit on how much load you're putting on it, the type / diameter of rope you’re using, etc.)
Why?
Load strand on the outside of the knot: When loaded, this cinches down on the entire knot, even to the point of partially deforming it. No loose strands, welded, hard to untie.
Load strand on the inside of the knot: the very top strand goes to the rope tail, and takes minimal load. This gives you a slightly looser strand to start with when you need to untie it.
Give this a try yourself. Try each version, load it with your full body weight, and bounce on it a few times. See which one works better for you!
Notes:
To emphasize, both of these knot variations are perfectly safe and acceptable to use.
Like with every knot, it should be properly “dressed and stressed”. That means no crossed strands, and pulling each of the four strands separately to snug everything down.
If you need to tie a bight knot and expect it to take a large load, a butterfly knot might be a better choice. It's almost always easier to untie than a figure 8.
The good news: if you tie a figure 8 the correct way, the load strand will almost always be in the correct position, as shown in the right side photo. (Check out the video below from the Swedish climbing instructor on one way to do this.)
If you’re a hotshot sport climber and taking loads of big falls working a project, you're probably good enough to tie in with some variation of a bowline. However, there are lots of bowline flavors, and they can be a bit hard to recognize and partner check, so I recommend a bowline only for more advanced climbers.
For beginners and intermediates, I strongly recommend using the retraced figure 8. It's been the standard tie-in knot for decades for a good reason.
Here's a YouTube video from the outstanding YouTube channel “The Rope Access Channel” where a rigging professional (Alex, he’s great) explains how this works.
Here's a short video from Swedish climbing instructor John Liungman on how to tie it with the load strand in the middle.
For a counterpoint, here’s Australian rigging expert Richard Delaney from RopeLab. Richard has a quick look at the methods of tying it, and concludes they're both equally easy to untie. (But notice he doesn't actually try to do it himself . . . )
I'm going with the Rope Access Channel on this one.

The Petzl Micro Traxion has a keeper cord hole
The Petzl Micro Traxion is an efficient, compact, progress capture pulley popular with many climbers and rigging professionals. It's also quite expensive, and you definitely don't want to drop it. Good news: there’s a “stealth” built-in spot to thread a thin keeper cord.
The Micro Traxion is a progress capturing pulley, popular for rock and crevasse rescue, rope soloing, arborists, riggers, big walls and more. It's also an expensive piece of kit, and you want to do everything you can to avoid dropping it.
Did you know the micro traxion has a hole in it that's designed for a keeper cord? Thank you, clever Petzl product designers! I’ve talked with people who have used it for years and don't know that it's there. I took a careful read through the technical documentation, and it's not mentioned in there either. (And, full disclosure, a Petzl product rep told me about it, otherwise I never would've found it myself.) Well, now you know, a secret little bonus from Petzl! =^)
You need a strong string/cord with a very small diameter to fit through the keeper cord hole. I used 1.3 mm dyneema / spectra / UHMWPE string. A mere 1.3 mm, but rated to 580 pounds, amazing! You may find something tiny (2mm?) at your climbing shop, good luck. You'll also probably need a safety pin or something similar to work it through the hole, be patient.
Now I get it, not everybody likes keeper cords. Some people find that they are fiddly, get in the way, and hang up on other gear. You'll probably feel this way until you drop a Grigri or something similar, then you'll be a convert. =^) Give it a try and see what you think, it's easy to remove if you don't like it.
(And, hopefully this is obvious, but please do not carry gear on your harness dangling only from the keeper cord. Clip it properly to a carabiner. The cord is there only if you’re a fumble fingers.)
Here’s a link where you can buy dyneema string like this. Bonus, it can also work for repairing the trigger wires of cams. (Or so says British expedition climbing expert Andy Kirkpatrick, I personally have never done this.) Share some with your friends, you’re going to buy quite a lot of it, like about 10 meters.
An excellent carabiner to pair with your micro trax is the Petzl Sm’D. This is a modern compact D shaped carabiner, available in screw gate or double action twist gate. It has the bonus feature of a small hole drilled just below the hinge, which is designed for the other end of the keeper cord. See photos below.