

Alpine Tips

Anchor-induced rope twisting
Certain configurations of anchor hardware can put a mean twist in your rope. Learn how to spot these culprits, how to re-rig an anchor with additional hardware to minimize the problem, and a way to quickly remove twists from your rope.

Some configurations of anchor hardware can give you a smooth easy rope pull with no twists. Others can add some snarls to your rope. Here are a few examples of each.
Side note: if the rock below the anchor is slab / lower angle, that often leads to more twists. If it’s hanging pretty much freely or vertical, it’s usually less twisting.
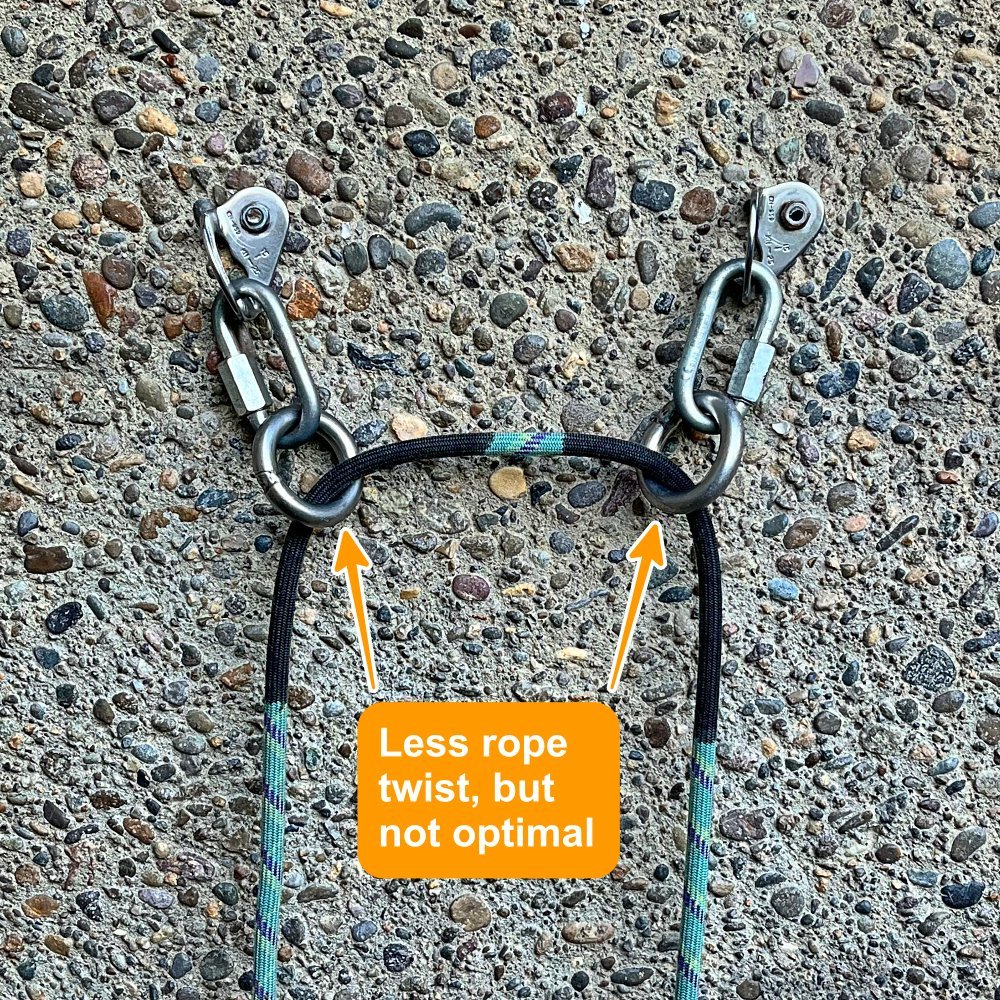
Do you need to rappel, lower off, or redirect a lower from an anchor rigged like the top photo? Be prepared for some possible rope twisting.
When you run a weighted rope through anchor point(s) with the bottom link(s( lying flat against the rock like this, the rope drags at these two spots and starts spiraling, which can put some serious pigtails in your rope.
The general concept: the more friction and direction changes, the more twisting will happen.
(It's unlikely you will ever see this, because any halfway competent route setter will add another link so it looks like the second photo below, but it's possible; I've seen it a few times.)
If you have two extra quick links with you, or maybe want to donate a couple of carabiners, you can add those to the anchor to improve it as shown below. You might want to tape the gates of the carabiner closed, to discourage people from stealing them.
If you don't have any hardware to enhance the anchor, there's probably not much you can do about it. If rappelling, try to separate the rope strands when you pull them, so one doesn’t twist around the other which might make pulling your rope difficult to impossible. If it's your local crag, be a good citizen, climb up there another day with some hardware and re-rig it as shown below.
One improvement: add a second set of either welded steel rings (preferred, as they rotate and last longer) or good quality quick links. Note that these are now perpendicular to the rock. This results in an easier rope pull with less twisting. But, depending on a few other variables, your rope might still get a bit pigtailed.
Of course, if adding rings you’ll need to open the sleeve of the existing quick link, so be sure and bring some pliers.
It helps if the bolts are aligned horizontally. If one bolt is a bit higher than the other in this setup, you still might get a little rope twist, but not nearly as badly as you might without the second link/ring.
The closer together the rings are, generally the less rope twist you will have.
Lowering someone tends to create more twists, because the rope has a higher load. If come across anchors like the image below, you might be better off rappelling rather than lowering.
Anytime you're putting a quick link on an anchor, especially at a popular climbing area, it's best practice to use at least 8 mm (and perhaps even 10 mm) and ideally proper CE climbing rated quick links rather than random ones from the hardware store. CAMP is one of several manufacturers to offer strong, inexpensive, CE rated quick links, read an article about that here.
One more quick link note: it's best practice to place quicklinks so the threaded sleeve closes in a downward direction. That way, if the sleeve ever loosens, gravity helps hold it closed. As the saying goes, ”Screw down so you don't screw up.”
If you’re setting quick links in a more permanent position, give them a good crank with some pliers or a wrench and maybe some Loctite on the threads. If you do that, it doesn't matter which way the threaded sleeve is facing.
A great way to rig a rappel anchor for minimal rope twisting is to have two points that come together at the same level.

Even better, a single point of connection. Like this welded ring rated for something ridiculous like more than 80 kN. Yes, it’s not redundant, but you can trust this absolutely.

Tip: If your rope does get twisted, when you get to the bottom or maybe the next lower anchor, try pulling the entire rope through a tube style belay device clipped above you. This can be a fast way to remove the pigtails. Read how to do that at this article.


Download maps for an entire state in Gaia GPS? Yes!
You can (probably) download maps covering an entire state (or small country) of the excellent “Gaia Topo” map layer in just a few minutes without maxing out your phone memory. This lets you ALWAYS have a great base map on your phone when outside of cell coverage.

With most every backcountry mapping phone app, a necessary but often tedious chore is downloading the map layer(s) covering your outing to your phone before you leave cell phone coverage. Sounds simple enough, right?
But, if you want multiple map layers, at different resolutions, and especially if your phone has limited memory (maybe even forcing you to select and delete previously saved maps, or deleting the memory cache of the app to free up memory), coordinating all this can become a serious hassle. And of course, how about those times when you forget to download maps, or change destinations, or drive an unexpected route home? Whoops, maybe you’ll have no map at all!
Happily, those days are pretty much over. There’s now a convergence of two great navigation advances: phones with lots more memory, and high quality map downloads that require less space. A great example of the latter is the new and greatly improved “Gaia Topo”, the default layer from Gaia GPS, my favorite backcountry GPS phone app.
Making plans for a Utah road trip, with great places to explore and lots of remote areas outside of cell coverage? Before, downloading high resolution maps for the entire state would've been pretty much impossible, because it would max out the memory on most phones, not to mention taking hours to download. But not any more! On wi-fi, the download only took me about 8 minutes and about 230 MB. (Or is it 443 MB? See below.)
You might think that decreasing the download size would also result in less useful map information. But, it's actually the opposite - the Gaia GPS cartography wizards somehow managed to make this map layer have MORE useful data, while at the same time making the download sizes much smaller.
How does Gaia fit so much data in such a tiny download? I don’t know all the details, but it’s pretty damn cool and I love it! (We could get into a nerdy discussion about raster versus vector map data, zoom levels and map scale, but that’s a little much for the non map-geeks.)
I cover the many improvements in the Gaia Topo layer in detail in this article. Here’s a screen grab from the Gaia GPS blog to give you a sense of the improvements from the previous version. Suffice it to say, the new Gaia Topo is much more useful than the old one. Plus, the Gaia cartography gnomes regularly add upgrades and improvements.
A note on map improvements: Map updates appear automatically when you open Gaia Topo in the app or on a desktop computer. However, if you download / save a portion of the Gaia Topo map to your phone and don’t have cell or Wi-Fi coverage, those map updates will not appear automatically; you need to download that area again for the latest map updates to appear. So, if you do decide to download say your entire state or country, you may want to delete it and re-download it about every six months, so you always have the most current map.

Here’s a chart from the Gaia GPS blog giving a comparison of download sizes and speed between the different versions of the map.

A few notes:
It’s highly recommended to download large maps like this on wi-fi instead of using cell data.
To download maps to your phone, you need at least a standard membership to Gaia GPS. (The cost for this is about the same is just one quality printed map, so in my mind it's a pretty screaming deal.) Learn more about their different subscription plans here.
Map scale: If you look at the map scale in the top part of the screen grabs, it says something strange like “Max Zoom 12, 1:192,000”. That scale is incorrect, don't let it throw you off. This map is based on “vector” (line) data as opposed to “raster” (or pixel) data. So, zoom level 12 corresponds to about a 1:8000 scale. If you download at this maximum level of 12, you’ll have an incredible level of map detail, even when you zoom in close. If you have lots of extra memory on your phone, this is recommended. If you're short on phone memory, you can reduce the maximum zoom with the slider bar to make a smaller download file.
I want to mention what appears to be a (hopefully temporary) bug with the app. There appears to be a discrepancy between the original “estimated” download size, and then what the actual download size turns out to be. I reported this bug to Gaia GPS in early July 2020, and their response was, “Thanks for letting us know, we’ll have a look.” For example, look at these two screen grabs. On the left is the estimated size of the download. On the right is the actual size after downloading. You can see there's a difference of about 200 MB. Now, if you have a phone with a huge amount of free memory, a few hundred extra megs and extra minutes of download time is not that big a deal. But if you’re short on phone memory and have limited Wi-Fi, then this download size might become an issue. Just be aware of this.

International coverage
Travelling abroad? Gaia Topo has worldwide coverage in a metric version, along with the same high quality maps. Check out this screen grab; download all of Switzerland for about 100 MB.

Downloading an entire large area ONLY works with the Gaia Topo layer, not other map layers!
Just for fun I tried to download all of Utah using Open Cycle, one of my favorite map layers. Bad idea! This would’ve been 5+ gigabytes to download, taking up way too much room on my phone.
Plus, Gaia GPS has a download limit of 100,000 map tiles for pretty much every map layer (except for satellite, which has a limit of 10,000 map tiles). If you try to exceed this, Gaia is clever enough to give you a red warning text in the upper right corner, letting you know that it’s probably not a good idea.

Downloading odd shaped areas
It might appear that Gaia only lets you download rectangular areas of maps. That’s great if you're after Utah, Colorado etc, but not so helpful if you want to download a large area that's not a convenient rectangle, like Southern California, New Zealand, or some other large odd-shaped land area. But you can! Here's how.
On the phone app or GaiaGPS.com, you need to create and save what Gaia calls an “Area”. This is simply a polygon that can have as many vertices as you want. Then, after you’ve defined your area, you download the map tiles that cover it. Here are a few screengrabs to show the process.
Here's what would happen if you try to download Southern California with the normal download rectangle. Lots of ocean and Nevada that we're not interested in (sorry, Nevada), plus a 453 MB download, ouch! We can do better than that!

On your phone, tap the “Plus” icon from the top row, then tap “Create Area”.

You should see a selection triangle on your screen with five blue dots.

Tap and drag the blue dots to cover your area of interest. Every time you move a dot a new one appears, letting you select large irregular shapes. When you're done selecting Southern California, it should look something like this:

Tap “Save” in the upper right corner. You should get a prompt to “Choose Offline Maps”. Under Resolution, tap “High”. (It actually doesn't seem to matter what resolution you choose with Gaia Topo, the map downloads size stays the same.)
Now if you tap “Save” in the upper right corner the map should start downloading.
Note the download size in the very bottom, 248 MB. That’s a whole lot better than the 453 MB that you would've downloaded if you tried to use a rectangle!

Give the map a few minutes to download. (Remember to do this with a Wi-Fi connection if possible.) To check that it's properly saved to your phone, tap the “Saved” folder icon on the bottom, and select “Maps” from the filter in the top left corner.
Testing your download
Once you’ve downloaded a big area, you can run a test to prove to yourself that the map is indeed saved properly onto your phone and it’s ready to use outside cell phone coverage.
Go to your phone settings, and turn on Airplane mode. This should turn off your Wi-Fi and cell coverage.
Zoom into some part of the country you’ve never been before. The map should look blurry and terrible, because your phone is not able to download the map tiles on the fly like it normally does.
Now, while keeping Wi-Fi and cell coverage off, zoom in to a part of the large map area that you downloaded. The map should look crisp and clear. This proves that it’s on your phone and ready to use when you don’t have cell coverage.
And, if you zoom / pan carefully right to the edge of your download area, you should be able to see a noticeable change in map quality between what was downloaded on your phone and was not. Here's an example of that. The bottom half of the image with the better quality contours is what's actually saved onto your phone.


The new (and much improved) "Gaia Topo" map layer
Gaia GPS made a big update in 2020 to their standard base map, called Gaia Topo. Learn some of the upgrades and see some examples of different zoom levels. It might be the one go-to map layer that you can use for almost everything!
“Gaia Topo” Yosemite example, older version (top) and 2020 version (bottom)

IMAGE: HTTPS://WWW.INSTAGRAM.COM/P/B8HZPDJNB3B/
Gaia GPS is one of the most popular phone based backcountry GPS navigation apps, for good reason. It has lots of features that backcountry users love, but until recently, their default map layer was not necessarily one of them. (And, I’ll mention that I have a Masters in Geosciences with an emphasis in cartography, so I have a pretty good eye for this kind of thing.)
The default “Gaia Topo” layer, when it first came out, was pretty rough around the edges. The contour lines were jagged and visually obtrusive, the zoom layers were not consistent, the map colors were not very attractive, urban areas were lousy, the Points Of Interest (POI) were lacking . . . It got the job done, but it hurt my eyeballs to scan it more than a few minutes. It was clunky enough so I rarely used it, instead cobbling together various combinations of Open Cycle, USGS quad maps, Forest Service maps, and satellite imagery, depending on sport and location. Yes, keeping track of these different map downloads was a substantial headache, especially on my older phone with limited memory.
Well, happily that’s all a thing of the past. In January 2020, Gaia GPS introduced a new and vastly improved Gaia Topo map layer that has loads of great features, enough to probably serve as the only map layer needed for many people. Let's look at some of these features, and then some examples.
International coverage? Oui! Here's Chamonix.

image: gaiagps.com
What’s cool about the new “Gaia Topo” layer?
Progressive zoom levels - Greater map detail doesn’t show until you zoom in fairly close, making the map much cleaner.
“Easy on the eyes” color palette.
Subtle relief shading, enough to give you a slight sense of where the high terrain is but not so heavy that it overwhelms other map features.
Public lands indicated by subtle color shading, A great help if you want to find a free place to pull over and sleep for the night on state or Federally owned (Forest Service or BLM) land.
Much better in urban areas, showing major / minor road networks, parks, and color-coded Points of Interest (POIs) like restaurants, gas stations, medical clinics/hospitals, parks, museums, and more.
More POIs of direct use to backcountry users, such as campgrounds, trailheads, popular rock climbs, hot springs, river campsites for multi-day whitewater trips, ski runs and nordic trails, backcountry ski huts, dog parks and more.
Suggestions for nearby routes - Tap a campground or trailhead, tap the “info” icon, and get a highlighted map and often a photo to the destination. Scroll down a bit further to see other nearby hikes. (This feature has a few extra tricks to leverage for full advantage, read the article at Gaia GPS to learn more about it.)
Worldwide coverage, available with metric elevations in the “Gaia Topo meters” layer (for those who live outside the only 3 non-metric countries: the United States, Liberia and Myanmar).
Based on the Open Source map project Open Street Map, which means that the map is constantly updating as contributors around the world add data, making it is as accurate as possible.
It’s the default free layer on the Gaia GPS website . (Free, one of my favorite words!)
Probably the best thing, MUCH smaller map downloads! Why is this great? Now you can download an entire large Western state, (or say, all of Switzerland) onto your phone at a rather modest file size of around a few hundred Mb and a few minutes download time on Wi-Fi. This means you will pretty much always have the maps you need at the highest zoom level on your phone, with no need to remember to download them before you leave for a specific area that’sa outside of cell coverage. This is a HUGE convenience!
A note on map improvements: The crew at Gaia GPS is constantly updating this map. You’ll see the latest updates appear automatically when you open Gaia Topo in the app (with Wi-Fi or cell coverage) or on a desktop computer. However, if you download / save a portion of the Gaia Topo map to your phone and don’t have cell or Wi-Fi coverage, you need to download that area again for the latest map updates to appear. So, if you do decide to download say your entire state or country, you may want to delete it and re-download it about every six months, so you always have the most current map.
Note: while you can explore this map layer with a free account at GaiaGPS.com, you need a basic paid Gaia membership to be able to download maps to your phone, Go here to learn more.
Here’s a screen grab from Gaia showing some comparisons of download size and speed for different areas.

image: blog.gaiagps.com
Let's look at a few examples, mostly some before/after screen grabs from the Gaia GPS blog. I don't think there's a need for commentary on these, the images pretty much speak for themselves. Which map would you rather use?

image: blog.gaiagps.com

image: blog.gaiagps.com

image: blog.gaiagps.com
A good way to get a feel for it is to go GaiaGPS.com, find an area you're familiar with, click through the progressive zoom layers from far out to close in, and notice how the map detail changes. (You can do this for free, and you don’t need a Gaia GPS account.)
Let's do this for the south Lake Tahoe area. "(Note the scale bar in the lower left corner, starting at 10 mile zoom). Tap the “plus” icon in the upper left corner to zoom in one level at a time, or the mouse scroll wheel if you have one.
Good general overview. Public lands shown, major cities and roads, and the Pacific Crest Trail west of the lake.

Next level: More trails and smaller roads, a cluster of POI icons.

Next level: Still more trails, more POI icons, parks, peaks, roads, campgrounds, and waterways labeled.

Next level: Contour lines and smaller streets appear. POI clusters of smaller features shown.

Next level: Very detailed contour lines, pretty much every path and street shown, most every important feature labeled.


Old School Tools - opposite and opposed carabiners
Rigging two standard carabiners opposite and opposed can replace one locker. There’s one correct way to set it up and several wrong ways, as well as a method to substitute three standard carabiners for two locking carabiners. Let's take a closer look at this old-school technique that newer climbers may not yet know.
Image credit: from the Ropelab Instagram @ropelab.richard, run by Australian rigging expert Richard Delaney, used with permission.
With the bounty of options available these days for locking carabiners, many newer climbers may not know the (slightly old school) method of using two non-locking carabiners “opposite and opposed”, to replace a locker. (In the Dark Ages before locking carabiners were invented, this was the only way to do it.) If you find yourself short on lockers, this is still a good trick to know.
Here's the rule of thumb: Two snapgate carabiners, properly rigged with gates opposite and opposed, equals one locking carabiner.
First off, don't get hung up on the confusing terminology. Many rope experts do not use these terms correctly, so it's cool if you don't completely grasp it either. The important thing is to know how to set it up correctly, not necessarily the exact definition of each term.
There’s one correct way to set it up, and some that look correct but aren’t, so let’s have a closer look.
It's best practice to try to use two carabiners of similar shape and size. This can be a good place to use your oval carabiners, if you have any. Like I said, old school. Asymmetric carabiners can sometimes pinch the rope a bit if used in this configuration, but if you don't have ovals, no problemo.
Top left: correctly rigged opposite and opposed carabiners.
The gates are “opposite” (meaning, they form an “X”)
AND the gates are “opposed” (meaning, they don’t open on the same side.)
Or, to say it another way: the gates on opposite sides and the hinges are on the same end, so they are opposed when both are open.

Image credit: Richard DElaney @ropelab.richard
Let's look at the other three set ups and see why they’re not ideal:
Bottom right: Both carabiners are aligned the same. Not much more security than just using one.
Bottom left: The open gates do not form an “X”. Potential problem: if either carabiner flips 180°, the carabiners are aligned the same, like as the bottom right.
Top right: The gates do open to make an “X”, but the gate openings are on the same side. (Some rigging experts call this acceptable.) Potential problem: if the gates rub on a rock, both the gates can open at the same time. Carabiners are much weaker if loaded with the gate open, so we want to avoid this.
Now, let's take it a step further. Here's another rule of thumb: Three standard carabiners, with gates opposite and opposed, is the equivalent of two locking carabiners. Yes, the math in this example doesn’t quite match what we saw above, but that's how it works.

In the left photo, we have two opposite and opposed locking carabiners, standard practice in the guiding world for a very secure top rope anchor. (Extra points if these lockers are the same make and model, and if they are a wide bottom HMS belay carabiner as shown, which can give a smoother feed of the rope.)
Equally secure to this is the right photo. It’s a bit hard to see, but the two outside carabiners are opposite and opposed to the middle carabiner.
Granted, most of the time when you’re setting up a secure top rope anchor, you're probably going to have two locking carabiners to rig opposite and opposed such as the example on the left. Rigging a top rope anchor with three standard carabiners is something more often seen in a teaching or instructional type situation and not when you were out climbing with your pals.
Please note: we're talking about a top rope anchor here, not the master point on a multi pitch climb. A top rope anchor is typically high up and out of sight, and you may have beginners on the route who may not know how to properly evaluate the security of the anchor once they arrive. For this reason, the extra security of two opposite and opposed lockers (or equivalent) is the guide “industry standard”. For a master point on a multi pitch climb, a single locking carabiner is adequate, because you’re right there to monitor it at all times.
Do you in fact need two opposite and opposed locking carabiners at a top rope anchor? Some people will choose to set up a top rope from a single locker (or the equivalent for sport climbing, two opposite and opposed normal quickdraws) but it all depends on your acceptable level of risk. Personally, I always use two carabiners at the master point, with at least one a locker. The way I see it, you probably have the gear already, it takes another couple of seconds to rig, so why not have that extra level of security?
Remember, it’s YOU who’s accountable for your acceptable level of risk and comfort. Don't let it be dictated by someone else, regardless of their experience or credentials. If using locking carabiners everywhere on a top rope anchor gives you a warm fuzzy feeling, and you have the gear, by all means do it.
Below left is a top rope anchor with two opposite and opposed standard quickdraws, an anchor rig many sportclimbers are happy with. On the right is the same setup, only this time it has a “locker draw” to add extra security. A locking quickdraw is handy for all kinds of things, which we cover in this article. Which anchor would you prefer to climb on?

Quickdraws for a sport climbing anchor: gates in or gates out?
There is an interesting subtlety to using quickdraws on a two bolt sport climbing anchor.
You can rig it so the GATES cross to make an “X”, or the SPINES cross to make an “X”. In both cases the masterpoint carabiners are opposite and opposed. WHAT?!
This is highly confusing to many people! I’ll admit it was a bit of a head scratcher for me at first. Like many things in climbing it’s a better show than a tell. Here are some photos to illustrate how this works.
Let's start with a pair of quickdraws stacked on top of each other. All the gates face left.
There are two quickdraws in the photo, sorry it's a little hard to see both.
There's some masking tape near the top carabiner on the draw; that's for another project, please ignore it.

Take the top quickdraw and flip it 180 degrees, so the gates face to the right. This creates opposite and opposed carabiners (green) at the bottom masterpoint.

To hopefully make this explanation extra clear, I put some yellow tape on the bottom carabiners. This shows they’re staying in the exact same orientation in the next two steps.

It's time to build our anchor, and clip the top of each draw to a bolt.
If we clip the bolts with the gates facing IN (i.e,, TOWARD from each other), the carabiner GATES at the masterpoint cross to make an “X”.

If we clip the bolts with the gates facing OUT (i.e,, AWAY from each other), the carabiner SPINES at the masterpoint cross to make an “X”.
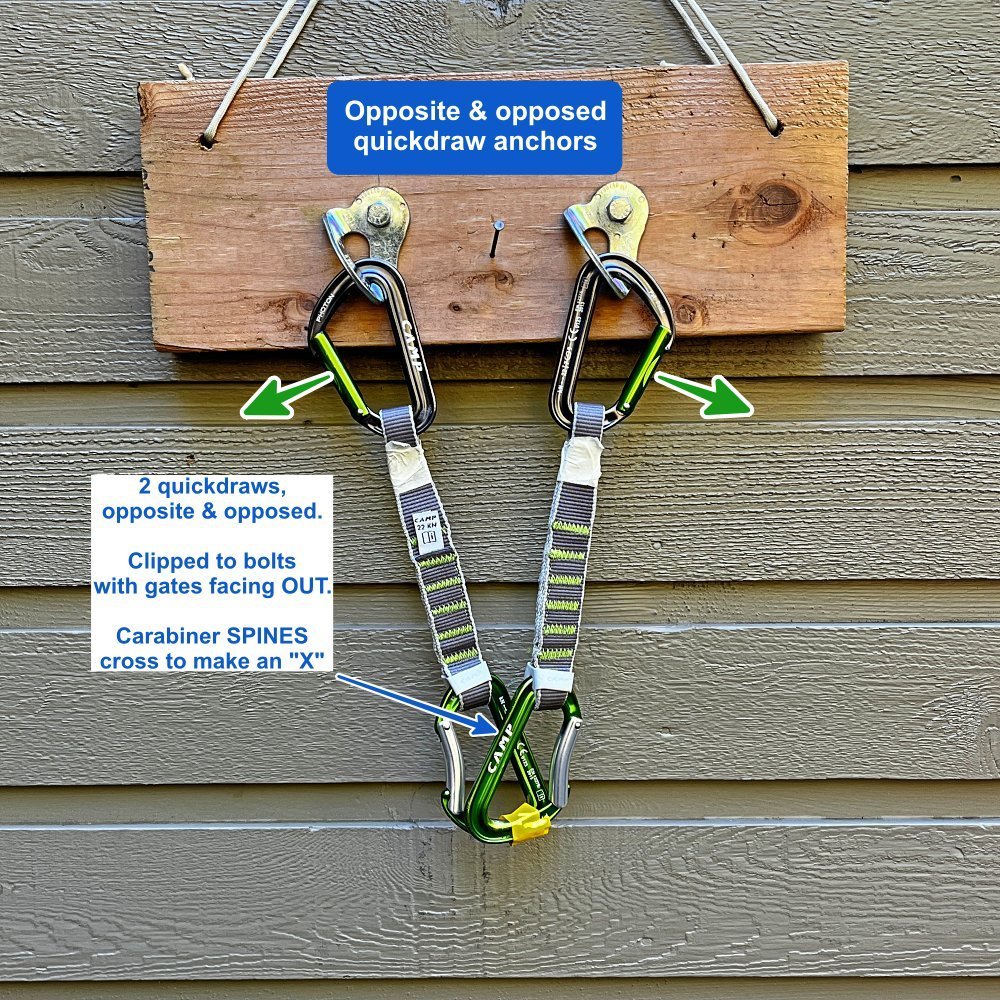
Note that in both cases, the bottom green carabiners have stayed in exactly the same opposite and opposed orientation. If the gates make the “X”, or the spines make the ”X” depends on how you clip the top of the draw: facing in or facing out.
This causes a lot of confusion! I hope these photos help clear it up.
So what? Is one better than another?
There's no firm consensus, but most people prefer to clip with the gates facing OUT, or away from each other.
(Gates out seems to be the set up in every rock gym I’ve ever seen, so that ought to tell you something.)
If the gates face in, you can occasionally have the gates jangle around or the rope flip or some other weirdness, and the gates can get tangled and twisted on each other. When the gates out, this is much less likely to happen.
Or, as mentioned above, you can use my preferred option: gates out and use a locker draw pretty much on every top rope. That eliminates just about any potential problem.

All about sewn pocket daisy chains
Sewn pocket daisy chains are designed for aid climbing, have a strength of only about 3 kN between the pockets, and have some limitations for use as a lanyard and definitely in anchor systems. Some people choose to use these, occasionally incorrectly, so let's learn about this gear and some of the drawbacks.

How should you use it? Black Diamond spells it out pretty clearly on their website:

image: blackdiamondequipment.com
A sewn pocket daisy chain like this has been a part of climbing for decades. It's a tempting piece of gear to use for many things, especially for new climbers. Look at all those handy pockets! You could use that for all kinds of stuff, right? How about I use it to build a top rope anchor, or maybe I can clip in to the anchor with that along with the rope?
You can probably get away with many of these uses, but please don't. These are designed for body weight, aid climbing only (usually for connecting your harness to your ascenders when cleaning, or to your aid ladders when leading).
As Black Diamond says: a sewn loop daisy like this should not be used as part of the belay or anchor system.
Climbers who use these for other applications may not be aware of their primary limitation: While if it's loaded end-to-end it's rated as a full strength sling over 20 kN, the stitching that separates the pockets is only rated to a maximum of 3 kN. If you clip the pockets wrong and the stitching blows, the carabiner can come completely off the daisy, yikes!
Now, this is old news to many climbers. But as I recently discovered, not everyone has got the message (details below), so it bears repeating.
It’s okay to use these as a personal bodyweight tether, as long as you know the drawbacks. There are a couple of acceptable ways to set this up. There’s also one way that's definitely not recommended, and that’s clipping the end loop and any other single pocket with one carabiner.
(And, if you're wondering about girth hitching to the belay loop instead of your tie in points, it's okay to do that.)
Let's look at a few different ways to use this as a personal tether, first the wrong way and then two acceptable ways. For this to completely fail as shown, you would have to have an epic load that breaks the stitching on about 7 pockets. Highly unlikely, but still not best practice.

The next two ways are fine: gold carabiner in the end pocket, and blue carabiner in any intermediate pocket. If the stitching were to fail in the pocket clipped by the blue carabiner, you would simply move to the next pocket with no chance of becoming completely unclipped. Another way to think about it: you need two locking carabiners to stay safe, unless the daisy is completely extended.


Black Diamond has some nice diagrams on their website. It's tempting to adjust the daisy length like in illustration #2, but that can have a very bad outcome, as we’ll see below in a couple of videos. Illustration #3 should be pretty obvious: if that stitching fails the carabiner is completely off, as in illustration #4.

image: https://www.blackdiamondequipment.com/
Let's have a closer look at illustration #2. What's the problem with that, you might think? If the daisy takes a big load and the stitching in a couple of pockets were to fail, you're still clipped into the end pocket, right? Well, guess what, it can fail, and even when you watch it happen slowly it still looks like a sleight of hand, rope magic trick.
Now, if your daisy has a twist in it, then your anchor will not fail. But the twist is very subtle, hard to see and not something you want to rely on. It’s tricky to describe this, but if you want to play around with this, you can replicate it with a sewn runner and some masking tape.
But, daisy chains can be misused in other ways as well. I was recently at a local top rope crag in Oregon, and right next to me some climbers had set up a top rope anchor with two sewn pocket daisy chains. Each daisy was clipped to a solid bolt and extended over a cliff edge. One daisy was fine, clipped only in the ends. But the bolt end of the second daisy was clipped into a pocket and the end loop, to shorten it and better distribute the load, in theory.
The top rope anchor my neighbors rigged looked about like this:
At first glance, this might look okay. Two sewn daisies, locking carabiners everywhere, bomber bolts at the top, nice load distribution, small angle, fully redundant . . . good to go, right? Well, not quite.

Close up of the left anchor. If the sewn pockets were to fail under a sudden load, the carabiner might completely unclip from the daisy.

Here's another variation, this time using a single daisy chain for a top rope anchor. Please don't do this either.

And, one more variation. I think you get the idea. Don't use a daisy chain as a top rope anchor.

Now realistically, a failure here is VERY unlikely when top roping, when the maximum load your anchor is likely to see is around 3 kN. And, even if the stitching on the yellow daisy were to blow out on one pocket, you would drop to the next pocket and then the load would probably transfer to the purple daisy, and everything would be okay and you'd have a great story to tell.
But, having said that, we can all agree that using gear correctly whenever possible is the best practice. Please don't use a sewn pocket daisy chain for building a top rope anchor, and please don't clip the end loop and any other pocket with the same carabiner.
If you want to see daisy pockets popping one by one in a break test, check out this great video from the Italian Alpine Club, forward it to about 13:20 and 22:10.
When I started climbing wayback-when, daisychains like this were very popular to use as sport climbing tethers for anchor cleaning. Fortunately this practice has pretty much faded into oblivion, but like I saw at the cliff recently, not everyone has got the message yet. Please, if you see anyone using equipment in a potentially dangerous way, consider giving them a discreet and polite reminder of the proper use.
Maybe a better question to ask yourself is why use a daisy chain at all? If you’re aid climbing, most climbers find an adjustable daisy is a better option. For most trad and sport leading, there may not be much reason to have a daisy /PAS / lanyard on your harness at all. When you’re cleaning sport anchors or rappelling, a simple sling works fine in almost all circumstances for a tether to the anchor.
But, if you happen to have a sewn daisy like this in the bottom of your gear box, there are a couple of things they are good for. One, they make a pretty good over the shoulder gear sling, and two, for big wall climbers, they can help you organize your vertical camping spot.
These inherent problems with sewn pocket daisy chains prompted the invention of tethers like the Metolius PAS (Personal Anchor System) or the Sterling Chain Reaction. These are made of individual loops that are each rated to 20+ kN, so there's no more concern with the stitching breaking between pockets. Some climbers find these bulky and a little awkward to use, other people like them a lot. Give it a try and make up your own mind.
Below: Sterling Chain Reactor (top) and Metolius PAS


Use a quicklink as a wrench
Need to tighten or maybe loosen a quick link you find at an anchor? If you have another quick link with you, you might be able to use it as an improvised “wrench”. Not as good as pliers, but probably better than just your fingers.
Quick links are commonly used as rappel hardware, but they can loosen over time and of course work better when the sleeve is locked down tight. If you find a loose quick link on a route, here's how you might be able to tighten it, provided you have another link with you. This lets you apply a lot more torque then you can with just your fingers.
Notes:
This method is meant for field improv. Obviously, the best tool for this job is a crescent wrench or pliers.
It's best practice to install quick links so the sleeve threads down to close, not upwards. That way it's more likely to stay closed.
Quick links are a rather heavy, single use piece of gear, and many people will choose not to carry them. For some routes it makes make sense to have them, for others perhaps not.
It's best practice to use proper CE rated quick links for climbing rather than random ones from the hardware store. CAMP makes inexpensive, super-strong quick CE rated links in three different sizes, read more about those here.
Like many things in climbing, it's a better show than a tell. Here's a quick video I made to show how it works.

"The Bolting Bible" - free PDF book
Climbing bolts - If you place them (or like most of us, merely use them) having a solid understanding of their mechanics and proper placement is a great idea. Ryan Jenks (founder of How not to Highline) wrote a great e-book that covers all aspects of bolting. Donations to Ryan not required, but appreciated.
Ryan Jenks, a mostly fearless, generally hilarious and always high energy guy, is behind “How Not to Highline” (YouTube and website). He somehow manages to combine humor, science, and exciting real life testing to shows some of the break limits of climbing gear and rigging.
Ryan wrote a very detailed e-book on bolting, called “The Bolting Bible”. It's all here: ethics, metal types, rock types, hole drilling, mechanical bolts, glue in bolts, different types of glue . . . 130+ pages, 400+ photos, 200+ links.
If you ever plan on placing a bolt, this e-book will help. And for the rest of us who rely on bolts and really hope they are properly placed, this is a great tutorial on how they’re properly installed, and occasionally what to look for when they’re not. It's also updated regularly with new testing results and materials.
While you can download the e-book for free from the link below, Ryan would certainly appreciate it if you could make a modest donation so he can continue to produce more high-quality free educational material that benefits our entire community.
Note: Placing bolts is a BIG responsibility. Follow these best practices:
Practice bolting somewhere obscure no one will ever see or use, not at your local crag.
Have an experienced person check your work.
Study and follow bolting regulations from land management agencies.
Don’t add bolts to an existing route.


GaiaGPS - cell coverage map layer
The GaiaGPS app has yet another cool new map layer - cell phone coverage of the United States. If you need to make a backcountry 911 call, or if you're on a long backpacking trip and want to check in before you enter an area with minimal coverage, this map could be really handy.
GaiaGPS, the favorite backcountry GPS phone app for many outdoors folks, keeps adding map layers at an impressive rate. (To be honest, it's hard for me to keep up on all of them, but I try.)
As of June 2020, there’s a new one that might be useful for some folks.
It's a cell phone coverage map of the United States, which shows where in the backcountry you're likely to receive a signal. There's a layer for individual carriers such as Verizon, Sprint, AT&T etc, and also a layer for “all carriers”. The darker the color, the better the signal, at least in theory.
Should you be yapping on your phone and checking social media in backcountry? That's a question you get to answer for yourself. =^)
Should you be yapping on your phone and checking social media in backcountry? That's a question you get to answer for yourself. =^) But, if you have a backcountry emergency and need to get somewhere where you can make a phone call for help, or you're on a long backpacking trip and want to check in with folks at home before you move into an area with no coverage, this feature could be very helpful.
This map layer is available only on the Gaia Premium level of membership which typically is $40 a year.
As with all Gaia map layers, you need to download these to your phone while you have Wi-Fi (preferred) or a cell connection.
Read the full scoop about the cell phone map layer on the GaiaGPS blog.
Let's start out small scale to large scale. Here is a good chunk of Colorado, Verizon layer.

How about Yosemite National Park? Good coverage (Verizon layer) if you're in the Valley, but not much anywhere else. Minimal cell coverage in an alpine wilderness; isn't that how it should be?

image: Gaiagps.com screen grab
A final zoom in to Mt. Rainier National Park. Hgh up on the mountain coverage should be good, but down in the lowlands driving into the park and even at the main Paradise visitor center, probably not. (This is the “All Carriers” layer, and yes that magenta color is a little strong on the eyes.)

image: Gaiagps.com screen grab

Clip a chain anchor directly with a master carabiner
Find yourself at a chain anchor with a single huge ring or two equal lengths of chain? Lucky you, your anchor building may have gotten a lot easier. You can probably clip the bottom chain links with a large HMS carabiner and simply use that as your master point.
You're on a multi pitch route. If you come across a stout chain anchor, and if the bolts are close together and/or the chain is quite long, lucky you! You’ve got about the easiest and fastest anchor you could ever build. (Note, a vertically oriented chain anchor is also perfect for this, we're going to cover that in a new article soon.)
Why is this a sweet setup? Extremely fast to build, minimal extra gear, no slings, no knots, really easy to break down for your second.
Get the largest HMS “pearabiner” belay carabiner you have, clip the bottom two links, lock it, done. That becomes your “master carabiner”.

Note: Carabiners are strongest when loaded along the spine. When you bring up your second, that will be a larger load than just holding your body weight. So, take a moment before you clip that master point carabiner to have a look at where the rope is running down the pitch. In this example, let's say the rope is coming up from the left side of the anchor. Ideally, that means the spine of the carabiner would be on the left to take the potentially larger load, and the gate of the carabiner should face to the right.
Check out the nice diagram from Petzl to see how this works. In the diagram, the loaded rope is closest to the gate, the weakest configuration. In theory, It would be better if the load strand were on the left, closest to the spine.
(In my humble opinion, this is more of a potential issue with large loads. When bringing up your second, the load is never going to exceed 2-3 kN, so it's probably not critical if you forget to do this step. But it’s best practice, so it’s worth mentioning.)

image: Petzl.com
Add a smaller locking carabiner and clove hitch to the master point to secure yourself.

Clip your plaquette style belay device and blocking carabiner to the master carabiner. (As mentioned above, ideally clip this closest to the carabiner spine, because that's going to be taking a slightly higher load than just your bodyweight on the right.)

Finally, if you’re feeling courteous and have a spare locking carabiner, you can clip that to the master point on the far left to give your second a convenient place to clove hitch themselves when they arrive.

Possible concerns, addressed. (In some climbing situations these are valid concerns, but not necessarily here.)
Clipping multiple carabiners together!
Clipping directly into the rappel rings and possibly damaging them!
Loading the carabiner in multiple directions!
Clipping multiple non-locking carabiners together and having them flop around is a bad idea, because they can unclip themselves. However, at an anchor like this, when you use all lockers and there is no flopping movement of the carabiners, this is acceptable practice. We cover this more in this article.
Clipping into the rappel rings is totally fine with aluminum carabiners. Aluminum, being softer than the steel ring, is never going to damage the rappel hardware. (It's like using a plastic ice scraper on a car windshield; the soft plastic is never going to hurt the glass no matter how hard you scrape.) We cover this in detail here.
Loading a carabiner and three or four directions at once (known as tri-axial and quad-axial loading) can weaken a carabiner. But in this case it's not a worry, because the chains are quite long and the loads are not going to exceed 2 or 3 kN. If the loads were higher, and chains were shorter and/or the bolts farther apart, it might be a concern. Multi axis carabiner loading is an interesting and slightly complicated situation, and we cover it extensively in this article.
Detour to a toprope anchor: If you’re rigging a top rope on a chain anchor, and maybe you're short on quickdraws or other anchor material, you can clip two carabiners opposite and opposed to the bottom links. Ideally one of these is a locking carabiner.
This is generally not standard practice, it's usually a better option to use two quick draws or a mini quad, but if you're short on gear this is acceptable.
Note: if you do this on a link of the chain, you'll probably have enough room to pass the end of the rope through but probably not enough room for a bight of rope to lower from. In this case, there are large quick links at the bottom, so there's plenty of room to rig for lowering off, as shown in this article.
(I first saw this technique in a YouTube video (at 7:45) made by AGMA Rock Guide Cody Bradford.)

Here’s a nice video from Outdoor Research that shows many of these concepts in action. Important points mentioned in the video:
Avoid using smaller D shaped locking carabiners at the master point, because the carabiners become stacked on one another and the loading becomes less than ideal.
Of course, always avoid directly cross loading any carabiner gate; that’s a bad thing.
If the bolts are too far apart, and/or the chains too short, you might start to get some side loading on the top part of your carabiner. Be mindful of this, and re-rig with a sling if you don't like it. Here's an article on strength reduction from off-axis carabiner loading. (It's probably a lot stronger than you think; you'll be fine.)

How to view GPX files in Google Earth
If you have a GPX track of your hike, climb, or outdoor adventure, it's easy to view it in the 3D fly around magic of Google Earth. It's a simple three-part process, learn how to do it here.
A GPX track file shows a continuous line of a mountaineering route, hike, mountain bike trail, or pretty much anything. It's of course great to have a GPX track on your phone GPS app to help with navigation in the field. But it's also really helpful to see it in Google Earth before you leave town to help visualize your route, and maybe save a few screen grabs to help with wayfinding on your actual trip.
(If you're looking for GPX files of climbing routes in the Pacific Northwest, a great place to start is right here on Alpinesavvy, where you can download more than 70 of the most popular routes.)
While Google Earth does import GPX files, it’s a bit of a bother. They display more easily if you convert them to a KML file first. A “KML” file (Keyhole Markup Language, in case you really wanted to know) is a file format of geographic data that plays nicely with Google Earth.
There are various ways to convert from GPX to KML. Here's a method that's fast and simple. Of course it’s my favorite mapping software, CalTopo! (If you'd like to learn the basics of Calopo, watch this video.)
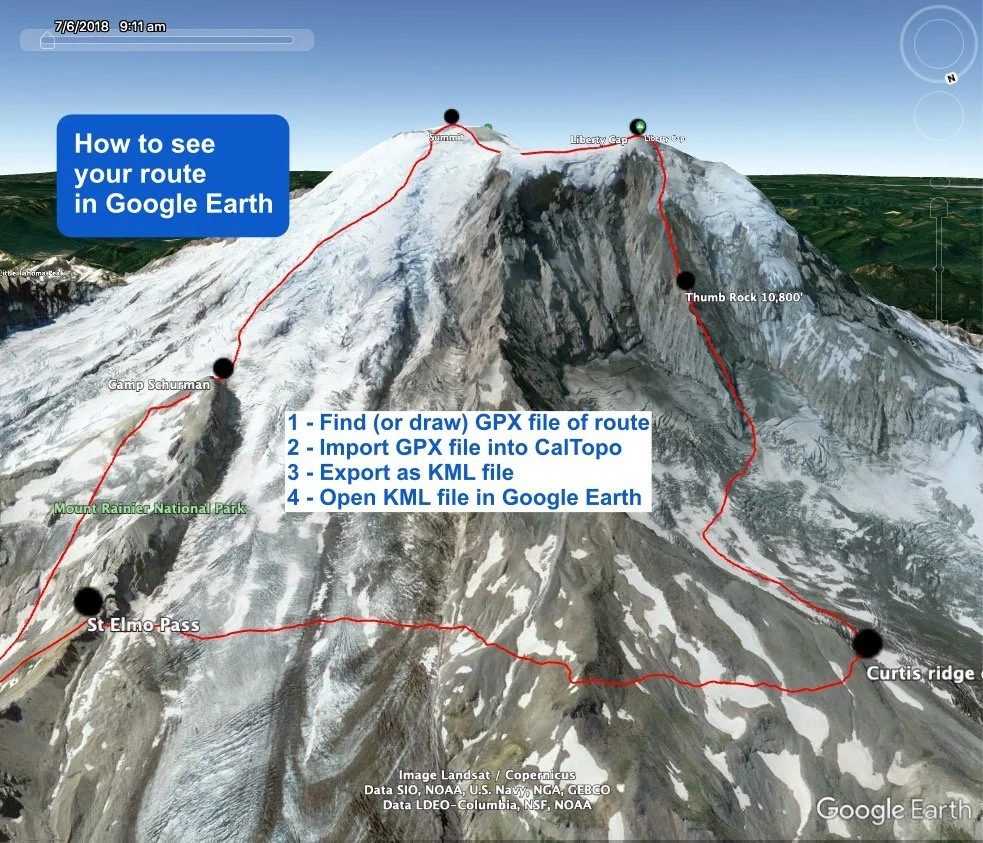
Here’s a walk-through using the Liberty Ridge route on Mt. Rainier as an example.
First, find a GPX file of your route and open it in CalTopo. A GPX file can be either recorded by you, drawn in mapping software if you know the route, or downloaded from the web. (For climbing routes, peakbagger.com is a good source to find and download GPX tracks. Read this article for a step-by-step how to do this.)
Step 1: Go to caltopo.com, click “Import” on the top menu, and import your GPX file. It should open in CalTopo.

Step 2: Export the GPX file as a KML file. From the “Export” menu on the top row, select “KML for Google Earth”, and save the KML file to your hard drive.

Step 3 - Launch Google Earth and open the KML file. This should open the 3D fly-around splendor of Google Earth, with your route drawn in. Looking at your favorite mountain in Google Earth is great, but having your route drawn in is much better!
Take lots of screen grabs, they’re free and weigh 0.0 grams. One way is from the Google Earth menu, File > Save > Save Image. You can print them to take with you, save some on your phone, or both.
Take some from farther back showing the whole route . . .

and also some “close ups” .


The "cowboy" figure 8 on a bight
Here’s a flashy, fun, and fast way to tie the figure 8 on a bight, one of the fundamental knots in climbing. (It just might give you a little smile every time you do it.)
What's a “cowboy knot? It's a way of tying a knot that's fast, flashy, and fun!
The figure 8 on a bight is one of the fundamental knots in climbing. Here's the cowboy version.
I learned this #CraftyRopeTrick a long time ago from the manager of a rock gym, and have loved it ever since. As always, dress your knot to remove any odd twists.
A figure 8 on a bight can be difficult to untie after it's received a very heavy load. If you need a bight knot in a high load situation, a butterfly knot might be a better choice.
This knot should always be loaded along the axis, and not “ring loaded”, or loaded across in two opposing directions. It’s possible for the knot to roll under heavy loading if it’s ring loaded. If you anticipate loading in strange directions, again a butterfly knot might be more appropriate.
Play around with this and enjoy!

Let's talk about off-axis carabiner loading
In the real world, carabiners can be loaded in some strange ways that are not normally tested. Let’s take a closer look at carabiners loaded in three and four different directions, and learn when you do and probably don't need to be concerned about it.
Short attention span version: Loading your carabiner in three or even four directions is not really a concern for climbers. The carabiner can take a higher load than you will ever put on it in a realistic recreational climbing scenario.

Carabiner rating overview: To attain the CE (“Conformité Européene”) safety rating, carabiners are tested in three loading configurations: along the spine (major axis), gate open, and minor axis (aka, cross loaded). These values should be visible on every carabiner, and surely you’ve noticed them.
The optimal load for a carabiner is along the major axis, or spine. This number should always be the highest of the three ratings, which tells you that’s the strongest configuration. Hopefully you learned this on your first day of climbing, because it's pretty important.

image: https://www.blackdiamondequipment.com/en_US/qc-lab-off-axis-tri-axial-carabiner-loading.html
However, in many real world climbing situations, carabiners are loaded in something other than these three tested configurations. Let’s look at a few.
One of these is the weakest configuration, “nose hooking”. A nose hooked carabiner can break at a load as low as 2 kN, yikes! (Here's an entire article from the Black Diamond Quality Control lab about nose hooking.)
A nose hooked carabiner, yikes! This is super dangerous, if you ever see it, stop and fix this right away!

There are other ways carabiners can be loaded, which is from three or four different directions. Our engineering friends call this “tri-axial” or “quad-axial” loading.
Note, there’s no official strength rating for carabiners under these multi directional loads. (Probably because there are too many variations and it would be hard to test consistently? I don't know, that's a guess.)
What about these examples of tri-axial loading? Is this really something to be concerned about, or not? Most people would say yes, because when you see the Petzl “Yer Gonna Die - YDG” icon, that should get your attention!
But okay, you might be saying, these examples below are kind of silly, most climbers know you shouldn’t load a carabiner like that . . .

image: https://www.petzl.com/US/en/Sport/Examples-of-dangerous-carabiner-loading-?ActivityName=Rock-climbing
And, from this page of the excellent Petzl website, comes this interesting graphic.
Now, depending on your anchor building style, this might be something you see more often. Petzl says don't do it, but what are the real world values we're talking about?

(Let's not freak out about that 7 kN value. Petzl is talking about directly cross loading the gate, which we all know is bad, but still something to keep in mind.)
Good thing the clever engineering gnomes at Black Diamond had the same question and decided to break some gear to find some answers. The premise: When a carabiner is loaded in three (or more) different directions, it’s weaker. The question is, by how much, and is it enough to worry about?
We have some real data and testing results below, but let's first look at a real world anchor.
Let's have a look at this anchor below made by IFMGA Certified Guide Karsten Delap. The top “master point” carabiner is clipped through both of the rappel rings. (Some folks get concerned doing this might damage the rings. It actually won't, because the rings are steel and the carabiner is made of softer aluminum. It's like using a plastic ice scraper on your car windshield. The soft plastic doesn't hurt the harder glass.)

image: IFMGA Guide Karsten Delap - https://www.instagram.com/p/B5EjrGojxdI/
This is “quad-axis” loading, as the carabiner could receive a load in four different directions. Problem, or not?
No problem. Realistically, loads in this configuration are going to be low. It's the hanging weight of the belayer on the clove hitch, say 1 kN, and belaying your second up directly from the anchor, a max load of say 2-3 kN. (Also note that the second is being belayed on the right, or spine side of the anchor carabiner, which is the strongest orientation.) Once the second is at the anchor, and the new leader heads out, the new belayer will probably only have a clove hitch on the master carabiner.
As we see in this nice diagram below from Petzl, when you do clip two different loads to the same carabiner, it's best to clip the heaviest one closest to the spine.

So, once again the forces in the real world are going to be significantly less and in a different orientation than in the laboratory.
But, breaking gear is fun, so let's see what Black Diamond has to say!
Here’s the original article from the Black Diamond QC lab archives. (Keep in mind that this testing was done on a very small sample size, on one model of carabiner, from one manufacturer, so the results do not apply universally.)
The Black Diamond website tells us that the Vapor Lock screw gate carabiner has a major axis, closed gate strength of 21 kN. Below are photos and test results from some tri-axial and quad-axial loading done by Black Diamond.
(If you're on a mountain rescue team or doing industrial rigging, or need to maintain your 10:1 safety factor, then you're probably using things like rigging plates to attach multiple carabiners to one anchor and not doing three or four axis loading in the first place.)
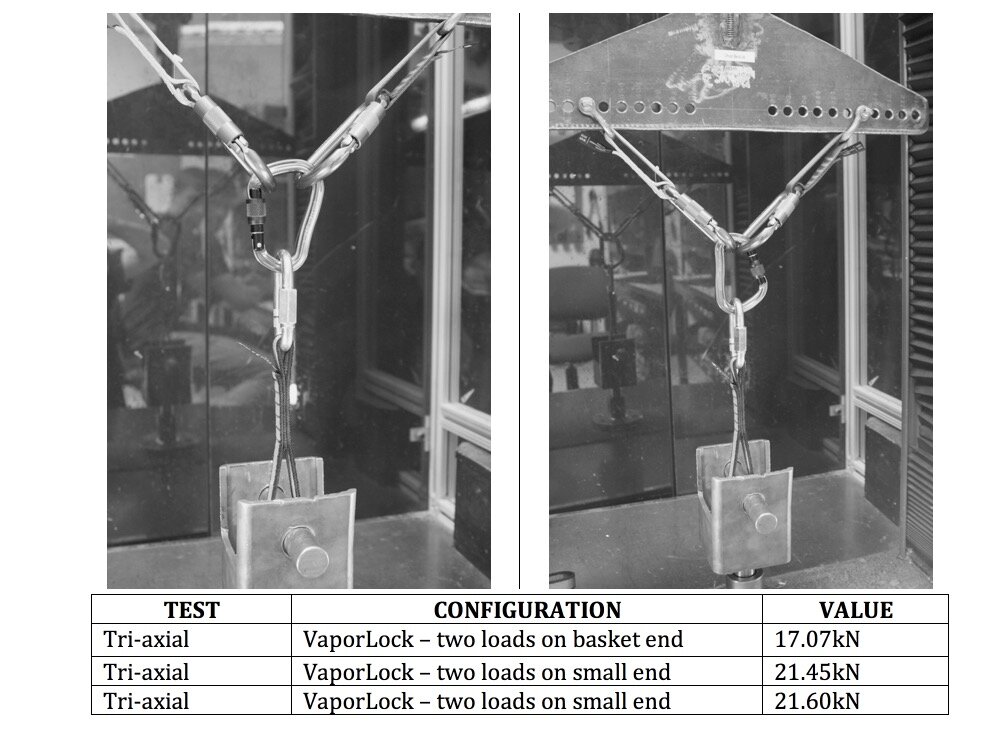
image: https://www.blackdiamondequipment.com/en_US/qc-lab-off-axis-tri-axial-carabiner-loading.html
Summary of tri-axial loading test: With two loads on the widest end, the carabiner was weakened approximately 20%. With two loads on the small end, the carabiner was effectively not weakened at all (Remember, the carabiner is rated to 21 kN.)

image: http://www.blackdiamondequipment.com/en_US/qc-lab-off-axis-tri-axial-carabiner-loading.html
Summary of quad-axial loading test: With the carabiner locked, the weakest iteration of the test showed about a 25% reduction in strength. Even so, this was still almost 16 kN, which is sufficiently strong enough for just about any climbing application. (Look at the loading angle onto the top of the carabiner in that top left photo, that is pretty extreme!)
Here's a great video from our friends at How not to Highline. The video is on three-way loading in general. They test various configurations of quickdraws pulling at different angles, and different shapes of carabiners. In one example, and oval carabiner clipped with two quickdraws at about a 90 degree angle broke at around 21 kN.
A tiny CAMP Nano carabiner, one of the smallest made, broke at around 17 kN with the double pull on the narrow end, and about 11 kN with the pull on the wide end. (Screen grab below of the set up.)
So, it appears it if you are going to triload a carabiner, having the double directional pull on the skinny / hinge side of the carabiner gives increased strength.

Here's another test, from Over the Edge Rescue in New Zealand. The carabiner is a CT Snappy screwgate, rated at 23 kN on the major axis.
Three-way loading, wide gate down, three different tests. Average breaking strength: 23.7 kN.
That’s higher than the rated strength!

image: https://overtheedgerescue.com/canyoning/vlad-master-carabiner/
And, here's a 30 second video from Australian rigging expert Rich Delaney at Ropelab: “Three-way loading, no problem.”
Takeaway:
Always try to load a carabiner along the spine (the strongest orientation) whenever possible.
Quad-axial loading can reduce carabiner strength by a maximum about 25%, to about 16 kN. Other configurations of tri-axial loading show essentially no reduction in carabiner strength.
In all cases, this is considerably stronger than 9 kN, which is about the maximum force possible in climbing.
So, in those oddball situations where optimal carabiner loading is not possible, it's probably going to be fine. Just don't make a habit of it. =^)
So, that’s some lab break test results, admittedly on a fairly small sample size. Alpinesavvy does not give advice, we offer ideas and information.
I'm not here to tell you what you should or should not do when to comes to building anchors. Look at these results and decide for yourself.
What do you think?

The one handed clove (and munter) hitch
The one handed clove hitch is not really required for beginners, but there are some places where it can be very helpful. There are a few ways tie it, but also some ways to screw it up. Learn one solid method, and watch a couple of short videos on how to tie it and how to use it.
Big picture comment: When you’re getting started in climbing, a good approach to knots is learning ONE, and one way only, to tie all the important ones. It's much better to learn one method 110%, than to partially know several. After you've learned the basics inside and out, then you can get into variations like these.
I’ll admit, for many years I thought tying one handed climbing knots was pretty much a party trick. Like most climbers, I learned to tie the clove in a standard two handed manner (aka the “air clove”, because you tie it “in the air”). 90% of the time, I had some kind of a realistic stance where I could use both hands, or if not, I would clip a tether into the anchor. So, the air clove worked fine.
However, there are times when you’re at a precarious stance, getting pumped/scared, and can JUST get in a good piece of rock pro or clip an anchor bolt. Here, momentarily grabbing the carabiner / quickdraw and securing yourself in two seconds with a one-handed clove hitch is pretty damn handy! And, I have to say, now that the one hand version is firmly in my muscle memory, it’s pretty hard to go back to the two handed method.
Why learn the one-handed clove hitch?
It keeps you safely on belay while you are tying the knot.
It lets you dial in the correct length between your body and the carabiner.
It doesn’t twist the rope, such as the “air clove” does.
There are lots of YouTube videos on the one-handed clove hitch. Most that I've seen skip one critical point: You must pay attention to the direction of the carabiner gate. For the method I prefer, as a right-hander, I need the carabiner gate opening to to the RIGHT.
Once you get the method down, it's good to practice with both hands, with the carabiner facing in both directions.
Also a note for the nitpickers, this is not a “one-handed” version per se, because you still use your other hand to grab the carabiner / quick draw to stabilize it. I think of this as a much more practical, real-world way to do it, but if you want the true one-handed version, check out the video at the bottom.
There's a very similar method to this that's known as the handshake clove. The handshake clove results in the strand going to the climber (you) coming out the front of the knot toward you, as opposed to the back of the knot, facing away from you. There's no significant advantage to one or the other, so I'm teaching it the way I learned it which is not the handshake method. If you prefer the handshake and have some reason for wanting the rope to exit running toward you, then by all means use that.
For the one handed munter hitch, repeat this exact same process, except grab the right hand side of the rope (going from your harness to the quickdraw) with your right hand, thumbs down. Try doing this 10 times for each knot, and then 10 times with your eyes closed for each knot. That’ll help etch it to your muscle memory.
Safety note: There is one unusual situation where it’s momentarily and potentially unsafe to do this: If you’re the second, and you’re using this to tie in to the anchor as you arrive, and you’re being belayed off of a plaquette style device directly from the anchor. If you were to fall during the second or two that it takes you to tie this knot, there's a chance that the belay device will not catch you, because the rope strand from the device is no longer going downwards. If there's the slightest chance this could happen, it's slightly safer to tie an “air clove”, and clip this into the anchor. (I'll be the first to admit that this is an extremely unlikely situation for you to fall in the exact moment that the belay device is that a less than optimal angle, but I thought I would mention it for you safety enthusiasts.)
Now, for those of you who want the true one-handed clove hitch, here you go. I think I first saw this from Adam Fleming, adamflemingguiding.com, thanks Adam! Adam calls at the “party clove” because it's more of a party trick than a very practical knot, but it's still a fun one to learn. Just be careful not to get your thumb cut in there . . .
Here's a nice video by AMGA Certified rock guide Cody Bradford showing how a tying one handed clove hitch first thing at a marginal anchor is pretty sweet! (The rest of the video showing how he builds an anchor is great too.
While sadly Cody is no longer with us, his Instagram continues to stay up and is a great source of tips like this, check it out.

Don't put rubber bands on an “open" sling
Having a rubber band or something similar to prevent the bottom carabiner on a sport climbing quickdraw from rotating is fine. But you never want to do this on an “open” sling, as the rope can easily become completely unclipped from the carabiner without you noticing.
For those with a short attention span, here's the short version:
Do NOT put a rubber band (or tape) on a sling like in the photos below, you could die.

It also applies to any kind of a rubber band (or tape) on your personal tether - do NOT do this.
Do people do this? Yes.
Here's an article (perhaps behind a PAYWALL) about a woman who had tape on a sling she was using as a tether, similar to the rubber band in the photo below. She had it clipped incorrectly, leaned back at an anchor, the tape broke, and she fell about 60 feet. She was extremely fortunate to be partially spotted by her climb partner, who was able to partially cushion her fall. Neither of them were seriously injured.
Here's another article on a similar accident: “On June 12 Karen Feher (33) and her partner were climbing Rico Suave (5.10a). Upon reaching the anchor, she clipped in. Her setup: She had two thin dyneema slings girth hitched to her harness. At the end of each sling was a locking carabiner held in place with a rubber Petzl keeper (called ‘Petzl Strings’). The “string” is designed to fit on the end of a Petzl runner in order to keep the lower carabiner on a quickdraw in place for easy clipping and to protect the webbing from abrasion. She clipped a locking carabiner to each bolt and probably called, “Off belay.” It is unclear if she was going to rappel or be lowered. It doesn’t matter. She took a fatal fall about 50 feet to the ground.”
Related to this: the tragic accident in 2013 of then 12 year old climber Tito Traversa, who died after taking a ground fall high on a sport route. An investigation showed that many of his quickdraws had been assembled incorrectly, with the rope only clipped through the rubber portion and not through the nylon sling. So, even having the rubber band device on the bottom carabiner is certainly not foolproof.
Even if you’d never think of rigging something like this yourself, you might see someone else doing it; maybe you can prevent an accident. I once saw a climber do this exact thing on the end of their personal lanyard/tether. At the time I saw it, I didn’t know about this potential problem, or I definitely would've pointed it out.
If you want to keep your tether carabiner from rotating or being cross loaded, simply put a girth or clove hitch in the end of your tether (right side photo).
The clove or girth hitch gives two benefits: 1) Secures the carabiner for optimal loading along the spine, AND 2) creates redundancy in the (highly unlikely) event one strand of the sling fails.

Here's the longer version.
First off, some definitions.
An “open” sling is one that’s sewn with bar tack stitching and makes a loop / circle. The other type of sling is known as a “dogbone”, typically found on a quickdraw for sport climbing. Slings for sport climbing are usually a piece of tripled webbing, with multiple rows of bar tacks for strength and rigidity.
Open sling (top) and sport climbing dogbone sling (bottom).

example of “open” sling (top) and sport climbing dogbone sling
On a typical dogbone, the bottom or rope clipping carabiner may have a small bit of rubber on it to keep the bottom carabiner from spinning and preventing cross loading.
Below are two examples. The top is a device from Petzl that has the rather unusual name of “String”. The bottom is a more generic quickdraw that has a thin rubber band between the dogbone and the carabiner. (In my opinion, this is a slightly safer set up, because you can clearly see that the dogbone is properly clipped to the carabiner, unlike in the Petzl example. More on that below.)


Left: Open sling with rubber band on bottom carabiner, dangerous!
Right: Standard quickdraw with rubber band thingie on bottom carabiner, totally fine.

Side note: This “String” / rubber band should only go on the BOTTOM carabiner. If you put it on the TOP or bolt clipping carabiner, the carabiner can rotate with rope movement and perhaps be loaded in a way that causes a large reduction in strength, and possible failure. See dramatic warning diagram from Petzl below.

image: https://www.petzl.com/US/en/Sport/STRING--installation-and-precautions
So, you might be thinking, if it's a good idea to do this for a sport climbing draw, how about I do the same thing for my alpine quickdraws (or even personal lanyard) made out of a 60cm (single) or 120 cm (double) sewn open sling? Just add a thick rubber band, and no more worries about cross loading. Should be fine, right?
Do not use a rubber band (or tape) on an open sling.

Why? If the sling gets clipped back to itself, it can result in the carabiner ONLY clipped to the rubber band and not on the sling at all, YIKES! This is easy to do, especially when you're doubling or tripling up a longer sling to rack it as an alpine quickdraw, or clipping a lanyard back onto itself to tidy up your harness.
This diagram from Petzl shows how this can happen.

image: https://www.petzl.com/US/en/Sport/STRING--installation-and-precautions
Here’s a similar warning from Black Diamond:

image: https://blackdiamond-web.cdn.prismic.io/blackdiamond-web/2294b9da-d748-4742-9837-cc2c8be53285_MM5824_K_Runners+and+Dogbones_IS-WEB.pdf
On sport climbing quickdraws, having some sort of rubber band on the bottom carabiner is generally safe (but not always, see accident report below). This is because the bar tacks and the stiff sling prevent this from happening. It’s a bit hard to describe in words, much easier to see in the video below.
I highly encourage you to get a sling, a rubber band, and see this mechanism of failure for yourself. It might take a few tries to figure it out. (This is similar to the reason why we avoid using sewn pocket daisy chains intended for aid climbing as a personal lanyard, because if you clip two adjacent pockets, you’re only held by the bar tacks between the pockets.)
Finally, here's a simiular video from UKClimbing.com that shows how this can fail.
Safety Video - The Danger Of Open Quickdraws

Organize the big wall bivy with a sewn daisy
The humble sewn daisy chain is a great way to hang pretty much anything and decluster your big wall bivy.
This tip is from the excellent book, “Hooking Up: The Ultimate Big Wall and Aid Climbing Manual”, by Pete Zabrok and Fabio Elli. 500+ pages of great instruction and photos, highly recommended for big wall climbers.
You need LOTS of places to clip gear at a big wall bivy. One simple approach: an old school sewn pocket daisy chain, strung between the anchor components, is a great way to help tame the cluster.
And, if you add a glove, it's a handy place to keep from spilling your can of . . . prune juice.

Two methods for faster belay transitions
On longer multi pitch routes, efficient belay changeovers can save a surprising amount of time. Here are two elegant ways to do this.
Having a simple and consistent method for belay changeovers, clearly understood by both partners, can really speed up multi pitch climbing. Here are two approaches, each offering a secure, speedy, and simple method to swap leads, with a minimum of gear and futzing around.
For this example, let’s assume:
A climbing team of Heidi and Hans, on a multi pitch route, where the partners are swapping leads every pitch.
Each climber has a plaquette style belay device (such as a DMM Pivot, Petzl Reverso or ATC Guide), and each climber has two designated locking carabiners to use with this device.
The second is belayed directly from the master point of the anchor.
They have reasonable ledges to stand on, not a full hanging belay.
The belayer is belaying the leader from their belay loop and not using a fixed point belay directly from the anchor.
Method #1 - Transfer the belay device from the anchor to the belay loop
Heidi leads pitch 1, builds an anchor, puts Hans on belay, and belays him up.
Hans arrives at the anchor, secures himself to the anchor with a clove hitch and calls off belay.
Key move: Heidi unclips the the belay device from the anchor master point, slides it down the rope, and clips what was the blocking carabiner to her belay loop. The rope never needs to come out of the belay device, slick!
Heidi ties an overhand on a bight / backup knot below her belay device to go hands free, and helps Hans rack for his lead.
When Hans is ready, he unties his clove hitch and begins leading pitch 2.
Method #2 - Exchange belay devices after each pitch
No video for this one, so you’ll have to follow a description. It takes a while to explain it in words, but in real life it’s faster than it might sound. :-)
Heidi leads pitch 1, builds an anchor, puts Hans on belay, and belays him up.
When Hans arrives at the anchor, he’s secured by Heidi‘s plaquette and the dynamic rope. There’s no need for Hans to search for a spare carabiner, use a personal tether/PAS to connect to the anchor, clove hitch his rope to anything, etc.
Heidi ties an backup / overhand on a bight in her brake strand, which lets her to go hands-free. She starts passing her remaining gear to Hans, who racks it for his lead on pitch 2.
Key move: exchange belay devices. As Hans is racking for the next pitch, Heidi takes the belay device and two locking carabiners from Han’s harness. She clips his device to her belay loop and puts Hans on lead belay for his upcoming pitch. The rope is (hopefully) already neatly stacked with Han’s end on top.
Hans is now secured by both belay devices: one from Heidi‘s harness, and one connected to the anchor master point.
Hans is racked up and ready to lead pitch 2. Hans unties the backup knot below the plaquette on the anchor. After clear communication with Heidi that he’s on lead belay and she's ready for him to climb, Hans removes the plaquette and the two locking carabiners from the anchor master point, and clips them to his harness. Hans heads out, completes pitch 2, and uses Heidi‘s belay device and her carabiners in the same way to belay her up.
They repeat this until they get to the top of the route. (And of course, make sure you check your harness and give all gear back to its rightful owner when you’re done.)

How to tie an improvised aider with slings
Need to do some improvised aid climbing to get past a tough section of rock? When the summit is more important than style points, here's a way to tie an improvised aid ladder out of a double and single length sling.
Variations of this have been around since pretty much forever, but the subtleties of putting the bar tack at the bottom and offsetting the top step are from the excellent aid / big wall book, “Hooking Up”, by Pete Zabrok and Fabio Elli.

Need to pull a few a few moves of “alpine aid” to get past a difficult spot? (There goes your onsight, sorry.)
Maybe it started raining, the rock is wet and slippery, and you decide that the best way to continue going up is the aid climb rather than free climb.
How about quickly making a “ladder” to help someone climb over the lip of a crevasse?
Here's how to quickly make an aid ladder out of two slings. (If you don't have a 120 cm sling, you can do the same thing with three 60 cm slings.)
While a skinny Dyneema sling works, it’ll be easier on your feet to use a wider nylon sling if you have it. (But hey, this is improv, use whatever you’ve got.)
Even if you have to make a few aid moves in a row, you should only need one aider. Basic sequence: Place some gear, clip the aider to it, climb up the aider steps, clip a carabiner or quickdraw from your belay loop to the gear and hang from it (aka fifi hook), remove your aider, repeat as necessary.
1 - Start with a 120 cm sling. Put the sewn part on the “bottom” of one half of the sling. The bar tacks cause the sling to open up a bit when it's hanging, making it easier to step into. It helps to actually put your foot in the sling and step (gently) on the bar tacks, to keep them in the right place and put a bit of tension on the sling as you do the next steps.
2 - Tie an overhand knot in the sling, about at the midway point.

3 - Pull down some sling material to make the top step offset a bit (this makes it easier to step into) and tie a second overhand knot, making a very small loop. The second overhand knot keeps the top step open. You could stop here if you’re fairly short and/or have great hip mobility. However, adding one more step to the aider makes this work much better.

4 - Girth hitch a single length 60 cm runner into the top of the double runner. Try to keep the bar tacks on the bottom as shown. Tie another overhand knot as before, with a little bit of extra material on one side, making an offset loop.
Schweeeet! Now you have a three step aider, and it's hopefully long enough for you to reach to clip a high placement and still reach the bottom step with your foot. If it's still a bit short, clip a quickdraw to the top to extend it a little bit.


CE rated quick links from CAMP
While some people are fine with using random hardware store quick links for rappel anchors, I'm not one of them. Well, good news. CAMP (Italy) sell CE rated quick links that are the right sizes, right price, and insanely strong.
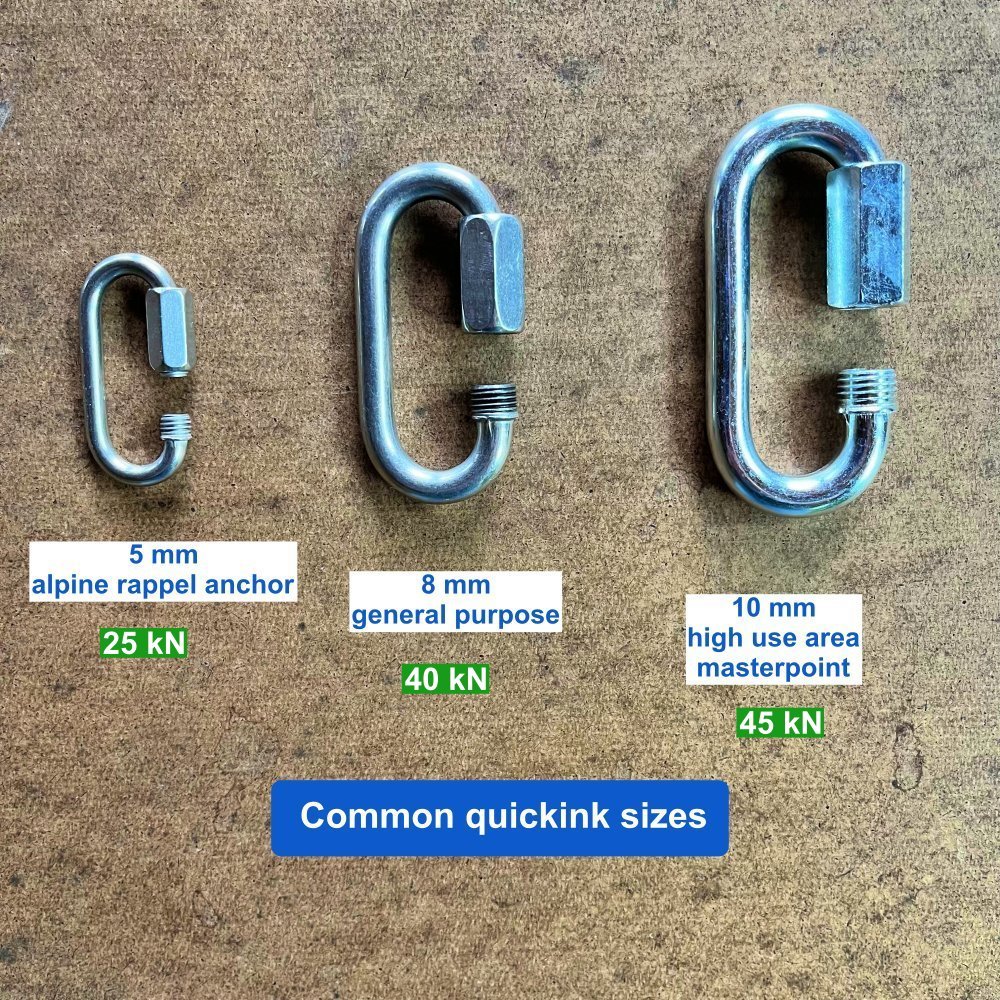
CE rated quick links from CAMP
5mm, 8mm and 10mm (Note, the 5mm is stainless only, not CE rated, and 22 kN)
galvanized or stainless
starting at about $3 each
strength - 25kn to 50kN (!!!)
Let's take a moment to appreciate the humble quick link. Also known by a few other terms, such as “rapid links” or “maillon rapide” of just “maillon”, it's a simple, inexpensive, near bulletproof, and long lasting connection point that’s useful in many aspects of climbing. It was originally used by farmers, who needed an easy way to repair or extend chains. They are popular with cavers, who needs sturdy connection points that take a lot of abuse.
Of course you can buy quick links from the hardware store, but they're going to be made at some unknown machine shop in a far away country. Is that where you want your life support hardware to be from? I didn't think so. (Although, I added a video at the bottom of the page that shows even these hardware store versions are probably gonna be fine. . . )
Instead, for about the same price, get a proper CE rated quick link from a reputable manufacturer, such as CAMP or Metolius.
The 8 mm galvanized steel quicklink, rated 40 kN /9,000 lbs(!), is just $3, whatta deal!
Try a Google for “CAMP quick link” or visit the CAMP website.
(And, as is the policy at Alpinesavvy, this is not an affiliate link and I earn $0.00 by referring you to buy these quick links or take Mark’s class. I’m simply sharing good gear/info I think you’ll like too.)
But quick links are too heavy . . .
Many people like to hate on quick links, grumbling that they are “heavy” and single use item.
But are they really that heavy, compared to the gear you’re already carrying? Perhaps not! Check out the photo below. The 5 mm stainless steel quicklink is actually stronger, lighter, and less expensive than a small snapgate carabiner.
It does look about as robust as a paper clip, but can't argue with 25 kN! Yes they are a fairly specific single use item, but they do that one thing pretty darn well.

When rappelling, it’s best practice to run your rope through some sort of metal connection at the anchor. Doing this gives a smoother rope pull, with no chance of damaging the anchor webbing. In alpine climbing where you don’t have bolted/chain anchors, this usually means three options: quick link, rappel ring, or your least favorite carabiner. (Carabiner tip: tape the gate shut to make “cheapskate locker” for a more secure rappel anchor.)
Quick links are a good choice at rappel anchors for two reasons:
You can open the threaded sleeve and put it OVER existing cord or webbing (which you can kind of do with a rappel ring, but I find it sketchy).
They have a very small opening, which lets them be used with a blocking knot. (Blocking knots are an advanced technique; you can learn about them here.)
Notes . . .
It's best practice to close the sleeve of the quick link by screwing it down toward the ground. This means that gravity is helping keep the sleeve closed. A little pneumonic to help remember this is: “Screw DOWN so you don't screw UP.” Also applies to locking carabiners.
If you have a link that you want to fix it more permanently, give it an extra turn with a pair of pliers; a multi-tool is your friend. And if you’re a route developer, feel free to put a few drops of Loctite on it to really hold it closed.
A study from On Rope Canyoneering states that quick link breaking strength increases by roughly 10% if you use a wrench to tighten the sleeve rather than your hands.
What size quick link should I get?
5mm: Leave behind at alpine rappel stations, and as a master point if you're going to use a knot block, because it's so small. Fits rope up to about 10.5 mm. Yes it might look like a paper clip, but it's rated to 25 kN, #SuperGoodEnough!. From CAMP, comes in stainless steel only.
8mm: Nice all around size. A bit too heavy for alpine climbing. Fits two carabiners, and rotates through a standard bolt hanger. Good for connecting chain to hangers and rings. Rated to 40-50 kN.
10mm: Tie up aircraft carriers, and for master point / rope connection / lowering point at high use areas. Last a long time, cheap and easy to replace. (Yes, it's good practice in most areas to lower off for the last person rather than rappel. ) Rated to 40-50 kN.
When are quick links useful?
An alpine climb where you anticipate building your own rappel stations. The 5mm stainless is a good choice here.
If you're a good Samaritan and want to improve anchors at your local crag. (It's best practice in most outdoor climbing areas to use stainless steel hardware whenever possible. It lasts much longer. If you are equipping outdoor anchors, spend a few more bucks and get stainless steel.)
Making an anchor where you want to do some kind of a knot block (Reepschnur), and want to be 120% certain that the knot is unable to pass through the master point. A quick link is perfect for this.
Making a durable and (mostly) theft-proof “gym quickdraw” from a fixed eye steel carabiner and a quicklink for your project route or “clip & lower” sport anchor. (Photo below.)
You can chain two “dogbones” together to make an ultra-long quick draw. (Photo below.)
For certain applications in big wall climbing or rope soloing, where do you need a supe- strong, very reliable connection.
Please do NOT use them to bail off of a sport climb, use a carabiner instead. Reason: the gate is often quite difficult to open for the next person up who needs to remove your gear.
DIY “perma-draw”, like what you find on lead routes in many climbing gyms.

You can chain two quick draws together with a quick link, as seen on the right.

Here's where you should probably NOT use a quick link: retreating from a sport route. It can make it difficult to clip for the next climber, and they can be hard to remove, especially if they've been there for a while and the threads start to rust shut.
Leave a carabiner instead. If you're not comfortable with lowering from one snap gate, leave a locker, or tape the gate closed, aka “cheapskate locker”.

So, how strong are those hardware store quick links after all? Here's a video from On Rope Canyoneering that tries to answer the question.
They tested two diameters, zinc (non-stainless steel) hand tightened, five links of each size tested.
5/16” (8 mm) broke at an average of 31.5 kN
1/4” (6.4 mm) broke at an average of 10.5 kN


When and how to belay a rappel
There are some circumstances where belaying a rappeller is a good choice. Learn two of those situations, and a quick way to set it up.
Note - This post discusses techniques and methods used in vertical rope work. If you do them wrong, you could die. Always practice vertical rope techniques under the supervision of a qualified instructor, and ideally in a progression: from flat ground, to staircase, to vertical close to the ground before you ever try them in a real climbing situation.
A belayed rappel is something many climbers think might be helpful only with a nervous beginner who needs the extra reassurance of a belay, or maybe an injured partner.
There’s another application - when you're rappelling into unfamiliar terrain with the location of the next anchors uncertain or nonexistent.
If there’s a reasonable chance that the person rappelling can’t locate the existing anchor (or a suitable place to build one) and needs to climb back up, it's going to be much easier to do so if they can be belayed by a separate rope strand. So, think of it as not really safeguarding the way down, but more to safeguard the rappeller climbing back up, should they need to do so.
Here's one way to set up a belayed rappel with two ropes.
(The same method applies with one rope. In the photos below, where you see the ropes tied together, imagine that’s the middle mark if you were using one rope.)
Here's the complete set up, ready to go. Yes it is a little confusing, so let's break it down step-by-step in the photos below.

Step 1:
Pass blue rope through the anchors, tie it to the green rope with a flat overhand bend.
Tie a stopper knot in blue, toss the blue rope.
Be sure that your green rope is stacked neatly, or in a rope bag or something similar.

Step 2:
Clip a locking carabiner, HMS preferred, to the master point.
Tie a butterfly in the blue rope, and clip it to this locker.
(Some people get freaked out about three-way loading on the blue carabiner. Black Diamond tested this, and it broke at at around 21 kN, which is the rated strength of the carabiner under a normal load. So, under the body weight of one person rappelling, it's not gonna be a problem.)

Step 3:
First person rappelling goes on rappel, single strand, blue rope. (Harness and third hand / autoblock not shown for clarity.)
Rigging an extended rappel (not shown) or using a Grigri or similar assisted braking belay device is a fine idea, because both of these can be easily converted to an ascending system if needed, as we cover here and here.

Step 4:
Take a second HMS carabiner (yellow), and clip it to the first one.
Tie a Munter hitch on this second locker.
Tie a bight knot in the end of the green rope.

Step 5:
With another locker, the rappeler clips the bight knot to their belay loop. Alternatively, you could skip this carabiner and bight knot, and tie in with a retraced figure 8. (Harness not shown for clarity.)
Schweeeeeet, now you're ready to go. First person down raps on blue rope, single strand. Person above feeds out green rope through the Munter hitch.
If the rapper has to go back up for any reason, they have a top rope belay for any part they can climb, with the option of ascending up the rappel rope (or even getting an assisted hoist) if it gets steeper. Depending on the terrain, this is probably faster and less strenuous than prusiking both strands, which they would probably have to do if they didn’t set it up like this.
When the first person reaches the ground (helpfully pulling down all of the green rope on their way) the top person cleans the carabiners and raps normally on two strands.

Here's a close-up of the rigging.

Note for belaying a beginner . . .
Anytime you're working with beginners who are just learning to rappel, it can be a good idea to not only have a belay, but also some kind of releasable system on the rappel rope. If they freeze on the rappel, get their shirt stuck in the device, whatever, you can release the system and get them to the ground.
Here's a modified way to set this up: Instead of fixing the rappel rope with a butterfly, fix it with a munter mule overhand (MMO), with at least 2-3 meters of slack behind it. If the rappeller gets hair or clothing stuck in their device, you can tension and hold the rappeller on the belay rope, then release and lower on the MMO. This creates some slack in the rappel rope, so the blockage can be removed.
In a more formal instructional situation, you're probably going to have a set up with a completely separate belay rope that's not tied to the rappel rope, which makes any mild rescue shenanigans you need to do quite a bit easier. But the main method shown here is a good compromise when on a real climb and needing to improvise a bit.

Big wall anchors: a middle ground
A big wall anchor does not have to be a 25 carabiner engineering project, nor modern minimalist. There's a broad middle ground that gives you redundancy for your hauling system, is fast to set up, sufficiently strong, and has no knots to untie. Let's look at a few ways to set this up.
A few words on hauling, from the excellent big wall climbing book, “Higher Education”, by Andy Kirkpatrick (Buy it here):
“Hauling is potentially one of the most dangerous aspects of big wall climbing. This translates to ultra-caution in all parts of your hauling system and interaction with bags, haul lines, docking cords, and pulleys. If you rush and make a mistake, drop a load or have it shift where it's not wanted, you could easily kill someone or yourself. I try and teach climbers to view their bags as dangerous creatures, like a great white shark, rhino, or raptor that is in their charge. The ability to keep them calm and under your control comes down to paranoia, foresight, and heavy respect for the damage they can do.”
Big wall anchors can take many different forms. Let’s see some examples.
Old school hardman sketchy
A caption here could be: “I’m so happy to still be alive after jugging this rope connected to a few RURPs strung together by clove hitches . . . (Photo by Dave Diegelman, climber, Dale Bard, Sea of Dreams, El Capitan, 1978)
Photo by Dave Diegelman, climber, Dale Bard, Sea of Dreams, El Capitan, 1978
Modern minimalist
“Build your anchor with the rope, and haul from one bolt” anchor. (Purple and red cords are docking tethers for the haul bag.) Photo: Mark Hudon
Some big wall experts will tell you that it's fine to haul off of one bolt. Well, it probably is fine in bulletproof Yosemite granite, on a well-travelled route with newish 3/8” inch bolts on every anchor. But not everybody climbs with such sweet anchors, do they? How about a sandstone wall in Utah, where are the anchors are often older and in much softer rock? Maybe not!
Do you want your pet velociraptor tied to just one bolt, when including another one takes just a few seconds and a couple of extra pieces of gear? (Remember, never let anyone else dictate your level of comfort or safety, no matter what their credentials might be.)
The photo below shows making the with anchor with the lead rope. This can work if you are thoughtful and organized with your belay set up (aka experienced), but it can be a frustrating time suck if you start making rookie mistakes like clipping a heavy load over the top of the lead rope (ask me how I know this . . .) If this works for you, great, but if you're getting started in big wall climbing, having some sort of equalized masterpoint(s) and not using the lead rope to make the anchor, might be a better approach.
photo: mark Hudon, hudonpanos,com
Classic overbuilt
Quite possibly one of the best climbing illustrations ever, by the always amazing Mike Clelland, from (I think) Climbing magazine. Redundancy, definitely. 24+ carabiners and an engineering project, also definitely. Probably overbuilt for most people, but still a great drawing.

image credit: Mike Clelland
Ideally, big wall anchors have the following qualities:
Adequate strength - Adequate strength means strong enough for the intended loads, and not overbuilt. It also means adequate enough not to give you the slightest hesitation or stress about whether the anchor is going to hold.
Simplicity - A tangled rat’s nest of slings and rope is confusing and potentially unsafe, because it’s not easy to see what can safely be unclipped and what cannot.
Consistency - Ideally, you and your partner have the same system that you agree on and that you’re able to use at pretty much every anchor. The gear to do this is already packaged up in two identical “anchor kits”. One of these is in use at the current anchor, and the other is either on the leader’s harness or on the zip line ready to send up to them when they finish the pitch. A classic beginner mistake is to build a random anchor with whatever gear can be scavenged from your depleted rack after you’ve led your pitch. Please don't do this.
Zero to minimal knots - Tying knots, as in a cordelette style anchor, takes more time, energy, cursing and hassle to untie when you’re breaking down the anchor. Try to avoid knots in your anchor whenever possible.
Sketchy old school, modern minimalist, and classic overbuilt are not your only options. There’s a large middle ground, where your anchor can be strong enough, with a fast set up and easy break down, yet still have redundancy for your hauling point to keep your rhino under control.
For this example, let's assume:
Tina the Tiger led the last pitch and built the anchor.
A typical big wall trade route anchor of three horizontal bolts.
A hanging belay with no friction-inducing ledge. (If you do have the haul rope running over a ledge, then having your haul point as high as possible will help minimize evil friction.)
The hauling load is shared between two points; no hauling from a single bolt without a backup. (Of course you CAN choose to haul from one bolt; we’re not in this example.)
Tina fixed the lead rope (green) for her second to the right bolt with a butterfly knot, and backed it up with a clove to the middle bolt. You probably don't need an equalized master point to fix the rope for your second, because it’s holding pretty much just their body weight. Back up the rope, yes. Equalize it to a master point, probably not.
Tina’s partner is coming up on the right, so she set up the hauling point on the opposite side, in this case the left. Don't make your partner climb over the haul bags if you don't have to. (Note: if the next pitch traverses to say the right, you usually want to set up the haul on the right, so you can lower out the bags without them smacking into you.)
Certain parts of a real life anchor are omitted for clarity, such as rope bags, the leader’s daisies, etc.
Generally speaking, having the haul point higher is better, because it can give you a more efficient pulling stroke and can minimize friction from any ledges that the rope might be rubbing on. The longer the runners you’re using, the lower the hauling point will be. Keep this in mind when setting up your anchor.
Method 1 - Haul from one bolt, and back it up with a sling to an adjacent bolt
Let's start with the one bolt method, but give it a little more security with a back up sling. Most of the time, try to make this your go-to. Reason: it keeps your hauling point high, which is often better ergonomically, and can minimize evil friction if the haul rope is running over any rock edges.
You have one bolt that looks totally bomber, and it's nice and high. Schweeet! Simply back this up with a sling to a neighbor bolt. In the highly unlikely event the left bolt fails, you're backed up by the middle bolt. (This tip is from the outstanding big wall instruction book “Hooking Up” by Pete Zabrok and Fabio Elli, highly recommended.)

Method 2 - Two single runners
This is a simple yet often overlooked technique that can work great if the bolts are more or less level. Strong, redundant, distributed load, fast set up, and zero knots to untie when you're done. If you need to shorten a runner a little bit to better distribute the load, you can add some twists or make a few wraps around a carabiner, as we cover in this tip here.

Method 3 - Metolius PAS (or similar sewn loop tether, NOT a daisy chain with bar tacked pockets)
This also offers bomber strength, a quick set up, decent load distribution, and with the extra bonus of lots of places to clip things to full strength loops when you need to. It’s extremely handy to have multiple clipping points like this.

Metolius makes a longer version of the PAS called an “Anchor Chain”, which could be a good option if the bolts are a bit farther apart, or if you need a few more places to clip things. (Each sewn loop is rated 22 kN.)

Metolius Anchor Chain, image: Metolius.com
Method 4 - Quad anchor from 180 cm sling
You can make a quad anchor out of a 180 cm sling and keep the knots in it permanently tied. (Yes, a 180 cm sling is a little hard to find. Try a Google search for “Mammut Contact” or “Petzl Pur’Anneau”. ) Again, this gives a fast set up and good equalization, and offers several different places to clip in stuff.

Method 5 - Girth (or clove) hitch at the master point
This might look like a cordelette that would be a hassle to untie, but check out the master point: it's tied with a girth hitch. This makes it easy to untie even after it's been severely loaded. Yes, a girth hitch is fine to use at the master point, we cover it in depth here. You could use a clove hitch also, which we cover in this Tip.

Each of these systems offers quick set up, zero knots to struggle with, just a few extra pieces of gear, and redundancy and load distribution at the hauling point. For those not ready to embrace anchor minimalism, these methods offer a good compromise.